
1
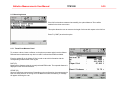
Athletics Measurements User Manual
Athletics Measurement
On-Board application program for TPS-System1200
Version 1.0
English
TPS1200
2-1
User Manual
Athletics Measurements User Manual
TPS1200
2-2
Table of Contents
1.
Introduction....................................................................................................................................................................................................... 2-4
1.1
Overview .................................................................................................................................................................................................... 2-5
1.2
Technical terms ......................................................................................................................................................................................... 2-6
1.2.1 Pole Vault .............................................................................................................................................................................................. 2-6
1.2.2 Jump Events.......................................................................................................................................................................................... 2-8
1.2.3 Throwing Events.................................................................................................................................................................................... 2-9
2
Getting started ................................................................................................................................................................................................ 2-10
2.1
Selecting the application.......................................................................................................................................................................... 2-11
2.2
Main Menu ............................................................................................................................................................................................... 2-12
3
Pole Vault ........................................................................................................................................................................................................ 3-13
3.1
Pole Vault Menu ...................................................................................................................................................................................... 3-14
3.2
Measuring the ground plane .................................................................................................................................................................... 3-15
3.2.1 Measuring a point in the ground plane................................................................................................................................................ 3-15
3.3
Measuring the base points....................................................................................................................................................................... 3-16
3.4
Measuring the crossbar ........................................................................................................................................................................... 3-17
3.5
Resuming a Pole Vault measurement ..................................................................................................................................................... 3-18
4
Horizontal Jumps ........................................................................................................................................................................................... 4-19
4.1
Horizontal Jumps Menu ........................................................................................................................................................................... 4-20
4.2
Measuring the Foul Line .......................................................................................................................................................................... 4-21
4.3
Measuring jumps ..................................................................................................................................................................................... 4-22
4.3.1 Horizontal Jumps Measure Panel ....................................................................................................................................................... 4-22
4.3.2 Horizontal Jumps Plot Panel ............................................................................................................................................................... 4-23
4.4
Resuming a Jump Measurement............................................................................................................................................................. 4-24
5
Throwing Events............................................................................................................................................................................................. 5-25
5.1
Throwing Events Menu ............................................................................................................................................................................ 5-26
5.2
Individual Throw Event Menu .................................................................................................................................................................. 5-27
5.3
Measuring the centre point ...................................................................................................................................................................... 5-28
5.3.1 Centre Point Check Panel ................................................................................................................................................................... 5-28
5.4
Measuring the foul line............................................................................................................................................................................. 5-29
5.5
Measuring throws .................................................................................................................................................................................... 5-30
Athletics Measurements User Manual
TPS1200
2-3
5.5.1 Throw Event Measure Panel ............................................................................................................................................................... 5-30
5.5.2 Throw Event Plot Panel....................................................................................................................................................................... 5-31
5.6
Resuming a Throw Event ........................................................................................................................................................................ 5-32
6
Configuration .................................................................................................................................................................................................. 6-33
6.1
Overview .................................................................................................................................................................................................. 6-34
6.2
Standard Configuration............................................................................................................................................................................ 6-34
6.3
Hidden Configuration ............................................................................................................................................................................... 6-35
6.3.1 Hidden Configuration Circles Panel .................................................................................................................................................... 6-35
6.3.2 Hidden Configuration Rounding Panel................................................................................................................................................ 6-36
6.3.3 Hidden Configuration Recording Panel............................................................................................................................................... 6-36
Athletics Measurements User Manual
Introduction
In this chapter
1.1 Overview
1.2 Technical Terms
TPS1200
2-4
Athletics Measurements User Manual
TPS1200
2-5
1.1 Overview
The Athletics Measurements application for System 1200 allows measurements to be be taken for athletics field events using a System 1200
sensor.
Distances and heights are recorded according to the rules set out in the Competition Rules Handbook of the International Association of Athletics
Federations (IAAF).
Distances or heights may be measured for the following events:
Pole Vault
Horizontal Jumps
Triple Jump
Long Jump
Throwing Events
Discus
Hammer
Shot Putt
Javelin
Athletics Measurements User Manual
TPS1200
2-6
In order to make the following chapters on measuring distances and heights easier to understand, basic terminology is introduced in this chapter.
1.2 Technical terms
1.2.1 Pole Vault
In the pole vault event it is required to measure the distance (Reported Height), in whole centimetres, perpendicular to a horizontal plane defining
the level of the runway to the lowest part of the upperside of the crossbar. It is assumed that the lowest part of the crossbar is in the centre of the
two vertical crossbar supports defined by two measured points (Base Pt 1, Base Pt 2), however it is also possible to measure the lowest point of
the crossbar if this is not the case.
Athletics Measurements User Manual
TPS1200
2-7
The horizontal plane marking the level of the runway is defined by the measuring of three points at the level of the runway (Gnd Pt. 1, Gnd Pt. 2,
Gnd Pt. 3) on the box used for planting the pole when vaulting:
Once the plane of the level of the runway has been established, the two base points (Base Pt. 1, Base Pt. 2) are measured on the vertical
supports of the crossbar. These two points are then used to calculate the centre of the crossbar where the height should be measured.
It should be noted that the pole may be offset in a plane parallel to the vertical plane defined by the two base
points. The athlete may decide the distance of the pole offset for each jump
Athletics Measurements User Manual
TPS1200
2-8
1.2.2 Jump Events
The triple jump and long jump share the same measuring methodology and terminology.
A foul line marking the the vertical plane from which the jump should be measured is defined by two points (P1, P2).
Once a jump has been made, a judge places a prism at the point indicating the nearest break in the landing area made by any part of the body to
the foul line, or the projection of the foul line.
The Reported Distance shall be measured perpendicular to the foul line or its projection, the reported distance is recorded in whole centimetres.
Athletics Measurements User Manual
TPS1200
2-9
1.2.3 Throwing Events
The same methodology is used for the hammer, discus and shot putt and javelin events.
A foul line is delimited by a circle or part of a circle.
Once a throw is made, the calculated distance from the centre of the circle defining the foul line to the point where the implement lands is made.
The radius of the circle (R for discus, hammer, shot putt, L for the javelin) is then subtracted from the calculated distance to give the reported
distance.
The foul line for the hammer, discus and shot putt is represented by a circle (boundary) and is defined by measuring three points on the circle:
The foul line for the javelin is represented by an arc defined by two points measured in a clockwise direction:
Athletics Measurements User Manual
2 Getting started
In this chapter:
2.1 Selecting the Application
2.2 Main Menu
TPS1200
2-10
Athletics Measurements User Manual
2.1 Selecting the application
1. Select Main Menu: Programs.... OR Press PROG.
2. Select Athletics Measurements in the menu.
3. CONT (F1) to start the application.
TPS1200
2-11
Athletics Measurements User Manual
2.2 Main Menu
In the Main Menu of the application, three options are available.
To select an option, highlight the option with the arrow keys and press
the CONT (F1) key or, alternatively select the numeric key that corresponds
to the option (1, 2, 3).
The Pole Vault option can be used only to measure the pole vault event.
The Horizontal Jumps option may be used to measure the long jump or
the triple jump.
The Throwing Events option canbe used to measure the discus, hammer,
shot putt and javelin events.
Note: It is not necessary to station (position and orient) the sensor in order to use
any of the program options, all measurements are made relative to the sensor
position.
TPS1200
2-12
Athletics Measurements User Manual
3 Pole Vault
In this chapter:
3.1 Pole Vault Menu
3.2 Measuring the ground plane
3.3 Measuring the base points
3.4 Measuring the crossbar
3.5 Resuming a pole vault measurement
TPS1200
3-13
Athletics Measurements User Manual
TPS1200
3.1 Pole Vault Menu
The pole vault event involves three steps:
1. Measure three points in a horizontal plane to define the level of the runway from which heights will be measured.
2. Measure two base points on the vertical supports of the crossbar.
3. Measure the height of the crossbar.
Each step in the process may be selected in the Pole Vault menu.
If no ground plane has been measured previously, only the first step of the process,
Measure Ground Plane will be enabled on entering the menu.
It is necessary to measure the ground plane successfully before the second step,
Measure Base Points, can commence.
In a similar way, the final step of the process, Measure Bar, will only be enabled once
the Measure Base Points step has been finished successfully,
The only exception to this sequence is if a pole vault measurement is resumed (see
§3.5 Resuming a Pole Vault measurement).
To select an option, highlight the option with the arrow keys and press
the CONT (F1) key or, alternatively select the numeric key that corresponds
to the option (1, 2, 3).
3-14
Athletics Measurements User Manual
TPS1200
3-15
3.2 Measuring the ground plane
The level of the runway is defined by a horizontal plane. The height of this horizontal plane is defined by measuring three points on the pole vault
box. These points are measured in turn and then the deviation of the three points from the plane is calculated. The user must then decide if the
maximum deviation from the plane is acceptable or not before continuing.
3.2.1 Measuring a point in the ground plane
To measure a point on the ground plane, locate a reflector pole on a point on the pole
vault box and aim at the reflector. Reflectorless measurements may also be used if a
reflectorless EDM is available.
NEXT (F1)
Stores the measurement and moves on to measure the next point on the ground plane.
It is only possible to move on to the next point if a valid distance has been measured. If
all three points have been measured, the maximum deviation from a horizontal plane will
be calculated and displayed.
DIST (F2)
Measures the distance using the curently selected EDM mode.
BACK (F3)
Returns to the previous step.
Once three points have been measured successfully, the maximum deviation from a
horizontal plane will be displayed. The user must decide if the maximum deviation
from the plane meets requirements.
STORE (F3)
Stores the mean height of the three measured points as the ground plane height and
returns to the Pole Vault menu.
REMEA (F3)
Returns to the Ground Plane measurement dialog.
Athletics Measurements User Manual
TPS1200
3-16
3.3 Measuring the base points
If the ground plane has been measured successfully, the option Measure Base
Points will be enabled in the Pole Vault Menu.
This option allows the user to measure two points located on the vertical
crossbar supports. These points allow the position of the centre of the crossbar
to be calculated.
Press F1 (CONT) to select the option.
To measure a base point , locate a reflector on the point to measure and aim at the
reflector. Reflectorless measurements may also be used if a reflectorless EDM is
available.
NEXT (F1)
Stores the measurement and moves on to measure the next base point to measure. It is
only possible to move on to the next base point if a valid distance has been measured. If
both points have been measured successfully, the application returns to the Pole Vault
Menu.
DIST (F2)
Measures the distance using the curently selected EDM mode.
BACK (F3)
Returns to the previous step
Athletics Measurements User Manual
TPS1200
3-17
3.4 Measuring the crossbar
If the base points have been measured successfully, the option Measure Bar will be
enabled in the Pole Vault Menu.
This option allows the user to measure the height of the crossbar over the defined
ground plane.
Press F1 (CONT) to select the option.
On entering the Measure Bar dialog, the sensor will turn to the point that is calculated to
be halfway between, and in the same plane as, the two base points.
The user should then manually turn the instrument so that the cross-hairs of the
telescope coincide with the upper part of the bar at it’s lowest point.
Point ID:
Name of the point to be recorded.
Crossbar Height:
The height of the crossbar over the ground plane
Hz. Offset:
The horizontal distance from the calculated centre point of the
crossbar, halfway between the base points.
Pole Offset:
As described in §1.2.1, the athlete may decide to offset the pole
from the plane of the measured base points. In this case,
the pole offset must be entered so that the calculation of the
intersection of the pointing of the sensor and the plane of the
crossbar is correct.
Athletics Measurements User Manual
TPS1200
3-18
STORE (F3)
Stores the measurement. Depending on the configuration, the measurement is sent to a serial port and / or the log file.
ESC
Returns to the Pole Vault Menu.
3.5 Resuming a Pole Vault measurement
It may sometimes be the case that it is necessary to leave the pole vault function and
return at a later time, for example, to measure a distance for another event.
If both the ground plane and the base points have been measured successfully, it is
possible to resume measurement of the crossbar without having to repeat the
measurement of the ground plane and the base points.
To resume an existing measurement, enter the Pole Vault Menu from the Main Menu
and press the RESUM (F4) key.
The measured ground plane and base points will be recalled from memory and it is
possible to proceed directly to the Measure Bar dialog.
Athletics Measurements User Manual
4 Horizontal Jumps
In this chapter:
4.1 Horizontal Jumps Menu
4.2 Measuring the foul line
4.3 Measuring jumps
TPS1200
4-19
Athletics Measurements User Manual
TPS1200
4-20
4.1 Horizontal Jumps Menu
The Horizontal Jumps function can be used for measuring both the long jump and triple jump events. No distinction is made between these events
as the methodology used is identical for both events. Measurement of a horizontal jump involves two steps:
1. Measure two points that define the foul line from which jumps will be measured.
2. Measure the jump distance of each competitor.
Each step in the process may be selected in the Horizontal Jumps menu.
If no foul line has been measured previously, only the first step of the process, Measure
Foul Line will be enabled on entering the menu.
It is necessary to measure the foul line successfully before the second step, Measure
Jumps, can commence.
The only exception to this sequence is if a jumps measurement is resumed (see §4.4
Resuming a jumps measurement).
To select an option, highlight the option with the arrow keys and press
the CONT (F1) key or, alternatively select the numeric key that corresponds
to the option (1 or 2).
Athletics Measurements User Manual
TPS1200
4-21
4.2 Measuring the Foul Line
The foul line is defined by two points, each point has to be measured in turn.
To measure a point on the foul line, locate a reflector on the point to measure and aim
at the reflector. Reflectorless measurements may also be used if a reflectorless EDM is
available.
NEXT (F1)
Stores the measurement and moves on to measure the next point on the foul line. It is
only possible to move on to the next point if a valid distance has been measured.
DIST (F2)
Measures the distance using the curently selected EDM mode.
BACK (F3)
Returns to the previous step
The process should be repeated for the second point on the foul line.
If both points have been measured successfully, the NEXT (F1) key returns to the
Horizontal Jumps Menu.
Athletics Measurements User Manual
TPS1200
4-22
4.3 Measuring jumps
If the foul line has been measured successfully, the option Measure Jumps will be
enabled in the Horizontal Jumps Menu.
This option allows the user to measure the length of a jump with respect to the foul line.
Press F1 (CONT) to select the option.
4.3.1 Horizontal Jumps Measure Panel
To measure a jump, locate a reflector on the point to measure and aim at the
reflector. Reflectorless measurements may also be used if a reflectorless EDM is
available.
Enter the athlete ID on the Athlete ID line in order to save this information with the
corresponding measurement in the log file.
DIST (F2)
Measures the distance using the curently selected EDM mode. The reported
distance is displayed on the line Distance Jumped.
STORE (F3)
Stores a valid jump measurement. Depending on the configuration, the
measurement is sent to a serial port and / or the log file. If the distance is sent
successfully, a message will appear informing the user.
Athletics Measurements User Manual
TPS1200
4-23
FOUL (F5)
Stores the jump as invalid. Depending on the configuration, an invalid measurement is sent to a serial port and / or the log file. If the information is
sent successfully, a message will appear informing the user.
PAGE(F6)
Go to the Horizontal Jumps Plot panel
CONF (SHIFT F2)
Go to the configuration panel. See §6 for more information.
FINE (SHIFT F5)
Display the Distance Jumped in fine mode. The distance is displayed to 3 decimal places for 10 seconds and is then reverted to two decimal
places. This function may be used for checking purposes but does not affect the recording of the data. All measurements are recorded in
centimetres.
4.3.2 Horizontal Jumps Plot Panel
This panel allows a graphical view of the jump in relation to the foul line.
The function key functionality is identical to that described for the Measure panel.
Athletics Measurements User Manual
TPS1200
4-24
4.4 Resuming a Jump Measurement
It may sometimes be the case that it is necessary to leave the horizontal jumps function
and return at a later time, for example, to measure a distance for another event.
If the foul line has been measured successfully, it is possible to resume jump
measurement without having to repeat the measurement of the foul line.
To resume an existing measurement, enter the Horizontal Jumps Menu from the Main
Menu and press the RESUM (F4) key.
The measured foul line will be recalled from memory and it is possible to proceed
directly to the Measure Jumps dialog.
Athletics Measurements User Manual
5 Throwing Events
In this chapter:
5.1 Throwing Events Menu
5.2 Individual Throw Event Menu
5.3 Measuring the centre point
5.4 Measuring the foul line
5.5 Measuring throws
5.6 Resuming a Throw Event
TPS1200
5-25
Athletics Measurements User Manual
5.1 Throwing Events Menu
Within the throwing events menu, it is possible to select any of the available events:
Discus, Hammer, Shot Putt or Javelin.
The methodology used for each event is identical apart from the measurement of the
javelin foul line, more details are given in the appropriate section of this chapter.
Given that the same methodology is used for each event, the general process is
explained in this manual. This process is applicable to all events except where any
modifications to the process for a specific event are explicitly stated.
To select an option, highlight the option with the arrow keys and press
the CONT (F1) key or, alternatively select the numeric key that corresponds
to the option (1 or 2).
TPS1200
5-26
Athletics Measurements User Manual
TPS1200
5.2 Individual Throw Event Menu
Throw event measurement consists of two steps:
1. Define the foul line.
2. Measure the throw distance of each competitor.
The foul line for the throwing events is defined by a circle or part of a circle. In
some installations, it is possible that the centre of the circle is marked on the
ground and may be measured. In this case, definition of the foul line is possible by
simply measuring the centre point.
If the centre point is not marked on the ground, it may be calculated by measuring
three (two for javelin) points along the foul line.
Both of these options are available in the menu for each individual event (discus,
hammer, shot putt, javelin).
If no foul line or centre point has been measured previously, only the two menu
options will be enabled on entering the menu.
It is necessary to measure the foul line successfully before the second step, Measure Throw, can commence.
The only exception to this sequence is if a throw measurement is resumed (see §5.6 Resuming a throw measurement).
To select an option, highlight the option with the arrow keys and press the CONT (F1) key or, alternatively, select the numeric key that
corresponds to the required option (1, 2 or 3).
5-27
Athletics Measurements User Manual
TPS1200
5-28
5.3 Measuring the centre point
Centre Point Measure Panel
The centre point of a circle may be measured in the Centre Point Measure Panel for
each throw event..
DIST (F2)
Measure the distance from the sensor to the centre point.
STORE (F3)
Store the centre point as the point from which measurements will be calculated.
DONE (F4)
Return to the throw event menu. This function is only enabled once a valid
distance has been stored.
PAGE (F6)
Go to the plot page.
CONF (SHIFT F2)
Go to the configuration panel. See §6 for more information.
5.3.1 Centre Point Check Panel
The distance from the centre point of the circle to the foul line may be checked in the
Check panel.
To check the circle radius, measure a point on the foul line with the DIST (F2) key.
Stored Radius:
The radius of the event circle stored in the program configuration.
In the configuration, a different radius is stored for each throwing
event, see §6 for more information on the configuration.
Measured Radius:
The measured distance from the centre point to the point
measured on the foul line.
The function key functionality is identical to that described for the Measure panel.
Athletics Measurements User Manual
TPS1200
5-29
5.4 Measuring the foul line
If the centre point of the throwing circle is not available, it is possible to define the foul line by measuring points along it. In the case of the javelin
two points must be measured in a clockwise direction. For the other events, three points are measured on the foul line, the direction of
measurement is not important in this case. The measure foul line function can be selected from the menu of each individual throw event.
To measure a point on the foul line, locate a reflector on the point to measure and aim at
the reflector. Reflectorless measurements may also be used if a reflectorless EDM is
available.
NEXT (F1)
Stores the measurement and moves on to measure the next point on the foul line. It is
only possible to move on to the next point if a valid distance has been measured.
DIST (F2)
Measures the distance using the curently selected EDM mode.
BACK (F3)
Returns to the previous step
The process should be repeated for the second and third point on the foul line for all events except the javelin. In this case two points must be
measured in a clockwise direction.
When points have been measured successfully, the NEXT (F1) key displays the results
panel.
Stored Radius:
Measured Radius:
The radius of the event circle stored in the program configuration,
see §6 for more information on the configuration.
The mean distance from the calculated centre point to the points
measured on the foul line.
STORE (F3)
Stores the radius of the measured points and returns to the throw event menu.
REMEA (F3)
Returns to the measure foul line dialog.
Athletics Measurements User Manual
TPS1200
5-30
5.5 Measuring throws
If the foul line has been measured successfully, the option Measure Throw will be
enabled in the throw event menu.
This option allows the user to measure the length of a throw with respect to the foul line.
Press F1 (CONT) to select the option.
5.5.1 Throw Event Measure Panel
To measure a throw, locate a reflector on the point to measure and aim at the reflector.
Reflectorless measurements may also be used if a reflectorless EDM is available.
Enter the athlete ID on the Athlete ID line in order to save this information with the
corresponding measurement in the log file.
DIST (F2)
Measures the distance using the curently selected EDM mode. The reported distance is
displayed on the line Event Distance.
STORE (F3)
Stores a valid throw measurement. Depending on the configuration, the measurement is
sent to a serial port and / or the log file. If the distance is sent successfully, a message
will appear informing the user.
Athletics Measurements User Manual
TPS1200
5-31
FOUL (F5)
Stores the throw as invalid. Depending on the configuration, an invalid throw is sent to a serial port and / or the log file. If the information is sent
successfully, a message will appear informing the user.
PAGE(F6)
Go to the Throw Event Plot panel
CONF (SHIFT F2)
Go to the configuration panel. See §6 for more information.
FINE (SHIFT F5)
Display the Event Distance in fine mode. The distance is displayed to 3 decimal places for 10 seconds and is then reverted to two decimal places.
This function may be used for checking purposes but does not affect the recording of the data. All measurements are recorded in centimetres.
5.5.2 Throw Event Plot Panel
This panel allows a graphical view of the throw in relation to the foul line.
The function key functionality is identical to that described for the Measure panel.
Athletics Measurements User Manual
TPS1200
5-32
5.6 Resuming a Throw Event
It may sometimes be the case that it is necessary to leave a throw event function and
return at a later time, for example, to measure a distance for another event.
If the foul line has been measured successfully, it is possible to resume throw
measurement without having to repeat the measurement of the foul line.
To resume an existing measurement, enter the individual throw event (discuss, hammer,
shot putt, javelin) menu from the Main Menu and press the RESUM (F4) key.
The measured foul line will be recalled from memory and it is possible to proceed directly
to the Measure Throws dialog.
Athletics Measurements User Manual
6 Configuration
In this chapter:
6.1 Overview
6.2 Standard Configuration
6.3 Hidden Configuration
TPS1200
6-33
Athletics Measurements User Manual
TPS1200
6-34
6.1 Overview
The configuration of the application allows the application to be configured to suit user preferences. Two configurations are used:
1. The standard configuration that is available to all users, containing basic configuration information.
2. The hidden configuration that is used to configure vital measurement parameters. This configuration is reached by a special sequence of
key strokes. It could be that the sequence of key strokes is not given to some operators so as to ensure that the configured parameters
are not changed.
6.2 Standard Configuration
The standard configuration is available in most screens by pressing the SHIFT F2 key combination.
The following parameters are available:
Write Logfile: Establishes whether a log file is written or not. The default value for
this parameter is YES. If this parameter is set to yes, each time the
button STORE is pressed whilst running the application, information
will be written to the logfile. The information written will depend upon
the place in the application where the STORE button was pressed.
Logfile Name: The name of the logfile to write. The logfile is saved to the DATA
folder of the memory card.
CONT (F3)
Return to the panel from which the configuration was called.
Athletics Measurements User Manual
TPS1200
6-35
6.3 Hidden Configuration
The hidden configuration can be accessed from the standard configuration by pressing the “.” key 3 times in rapid succession.
6.3.1 Hidden Configuration Circles Panel
The circles panel allows the radius of the throwing circles to be entered. This is the
only place in the application where these values may be entered.
The default values for the circle radius of each event is that specified in the IAAF
Competition Rules handbook.
To modify a value, select the required event and type in the new value.
CONT (F1)
Save changes and return to Standard Configuration dialog.
DEFLT (F5)
Set the value to the defaul value. The default values are:
Discus:
1.2500 m
Hammer:
1.0675 m
Shot Putt:
1.0675 m
Javelin:
8.0000 m
PAGE (F6)
Go to the Rounding panel.
ESC
Return to Standard Configuration dialog without saving changes.
Athletics Measurements User Manual
TPS1200
6-36
6.3.2 Hidden Configuration Rounding Panel
The Rounding panel is used to fix the number of decimal places to which the reported
distances will be displayed for the throwing events. Distances are always rounded
down to the nearest place as specified in the configuration.
The rounding value entered in this panel does not affect the decimal places of the
distances sent via the serial port.
To modify a value, select the required event and select the value from the list.
CONT (F1)
Save changes and return to Standard Configuration dialog.
DEFLT (F5)
Set the value to the defaul value. The default value for all events is 0.01
PAGE (F6)
Go to the Recording panel.
ESC
Return to Standard Configuration dialog without saving changes.
6.3.3 Hidden Configuration Recording Panel
The recording panel allows the user to select whether the results of the application
will be sent through one of the instrument serial ports.
Record RS232:
Record the measurement results to the selected RS232
port.
Athletics Measurements User Manual
TPS1200
6-37
Port:
RS232 port through which the results should be sent.
CONT (F1)
Save changes and return to Standard Configuration dialog.
DEVCE (F4)
Call the standard system Interfaces dialog. The device associated with each available RS232 port may be configured in this dialog.
PAGE (F6)
Go to the Circles panel.
ESC
Return to Standard Configuration dialog without saving changes.
Note:
If the RS232 option is activated in the hidden configuration, pressing the STORE key sends a distance via the serial port in the following format:
<STX>nnn.nn<ETX>
The first character <STX> is ASCII 2, start transmission and the last character <ETX> is ASCII 3, end transmission.
The distance, in meters, is reported in the six spaces between these characters. Leading spaces are used for shorter distances. The screen will
indicate that the distance has been sent successfully with the message “Distance sent successfully”.
In the case of the FOUL key being pressed, the following message is sent via the serial port:
<STX> x<ETX>
Leading spaces are used to pad the message to 6 characters.
All distances sent through the RS232 port are rounded down to the nearest centimetre.


![English [2012v1]](http://vs1.manualzilla.com/store/data/005857990_1-ba5aca9850e0a37c2eb2dd5a5d355973-150x150.png)


![English [2014v1]](http://vs1.manualzilla.com/store/data/005775879_1-a83e57144a66539570f80a48a6e80397-150x150.png)