1
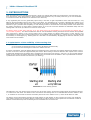
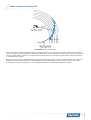
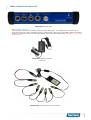
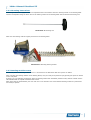
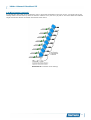
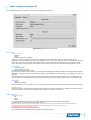
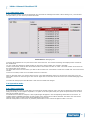
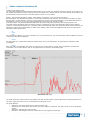
Manual
FalseStart III
Version: 2014v1
Table of Contents
PREFACE......................................................................................................2
1. INTRODUCTION.......................................................................................3
1.1 Optimization of the audibility of the starting shot.............................................................3
2. FALSESTART III SYSTEM.........................................................................5
2.1 Contents.....................................................................................................................5
2.2 Wireless setup.............................................................................................................5
2.2.1 Caddy setup.........................................................................................................5
2.2.2 Mounting instructions.............................................................................................7
2.2.3 Starting modules setup..........................................................................................7
2.3 Wired setup (optional)..................................................................................................8
3. WIRELESS FALSESTART APPLICATION....................................................9
3.1 Start up......................................................................................................................9
3.1.1 Managing sets.....................................................................................................12
3.2 Operation mode.........................................................................................................12
3.2.1 Basic principle.....................................................................................................12
3.2.2 Main window.......................................................................................................13
3.2.3 Menus................................................................................................................13
3.2.4 General / Race information...................................................................................14
3.2.5 Status / Measurements.........................................................................................15
3.3 Features....................................................................................................................17
3.3.1 Application..........................................................................................................17
3.3.2 System...............................................................................................................17
3.4 Shutdown..................................................................................................................18
3.5 Admin mode..............................................................................................................18
4. FAQ.......................................................................................................19
5. Appendix A: Keyboard shortcut list.......................................................21
www.timetronics.be
TimeTronics NV
Lammerdries-Oost 23B
B-2250, Belgium
Tel +32 (0)14 23 19 11
Fax +32 (0)14 23 20 24
VAT BE0440 224 404
HR Turnhout 64540
KBC Bank 414-4191871-52
SWIFT : KREDBE22
IBAN : BE64 4144 1918 7152
2014v1 Manual FalseStart III
PREFACE
Welcome to the "FALSESTART III" user manual.
May we recommend you to gently browse through the entire manual first, just to have an initial idea of how the book is
structured. As we can't possibly explain all details simultaneously, this might help you a bit in understanding and tracing
things back. Of course, the table of contents will also help you in doing so.
Please note that all pictures are examples, the delivered version can be different than shown in this manual please inform
yourself before purchase.
If you, after reading this document, have any further question regarding the operation or service of this or any other
TimeTronics equipment, please contact your local distributor or TimeTronics directly, by email: [email protected], or call us
at +32 (0) 14 23 19 11.
Please also contact us if you have any remarks or advise regarding this user manual: [email protected]
Good luck with FalseStart III and thank you for your confidence in the TimeTronics products and services.
The editors
© Copyright 2014 TimeTronics. All rights reserved.
TimeTronics
Lammerdries 23b
B-2250 Olen
Belgium
Tel.: +32 (0) 14 23 19 11
Disclaimer
Under no circumstances shall TimeTronics be liable for any loss, damage or expense suffered or incurred with respect to any
defective product. In no event shall TimeTronics be liable for any incidental or consequential damages that you may suffer
directly or indirectly from use of any product. Windows, Windows XP and Windows VISTA are registered trademarks of
Microsoft Corporation.
2
2014v1 Manual FalseStart III
1. INTRODUCTION
Track and field timing and resulting has entered a whole new episode after IAAF has introduced the zero false start rule.
As a consequence, time measurement in track and field races should be very accurately measured, up to one thousandth
of a second to assure all athletes to be evaluated in the same way.
A very significant part of a race (particularly sprint races) is the start. A right interpretation of the start movement is a very
difficult, almost impossible task for the human eye and brain. The development of our system, FalseStart III, enables you to
electronically detect a false start and give a fair analysis of the start of all athletes. During the development we have taken
attention to get a powerful start beep/bang on each starting module to eliminate the sound delay between each athlete and
the starter. Furthermore we have added a wireless option so you do not need wires between the FalseStart caddy and each
starting block. Of course you still have to choice to use it wired.
An athlete causes a false start whenever he or she starts before 100 thousandths of a second after the starting shot (=
current IAAF regulation). The IAAF considers this limit of 100 thousandths as being the fastest human reaction time possible.
This means that a starter in the current system has to judge whether an athlete starts sooner or later than the 100
thousandths of a second, thus causing a false start or not. An athlete can be privileged (e.g. letting him run at a start after 65
thousandths) or handicapped (e.g. shooting back at a start after 105 thousandths). By applying an electronic detection, these
inaccuracies can be avoided.
1.1 Optimization of the audibility of the starting shot
It is possible that:
a) The sound of the starting shot does not reach all athletes simultaneously.
b) The sound of the starting shot reaches the athletes too late.
At a start of 8 athletes, where all starting blocks are positioned next to each other, the distance between the athlete in lane 1
and the one in lane 8 amounts to approximately 8.5 meters. When looking at the time difference with respect to the moment
at which both athletes hear the starting shot, and taking into account the sonic speed (= 343 m/s), we can conclude that the
athlete in lane 8 hears the starting shot 2.5 hundredths of a second later than the athlete in lane 1 provided that the starter
is positioned at the far left side from the track (see drawing).
Illustration 1: Unfair starting position
This difference may even become larger at races such as the 400 meters, at which the starting blocks are positioned at least
7.5 meters from each other. The athlete in lane 8 would hear the starting shot 14.4 hundredths later than the athlete in lane
1, on condition of course that the starter would take place close to the athlete in lane 1, which would rather be unfair.
The starter could in fact position himself at an equal distance to each athlete, in other words in the center of an imaginary
circle which is drawn over the starting blocks. Consequently he will be about 31 meters apart from each athlete so that all
athletes will simultaneously hear the starting shot 9 hundredths of a second too late.
3
2014v1 Manual FalseStart III
Illustration 2: Late starting shot
That is why this virtual distance between starter and athlete will have to be reduced. We bring the sound to each athlete by
using a microphone and an amplifier at the central starter position, and a loudspeaker into EACH starting module (mounted at
the back of each starting module). By using the antenna of the central unit, all starting modules will be connected (wireless)
to the FalseStart III system.
What we certainly want to emphasize is that the FalseStart III detection system remains an auxiliary TOOL for the starter, to
ASSIST him. It still remains the starter’s responsibility to make the final decision when it comes to defining a false start.
In subsequent parts you will encounter a more elaborate description of our FalseStart III detection system.
4
2014v1 Manual FalseStart III
2. FALSESTART III SYSTEM
2.1 Contents
The FalseStart III system configuration is packed in a case containing:
1 Caddy = case on wheels containing:
4 built-in batteries (each 12 Vdc, 7 Ah)
1 built-in FalseStart central unit
1 Notebook/Touchscreen computer with Wireless FalseStart application installed (depending on the edition, a
notebook or touchscreen computer will be installed in the caddy)
30 m cable to connect with false start cable for 100 m
2 metal enforced wooden carrying case containing:
8 or 10 starting modules
1 synthetic carrying case containing:
1 start detector to be mounted on starting pistol (with 3 m cable)
1 start button (with 3 m cable)
1 headset with built-in microphone and headset extension cable
1 battery charger (110 Vac ... 220 Vac -> 12 Vdc)
1 charging cable for starting modules
1 starting module mounting tool
1 user manual
1 'TimeTronics' T-shirt
Optional:
1
1
1
1
small false start cable for 100 m
medium false start cable for 200 m
large false start cable for 400 m or 4 x 400 m
belt pack wireless audio system with 50 W battery powered speaker
2.2 Wireless setup
2.2.1 Caddy setup
The caddy contains 3 main parts: a battery, a central unit and a computer with the Wireless FalseStart application installed.
To power on the touchscreen computer, switch on the power button on the front of the caddy. The power button of the
notebook is located inside the notebook. After the start up of the computer, the Wireless FalseStart application will
automatically be launched. You can also find the icon of the application on the desktop.
On the front panel of the central unit there are 4 connections, 2 buttons and a led.
1. MacFinish connection
This connection is used when connecting the FalseStart III system to the MacFinish photo finish and timing system.
2. Starting blocks connection
The extension cable of the starting modules is plugged in here. To work in wired mode, connect the false start cable
(100 m, 200 m or 400 m) with the extension cable.
3. 'Starting pistol' connection
This connection is used to plug in the cable of the start detector. Alternatively you can also plug in the cable of an
electronic starting device.
4. Headset connection
This connection is used to plug in the cable of the starters headset.
A. Headset micro volume button
This button can be used to control the volume of the headset microphone.
B. Power On button
You can now power up the central unit by pressing the power button on the front panel.
The led above the power button shall light permanently to indicate the central unit is powered up. When starting
modules have associated with the central unit, the led shall start blinking slowly (in wireless mode).
We advice you to first power up the central unit before powering up the starting modules.
5
2014v1 Manual FalseStart III
Illustration 3: Front panel
Battery charger connection
This connection is located on the caddy..It can be used for charging the 12 Vdc battery of the central unit. To
charge the central unit, plug in the battery charger (marked for the central unit) to the battery charger connection.
To charge the starting modules, use the power adapter connected to the charging cable. Remember to only use the
chargers indoor!
Illustration 4: Battery charger
central unit
Illustration 5: Charging cable starting modules
6
2014v1 Manual FalseStart III
2.2.2 Mounting instructions
All starting modules are equipped with an U-shaped bracket on the bottom. Place the starting module on the starting block
with the loudspeaker facing the finish. Secure the starting module to the starting block with the delivered mounting tool.
Illustration 6: Mounting tool
Make sure the starting module is tightly mounted on the starting block.
Illustration 7: Mounting starting module
2.2.3 Starting modules setup
On the rear panel of a starting module there is 1 connection for the false start cable and a power on button.
After mounting the starting modules to the starting blocks, they are ready to be powered up by pressing the power on button
on the rear panel.
At power up, a led will light permanently. When the starting module has associated (wireless mode) with the central unit the
led shall blink fast at a speed of 4 blinks each second.
After some time the led shall blink just once each one or two seconds. This means that the starting module is synchronized
and ready to operate.
7
2014v1 Manual FalseStart III
2.3 Wired setup (optional)
An optional false start cable can be provided to work in wired mode. Depending on the type of race, you should connect the
starting modules to each other by means of either the cable for 100 m, 200 m or (4x) 400 m. The three cables have different
length and also the distance in between their branch points varies.
Illustration 8: Connection of the cable(s)
8
2014v1 Manual FalseStart III
3. WIRELESS FALSESTART APPLICATION
3.1 Start up
After the start up of the computer, the Wireless FalseStart application shall automatically be launched. You will also find a
shortcut of the application on the desktop. Double click on it to start the Wireless FalseStart application.
When the Wireless FalseStart application is started, you will get a screen where you can set the properties of the FalseStart
III system. The properties screen has a tab containing application properties and system properties.
The application tab displays properties about the functioning of the Wireless FalseStart application. The following properties
can be selected:
Illustration 9: Properties application tab
Application:
–
COM port
Select the serial (COM) port that will be used for communication between the Wireless FalseStart application and the
FalseStart III system. The appropriate COM port will be indicated with "USB Serial Port".
–
Start block set
A start block set is a collection of starting modules and a central unit. The modules are denoted by their serial
number and lane.
By clicking "Manage Set" you can control the central units/starting modules of the sets.
–
Starter name
You can set the name of the starter.
–
Results directory
You can specify the directory where all results will be saved.
–
Printer options
–
None
–
Ticket printer
–
Serial printer
You can specify which printer you want to use. Select none if you don't have a printer.
Select ticket printer if you have one installed on the caddy and want to have the results printed out on a paper.
Select the serial printer option to get the results printed by the serial port of the touchscreen. You must select
the appropriate COM port.
Automatic printing
–
Off
–
Results
–
Results and graphs
–
9
2014v1 Manual FalseStart III
The system tab is split up in two part: central unit and start block properties.
Illustration 10: Properties system tab
Central unit:
–
Operation mode
–
Wireless
–
Wired
–
Automatic detection (default)
The most convenient setting for selecting the operation mode is automatic detection. As the words say, the
application will automatically detect if you are working in wireless or wired mode. If you haven't plugged in the false
start cable, the system will detect the wireless operation mode. With the cable plugged in, it will switch to wired
mode. By selecting one of the two other options, the modules are set fixed to the corresponding operation mode.
–
Recall mode
–
Automatic recall
–
Remote (Manual) recall
This property sets the type of recall.
By selecting automatic recall all starting modules will automatically sound alarm beeps if a starting module detects a
false start. The starter will also hear the alarm beeps in his headset but he doesn't have to do anything to recall the
athletes.
By selecting remote (manual) recall the starter will first hear recall beeps in his headset in case of a false start. He
can then decide to recall the athletes. If the system detects the recall, all starting modules will sound alarm beeps.
–
Photo finish
–
None
–
MacFinish (default)
With this property you can specify if you are using a photo finish timing system along with the FalseStart III system.
–
Headset volume
Specify the volume of recall beep sound that will be played through the headset of the starter. The headset volume
can be selected in 6 steps from 37% (lowest volume) to 100 % (maximum volume).
Starting modules:
–
Start sound mode
–
Off
–
Beep
–
Bang
This property indicates which sound a central unit/starting module will play after a start signal.
By selecting Off, no sound will be played after a start.
Beware that not selecting a start sound will create a dissimilarity for the athletes. Not all athletes will hear
e.g. the start sound of a traditional starting gun at the same time. This is explained in 2.1.
We always advice to select a start sound.
By selecting Beep, a start beep will be played.
If you choose Bang, a predefined starting pistol sound will be played.
10
2014v1 Manual FalseStart III
–
Recall sound
–
On
–
Off
This option controls whether the central unit or starting modules may sound the recall alarm beeps. You can select
Off for instance if you use a 2nd traditional starting gun to recall the athletes. You can choose one of the options
dependent of the selected recall mode.
–
Sound volume
Specify the volume of start or alarm sound that will be played through the loudspeakers. The sound volume can be
selected in 6 steps from 37% (lowest volume) to 100 % (maximum volume).
–
Sensitivity
The sensitivity is related to the sensitivity of the starting modules' sensors. In fact, the sensitivity number is closely
related to the explosiveness of the athletes in question.
The higher the power/ explosiveness of the athletes, the higher you should set the sensitivity number. This will
decrease the sensitivity of the FalseStart III system.
Example:
Top athletes: set sensitivity number to 100
Male adult athletes: set sensitivity number to 50
Female adult athletes: set sensitivity number to 40
Juvenile athletes: set sensitivity number to 32
After pressing OK, the application will continue to operate with the new properties and pass them to all starting modules. If
cancel was clicked, all modifications of the properties will be discarded.
You get a main window displaying the status of the central unit and the starting module that were specified in the start block
set.
The starting modules will establish a connection with the central unit.
The central unit will report the status of each starting module on the screen. In idle state the central unit and each starting
module report an idle status marked by a blue light and a green measure button.
When you have just set new properties the system will show the busy window. This window will be shown as long as not all
properties have been distributed to all devices. When all starting modules have the same properties, the busy window will
disappear.
In case there is a starting module (lane) that's not used for the race, set the activity status of the module to inactive to
discard the check of the properties distribution of the module.
The busy window is non-blocking which means you can still view or modify other settings or statuses.
11
2014v1 Manual FalseStart III
3.1.1 Managing sets
In the properties window next to the start block set you'll find the "Manage Set" button. When clicking on it, a new window
will open where you can control your start block sets.
Illustration 11: Managing sets
To change the properties of a set, first click on the name of the set. The window will enlarge and display all the modules of
the selected set.
You can modify the settings by double-clicking on the lane or serial number of a module in the table.
To add a new module, fill in the lane and serial number of the module and click on "Add". The serial number can be found on
the bottom plate of the module.
You don't have to fill in the lane when you want to add a central unit. Just mark the check box "Central Unit" next to the serial
number.
To remove a module, select one in the table and click on "Remove".
Click on "New Set" when you want to add a new set. A text field will appear where you can fill in the name of the new set.
Click Add to confirm or Cancel to ignore the new set. Again click on the name of the set to fill in the modules belonging to the
new set.
To confirm all changes press the OK button. Click Cancel to discard all changes.
3.2 Operation mode
3.2.1 Basic principle
If the FalseStart III system is in idle state you must set the system ready for every new race by clicking the ready button or
hitting the F5 key on the computer keyboard. A 2nd option to set the system ready is to press the power button on the front
panel of the central unit once.
To indicate that a module is ready for a start a yellow light will appear in the corresponding status label on the screen. To
indicate that the FalseStart III system is ready a light on the starting device will be activated. The starter can now fire the
starting device and the reaction times will be displayed on the screen.
Click the ready button on the screen or press the power button on the central unit again to start a new race.
12
2014v1 Manual FalseStart III
3.2.2 Main window
Illustration 12: Main window
The main window can be divided into 3 parts. The first part displays the menus on top of the screen. The second part shows
general information and information about the race. The third part displays the status and measurements of the central unit
and the starting modules.
3.2.3 Menus
On top op the application you notice the following menus:
–
File
–
Open
This item can be used to open a saved result. The selected result will be opened in a new tab sheet. You can switch between
the opened results by selecting the desired tab sheet in the left bottom corner of the screen. To close an opened result, press
x next to the name of the opened tab sheet. The current results are displayed in the “Live” tab sheet.
–
Save
Use this item to manually save the current results. After each race the reaction times and athlete start graphs are collected. If
all measurements are received, the system will do an automatic save of the results. So you do not have to do a manual save
of the results after each race.
–
Admin
Press this item to go to administrator mode. If the password is correct, access is granted to the administrator mode.
–
Print
By clicking the print item, the results displayed on the currently active window are printed out.
–
Exit
To close the Wireless FalseStart application, press the exit item or the x button on the right top of the main window.
–
Setup
–
Properties
Select the properties menu item if you want to change the properties of the FalseStart III system. You will get the FalseStart
III properties window which is the same as you saw after start up.
–
Shutdown devices
This item can be used to shut down individual or all modules. A window is shown with the serial numbers of all modules in the
start block set. By marking the modules and pressing OK you will shut down the selected modules. A shutdown is confirmed
by 2 beeps.
You can also notice the shutdown if the Measure label of the corresponding module has turned red after 10 seconds. By
pressing the Measure button, a window is popped up and Connection is indicating NO.
13
2014v1 Manual FalseStart III
All modules can be shut down individually except the central unit. A selection of the central unit to shut down will implicate
that the all modules will be shut down.
–
Window
–
Show live view
Previously saved results can be opened with the open item of the file menu. These results are opened in a new tab next to the
live tab. By clicking the "Show live view" item you can switch back to the live measurements.
–
Layout
In some circumstances (e.g. bright sunlight hitting the screen) it is possible that the readability of the computer screen
becomes difficult. By clicking the layout item you can select a different theme which will modify the color and font settings for
a better readability. Select the most appropriate theme for your environment.
–
Race counter reset
The application will keep track of the number of races that we started. By selecting this item you can reset the race counter to
1.
–
Help
–
Key assistant
The Wireless FalseStart application can be controlled by a mouse, track pad or keyboard shortcuts. This menu item will return
a summary of all keyboard shortcuts that can be used to operate the application. Look at appendix A for the list of keyboard
shortcuts.
–
About
This will return information about the Wireless FalseStart application.
–
About Qt
This will return information about the Qt framework.
3.2.4 General / Race information
Illustration 13: General info
–
Ready
On the left side you can find the ready button. By clicking on it (or hit F5 on the keyboard) you can set the FalseStart III
system ready. As explained before you can also press the power button of the central unit once to set the system ready.
Pressing Ready when all modules are already in ready state will set them back to idle.
–
Race name
Underneath the menu bar, you can see 3 drop down lists for selecting a server, a competition and a race. These items will be
filled in in case the Wireless FalseStart application is able to make a wireless (Wifi) connection to Athletics Manager Server.
Two requirements have to be fulfilled. Your Athletics Manager Server license must have the FalseStart option enabled.
Otherwise the Wireless FalseStart Application is not allowed to get the races.
Secondly a competition and races should have been defined in Athletics Manager Server so that the Wireless FalseStart
Application can retrieve them from the server.
Further details about the connection between the Wireless FalseStart Application and Athletics Manager Server can be found
in the manual.
By selecting a race you shall notice that the race name is set and that the race information (athletes ID, name and info) is
filled in on each starting module.
Pressing the "Arrow up" button on the right will hide the race information giving you an enlarged screen. You 'll see the race
information again if you click on the "Arrow down" button. The next race will automatically be loaded when you hit the
"Ready" button.
You can also specify the name of the race if you are not using Athletics Manager Server. Simply click on the race info next to
the 'Ready' button. The results will be saved now with the custom name. If you clear the custom name the Wireless FalseStart
Application will continue to use the race number of the automatic race labeling.
You can also manually change the heat and start number if necessary.
–
Comment
Next to the race info stands the comment icon. By clicking it, a window will open and you can add comment or information
about this race. If you set this before you've set the starting modules to ready, the application will automatically save the
comment associated with this race. If you've added comment about the previous race beware that you need to manually save
the results.
14
2014v1 Manual FalseStart III
–
Operation mode
Next to the comment icon is the operation mode icon. This indicates the operation mode that is being used by the FalseStart
III system.
Icon
indicates a wireless operation mode.
Icon
indicates a wired operation mode.
–
Activity
Next to the operation mode icon there is a progress bar indicating if the application is currently active. The progress bar will
be filled and cleared periodically if the application is working.
–
Results progress
At the end of this part you can see the status of the results. All results of a race are automatically saved when all reaction
times and athlete graphs are received. The results progress bar is updated if a single results is received. If all results are
gathered, the results status will display "Results saved".
Results can be found in the "Results" directory which is selected in the properties window.
The application will save 2 types of results files: *.fs1 and *.fsr. The files with extension fs1 must be opened with the Wireless
FalseStart application. The files with extension fsr are text file in a syntax readable for a MacFinish photo finish and timing
system.
3.2.5 Status / Measurements
In this frame you can see 10 labels indicating the status and measurements of the central unit and the starting modules.
Illustration 14: Status/measurements
–
Active
In the active field you can set the participation status of an athlete/starting module. If you click on the drop down item of the
appropriate lane you can set the participation status to
–
Active: This lane will be used in the FalseStart III system.
–
DNS: Set the status to DNS before the start of a race when the athlete did not start.
–
DQ: Set the status to DQ after the start of a race when the athlete is disqualified.
–
DQ PEND: Set the status to DQ PENDing after the start of a race when the athlete is disqualified but still may
participate to the next start. This can be in case of an appeal against the disqualification.
–
Inactive: Set the status to Inactive before the start of a race if no athlete will participate in this lane.
The FalseStart III system shall only perform any measurements of a starting module in active and DQ PEND state. In any
other state no measurements are done.
–
Lane
The lane number of the starting module is displayed. If a lane mismatch is found, you will be informed by the application. The
lane number will be marked in red. A mismatch can occur if the lane number of the starting module does not match the lane
number specified in the starting set. You can resolve this issue by clicking on the red lane. The application will suggest the
correct lane number which you have to confirm by clicking on it.
By clicking on the lane label all starting modules will be sorted according to their lane number in a descending way.
–
Time
The time field will return the reaction time of an athlete. The reaction time is displayed in milliseconds after start.
By clicking on the time label all starting modules will be sorted according to their reaction time in a descending way. So the
athlete with the fastest reaction time is positioned at the top of the frame.
Athletes who triggered a false start have a reaction time indicated in red.
–
Status
The status of a starting module is indicated beneath this label. The central unit and the starting modules can be set in 3
states: idle, ready and started.
The idle state is marked by a blue light. The system is now in a rest state.
The ready state is marked by a yellow light. The system is now measuring the athletes reaction time and waiting for a start.
The started state is marked by a pistol. After a start, the starting module is in the started state. Afterward, it will return to
idle state.
–
Measure
The measure field is shown as a green or red button.
The green button indicates the central unit / starting module is working correctly. The amount of green on the button is an
indication of the battery status. A fully green colored button indicates a fully charged battery. A small green colored button
15
2014v1 Manual FalseStart III
indicates a low battery status.
The red button indicates a falsely detected measurement by the central unit / starting module. By clicking on the button you
get detailed information about the measurements of the central unit / starting module. The measurements of the battery, the
synchronization measurement and connection status is shown in a new window.
Battery: This indicates the battery voltage. If the battery drops below 11 Volt you should recharge it.
Synchronization: The FalseStart III system is continuously synchronizing all modules. This means they will share the same
timing system. A value between -1000 and 1000 indicates the module is synchronized properly. If the application detects a
mismatch for more then 30 seconds it shall automatically resynchronize the relevant module.
Connection status: The Wireless FalseStart application will continuously ask the status of each starting module. The
connection status will display YES if the starting module is responding correctly. If the application detects that a starting
module is not responding anymore, the connection status will indicate NO. When the connection status returns Unknown, the
application is still trying to determinate the status. After waiting a few seconds the application will return the result of the
connection status measurement.
–
ID
–
Name
–
Info
This information is filled in if you have selected a race in race selection box. The race information will be available if you have
a connection with Athletics Manager.
–
Signal
The signal field is a number that indicate the relative force used on the start blocks. It represents the magnitude of the
acceleration.
–
Graph
After each start, the application will collect the reaction time of each starting module. When completed it will collect the
acceleration curve of each athlete. Click on the graph button to watch the acceleration graph.
Illustration 15: Graph
The graph shows the measured force of an athlete from 200 ms before start to 599 ms after start. Each large black line on
top of the graph represents 100 ms, a small black line represents 10 ms.
The graph displays:
–
Offset line: shows the athletes force measurement in rest.
–
Sensitivity line: shows where the reaction time of the athlete is calculated. This value can be set in the properties
window.
–
Start time: indicating the start moment.
–
IAAF time: Indicating the minimum reaction time for not triggering a false start.
16
2014v1 Manual FalseStart III
–
Reaction time: Indicating the athletes reaction time (where the graph meats the sensitivity line).
You can examine the result by moving the mouse over the graph or by zooming in/out on the graph.
If you move the mouse over the graph, you 'll see a field with the time after start as the 1 st parameter and the measurement
value of the current mouse location as the 2nd parameter.
Right-click on the graph to open the zooming window.
An “All graphs” button to show all graphs in a single window is added underneath the graphs button of the last lane.
Properties own to central unit
The status/measurement frame of a central unit does not show the synchronization measurement but displays the start signal
measurement instead.
Start signal: When the starting device is plugged in the "Starting Pistol" connection on the front panel the start signal
measurement will indicate connected. If no starting device is plugged in, the measurement will indicate not connected.
The FS parameter displays the status of the FalseStart III system. To indicate that the system is ready for a start a yellow
light will appear next to the FS label. When the system is not ready, a blue light will appear.
The MF parameter displays the status of the MacFinish photo finish system. This parameter is only visible if the Photofinish
parameter of the properties window is set to MacFinish.
A yellow light is shown next to the MF label if the MacFinish photo finish system is ready, otherwise a blue light is shown.
The FalseStart III system is ready when the central unit is ready and all participating starting modules are ready. When
MacFinish is selected as the photo finish system the FalseStart III system shall also wait for MacFinish to be ready.
3.3 Features
3.3.1 Application
–
Automatic operation mode detection
The Wireless FalseStart application is capable of automatically detecting the operation mode of the FalseStart III system. It
can rapidly detect if you are working in wireless or wired mode.
The system will resolve the operation mode selection itself which reduces the change on errors from incompatible settings.
–
Automatic/manual race labeling
The Wireless FalseStart application will give each race a unique name. This name is based on a sequence number or on the
selected race name (received from Athletics Manager Server). But the user can also give each race a custom name.
–
Automatic/manual results saving
After each race, the application will store the results of the race automatically. There is also the option to store results
manually.
–
Complete view of saved results
Every saved result can be opened to examine them thoroughly.
–
Visibility and contrast modification
The FalseStart III system can be used indoor or outdoor. The light and weather circumstances can be very different. That's
why there is a possibility to modify the layout of the application to your desires by selecting one of the predefined themes.
–
Keyboard shortcuts operation
The application can be controlled by a mouse or track pad. But quick and handy control keyboard shortcuts have been
assigned to the functionality of the FalseStart III system. Take a look at appendix A for a detailed description of the keyboard
shortcuts.
3.3.2 System
– Automatic network channel selection
The central unit of the FalseStart III system is responsible for setting up the wireless network to allow starting modules to
connect. It is capable of detecting interference (noise) on each of the used channels. So it will select the channel which will
guarantee the best operation.
–
Automatic/manual power down control
If the application is not running for more then 15 minutes, the system will perform an automatic shutdown (to save battery
power). Each modules in power down mode will start an audible countdown for 10 seconds. This can be interrupted by
pressing the power button or running the application again.
17
2014v1 Manual FalseStart III
–
Lane mismatch detection
Each starting module has a predefined lane number. But when creating the start block set, you had to fill in the serial number
of each starting module and also the lane number. The system can detect if the lane number in the starting modules is
different then the lane number you've selected in the start block set. The mismatch will be alerted and you can set the correct
lane.
–
Power button functionality
The power button has multiple functions.
First of all it shall power up a device by pressing the button once. The led on the front panel will light up.
To shut down a module you must press and hold the power button for more then 3 seconds. A beep will be heard if the time is
elapsed. From this point the module will shut down when you release the power button. Be aware that shutting down a
central unit will also shut down all starting modules.
The power button on a central unit can also be used to put the system ready. After all starting modules have connected to the
central unit, the system can be set ready by pressing the power button once. After a few seconds you will see in the
measurement screen that all status labels have changed to ready (yellow light).
3.4 Shutdown
To shut down the FalseStart III system after functioning, you can hold the power on button of the central unit for at least 3
seconds. The Wireless FalseStart Application will send a power down request to all modules. This will be confirmed by 2 beeps
from the starting modules. You can also check that a module is shut down if the led on the module stopped blinking.
You can now close the Wireless FalseStart Application and shut down the notebook/touchscreen computer.
When the computer is shut down, switch off the power button on the front of the caddy to power down the
whole system.
3.5 Admin mode
For some extra functionality you need to go to admin mode.
In admin mode it is possible to change common settings like the audio channel or panID, inquire info of each module, see the
packet logging, ...
Beware that this is a privileged mode and the use of it is only needed in exceptional conditions.
Go to admin mode (File -> Admin) by using the password 'fs3'. You shall notice that some new buttons are shown.
To set the application back to user mode, click on File -> Admin and leave the password blank.
18
2014v1 Manual FalseStart III
4. FAQ
- What does the background color of the COM port setting mean?
The background color will turn green if the application can open the serial port. The application has started to communicate
with the FalseStart III system. If the background color is red then there is probably another application using this port. You
have to close the other application first so the COM port will be released. You can now select a different COM port and reselect
the previous one. The background color will now be green.
- The measure indication is red. What is wrong?
By clicking on the (red) measurement button you get a window returning detailed information about the status of each
measurement.
The battery voltage must be at least 11,0 V. If not recharge the battery for a correct operation.
The start signal measurement should indicate "Connected". This means that a starting device (starting pistol, …) is connected
to the central unit. If the measurement indicates "Not connected" check if you have connected a starting device to the
"Starting Pistol" connection of the central unit.
The synchronization measurement should indicate a value between -1000 and 1000. This means the module is synchronized.
If the Wireless FalseStart application detects that a module is not properly synchronized for more then 30 seconds, it shall
automatically do a resynchronization of the relevant module.
If the connection measurement is indicating an error, it will report "NO". This means that the central unit can not
communicate with the starting module. Check if the starting module is powered up.
The FalseStart III system is self healing which means it will try to re-establish the connection. It could be possible that the
system is doing this. By simply waiting some minutes the connection can be re-established or you could power down and
power up the module.
- I hear some interference on the starting module after setting the system ready. What can I do to minimize the disturbance?
It is possible that there are other people in your surroundings that are using the same frequency band.
Check that all antenna's are in good shape (not damaged).
The FalseStart III system uses an audio module with 15 channel. You can set the system to a different audio channel for
reducing the disturbance.
Go to admin mode (see 3.5)
Click on the 'Settings' button on the right-hand corner of the screen.
Select a different audio channel and confirm this by pressing OK.
Set the system ready to check if the disturbance is disappeared. You can try all channels to evaluate the best result.
Set the application back to user mode. Click on File -> Admin and leave the password blank.
- How can I recharge my central unit and starting modules?
Recharging the FalseStart III system is divided in 2 part. To recharge the central unit connect the battery charger (marked by
Central Unit) to the "Battery charger" connection on the caddy and plug it in the main power.
To recharge the starting modules, connect the power adapter of the charging cable in the mains power. Next connect each
starting module to the charging cable.
The FalseStart III system will now charge all modules. They don't need to be powered up when you want to recharge them.
It takes about 10 hours to fully charge the FalseStart III system.
- How do I have to store the FalseStart III system until the next event?
We advice you to first recharge the Wireless FalseStart system before storing it.
- I want to replace a malfunctioning starting module. What do I have to do?
First you need to remove the old starting module and add the new starting module to the set of starting modules (See 3.1.1).
The serial number can be found on the bottom of the starting unit.
Set the Wireless FalseStart application to wired mode.
Disconnect the serial cable from the central unit (backside) and connect it to the starting module.
Power on the starting module and check if the module is responding. The status label displays a blue light if communication is
successful.
Go to admin mode (see 3.5). You shall notice that some new buttons are shown.
Click on the info button of the new starting module and set the correct lane and panID. The panID can be found on the sticker
on the central unit.
Beware to set the correct PanID. The starting module will not react to the central unit (in wireless mode) if an incorrect PanID
is set.
Wait some seconds and click again on the info button. Check that the settings have been set, otherwise repeat the previous
step.
If all settings are correct, power down the starting module and connect the serial connector back to the central unit.
Set the application mode back to wireless mode.
Set the application back to user mode.
- Can I use multiple FalseStart III system together on the track?
It is possible to work with multiple FalseStart III systems on the track. You only have to choose a unique panID for every
FalseStart III system. The panID can be compared to a group number. Every device with the same panID can communicate
19
2014v1 Manual FalseStart III
with each other. By default, all system have a panID set to '1AB2'.
So if you want to use a 2nd system, change the panID of the 2nd set to e.g. '1AB3'.
To change the panID of your system, go to admin mode (see 3.5). The info buttons are now visible.
Change the operation mode to wired (see 3.1).
If you have a start cable available, connect it to the central unit (see illustration 3) and each starting module. If no start cable
is available, you can connect the serial cable on the back side of the central unit to thestarting module to change the panID.
Click on the info button of the central unit and double click on the panID. You can now use the (virtual) keyboard to change
the panID to e.g. '1AB3' and press OK. A confirmation to change the settings is asked.
Beware to set the correct panID. The starting module will not react to the central unit (in wireless mode) if an incorrect PanID
is set.
Wait some seconds and click again on the info button. Check that the settings have been set, otherwise repeat the previous
step.
If you have the start cable plugged in, you can repeat this step for all starting modules. When not working with a start cable,
disconnect the serial cable from the back panel of the central unit and plug it into the staring module. Now click on the info
button of the active starting module to change the panID. The panID of the starting modules need to be the same as the
panID of the central unit!
Wait some seconds and click again on the info button. Check that the settings have been set, otherwise repeat the previous
step. You can now proceed with the next starting module.
If all panID's are set, power down the starting modules and connect the serial connector back to the central unit.
Set the application mode back to wireless mode.
Set the application back to user mode.
20
2014v1 Manual FalseStart III
5. Appendix A: Keyboard shortcut list
Key / Shortcut
Description
Enter / Return
Set focus on the main window
Escape
Deselect athlete
Arrow down
Select next athlete
Arrow up
Select previous athlete
F3
Sort results based on the lane number
F4
Sort results based on the reaction time
F5
Set all starting modules to READY
F6
Change the participation status of the selected athlete
F7
Show the graph of the selected athlete
F8
Show the graphs of all athletes
F9
Set previous race
F10
Set next race
F11
Set previous start number
F12
Set next start number
Ctrl + A
Go to administrative mode
Ctrl + L
Select window layout
Ctrl + O
Open results
Ctrl + P
Show setup properties
Ctrl + R
Reset race counter
Ctrl + S
Save results
Ctrl + X
Exit application
Ctrl + Tab
Display all open tabs
Ctrl + Shift + L
Open key assistant window
Alt + E
Select race from race info panel
Alt + H
Hide race info panel
Alt + L
Go to live tab
Alt + M
Display measurements of selected athlete
Alt + X
Close current tab
Alt + Shift + M
Display measurements of central unit
21
2014v1 Manual FalseStart III
© Copyright 2014 TimeTronics. All rights reserved.
TimeTronics
Lammerdries 23b
B-2250 Olen
Belgium
Tel.: +32 (0) 14 23 19 11
22


![English [2012v1]](http://vs1.manualzilla.com/store/data/005666127_1-015c2c1b906ab908850f1f1f8721a849-150x150.png)
![English [2012v1]](http://vs1.manualzilla.com/store/data/005770981_1-8c196de42073f8db3e58cd387e9490be-150x150.png)
![English [2012v1]](http://vs1.manualzilla.com/store/data/005947215_1-83afe423bc1815c8427a220bc0eb1bc7-150x150.png)

![English [2012v1]](http://vs1.manualzilla.com/store/data/005857990_1-ba5aca9850e0a37c2eb2dd5a5d355973-150x150.png)


![English [2012v1]](http://vs1.manualzilla.com/store/data/005994732_1-5b50c16b769d7d14a751f578cdbfd574-150x150.png)


![English [2015v1]](http://vs1.manualzilla.com/store/data/005829431_1-1fdc30543d444fb0915a40c3aab945a8-150x150.png)