1
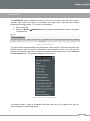
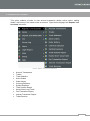
Brokers Manual Version 2 i ii Table of Content Introduction ............................................................................................................................................ v 1.1 Preface .......................................................................................................................................... v 1.2 References .................................................................................................................................... v Straticator ............................................................................................................................................... 1 2.1 Client Terminal .............................................................................................................................. 1 2.2 Setting up Straticator for Trading ................................................................................................... 2 2.2.1 Broker Accounts ..................................................................................................................... 2 2.2.2 User accounts ........................................................................................................................ 3 2.2.3 Price Markup .......................................................................................................................... 5 2.2.4 Leverage ................................................................................................................................ 6 2.2.5 Risk Book ............................................................................................................................... 8 2.2.6 Money Manager ..................................................................................................................... 8 2.3 The Broker Menu ......................................................................................................................... 10 2.3.1 Sub-Brokers ......................................................................................................................... 11 2.3.2 User Account Balance Live .................................................................................................. 12 2.3.3 Reports Live Accounts ......................................................................................................... 14 Account Transactions ............................................................................................................... 15 Trades ...................................................................................................................................... 15 Trade Statistics ........................................................................................................................ 16 Active Orders ........................................................................................................................... 17 Order History ............................................................................................................................ 17 Currency Exposure................................................................................................................... 18 Symbol Exposure ..................................................................................................................... 19 Trade Volume Report ............................................................................................................... 19 Hourly Short-Long Trade .......................................................................................................... 19 Fee Transaction Report ............................................................................................................ 20 Interest Transaction Report ...................................................................................................... 20 Trade Revenue ........................................................................................................................ 21 2.3.4 Deposit and Withdrawal ....................................................................................................... 21 Deposit ..................................................................................................................................... 21 Withdraw .................................................................................................................................. 22 Correction................................................................................................................................. 23 2.3.5 FIX ....................................................................................................................................... 23 FIX Trades ............................................................................................................................... 24 2.3.6 Risk Book ............................................................................................................................. 24 Set Limits ................................................................................................................................. 25 Bank Reconciliation .................................................................................................................. 25 2.3.7 Server Logs.......................................................................................................................... 26 2.3.8 Users ................................................................................................................................... 27 2.3.9 Login Report ........................................................................................................................ 32 2.3.10 View ................................................................................................................................... 33 i Robot Status ............................................................................................................................ 34 Backtest Results....................................................................................................................... 34 External Accounts .................................................................................................................... 35 Limit Orders.............................................................................................................................. 35 2.3.11 Setup ................................................................................................................................. 36 Sales Person ............................................................................................................................ 37 Broker Accounts ....................................................................................................................... 37 PriceMarkup Groups ................................................................................................................ 39 Leverage Groups...................................................................................................................... 41 ii Table of Figures Figure 1: The Broker Menu ................................................................................................................ 10 Figure 2: Sub-Brokers Screen ........................................................................................................... 11 Figure 3: Reports. Live Accounts Sub-Menu ..................................................................................... 11 Figure 4: Users Sub-Menu................................................................................................................. 12 Figure 5: User Account Balance ........................................................................................................ 12 Figure 6: Reports Sub-Menu ............................................................................................................. 13 Figure 7: Profit- Loss Report.............................................................................................................. 13 Figure 8: Reports. Live Accounts Sub-Menu ..................................................................................... 14 Figure 9: Account Transactions Screen ............................................................................................. 15 Figure 10: Trades Screen .................................................................................................................. 16 Figure 11: Trade Statistics Screen..................................................................................................... 16 Figure 12: Active Orders Screen........................................................................................................ 17 Figure 13: Order History .................................................................................................................... 18 Figure 14: Currency Exposure Screen ............................................................................................... 18 Figure 15: Symbol Exposure Screen ................................................................................................. 19 Figure 16: Trade Volume Report ....................................................................................................... 19 Figure 17: Hourly Short-Long Trade Report ....................................................................................... 20 Figure 18: Fee Transaction Report Screen ........................................................................................ 20 Figure 19: Interest Transaction Report .............................................................................................. 20 Figure 20: Trade Revenue Screen..................................................................................................... 21 Figure 21: Deposit and Withdrawal Sub-Menu................................................................................... 21 Figure 22: Deposit Screen ................................................................................................................. 22 Figure 23: Withdrawal Screen ........................................................................................................... 23 Figure 24: Correction Screen............................................................................................................. 23 Figure 25: FIX Sub-Menu .................................................................................................................. 24 Figure 26: FIX Trades........................................................................................................................ 24 Figure 27: Risk Book Sub-Menu ........................................................................................................ 25 Figure 28: Set Limits.......................................................................................................................... 25 Figure 29: Bank Reconciliation Screen .............................................................................................. 26 Figure 30: Logs Tab Screen .............................................................................................................. 26 Figure 31: Queues Tab Screen ......................................................................................................... 27 Figure 32: FIX Tab Screen ................................................................................................................ 27 Figure 33: The User Screen .............................................................................................................. 28 Figure 34: Create New User Screen .................................................................................................. 28 Figure 35: The User Information Screen ............................................................................................ 29 Figure 36: Actions Sub-menu ............................................................................................................ 29 Figure 37: Conformation Message to Terminate all Robots ............................................................... 30 Figure 38: Confirmation Message for Stop Out Call ........................................................................... 30 Figure 39: Password Change Form ................................................................................................... 31 Figure 40: FIX Accounts Screen ........................................................................................................ 31 Figure 41: Assign FIX Account .......................................................................................................... 31 iii Figure 42: Assign FIX Account .......................................................................................................... 32 Figure 43: Confirmation Message for Guest User Account Extended ................................................ 32 Figure 44: Login Report Sub-Menu.................................................................................................... 33 Figure 45: Login Report ..................................................................................................................... 33 Figure 46: Active Users ..................................................................................................................... 33 Figure 47: View Submenu ................................................................................................................. 33 Figure 48: Robot Status Screen ........................................................................................................ 34 Figure 49: Detailed Status ................................................................................................................. 34 Figure 50: External Accounts............................................................................................................. 35 Figure 51: Number of Limit Orders .................................................................................................... 36 Figure 52: Details of Limit Orders ...................................................................................................... 36 Figure 53: Setup Submenu ................................................................................................................ 37 Figure 54: Sales Person Screen ........................................................................................................ 37 Figure 55: Add Sales Person ............................................................................................................. 37 Figure 56: My Accounts Screen ......................................................................................................... 38 Figure 57: Create Account Screen..................................................................................................... 38 Figure 58: The Account Screen ......................................................................................................... 39 Figure 59: PriceMarkup Screen ......................................................................................................... 40 Figure 60: Add PriceMarkup Group ................................................................................................... 40 Figure 61: Confirmation Message ...................................................................................................... 40 Figure 62: List of Symbols ................................................................................................................. 41 Figure 63: Confirmation Message ...................................................................................................... 41 Figure 64: Leverage Screen .............................................................................................................. 41 Figure 65: Create Leverage Group .................................................................................................... 42 iv Introduction 1 1.1 Preface The purpose of this document is to give a brief about Straticator from a broker’s point of view. This document also explains the working of the application along with a brief description of all the options available for a broker in Straticator. This document is intended for the new or experienced broker, who needs to start up a brokerage company, get clients and be fully involved in the financial markets. 1.2 References Topic Web Sites/ Related Documentation References About Straticator www.straticator.com Client Terminal User Manual v Straticator 2 Straticator includes all elements to perform brokerage services in the financial markets. Henceforth, with Straticator, you can start up your own brokerage company, get your own clients and get fully involved in the financial markets. The core elements of Straticator for a broker are: 1. Client terminal 2. Broker accounts 3. User accounts 4. Price Markup, fee and interest 5. Leverage and Margin control 6. Risk book control 7. Registration 8. Reporting 2.1 Client Terminal Client terminal is the User Interface (UI), which enables a user to trade through his account. It is a Modern architecture built using Microsoft .NET, Silverlight, SQL Server and Internet Information Server (IIS). The user connects to the trading system using browser on a PC or Mac. The browser is responsible for all presentations to the users and accepts all users’ input and sens it to the Host Server. The Straticator is a combined manual and Algo-Trading platform that combines charting and analytic tools with computer aided trading. We have dramatically lowered the bar for writing Strategies and turn them into automated trading robots. Straticator has a comprehensive charting module, where any number of currency pars, Standard Technical Indicators, Personal Indicators, and Japanese Candlestick Patterns can be applied to a chart. This chart forms the foundation for a strategy and a user can easily convert a chart into a strategy. 1 A user has the following tools available for building automated trading: 1. 2. 3. 4. 5. 6. 7. Built Charts Create new strategies Use pre-built strategies for trading Back-test and optimize the pre-built strategies Share the strategies with other users Convert comprehensive set of indicators and candlestick patterns into a strategy Create robot from any strategy For more information on client terminal refer to the User Manual 2.2 Setting up Straticator for Trading When a broker is signed up on Straticator, he needs to setup a Trading environment. This setup consists of the following parts: 1. Broker accounts 2. User accounts 3. Price markup 4. Leverage levels 5. Risk book levels Once these 5 setups are in place, a user (and a user account) can be created. Money can be deposited and the user can start to trade. 2.2.1 Broker Accounts A Broker Account represents a physical account in the bank. This account is in a fixed currency. The broker creates a Broker Account for each currency he supports. All equities on these accounts belong to the users. This is a sum account that holds equity for a group of users. 2 Deposits, withdrawal, earnings, and losses are calculated in the account currency. A broker should typically create at least the following 3 broker accounts: 1. One in Euro (EUR) 2. One in Dollars (USD) 3. One in his national currency This way, the user can operate with 3 different currencies; one local currency and two international currencies. 2.2.2 User accounts A user account is a sub account to a broker account. So every user account belongs to one broker account. This implies that a user account will be in the same currency as that of the broker account. A user can have as many accounts as he wants; more than one per currency. A user creates the user account himself and gives it a name. The user needs to pick one of the currencies, which is represented by the Broker Accounts. The User can also create a Demo account. A demo account can be in any currency and is not linked to a broker account. Since a demo account is not linked to a broker account, all trades on a demo accounts do not affect equity on the broker account. A broker can perform the following operations on user account: 1. Deposit money in user account 2. Withdraw money from user account 3. Make corrections to the equity on the user account Deposit If a user needs to deposit money on the user account, he needs to deposit money in the bank on the broker’s account, to which the user account belongs to. The user needs to specify the UserId (LoginId) in the Message to account hold field on the physical bank transaction, while depositing the money. A user needs to specify only the LoginId, when the user has only one user account per broker account. However, the user needs to specify the user account in which he needs to deposit the money, if the user has more than one user account per broker account. The syntax used for the latter case is LoginId/UserAccountId. Every day or more than once a day, the broker needs to print out a bank statement of the bank’s broker account, to see all the new deposits that users have deposited. 3 After reviewing the bank statement the broker needs to open the Broker menu and select the Deposit option. The broker selects the broker account from a dropdown box in the top and a grid and specifies the LoginID/Account in the first field and the amount deposited in the second field. After specifying the details, the broker clicks on the Save button and takes a print. Finally, the broker clicks on the Post button to register the deposits on the user account and on the broker account. When a user or a user account is not found, an error message is displayed and no deposits are posted. All lines have to be valid before they are posted. Once all lines a valid they are all posted and then deleted from the grid. The deposit transactions can be found on the individual user account under the menu point Account Transactions. Withdrawal When a user needs to withdraw money from his account, he informs the broker and asks to credit his account with that amount. After receiving the withdrawal request from a user, the broker opens the Broker menu and selects the Withdrawal option. The process of withdrawal follows the same workflow as in the case of a deposit. The broker selects a broker account and enters the LoginId/Account and then enters the amount to be withdrawn. The amount should be entered as a positive number. Once the lines are posted, the user accounts is credited for the amount. Following this, the broker transfers the amount to the physical bank account specified by the user, to move the money from the client account to the user account. Correction The broker can even make corrections to the equity on the user account. The broker needs to open the Broker menu and select the Correction option to display the same grid as in Deposit and Withdrawal. The broker then needs to specify the LoginId/Account and the amount. Note: If the amount is positive then the correction process registers and adds money to the user account. And if the amount is negative, then the correction process subtracts money from the user account. 4 2.2.3 Price Markup A broker earns profit through price markup. The Broker has a contract with a liquidity provider, typically a bank, which steams quotes to Straticator. These quotes are then marked up and presented to the user in the trading terminal. If user submits an order, the order is passed to the bank on the broker’s trading account. When the order comes back as a trade, the price on this trade is marked up and used as the trading price in the user’s account. This way the broker earns a profit on every trade. A broker can also add a fixed fee to the trades, which the user has to pay, and earn profit on a user trade. In yet another way, a broker can add overnight interest on open positions when the market rolls over at 5.00 p.m. New York Time and earn profit on a user trade. The broker first needs to create a Price Markup Group, which has a name and a list of all symbols to be traded. For each symbol the broker needs to specify a price markup, fee, and interest. A broker can create as many price markup groups as desired and mark one of them as Default. This Default price markup group is automatically assigned to all new users that are created in the system. The broker can also assign a price markup group to a user. This enables the broker to differentiate users; for example, some users have a higher trading cost than others. Note: Price markup is entered in pips. The following apply when price markup is added to the quotes price and the trading price from the bank: 1. If the price is an Ask price, the price markup gets added to the price received from the bank 2. If the price is a Bid price, the price markup gets subtracted from the price received from the bank 3. If user is trading a volume that is less than PriceMarkupLevel1 then MarkupPrice1 is used 4. If user is trading a volume that is greater than or equal to PriceMarkupLevel1 and less than PriceMarkupLevel2, MarkupPrice2 is used 5. If user is trading a volume that is greater than or equal to PriceMarkupLevel2 and less than PriceMarkupLevel3, MarkupPrice3 is used 6. If user is trading a volume that is greater than or equal to PriceMarkupLevel3 then MarkupPrice4 is used 5 The broker can also add fees on both buy as well as sell transactions. The fee is in the counter currency. For example, if the symbol being traded is EURUSD, then fee is in USD and if the symbol traded is USDJPY, then fee is in JPY. The fee appears as a separate field on each trade. The following apply when fee is added to a transaction: 1. If user is trading a volume that is less than FeeLevel1 then Fee1 is added 2. If user is trading a volume that is greater than or equal to FeeLevel1 and less than FeeLevel2, then Fee2 is added 3. If user is trading a volume that is greater than or equal to FeeLevel2 and less than FeeLevel3, then Fee3 is added 4. If user is trading a volume that is greater than or equal to FeeLevel3, then Fee4 is added When you define interest, there is a Long interest and Short interest per symbol. Interest is entered as an annual % rate. For each roll over 1/360 of the interest is added as roll over interest. The following apply when a rollover interest is added to the position: 1. If user has a long position the Long interest is used, and if user has a short position the Short interest is used 2. If interest rate is positive, then the user pays interest. On the other hand, if the rate is negative then the user receives interest. 3. The open position is calculated per symbol per user account and interest is added per symbol per account. The interest will appear on the user account statement. 2.2.4 Leverage The idea about leverage is that you can invest for a larger amount of money than you have deposit in your account. The upside of leverage is that you can earn more money, since a small increase in price can give you a greater return on your equity invested. Of course, the downside is that you can lose more money with a small drop in price. How to calculate and control Leverage: The products are grouped into Forex, CFD, Futures, Commodities and Shares. Each group has its own leverage level. For example, we have Forex leverage at 50 and CFD Leverage at 10. If you buy Forex for 100.000 Dollars, you need to spend (100.000 / 50) = 2.000 Dollars of your Equity in your account to buy the Forex. 6 For example, if you have deposited 10.000 Dollars in your account and used 2.000 Dollars of your Equity, it is called “Margin used is 2.000 Dollars”. Margin used in % is (100 * 2.000/10.000) = 20%. If you further buy CFD’s for 25.000 dollars, you spend (25.000 / 10) = 2.500 dollars. You have now spent 4.500 Dollars in Margin Used, and therefore Used Margin % is (100 * 4.500 / 10.000) = 45%. Let us assume that your investments are going well and prices are moving up, so you have an unrealized profit. If you have an unrealized profit of 3.000 dollars, your equity in your account now be 10.000 + 3.000 = 13.000 dollars. And your Used Margin % is (100 * 4.500/ 13.000) = 35%. On the other hand, if you had a loss of 3.000 dollars your Used Margin % would then be (100*4500/7000) = 64%. In your account, you have Leverage Group. First of all, this group specifies how much leverage you have on each product, but it also defines some levels on how high your Used Margin % is allowed. These levels are: Max Entry Level: If you place a new order, and the order results in exceeding the usage of your Used Margin %, the order is rejected. The Used Margin % could be even 50%. Warning Level 1-3: The Used Margin % increases, if you lose money on your open investments. If the Used Margin % reaches above level 1 you get a first warning, and so on with 2 and 3. These levels could be 60 %, 70 %, and 80 %. Stop Out Level. Straticator exits all positions, If the Used Margin % reached stop out level. You, therefore, no longer have any investments and the Used Margin % reaches down to 0%. The Stop out level could be 90%. You, as a user should either exit some of the position when your Used Margin % reach the Warnings levels, or you could deposit more money, in order to bring down your Used Margin %. The user himself can define a lower level than the level defined by the Leverage group. This way the user can set a lower risk level that the level set by the broker. 7 2.2.5 Risk Book When an order is submitted for trading, it is first passed through the Risk Book. The risk book controls if the order is sent to the bank or it is put on the broker’s Own risk book. If an order is put on the broker’s own risk book, the trading price becomes last seen price from the bank. If the order is sent to the bank, the price given is the price of the trade returned from the bank. When defining a risk book, the following fields per instrument (symbol) that can be traded, need to be specified: 1. Max Long Exposure 2. Max Short Exposure 3. Order Quantity The Risk book makes sure that the risk position size on their own book stays within Max Long Exposure and Max Short Exposure limits. When a new order is added to the Risk Book, and the limits are exceeded, then and order is sent to the banks to bring down the risk so that it is within the limits. The order size is in multiple of the Order Quantity. The order, that brought the Risk book above its limits, is kept “on hold” until the price of the trade from the bank is known. Once the trade comes back, the order is then given the price. The reason for that is that it could be a large order that triggered the bank order. 2.2.6 Money Manager In the modern challenging world it is vital to be aware of the numerous investing opportunities. You need to make an informed choice, accept the profitable ones and reject unsecure and risky offers. But there have always been two very special categories of clients: People who would like to diversify their investments and benefit from Forex and CFD trading but have no time or skills to do in-depth market research, trade and monitor positions themselves; Professional money managers who would like to manage funds many times exceeding their own capital receive a guaranteed fee for that. Straticator introduces a new investing tool that can make interaction between Money Managers and Investors more effective, honest, flexible and transparent. It is an innovative, full-featured LAMM (Lot Allocation Management Module) service. 8 This system consists of one account of the Money Manager and multiple individual accounts of the investors. The Money Manager trades on his personal account and all transactions (both profitable and unprofitable), are manifested on the accounts of the investors. The Money Manager setup up a “portfolio account” and then all investments made on this account is “replicated” on to clients’ accounts, which is setup to follow the portfolio account. The investor operates his account, thus, the transactions carried out by Money Managers are automatically copied on each investors' account. The results of this trade are determined by the profitability of these transactions. The Investor can join any number of Money Manager with different profiles to diverse his investments and may at any time disconnect his account from the Money Manager. The whole process is carried out in following steps: 1. 2. 3. 4. Admin creates a new User or opens the existing user details. Admin assigns the Money Manager task to the new or existing user. Money Manager User logs in and creates portfolio accounts. Other users can follow money managers once they have shared the portfolio accounts. 9 2.3 The Broker Menu This section explains the working of the application along with brief description of all the options available for a broker on the Straticator platform. The options under Broker menu, as shown in figure below are: Figure 1: The Broker Menu User Account Balance Live Reports Live Accounts Demo Deposit and Withdrawal FIX Server Log Users Login Report View Setup Help 10 2.3.1 Sub-Brokers The Sub-Broker option enables the broker to view list of brokers under the main broker. One can also create users under a sub-broker, view login report, and add price markup groups and leverage groups. To view list of sub-brokers: 1. Open Straticator. 2. Select the Broker Sub-Brokers option to open the Sub-Brokers screen, as shown in figure below: Figure 2: Sub-Brokers Screen The figure above displays details of all sub-brokers under a broker. The broker can also view detailed reports, such as account transactions, fee transaction report, and user account balance for a specific sub-broker. A sub-menu appears when broker clicks on the Reports. Live Accounts button. Figure below displays the sub-menu: Figure 3: Reports. Live Accounts Sub-Menu The broker needs to select a sub-broker and then select any of the option from the submenu to display corresponding report. 11 Note: For detailed explanation on the above options you can refer to the section 2.3.3 The sub-menu which appears when one clicks on the Users button, is displayed in the following figure: Figure 4: Users Sub-Menu The Broker can view the Users screen and Login Report. 2.3.2 User Account Balance Live The User Account Balance Live option enables the broker to view account balance of all live users under him. To view Live User Account Balance: 3. Open Straticator. 4. Select the Broker User Account Balance Live option to open the Account Balance screen, as shown in figure below: Figure 5: User Account Balance The figure above displays account balance of all live users under a broker. The broker can also view detailed reports, such as statement, profit-loss report, and account transactions for a specific user. 12 When the broker clicks on the Reports button, a sub-menu appears as shown in figure below: Figure 6: Reports Sub-Menu The broker needs to select a user and then select any of the option from the Reports submenu to display corresponding report. For example a sample screen for Profit-Loss Report of UID 380 is shown in figure below: Figure 7: Profit- Loss Report Similarly a broker can view any report corresponding to the selected user. 13 2.3.3 Reports Live Accounts This option enables a broker to view account transaction details, active orders, trading details, and history of all orders under an account. Figure below displays the Reports Live Accounts sub menu: Figure 8: Reports. Live Accounts Sub-Menu Account Transactions Trades Trade Statistics Active Orders Order History Currency Exposure Symbol Exposure Trade Volume Report Hourly Short-Long Trade Fee Transaction Report Interest Transaction Report Trade Revenue 14 Account Transactions A broker needs to be informed about all the transactions in all user accounts under him. To view the transaction details of user accounts: 1. Open Straticator. 2. Select the Broker Reports Live Accounts Account Transactions option to open the Account Transactions screen. 3. Specify the start date-time and end date-time, the duration for which you need to view the transaction details. 4. Click on the Search button to display the transaction details, as shown in the figure below: Figure 9: Account Transactions Screen The figure above displays transaction details, such as user ID, date and time, amount, and the type of transaction. Trades This option of the Brokers menu enables the broker to view list of all trading executed through the broker’s account. To view the list of all trading: 1. Open Straticator. 2. Select the Broker Reports Live Accounts Trades option to open the Trades screen. 3. Specify the start date-time and end date-time, the duration for which you need to view the trading details. 4. Click on the Search button to display the details, as shown in the figure below: 15 Figure 10: Trades Screen Trade Statistics This option of the Brokers menu enables the broker to view trade statistics for all the trades executed through the broker’s account. To view the statistics: 1. Open Straticator. 2. Select the Broker Reports Live Accounts Trade Statistics option to open the Trade Statistics screen. 3. Specify the start date-time and end date-time, the duration for which you need to view the statistics. 4. Click on the Search button to display the details, as shown in the figure below: Figure 11: Trade Statistics Screen 16 Active Orders This option of the Brokers menu enables the broker to view list of all active orders under a broker’s account. To view the list of active orders: 1. Open Straticator. 2. Select the Broker Reports Live Accounts Active Orders option to open the Active Orders screen. 3. Specify the start date-time and end date-time, the duration for which you need to view the active orders details. 4. Click on the Search button to display the active orders, as shown in the figure below: Figure 12: Active Orders Screen The figure above displays order details, such as symbol, duration, volume, and the type of order. Order History The broker can use this option to view the history of all orders that have been executed in the past. To view the order history: 1. Open Straticator. 2. Select the Broker Reports Live Accounts Order History option to open the Order History screen. 3. Specify the start date-time and end date-time, the duration for which you need to view the active orders details. 4. Click on the Search button to display the order history, as shown in figure below: 17 Figure 13: Order History Currency Exposure This option enables the broker to check the percentage of trade for a symbol or currency. To view the exposure of a symbol or currency: 1. Open Straticator. 2. Select the Broker Reports Live Accounts Currency Exposure option to open the Currency Exposure screen, as shown in the figure below: Figure 14: Currency Exposure Screen 18 Symbol Exposure Alternatively, Select the Broker Reports Live Accounts Symbol Exposure option to open the Symbol Exposure screen, as shown in the figure below: Figure 15: Symbol Exposure Screen Trade Volume Report This option enables a user to view the Trade Volume report. Figure below displays the report screen: Figure 16: Trade Volume Report Hourly Short-Long Trade This option enables a user to view the Hourly Short-Long Trade report. Figure below displays the report screen: 19 Figure 17: Hourly Short-Long Trade Report Fee Transaction Report This option enables the user to view a report for all fee transaction corresponding to an account. Figure below displays the Fee Transaction Report screen: Figure 18: Fee Transaction Report Screen Interest Transaction Report This option enables the user to view a report for all interest transaction corresponding to an account. Figure below displays the Interest Transaction Report screen: Figure 19: Interest Transaction Report 20 Trade Revenue This option enables the user to view a report for trade revenue corresponding to an account. Figure below displays the Trade Revenue screen: Figure 20: Trade Revenue Screen 2.3.4 Deposit and Withdrawal This option in the Broker’s menu enables a broker to perform the following accounting related tasks: Deposit in user account Withdraw from user account Correction in transaction Figure below displays the Deposit and Withdrawal sub-menu: Figure 21: Deposit and Withdrawal Sub-Menu Deposit 21 To deposit an amount in user account: 1. Open Straticator. 2. Select the Broker Deposit and Withdrawal Deposit option to open the Deposit screen, as shown in the figure below: Figure 22: Deposit Screen 3. Select the broker account from a dropdown box in the top. 4. Click on the button at the bottom to add a new grid. 5. Specify LoginID/Account in the first field and the amount to be deposited in the second field. 6. Save the information. 7. Click on the Post button to send the request for deposit to the bank. Note: Export Button - A broker can click on Export button to export all the entries for deposit in an Excel file for his own reference. Import Button – A broker can click on Import button to import all the entries for deposit from an Excel file into the application from where he can directly post all the entries for deposit. Print Preview Button – A broker can click on the Print Preview button to view the print preview of all the entries for deposit. Withdraw To withdraw an amount from the user account: 1. Open Straticator. 2. Select the Broker Deposit and Withdrawal Withdraw option to open the Withdraw screen, as shown in the figure below: 22 Figure 23: Withdrawal Screen 3. Select the broker account from a dropdown box in the top. 4. Click on the button at the bottom to add a new grid. 5. Specify LoginID/Account in the first field and the amount to be withdrawn in the second field. 6. Save the information. 7. Click on the Post button to send the request for withdrawal to the bank. Correction To correct a transaction in the user account: 1. Open Straticator. 2. Select the Broker Deposit and Withdrawal Correction option to open the Correction screen, as shown in the figure below: Figure 24: Correction Screen 3. Select the broker account from a dropdown box in the top. 4. Click on the button at the bottom to add a new grid. 5. Specify LoginID/Account in the first field and the amount to be corrected in the second field. Note: You need to specify the amount in negative in case the transaction is for withdrawal and in positive if the transaction to be corrected is for a deposit. 6. Save the information. 7. Click on the Post button to send the request for correction to the bank. 2.3.5 FIX FIX is a connection between Straticator and the bank. Figure below displays the FIX submenu: 23 Figure 25: FIX Sub-Menu FIX Trades This option enables one to view list of FIX trades. Figure below displays a list of FIX Trades: Figure 26: FIX Trades 2.3.6 Risk Book A broker can view the Risk Book option only if the administrator has provided rights for the same. 24 Select the Broker Risk Book option to display a sub-menu, as shown in figure below: Figure 27: Risk Book Sub-Menu Set Limits This option enables a broker to set a limit for long exposure and shot exposure for each symbol. To open the risk book: 1. Open Straticator. 2. Select the Broker Risk Book Set Limits option to open the Set Limits screen, as shown in figure below: Figure 28: Set Limits 3. Double-click on any value corresponding to a symbol to edit the same. 4. Save all the changes. Bank Reconciliation This option enables a broker to synchronize the correct value of a symbol with a bank. To synchronize: 1. Open Straticator. 2. Select the Broker Risk Book Bank Reconciliation option to open the screen, as shown in figure below: 25 Figure 29: Bank Reconciliation Screen 3. Modify the values and post the changes. 2.3.7 Server Logs This option displays the log details, queue, and FIX for information purpose. To open Server Logs: 1. Open Straticator. 2. Select the Broker Server Logs option to open the screen. The Server Log screen has three tabs: a. Logs, as shown in the figure below: Figure 30: Logs Tab Screen 26 b. Queues, as shown in figure below: Figure 31: Queues Tab Screen c. FIX, as shown in figure below: Figure 32: FIX Tab Screen 2.3.8 Users A broker can interact with more than one user who can trade under him. Straticator provides the option for a broker to create more than one user. To create a user: 27 3. Open Straticator. 4. Select the Broker Users option to open the users screen, as shown in the figure below: Figure 33: The User Screen The figure above displays a list of users under a broker. 5. Click on the Create User button to open the Create New User screen, as shown in the figure below: Figure 34: Create New User Screen 6. Fill in the new user information along with the login information. 7. Save the information to create the user. 28 You, as a broker, can also modify user details, for which you need to: 1. Open the Users screen. 2. Click on the user name that you need to modify, the User information screen appears, as shown in figure below: Figure 35: The User Information Screen 3. Edit the required information and save the changes. While modifying the User information, you can perform all trading tasks through the Trading menu that appears on each users profile, as shown in the figure above. The Actions menu is as follows: Click on the Actions menu to display the sub-menu, as shown in the figure below: Figure 36: Actions Sub-menu 29 The following are the options of the Actions menu: Terminate all robots Stop out call from the bank Change Password Assign Client Id Extend Guest Account Terminate all robots The Terminate all robots option enables the broker to terminate all the running robots. Select the Terminate all robots option to display a confirmation message box, as shown in the figure below: Figure 37: Conformation Message to Terminate all Robots Stop call out from the bank The Stop out call from the bank option enables the broker to stop all the transactions from a bank. Select the Stop out call from the bank option to display a confirmation message box, as shown in the figure below: Figure 38: Confirmation Message for Stop Out Call Change Password 30 The Change Password option enables the broker to change the old password. Select the Change Password option to display a dialog box, as shown in the figure below: Figure 39: Password Change Form Assign Client Id The Assign Client Id option enables the broker to assign an account against a FIX account. Select the Assign Client Id option to display FIX Accounts screen, as shown in the figure below: Figure 40: FIX Accounts Screen The figure above displays one FIX connection against an account. Click on the Add button to display a dialog box, as shown in the figure below: Figure 41: Assign FIX Account 31 Select the type of FIX from the drop down list, specify the account name and type, and click on OK button to assign an account to a FIX account. A broker can click on the FIX name to modify the corresponding FIX. Click on the FIX name to open a dialog box, as shown in figure below: Figure 42: Assign FIX Account In the figure above, a broker can modify the FIX, name, or Account. Extend Guest Account The Extend Guest Account option enables the broker to extend a guest user account usage. Select the Extend Guest Account option to display a confirmation message box, as shown in the figure below: Figure 43: Confirmation Message for Guest User Account Extended 2.3.9 Login Report This option enables the broker to view the login details, such as User Id, Login Id, and time of login along with list of active users. Figure below displays the login report sub-menu: 32 Figure 44: Login Report Sub-Menu Select the Login History option to display all login details, as shown in figure below: Figure 45: Login Report Select the Active Users option to display list of active users, as shown in figure below: Figure 46: Active Users 2.3.10 View This option of the Broker menu enables a broker to view robot status, backtest results, external accounts, and tracking. Figure below displays the View submenu: Figure 47: View Submenu 33 Robot Status The Broker menu enables a broker to view the status of all robots running. To view a robot status, a broker needs to perform the following tasks: 1. Open Straticator. 2. Select the Broker View Robot Status option to open the Robot Status screen, as shown in the figure below: Figure 48: Robot Status Screen The figure above displays a list of all the symbols and the number of robots running corresponding to each symbol. 3. Click on the name of the symbol to view the detailed status of all robots running corresponding to the symbol. The figure below displays the detailed status: Figure 49: Detailed Status Backtest Results 34 A backtest will test a strategy before being executed. This option enables one to view the list of backtest results. You need to select the Brokers View Backtest Result option to view the backtest results. External Accounts This option of the Broker menu enables a broker to view robot status, backtest results, external accounts, and tracking. Figure below displays the View submenu: The external accounts are the accounts of users with the bank. This option enables one to view the list of external accounts. You need to select the Brokers View External Accounts to view a list of external accounts, as shown in the figure below: Figure 50: External Accounts Limit Orders Limit order is an order placed with a brokerage to buy or sell a set number of shares at a specified price or better. Limit orders also enables an investor to limit the length of time that an order can be outstanding before being canceled. Limit orders are beneficial because investors get the specified purchase or sell price during a trade. Limit orders are especially useful on a low-volume or highly volatile stock. This option in the Brokers menu enables a broker to view the Limit Order status. 1. Open Straticator. 2. Select the Broker View Limit Orders option to open the screen, as shown in the figure below: 35 Figure 51: Number of Limit Orders 3. Click on any symbol to view the limit order corresponding to the symbol. Figure below displays limit orders for EURUSD symbol: Figure 52: Details of Limit Orders 2.3.11 Setup This option of the Broker menu enables a broker to change the settings for broker account, price markup group, and leverage group. Figure below displays the Setup submenu: 36 Figure 53: Setup Submenu Sales Person This option enables the broker to create and delete sales person names for the broker account. To create a sales person name: 1. Open Straticator. 2. Select Broker Setup Sales Person option to open the Sales Person screen, as shown in the figure below: Figure 54: Sales Person Screen 3. Click on the Create button to open a screen, as shown in figure below: Figure 55: Add Sales Person 4. Specify the name of the Sales Person and save the information. Broker Accounts The Broker Accounts option in the Broker menu enables a broker to create, modify and view brokers account. To view and create brokers account: 1. Open Straticator. 2. Select the Broker Setup Broker Accounts option to open the Broker Accounts screen, as shown in the figure below: 37 Figure 56: My Accounts Screen The figure above displays a list of accounts. 3. Click on the Create Account button to open Create Account screen, as shown in the figure below: Figure 57: Create Account Screen 4. Specify all the corresponding details for a broker account. 5. Save the information for new account. To modify an existing broker account: 6. Open the My Accounts screen, as in step number 2. 7. Click on the name of the account that you need to modify. An account screen is displayed, as shown in the figure below: 38 Figure 58: The Account Screen 8. Modify the details as required and save the changes. PriceMarkup Groups A Price Markup Group has a name and a list of all symbols to be traded. For each symbol the broker needs to specify a price markup, fee and interest. A broker can create as many price markup groups and mark one of them as Default. This Default price markup group is automatically assigned to all new users which are created in the system. Note: Price markup is entered in pips. To create a Price Markup group: 1. Open Straticator. 2. Select the Broker Setup PriceMarkup Groups option to open the PriceMarkup screen, as shown in the figure below: 39 Figure 59: PriceMarkup Screen 3. Click on the Add Price Markup Group button to open the screen, as shown in the figure below: Figure 60: Add PriceMarkup Group 4. Specify the name of the Price Markup group and save the information, a confirmation message appears, as shown in figure below: Figure 61: Confirmation Message The figure above implicates that the Price Markup group has been created successfully. A broker can add multiple price mark-ups to a single price markup group. To add a price markup: 1. Open the PriceMarkup screen. 2. Click on the Price Markups link corresponding to the group 40 3. When you click on the Price Markups link, a screen, as shown in the figure below is displayed: Figure 62: List of Symbols The figure above displays a list of corresponding symbols to which you can specify the values. 4. Specify all values and save the information; a confirmation message appears, as shown in the figure below: Figure 63: Confirmation Message Leverage Groups A broker creates a Leverage Group to control the equity leverage, for which the broker specifies a factor that the equity on the User account gets multiplied to get the total amount, which the User can then invest. A broker can mark one of the leverage groups as Default, which is automatically assigned to the user. To create a leverage group: 1. Open Straticator. 2. Select the Broker Setup Leverage Groups option to open the Leverage screen, as shown in the figure below: Figure 64: Leverage Screen 41 3. Click on the Create Leverage Group button to open a screen where you can specify all details for a leverage group. Figure below displays the Create Leverage Group screen: Figure 65: Create Leverage Group 4. Specify all details to create the Leverage group. For further details, you can visit http://www.straticator.com/support.html , where you can refer to different support documents. You can also mail at [email protected]. 42