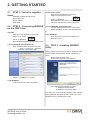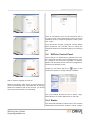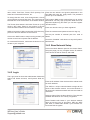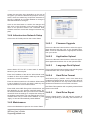
1
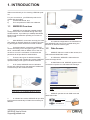
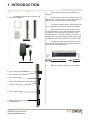
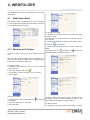
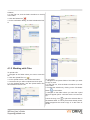
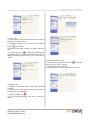
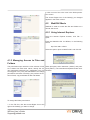
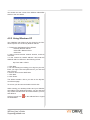
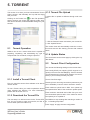
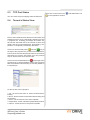
User’s Manual
PORTABLE WIRELESS STORAGE SERVER
English (EN), French (FR), German (DE), Spanish
(ES), Dutch (SE), Italian (IT), Portuguese (PT)
WiDRIVE User’s Guide
[email protected]
COPYRIGHT INFORMATION
Copyright © 2008 EDSLab Technologies Inc. All rights reserved.
EDSLab Technologies Inc. reserves the right to make technical changes. EDSLab Technologies Inc. assumes
no liability for damages incurred directly or indirectly from errors, omissions or discrepancies between this product and the documentation.
Under the copyright laws, this manual may not be copied, in whole or in part, without the written consent of EDSLab Technologies Inc. every effort has been made to ensure that the information in this manual is as accurate
as possible.
WiDrive logo is trademarked.
Other company and product names mentioned herein are trademarks of their respective companies. Mention of
third-party products is for informational purposes only and constitutes neither an endorsement nor a recommendation. EDSLab Technologies Inc. assumes no responsibility with regard to the performance or use of these
products.
EDSLab Technologies Inc.
Email address: [email protected]
Taiwan Department Address: 4F,No.150.,Sec.2.,Nanking E. Rd., Taipei City 10486, Taiwan
Singapore Address:
Tel (Taiwan): +886 2 2506-9338
Tel (Singapore): +65 6871-9918
This manual is provided ``as is’’ without warranty of any kind, express or implied, including but not limited to the
implied warranties or conditions of merchantability or fitness for a particular purpose. In no event shall EDSLab
Technologies Inc. , its directors, officers, employees or agents be liable for any indirect, special, incidental, or
consequential damages (including damages for loss of profits, loss of business, loss of use or data, interruption
of business and the like), even if EDSLab Technologies Inc. has been advised of the possibility of such damages arising from any defect or error in this manual or product.
WiDrive User’s Guide
[email protected]
TABLE OF CONTENT
1. INTRODUCTION
1
1.1
WiDRIVE Overview
1
1.2
Data Access
1
1.3
Indicators and Switches
2
2. GETTING STARTED
3
2.1
STEP 1: Check for supplied items 3
2.2
STEP 2 : Connecting WiDRIVE for the FIRST time
3
2.3
STEP 3 : Installing WiDRIVE Utility 3
3. WiDRIVE CONFIGURATION
4
3.1
WiDRIVE Presets
4
3.2
WiDRIVE Setup Wizard
4
3.3
WiDRIVE Connection Utility
4
3.4
WiDRIVE Control Panel
5
3.4.1 Status
5
3.4.2 Login
6
3.4.3 Base Network Setup
6
3.4.4 Infrastructure Network Setup7
3.4.5 Maintenance
7
3.4.5.1 Firmware Upgrade
7
3.4.5.2 Application Upload
7
3.4.5.3 Language Pack Upload
7
3.4.5.4 Hard Drive Format
7
3.4.5.5 Hard Drive Repair
7
3.4.5.6 WiDRIVE Reboot
8
3.4.5.7 WiDRIVE Shutdow
8
3.4.5.8 Factory Reset
8
3.4.6 Help
8
4. WEBFOLDER
9
4.1
WebFolder Mode
9
4.1.1 Working with Folders
9
4.1.2 Working with Files
10
4.1.3 Managing Access to Files and Folders
12
4.2
WebDAV Mode
12
4.2.1 Using Internet Exporer
12
4.2.2 Using Windows XP
13
5. TORRENT
14
5.1
Torrent Operation
14
5.1.1 Install a Torrent Client
14
5.1.2 Download the Torrent File 14
5.1.3 Torrent File Upload
14
5.1.4 Update Status
14
5.2
Torrent Client Configuration
14
5.3
TCP Port Status
15
5.4
Torrent’s Status View
15
6. QUESTIONS & ANSWERS
16
7. SAFETY AND CARE
17
8. TECHNICAL SPECIFICATIONS
18
9. REGULATORY INFORMATION
19
WiDRIVE User’s Guide
[email protected]
1. INTRODUCTION
Welcome and thank you for choosing a EDSLab product.
For your convenience, your EDSLab product is furnished with two guides:
a)
a Quick Start Guide, and
b)
This comprehensive PDF User’s Manual.
1.1 WiDRIVE Overview
o
WiDRIVE is a pocket-size portable wireless
storage server that is accessible through 802.11b/g
WLAN interface. It provides up to 54Mbps bandwidth
based on WLAN networks operating at 2.4 GHz frequency band.
- Infrastructure mode is used when there is an existing Wireless Router where all wireless Notebooks/
PCs are connected to. WiDRIVE can be configured
to automatically join the wireless network
o
With WiDRIVE, consumers can enjoy the ease
The manual configuration of IP addresses for
and mobility of wireless lifestyle in accessing and shar- o
both
WiDRIVE
and host can be avoided during the
ing their digital content without the hassle of cables.
transition of wireless network types.
o
A wireless network connection to WiDRIVE
can be secured by one of encryption types, i.e. WLAN
64-bit, 128-bit WEP, WPA or WPA2. Prior to the connection to a host, the verification of username and
password will be provided for authentication.
o
There are two types of wireless networks,
Access Point(AP) and Infrastructure modes. WiDRIVE
operates easily in both types of wireless networks.
o
In AP mode, WiDRIVE acts as a Wireless
Router and a DHCP server that assigns IP addresses
to hosts that join the wireless network.
- AP mode is normally used under condition
when there is no available Wireless Router.
1.2 Data Access
o
WiDRIVE offers two mode of data access, the
USB mode and WebFolder mode.
o
In USB mode, WiDRIVE is behaved as an
external storage device.
o
In WebFolder mode, WiDRIVE appears to the
connected computer as a web-based file manager.
- WiDRIVE enables users from different
hardware platforms (PC, PDA, PSP, Set-top
box, etc) to share the content at WebFolder
mode.
o
WiDRIVE operates in both USB mode and
WebFolder mode.
o
In Infrastructure mode, WiDRIVE will join Wireless Routers automatically to obtain the necessary IP
address.
WiDRIVE User’s Guide
[email protected]
- Infrastructure
Network
- AP Network
1
1. INTRODUCTION
1.3 Indicators and Switches
o
The diagram below shows the LEDs and
Switches on WiDRIVE:
o
Power Indicator LED is status indicator for
charging:
o
Activity Indicator LED is the status indicator for
data transfer. The BLUE indicator light will commence
flashing during data transfer or communication.
o
The Power ON/OFF button near the upper left
corner of WiDRIVE is to switch on and off WiDRIVE
WiDRIVE
o
When booting up, the Power Indicator LED
will stay ORANGE in color until WiDRIVE completes
its booting process and ready for operation. If successfully boot up, the Power Indicator LED will turn to
GREEN color. The Power Indicator LED will also turn
to ORANGE color during shutdown and factory reset.
o
The Network Type Selection switch near the
lower left corner of WiDRIVE is to select the wireless
network type (AP/Infrastructure).
DC- Power Adapter
AP Mode
Infrastructure Mode
o
Refer to the figure above for further details.
Power indicator LED•
Activity indicator LED•
Factory reset button•
USB 2.0 high speed data port•
DC power charge port•
Power ON/OFF button•
Network Type Selection switch•
(AP/Infrastructure)
WiDRIVE User’s Guide
[email protected]
2
2. GETTING STARTED
2.1 STEP 1: Check for supplied
items
WiDRIVE portable storage server
Quick start guide
Power adapter
USB cable
2.2 STEP 2 : Connecting WiDRIVE
for the FIRST time
AP mode:
Make sure that WiDRIVE is power off.
Swtich to AP mode.
Power on WiDRIVE.
Now WiDRIVE behaves like a wireless router.
Connect WiDRIVE with Windows XP:
Open Wireless Newwork Connection tool.
1. Start -> Connect to -> Wireless
Network Connectoion page
Infrastructure mode:
Make sure that WiDRIVE is power off.
Swtich to infrastructure mode.
Power on WiDRIVE.
Now WiDRIVE connects to a wireless router
which you had defined in AP mode before.
Connect WiDRIVE with Windows XP:
Connect devices like PC to the same router.
Search WiDRIVE by using *the WiDRIVE utility.
Login WiDRIVE:
Open browser and type in the searched IP
address to log in.
2.3 STEP 3 : Installing WiDRIVE
Utility
Setup program can be found in HDD or download from
official website. Please install utilities with following
steps:
Double click the setup icon.
Follow instructions to install software.
Select on “WiDRIVE“ to connect.
Login WiDRIVE:
Open browser with: http://192.168.2.1
Two utilities will be available includes:
1. WiDRIVE Setup Wizard.
2. WiDRIVE Connection Utility.
The first one is used to quickly configure basic settings
within WiDRIVE, and another one is used to discover
WiDRIVE when in infrastructure mode.
WiDRIVE User’s Guide
[email protected]
3
3. CONFIGURATION
3.1 WiDrive Presets
WiDrive comes pre-configured from the factory with the
following settings:
IP Address
: 192.168.2.1
Subnet Mask : 255.255.255.0
Wireless Channel : 10
SSID : WiDrive
WEP/WPA/WPA2 Key : none
These factory settings can be changed.
Admin Username Admin Password Guest Username Guest Password : Admin
: admin
: Guest
: guest
3.2 WiDrive Setup Wizard
WiDrive Setup Wizard provides step-by-step configuration of WiDrive in AP and Infrastructure modes.
3.3 WiDrive Connection Utility
Step 1: Start WiDrive Connection Utility from the Start
menu.
WiDrive User’s Guide
[email protected]
4
There is a dropdown menu for the username field in
the login screen. Select Username (“Admin”) and type
Password (factory configured password “admin”) then
click “Login”.
If the device has not been configured, use the default
admin password. You will later want to change the
Password entries from the default (admin) to something
else.
3.4 WiDrive Control Panel
Control Panel is a Web-browser graphical user interface (GUI) that provides a structured approach to monitor, configure, and control the operation of WiDrive.
WiDrive can be setup into AP mode and configured for
infrastructure wireless access.
Clicking on the Control Panel icon
opens a new
screen with options to change settings of WiDrive.
Step 2: Select a highlight from the list.
WiDrive Connection Utility launch a web browser and
have it automatically open a specified URL by fetching
WiDrive’s IP address. After a few seconds, you should
see a login screen similar to the following:
The Control Panel provides access to Status, Login,
Base Network, AP Profile, Maintenance, and Help.
3.4.1Status
The Status panel displays runtime status. This includes
details about the hard drive, wireless, TCP/IP configu-
WiDrive User’s Guide
[email protected]
5
ration, SSID, Time Zone, Torrent, UPnP portmap, Port Enter the new admin’s and guest’s passwords in the
status and connected PC/device, etc.
two fields and press the Apply button. The password
can be up to 12 characters.
To change the time zone, click Change button, choose
your local time zone and click Save. The current time of The Dynamic DNS Access option allows you to set the
selected time zone will be shown in the Status window. DNS server. You may sign up Dynamic DNS service at
http://www.dyndns.org and there you can also register
The Torrent Client status is ON when Torrent is up and “domain names”.
running, OFF when Torrent is not running in the AP
mode and Need Install if Torrent software is missing.
Enter one domain name you have registered.
WiDrive Connection Utility requires the UPnP discovery Enter the username and password used for sign-up.
protocol to discover WiDrive on the network.
Set the port number of external port from 1025 to
Click on the ‘MAP’ button to map Incoming packet’s port 65535.
number to the local computer with IP address.
Check the “Disabled” radio button to stop the Dynamic
On connected PC/device, make sure the device is con- DNS service.
nected to your computer.
3.4.3Base Network Setup
Click on the Basic Network panel on the Control Panel.
Using this page you may configure the the IP address
of the device as well as channel, and SSID.
3.4.2Login
The Login panel is where the administrator defines the
Admin and Guest accounts, and Dynamic DNS Access.
Enter the IP address of the device and the subnet mask
for the IP address.
The SSID is a unique named shared amongst all the
points of the wireless network. It must be identical on
all points of the wireless network and cannot exceed 32
characters.
Select a channel from the drop-down list. The channels
available are based on the country’s regulation.
Select Disable radio button if your wireless network
does not use any type of encryption, WEP 64, WEP
128, WPA, or WPA2 radio button if your wireless network uses this encryption.
WiDrive User’s Guide
[email protected]
6
Create the encryption keys depending on the type of
encryption you choose. 64bit-hex keys require 10 characters, where as 128-bit keys require 26 characters. A
hex key is defined as a number between 0 through 9
and letter between A through F.
Click on the Save button to confirm the changes and
then click on the OK button on the Success dialog to
return to the pervious window. The countdown timer
will start at 50 secs once these changes have been applied.
3.4.4Infrastructure Network Setup
Click on the AP Profile panel on the Control Panel.
3.4.5.1
Firmware Upgrade
Click on the Browse button and then select the appropriate firmware and then click on the Upload button.
Make sure that downloaded the appropriate firmware
from your vendor.
3.4.5.2
Application Upload
Click on the Browse button and then select the appropriate application and then click on the Upload button.
3.4.5.3
Language Pack Upload
Select Obtain IP From AP or enter static IP address Click on the Browse button and then select the language
to add and then click on the Upload button.
based on your network plan.
Enter the IP address of the device. When Mode is set 3.4.5.4
Hard Drive Format
to Obtain IP From AP, this field is read-only and reports
the device’s current IP address.
You’ll format (only 1 partition: 100% of the hard drive)
or split the hard drive (50:50, 25:75 or 75:25) in place of
Enter the subnet mask for the IP address. When Mode the list of the partitions. You may need to wait for some
is set to Obtain IP From AP, this field is read-only and minutes as it takes time to format the hard drive.
reports the device’s current subnet mask.
CAUTION: This operation will completely erase all data
Enter SSID, select WEP Encryption to be 64 bits or 128 stored on the HDD.
bits depending on your wireless router/AP setting. Enter the exact same KEY that your used for the wireless
Hard Drive Repair
router/AP. Save the settings to complete the change of 3.4.5.5
the wireless router SSID. The new settings have no immediate effect until you either reboot WiDrive or press Click the Repair button. This will start the process of
verifying and repairing, if necessary, the hard drive vol“Apply” to save and automatically restart WiDrive.
ume.
3.4.5Maintenance
Click on the Maintenance panel on the Control Panel.
WiDrive User’s Guide
[email protected]
7
3.4.5.6
WiDrive Reboot
Click on the Reboot button to reload the device. Wait
several minutes for the device to reboot.
3.4.5.7
WiDrive Shutdown
Click on the Shutdown button to perform a soft shutdown.
3.4.5.8
Factory Reset
Click on the Reset button to reset the device to its factory default settings. Alternatively, you could also use
the hardware reset button.
Note: The firmware upgrade, hard drive repair and format, and factory reset processes may take about several minutes to complete. Do not power off the device during this process as it may crash the device and make it
unusable. The device will restart automatically once the
process is complete.
3.4.6Help
To get help while in the Control Panel, click the Help
panel, then click on the appropriate help subject.
At the top right is the Return link to the WebFolder
screen.
WiDrive User’s Guide
[email protected]
8
4. WEBFOLDER
The WebFolder provides a web-based access to files
and folders.
4.1 WebFolder Mode
The Web interface is displayed once you have logged
in. Folder hierarchies organize the repository so that users can browse through it easily.
To copy/move a folder:
1. Navigate to the parent folder of the folder you want
to copy or move.
2. In the File List, click the Select checkbox to the left
of the folder.
3. Finalize the selection by clicking on the Add to Selection button
in the toolbar.
4. Navigate to the folder where you want to paste the
folder.
4.1.1Working with Folders
or Move icon
5.Click the Copy icon
selected
folders
in
the
desired
folder.
To open a folder, click its icon or file name in the File
List.
to place the
You can also use the Address Bar to navigate up or
down your file hierarchy. (HINT: users can directly type
in the path in the Address input too)
To create a folder:
1. Navigate to the folder in which you want to create
your new folder.
.
2. Click the Create Folder icon
3. In the dialog, type the name for your new folder.
4. Click Create.
To rename a folder:
1. In the File List, click the Rename icon
of the folder.
2. Type the new name for the folder.
3. Click Rename.
WiDrive User’s Guide
[email protected]
Copying a folder in this way makes a second copy of
to the right the folder and all its contents. Moving a folder in this
way relocates the folder in a single location.
To delete a folder:
1. Navigate to the parent folder of the folder you want
9
to delete.
2. In the File List, click the Select checkbox to the left
of the folder.
.
3. Click the Delete icon
4. In the confirmation dialog, click OK to delete the folder.
4.1.2Working with Files
To upload a file:
1. Navigate to the folder where you want to store the
file.
.
2. Click the Upload File icon
3. In the Upload window, click the Browse button.
4. Locate the file you want to upload and click Open.
5. In the Upload window, click the Upload button.The
file is added to the File List.
To copy a file:
1. Navigate to the parent folder of the folder you want
to copy or move.
2. In the File List, click the Select checkbox to the left
of the folder.
3. Finalize the selection by clicking on the File Select
in the toolbar.
button
4. Navigate to the folder where you want the copied
file(s) to appear (which could also be the current folder).
to place the selected files in
5.Click the Copy icon
the desired folder. If a file by that name already exists,
WiDrive appends the words “Copy of” to the name of
the file.
WiDrive User’s Guide
[email protected]
10
To move a file:
1. In the File List, click the Select checkbox to the left of
the file(s) you want to move.
2. Finalize the selection by clicking on the File Select
in the toolbar.
button
3. Navigate to the folder to which you want to move the
file.
4. Click the Move icon
to place the selected files in
the desired folder. If a file by that name already exists,
WiDrive appends the words “Copy of” to the name of
the file.
To change the name of a file:
to the right
1. In the File List, click the Rename icon
of the file(s) you want to rename.
2. Type the new name for the file.
3. Click Rename to save the file with the new name.
To delete a file:
1. Navigate to the parent folder of the folder you want
to delete.
2. In the File List, click the Select checkbox to the left of
the file(s) you want to delete.
.
3. Click the Delete icon
4. In the confirmation dialog, click OK to confirm the
delete.
WiDrive User’s Guide
[email protected]
11
2. Click on one of the color icons in the folder permission screen.
The Access Rights icon of the folder(s) you changed
appears in the Action column.
4.2 WebDAV Mode
WebDAV is used to access the files and folders on a
remote web server.
4.2.1Using Internet Explorer
Using the Internet Explorer browser, click File -->
Open.
Enter the WebDAV URL for WiDrive, in the following
format:
http://192.168.2.1/dav/c
Select the option “Open as Web Folder” and click OK.
4.1.3Managing Access to Files and
Folders
The permissions upon which the color scheme of fold- When prompted, enter username (“Admin”) and passers is based can take three values, namely the val- word (“admin”). The username and password are caseues restricted access(red icon), read(amber icon), full sensitive.
access(green icon). Only the administator can change
permissions and take ownership, plus perform the actions of read, copy and delete at files and folders.
To change the folder permissions:
1. In the File List, click the Access Rights icon to the
right of the folder(s) you want to change.
WiDrive User’s Guide
[email protected]
12
You should now see a view of the WiDrive folders/files
similar to the view below.
4.2.2Using Windows XP
Your WebDAV web folders can be viewed in the Windows Explorer view under ‘My Network Places’.
1. To begin the Add Network Place Wizard:
• Click My Network Places
• Click Add a Network Place
• Click Next.
2. Select Choose another network location, and then
click Next.
3. In the “Internet or network address:” field, enter the
WebDAV URL for WiDrive in the following format:
http://192.168.2.1/dav/c
4. Click Next.
5. You see a dialog box asking you to log into your site.
Enter your login name and password for your site and
then click OK.
6. Enter a name for the WebFolder.
7. Click Next.
8. Click Finish.
The Wizard creates a link to your site on the My Network Places page.
To access your documents double-click this link.
While viewing your desktop folders and your WebDav
web folders in the Windows Explorer, you can drag and
drop folders and files back and forth between your PC
and WiDrive.
Click on Logout icon
the WebFolder.
in the Address Bar to logout
WiDrive User’s Guide
[email protected]
13
5. TORRENT
This section is to show you how to download a Torrent 5.1.3Torrent File Upload
Client, torrents, and ultimately end up with the file(s)
that you want.
A torrent file is upload to WiDrive through web interClicking on the Torrent icon
in the File Operation face.
section opens a new screen with options to start, stop,
and remove torrents, tweak bandwidth settings for your
torrents.
1. click the “Browse” button and select your torrent file
2. click “Upload Torrent”.
5.1 Torrent Operation
WiDrive can run as a torrent client that is capable of
preparing, requesting, and transmitting any type of
computer file over a network, using the protocol.
The torrent client will automatically make the connections and start the file sharing process with external
peers.
5.1.4Update Status
You can refresh current torrent page by clicking the “Update Status”.
5.2 Torrent Client Configuration
You can set the following settings on the torrent client.
Auto Config UPnP port mapping (UPnP support is required). Uncheck “Auto Port Mapping”. If this is checked,
you will experience it slowing down speeds. It’s not necessary if you manually forward your ports.
5.1.1Install a Torrent Client
Check “Peer Exchange”.
First you need the torrent client software to be able to Listening Port for incoming connections (make sure your
port is available). Common values are 2048 – 65535.
use the torrent.
To use a Torrent client, you need to upload the torrent Enter maximum upload rate in kB/s. Your optimal upclient software into WiDrive. For more information, load speed will be 80% of the maximum upload speed.
please refer to Section 3.4.5.2.
Enter maximum download rate in kB/s. Set your maximum download speed at 90% of the maximum down5.1.2Download the Torrent File
load speed you’re capable of.
The next step is to add a torrent via the ‘Torrent URL’ Set WiDrive to stop seeding after reaching a certain ralink. You can choose to open a torrent file, an URL or tio, i.e. Seeding Stop Ratio.
even a folder (with torrent files in it).
Press “Apply” to apply the new configuration.
WiDrive User’s Guide
[email protected]
14
5.3 TCP Port Status
You can check the port mapping status of WiDrives.
There are Control Panel icon
and WebFolder icon
in the Operations section.
5.4 Torrent’s Status View
Each of the individual torrent file has its own status and
start/stop control. Once a download is started you’ll see
a progress bar, including percentage and status detail, like the download rate or the number of peers and
seeds, and the current state(active, downloading, suspended, or completed) of torrents(in brackets).
/resume
icon (to
Click on a torrent’s little pause
the right of the progress bar,) to resume a torrent download or pause a torrent temporarily halts its connections
and keeps it in memory. Use Pause if you only need to
stop an active torrent for a few seconds..
Click on a torrent’s little delete icon
(to the right of the
progress bar,) to stop and delete a job to free up space
after it has finished downloading or manually delete an
incomplete job.
On the top bar of the right pane:
1. All - all the torrents have or haven’t finished downloading.
2. Done - all the torrents have finished downloading and
are seeding.
3. Active - all the torrents in the active uploads.
4. Suspended - all the unfinished (suspended) torrents.
5. Queue - all the torrents in the queued uploads.
WiDrive User’s Guide
[email protected]
15
6. QUESTIONS & ANSWERS
Q1: I cannot detect WiDrive on computer’s wireless Q4: How do I find out the IP address of WiDrive?
network connection. What could be the cause?
A4: WiDrive Connect Utility will search and detect for
A1: This could be due to a weak wireless signal or in- any WiDrive that is attached to the same network that
terference from other devices (radio, cordless phone, the PC is connected to. When WiDrive is detected,
microwave oven, etc).
WiDrive Connect Utility will display the IP address of
WiDrive.
Do check that the WiDrive is operating in AP mode. A
computer will not be able to detect if WiDrive is switched Q5: How do I find out WiDrive’s IP address without
to Infrastructure mode.
using the WiDrive Utility?
To ensure a good wireless signal, you may place WiD- A5: To determine the IP address of WiDrive when oprive closer to your computer and make sure no metalic erating in AP mode, use the command ‘ipconfig/all’ at
obstruction is blocking the embedded antenna.
the command prompt. The IP address of DHCP Server
reported by ipconfig belongs to WiDrive.
You may also try renewing the wireless network connection on your computer and starting a new network Q6 : I am getting very slow data transfer. How do I
scan. This can be done by selecting [Repair] option on improve the speed?
the Windows’s Wireless Network Connection.
A6 : When many users simultaneously accessing WiDQ2: I am connected to the WiDrive’s network but un- rive, the performance will be affected as the wireless
able to access it. What should I do?
bandwidth is shared among users. Please try to switch
from Infrastructure network to AP network. (In general,
A2: Check that you do not have a conflicting wired net- the data throughput between two devices in an AP network connection. If there is a wired network connection, work is twice of that in an Infrastructure network)
ensure its IP address is not on the same IP subnet as
the IP address of WiDrive. To change the IP address or Q7: I forgot the Admin Username and Password for
subnet of WiDrive, you can follow instructions in Sec- WiDrive. Please help me!
tion 3.4.
A7: You can restore WiDrive to its original factory conQ3: My WiDrive is connected. I can key in the IP ad- dition by powering up WiDrive and then pressing the
dress of WiDrive in the web browser and make con- reset button using a paper clip.
nection. However, WiDrive Utility indicates that it is
not connected. Is WiDrive Utility broken?
Q8: Why is WiDrive enclosure made of plastic?
A3: This may be caused by the firewall that blocks the
UPnP discovery protocol on WiDrive. Please consult the
firewall provider on opening the firewall for the UPnP
discovery protocol.
A8: Wireless signal can be obstructed by metallic material. To ensure proper signal from the embedded antenna, WiDrive is manufactured using superior plastic
and craftsmanship.
The UPnP server is run on the internal hard drive of Q9: The Torrent does not seems active, always
WiDrive. Please ensure that you have the UPnP server shows zero upload and download speed.
uploaded into the hard drive. You can determine the status of the UPnP through the Control Panel of WiDrive. A9: Please try to change the Torrent Port number used.
If you Internet Router support UPnP or NAT, you may
If the UPnP installation is not found, please upload it wish to enable the Torrent auto check if you are confrom www.edslab.com through the Control Panel of nected to the same wireless network as WiDrive. If you
WiDrive.
are running the WiDrive Utility, click on [Scan] to confirm
you have a connection to WiDrive.
WiDrive User’s Guide
[email protected]
16
7. SAFETY AND CARE
Please read the following safety information prior to using WiDrive.
o
Only qualified personnel should service WiDrive. Faulty installation or service may be dangerous
and may invalidate any warranty applicable to WiDrive.
o
Do not store or carry flammable liquids, gases,
or explosive materials in the same compartment as
WiDrive.
o
Switch your WiDrive off before boarding an
aircraft. The use of wireless devices in aircraft may be
dangerous to the operation of the aircraft, and is illegal.
o
Switch your WiDrive off when in any area with
a potentially explosive atmosphere, and obey all signs
and instructions. Sparks can cause an explosion or fire
resulting in bodily injury or even death.
o
WiDrive can cause interference to pacemakers,
hearing aids, and medical equipment. Maintain safe
distances from medical devices when operating in such
environments.
o
Use only supplied battery packs and charger
come with WiDrive to avoid electrical damage, explosion, or chemical leak.
o
Do not drop or knock WiDrive. Rough handling
can damage the electronics board and hard drive in
WiDrive.
o
Do not expose WiDrive to extreme temperature.
Do not put WiDrive on heating devices such as microwave oven, stove, or radiator. The device may explode
when overheated.
o
Clean WiDrive surface with soft damp cloth. Do
not use any cleaning agent.
o
Keep WiDrive dry. Any precipitation, humidity,
and liquids can corrode electronic circuits in WiDrive.
WiDrive User’s Guide
[email protected]
17
8. TECHNICAL SPECIFICATIONS
Dimensions
System Requirements
Size: 130mm x 79mm x 23mm
Weight (Without 2.5”HD): 110g
Windows XP, SP2, Vista, Macintosh, Web browser.
Pentium III or higher with 128MB RAM
802.11 b/g interface
USB interface
Wireless Interface
Standard: IEEE 802.11b & 802.11g standards
Frequency Band: 2.412GHz – 2.472GHz ISM BW
Modulation Technology: 802.11b: CCK, DQPSK, DBPSK; 802.11g: OFDM
Data rate: Up to 54Mbps
Mode: AP, Infrastructure
Range: Up to 25m
Security Features
Environment
Operating temperatures: 5 to 40°C
Storage temperatures: -10 to 50°C
Relative humidity: 5% to 90%
Shock operational: 300G or less (2ms, half sine
wave)
Non-operational: 1000G or less (1ms, half sine wave)
Wired Equivalent Privacy (WEP) 64/128 bit encryption,
WPA/WPA2 PSK
Username and password protected access
Network Protocols
DCHP Client, DCHP Server
TCP/IP
HTTP
WebDav
UPNP
DDNS
Internal Storage
Capacity: Prevailing market HDD capacity
Form Factor: 2.5” HDD
Interface: SATA
Acoustics (20GB typical): Idle 2.0 Seek 2.6 (A-Weighted Sound Power (Bels))
LED indicator
Tri Color LED Indicator
Activity-Flashing Blue
Standby or Charging -Still Orange
Lower power-Flashing Orange,
Button/Switch: On/Off, AP/Infrastructure selection
Power
AC source: 110/230V 50/60HZ
DC source: 5V +/- 5%, 2A
WiDrive User’s Guide
[email protected]
18
9. REGULATORY INFORMATION
This product is not certified as a medical product
according to the Medical Product Directive 93/42
For the latest driver updates, user manuals & FAQs
EEC.
please have a look at the EDSLab options &services
Automotive environment: Please search
support page:
the owner instructions of the related vehicle for
www.EDSLab.com
advices regarding the use of this product (category).
For the EDSLab hotline numbers
Aviation environment: Please follow the instructions of the flight personnel regarding restrictions
of use.
CE compliance
Additional environments not related to
EMC
This product is CE marked in accordance Outdoor use: As a typical home/office
with the requirements of the applicable EU Direc- equipment this product has no special resistance
tives. Responsible for CE marking is EDSLab
against ingress of moisture and is not strong shock
Technologies Inc. A copy of the official Declara- proofed.
tion of Conformity can be obtained from following website: http://www.edslab.com
Working Environment
The Electromagnetic Compliance (EMC)
of this product has been verified typically for
this product category for a so called Residential,
Commercial & Light Industry Environment. Any
other working environment has not been verified
by EDSLab Technologies Inc. and the use of this
product in these working environments is maybe
restricted or cannot be recommended. Possible
consequences of the use of this product in non
verified working environments can be: Disturbances of other products or of this product in the
nearby surrounding area with temporarily malfunction or data loss/corruption as result. Example
of non verified working environments and related
advices:
Industrial environment (e.g. environments
where a mains voltage of 380V three-phase is being used mainly): Danger of disturbances of this
product due to possible strong electromagnetic
fields especially near to big machinery or power
units.
Medical environment: The compliance to
the Medical Product Directive has not been verified byEDSLab; therefore this product cannot be
used as a medical product without further verification. The use in usual office environments e.g.
in hospitals should be no problem if there is no
Need help?
WiDrive User’s Guide
[email protected]
19
9. REGULATORY INFORMATION
Text for WEE
Disposal of batteries and/or accumulators
Text WEEE & Battery : for option with battery
Following information is only valid for EU-member States:
Disposal of products
The crossed out wheeled dust bin symbol
indicates that batteries and/or accumulators must
be collected and disposed of separately from
household waste.
If the battery or accumulator contains
The crossed out wheeled dust bin symbol more than the specified values of lead (Pb), merindicates that products must be collected and dis- cury (Hg), and/or cadmium (Cd) defined in the
Battery Directive (2006/66/EC), then the chemiposed of separately from household waste. Integrated batteries and accumulators can be disposed cal symbols for lead (Pb), mercury (Hg) and/or
of with the product. They will be separated at the cadmium (Cd) will appear below the crossed out
wheeled dust bin symbol.
recycling centres.
By participating in separate collection
The black bar indicates that the product
of batteries, you will help to assure the proper
was placed on the market after August 13, 2005.
disposal of products and batteries and thus help to
prevent potential negative consequences for the
By participating in separate collection of
products and batteries, you will help to assure the environment and human health.
proper disposal of products and batteries and
For more detailed information about the
thus help to prevent potential negative consecollection
and recycling programmes available in
quences for the environment and human health.
your country, contact your local city office or the
shop where you purchased the product.
For more detailed information about the
collection and recycling programmes available in
your country, contact your local city office or the
shop where you purchased the product.
© 2008 EDSLab Technologies Inc.
All rights reserved
EDSLab reserves the right to make technical changes.
EDSlab assumes no liability for damages incurred directly or indirectly from errors, omissions or discrepancies between this product and the documentation.
WiDrive User’s Guide
[email protected]
20