1
USER GUIDE
Enterprise IP Solutions
OfficeServ Messenger
Every effort has been made to eliminate errors and ambiguities in the information contained in this
guide. Any questions concerning information presented here should be directed to SAMSUNG
TELECOMMUNICATIONS AMERICA, 1301 E. Lookout Dr. Richardson, TX. 75082 telephone (972) 7617300. SAMSUNG TELECOMMUNICATIONS AMERICA disclaims all liabilities for damages arising from
the erroneous interpretation or use of information presented in this guide.
Samsung Telecommunications
Publication Information
SAMSUNG TELECOMMUNICATIONS AMERICA reserves the right without prior notice to revise
information in this publication for any reason. SAMSUNG TELECOMMUNICATIONS AMERICA also
reserves the right without prior notice to make changes in design or components of equipment as
engineering and manufacturing may warrant.
Copyright 2010
Samsung Telecommunications America
All rights reserved. No part of this manual may be reproduced in any form or by any means—graphic,
electronic or mechanical, including recording, taping, photocopying or information retrieval systems—
without express written permission of the publisher of this material.
PRINTED IN USA
TABLE OF CONTENTS
Introduction
Chapter 1 ........................................................................ 1
What is OfficeServ Messenger?............................................................................................. 1
Installation
Chapter 2 ........................................................................ 2
Things to Know Before Installation........................................................................................ 2
Keyphone Requirements ................................................................................................ 2
PC Requirements .......................................................................................................... 2
30 Day Free Trial Period ................................................................................................ 3
OfficeServ Messenger Components.................................................................................. 3
Finding the Messenger IP Address ................................................................................... 4
OfficeServ Messenger Connection Map ............................................................................. 5
How to Install OfficeServ Messenger ..................................................................................... 6
Installing the Messenger Server ...................................................................................... 6
Installing the SIMPLE Gateway ....................................................................................... 9
Installing the XCAP Server ............................................................................................ 11
Licensing
Chapter 3 ...................................................................... 14
How Licensing Works ......................................................................................................... 14
How the 30 Day Free Trial License Works ............................................................................. 14
How to View Your License ................................................................................................... 15
How to Enter a New License ................................................................................................ 16
Configuration
Chapter 4 ...................................................................... 18
Gathering Configuration Information .................................................................................... 18
Verifying IIS Settings ......................................................................................................... 19
Configuring OfficeServ Messenger in IIS 5.1 .................................................................... 19
Configuring OfficeServ Messenger in IIS 6.0 .................................................................... 22
Configuring OfficeServ Messenger in IIS 7.0 or IIS 7.5 ..................................................... 25
Configuring Messenger Options ........................................................................................... 26
Configuring Multi-System Settings ....................................................................................... 28
Configuring User Accounts .................................................................................................. 30
Creating Departments .................................................................................................. 30
Creating Job Positions .................................................................................................. 30
Creating Users Individually............................................................................................ 31
Creating Users from a Spreadsheet ................................................................................ 33
Assigning Unfiled Users to Departments.......................................................................... 35
Backing Up the User List ............................................................................................... 35
Operation
Chapter 5 ...................................................................... 37
Connecting OfficeServ Messenger ........................................................................................ 37
Using the Web Interface ..................................................................................................... 38
The Messenger Server Status Page ................................................................................ 39
Sending a Broadcast Message........................................................................................ 40
Viewing Administrative Logs .......................................................................................... 41
Clearing Administrative Logs ......................................................................................... 41
Viewing / Deleting Message Logs ................................................................................... 42
Viewing Unread Message Headers .................................................................................. 43
Viewing / Deleting File Transfer Logs .............................................................................. 43
Viewing Conference Status ............................................................................................ 44
Viewing Conference Statistics ........................................................................................ 44
Software License Agreement and Limited Warranty .............................................. 46
1
CHAPTER 1
What is OfficeServ Messenger?
OfficeServ Messenger is a server application that provides instant messaging, collaboration, and
presence awareness to the OfficeServ Communicator application and users of the SMT-i5243 IP
keyset.
OfficeServ Messenger communicates with OfficeServ 7000 Series systems through the OfficeServ Link
V3 application. OfficeServ Link permits the OfficeServ Messenger to connect to up to eight systems
simultaneously, allowing multi-system applications to take advantage of the OfficeServ Messenger
features across the organization. This not only brings your whole business closer together, but also
prevents you from having to maintain a separate server for each system.
OfficeServ Messenger provides users with the following features:
•
Instant Messaging
•
Presence Awareness
•
Buddy Lists
•
Video Chat
•
Whiteboard Collaboration
•
Desktop Sharing
•
Application Sharing
•
File Sharing
Be careful when installing OfficeServ Messenger in multi-site
locations; data routing issues and/or data latency may hinder
performance and cause unintended errors in the application. Multisystem connections are intended primarily for single-site multisystem locations, such as a corporate headquarters.
PAGE
INTRODUCTION
2
CHAPTER 2
Things to Know Before Installation
Keyphone Requirements
OfficeServ Messenger is compatible with any of the OfficeServ 7000 Series keyphone systems,
including:
•
OfficeServ 7030
•
OfficeServ 7100
•
OfficeServ 7200-S
•
OfficeServ 7200
•
OfficeServ 7400
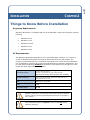
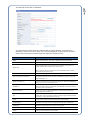
PC Requirements
The OfficeServ Messenger application is has a web-based admin interface, so it requires a
version of Windows that supports the Internet Information Services (IIS) module. It is
strongly recommended that you run OfficeServ Messenger on the same PC as the OfficeServ
Link V3 application, and that this machine be dedicated solely to Samsung applications. This
PC must meet the following minimum requirements (requirements may be higher for multisystem and other high usage environments):
Microsoft® Windows XP or higher
Operating System
Database Platform
including but not limited to:
Windows 7, XP Professional, Vista, 2003, and 2008
With Internet Information Services (IIS) installed
Microsoft SQL Express 2005 or higher
including SQL Express 2005, SQL Express 2008, SQL Server
2005, and SQL Server 2008
CPU
Pentium 4 – 2.0 GHz
RAM
1 GB
Hard Disk Space
20 GB
OfficeServ Messenger is only supported on Microsoft® Windows operating
systems. Samsung will not support OfficeServ Messenger on Mac OS® or
Linux systems.
Local Administrator rights are required in order to install and operate
OfficeServ Messenger.
PAGE
INSTALLATION
Each user who connects to OfficeServ Messenger will use at least 1
connection which can quickly overwhelm the available limit. So if you
intend to have OfficeServ Messenger available to all users it is strongly
recommended that you install it on a server version of Windows (2003 or
2008) where unlimited connections are allowed.
OfficeServ Messenger requires the Microsoft SQL Server software to have
Mixed Mode Authentication enabled. Consult Microsoft documentation for
information on how to enable Mixed Mode Authentication.
30 Day Free Trial Period
Samsung provides a 30 day free trial period for OfficeServ Messenger to allow users to
experience and evaluate the applications risk-free. This free trial period allows the OfficeServ
Messenger to connect to OfficeServ Link without the need for a Messenger license key. The
trial expires 30 days from the date of installation. After expiration a valid Messenger license
key must be entered in order to continue use of OfficeServ Messenger. For specific details see
the 30 Day Free Trial section in Chapter 3.
OfficeServ Messenger Components
The OfficeServ Messenger application consists of 3 separate components:
1. The Messenger Server
2. The SIMPLE Gateway
3. The XCAP Server
The Messenger Server is the main application that communicates with the other two
components as well as OfficeServ Link, the Messenger Admin web interface, and users
connecting with the OfficeServ Communicator application.
The SIMPLE Gateway passes data between the Messenger Server and the XCAP Server; this
includes buddy list status data, login requests, etc. This component is only required when you
have users connecting with their SMT-i5243 keysets.
The XCAP Server formats the data provided by the SIMPLE Gateway into XML displays that are
sent to SMT-i5243 keyset users. This component is only required when you have users
connecting with their SMT-i5243 keysets.
3
PAGE
Windows 7, Vista, and XP limit the number of simultaneous internet
connections to 10. Although this connection limit can be overridden
Microsoft, and therefore Samsung, does not recommend it.
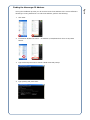
1. Click Start
2. In Windows XP/2003 click Run…. In Windows 7/Vista/2008 click where it says Start
Search.
3. Type cmd and press enter to launch a DOS command prompt
4. Type ipconfig and press Enter
PAGE
During the installation process you will need to know the IP address of the server OfficeServ
Messenger is being installed on. To find the IP address, perform the following:
4
Finding the Messenger IP Address
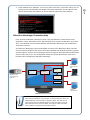
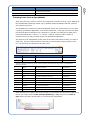
OfficeServ Messenger Connection Map
Users connect to OfficeServ Messenger server using the OfficeServ Communicator client
application or their SMT-i5243 keyset. The Messenger then connects to OfficeServ Link which
will in turn establish communications between the OfficeServ Messenger and the OfficeServ
7000 Series systems.
The OfficeServ Messenger system administrator connects to the Messenger Admin interface
using the Internet Explorer web browser that ships standard with Windows operating systems.
Internet Explorer connects to the Messenger Server through the Windows Internet Information
Services (IIS) web server. This configuration allows the system administrator much more
flexibility when managing the OfficeServ Messenger.
OfficeServ
Link
OfficeServ
Messenger
OfficeServ 7000
Series Keyphone
Systems
SIMPLE
Gateway
XCAP Server
OfficeServ
Communicator
User
SMT-i5243 User
IIS
System
Administrator
OfficeServ CTI Server
OfficeServ Messenger communicates with OfficeServ Link on TCP port
6005 and with OfficeServ Communicator on TCP and UDP port 5070. The
SIMPLE Gateway communicates on UDP port 15060. The XCAP Server
communicates with the SIMPLE Gateway on UDP port 25060, and with
SMT-i5243 keysets on TCP port 18080. This may be useful information
when installing in a tightly controlled data network.
5
PAGE
5. The IP address list is displayed. Your PC may have more than 1 connection listed; you are
looking for one that says Ethernet adapter Local Area Connection. The IP address of the
system will be listed as IP Address or IPv4 IP Address. Make note of this address.
Installing OfficeServ Messenger is a fairly simple, straightforward process. Every effort has been made
to ensure a fast and trouble-free installation. To begin, obtain the OfficeServ Messenger setup files
from your authorized Samsung installation company.
There are 3 setup files: the Messenger Server setup, the SIMPLE Gateway setup, and the XCAP Server
setup. The SIMPLE Gateway and XCAP Server are only required if you have users logging in to the
OfficeServ Messenger with SMT-i5243 keysets.
If you are installing all 3 components they must be installed in the following order: Messenger Server
then SIMPLE Gateway then XCAP Server.
Installing the Messenger Server
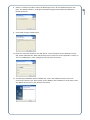
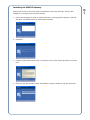
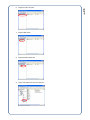
Double-click the file to launch the setup. Initialization of the setup will begin. Proceed with
installation by configuring the following settings:
1. Choose the language you wish to read the End User License Agreement (EULA) in and then
click Next. The default setting is United States (English).
2. Click Next.
3. Carefully read the EULA then select “I accept the terms of the license agreement” and Click
Next.
6
PAGE
How to Install OfficeServ Messenger
7
PAGE
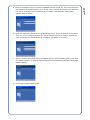
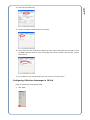
4. Enter the IP address of the OfficeServ Link V3 server (if it is installed on the same PC as
OfficeServ Messenger you may enter 127.0.0.1). After entering the IP address click Next.
5. Enter the port number OfficeServ Link is using. In almost all cases this field does not need to
be changed from the default value of 6000. Check with the OfficeServ Link V3 installer to
determine if you need to change this value. Click Next after verifying the port.
6. Enter a domain name for OfficeServ Messenger. This simply determines how to format user
logins. Samsung recommends leaving this at the default setting of osm.com. Click Next after
setting the domain you wish to use.
7. If you have already obtained your license key for OfficeServ Messenger you may enter it here
(the OfficeServ Messenger license key is NOT the same key as your OfficeServ Link license
key) and click Next. If you do not have your license key you may click Next and enter it after
installation through the Messenger Admin web interface. Licensing is discussed in Chapter 3.
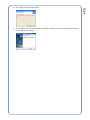
9. Click Install to begin installing files.
10. Enter the connection details for the SQL Server. This information can be obtained from the
SQL system administrator. Note that the SQL Server instance must be specified if it exists (ie.
127.0.0.1\SQLExpress). After configuring the connection click Next.
11. The Messenger database will be installed next. This is the database used to store user
accounts and activity logs. After setting up the database the installation is done and a screen
will appear alerting you to click Finish to exit setup.
8
PAGE
8. Select or confirm the location where the Messenger Server will be installed and then click
Next. The default location is C:\Program Files\Samsung Electronics\Samsung OfficeServ
Messenger Server.
1. Choose the language you wish to read the End User License Agreement (EULA) in and then
click Next. The default setting is United States (English).
2. Click Next.
3. Carefully read the EULA then select “I accept the terms of the license agreement” and Click
Next.
4. Enter the user and company names the software is being installed for and then click Next.
PAGE
Double-click the file to launch the setup. Initialization of the setup will begin. Proceed with
installation by configuring the following settings:
9
Installing the SIMPLE Gateway
6. Enter the connection information for the Messenger Server. For the IP field you should enter
127.0.0.1, the Port field should be 5070, and the Domain field will be whatever domain you
chose in step 6 of the Messenger Server installation (the default is osm.com).
7. Select or confirm the location where the SIMPLE Gateway will be installed and then click Next.
The default location is C:\Program Files\Samsung Electronics\Samsung OfficeServ Messenger
SIMPLE Gateway.
8. Click Install to begin installing files.
10
PAGE
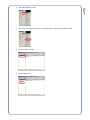
5. Enter the IP address and port number the SIMPLE Gateway should use. The IP field should be
the IP address of the Messenger PC (ie. 192.168.1.24). In almost all cases the port field does
not need to be changed from the default value of 15060. Click Next after setting the IP
address and port number.
11
PAGE
9. After installing the necessary files the installation is done and a screen will appear alerting you
to click Finish to exit setup.
Installing the XCAP Server
Double-click the file to launch the setup. Initialization of the setup will begin. Proceed with
installation by configuring the following settings:
1. Choose the language you wish to read the End User License Agreement (EULA) in and then
click Next. The default setting is United States (English).
2. Click Next.
3. Carefully read the EULA then select “I accept the terms of the license agreement” and Click
Next.
5. Enter the connection information for the SIMPLE Gateway. For the IP field you should enter
127.0.0.1, the Port field should be 15060, and the Domain field will be whatever domain you
chose in step 6 of the Messenger Server installation (the default is osm.com).
6. Enter the connection details for the SQL Server. This information can be obtained from the
SQL system administrator. Note that the SQL Server instance must be specified if it exists (ie.
127.0.0.1\SQLExpress). After configuring the connection click Next.
7. Select or confirm the location where the XCAP Server will be installed and then click Next. The
default location is C:\Program Files\Samsung Electronics\Samsung OfficeServ Messenger XCAP
Server.
12
PAGE
4. Enter the IP address and port numbers the XCAP Server should use. The IP field should be the
IP address of the Messenger PC (ie. 192.168.1.24). Port is the UDP port used to communicate
with the SIMPLE Gateway and Req is the TCP port used to communicate with SMT-i5243
keysets. In almost all cases the Port and Req fields do not need to be changed from the
default values of 25060 and 18080. Click Next after setting the IP address and port numbers.
PAGE
13
8. Click Install to begin installing files.
9. After installing the necessary files the installation is done and a screen will appear alerting you
to click Finish to exit setup.
14
CHAPTER 3
How Licensing Works
In order to use OfficeServ Messenger you will need a valid software license. Licenses are used to
regulate the number and types of users who may connect to and use the OfficeServ Messenger. The
advantage of licensing is that you can reduce your overall costs by purchasing only the number of
connections you need without having to manage a hardware dongle or a complicated middleware
licensing application.
The license used for the OfficeServ Messenger is not the same as the OfficeServ Link license used by
other CTI applications; it is a separate license key used only by and for the OfficeServ Messenger.
When a user attempts to connect to OfficeServ Messenger the user type is checked against the list of
licensed connections. If there are no available licenses for the connection a licensing error will be
returned to the user. As an example, if an SMT-i5243 keyset attempts to connect, but the current
license allows only OfficeServ Communicator connections the SMT-i5243 connection will be rejected.
If there are available licenses the OfficeServ Messenger will then proceed to check the supplied login
credentials against the user database to see if the login is correct. If the login does not match an
existing user list an error is returned to the user. If a valid account is found the OfficeServ Messenger
will log the user in and begin communications.
How the 30 Day Free Trial License Works
Samsung understands that sometimes you want to test out an application to see if it works for your
company before making a committed purchase. In order to fill this need the OfficeServ Messenger
installation process creates a free 30 day trial license. This free trial license allows up to 10 OfficeServ
Communicator users and up to 10 SMT-i5243 keyset users to connect to OfficeServ Messenger for up
to 30 days without the need to purchase a software license key.
The 30 day trial period begins the moment you install OfficeServ Messenger, it is not tied to
application run time. If you intend to use the trial you should install OfficeServ Messenger only after
you are prepared to start testing. Once the trial expires you must purchase a license key from
Samsung in order to continue using OfficeServ Messenger
PAGE
LICENSING
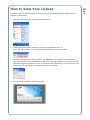
In order to view your current license you need to log in to the Messenger Admin web interface. To
launch the web interface:
1. Click Start then click Internet to open Internet Explorer.
2. Load the Messenger Admin website by typing http://[IPAddress]/osm (i.e.
http://192.168.1.24/osm) into the address bar and clicking Go or pressing Enter.
3. You will be prompted to log in to the server. You must enter the username and password of a
user on the server that has administrative rights (such as the Administrator user). Enter the login
information and then click OK. If you want to save this login information so you don’ have to enter
it again check the Remember my password box before clicking OK.
4. This will load the Messenger Admin login page.
15
PAGE
How to View Your License
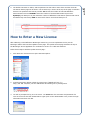
How to Enter a New License
After obtaining a valid OfficeServ Messenger license key you must implement the key via the
Messenger Admin web interface Update License page. The Update License page transfers the key to
the Messenger Server application for verification to ensure it is valid and authentic.
Follow these steps to load the Update License page:
1. Click Start then click Internet to open Internet Explorer.
2. Load the Messenger Admin website by typing http://[IPAddress]/osm (i.e.
http://192.168.1.24/osm) into the address bar and clicking Go or pressing Enter
3. You will be prompted to log in to the server. You must enter the username and password of a
user on the server that has administrative rights (such as the Administrator user). Enter the login
information and then click OK.
16
PAGE
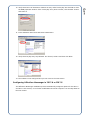
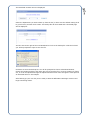
5. The default username is admin, and the password is also admin. Enter these and then click OK.
The Server Status page will be shown. The License Key is shown at the top of the page. Just below
that are the quantities that license provides. PC: shows the number of licensed OfficeServ
Communicator users and PHONE: shows the number of licensed SMT-i5243 keyset users.
System(s) will always be 8 (the maximum number of OfficeServ 7000 Series systems that can be
simultaneously connected). PDA: is reserved for future use and will always be 0.
PAGE
17
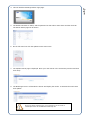
4. This will load the Messenger Admin login page.
5. The default username is admin, and the password is also admin. Enter these and then click OK.
The Server Status page will be shown.
6. On the left menu bar click the Update License menu item.
7. The Update License page is displayed. Enter your new license in the License Key text box and then
click Verify.
8. The Messenger Server will decode the license and display the results. To activate the new license
click Update.
Be sure to retain a backup copy of your license key in the event of
catastrophic failure of the OfficeServ Messenger PC.
18
CHAPTER 4
Gathering Configuration Information
The biggest portion of configuration is setting up the accounts users will log in to when connecting to
the OfficeServ Messenger. This requires gathering a certain amount of detail about each user. You will
need the following information for each person who will be logging in to the OfficeServ Messenger:
•
First and last name
•
Preferred name
•
Preferred username
•
Preferred password
•
System id
•
Station number
•
Cell phone number
•
Job description
•
Job position
•
Email address
•
Work street address
•
Department
(nickname)
(login id)
(only required in multi-system environments)
(optional)
(optional)
(optional)
(optional)
(optional)
It is recommended that if you have more than a few users you put this information into a
spreadsheet. The reason for this is that you can later use this spreadsheet to create all the users at
one time. This is discussed in more detail later in this chapter.
After gathering all the user data you can begin the process of configuring the user accounts through
the Messenger Admin web interface. However, before doing this you will need to verify a few settings
to ensure that the web interface is running optimally. You will also need to check OfficeServ
Messenger Server application settings and configure multi-system settings (if necessary).
For multi-system environments you will need to obtain the following information for each system from
the OfficeServ 7000 Series system administrator:
•
IP address
•
Network Node ID
PAGE
CONFIGURATION
Internet Information Services (IIS) is the Microsoft component that allows a PC to act as a web server.
Microsoft Windows currently supports 4 versions of IIS depending on which Windows version you are
running, as shown below.
OPERATING SYSTEM
Windows XP Professional, Windows XP Media Center
IIS VERSION
V5.1
Windows 2003
V6.0
Windows 2008, Windows Vista (Home Premium, Business, Enterprise, Ultimate)
V7.0
Windows 2008 R2, Windows 7
V7.5
The installation process for IIS is also operating system dependant. For
details on installing IIS on your system consult Microsoft’s documentation.
In order to install OfficeServ Messenger on a PC running IIS 7.0 or higher
you must ensure that all IIS 6 Compatibility options are also installed.
Configuring OfficeServ Messenger in IIS 5.1
Begin by launching the IIS Admin Panel:
1. Click Start
2. Click Control Panel
PAGE
19
Verifying IIS Settings
PAGE
20
3. Click Performance and Maintenance
4. Click Administrative Tools
5. Double-Click Internet Information Services to launch the IIS Admin Panel
PAGE
21
6. Expand Local Computer
7. Expand Web Sites
8. Expand Default Web Site
9. Right-click OSM and choose Properties
PAGE
22
10. Click the Documents tab.
11. Check the Enable Default Document checkbox.
12. Verify that the list of documents contains an entry called “index.php” and click OK to close
the OSM properties window. If the “index.php” entry does not exist, click the Add… button
and create it.
13. The website is now configured and you can move to the next section.
Configuring OfficeServ Messenger in IIS 6.0
Begin by launching the IIS Admin Panel:
1. Click Start
PAGE
23
2. Click Administrative Tools
3. Click Internet Information Services (IIS) Manager to launch the IIS Admin Panel
4. Expand Local Computer
5. Expand Web Sites
PAGE
24
6. Expand Default Web Site
7. Right-click OSM and choose Properties
8. Click the Documents tab.
9. Check the Enable default content page checkbox.
11. In the IIS Admin Panel click Web Service Extensions
12. Verify that the php entry says Allowed. If it doesn’t, select it and then click Allow.
13. The website is now configured and you can move to the next section.
Configuring OfficeServ Messenger in IIS 7.0 or IIS 7.5
The OfficeServ Messenger installation process automatically configures options for the IIS 7.0
and IIS 7.5 web servers, so no further modifications should be required. You can skip ahead to
the next section.
25
PAGE
10. Verify that the list of documents contains an entry called “index.php” and click OK to close
the OSM properties window. If the “index.php” entry does not exist, click the Add… button
and create it.
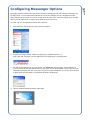
Messenger options include items such as the location of debugging logs and the login information for
the SQL server. In most cases these options do not require changing, but it is important to know
where they are in the event you need to change them at some point. This may happen if you change
SQL servers at some point or change the IP address of the CTI server.
To begin, log in to the Messenger Admin web interface:
1. Click Start then click Internet to open Internet Explorer.
2. Load the Messenger Admin website by typing http://[IPAddress]/osm (i.e.
http://192.168.1.24/osm) into the address bar and clicking Go or pressing Enter
3. You will be prompted to log in to the server. You must enter the username and password of a
user on the server that has administrative rights (such as the Administrator user). Enter the login
information and then click OK. If you want to save this login information so you don’ have to enter
it again check the Remember my password box before clicking OK.
4. This will load the Messenger Admin login page.
26
PAGE
Configuring Messenger Options
27
PAGE
5. The default username is admin, and the password is also admin. Enter these and then click OK.
The Server Status page will be shown.
6. Click the Server Configuration menu item on the left menu.
7. The Server Configuration screen is displayed. Fields are discussed below.
OPTION
Path
DESCRIPTION
Set the location for debug log files. The default is the LOG folder under the
location you installed the Messenger Server software to.
Set the detail level of debug logs:
System – log only messages sent to the Windows Event system
Level
ERROR – log only error events and system messages
WARNING – log error and warning events and system messages
INFO – log all of the above and also include informational messages (this is
the default)
DEBUG – log all events and messages generated by the Messenger
Set the method for deleting log files (this is done to save hard drive space):
OFF – keep all logs
Keeping Count(s)
Auto Clear Hour
2, 7, 30, 60, 365 – keep log files the specified number of days and then delete
them
MANUAL – specify the number of days to keep log files manually (this is the
default)
Set the hour of the day to delete log files that have expired (the default is
5am).
IP Auto Check
Automatically detect the server’s IP address. The default, TRUE, is appropriate
for most situations. It should be set to FALSE only if the server has multiple
active network interface cards (NICs).
Server Manual IP
Specify which IP address the Messenger server should listen on (when more
than one NIC is active). When IP Auto Check is set to TRUE this field will be
a drop-down list of all the NIC cards in your server. When IP Auto Check is
set to FALSE this field is a type-in box.
Multicast TTL Value
Set the Time-To-Live value for broadcast messages. This value should not
require modification.
Authentication
Set the login information for the SQL server. This should only be modified if
you know that SQL server settings have changed.
Service Install
Service Uninstall
Start
These buttons allow you to create or delete the Windows Service used for
launching the OfficeServ Messenger Server. The service is installed by default.
When installed the Service Install button is disabled, otherwise the Service
Uninstall button is disabled.
Stop
The Start and Stop buttons control the Windows Service used for launching
the OfficeServ Messenger Server.
Save
Save the current changes.
Refresh
Refresh the screen to reflect any changes that may have been made.
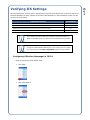
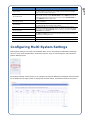
Configuring Multi-System Settings
Multi-System settings only need to be modified when you are connecting the OfficeServ Messenger
Server to more than one OfficeServ 7000 Series system. They are set through the web interface’s
System Settings menu:
The System Settings screen allows you to configure the systems OfficeServ Messenger should connect
to. By default only a single system is configured, as shown below, with blank entries for the other 7.
28
DESCRIPTION
PAGE
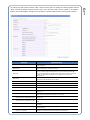
OPTION
OPTION
DESCRIPTION
SYSTEM ID (read only)
Display the Messenger System ID for the OfficeServ 7000 Series system
being configured.
OSLink Type
Set the messaging format for OfficeServ Link. In the U.S.A. this value will
always be KP and you shouldn’t change it.
OSLink IP
Set the IP address of the OfficeServ Link. In most cases this will be
127.0.0.1. When using multiple systems you must check the V3 checkbox
and enter the IP address of the OfficeServ 7000 Series system in the Switch
IP field. The OfficeServ IP address con be obtained from the system
administrator.
OSLink Port
Set the TCP port number OfficeServ Link is configured to listen on. In most
cases this will be the default value of 6000.
Dialing Position
Set the regional dialing properties for the OfficeServ 7000 Series system.
Country/Region
Area Code
Dialing Rule
Set the country the system is in.
Set the system’s local area code (i.e. 214).
Configure how the OfficeServ Messenger places external calls.
Access Code for Local Calls
Set the digit dialed to access a local CO line. In most cases this is the default
setting of 9.
other area for local calls
If your area has more than 1 area code, enter the remaining code(s) here.
Codes should be separated by commas (i.e. 972,214)
Access Code for Long-Distance Calls
Set the digit dialed to access a local CO line. In most cases this is the default
setting of 9.
Carrier Code for Long-Distance Calls
Set the carrier code for national long-distance. You will usually leave this field
blank.
Carrier Code for International Calls
Set the carrier code for international long-distance. You will usually leave this
field blank.
Access Code
System 1 – System 8
Configure how the OfficeServ Messenger routes calls between users in
different systems.
Set the Node ID of the other systems. Node IDs can be obtained from the
OfficeServ 7000 Series system administrator from MMC 820.
29
PAGE
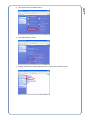
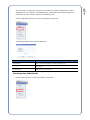
To configure a new system click the “Add.” link on the far right. To modify an existing system click the
“Mod.” link and to delete a system click the “Del.” link. Click the “Mod.” link for system 1. The Modify
System screen will appear. Configure the necessary systems and proceed to user account creation.
The configuration of user accounts in OfficeServ Messenger is done through the Messenger Admin web
interface. User accounts can be created individually through the web interface or a batch at a time by
uploading a properly formatted spreadsheet file.
Creating Departments
In order to add, edit, or remove Departments the OfficeServ Messenger
service must be stopped. For more information on stopping the service see
Chapter 5.
The first step to creating user accounts is to create all necessary department groups in your
company. Though this step is optional, it is extremely useful in organizing and viewing users
when you will have many of them.
Click the Manage Group item on the web interface’s left menu:
The Manage Group screen will be displayed:
OPTION
DESCRIPTION
Group Name
Set the name of the department (ie. Sales, Support, etc.).
Group Description
Set a brief description of the department. This optional field is not used and is
purely for reference.
Group Code
Set a short code for the department. This optional field is not used and is
purely for reference.
Group Rank
Set the rank of this department. Rank simply determines the order of
appearance in the department list.
Upper Group
If the department is a sub-group of another department (ie. Sales Engineering
as a sub-department of Sales), choose the master department here.
Creating Job Positions
In order to add, edit, or remove Job Positions the OfficeServ Messenger
service must be stopped. For more information on stopping the service see
Chapter 5.
30
PAGE
Configuring User Accounts
Click the Manage Position item on the web interface’s left menu:
The Manage Position screen will be displayed:
OPTION
DESCRIPTION
Position Name
Set the name of the position (ie. Manager, Engineer, etc.).
Position Code
Set a short code for the position. This optional field is not used and is purely
for reference.
Position Weight
Set the rank of this job position. Rank simply determines the order of
appearance in the position list.
Creating Users Individually
Click the Add User item on the web interface’s left menu:
31
PAGE
The next step to creating user accounts is to create all necessary job positions in each
department in your company. Like Departments, Job Positions are an optional piece of
information, but are useful in sorting and searching users.
PAGE
32
The Add User screen will be displayed:
You will notice that some items are marked with an orange asterisk. These items are
mandatory and must be set for each user. The full description of each field can be found
below. After entering all necessary data click Submit to create the user.
OPTION
Name
Nickname
ID(SIP URI)
DESCRIPTION
Set the user’s full name. This name is displayed in user’s contact lists.
Set the user’s preferred name. This name is displayed during chat sessions.
Set the user’s login ID. This is also sometimes referred to as a SIP URI
(Session Initiated Protocol Universal Resource Identifier), because it is a
unique identifier that is assigned to a specific person.
After entering an ID you must click the Check Availability button to ensure
that the ID doesn’t already exist.
Password
Set the user’s login password.
Hint for reissuing the password
Set the password retrieval question. This feature is not currently implemented
and is reserved for future use. This field is mandatory, though, so you must
enter something in it.
Answer the upper hint
Set the answer for the password retrieval question. This feature is not
currently implemented and is reserved for future use. This field is mandatory,
though, so you must enter something in it.
SYSTEM ID
Select the system the user is connected to by clicking Select System and then
clicking the OSLink IP that corresponds to the OfficeServ 7000 Series system
this user’s phone is connected to.
Extension Number
Set the user’s 2, 3, or 4 digit phone extension. After entering an extension
number you must click Check Availability to ensure that the number isn’t
already assigned to another user.
CID
Set the Caller ID display for this user. This is shown only in other users’
contact lists. To set the number click Enter and then type the desired number
in the box (ie. (972) 555-1234) and click Use.
Mobile
Set the user’s cell phone number. This number can be used by other users to
call this user’s cell phone from within OfficeServ Communicator.
Job Description
Enter a short description of the person’s job duties (ie. “CTI engineer”). This
information is optional and is only displayed in other users’ contact lists.
Image Path
This field is reserved for future use and can be ignored.
Position
Select the user’s job position (ie. “Engineer”) from the drop-down.
E-mail
Set the user’s email address. This is used to allow other users to email this
user from within OfficeServ Communicator.
Address
Set the user’s street address. This information is optional and is only displayed
in other users’ contact lists.
Department
Select the user’s department (ie. “Product Engineering”) from the drop-down.
Creating Users from a Spreadsheet
When you have many users to create it isn’t practical to create them one at a time. Because of
this the OfficeServ Messenger allows you to upload a simple spreadsheet that will create all
users listed in the sheet.
The spreadsheet is a basic CSV (Comma-Separated Values) file, which means you can create
it through spreadsheet applications, such as Microsoft Excel©, or through a normal text editor
like Microsoft Word or Notepad. This is because in a CSV file you simply list out data with a
comma separating each “column” (i.e. column1, column2, column3). This is handy on
occasions where you may not have access to a spreadsheet application.
The columns of the spreadsheet contain much of the same information as when you create a
single user, and are created as follows (note that you should begin entering data on row 2,
row 1 is ignored as it is assumed to be a title row):
COLUMN
OPTION
DESCRIPTION
MAX LENGTH
A
ID
The user’s login ID.
50 characters
B
Password
The user’s login password.
16 characters†
†When entering a password you must place an asterisk ( * ) at the beginning of the password (i.e. “samsung”
should be entered as “*samsung”) so that it may be properly encrypted when being written to the OfficeServ
Messenger database.
C
Name
The user’s full name.
50 characters
D
Nickname
The user’s preferred name.
50 characters
E
E-mail
The user’s email address.
255 characters
F
Extension Number
The user’s 2, 3, or 4 digit phone extension.
4 characters
G
CID
The Caller ID display for this user.
8 characters
H
Mobile
The user’s cell phone number.
50 characters
I
Image
Reserved for future use, leave it blank.
255 characters
J
Position
The user’s job position.
50 characters
K
Address
The user’s street address.
255 characters
L
Password Hint
The password retrieval question.
50 characters
M
Hint Answer
The answer for the password retrieval question.
50 characters
After entering all your data in the correct format you will need to save the file as a CSV file. To
do this you simply select the CSV (Comma delimited) (*.csv) entry from the Save as
type: field of the Save window when you are saving the spreadsheet.
33
DESCRIPTION
PAGE
OPTION
The Upload Contacts screen will be displayed:
Click Browse…, locate your CSV file then click Open and then OK. The file will be uploaded to
the server and verified. If contacts cannot be loaded you will be shown which users had errors
and what the errors are. Otherwise the following screen is displayed:
Save to SYSTEM ID allows you to set which OfficeServ 7000 Series system (in multi-system
environments) to create the user under. Save to Group allows you to set the department the
users will be created under. After setting these values click Save. You will be asked if you
want to create the users. Click OK to proceed.
A summary screen is displayed showing you the results of the upload. You may click Back to
return to the Upload Contacts page (in the event that you have more files to upload).
34
PAGE
Once the CSV file is created you are ready to upload it to the server so your users can be
created. Begin by clicking the Upload Contacts menu item from the left menu of the web
interface:
To begin, click the Assign User menu option in the left menu.
The Assign User screen will be displayed:
Any users who do not have a department specified will appear in the Unfiled Users list. The
Groups list contains all the departments you have created. Select one or more users from the
Unfiled Users list, then select a department, and then click Submit. The selected users will be
assigned to the selected department.
The Assign User screen is intended only for assigning unfiled users, and
can’t be used to reassign users from one department to another.
Backing Up the User List
After creating and configuring all users you will want to back up your user list in case anything
should happen to the server in the future. To do this click on the Download Contacts item in
the left menu of the web interface.
35
When importing or creating users sometimes it isn’t convenient to add them to a department,
such as when the department has not been created yet. In these cases it is not efficient to add
users to a department one at a time, so the Messenger web interface contains a menu option
specifically designed to let you assign users to departments quickly.
PAGE
Assigning Unfiled Users to Departments
PAGE
36
The Download Contacts screen is displayed:
Select the department you wish to back up from the list (or leave it at the default setting of All
to get all users) and then click Create. The backup file will be created and a download page
will be displayed:
The blue text to the right of the word Download is a link to the backup file. Click the link and
you will be prompted to open or save the file.
Click Save to store the backup file. You will be prompted to choose a download location.
Choose the location and then click Save. Be sure to keep the file in a secure location for future
use, as it can be uploaded through the Upload Contacts screen later through the same process
as described earlier in this chapter.
After backing up your user list you are ready to start the OfficeServ Messenger services and
begin connecting clients.
37
CHAPTER 5
This chapter deals only with Administration of the OfficeServ Messenger.
For details on how your users will interface to the Messenger see the SMTi5243 Keyset User Guide and/or the OfficeServ Communicator User
Guide.
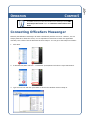
Connecting OfficeServ Messenger
Normally the OfficeServ Messenger will start automatically with the server PC. However, it is not
always practical to reboot the server, so it is important to know how to launch the application
manually. This is done from the Windows Services Snap-In. You can get to the Snap-In as follows:
1. Click Start.
2. In Windows XP/2003 click Run…. In Windows 7/Vista/2008 click where it says Start Search.
3. Type services.msc and then press Enter to launch the Windows Services Snap-In.
PAGE
OPERATION
38
PAGE
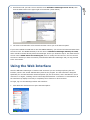
4. Scroll down until you find a service with the name OfficeServ Messenger Server for UC, then
click the Start button in the upper right of the title bar (shown below).
5. The service will start after a few seconds and then return you to the Services panel.
If you have installed the XCAP Server and the SIMPLE Gateway, you will need to locate and start those
services as well. The SIMPLE Gateway’s service name is OfficeServ Messenger Gateway for OSM,
and it should be located directly above the Messenger service you located in step 4. The XCAP Server’s
service name is XCAP Server for Samsung UC, and it is usually the last service in the list. Once all
services are started you have successfully connected the OfficeServ Messenger and you may proceed
to the next section.
Using the Web Interface
Once the OfficeServ Messenger is launched and connected you are can begin exploring the web
interface, which is the central administration point for the program. The web interface is designed
specifically for use with Microsoft’s Internet Explorer (IE) line of browsers, and is intended for use on
versions 6.0 or higher, including version 8 that ships with Windows 7. Because it is customized for IE
the interface may display incorrectly or completely fail to function in other browsers.
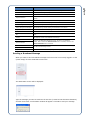
To begin, log in to the Messenger Admin web interface:
1. Click Start then click Internet to open Internet Explorer.
39
PAGE
2. Load the Messenger Admin website by typing http://[IPAddress]/osm (i.e.
http://192.168.1.24/osm) into the address bar and clicking Go or pressing Enter
3. You will be prompted to log in to the server. You must enter the username and password of a
user on the server that has administrative rights (such as the Administrator user). Enter the login
information and then click OK. If you want to save this login information so you don’ have to enter
it again check the Remember my password box before clicking OK.
4. This will load the Messenger Admin login page.
5. The default username is admin, and the password is also admin. Enter these and then click OK.
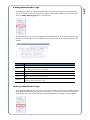
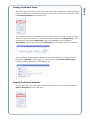
The Messenger Server Status Page
After logging in you are presented with the Messenger Server Status Page. You can use the
left menu (highlighted below) to access the rest of the Messenger web interface. This page is
used to get a quick view of the state of various parts of the OfficeServ Messenger as described
on the next page.
License Key
The license key that is currently active for the Messenger.
License Info
The user quantities granted by the above license.
Server Startup Time
The time that the Messenger services were last started.
Export IP Address
The IP address users will enter in OfficeServ Communicator to connect to the
system.
Elapsed Time
The amount of “uptime” between Server Startup Time and now.
SIP Messages
The total number of call activity logs.
Buddy Management Messages
The number of logs records relating to buddy lists.
Admin Management Messages
The number of log records relating to administrative user actions.
Logon Users
The number of users currently logged in to the system.
Active Conferences
The number of users currently in a video conference.
DB
Displays whether the SQL database connection is active or if there was an
error.
Version
The software version of the OfficeServ Messenger.
Service Install
These buttons allow you to create or delete the Windows Service used for
launching the OfficeServ Messenger Server. The service is installed by
default. When installed the Service Install button is disabled, otherwise the
Service Uninstall button is disabled.
Service Uninstall
Start
Stop
The Start and Stop buttons control the Windows Service used for launching
the OfficeServ Messenger Server.
Refresh
Refresh the screen to reflect any changes that may have been made.
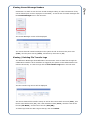
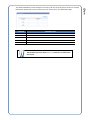
Sending a Broadcast Message
When you want to send a broadcast message to all users who are currently logged in to the
system simply click the Send Notice menu item.
The Send Notice screen will be displayed:
Type the message you want to send into the text box (it must be less than 600 characters)
and then click Send. A confirmation window will appear. Click OK to send your message.
40
DESCRIPTION
PAGE
OPTION
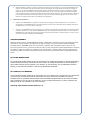
The Admin Activity Logs screen is displayed. Use the date ranges at the top to select the time
period you wish to search for (the default search range will pick up all records) and then click
Submit.
OPTION
DESCRIPTION
NO.
The log record identifier. This is for reference only.
User
The user who performed the action. This will usually be OfficeServAdmin, which is the default
administrator login created by the installation.
Time
The time and date the activity occurred.
Type
The type of activity, such as adding a user or modifying a system.
Table
The SQL Database table that was modified. For example, if the Type is ADD and the Table is
USERS it means that a new user was created.
Description
The details of the activity. This includes such data as which user account was created or the IP
address an administrator logged in from.
Clearing Administrative Logs
While administrative logs are very useful, they can eventually grow to a large number of items
and it becomes difficult to find what you’re looking for. To clear out old logs you can click the
Clear Activity Logs item in the left menu to set the parameters for which records to delete.
41
The Messenger tracks all operations performed by someone who logs into the web interface.
This is for security in the event that a user makes unauthorized changes. To view these logs
click the Admin Activity Logs item in the left menu.
PAGE
Viewing Administrative Logs
PAGE
42
The Clear Activity Logs screen is displayed.
Select the date range for the records you want to delete and then click Submit. The default
date range when you load the page will delete all administrative logs.
Viewing / Deleting Message Logs
The Messenger also tracks unread administrative broadcast messages and unread user-to-user
messages. You can view the summary of how many unread messages are in the system by
clicking the Message Logs item in the left menu.
This will open the Message Logs screen.
OPTION
DESCRIPTION
Period
The time period the message records span.
Notice
The number of unread administrative broadcast messages.
Note
The number of unread user-to-user messages.
Total
The total number of unread messages.
Type:
Set which types of message logs to delete: all (Total), broadcasts (Notice), or
user-to-user (Note).
Status:
Set the status type of message logs to delete: all (Total) or messages already
read (Read).
Period: [2005/01/01] ~
Select the age of logs you wish to delete. The beginning date is always January 1st
2005 to ensure all old records are removed. The end date you specify MUST be 2
or more months in the past. This ensures you don’t accidentally delete logs
pertaining to messages still in the system.
Delete
Deletes the message logs specified by the above parameters. Messages
themselves are not deleted, only the activity logs for them.
The Unread Messages screen will be displayed.
The screen shows all unread messages in the system as well as the time they were sent
(Time), who they were sent by (From), and who they were sent to (To).
Viewing / Deleting File Transfer Logs
The OfficeServ Messenger allows OfficeServ Communicator users to share files through the
collaboration interface. All file transfers are logged by the system so that administrators can
monitor this activity. To view the logs click the File Transfer Logs item in the left menu.
The File Transfer Logs screen will be displayed.
This screen shows all file transfer activity as well as when the transfer occurred (Time), who
the file was transferred to (To), who it was transferred from (From), what the name of the
file was (File Name), and the size of the file (Size (KB)).
To delete logs select the date range at the top, then click Delete.
43
Sometimes it is useful to see who has unread messages waiting in order to determine if they
can be deleted (such as if an employee is terminated). To see the list of unread messages click
the Unread Messages item in the left menu.
PAGE
Viewing Unread Message Headers
The Conference Status screen displays all conferences currently in progress as well as a quick
status overview of the conference, such as the number of participants (Attendant(s)), when
the conference was created (Start Time), and a brief description of the conference
(Description). Click on the conference ID (Room No.) to view details about the conference.
The Room Status window displays a detailed record of the conference, including the list of
participants (Attendee) and the type(s) of resources being used (Active Session Type),
including Chatting, Whiteboard, Video chatting, etc.
Viewing Conference Statistics
To see a quick summary of the types of conference resources currently being used click the
Session Statistics item in the left menu.
44
When more than two users are involved in a chat, video chat, whiteboard, or audio conference
session the Messenger will track the activity as a conference. To view active conferences click
the Conference Status item in the left menu.
PAGE
Viewing Conference Status
45
PAGE
The Session Statistics screen displays a summary of all the currently active resources. Clicking
Refresh will update the screen to reflect any new activity since you loaded the page.
OPTION
DESCRIPTION
Active Users
The number of user currently involved in a conference of some type.
Voice
The number of users in an audio conference.
Chatting
The number of users in an instant message chat session.
Video
The number of users in a video chat.
Whiteboard
The number of users involved in a collaborative white boarding session.
For more details on how your users will interface to the Messenger see the
SMT-i5243 Keyset User Guide and/or the OfficeServ Communicator
User Guide.
SOFTWARE LICENSE AGREEMENT AND LIMITED WARRANTY
For OfficeServ CTI Applications for OfficeServ Keyphone Series
IMPORTANT, READ CAREFULLY
This Samsung End-User License Agreement (EULA) is a legal binding agreement between you (either an individual
or an entity) and Samsung for Samsung software product identified above, which includes computer software and
may include printed material, and "online" or electronic documentation ("SOFTWARE"). By installing, using the
SOFTWARE, you indicate your acceptance of this Samsung License Agreement. If you do not agree to the terms of
this License Agreement, please do not install or use the enclosed SOFTWARE.
SOFTWARE LICENSE
The SOFTWARE is protected by copyright laws and international copyright treaties, as well as other intellectual
property laws and treaties.
1.
2.
GRANT OF LICENSE. This License Agreement grants you following rights:
a.
SOFTWARE: Samsung grants to you a personal, non-exclusive license to make and use one (1) copy of the SOFTWARE
accompanying this Agreement on any single computer, provided the SOFTWARE is in use on only one computer at any
time. If you have multiple Licenses for the SOFTWARE, then at any time you may have as many copies of the SOFTWARE
in use as you have Licenses.
b.
Electronic Documents: Solely with respect to electronic documents included with the SOFTWARE, you may make an
unlimited number of the copies, provided that such copies shall be used only for internal purpose and you shall not
publish or distribute such to any third party, without Samsung Electronics Co., LTD. written and expressed consent.
c.
Limitation on Reverse Engineering, Decompilation, Disassembly: You shall not reverse engineer, decompile or
disassemble the SOFTWARE, except to the extent that this restriction is expressly prohibited applicable law.
d.
Separation of Components: The SOFTWARE is licensed as a single product. Its component parts may not be separated for
use on more than one computer.
e.
Rental: You may not rent, lease and/or lend the licensed SOFTWARE.
f.
Support Services: Samsung may provide you with support services related to the SOFTWARE, according to Samsung
policies and programs and in for the country in which the SOFTWARE was purchased. With respect to technical
information you provide to Samsung as part of the support services, Samsung may use such information for its business
purpose, including for product support and development. Samsung will not utilize such technical information in a form
that personally identifies you.
g.
SOFTWARE Transfer: You may permanently transfer all of your rights according to this agreement, provided you retain no
copies, you transfer all of the SOFTWARE, and the recipient agrees to the terms of this agreement by notifying in writing
to authorized Samsung VAR, outfit and/or dealer in which the SOFTWARE was purchased. And including all prior versions
of SOFTWARE, if the SOFTWARE is an upgrade.
h.
Termination: Without prejudice to any other rights, Samsung may terminate this agreement if you fail to comply with the
terms and condition of this agreement. In such event, you must destroy all copies of the SOFTWARE and all of its
component parts.
SOFTWARE ACTIVATION
a.
3.
Software Activation; Samsung will provide a software activation code that will allow use of the purchased OfficeServ CTI
products. The activation code will be associated with the MAC address of the LAN interface of the Samsung telephone
system. In the event of hardware failure associated with the LAN interface Samsung will issue a replacement software
activation code when requested by a Samsung authorized dealer. In the event that a replacement software activation
code is issued the defective hardware associated with the original software activation code must be returned to Samsung.
If the hardware associated to the software activation code is not returned to Samsung by the dealer the dealer will be
billed for the original purchase price of the OfficeServ CTI application.
UPGRADES & COPYRIGHT
a.
Upgrade: If the SOFTWARE is an upgrade of a component of a package of software programs that you licensed as a
single product, the SOFTWARE may be used and transferred only as an part of that single product package and may not
be separated for use on more than one computer.
b.
Copyright: The SOFTWARE is owned by Samsung or its suppliers and protected by copyright laws and international treaty
provisions. Therefore, you must treat the SOFWARE like any other copyrighted material except that you may install the
SOFTWARE on a single computer provided you keep the original solely for backup or archival purpose. You may not copy
the printed materials accompanying the SOFTWARE.
LIMITED WARRANTY
Samsung warrants that (a) the SOFTWARE will perform substantially in accordance with the accompanying written
materials for a period of ninety (90) days from the date of receipt, and (b) any Samsung supplied hardware
accompanying the SOFTWARE will be free from defects in materials and workmanship under normal use and
service for a period of one(1) year from the date of receipt. During the warranty periods specified above, Samsung
will replace or repair any software or hardware found to be defective. Warranty claims should be made through
the Samsung dealer from whom the products were purchased, and must be made within the applicable warranty
period.
NO OTHER WARRANTIES
TO THE MAXIMUM EXTENT PERMITTED BY THE APPLICABLE LAW, SAMSUNG DISCLAIMS ALL OTHER WARRANTIES,
EITHER EXPRESS OR IMPLIED, INCLUDING BUT NOT LIMITED TO IMPLIED WARRANTIES OF MERCHANTABILITY
AND FITNESS FOR PARTICULAR PURPOSE, WITH RESPECT TO THE SOFTWARE, THE ACCOMPANYING PRODUCT
MANUAL(S) AND WRITTEN MATERIALS, AND ANY ACCOMPANYING HARDWARE.
NO LIABILITY FOR DAMAGES
TO THE MAXIMUM EXTENT PERMITTED BY APPLICABLE LAW, IN NO EVENT SHALL SAMSUNG OR ITS SUPPLIERS BE
LIABLE FOR ANY DAMAGES WHATSOEVER (INCLUDING, WITHOUT LIMITATION, DAMAGES FOR LOSS OF
BUSINESS PROFITS, BUSINESS INTERRUPTION, LOSS OF BUSINESS INFORMATION, OR ANY OTHER PECUNIARY
LOSS) ARISING OUT OF THE USE OF OR INABILITY TO USE THE SOFTWARE PRODUCT, EVEN IF SAMSUNG HAS
BEEN ADVISED OF THE POSSIBILITY OF SUCH DAMAGES.
Samsung Telecommunications America, L.P.