1
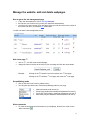
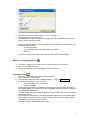
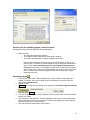
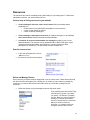
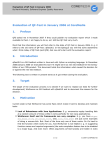
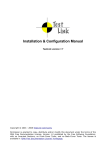
USER MANUAL IAC CONTENT MANAGEMENT SYSTEM
FOR WEBSITES AND LEARNING ENVIRONMENT
2
Table of Contents
GENERAL ........................................................................................................................................5
Login to the website: .....................................................................................................................................5
What do the boxes mean ….? .......................................................................................................................5
MANAGE THE WEBSITE: ADD AND DELETE WEBPAGES........................................................6
How to get to the site management page......................................................................................................6
Add a new page ☼ .........................................................................................................................................6
Set publishing mode ......................................................................................................................................6
Allow comments.............................................................................................................................................6
Move a page (and all its subpages) to another level in the navigation tree...............................................7
Change the sequence of pages under a parent-page:..................................................................................7
Delete a page ..................................................................................................................................................8
Preview your website.....................................................................................................................................8
USE THE WYSIWYG EDITOR TO EDIT YOUR WEBPAGES........................................................9
Start the editor...............................................................................................................................................9
Type / change the text of the webpage .........................................................................................................9
Paste from a Word document.......................................................................................................................9
Paste from a webpage using “paste from txt”.............................................................................................9
Tip: Use Notepad to remove all code ...........................................................................................................9
Use tables to layout......................................................................................................................................10
Use of format................................................................................................................................................10
Use of font: better not to ….. ......................................................................................................................10
Save, Save, Save !.........................................................................................................................................10
How to copy a hyperlink .............................................................................................................................10
Creating hyperlinks to documents / other websites / e-mail adresses .....................................................10
3
Deleting / changing hyperlinks ...................................................................................................................11
Inserting images...........................................................................................................................................11
General rules for uploading images: small is beautiful............................................................................12
Uploading images.........................................................................................................................................12
General rules for uploading documents ....................................................................................................13
Uploading documents to the webserver and link to them ........................................................................13
RESOURCES ................................................................................................................................ 14
Various ways of listing resources in your website ....................................................................................14
Start the resource tool .................................................................................................................................14
Define and Manage Themes........................................................................................................................14
Submit a resource ........................................................................................................................................15
Manage / edit a resource .............................................................................................................................16
Link to a single resource .............................................................................................................................16
ADD A SELECTION OF RESOURCES TO A SINGLE WEBPAGE............................................ 17
Open the “edit document related resources” window ..............................................................................17
Select the theme / themes ............................................................................................................................17
How to change publication of combined themes from AND to OR.........................................................17
4
General
Login to the website:
•
Click on the log on button at the top right of the screen;
•
Fill in your username and password;
•
Click on the log on button.
What do the boxes mean ….?
Navigation menu: use the navigation menu to
navigate the pages
User information:
Use the box “user information” to :
•
Manage the website : add new pages,
create subpages, define who is allowed to
view which page etc.
•
Edit the webpages : write the text, insert
images etc.
•
Go to the resource tool, the online library
for your website.
•
Edit document related resources: insert a
selection of resource tool records at the
bottom of your page
5
Manage the website: add and delete webpages
How to get to the site management page
•
•
•
in the user information box, click on “Manage this site”;
the first time you will have to log in with your username and password;
you will get to a site overview, a list with sites. Select your site and click on the number in
front of the site name, for example [42] /landscapes.
You will now see the site management screen:
Add a new page ☼
•
•
click on ☼ , this will create a new subpage;
change the name in the box to the name of your new page and click the create button.
Example:
Clicking on the ☼ behind <root>/ will create a new 1st level page.
Clicking on the ☼ behind a 1st level page, will create a 2nd level page.
Set publishing mode
•
•
Click on the word in the column “publish mode”;
You will get a drop down menu. Select the publishing mode for your page.
•
•
•
•
public (the whole world can see it);
private (only people with username and password can see it);
course only (only people in a defined coursegroup can see it)
back-office (only the webeditor and administrator can see it)
Allow comments
•
To create a comments box at the bottom of your webpage, thick the box in the column
“allow comments”
.
6
This will create a textbox at the bottom of your webpage which can be used by visitors to
leave text on the webpage. Other visitors can read the comments of previous visitors. It can
for instance be used to interact with visitors on the content of a page, or to give feedback to
the content of a page or a document in a project team. The webeditor can edit or delete
comments.
Move a page (and all its subpages) to another level in the navigation tree
•
•
To move a page to another level in the navigation tree, click the arrow
Open the drop down list of all the pages in your website;
•
•
Select the page under which you want your page (and its subpages) to be located;
You will get a dialogue box, asking whether you are sure YES / NO.
;
Change the sequence of pages under a parent-page:
•
•
Click on the number in brackets behind the page, for example [20];
Change the number in the box and click on the button apply;
•
The page will now move up or down in the same level.
When you start making your pages in the website, it is advisable to use 10, 20, 30 etc as
numbers for your 1st level pages. It makes it easier to add a page later in between two
existing pages (for example later on, you can give a new page number 25, this will place
it between 20 and 30).
The subpages under a page (the children) have their own sequence.
For instance like this:
Using a mix of double and singe digits gives
you a better overview:
Week 1
Monday
Tuesday
Wednesday
Thursday
Friday
Week 2
Week 1
[20]
Monday
[0]
Tuesday
[1]
Wednesday [2]
Thursday
[3]
Friday
[4]
Week 2
[30]
[20]
[00]
[10]
[20]
[30]
[40]
[30]
7
Delete a page
•
To delete a page, click on the red cross
o
You cannot delete a page if it has subpages. Before you can delete the “parent”,
you will have to either move the subpages, or delete the subpages.
o
Note, the page will not be permanently deleted. It will move to the box “importing
deleted pages” at the bottom of the site management page.
Preview your website
•
Click on (pre)view to go to the website to preview the site and its pages.
•
When it is your first preview, click on the log on button at the top right of the screen;
•
Fill in your username and password;
8
Use the WYSIWYG editor to edit your webpages
Start the editor
•
•
•
Navigate to the page you want to edit using the navigation menu (or the site map);
in the user information box, click on “Edit this page”;
the page will now be opened in the webpage editor.
Type / change the text of the webpage
•
•
You can type the text for your webpage in the window;
You can change the text of your webpage.
Paste from a Word document
Pasting formatted text from Word is generally not a good idea because the source code from
Word is pasted as well. This can create unexpected problems down the line. The text may appear
correctly in the editor, but not in the web page. Or editing at a later stage may become impossible
due to hidden formatting code from Word. Also, the code does not adhere to web styles, thereby
making it practically impossible to update the color or font scheme of your web pages at a later
stage.
•
. This will remove
To paste text from a Word document, use the special button:
invisible Word code. Bold and Italics in the Word document will remain Bold and Italics in
your webpage.
Paste from a webpage using “paste from txt”
•
To paste from a webpage, use the special button. This will clear the text from all its
formatting and remove the invisible html code. It will prevent future problems with text not
appearing correctly in your webpage. All styles will be removed, and you will paste plain
text in your webpage. You can edit the text using the editor.
Note: when you want to apply a bulleted list, or a heading to a selection of text
Previously pasted using “paste from word” or “paste plain text” buttons, you first have to
add paragraph breaks by deleting whitespace / empty lines and adding whitespace /
empty lines with the Enter key.
Tip: Use Notepad to remove all code
Clearing text from it of all formatting can also be achieved by copying text into Notepad, and then
from Notepad into the Editor. You then don’t have to use the paste from word” or “paste from txt”
options.
9
Use tables to layout
•
You can use tables to create a user-friendly layout of text and images. When you want
the table borders to be invisible, set the border to zero (0).
Use of format
You can use the options under the dropdown menu “format” to apply heading styles.
•
Select the text and apply the format you want.
Note: Heading text is used by search engines to check the relevance .
Note: when the format applies to more text than you selected, you have to add paragraph
breaks. This problem may occur after pasting text from other applications. (re “paste from
a webpage using “paste from txt”).
Note: The way headings display in your website (the size, color etc.) depends on the
stylesheet which has been defined for your site. Ask the administrator to make changes.
Use of font: better not to …..
If you really want, you can use fonts, but it is better not to, because they can be defined in the
stylesheet. This makes it possible to change the font or the colour of all text in a website in a few
minutes by just redefining some lines in the stylesheet. If you use the font button, changing the
font or the text color in your website may take days.
Save, Save, Save !
Click on the save button before you navigate to another page, otherwise your changes will be
lost.
How to copy a hyperlink
•
You can copy a hyperlink from the address bar of your browser, select the address and,
o press CTRL+C or
o click on the address with your right mouse button and choose “Copy”
or
•
Hover over an image or hyperlink with your mouse and click on it with your right mouse
button and choose “Snelkoppeling kopiëren” or “Copy Shortcut”. You now have the URL
or address of the file copied.
This can also be used to make hyperlinks to other pages of your site: hover over the link
to the page in the navigation menu and “copy Shortcut.
Creating hyperlinks to documents / other websites / e-mail adresses
•
•
•
Select the text you want to use as a link;
Click on the insert/edit link button;
You will get a window “link – webpage dialogue”;
10
•
•
•
Choose the link type you want: URL for a link to a webpage;
Choose the protocol, normally http://;
Copy and paste (or type) the link to the webpage (the URL or address) in the URL text
box (re: “how to copy a hyperlink”)
•
Links to an external website or to a document have to be opened in a New Window. Do
this by defining the Target :
o Go to the target tab;
o In the drop down menu, select New Window (_blanc);
o Click OK.
•
If you link to a page which is part of your site you don’t have to define a target:
Deleting / changing hyperlinks
•
•
•
To remove / change a link put your cursor on the text with the link to remove;
Click the insert/edit link button;
Change or delete the link to the webpage in the URL text box.
Inserting images
•
•
•
•
•
•
•
•
Insert your cursor where you want the image to appear;
Click on the insert image button;
In the window “image properties – webpage dialogue”, click on Browse Server
In the window “connect to www.iac.wur.nl”:
o user name: iaclo (note: lowercase!)
o password: 495374
browse through the folder of your website o the image you want to include and click on
the image filename (if the image has not been uploaded, follow the procedure “upload an
image” described hereunder) ;
You will now get back to the “Image Properties” window, and the URL text box shows the
path to your image;
You can type an “Alternate text”. This text will appear to the visitor of your website when
s/he hovers his/her mouse over the image. This text is also indexed by Search engines,
and therefore improves your “search profile”;
Click the OK button at the bottom of the window.
11
General rules for uploading images: small is beautiful
Some general rules should be followed when uploading files.
•
Make sure that:
o The image file-name has no spaces ;
o The image file-name contains only letters and/or numbers;
o The file-size and dimension (in pixels) is adapted to web-use.
Normally the width should not be more than around 720 pixels, and when you
want to work in 2 columns, the width should be around 350 pixels. Resolution for
web is 72 dpi. Never upload pictures from your Digital Camera directly to
the server to use them in your website, they are much too big and your website
visitors might have to wait for minutes before the can see the picture. First resize
them. You can use the freeware program IRFAN view to resize your images
(www.irfanview.com)
Uploading images
•
•
•
•
•
•
•
In the window “FCK editor – Resources Browser”, create a folder for the images your
website, if it doesn’t exist. Use the folder name of the website (in the URL of the site:
www.iac.wur.nl/foldername/)
Open the folder
Browse… your computer (or network) for the image you need (don’t forget to resize big
images!);
Click the button Upload
You will now get back to the “Image Properties” window, and the URL text box shows the
path to your image;
You can type an “Alternate text”. This text will appear to the visitor of your website when
s/he hovers his/her mouse over the image. This text is also indexed by Search engines,
therefore improves your “search profile”;
Click the OK button at the bottom of the window.
12
General rules for uploading documents
Some general rules should be followed when uploading files.
•
Make sure that:
o The document file-name has no spaces ;
o The document file-name contains only letters and/or numbers;
o The file-size is adapted to web-use (preferably not more than 500 kB).
When making files available, please keep in mind that many people are still accessing the
internet with a low-bandwidth connection (i.e. telephone line). A file larger than 500 kb tests such
a user’s patience and is often a nuisance to receive rather than a pleasure.
When not properly edited, a 4 page powerpoint file can be 40 Mb. A common cause of big file
sizes is including high resolution images. To reduce the file size, make sure that the images are
not too big. Sometimes it helps to make a pdf file. Print the document; select the pdf printer from
the list; in the properties menu, set the resolution to 72 dpi (preset resolution is often 300 dpi).
Uploading documents to the webserver and link to them
•
•
•
Click on the insert/edit link button.
In the window “link – webpage dialogue”, click on Browse Server
In the window “connect to www.iac.wur.nl”:
o user name: iaclo (note: lowercase!)
o password: 495374
•
In the window “FCK editor – Resources Browser”:
o In the upper left of the window, select the resource type you want to upload (for a
word document, a powerpoint file, or a pdf file, use the type ‘file”)
o
Create a folder for the files for your website, if it doesn’t exist. Use the folder
name of the website (see the url of the site)
o
o
o
o
o
Open the folder
Browse… your computer (or network) for the document you need.
Click the button Upload
Click on the filename
You will now get back to the “Link” window, and the URL text box shows the path
to your file.
Click the OK button at the bottom of the window.
o
13
Resources
The resources tool can be considered as an online library for your web project. To define and
upload the resources, you use the Resource Tool.
Various ways of listing resources in your website
•
A list including all resources, with a search menu offering combined search
possibilities for;
o freetext search in the titles AND in descriptions of the resources;
o a menu to look search for themes
o a menu to search media types
•
A list including a certain type of resources (for instance all reports, or all websites)
with a search menu offering combined search possibilities.
•
A selection of resources at the bottom of a webpage according to one or more
attributed themes. The selection can be generated with an AND or OR option, eg all
resources with both participation and monitoring, or all documents with either
participation or monitoring. This option does not show a search box.
Start the resource tool
•
•
in the user information box, click on
“edit resources”;
the resource tool will now be started
Define and Manage Themes
Every resource you submit must be categorized in one or more themes. These themes will help
the user to find the information s/he is looking for. So, before you can submit or manage any
resources, you need to define the themes within which you would like to categorize your
resources.
•
Define the themes using the manage resources drop down menu:
Think carefully about the themes! They
shouldn’t be too generic, but neither
too specific. Ten themes is probably
enough. When you want to publish a
portal,you could use more themes,
around 15 would then be a maximum.
When you submit a resource,
assigning 1 or 2 themes should be
enough to describe the resource.
14
•
Define the name, the access mode, use as category “main”, and click the button
Add New Theme ;
Submit a resource
•
Go to the drop down menu “submit resources”
•
Select the type of resource you want to submit
You can submit seven types of resources. If a resource cannot be clearly categorized;
such as a thesis, or a brochure from an organization, you can submit it as a “report”, as
this is the resource with the most general entry fields.
•
You will see a web form with specified fields. All fields with an asterix (*) are optional, all
others are mandatory.
•
Select one or more themes within which this report will be categorized. You can select
more than one theme by keeping the CTRL key depressed, while selecting the themes
with your mouse.
•
Available for …… means:
o Public view = all website vsitors can see the report,
o Community view = only users with an ID and password can view the resources
o Back office view = the resource is not published in the website
•
When writing the description of the resource, keep in mind that this text is searchable
with a free-text search. So try to include keywords in the description of the resource.
•
If you want to store the file on the IAC server, browse your system for the file using the
browse button. Select the file and click the button Open. Make sure that:
o The document file-name has no spaces ;
o The document file-name contains only letters and/or numbers;
o The file-size is adapted to web-use (preferably not more than 500 kB).
15
•
After having completed all fields, click submit report.
When making files available, please keep in mind that many people are still accessing
the internet with a low-bandwidth connection (i.e. telephone line). A file larger than 500 kb
tests such a user’s patience and is often a nuisance to receive rather than a pleasure.
Manage / edit a resource
•
After having submitted a resource, you can edit or delete it via the “manage” menu.
Link to a single resource
The resources defined with the resource tool can be automatically published in various ways.
Sometimes however, you might want to link directly to a single resource from within a web page.
The logic behind this is the same as linking to another webpage, so you will need to know the
URL of the individual resource.
•
Via the “manage” drop down menu in the resource tool, find the resource you want to link
to;
•
With your resource entry on the screen, you should see the “download arrow”
•
Hover over the icon and click on the arrow with your right mouse button and choose
“Snelkoppeling kopiëren” or “Copy Shortcut”. You now have the URL or address of the
file copied.
•
You can now return to the webpage editor (FCK editor), select the text which you want to
make into a link, click on the link icon, and paste the address into the URL field.
•
When linking to a file it is strongly advisable to choose “New Window” as the target.
16
Add a selection of resources to a single webpage
•
A selection of resources at the bottom of a webpage according to one or more
attributed themes. This option does not show a search box.
Open the “edit document related resources” window
•
in the user information box, click on
“edit document related resources”;
Select the theme / themes
•
Select one or more themes within which you categorized the resources. All resources
which have been attributed this theme will be displayed at the bottom of your webpage..
You can select more than one theme by keeping the CTRL key depressed, while
selecting the themes with your mouse.
•
Click the Apply button
How to change publication of combined themes from AND to OR.
The selection can be generated with an AND or OR option, eg all resources with both
participation and monitoring (AND), or all documents with either participation or monitoring (OR).
The default is set to AND, when you want to change to an OR query (this setting can only be
changed at website level, not at webpage level):
•
ask the administrator
17