1
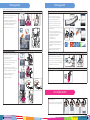
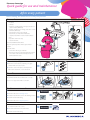
Planmeca Sovereign
Quick guide for use and maintenance
After every patient
When starting, the dental unit is in entry/exit position.
Clean surfaces
Wipe with disinfectant Dürr FD 333/FD 322 or similar:
• headrest
• armrests
• handle of operating light (or change, autoclave or
clean in thermodisinfector)
• hygienic membrane (or change, autoclave or clean
in thermodisinfector)
• instrument hoses (no autoclaving!)
• instruments; see instrument instructions
• cuspidor, instrument console and arm surfaces
• GUI
• tray tables and mouse tray
• assistant element.
DO NOT USE SPRAY DISINFECTANT!
Wipe the upholstery with a mild soap and water
solution.
Clean the bowl:
• Clean the bowl using a soft brush.
• Rinse the bowl by touching the Bowl rinse button.
• The outside of the bowl can be wiped clean or
disinfected with a cloth.
Clean suction system
1 Remove used aspirating tips.
2 Rinse the suction tubes by aspirating one glass
of water with each suction tube.
3 Clean the suction handpieces and wipe them
with Dürr FD 333/FD 322, or autoclave them.
3
2
Clean filters
Empty and clean the bowl filter.
The bowl filter can also be used without the cover cap.
Note! Do not empty the bowl filter to the drain.
Flush instrument waterlines
1 Select the maintenance mode from GUI.
1
2 Drive the unit to the cleaning position.
3 Insert the instrument hoses into the flushing holders.
4 Perform instrument flushing.
3
2
5 Drive the unit to the entry/exit position.
Or
The instrument waterlines can be flushed even when
the instruments are in the console.
1 Select the maintenance mode from GUI.
2 Perform instrument flushing.
1
2
4
Treating patient
Treating patient
When starting, the dental unit is in entry/exit position.
Prepare dental unit for patients
Use instruments
1 When the patient enters, select patient size
S, M, L or XL according to the patient’s height.
1
2
3
5 Fine adjust the specific instrument settings:
• Toggle spray (disabling spray) for upper/lower jaw
• Enable / disable automatic chip blow
• Enable / disable reverse rotation
• Edit rpm and torque
• Limit instrument speed
These adjustments are temporary and do not change
the instrument preset, unless intentionally saved.
The adjustments are discarded when you change to
another preset.
5
1 Drive the patient to the rinsing position.
3 If more water for the cup or bowl rinsing is needed,
put the emptied cup back to the cup holder OR
manually fill the cup or rinse the bowl.
3 Check the headrest position and make fine
adjustments according to the treatment ergonomics.
1
2
sov_003
1
sov_001
2 Put a cup in the cup holder. The cup is filled
automatically and then the bowl rinsing is activated.
2 Fine adjust the chair swivel.
5 Position the operating light according to
mandibular / maxillary positions.
4
Enable mouth rinsing
These adjustments only apply to the current treatment
situation and are not stored into the dental unit memory.
4 Position the instrument console and tray table.
3
Red colour and asterisk indicates that temporary
adjustments to a preset have been made.
Fine adjust working position
If the movements into automatic positions do not suit
the patient, use manual movements instead.
2
4 Change the preset according to the workflow.
For example, in endodontic treatments you can
progressively change to the next preset as you go deeper
into the root canal.
3 Drive the unit to the consultation position.
1 Select the suitable automatic position
(e.g. mandibular position).
1
3 Use the pedal for operating the instruments.
sov_016
These adjustments are automatically stored in the
dental unit memory until the next time you select the
patient size. Making the adjustments will improve
the ergonomics of your working position.
2 Select the correct presets / power modes.
A preset is a set of predefined Instrument settings
designed for a specific treatment situation.
sov_016
2 Adjust the position of the headrest.
1 Prepare the correct handpieces and burs/tips.
Finish treatment
Drive the unit to the entry/exit position.
2
6 Position the assistant element.
joystick
push the joystick inwards
headrest up
3
extend
tilt up
shorten
tilt up
tilt down
tilt down
headrest down
GUI or foot control
6
2
Planmeca Sovereign
sov_016
sov_016
sov_016
1 Those functions that can be performed with both
the GUI and the foot control are numbered in red.
sov_016
The graphical user interface (GUI) and the foot control
feature an identical logic.
sov_021
4
Quick guide for use and maintenance
3
After working day
In the morning
When starting, the dental unit is in cleaning position.
Wake up dental unit
Start cleaning procedure
2 Switch on the unit.
3 Take the cordless foot control from charging.
S195.eps
1 Open the clinic’s main water and air valves and check
the electricity.
Drive the unit to the cleaning position.
2
3
4
4 Sign in with your user name.
S237s.eps
Clean suction system
Rinse the suction tubes by aspirating 0.5 l of water with
each suction tube.
Clean surfaces
Disinfect the upholstery with Dürr FD 312.
Clean filters
S237s.eps
Empty the coarse filter.
Note! Do not empty the coarse filter to the drain.
Clean suction system
1 Insert the suction tubes into the suction tube
cleaning holder. Make sure that the holder is pushed
all the way to the bottom.
2 Pour Orotol Plus into the dosing cubic. Place the cubic
back into the holder.
1
2
3
Flush instrument waterlines
1 Select the maintenance mode from GUI.
3 Perform suction tube cleaning.
2 Insert the instrument hoses into the flushing holders.
4 Autoclave the suction handpieces.
3 Perform instrument flushing.
1
2
3
5 Wash or disinfect the suction tube holders
with Dürr FD 312.
4
5
Finish morning procedure
Drive the unit to the entry/exit position.
Clean filters
1 Empty, clean and disinfect the bowl filter and replace
when necessary.
The bowl filter can also be used without the cover cap.
Note! Do not empty the bowl filter to the drain.
1
2
1
2
2 Wipe clean or wash the bowl at max 65°C.
Shut down dental unit
1 Sign out.
3 Put the cordless foot control to charging.
4 Switch off the water and air valves.
4
Planmeca Sovereign
S195.eps
2 Shut down the unit.
3
Quick guide for use and maintenance
5
Weekly
Monthly
In these procedures, the dental unit is in cleaning position.
Clean surfaces
Clean surfaces
1 Clean and treat the upholstery with Dürr FD 360.
Clean the upholstery also under the protective
legrest cover.
2 Clean the foot control.
Clean the instrument flushing holders in
a thermodisinfector or autoclave them.
1
2
3
S237s.eps
3 Wipe the monitor screen with a dry and soft lint-free
cloth. Clean the backside of the monitor with a mild
soap and water solution.
Clean suction system
Clean filters
1 Rinse the suction tubes by aspirating 0.5 l of water
with each suction tube.
2 Wipe the suction handpieces with Dürr FD 333/FD 322.
3 Fill the dosing cubic with Orotol Plus. During the day,
Orotol Plus slowly runs through the suction rinsing
line and cleans it.
1 Replace the coarse filters.
1
2
2 Check the amalgam collector. Replace it when
95% full.
3
3 Empty the oil collector cup and clean it.
1
2
3
4
4 Clean or replace the VS/A filter.
Clean dental unit waterlines
Thermodisinfect the water container at 93°C.
Before and after longer breaks
3 Start the dental unit waterline cleaning (DUWL)
procedure from GUI.
1
2
3
4 Fill the container with Planmeca Planosil™.
2 Empty the waterlines for the duration of the break.
5 After the DUWL procedure, run water through all
water consuming instruments and the cup fill line.
3 Charge the foot control before the break and leave
the foot control without charging for the duration of
the break.
4
1
S237s.eps
2 Insert the instrument hoses into the flushing holders.
1 Remove the following from the dental unit for
the duration of the break:
• water container
• instrument hoses
• suction tubes
• legrest cover
4 Perform the dental unit waterline cleaning (DUWL)
procedure three times after the break, before using
the dental unit.
3
S195.eps
1 Select the maintenance mode from GUI.
4
Safety messages
In error situations, safety messages are displayed on the GUI. They contain an ID, a message, a description and a solution. Follow the instructions on
the display to recover from the error situation. When the error situation is resolved, the safety message closes automatically OR it can be closed by
touching the OK button or by pressing down the foot control pedal.
The Close button closes the safety message without
correcting the error.
The warning triangle in the Treatment window opens
the safety message.
6
Planmeca Sovereign
Quick guide for use and maintenance
7
Before first use
Console modification
Heavier balance
1
2 Attach the GUI on either side of the instrument
console and/or the assistant element.
!
#
@
sov_032
1 Place the instruments and suction tubes in the
console according to your preferences. Adjust
the balance of the instrument arms according to the
weight of the instrument. The suction tubes can be
used with or without the roller cages.
Lighter balance
3 Create your own user name and use that user name
to sign in to the dental unit.
3
2
!@
Create presets for instruments
1 Create the instrument presets
• Pick up the instrument.
• Edit and rename the existing factory installed
instrument presets.
2 Select the water source for instruments
• City water / bottled water
• Sterile water irrigation
• Perio Fresh
1
2
Create treatment positions
1 Create your own personal automatic positions:
• Select which automatic position to create.
Drive the chair to that position by touching one of
the automatic position buttons.
• Adjust chair height, chair swivel angle, headrest
angle and headrest length.
1
• Save the new automatic position by touching the
same automatic position button for 4 seconds.
2 Adjust the unit swivel:
For detailed instructions, please see the user’s manual. Copyright Planmeca. Rights for changes reserved.
8
www.planmeca.com
_
2
s
• To enable special treatment situations,
such as extractions from the left, and facilitate
the use of laser, CAD/CAM cart, anaesthesiologist,
wheel chair etc.
10030409_2/11.2011/en
• Select right/left-handed mode by swiveling
the cuspidor and the chair.