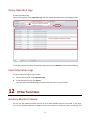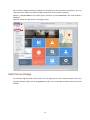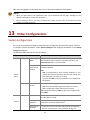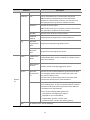
1
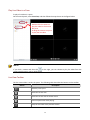
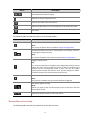
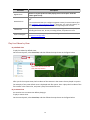
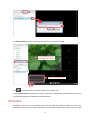
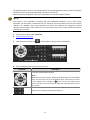
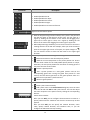
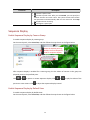
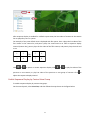
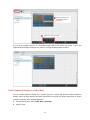
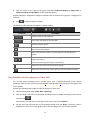
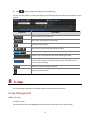
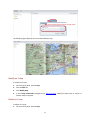
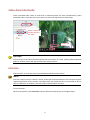
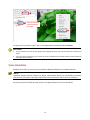
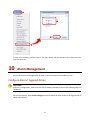
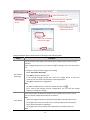
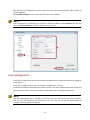
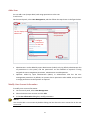
EZStation Video Management Software User Manual Manual Version: V1.04 Thank you for purchasing our product. If there are any questions, or requests, please do not hesitate to contact the dealer. Notice The contents of this document are subject to change without prior notice. Updates will be added to the new version of this manual. We will readily improve or update the products or procedures described in the manual. Best effort has been made to verify the integrity and correctness of the contents in this document, but no statement, information, or recommendation in this manual shall constitute formal guarantee of any kind, expressed or implied. We shall not be held responsible for any technical or typographical errors in this manual. The illustrations in this manual are for reference only and may vary depending on the version or model. So please see the actual display on your device. This manual is a guide for multiple product models and so it is not intended for any specific product. Due to uncertainties such as physical environment, discrepancy may exist between the actual values and reference values provided in this manual. The ultimate right to interpretation resides in our company. Use of this document and the subsequent results shall be entirely on the user’s own responsibility. Conventions Document Conventions Convention Description Boldface font Commands, keywords, parameters and GUI elements such as window, tab, dialog box, menu, button, etc. Italic font Variables for which you supply values. > Separate a series of menu items, for example, Device Management > Add Device. Symbols Symbol Description WARNING! Contains important safety instructions and indicates situations that could cause bodily injury. CAUTION! Means reader be careful and improper operations may cause damage or malfunction to product. NOTE! Means useful or supplemental information about the use of product. Contents 1 Introduction ·····································································································································1 2 Installation, Upgrade, and Uninstall ································································································1 System Requirements ································································································································1 Installation ·················································································································································3 Upgrade ·····················································································································································4 Uninstall ·····················································································································································4 3 Starting Components ·······················································································································5 EZManager Platform ··································································································································5 EZRecorder Server······································································································································6 EZStreamer Server ·····································································································································6 4 Live View ··········································································································································8 Encoding Device Management ··················································································································8 Add an Encoding Device ·····················································································································8 Modify an Encoding Device ··············································································································10 Delete an Encoding Device ···············································································································10 Remotely Perform Operations on an Encoding Device ····································································10 Group Management·································································································································11 Add a Group ·····································································································································11 Delete a Group ·································································································································12 Import Cameras ································································································································12 Play Live Videos········································································································································13 Play Live Video in a Pane ··················································································································13 Live View Toolbar ·····························································································································14 Shortcut Menu of Live View ·············································································································15 Play Live Videos by View ··················································································································15 PTZ Control···············································································································································17 Sequence Display ·····································································································································19 Enable Sequence Display by Camera Group ····················································································19 Enable Sequence Display by Default View ·······················································································19 Enable Sequence Display by Custom View Group············································································20 5 Recording and Playback ·················································································································21 Storage Device Management···················································································································21 Add a Storage Device ·······················································································································21 Modify a Storage Device ··················································································································22 Delete a Storage Device ···················································································································22 Configure a Storage Device ··············································································································22 Restart the Storage Service ··············································································································24 i Recording Configuration ··························································································································24 Configure Recording Schedule ·········································································································24 Manually Record Videos···················································································································26 Alarm-Triggered Video Recording ····································································································27 Video Records Query ·······························································································································27 Query Video Records by Custom View ·····························································································27 Query Video Records by Camera ·····································································································28 Playback ···················································································································································29 Video Record Control Toolbar ··········································································································29 Floating Toolbar for Video Record Playing ·······················································································31 Shortcut Menu for Playback ·············································································································31 6 Stream Media Server ·····················································································································32 Stream Media Server Management·········································································································32 Add a Stream Media Server ·············································································································32 Modify a Stream Media Server ········································································································32 Delete a Stream Media Server ·········································································································32 Configure a Stream Media Server ············································································································33 7 Decoding and Displaying Videos on the Video Wall ······································································34 Decoding Device Management ················································································································34 Add a Decoding Device·····················································································································34 Modify a Decoding Device················································································································34 Delete a Decoding Device ················································································································34 Remotely Configure a Decoding Device ···························································································35 Video Wall Management ·························································································································35 Add a Video Wall ······························································································································35 Modify a Video Wall ·························································································································35 Delete a Video Wall ··························································································································36 Configure a Video Wall ·····················································································································36 Video Wall Operations ·····························································································································37 Display Live Video on a Video Wall ··································································································37 Close Live Video on a Video Wall ·····································································································37 Split Screen for a Decoding Output Channel ····················································································37 Enable Sequence Display on a Video Wall ·······················································································38 Play Decoded Video Recordings on a Video Wall ············································································39 8 E-map ·············································································································································40 E-map Management ································································································································40 Add an E-map ···································································································································40 Modify an E-map ······························································································································41 Delete an E-map ·······························································································································41 Add a Hot Spot ·································································································································42 Modify a Hot Spot ····························································································································42 Delete a Hot Spot ·····························································································································42 ii Add a Hot Region······························································································································43 Modify a Hot Region·························································································································43 Delete a Hot Region ·························································································································43 E-map Operations ····································································································································44 View a Hot Spot ································································································································44 View a Hot Region ····························································································································44 View Hot Spot/Hot Region Alarms ···································································································45 Clear Hot Spot/Hot Region Alarms ···································································································45 9 Voice Communication ····················································································································45 Video Associated Audio ···························································································································46 Intercom···················································································································································46 Voice Broadcast ·······································································································································47 10 Alarm Management ·····················································································································48 Configure Alarm-Triggered Action ···········································································································48 Alarm Records ··········································································································································50 Acknowledge Live Alarms·················································································································50 Query History Alarms ·······················································································································51 Acknowledge History Alarms ···········································································································52 View Alarm-Triggered Videos ···········································································································53 Export Alarm Records ·······················································································································53 11 Operation Logs ·····························································································································53 Query Operation Logs ······························································································································54 Export Operation Logs ·····························································································································54 12 Other Functions····························································································································54 Auxiliary-Monitor Preview ·······················································································································54 Multi-Screen Display ································································································································55 Cloud Device Management······················································································································56 13 Other Configurations ···················································································································57 System Configuration·······························································································································57 User Management ···································································································································59 Add a User ········································································································································60 Modify User Account Information ···································································································60 Delete a User Account ······················································································································61 iii 1 Introduction EZStation is a device management software suite for small video surveillance solutions. It is easy to deploy and operate and suitable for scenarios with relatively small number of video channels, such as super markets, park areas, and residential communities. EZStation implements various video surveillance services, such as live view, playback, camera management, recording storage management, alarms, sequence display, video wall and e-map. EZStation also integrates various storage functions, such as NVR storage, DVR storage, and EZRecorder. It is applicable for medium- and small-sized video surveillance applications. Figure 1-1 Typical EZStation Network EZStation Network …… DVR 2 IPC IPC NVR Installation, Upgrade, and Uninstall System Requirements EZStation components shall be installed on PCs that meet the performance requirements. They can be installed on a single PC or on separated PCs. System requirements for EZManager 1 Item Requirements Operating System Microsoft Windows 7/Windows 8 (32-bit or 64-bit). CPU Intel Pentium IV 3.0 GHZ or higher. Memory 1 GB or higher. Network card Gigabit Ethernet network card (or higher) are recommended. Display definition 1280*720 or higher. System requirements for EZRecorder Item Requirements Operating System Microsoft Windows 7/Windows 8 (32-bit or 64-bit). CPU Intel Pentium IV 3.0 GHZ or higher. Memory 1 GB or higher. 1 TB or higher. HDD Note: The capacity of hard disk depends on the volume of data to be stored. You can figure out the capacity by the formula provided in the supplementary instruction. Network card Gigabit Ethernet network card (or higher) are recommended. System requirements for EZStreamer Item Requirements Operating System Microsoft Windows 7/Windows 8 (32-bit or 64-bit). CPU Intel Pentium IV 3.0 GHZ or higher. Memory 1 GB or higher. Network card Gigabit Ethernet network card (or higher) are recommended. 2 NOTE! Previewing multi-channel videos simultaneously or videos of higher resolution requires higher hardware configuration. The software operates on a 32-bit operating system, or on a 64-bit operating system that can host 32-bit software programs. The recommended hard disk space for EZRecorder should be able to store 1080P (6 Mbps bit rate) video for one week. To store more channels of videos with longer time, use hard disks with larger capacities. To figure out the hard disk space required, please use the formula: capacity (GB) ≈ stream (Mbps) x 60 x 60 x 24 x days x channel numbers/8/1024. For example, the capacity required for a 6 Mbps video to be stored for seven days is about 443 GB and that for 25 channels of CIF (1 Mbps stream) is about 1.8 TB. Installation NOTE! The following describes the typical installation of EZStation. To install the components separately, choose the custom installation mode. To install EZStation: 1. Double-click EZStation setup file. In the installation wizard dialog box, click Next. 2. Select Typical (the default choice). 3. Complete the installation according to system prompt messages. EZStation is installed on a system disk by default, for example, C:\Program Files\EZStation Software. 3 4. After the installation is completed, the and icons are displayed on the OS desktop. Upgrade To upgrade EZStation, see Installation. Uninstall You can uninstall EZStation using the quick uninstall function or using the uninstall option of the installer. To Quickly Uninstall EZStation 1. Select Start > All Programs > EZStation > Uninstall EZStation. The Windows Installer dialog box appears. 2. Click Yes. EZStation will be uninstalled automatically. To Uninstall EZStation Using the Setup File 1. Double-click EZStation setup file. The installation wizard appears. Click Next. 2. Select Remove and click Next to start uninstall. 4 3 Starting Components EZManager Platform As a centralized management platform for video surveillance devices, EZStation allows you to configure parameters, maintain the system, and query video records and perform other basic surveillance service operations. 1. Double-click and enter the login interface. 2. Use the default username admin and password admin for your first login. After successful login, the control panel of EZManager appears, as shown in the following figure. 1 2 3 4 The following table describes each area of the control panel Area Description 1 Function menu. 2 Shortcut buttons including 3 Control panel (function area). 4 Auxiliary function area including for live alarms, for logs, for task management, for CPU usage, and admin indicating the current user. for locking UI, 5 for switching users, and for Help. NOTE! Before performing operations on the interface, make sure that you have related operation permissions. For details, see 2 1 3 User Management. It is recommended that you change your password after your first login. For details, see Modify User Account Information. EZRecorder Server As a storage server, EZRecorder receives and stores data from the edge devices and provides VOD (video on demand) services. 1. After EZStation installation is completed, double-click to run EZRecorder. If appears in the lower right corner of the task bar, EZRecorder is running. 2. Right-click and choose Auto Run. If you select Auto Run, the PC will automatically run EZRecorder upon startup. If you select Auto Login to Windows and then enter the username and password for the Windows, you will automatically log in to the Windows after the PC is started. 6 EZStreamer Server As a stream media server, EZStreamer forwards live preview data on a camera if video streams on the camera reach the limit or the network bandwidth is insufficient. 1. After EZStation installation is completed, click interface. on the start menu to enter the EZStream NOTE! After EZStreamer is started, the media switch service is started by default. Click Stop to stop the service if required. 2. In the dialog box that appears, click Config. 7 3. To run the service automatically upon PC startup, select Auto Run. To automatically log in to Windows, select Auto Login to Windows, enter the username and password. 4. Click OK to complete the configuration. 4 Live View You need to add an encoding device before using EZManager to view live video on the encoding device. Encoding Device Management Add an Encoding Device CAUTION! It is recommended that you add an IPC only in one EZStation to ensure proper management. You can add an IPC to the EZStation directly or by adding its connected NVR or DVR. The setting parameters displayed for IPCs may vary, depending on the way of adding. For the actual parameters, see the display on your device. The following uses the way of direct adding as an example. Search for and add an online device On the control panel, select Device Management, and then follow the steps shown in the figure below. 8 1 2 The list displays the added encoding devices 4 3 Select the desired device NOTE! By default, the system automatically searches for all online devices on the LAN and updates the list periodically. If you want to search by the network segment, click and select the IP Segment check box. You can also click . Then the system searches for all online devices on the same network and automatically adds them to the device list. From the Add Online Device drop-down list, you can select Add to add the encoding device to the default group or select Add to Group to add the device to a specified group. The devices that are added by search are named in format of device type_IP address. You can right-click an online device in the list to configure the auxiliary parameters. The following table describes the parameters. Parameter Edit Network Address Restore Device Password Browse Web Page Description Change the device IP into the specified IP. Note: You need to be the administrator to access this function. You need to provide the serial number to restore the device password. Note: After you provide the serial number of your device, you will receive a sequence number used to restore the password. Opens the login page for the device in Internet Explorer. Manually add one device To manually add one device: On the control panel, select Device Management, and then follow the steps shown in the figure below. 9 1 2 3 4 Select the adding mode 5 The list displays the added encoding devices Enter device information 6 In the Device Information dialog box, you can click Add to add the encoding device to the default group or click Add to Group to add the device to a specified group. Manually add devices in batches To manually add device in batches: On the control panel, select Device Management, and then follow the steps shown in the figure below. 1 2 3 4 Select the adding mode 5 The list displays the added encoding devices Enter the network segment to search 6 In the Device Information dialog box, you can click Add to add the encoding devices to the default group or click Add to Group to add the devices to a specified group. Modify an Encoding Device To modify an encoding device: 1. On the control panel, select Device Management. 2. Select Device > Encoding Device. 10 3. Select the desired device and click Edit. 4. In the Device Information dialog box (as shown in Manually add one device) that appears, modify parameters. Delete an Encoding Device To remove a device with storage resource configuration, you need to delete storage resource first (see Configure a Storage Device). To delete an encoding device: 1. On the control panel, select Device Management. 2. Select Device > Encoding Device. 3. Select the device(s) to be deleted and click Delete. 4. In the Information dialog box, click Yes. Remotely Perform Operations on an Encoding Device CAUTION! Ensure that an encoding device is online before configuring detailed parameters for the device. To remotely perform operations on a device: 1. On the control panel, select Device Management. 2. Follow steps in the following figure to perform operations on the device. 1 2 3 Select the desired device 4 Select the desired operation Configure: You need to log in to the corresponding Web interface before configuration. Restart: Perform this operation with caution because this operation may affect the ongoing services. Group Management The system manages device channels by group. 11 Add a Group To add a group: On the control panel, select Device Management, and then follow the steps shown in the figure below. 1 2 3 4 The added group is displayed in the group list on the left. Delete a Group To delete a group: 1. On the control panel, select Device Management. 2. Click the Group tab. 3. In the group list on the left, select the desired group and click Delete Group. 4. In the Information dialog box, click Yes. Import Cameras To import cameras to a group: On the control panel, select Device Management, and then follow the steps shown in the figure below to import the desired camera(s) to a specified group. 12 1 2 4 Select a group to import the cameras 3 Select the desired cameras 5 You can click Import All to import all cameras to a specified group. Click to add a group. Click to delete a camera from the group. Click to modify the name of the camera. As shown in the following figure, the imported cameras are displayed in the list on the right. You can edit, delete, or configure a camera. Play Live Videos You can play live audio/video of a camera in a pane. After a camera is imported to a group, you can play live video in a pane, manipulate the live video by clicking the buttons on the Live View toolbar. 13 Play Live Video in a Pane To play a live video in a pane: On the control panel, select Live View, and then follow the steps shown in the figure below. 1 2 Double-click the camera to play live video in the current idle pane Or drag the camera to a pane to play the live video NOTE! If you click a camera and then click on the right, you can choose to play live video from the camera with the main, sub or third stream. Live View Toolbar The live view toolbar is under the panes. The following table describes the buttons on the toolbar. Button Description Switches pane layout. Saves the current view. Saves the current view as another name. Closes all panes with video playing. Plays the live video of the previous camera. 14 Button Description Pauses/Resumes sequence display. , Adjusts the sequence display interval. Plays the live video of the next camera. Adjusts the MIC volume or mutes the MIC for the PC in two-way audio. Full screen. The following table describes the buttons on the floating toolbar. Button Description Takes snapshots. Note: You can set the path to store screenshots in System Configuration. Records and locally stores the live video played in current pane. Click this button again to stop recording. , Note: You can set the path to store video records in System Configuration. Triggers manual alarms. Tip: It is recommended that you configure alarm-triggered actions for manual alarms first. Each time you click this button, an alarm is generated and reported and the corresponding action is taken. You can also trigger manual alarms through the shortcut menu of panes playing live videos. For details, play the live video using the shortcut menu. Opens PTZ control. Note: This function is available only for cameras with PTZ configured. Starts/Stops digital zooming. , , Note: Zooms in a region of the live video played in the current pane. Click this button again to stop. Adjusts the speaker volume or mute it for the PC. Shortcut Menu of Live View The following table describes key parameters on the shortcut menu. 15 Parameter Description Digital Zoom Zooms in a region of the live video playing in the current pane. Click this button again to stop. Manual Alarm Triggers manual alarm. Tip: It is recommended that you configure triggered actions for manual alarms first (see Configure Alarm-Triggered Action). Each time you click this button, an alarm is generated and reported and the corresponding action is taken. Camera Info Displays information about the camera corresponding to the current pane, including the frame rate, bit rate, encoding format, and packet loss rate. System Configure Shortcut to enter the system parameter configuration interface. For details, see System Configuration. Play Live Videos by View By a default view To play live videos by default view: On the control panel, select Live View, and then follow the steps shown in the figure below. 1 2 Select the desired view and click the Play button After you click an x-pane view, the live videos of the cameras in the camera list are played in x panes. For example, a four-pane default view is displayed with four panes. Pane 1 plays the live video of the first camera in the camera list, and pane 2 plays the second and so on. By a custom view You need to save a custom view before playing it. To play a custom view: On the control panel, select Live View, and then follow the steps shown in the figure below. 16 1 2 3 4 The Custom View list on the left displays the view that is successfully added. 8 Live videos are played according to the layout 5 7 Select the desired layout 6 9 Click to save the current surveillance layout into another view. In the Custom View list, double-click a view or select the view and click the Play button to play the live video according to the specified surveillance layout. PTZ Control Through PTZ control, you can remotely control PTZ, zooming, focus distance, wiper, and so on. The system also allows you to set preset positions for a PTZ, select camera patrol route, and so on. With 17 PTZ positions preset, you can set a preset position as a guarding position. You can also accessing the auxiliary functions such as 3D positioning, shortcut PTZ, and so on. After finishing the preparation tasks, you can perform PTZ control through PTZ panel. NOTE! PTZ control is only available to cameras with PTZ configured. Whether or not a PTZ control operation can take effect is determined by the functions and PTZ protocols that the PTZ camera supports. For example, some preset positions of certain PTZ cameras are assigned to special functions (such as wiper, menu, and so on). So you need to refer to PTZ camera specification before performing PTZ control. 1. On the control panel, select Live View. 2. Play Live Video in a Pane. 3. Click the pane and then click 4. See the following table to perform PTZ control. on the toolbar to open the PTZ control panel. Parameter Description Controls the PTZ rotation direction. Note: When the PTZ control panel is displayed (3D positioning must be disabled first), put the mouse on the corresponding pane, and when the mouse cursor changes into a triangle (like ), you can click and hold the left button and then move the mouse to adjust the viewing direction of the PTZ camera. Adjusts camera zooming and the focus distance. 18 Parameter Description Enables/Disables the IR. Enables/Disables the wiper. Enables/Disables the heater. Enables/Disable the light. Enables/Disables snow removal function. Adjusts the PTZ rotation speed. With the 3D positioning function enabled, click a point in the pane and the PTZ will rotate to the direction of the point. You can zoom in a region by holding the left button of the mouse and dragging from upper left to lower right or zoom out a region by holding the left button of the mouse and dragging from lower right to upper left. When 3D positioning is disabled, you can use the mouse to control the rotating direction of the PTZ. For example, when you move the mouse point to the upper-right corner of the pane, the point changes to . You can click the mouse to have the PTZ rotate to the upper-right direction. List of preset positions for setting and selecting. : Moves PTZ camera to the selected preset position. : Adds the current PTZ position to the preset position list. Ensure that the serial number for the newly added preset position is unique. Otherwise, the new preset position will overwrite an existing preset if they have the same serial number. : Deletes a preset position. : Sets a preset position as a PTZ guard position and set the corresponding guard time. During the guard time period of a PTZ camera, the PTZ camera goes back to the guard position when it is released and no operation is performed to it. : Deletes a guard position. Patrol route list. : Starts a patrol route manually. : Add a patrol route. In the Patrol Route dialog box, enter the route name and ID and click Add to add a patrol action. You can also adjust the action sequence in the patrol route by clicking the corresponding buttons. Patrol action includes: After you click Add, you can configure the PTZ camera to rotate to a preset position and the residence time that the camera stays at that position. After you click Add, you can specify the rotation direction, zoom value, speed, rotation duration, and residence time, or you can configure the PTZ camera to keep rotating. 19 Parameter Description : Deletes a patrol route. : Records a patrol route. After you click Record, you can specify the rotation direction and zoom value. The system records each motion trail parameter and automatically adds it to the action list. Click Stop to complete action recording. : Configures a patrol plan Sequence Display Enable Sequence Display by Camera Group To enable sequence display by camera group: On the control panel, select Live View, and then follow the steps shown in the figure below. 1 2 Select the desired pane. By default, the first idle pane is used for sequence display 3 4 After sequence display is enabled for a camera group, the live videos of cameras in the group are played by turns in the specified pane. Click or to pause or resume sequence display. Click previous or next camera. Click or to play live video of the to adjust the sequence display interval. Enable Sequence Display by Default View To enable sequence display by default view: On the control panel, select Live View, and then follow the steps shown in the figure below. 20 1 2 After sequence display is enabled for a default x-pane view, the live videos of cameras in the camera list are played by turns in x panes. For example, a four-pane default view is displayed with four panes. Pane 1 plays the live video of the first camera in the camera list, and pane 2 plays the second and so on. After a sequence display interval (assume 20s), pane 1 plays the live video of the fifth camera, and pane 2 plays the sixth and so on. Click 1 2 3 4 or 20s 5 6 7 8 to pause or resume sequence display. Click or to play live video of the previous or next camera, or play live video of the previous or next group of cameras. Click adjust the sequence display interval. Enable Sequence Display by Custom View Group To enable sequence display by custom view group: On the control panel, select Live View, and then follow the steps shown in the figure below. 21 to 1 2 After sequence display is enabled for the custom view group, each custom view is played by turns. Click or to pause or resume sequence display. Click next custom view. Click 5 or to play the previous or to adjust the sequence display interval. Recording and Playback After recording videos, you can obtain the video records by searching. Then you can play or download the video records. Before that, you need to prepare a storage device. Storage Device Management Add a Storage Device To add a storage device: On the control panel, select Device Management, and then follow the steps shown in the figure below. 1 3 The list displays the added storage devices 2 4 5 Enter device information (IP Address indicates that of the PC on which EZRecorder resides) Use a username and password with the permission for logging in to EZRecorder. 22 Modify a Storage Device To modify a storage device: 1. On the control panel, select Device Management. 2. Select Device > Storage Device. 3. Select the desired device and click Edit. 4. In the Device Information dialog box (see the figure in Add a Storage Device), modify the parameters. Delete a Storage Device To delete a storage device: 1. On the control panel, select Device Management. 2. Select Device > Storage Device. 3. Select the desired device(s) and click Delete. 4. In the Information dialog box, click Yes. CAUTION! Deleting a storage device using the EZManager management platform does not stop the execution of the existing plans on the storage device. To stop all the storage operations on the device, you need to stop EZRecorder Server first. Configure a Storage Device You can allocate storage resources for cameras as required by customers; you can also have cameras operating in different storage modes. CAUTION! Make sure that you have the corresponding EZRecorder operation permission before parameter configuration. To configure a storage device: On the control panel, select Device Management, and then follow the steps shown in the figure below. 23 1 4 2 3 Select the desired storage device The following table describes key parameters. Parameter Description Enables or disables time synchronization with the NTP server at fixed time. Time System Note: To enable this function, you need to set a valid NTP server address. Select the user account to be modified and change the password. User Note: The administrator can modify configurations of all users, and the operator can only modify their own configuration. Network Port Disk Listening Port: Communications port for EZRecorder. Downloading Port: Video downloading port for EZRecorder. VOD Listening Port: Communications port for VOD media services. Allocate or delete storage space. Configure Storage Stream, Capacity to Allocate(GB), and HDD Full of the channel for a camera. Click Add, select a storage channel, and configure Storage Stream, Capacity to Allocate(GB), and HDD Full. Select a storage channel and click Delete to delete the storage resources configured for the channel. Storage Channel Note: Configure disk storage space before configuring the channel. 24 Restart the Storage Service CAUTION! Restarting the storage service may affect other ongoing services. To restart the storage service for a storage device: 1. On the control panel, select Device Management. 2. Select Device > Storage Device. 3. Right-click the storage device and then select Configure. 4. Click Restart Service in the pop-up dialog box. Recording Configuration Configure Recording Schedule After you configure storage resources for a camera, the specified storage server will automatically start recording and storing according to the plan. It will stop automatically after the end time. For cameras directly connected to EZManager NOTE! The following configuration is applicable only to the cameras that EZManager directly manages. On the control panel, select Recording Schedule, and then follow the steps shown in the figure below to configure a recording schedule for a camera directly connected to EZManager. 4 2 Select a storage device 1 Select the desired camera 3 Draw a recording plan The following table describes the key parameters. 25 Parameter Description Deleting tool: delete all recording schedules. Edit Template Edit a drawn template. Perform exception recording on holidays. Add Holiday On the set holidays, the system only performs recording at the time that is configured according to the holiday configuration and performs normal recording in other days. Click Storage Capacity. You can self-define the storage capacity by configuring Storage Stream, HDD Full, and Add More (GB). Storage Capacity For cameras directly connected to NVR/DVR NOTE! The following configuration is applicable only to the cameras that EZManager manages through a third-party NVR or DVR. On the control panel, select Recording Schedule, and then follow the steps shown in the figure below to configure a recording schedule for a camera directly connected to an NVR or a DVR. 26 4 2 1 Select the desired camera 3 Draw a recording plan For description of the key parameters, see For cameras directly connected to EZManager. Manually Record Videos You can record and save the video playing in a pane to the client PC as local records. The video can be the live video of a camera or a VOD video. NOTE! You can specify the default path and file format in system configuration. You can view the content of a local recording file by dragging it to a pane in the live view window of EZStation. 1. On the control panel, select Live View. 2. Select the pane where the desired video is being played. 3. Click 4. To stop local recording, click on the toolbar. on the toolbar. 27 Alarm-Triggered Video Recording When an alarm occurs, EZStation triggers an action to store recordings automatically. Before EZStation begins the storage, make sure that you have added a storage device (see Add a Storage Device) to the system and configured storage resources and alarm-triggered actions for the associated camera. NOTE! You can set the duration for storing alarm-triggered recordings in system configuration. Video Records Query Query Video Records by Custom View You can query camera video records that are saved to a custom view. Before the query, make sure that a recording schedule has been configured for the cameras in the view. To query video records in a custom view: On the control panel, select Playback, and then follow the steps shown in the figure below. 28 1 Select the desired view 2 Set the desired record type, the start time and end time 3 Query Video Records by Camera You can query the video records of a camera. Before the query, make sure that the related storage medium is communicating with other devices properly. To query video records on a camera: On the control panel, select Playback, and then follow the steps shown in the figure below. 29 1 Select the desired camera 2 Set the desired record type, the start time and end time 3 NOTE! Currently, you can query video records from a maximum of 16 cameras at a time. If you select more than 16 cameras, latter ones will be ignored. Playback You can play stored video records of a camera in a pane. First search for video records, and then click the blue area (indicating the time range with video recorded) to play the video. While the video is playing, you can control it by using the buttons on the video record control toolbar and floating toolbar. NOTE! Excessive playback-related operations (such as pausing, resuming, and setting playback speed) degrade the synchronizing effect. Video Record Control Toolbar The video record control toolbar is on the record query page. 30 The following table describes the toolbar. Button Description Sorts videos by recording condition. After you select a video type, only this type of videos is displayed. Time bar. You can drag the bar when watching the video. The area in color indicates a time interval with video recorded. Click a colored area to view the video. Closes all panes. , Plays/Pauses a video. Normal playback. Synchronous playback. Controls the video play speed. , Moves the time bar leftward and rightward. Scales up/down the time bar. Plays videos in full-screen mode. 31 Floating Toolbar for Video Record Playing Button Description Takes snapshots. Note: You can set the path to store screenshots in System Configuration. , Records and locally stores the live video playing in current pane. Click this button again to stop recording. Note: You can set the path to store recordings in System Configuration. Start/Stop digital zoom. , Note: Zooms in a region of the live video playing in the current pane. Click this button again to stop. Downloads and saves the video from a storage device to your local PC as a recording file. , You can set the default path and file format for downloaded video records in System Configuration. Before you playing a downloaded video record, make sure your media player supports the format of the record. VLC player is recommended. Adjusts the speaker volume or mute it for the PC. NOTE! Before playing a video record, you can set the video transmission protocol based on the network environment to improve the image quality. Shortcut Menu for Playback The following table describes key parameters on the shortcut menu. Parameter Description Digital Zoom Zooms in a region of the video playing in the current pane to obtain more details about region. System Configure Shortcut to enter the system parameter configuration interface. For details, see System Configuration. Camera Info Displays information about the camera corresponding to the current pane, including the frame rate, bit rate, encoding format, and packet loss rate. 32 6 Stream Media Server You can configure a stream media server to forward live preview data on a camera if video streams on the camera reach the limit or the network bandwidth is insufficient. Stream Media Server Management Add a Stream Media Server To add a media server: On the control panel, select Device Management, and then follow the steps shown in the figure below. 1 3 The list displays the added storage device 2 4 Enter device information The IP address indicates that of the PC where the stream media server resides 5 Modify a Stream Media Server To modify a stream media server: 1. On the control panel, select Device Management. 2. Select Device > Stream Media Server. 3. In the stream media server list, select the desired server and click Edit. 4. In the Device Information dialog box (see the figure in Add a Stream Media Server), modify parameters. Delete a Stream Media Server To delete a stream media server: 33 1. On the control panel, select Device Management. 2. Select Device > Stream Media Server. 3. In the stream media server list, select the desired server(s) and click Delete. 4. In the Information dialog box, click Yes. Configure a Stream Media Server To configure a stream media server: 1. On the control panel, select Device Management. 2. Select Device > Stream Media Server. 3. In the stream media server list, select the desired server, and then follow the steps shown in the figure below. 1 2 Select the camera(s) from which the stream media server will receive streams 3 The stream media server will receive streams from the specified cameras and display the stream receiving records. 34 7 Decoding and Displaying Videos on the Video Wall Decoding Device Management Add a Decoding Device To add a decoding device: On the control panel, select Device Management, and then follow the steps shown in the figure below. 1 3 2 The list displays the added decoding devices 4 Enter device information 5 Modify a Decoding Device To modify a decoding device: 1. On the control panel, select Device Management. 2. Select Device > Decoding Device. 3. In the decoding device list, select the desired device and click Edit. 4. In the Device Information dialog box (see the figure in Add a Decoding Device), modify parameters. Delete a Decoding Device To delete a decoding device: 35 1. On the control panel, select Device Management. 2. Select Device > Decoding Device. 3. In the decoding device list, select the desired device and click Delete. 4. In the Information dialog box, click Yes. Remotely Configure a Decoding Device To remotely configure a decoding device: 1. On the control panel, select Device Management. 2. Select Device > Decoding Device. 3. In the decoding device list, select the desired device and click Configure. 4. On the Web interface, configure parameters. Video Wall Management Add a Video Wall To add a video wall: On the control panel, select Video Wall, and then follow the steps shown in the figure below. 2 Enter basic video wall 3 information 4 Modify a Video Wall To modify a video wall: 1. On the control panel, select Video Wall. 2. Select Configure > Decoding Device. 3. On the right, select the desired video wall and click Edit. 36 Here displays the added video wall 4. In the Video Wall Information dialog box (see the figure in Add a Video Wall), modify parameters. Delete a Video Wall To delete a video wall: 1. On the control panel, select Video Wall. 2. Select Configure > Decoding Device. 3. On the right, select the desired video wall and click Delete. 4. In the Information dialog box, click Yes. Configure a Video Wall Bind a decoding output channel to the specified screen On the control panel, select Video Wall, and then follow the steps shown in the figure below. 1 2 Drag the decoding output channel to the specified screen Splice Screens You can splice multiple screens into a larger one to play videos from one camera. Before splicing, make sure that the decoding device supports the splicing function. 1. On the control panel, select Video Wall > Configure. 2. Hold Ctrl and select the decoding output channels for screen splicing. 3. Click Splice. The selected screens are spliced into one. To cancel the splicing, select the spliced screen and click Restore. NOTE! The splicing function is applicable only to the screens bound to channels of the same decoder. 37 Video Wall Operations Display Live Video on a Video Wall To display live video on a video wall: On the control panel, select Video Wall, and then follow the steps shown in the figure below to display live video of a camera on a screen. 1 2 Drag the desired camera to the specified decoding screen to enable decoding for the channel 3 Select the stream type to play the live video Preview pane After encoding is enabled for a specified channel, the corresponding video wall will display live video from the channel. Close Live Video on a Video Wall To close the live video on a video wall: 1. On the control panel, select Video Wall. 2. Click the Operating tab. 3. In the video wall list, select the desired decoding channel and click Close. The decoding is disabled for the channel and the live video is closed. Split Screen for a Decoding Output Channel NOTE! You need to stop the live video in a decoding output channel before splitting the screen. To split screen for a decoding output channel: On the control panel, select Video Wall, and then follow the steps shown in the figure below. 38 1 2 Select the desired decoding output channel 3 Select the layout mode You can drag multiple cameras to a decoding output channel for which the screen is split. This implements the display of multiple live videos in a single decoding output channel. Enable Sequence Display on a Video Wall You can enable sequence display for a camera group on a video wall. Before enabling sequence display, make sure that cameras have been imported to the group. For details about how to import cameras to a group, see Group Management. 1. On the control panel, select Video Wall > Operating. 2. Select a pane. 39 3. Click the menu on the right of the group and select Sequence Display in Single Pane or Sequence Display in Video Wall to enable sequence display. Sequence Display in Single Pane: Displays live videos from all cameras of the group in a single pane in sequence. 4. Click to stop the sequence display. The following table describes the sequence display toolbar. Parameter Description Plays live video on the video wall. Plays video recordings on the video wall. Switches the pane layout. Stops the sequence display. Skips to the previous camera or camera group to start the sequence display. Pauses the sequence display, and starts playing the live video of the sequenced cameras. Clicks to start the sequence display automatically. Adjusts the time interval of the sequence display. Skips to the next camera or camera group to start the sequence display. Play Decoded Video Recordings on a Video Wall You can play video recordings from a storage server onto a specified decoding screen. Before operation, make sure that you have performed Add a Storage Device and Configure a Storage Device on the system. Perform the following steps to play a video recording on a video wall: 1. On the control panel, select Video Wall > Operating. 2. Click and drag a camera to the specified decoding screen to enable decoding for the channel, and then click . Alternatively, click the menu on the right of the camera and select Playback. 3. Set the start time and end time on the playback toolbar and click Query. The query result is displayed in the list. The system displays the video recording of the current day by default. 40 4. Click to play the video recording from the beginning. You can use the toolbar to control the playing. The following table describes the parameters on the toolbar. Parameter Description Plays live video on the video wall. Plays video recordings on the video wall. Switches the pane layout. Stops, pauses, and resumes the playing of a video. Controls the playing speed. Timeline. You can drag the timeline when watching the video. The blue area indicates that there is video recording during the time interval while the grey area indicates the contrary. Click a blue area to view the video recording. Moves the timeline leftward/rightward. Zooms in/out the timeline. 8 E-map You can manage surveillance for intended areas in accordance with the scene. E-map Management Add an E-map To add an e-map: On the control panel, select E-map, and then follow the steps shown in the figure below. 41 1 2 Select a local map and enter a map name The following figure displays the successfully added e-map. Modify an E-map To modify an e-map: 1. On the control panel, select E-map. 2. Click the Edit tab. 3. Click Modify Map. 4. In the E-map Information dialog box (see Add an E-map), modify the map name or switch to another map as required. Delete an E-map To delete an e-map: 1. On the control panel, select E-map. 42 2. Click the Edit tab. 3. Click Delete Map. 4. In the Information dialog box, click Yes. NOTE! Deleting a map also deletes all the hot spots and hot regions on the map. For a map that has a parent map, the parent map is displayed after the map is deleted. Otherwise, Add Map is displayed. Add a Hot Spot To add a hot spot: On the control panel, select E-map, and then follow the steps shown in the figure below. 1 2 Drag the desired camera or group to the map Alternatively, you can drag a camera within the same group as the e-map to the right pane to add it as a hot spot. After a hot spot is successfully added, drag the hot spot to the actual surveillance area. Modify a Hot Spot To modify a hot spot: 1. On the control panel, select E-map. 2. Click the Edit tab, right-click the hot spot you want to modify, and then select the desired color for the hot spot. Delete a Hot Spot To delete a hot spot: 43 1. On the control panel, select E-map. 2. Click the Edit tab. 3. Select the hot spot you want to delete, click Delete Hot Spot, and then click Yes in the Information dialog box. 4. You may also right-click the hot spot you want to delete, choose Delete from the shortcut menu, and then click Yes in the Information dialog box. Add a Hot Region To add a hot region: On the control panel, select E-map, and then follow the steps shown in the figure below. 1 2 3 Enter the hot region name and select a local map as the hot region map 4 The hot region is successfully added Modify a Hot Region To modify a hot region: 1. On the control panel, select E-map. 2. Click the Edit tab. 3. Select the hot region you want to modify and then click Modify Hot Region. 4. In the dialog box that appears (see Add a Hot Region), modify the map name or switch to another map as required. Delete a Hot Region To delete a hot region: 1. On the control panel, select E-map. 2. Click Edit. 44 3. Select the hot region you want to delete, click Delete Hot Region, and then click Yes in the Information dialog box. 4. You may also right-click the hot region you want to delete, choose Delete from the shortcut menu, and then click Yes in the Information dialog box. E-map Operations View a Hot Spot To view a hot spot: On the control panel, select E-map, and then follow the steps shown in the figure below. 1 2 Double-click the desired camera to locate the hot spot on the map and view live video from the camera NOTE! You can also select a hot spot on the map and double-click to view live video from the hot spot. View a Hot Region To view a hot region: 1. On the control panel, select E-map. 2. Click the Preview tab. 3. Under the parent map, double-click a hot region to see information. 4. To go back to the parent map, click Back to Parent Map in the upper right corner. 45 View Hot Spot/Hot Region Alarms If a hot spot or a hot spot device in a hot region generates alarms (for example, device online and offline alarms), the hot spot or hot region sends blinking red signals for alarming. To view hot spot or hot region alarms: 1. On the control panel, select E-map. 2. Click the Preview tab, and then follow the instruction shown in the figure below. Right-click the hot spot and choose Display Alarm Info. To view hot region alarms, double-click to enter the hot region map first. Clear Hot Spot/Hot Region Alarms To clear hot spot alarms: 1. On the control panel, select E-map. 2. Click the Preview tab. 3. Select the desired alarming hot spot, click Remove Alarm. To clear hot region alarms, double-click the hot region, select the alarming hot spot in the hot region, and then click Remove Alarm. After alarms are cleared, the hot spot or hot region restores to the normal state. 9 Voice Communication CAUTION! The video associated audio, intercom, and voice broadcast services are mutually exclusive. If one of the services is ongoing, starting another will stop the ongoing service. 46 Video Associated Audio Video associated audio refers to audio that is transmitted with live video simultaneously. Video associated audio is sent one way from a camera to users and stops when live video stops. 1 2 Select the desired camera and start live video 4 Unmute the camera 3 CAUTION! You can listen to the video associated audio from one camera at a time. Starting video associated audio for another camera will stop that from the existing camera. Intercom Intercom refers to a two-way voice session between EZStation and a camera. NOTE! Intercom requires that the camera is online, audio input and output devices are connected to ports supporting Intercom on the camera, and audio input and output devices are connected to the PC that runs EZStation. In addition, Live view needs to be started for Intercom. To start Intercom: On the control panel, select Live View, and then follow the steps shown in the figure below. 47 1 2 Select the desired camera and start live video 3 To stop Intercom, perform steps 1 and 2 in the figure above and then deselect Intercom. CAUTION! If you close the live view of the camera with ongoing intercom, the intercom with the camera then stops. You can intercom with only one camera at a time. Starting Intercom with another camera stops the existing intercom session. Voice Broadcast Broadcast here refers to a one-way voice broadcast between EZStation and multiple cameras. NOTE! Broadcast requires that the cameras are online, audio output devices are connected to the Audio Out ports on the cameras, and audio input devices are connected to the PC that runs EZStation. On the control panel, follow the steps shown in the figure below to start voice broadcast. 48 1 3 4 2 To stop voice broadcast, perform steps in the figure above and then deselect the cameras from the voice broadcast list. 10 Alarm Management You can set actions to be triggered by an alarm so that the alarm can be handled in time. Configure Alarm-Triggered Action CAUTION! Before the configuration, make sure that alarm-related parameters listed in the following table are configured. On the control panel, select Alarm Configure, and then follow the steps shown in the figure below to add an alarm device. 49 1 Select the type of alarm devices 8 3 Select the alarm type 2 Select an alarm device 4 Select Send Email as required 5 Click Add to add actions to be triggered The list displays the added alarm device 6 Select one or multiple cameras to trigger 7 Configure desired alarm-related actions according to the following table. Action Procedure Records and stores the video of the camera when a specific alarm occurs for later reference. Before configuring this action, you need to configure storage resource for the camera first. To configure storage for alarm-triggered recording: Select Store Alarm Recording. Click Add in the Store Resource list. In the Storage Configure dialog box, select the storage device to store the resource from this camera and configure related parameters. Click OK to complete the configuration. Note: Store Alarm Recording To delete an added camera, select the camera and then click . For a camera with storage resource configuration, you can click the storage resource to modify the settings. Moves a PTZ camera to the preset position when a specific alarm occurs, so that users can capture images of the position as needed. Go to Preset Note: This alarm-triggered action will preempt the PTZ when a specific alarm occurs. To configure this action, you need to set a preset position for the camera first. Only cameras with PTZ are supported. To configure this action, select a preset position for the camera in the list. Note: 50 Action Procedure To delete an added camera, select the camera and then click . Plays the live video of a specified camera on a specified pane when a specific alarm occurs. Live view Note: This action may preempt services in the panes. If the live videos of multiple cameras are associated to the same pane, the CPU usage of the PC may be quite high. As a result, some alarm-triggered actions or services may fail. Therefore, configure this alarm-triggered action properly. To configure live video playing action: In the Live View list, select the desired pane ID. Note: To delete an added camera, select the camera and then click . Outputs an alarm when a specific alarm occurs, so as to trigger third-party devices. Alarm Output To configure output Boolean alarm triggering: Configure the alarm output of the camera in the list. Note: To delete an added camera, select the camera and then click . Alarm Records You can view and acknowledge live and history alarms to know about camera exceptions and locate system problems. When an alarm occurs, the system reports the alarm automatically. The system also sounds an alert if you have configured an alarm alert. For details, see System Configuration. Acknowledge Live Alarms The live alarm list displays the latest alarms since the latest login. An alarm report includes alarm type, camera name, alarm level, alarm time, and descriptive information. To acknowledge live alarms: On the control panel, select Alarm Records, and then follow the steps shown in the figure below. 51 1 3 2 Select the desired alarm records Enter a comment in the dialog box 4 5 CAUTION! Acknowledged alarms are not displayed in the alarm list. Query History Alarms You can search for history alarms and perform operations on the History page. To query history alarms: On the control panel, select Alarm Records, and then follow the steps shown in the figure below. 52 1 3 2 Enter the query criteria The list displays the query results In the query results list, select an alarm record and click Details to view details of the alarm. Acknowledge History Alarms To acknowledge history alarms: On the control panel, select Alarm Records, and then follow the steps shown in the figure below. 53 1 3 2 Select the desired alarm records 4 Enter a comment in the dialog box 5 View Alarm-Triggered Videos To view alarm-triggered videos: 1. On the control panel, select Alarm Records. 2. Click the History tab. 3. For alarms with storing alarm video action configured, you can view alarm videos by selecting an alarm of this type and clicking Play Recording. Export Alarm Records To export alarm records to your local PC: 1. On the control panel, select Alarm Records. 2. Click the History tab. 3. In the history alarm list, select the desired records and click Export. You can export alarm information to an Excel file and save it to your local PC. 11 Operation Logs You can view or export operation logs. 54 Query Operation Logs To query operation logs: On the control panel, select Operation Log, and then follow the steps shown in the figure below. 1 Enter the query criteria 2 The list displays the query results In the query results list, select an operation log record and click Details to view details of the log. Export Operation Logs To export operation logs to your local PC: 1. On the control panel, select Operation Log. 2. In the operation log list, click Export. You can export the operation logs to an Excel file and save it to your local PC. 12 Other Functions Auxiliary-Monitor Preview You can use the auxiliary-monitor function on a PC with multiple monitors connected. In this case, you can use multiple monitors in addition to the main monitor to view live videos, recordings, and 55 alarms without display switching, allowing for comprehensive and convenient surveillance. You can only operate live videos but cannot configure parameters on the auxiliary monitors. Option 1: Click Live View on the control panel. Each time you click Live View, a live view window is displayed. Option 2: Follow the steps shown in the figure below. 1 2 Multi-Screen Display The software supports multi-screen display. You can drag a tab out of the original window into a new separate window, and put it back by grabbing the tab in the new window and move it back to the old window. 56 Click and drag the tab you want to display in single window Cloud Device Management Log in to the cloud 1. On the control panel, select Device Management. 2. Click Device > Cloud Device > Login. Then follow the steps in the figures below. NOTE! For your first login, you should register first. Configure a cloud device: Select Device Management on the control panel and then select the Device tab. 57 After you have logged in to the cloud, then you can add, edit and delete a cloud device. NOTE! 13 When you add a device, the registration code can be obtained from the login webpage. For the detailed information, see the user document. Before deleting a device, you need to delete the storage resources first if the device has been configured storage resources. Other Configurations System Configuration You can set PC parameters through system parameter configuration to implement specific functions. To configure system parameters, select System Configure and configure parameters in the System Configure dialog box. The following table describes the key parameters. Parameter Video Description Processing Mode In proper network transmission, the Short Delay mode is recommended. When network transmission has delay, the Better Fluency mode is recommended. Stream Transmission Protocol A transmission protocol for a camera to send video data to the display window. Note: Audio/ Video Picture Snapshot Format TCP is recommended in poor network conditions. If you change the stream transmission protocol, the change will take effect after you restart Live View. If you choose UDP, make sure EZStation is not disabled by the firewall. Format of snapshot images, which can be: BMP: non-compressed images and require more space. JPEG: compressed images and require less space. Note: The default format is JPEG. To get better image quality, select BMP. Startup System Auto Run If this function is enabled, EZStation is automatically started after Windows is started. Auto Login to EZStation If this function is enabled, you can log in to EZStation without entering the username and password. Auto Login to Windows You need to enter the username and password for Windows in order to use this function. You automatically log in to 58 Parameter Description Windows after the computer is started. Serial Port Port Port for external devices to communicate with the PC. Note: To connect external devices (such as specialized keyboard or control handler) to the PC, you need to set the serial port parameters of the PC to match the devices. Baud Rate Baud rate of the serial port. Note: The baud rate of the serial port must be consistent with that of the device connected to the serial port. Log Alarm Service Data Bits Data bits of the serial port communication. Keyboard Protocol Keyboard protocol supported by an external device. Operation Log Retention Time Length of time operation logs will be stored. Alarm Log Retention Time Length of time alarm logs will be stored. Enable Alarm Sound Enables/disable alarm sound. If enabled, you need to set the alarm sound duration. Alarm Record Duration Duration of video recording triggered by alarms. Auto Time Synchronizati on With this function enabled, EZStation synchronizes the time of its managed cameras with the system time, that is, the time of the PC where it runs. Automatic time synchronization interval: the time period between two successive time synchronizations. Operati on Enable DHCP With this function enabled, the PC where the program runs acts as a DHCP server. In inter-connected networks, cameras with DHCP enabled will send an application for IP addresses to the DHCP server automatically. You can set the following DHCP parameters: Mail Start Address: the beginning IP address. End Address: the end IP address. Subnet Mask: specifies a subnet mask. Default Gateway: specifies the default gateway. For detailed steps, see the following. 59 After the Email is configured, the system sends an email to the specified receiver address when an alarm is triggered. Select System Configure on the control panel and then set as follows. NOTE! After configuration is completed, you can enter a valid email address in the Receiver1 text box and then click Send Test Mail to verify that emails can be received. 2 1 3 User Management A user who is assigned role permission can perform operations to manage the system after logging in to the system. In the user management GUI, you can add, edit, and delete user accounts. The default username and password are “admin”. Admin is the super administrator of the system and has the full permissions. You cannot modify or delete Admin but can change the password. NOTE! The menu being grayed out or invisible may mean that you do not have the permission to operate. You can view user permission by checking the user role. And you can ask the administrator to modify the user permission if required. 60 Add a User You can add a user (except admin) and assign permissions to the user. To add a user: On the control panel, select User Management, and then follow the steps shown in the figure below. 1 2 The list displays the added user Set the username and password 3 Configure permissions for the user 4 Administrator: can be added by super administrator (admin) only. By default, administrator has all permissions in the system, and the permissions can be modified as required. If being assigned the user management permission, administrator can add operators. Operator: added by super administrator (admin) or administrator who has the user management permission. By default, an operator has no permission when added, and you need to assign permissions to the operator as required. Modify User Account Information To modify user account information: 1. On the control panel, select User Management. 2. Select the desired user account and click Edit. 3. In the User Information dialog box, modify parameters. NOTE! You can also edit a user account by double-clicking the line where the user account lies in the user account list. 61 Delete a User Account CAUTION! The admin user account cannot be deleted. To delete a user account: 1. On the control panel, select User Management. 2. Select the user account to delete and click Delete. NOTE! You can delete multiple user accounts at a time by selecting them and then clicking Delete. 62