1
WinQbase / Caliber
Getting started
MEATEST
WinQbase
CONTENTS
1.
INTRODUCTION
4
2
SYSTEM INSTALLATION AND ACTIVATION
5
3
FIRST START
8
3.1.
Selecting database
8
3.2.
Password
8
3.2.
Numbering of calibration certificates
9
WINQBASE – BASIC HANDLE
10
4
4.1.
Main menu
10
4.2.
Instrument inventory
10
4.3.
Calibration inventory
14
4.4.
Supplements
19
5.
NEW CALIBRATION
5.1.
Preparing
21
5.2.
Calibration process
22
5.3.
Parameter modification
25
6.
CALIBRATION PROCEDURES
6.1.
Form of procedure
27
6.2.
Edit procedure
27
6.3.
Create new procedure
29
6.4.
Other features of CALIBER
30
8.
CALIBRATION CERTIFICATE
34
9.
CODEBOOKS
36
10.
USERS
37
11.
BACK UP
38
Getting started
21
Version 22
27
3
WinQbase
1.
MEATEST
Introduction
This instruction should help you to begin with calibration software WinQbase and CALIBER.
The main aim is to introduce you into the procedures, which are used in this software
environment.
Program components in MEATEST software
Basic components of calibration software are formed with following items:
4
WinQbase
is basic program module with inventory of instruments and inventory of calibrations.
CALIBER
is universal calibration program for automated calibration of electric quantity meters. It
can be used either under WinQbase or as alone standing program. Some its features in
both cases are different.
Getting started
MEATEST
2
WinQbase
System installation and activation
Requirements
The system is supplied on a CD-ROM disc. The installation set contains all necessary
programs, created database structures and other auxiliary files and programs. The installation
requires Pentium 1.5 GHz, 1GB RAM, SVGA 800x600 at least. The program is designed for
WINDOWS XP/Vista/7/8 operating system. During installation user must have Administrator
access.
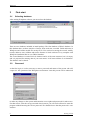
Installation process
Installation CD contains following types of WinQbase setups:
Full version (WinQbaseSetup.exe) – full version of the program with no limitation.
This version requires registration code after first run.
Demonstration version (WinQbaseDemoSetup.exe) - in demo version only 2 Groups
of Instruments can be created, 3 Instrument inventory records for each group and 3
Calibrations for each Inventory item. Also backup is restricted in demo version and database
can be located only in local machine. This version does not require registration code.
Viewer (WinQViewSetup.exe) – only for viewing database. This version does not
require registration code.
First install the program to all computers on which you wish to use the system (if you
have more computers for installation). Every installation must be registered with its own
unique “Registration code”. On the “SERVER” (a computer on which the database will be
stored) “WinQbase Database” installation must be executed.
Complete installation of WinQbase consists of one obligatory installation and four
optionally installations:
1. WinQbase installation
2. GPIB card installation (only if it is used, see Caliber manual)
3. VISA driver installation (only if it is used, see Caliber manual)
4. CAMERA installation (only if CAMOCR module is used)
Installation number 1 is obligatory. Installations number 2, 3 and 4 are optionally.
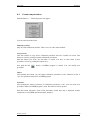
WinQbase installation performs user-friendly installation of the whole system. When
you insert the installation CD-ROM installation menu will appear and you can select desired
type of installation. If the menu is not displayed automatically, you can run installation
directly from “Install\Software” directory.
First, the program displays operation license conditions and then requires you to enter a
user name and a company name.
The next part of the installation is entering the name of a directory in which the
program will be saved. We recommend you to confirm the offered directory.
The installation creates database programs, main database and auxiliary programs and
files in the WinQbase directory. Separate directories “Archive1” and “Archive2” are created
for back up in the “Data” directory.
Getting started
5
WinQbase
MEATEST
Finally, a WinQbase program group is created, which is placed in the “Start”,
“Programs” menu.
During the installation you can be asked for computer restart.
If you are using a National Instruments GPIB card or Camera module, install
appropriate driver.
Uninstall WinQbase
To remove the WinQbase software from your system, you should use the "Add/Remove
Programs" control panel in Windows ("Start -> Settings -> Control Panel -> Add/Remove
Programs" from the Windows Start menu).
Program Caliber - module for calibrations
This program module is installed together with WinQbase.
6
Getting started
MEATEST
WinQbase
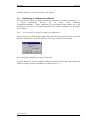
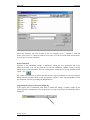
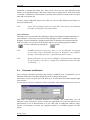
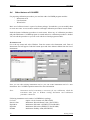
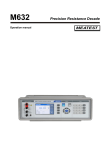
Program registration
The program can be registered during its run by means of the “Help” menu and by the
“About” item activation. The registration consists of two steps:
Step 1 – Company identification
Set the Serial number, Company name and User name who the license is to be registered to.
Serial number you can get from “Licence agreement” which is supplied with program
package. Press the button “Send licence to validation“. Program will ask for the path where to
save the file with the information about the user. Send this file “SNXXXXXXXX
(QUERY).LCN“ as attachment to the email [email protected].
Step 2 – Licence activation
In response to the email you will receive the activation file “SNXXXXXXXX
(ACTIVE).LCN“. Use this file to complete the activation by pressing the “Activate licence“
button.
Getting started
7
WinQbase
3
3.1.
MEATEST
First start
Selecting database
After starting WinQbase software you must select the database.
There are two databases included in install package. The first database is TRIAL database. In
this database there are three samples of meters, units under test, recorded. Fields and items in
WinQbase and Caliber module are mostly fill in. You can browse among the records, modify
records, add new ones, calibrate and test the features of whole software. Every computer with
WinQbase installation has its own TRIAL database.
The second database is named LOCAL database and is of the same structure, but it is empty
and it is prepared for entering data of your own meters. In PC network there is no limitation.
The database can be shared.
3.2.
Password
At the first login, it is also necessary to enter a password and names of the person who will
“supervise” the operation of the WinQbase environment. Later this person will be authorized
to make any changes to the system and determine access rights and passwords for other users.
For that reason, write the set-up password down because you will not be allowed to enter the
program without knowing the correct password. We should observe that the password is case
sensitive.
8
Getting started
MEATEST
WinQbase
If TRIAL database is selected, password is not required.
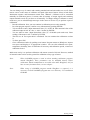
3.2.
Numbering of calibration certificates
The user must also choose a method of numbering calibrations. Ascending numbering (1,2...)
is
offered
automatically,
however,
you
can
choose
yearly
numbering
(199800001,199800002....) where calibrations will be numbered from number one at the
beginning of each year. For detailed information about protocol numbering see WinQbase
User’s manual.
Note: It is not possible to change the numbering method hence.
When you press the OK button the program checks the entered password for safety’s sake and
requires a confirmation. At the first startup, it is necessary to enter some basic data.
After confirming, WinQbase switches to main menu.
If TRIAL database is selected, method of calibration certificate numbering is not required and
cannot be changed. Format of numbering is continual in row 1, 2, … .
Getting started
9
WinQbase
MEATEST
4
WinQbase – basic handle
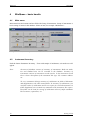
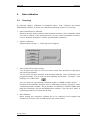
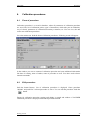
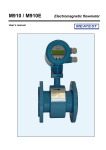
4.1.
Main menu
Main menu has nine buttons and one field with Group of instruments. Group of instruments is
basic sorting of meters in the database. Select an item, for example “Multimeters”.
Now you can access inventory of meters and calibrations.
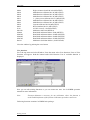
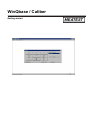
4.2.
Instrument inventory
Push the button Instrument Inventory. Form with sample of multimeter, unit under test will
appear.
Note:
Structure of database consists of inventory of instruments. Both unit under
test and standard unit can be recorded in the database. Inventory of
instruments consists of instrument records (cards). In the instrument record
there is basic description of the instrument like type, SN, customer address
etc.
To every instrument belongs inventory of calibrations in folder Calibrations
and Supplements in the same named folder. In inventory of calibrations, you
can find results of calibrations and its test report for selected instrument. In
folder Supplement you can make any comments to the instrument, like repairs.
this folder can be used for storing of calibration values of simple standards
like resistance, capacitance, etc.
10
Getting started
MEATEST
WinQbase
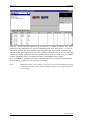
Viewing
You can view data of selected instrument. You can select another one by pushing the button:
Go to the first item.
Go to the previous.
Go to the next item.
Go to the last item.
Push the button BROWSE. List of instruments is displayed. You can set up the width of
individual columns arbitrarily.
Select another instrument (set arrow to the desired row) and push ESC button. Instrument
inventory form will appear again but with data of new sample.
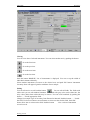
Editing
You can edit active record. Push the button
. You can edit all fields. The fields with
white color you can edit without limitation. The fields with gray color can be edited too, but
only values (data) from codebooks may be chosen. You can recall codebook by pushing the
button ”…” beside appropriate field.
Change for example Type of inventory from External to Internal. Push the button “…” beside
the field. Use browse button or arrow buttons to select new data for this field. Push ESC
button. New item is written to the field. Push the button
. New version of instrument
record is saved.
Getting started
11
WinQbase
MEATEST
You can notice, that arrow button beside label HISTORY becomes black instead of gray. It
means, that active record is not the first version. You have a look at previous one. Push black
arrow button beside label HISTORY. Date and name of person, who modified instrument
record is displayed. Label HISTORY becomes red. It is information that actually displayed
record belongs to history, and it is not really active in database.
Note:
Changing of not all fields will result automatic creation of History. Which
fields create History you can find in operation manual of WinQbase or simply
push the button F1 to open Help.
You can disable access to history record. Tick the item “Hide history” in top menu “Options”.
Information about last version of active record is shown. You cannot browse in HISTORY.
Cancel tick of “Hide history”. History records are accessible again.
To cancel edit mode without saving push the button
New record
You can create new record. Push the
button. Following menu will appear:
Now you can chose, either to create record for new instrument of the same type (select “New
from old”), or to create record for another model (select “Manually”). “New from old”
selection will result, that all data from active record will be copied to the newly created
record, except Serial number and Asset number. This feature enables multiple creation of
instrument records of the same type very easily.
After selecting, pre-set or empty form of new instrument will appear. You can enter data of
new instrument. For gray fields use codebooks. It is not obligatory to fill in all field. At
minimum gray fields and field of serial number must be fill in, otherwise you are not allowed
to save the record.
When all desired data are entered, save record by pushing the button
.
New instrument is appended to the list of instrument. You can check it. Push the button
Browse. List with instrument records including new instrument will appear.
Delete record
12
Getting started
MEATEST
WinQbase
A record, which was once saved, cannot be deleted. It is supposed, that instrument have been
used in calibration laboratory and using must be documented. However you can hide the
record. Hidden record is record, which in fact exists in database, but it is not displayed. To
hide active record, push the button “open eye”
.
Eye on the icon will close. It means, that this record is signed as hidden record. Not to display
hidden records, tick item “Hide record” in top menu “Options”. Now only non-hidden records
are displayed. Check it by pushing the button Browse.
Last calibration
In the form you can find information about date, validity and result of the last calibration of
the active instrument.
If validity of the last calibration is still OK, field “Verify to” is green. If instrument doesn’t
have valid calibration, a field is red.
You can disable calibration information on the screen. Push the button Calibrations. The
whole block disappears. Push it once more and information is displayed again.
Getting started
13
WinQbase
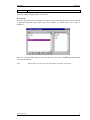
4.3.
MEATEST
Calibration inventory
Push the folder Calibrations. Card of last calibration of the active instrument is displayed. In
the card you can find all important information about process, conditions and result of last
calibration.
Viewing
You can view calibration data of the selected instrument. If there is recorded more than one
calibration, you can browse among them by pushing arrow buttons or by pushing the button
Browse. Function is similar to the same function in Instrument inventory.
Editing
You can edit active record. Push the button
. You can edit all fields. The fields with
white color you can edit without limitation. The fields with gray color can be edited too, but
only values (data) from codebooks may be chosen. You can recall codebook by pushing the
button ”…” beside appropriate field.
Function is similar to the same function in Instrument inventory. After changing active
calibration record, history of this record is automatically created.
Parameters calibration certificate
A part of calibration record in calibration inventory, there are text information, which are
inserted on the first page of calibration certificate.
Note:
14
Result of calibration process is calibration certificate. Calibration certificate
in WinQbase program consists of following parts.
Getting started
MEATEST
WinQbase
-
First page with general information, data of instrument under test,
customer, calibration laboratory, etc.
Second page, which contains text comment related to the calibration
Test report, i.e. table with measuring and evaluating data.
Among information on first page belong:
- Test report head, usually name of company, address, etc.
- Technical note, for example No. of accreditation approval
- Methodology, normally method of calibration
- Range of calibration like AC/DC voltage/current
- Chief, name of chief of laboratory.
These text information must be selected from codebooks. Push the button Parameters. Form of
first page texts will appear.
You can view it. Push the button Close. Now push editing button
and
Parameters
again.
You can edit parameters of the calibration certificate first page. On the left side, there are
displayed currently valid texts for active calibration. You can change them. Push the button
“…” beside the name of item. Form of appropriate codebook will appear.
Getting started
15
WinQbase
MEATEST
You can select any of items from the codebook. If you want to create new record in codebook,
push the button “+”. New and empty form is displayed. You can enter any text. After
finishing, save it by pushing the button
Note:
Structure of all parameters of calibration certificate first page is fixed. You
cannot change it. For example, in the form above, you can enter any text into
five rows, but you cannot add row and you cannot delete row. If you don’t
need all rows, don’t fill in them. The space in the test report will stay empty.
In fact you can remove any of the rows, but not here. See chapter about
Calibration certificate editing in operation manual.
In the same way you can edit or set all items of calibration certificate first page.
Exporting of test report
Push the button Export. Window for saving the file will appear.
16
Getting started
MEATEST
WinQbase
Select any directory and write a name of file, for example “test_1”. Confirm it with OK
button. Test report, i.e. content of window Test report, is saved as text file under chosen name.
You can open it in any text editor.
Delete calibration
Similarly to the instrument records, a calibration, which was once performed and saved,
cannot be deleted. You can only hide the record with calibration. Hidden record is record,
which in fact exists in database, but it is not displayed. To hide active record, push the button
“open eye”
.
Eye on the icon will close. It means, that this record is signed as hidden record. Not to display
hidden records, tick item “Hide record” in top menu “Options”. Now only non-hidden records
are displayed. Check it by pushing the button Browse.
Single/multiple group of instrument displaying
In the upper part of calibration form, there is button for setting, if either records of one
selected group of instruments will be displayed or records of all groups of instruments will be
displayed.
Getting started
17
WinQbase
MEATEST
Push the button. The icon disappeared, but the label “Multimeters” is displayed further. Now,
you can view all calibrations of all groups of instruments. Label “Multimeters” means that
currently displayed record belongs to the group of Multimeters. Use button Browse to display
list of all calibrations.
Push the button again. Icon appeared. Now you can view only records in group of instruments
“Multimeters”. Check is by pushing the button Browse.
If change of active group of instrument is required, you have to return to the main menu. Push
the button Close. Now you are in main menu. Push the button Groups of instruments and
select another one. Close the form by pushing the button Close. Enter into Instrument
inventory, open the folder Calibrations. Now you can view calibration of the last selected
group of instruments only.
Single/multiple calibration displaying
With next button you can control, if calibrations either for all instruments in selected group of
instruments or for active instrument will be displayed. This feature is useful, when a lot of
calibrations is recorded in database. You can simply select calibrations related to the active
instrument.
Push the button. Icon with symbol “1” disappeared. You can view calibrations of all
instruments in selected group of instruments now. Check it by pushing the button Browse.
Push the button again. Icon will appear. Now you can browse in calibrations of active
instrument only.
Note:
18
Both last two functions can be recalled in folder Instrument inventory and in
folder Supplements with the same effect.
Getting started
MEATEST
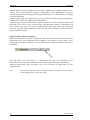
4.4.
WinQbase
Supplements
Folder Supplements is used for remarks about repairs of instruments under test and for
calibration data saving of those single standards.
Push the folder Supplements. Following form will appear:
Repair
Select item Repair in the field Type of supplements. Push the button “+”. Fields for remarks
and for comments is accessible for typing now. You can enter any text comments related to
the repair of active instrument. After finishing you can save it or cancel.
Note:
Folder Supplements/Repair is in fact single text editor.
Standard data
Select item Standard data in the field Type of supplements. Push the button “+”. Fields for
entering of calibration data of external standard are prepared for typing values. Following
fields are available (standard of inductance is used as sample):
Nominal value of standard,
0.1 (H)
Calibration value
0.1002 (H)
Accuracy in %
0.2 (%)
Comment
wire wound coil without core
Name of standard
MTE – L0.1H
After finishing you can save it or cancel.
Getting started
19
WinQbase
Note:
MEATEST
Folder Supplements/Standard data is in fact table of calibration values.
New type of supplement
New type of supplement can be easily created. Return back to the main menu. Push the button
Supplements. Form of types of supplements will appear.
Push the button “+”. Write new type of supplement, for example “Safety test” and save it.
New category of supplement is created in database.
Push the button Close, in main menu enter into Instrument inventory, select any instrument
and open the folder Supplements. Activate field Type of supplements. New type of
supplement is in the list.
20
Getting started
MEATEST
5.
New calibration
5.1.
Preparing
WinQbase
In following chapters calibration of multimeter Metex 3800, calibrated with M-140
Multifunction calibrator, is shown. New calibration performing consists of several steps.
1. Select instrument to be calibrated
Return to the main menu. Push the button Instrument inventory. Select instrument, which
you want to calibrate. If the instrument has not its own record in Instrument inventory,
create it. When the instrument is selected, open the folder Calibrations.
2. Add new calibration
Push the button with sign ”+”. Following form will appear.
3. Select method of test report creating
You can import test report, in case it was earlier created. This operation can only import
any text file into database.
You can create test report manually. Push the button manually. Form of calibration is no
prepared for editing. You can write test report manually into the field “ Test report”. After
finishing, save it with button
You can create test report through calibration module CALIBER. Push the button “…”
beside the field with button Program. Form of calibration procedures will appear. Select
calibration procedure “M3800”. This is procedure for calibration of METEX Model 3800
hand held multimeter with M-140 Multifunction calibrator. Close the form. Name of
calibration procedure was written into the field.
4. Start calibration
Before starting new calibration, calibrator has to be connected to the computer and
switched on. Use RS-232 line or GPIB interface for remote control.
Getting started
21
WinQbase
MEATEST
Push the button Program. Window with CALIBER calibration program is displayed.
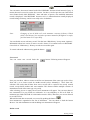
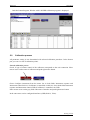
5.2.
Calibration process
All parameter setting is now determined with selected calibration procedure. In the bottom
part you can view list of calibration points.
Launch calibration process
Check, if type of remote control of the calibrator corresponds to the real connection. Place
mouse cursor on the name of calibrator and push right mouse button.
Chose Configure instrument from the menu. Set in both fields Instrument response and
Instrument control RS-232, if calibrator is controlled via RS-232. Set in both fields Instrument
response and Instrument control GPIB, if calibrator is controlled via GPIB.
Place mouse cursor on the gray field with name of interface and push right mouse button.
In the same menu can be configured interfaces (GPIB, RS232, VISA).
22
Getting started
MEATEST
WinQbase
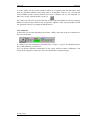
Now you can start with calibration. Push arrow button. Calibration is started from the
calibration point in active row.
After calibration is launched, following procedure is automatically performed:
Follow comments in the middle of the screen. You are asked to connect multimeter with
calibrator, Do it.
Confirm it by pushing ENTER.
You can see red line with arrows right side to the instrument names, if interface works
properly.
You are asked to switch multimeter to the calibrated function and range. Here the first
calibration point if DC voltage, range 200 mV. Set switch on the multimeter to this
position. Connect multimeter to the Hi-Lo output terminals on the calibrator.
Confirm it by pushing ENTER.
Calibrator is set to the first value, i.e. 20 mV DC.
You are asked to enter reading on the multimeter. Do it. Use basic units, i.e. V.
Result of the calibration in the first point is calculated and appropriate values are written
into empty columns in the test report table. Currently set and measured values are
displayed in right window “Readings”.
Program is going on with the second calibrated point.
Calibrator is set to the first value, i.e. 180 mV DC.
Getting started
23
WinQbase
MEATEST
You are asked to enter reading on the multimeter. Do it. Use basic units, i.e. V.
In this way calibration continue automatically. If program need change connection of
terminals or switch to another range, appropriate message is displayed on the screen.
Stop calibration process
You can anytime to interrupt calibration process. Press the button ESC. Calibration is stopped.
Push the arrow button again. Calibration is going on.
Go to in calibration process
When calibration process is interrupted, you can continue from arbitrary calibration point in
the list of calibration point.
Place mouse cursor to the row with 10 VDC calibration and press left mouse button. Row is
getting active. Press arrow button to continue. Calibration starts with further calibration from
newly selected point. All previous measurements will stay in test report.
Repeat calibration point
If you seem, calibration in any point is suspicious, you can repeat it very easily. Stop
24
Getting started
MEATEST
WinQbase
calibration by pushing the button ESC. Place mouse cursor on row with calibration point,
which is to be repeated and press left mouse button. Row is getting active. Push arrow button
to continue. Calibration in selected point is repeated. New results are written to the test report
table and overwrite the old.
To move among calibration points in the table you can use either double arrow buttons, or
slider left side the table.
Note:
Notice, that according to active row in the table, also structure of calibration
procedure is displayed in left status window.
Close calibration
Calibration can be closed either after finishing or during interrupting. Push the button ESC to
stop calibration. Click on the cross button in the right upper corner. Calibration form will
disappear. Form of calibration is displayed and results of calibration are transferred into the
field Test report. You can edit it in the window and save it by pushing appropriate button
or cancel calibration by pushing the
button
Note:
CALIBER creates test report every time, it is run. If calibration was stopped
by user before end of calibration and return to WinQbase was performed,
message “Canceled by operator” is appended into the test report
Note:
During calibration, you can work in WinQbase. Information that calibration
of any instrument is in process is displayed in Calibrations folder (red label
“Calibrating …”).
5.3.
Parameter modification
After selecting calibration procedure and starting CALIBER some of parameters can be
modified either before launching calibration process or during interruption.
Place mouse cursor onto green row with label “mer” in left window Procedure and push right
mouse button.
You can tick or not tick, if calibration will be terminated, when communication error occur or
when large deviation of calibrated instrument is evaluated. The second thing, you can
influence is type of character, which is written into appropriate row in the test report in case,
that deviation is out of allowed limits or in case, that result of calibration cannot be judge,
because of uncertainty deviation. See Operation manual of CALIBER program for more
details.
Getting started
25
WinQbase
MEATEST
You can change way of control and scanning standard unit and unit under test as well. Place
mouse cursor on the name of calibrator and push right mouse button. Select in both fields
Instrument response and Instrument control item “Manual”. Calibrator will be controlled
manually in calibration process. It means, that all settings of output signals and switching
output terminals on ad off, you have to do manually. To change setting of calibrator or meter
under test, you are asked through messages in the center of screen. Try to perform a part of
calibration:
- Run the calibration. Now you can continue in calibration process only manually.
- Do, what program requires, confirm every information by pushing ENTER.
- You are asked to enter “Input instrument value (V)” of M-140. Enter nominal value of the
calibrator output 20 mV in volts, i.e. 0,02. Confirm by ENTER
- You are asked to enter “Input instrument value (V)” of M3800 (unit under test). Enter
reading of the meter in mV. Confirm by ENTER
- The first row in Test report table is calculated. You can continue the calibration or abort
it.
- To abort, press ESC.
- Close calibration window by pushing cross button. Program returns to WinQbase, imports
test report and displays it in appropriate window. You can edit calibration test report,
temperature, humidity, date of calibration if necessary and calibration period, or/and save
calibration record.
Much more easily is to perform calibration with remote control of M-140. However, method
of manual control can be used in general for calibration of any type of meter.
Note:
When CALIBER program is used as alone standing calibration program,
outside WinQbase, more parameters can be modified directly before
calibration. Similar modification is accessible also under WinQbase, but you
have to enter from main menu, see next chapter.
Note:
When using of CALIBER program outside WinQbase is required, it is
necessary to install CALIBER program into a new directory. Use installation
CD ROM.
26
Getting started
MEATEST
6.
Calibration procedures
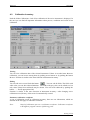
6.1.
Form of procedure
WinQbase
Calibration procedure is a record in database, where all parameters of calibration procedure
are saved, like list of calibration points, types of instruments, which take part in calibration,
way of control, parameters of calibration uncertainty evaluation, etc. You can view, edit and
create new calibration procedures.
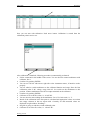
Go to the main menu. Push the button Calibration procedures. Following screen will appear:
In the window you can see content of calibration procedure and some additional information
like date of creating, name of author, name of procedure as well. You don’t need to know
internal commands.
6.2.
Edit procedure
Push the button Browse. List of calibration procedures is displayed. Chose procedure
“M3800” and push ESC. Selected procedure is active. You can edit the procedure. Push the
button.
Engine for calibration procedure creating and editing is started and window of CALIBER
calibration procedure is displayed with loaded procedure M3800.
Getting started
27
WinQbase
MEATEST
Now you can add calibration point, range or function. To change calibration point, place
mouse cursor on appropriate row in list of calibration points. Row gets green, i.e. it is active.
Move with cursor to the status window Value and push right mouse button. Select Modify…
form the menu. Box with field for new value entering is displayed. Write in new value and
confirm by ENTER. Calibration has been modified in one point. In similar way you can add
or delete calibration points. See operation manual of CALIBER for more details.
Close CALIBER by pushing cross button. Modified procedure is transferred into WinQbase.
You can add any comment. To save it press Save button.
Note:
28
Modifying doesn’t create history record. Be careful, when modifying existing
calibration procedure. After saving modified version, the original procedure
is overwritten.
Getting started
MEATEST
6.3.
WinQbase
Create new procedure
Push the button “+”. Following menu will appear:
You can select from the items:
Manually creation
Only for older calibration modules. There is no use with Caliber module.
New from old
This item enables to copy active calibration procedure and save it under new name. This
feature is used for creating of similar calibration procedures.
Push the button New from old. Procedure is copied. You have to enter name of new
procedure. Save it by pushing the button Save.
Now push the edit
procedure.
button. CALIBER program is started. You can modify new
Import
After pushing the button, you can import calibration procedure as file. Extension of file is
*.pre. See operation manual of CALIBER program.
Generator
After pushing the button, generator of calibration procedures is run. You can create new
procedure. When CALIBER program is used, Procedure wizard is opened.
Push the button Generator. Form of the Procedure wizard first step is displayed. Follow
instructions in CALIBER operation manual, chapter 3.
Getting started
29
WinQbase
6.4.
MEATEST
Other features of CALIBER
For preparing calibration procedures you need also other CALIBER program modules:
- Instrument cards
- User functions
- Wizard rules
Basic set of all these items is a part of software package. Nevertheless, you can modify them
or create new ones. Access to these modules is through Calibration procedures in main menu.
Push the button Calibration procedures in main menu. Select any of calibration procedures
and push Edit button. CALIBER program is started and active calibration procedure is loaded.
You can edit the procedure or you can work with above listed program modules.
Instrument card
Go to the top menu and select Window. From the menu select Instrument card. Form of
Instrument card will appear. Push the button Open and chose Meatest M140 from the list of
instruments.
Now you can edit existing instrument card or you can create instrument card of a new
instrument. See CALIBER operation manual for more information.
Note:
Instrument card of instrument is necessary for any calibration, which the
instrument takes part in. Without existing Instrument card calibration
procedure cannot run.
Following instrument card contains CALIBER basic package:
Coil x50
Option 130-50 Current coil (MEATEST)
Dat1281 Gen
Multimeter Wavetek/Datron 1281 (WAVETEK)
Hp34401A
Multimeter HP 34401A (HEWLETT PACKARD)
Hp3458A
Multimeter HP 3458A (HEWLETT PACKARD)
Ke2000
Multimeter Keithley 2000 (KEITHLEY)
30
Getting started
MEATEST
M109
M120
M120
M130
M133
M140
M142
M150
M612
P110
M1t380
M3800
M3850d
M3860d
M3870d
Dm311
WinQbase
High resistance decade M-109 (MEATEST)
Multifunction calibrator M-120 (MEATEST)
Multifunction calibrator M-120 (MEATEST)
Multifunction calibrator M-130 (MEATEST)
3 – phase power calibrator M-133 (MEATEST)
Multifunction calibrator M-140 (MEATEST)
Multifunction calibrator M-142 (MEATEST)
Current calibrator M-150 (MEATEST)
RTD simulator M-612 (MEATEST)
AC/DC source P-110 (MEATEST)
Multimeter M1T380 (METRA)
Hand held multimeter Metex 3800 (METEX)
Hand held multimeter Metex 3850D (METEX)
Hand held multimeter Metex 3860D (METEX)
Hand held multimeter Metex 3870D (METEX)
Multimeter Gold Star DM311 (GOLD STAR)
Close the window by pushing the cross button.
User functions
Go to the top menu and select Window. From the menu select User functions. Form of User
functions will appear. Push the button beside field Function. List of available function is
displayed.
Now you can edit existing functions or you can create new ones. See CALIBER operation
manual for more information.
Note:
Function definition is necessary for any calibration, where the function is
used. Without definition of the function calibration procedure cannot run.
Following functions contains CALIBER basic package:
Getting started
31
WinQbase
*VDC-2W
*VAC-2W
*IDC
*IAC
*RDC-2W
*RDC-4W
*C-2W
*FREQ1
*FREQ2
*RAC-2W
*RAC-4W
*VDC-4W
*VAC-4W
*C-4W
*P100 D90
*P100 U90
*P100 D68
*P100 U68
*P200 D90
*P200 U90
*P200 D68
*P200 U68
*P500 D90
*P500 U90
*P500 D68
*P500 U68
*P1000 D90
*P1000 U90
*P1000 D68
*P1000 U68
*N100 S90
*N100 S68
*N1000 S90
*N1000 S68
*TC R S90
*TC R S68
*TC S S90
*TC S S68
*TC B S90
*TC B S68
*TC J S90
*TC J S68
*TC T S90
*TC T S68
*TC E S90
*TC E S68
*TC K S90
*TC K S68
*TC N S90
*TC N S68
*P-DC
*P-AC
*P-DC3
32
MEATEST
two – wire DC voltage
two – wire AC voltage
DC current
AC current
two - wire DC resistance
four - wire DC resistance
two - wire capacity
Frequency
frequency with amplitude as parameter
two – wire AC resistance with frequency as parameter
four – wire AC resistance with frequency as parameter
four – wire DC voltage
four – wire AC voltage with frequency as parameter
four – wire capacity
Pt 100 temperature sensor, ISO standard, ITS90
Pt 100 temperature sensor, US standard, ITS90
Pt 100 temperature sensor, ISO standard, PTS68
Pt 100 temperature sensor, US standard, PTS68
Pt 200 temperature sensor, ISO standard, ITS90
Pt 200 temperature sensor, US standard, ITS90
Pt 200 temperature sensor, ISO standard, PTS68
Pt 200 temperature sensor, US standard, PTS68
Pt 500 temperature sensor, ISO standard, ITS90
Pt 500 temperature sensor, US standard, ITS90
Pt 500 temperature sensor, ISO standard, PTS68
Pt 500 temperature sensor, US standard, PTS68
Pt 1000 temperature sensor, ISO standard, ITS90
Pt 1000 temperature sensor, US standard, ITS90
Pt 1000 temperature sensor, ISO standard, PTS68
Pt 1000 temperature sensor, US standard, PTS68
Ni 100 temperature sensor, ITS90
Ni 100 temperature sensor, PTS68
Ni 1000 temperature sensor, ITS90
Ni 1000 temperature sensor, PTS68
TC temperature sensor type R, ITS90
TC temperature sensor type R, PTS68
TC temperature sensor type S, ITS90
TC temperature sensor type S, PTS68
TC temperature sensor type B, ITS90
TC temperature sensor type B, PTS68
TC temperature sensor type J, ITS90
TC temperature sensor type J, PTS68
TC temperature sensor type T, ITS90
TC temperature sensor type T, PTS68
TC temperature sensor type E, ITS90
TC temperature sensor type E, PTS68
TC temperature sensor type K, ITS90
TC temperature sensor type K, PTS68
TC temperature sensor type N, ITS90
TC temperature sensor type N, PTS68
One phase DC power
One phase AC power
Three phase DC power
Getting started
MEATEST
*P-AC3
WinQbase
Three phase AC power
Close the window by pushing the cross button.
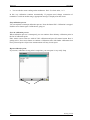
Wizard rules
Go to the top menu and select Window. From the menu select Wizard rules. Form of Wizard
is displayed. Push the Open button and select “default” by double click. List of rules is
displayed.
Now you can edit existing rules or you can create new ones. See CALIBER operation manual
for more information.
Note:
Getting started
Wizard rules are necessary for calibration procedure generation.
33
WinQbase
8.
MEATEST
Calibration certificate
Calibration certificate is related to the instrument calibration. Access to the calibration
certificates is from folder Calibrations in item Instrument inventory of main menu.
Push the button Instrument inventory in main menu. Select an instrument with at minimum
one calibration. Open its Calibration folder. In the fields and in Test report memo box should
appear recorded values and texts. Go to the bottom of them form.
Preview
Find field with types of printing and select Preview. Push the button with printer icon.
Preview of whole calibration certificate will display. You can go through all pages, but you
cannot edit them here.
Structure of calibration certificate is fix. It consists of:
First page. It contains data about calibrated instrument, calibration laboratory,
date, etc. Form of the first page can be changed. Only items from codebooks can
be included to the form. Item can be removed and added, but only item of
codebooks.
Second page. It contains conditions of calibration. Only items from codebooks
can be included to the form.
Third and next pages. They contain test report. Test report is created by
calibration program CALIBER.
Push the cross button in upper right corner. Preview disappears.
Printer
Find field with types of printing and select Printer. Push the button with printer icon.
Calibration certificate is printed on default printer.
Note:
In case there are several printers connected to the computer, Windows default
printer is used. If you need change printer for printing from WinQbase, you
have to tick it in Windows as default printer.
File
Calibration certificate can be exported as a file in default printer format. You can save the file
and print later. This file is not text file.
Export and Import
Functions Export and Import are used for exporting and importing form of calibration
certificates. It cannot be used for exporting of whole calibration certificate.
You can use several types of calibration certificate forms, with different contents, fix texts,
variables, etc. Exported file is in database format. This function can be used for transferring of
forms among computers or laboratories. For more detailed information see Operation manual
WinQbase.
34
Getting started
MEATEST
WinQbase
Modify calibration certificate
Calibration certificate can be modified according to your needs. Find field with types of
printing and select Modify. Push the button with printer icon.
Edit window for calibration certificate modification is displayed. Following operation are
allowed:
Remove fix text
Add fix text
Copy text
Remove variable, i.e. item as record from codebook
Add item, i.e. category of codebook
Copy item
Add or remove picture. Only one picture can be inserted into first page as OLE
object.
Change colors and fonts
Change position of objects
To remove an object from the form, sign the object with clicking left mouse button. Then push
right mouse button and select item Cut. Object will disappear.
To add a fix text object, click on button “A”. Place mouse cursor on the requested area, push
left mouse button and write text.
To add codebook variable, push the button “ab”. Place mouse cursor on the requested area,
push left mouse button and select from the list of codebooks desired variable.
To add a picture, you have to import it into database. New head should be created too.
Push Edit button in folder Calibrations and button Parameters. Select Test report head and
push the button “…” . Form of Test report head will appear. Push the button “+” to create new
head and write your text into three rows in the test report head. Push the button Insert.
Window for searching requested picture is displayed. Format of picture must be of those type,
which is supported with Windows operation system. Formats bmp, pcx, doc, etc. are suitable.
Confirm by OK and save new test report head. After saving, push the button Preview. You
can see inserted picture. To change its position or size, go back, chose Modify and Push the
button Printer. You can see here gray frame instead of life picture, which represents inserted
picture. You can move it, change size, etc.
Note:
Picture can be of whole page size and it can create background of the first
page.
Notice, that for each calibration you have to chose Parameters of test report
(also Test report head). The calibration certificate is printed always in this
form.
In general, you can insert the picture directly in Modify menu. This procedure is not
recommended, if you are using the database in computer network.
Getting started
35
WinQbase
9.
MEATEST
Codebooks
In inventory of instruments and calibrations, many of items have to be selected from their
codebooks. Access to the codebooks is from main menu. However, to the codebooks you can
enter, edit them or create new record also in Instrument inventory folder and in Calibrations
folder. Presence of codebook is always signalized with “…” button beside the field, which is
related a the codebook.
From the main menu you can enter to the following groups of codebooks:
Inventory parameters, where codebooks related to the instrument and sorting inside
database are accessible:
Manufacturer
Model
Customer
User item 1
Type of inventory
Quantity
Category
Test report parameters, i.e. codebooks with text, which will be filled into the calibration
certificate or which is related to the calibration:
Test report head
Methodology
Technical note
Range of calibration
Chief
Type of report
Calibration result
Others
Groups of instruments. It forms basic sorting of instruments.
Supplements. Types of supplements are recorded here.
Calibration procedures. It contains database of calibration procedures.
To edit or create new record in codebook, select requested group of codebooks. To edit Test
report parameters, push the button with the same name in main menu. Select from the menu
for example Methodology. Form of active record is displayed. Use standard buttons to edit
record or create new one. Don’t forget to save new modification before leaving the form.
36
Getting started
MEATEST
10.
WinQbase
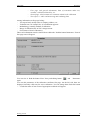
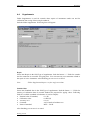
Users
The item contains two folders
Users
Function Users contains list of users with their passwords and levels of access.
Push the button Users in main menu. Form with folder User will appear.
Push the button browse. Table with list of users is displayed. Close the table.
Add new user. Push the button “+”. Fields for typing are getting white. Type User name, his
password, comment if required and tick level of access for the user.
Login and logout
Open the folder System logs. Form of login and logout will appear.
Push the button Browse. You can view persons, who have been worked with program, date
and time of login and logout. No edit function is available here.
Getting started
37
WinQbase
11.
MEATEST
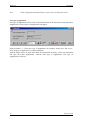
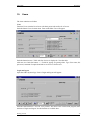
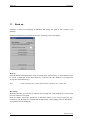
Back up
Function is aimed for backuping of database and setting the path to the currently used
database.
Push the button Back up from the main menu. Following screen will appear:
Back up
Push the button Backup database. Form for setting drive and directory, to which database will
be saved, is displayed. Select drive/directory. Confirm with OK. Database is packing and
saving into selected directory.
Note:
Name of backup file is fixed and cannot be changed. It is “qbase.pck”
Recreating
With this function you can recover database from backup file. Only backup file, created with
previous function is accepted.
Push the button. Select file “qbase.pck” in directory where it was saved in previous step.
Confirm by OK. Backup file is loaded and decompressed. After loading, restart of WinQbase
is requested. Restart WinQbase.
38
Getting started
MEATEST
WinQbase
Database defragment
This function serves for minimizing necessary space for database on hard disk. See WinQbase
operation manual for more details. Confirm with OK. Database is packing and saving into
selected directory.
Change path
This is very important function. Here you can change path to the database files. In general,
you can use more databases, but it is recommended to use only one.
Note:
Notice, that to enter the path you are asked during first launch of WinQbase.
Note:
Be very careful, when changing the path, not to lose calibration data.
Getting started
39