1
SLC16H-IR
TABLE OF CONTENT
USER MANUAL
PROGRAMMABLE INDOOR
SINGLE LINE
LED SIGN
SINGLE LINE LED SIGNS
TABLE OF CONTENT ......................................................................................... 1
SAFETY INSTRUCTIONS ................................................................................... 2
PACKAGE CONTENT ......................................................................................... 2
LED SIGN SETUP ............................................................................................... 3
MOUNTING INSTRUCTION........................................................................................ 3
CLEANING AND STORAGE ....................................................................................... 3
INTRODUCTIONS ............................................................................................... 4
PRODUCT SPECIFICATIONS .................................................................................... 4
COMPUTER SOFTWARE & PROTOCOL .................................................................. 4
HOW TO CREATE A SIMPLE MESSAGE IN SIX EASY STEPS ............................... 5
HOW TO CREATE A MORE SOPHISTICATED MESSAGE ....................................... 6
HOW TO RUN A SAVED PROGRAM ......................................................................... 7
HOW TO DELETE THE CURRENT PROGRAM FILE ................................................ 7
HOW TO DELETE A SPECIFIC PROGRAM FILE...................................................... 7
SEQUENCE FILES .............................................................................................. 8
SEQUENCE FILE SCENARIO .................................................................................... 8
HOW TO CREATE A SEQUENCE FILE ..................................................................... 9
HOW TO SCHEDULE A PROGRAM FILE................................................................ 10
HOW TO DELETE A SEQUENCE FILE.................................................................... 10
GRAPHIC IMAGES............................................................................................ 11
HOW TO INSERT A GRAPHIC IMAGE INTO A PROGRAM .....................................11
HOW TO CREATE USER DEFINED GRAPHIC IMAGES .........................................11
CLOCK, TIMER AND ALARMS ........................................................................ 12
HOW TO ADJUST THE TIME ................................................................................... 12
HOW TO ADJUST THE DATE................................................................................... 12
HOW TO SET TIME TO 12 HOUR FORMAT ............................................................ 12
HOW TO SET TIME TO 24 HOUR FORMAT ............................................................ 12
HOW TO ADD TIME TO A PROGRAM ..................................................................... 13
HOW TO ADD DATE TO A PROGRAM .................................................................... 13
HOW TO SET THE AUTO OFF TIMER..................................................................... 13
HOW TO SET THE AUTO ON TIMER ...................................................................... 13
HOW TO TURN ON/OFF THE HOURLY ALARM ..................................................... 13
HOW TO SET AN ALARM......................................................................................... 14
HOW TO DELETE ALL ALARMS (INCLUDING HOURLY ALARM) ......................... 14
HOW TO DELETE AUTO ON/OFF TIMER ............................................................... 14
PASSWORD PROTECTION .............................................................................. 15
HOW TO TURN OFF PASSWORD PROTECTION................................................... 15
HOW TO TURN ON PASSWORD PROTECTION .................................................... 15
HOW TO RESET THE PASSWORD TO THE DEFAULT VALUE ............................. 15
HOW TO CHANGE THE PASSWORD...................................................................... 15
DELETE COMMANDS....................................................................................... 16
HOW TO DELETE THE CURRENT PROGRAM FILE .............................................. 16
HOW TO DELETE A SPECIFIC PROGRAM/SEQUENCE FILE............................... 16
HOW TO DELETE AUTO ON/OFF TIMER ............................................................... 16
HOW TO DELETE ALL ALARMS (INCLUDING HOURLY ALARM) ......................... 16
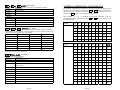
APPENDIX A: KEYS/BUTTONS DESCRIPTIONS............................................ 17
APPENDIX B: INTERNATIONAL CHARACTER SETS .................................... 23
APPENDIX C: DIP SWITCH SETTINGS ........................................................... 24
TROUBLE SHOOTING ...................................................................................... 25
NOTES ............................................................................................................... 26
DISCLAIMER: Every effort has been made to verify the accuracy of this user manual’s
content. However, specification and content can change without notice. Check for the latest
updates at Grandwell’s website, http://www.grandwell.com.
- Page 1 -
SAFETY INSTRUCTIONS
LED SIGN SETUP
When using electrical equipments, basic precautions should always be followed
to reduce the risk of fire, electric shock and injury to person, including the
following:
The LED sign is fairly easy to setup. Follow the simple instructions below.
1. Remove LED sign from the packaging and set it on a flat firm surface.
Position the sign so that the side with a small clear plastic piece is on the
left side of the sign when looking at front of the sign.
2. Attach the power plug to AC power adapter.
3. Attach the AC power adapter into the right side of the sign.
4. Make sure all power cord connections are firmly connected.
5. Plug power cord into an electrical socket. LED sign should power up.
6. Remove infrared remote control and insert batteries into it.
1.
2.
3.
4.
5.
6.
7.
8.
9.
10.
11.
12.
13.
14.
Read all safety instructions before using the LED sign.
Save these instructions for later use and reference.
Follow all warnings and instructions marked on the product.
Do not place this product on any unstable surface; it may fall, causing
damage to the product and/or injury to personnel(s).
This LED sign is not intended for use in wet or damp locations. Never
locate sign where it may fall into a bathtub or other water container.
This product requires adequate ventilation for proper operation and to
prevent overheating. Do not place this product near or over a radiator or
heat vent. Do not install this product in a built-in cabinet unless adequate
ventilation is provided.
Do not use this LED sign outdoors.
Connect to properly grounded outlets only.
Operate this product with only the power adapter supplied.
Do not run power cord under carpeting. Do not cover cord with throw rugs,
runner or the like. Arrange cord away from traffic area and where it will
not be tripped over.
If the AC display power supply is plugged into an extension cord, make
sure that the ampere ratings on the product and any other product
plugged into the cord do not exceed the cord’s ampere rating.
Do not operate this product with a damaged cord or plug, if LED sign
malfunctions, or has been dropped or damaged in any matter. Contact
manufacturer for any necessary repair.
Do not attempt to service this product without authorization or insert any
foreign objects into this sign. Hazardous voltages are present that can
cause electric shock or fire. Refer all servicing to qualified service
personnel.
Use LED sign only as described in this manual. Any other use not
recommended by the manufacturer may cause fire, electric shock, or
personal injury.
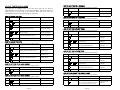
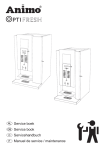
MOUNTING INSTRUCTION
The LED sign when placed horizontally leveled on its edge on a flat stable
horizontal surface should stand upright on its on without a prop. However, if
you wish to mount it to a wall, then follow the below steps.
1.
2.
3.
Refer to Figure 1 below and assemble as shown. You might need to
unscrew the wall mount bracket nut from the side of the sign first.
Take the sign with attached mounts and mark on the wall the drill hole
locations that correspond to the mounts. Make sure the wall is sturdy
enough to support the weight of the sign.
Drill holes at the marked locations on the wall and attach the sign to the
wall. *Note: Wall mount screws are not provided.
PACKAGE CONTENT
Please, check to make sure that your package contains the following items.
(1) LED Sign
(1)LED
Infrared
Sign Remote Control with 2 AAA 1.5V Batteries
Power
Supply
(1)5VUser
Manual
wall brackets
(1)2 100-240V
~ 50/60Hz AC to 5V DC Power Adapter
CD ROM
with PDF Users Manual and Software
(1)Small
AC Power
Plug
serial cable
(1)RJ11
PairtoofDB9
Mounting
Brackets
to Serial
Converter
Cable
+ Software
(1)USB
Female
9 Pin
Serial to
RJ11
Cable* on Small CDROM
(1) Floppy Diskette*
*Note: The RJ11 cable is used to connect the LED sign with a computer. The
floppy diskette contains software to program the LED sign via a computer. The
diskette may or may not be included in the package. However, if you wish to
use the software but do not have a copy of the software, please check our
website for a copy.
- Page 2 -
Figure 1. LED Sign’s Wall Mount Bracket Assembly.
CLEANING AND STORAGE
1. Unplug LED sign from all electrical outlets before cleaning the sign.
2. Use a soft cloth for dusting and a damp cloth for cleaning.
3. Use vacuum cleaner with brush attachment to remove heavy dust.
4. Do not use liquid, abrasive and/or aerosol cleaners on this product.
5. Save original packaging to store LED sign in a safe location.
- Page 3 -
INTRODUCTIONS
PROGRAM FILES
As a proud owner of a new LED sign, you are undoubtedly looking forward to
displaying your first message and getting the sign to work for you. Before you
get started, we recommend that you invest the time to review this user manual,
which will help you tremendously in understating the capabilities of the LED
sign. There are numerous exercises and useful tips to help you quickly learn
how to program the LED sign with effective and eye-catching messages.
In order to create eye catching and effective messages for your audience, you
will need to know what a program file is and how to create one. A program file
is structured as a single line of messages and commands that tell the LED sign
what to do, what to show, and how to do it. Here are some basic facts about
program files:
Before you begin, here are some helpful tips to remember.
• Point the infrared remote at the LED sign when you are creating or editing a
message. The infrared sensor is located on the left hand side of the LED sign.
The LED sign will beep every time when you successfully enter a command
via the infrared remote.
• The exercises and instructions in this manual assume that password
protection is disabled. However, if password protection is enabled, then you’ll
need to provide the factory default password of “000” when prompted for it.
We recommend that you turn off password protection while learning to
program the LED sign, as this will reduce the number of buttons you have to
press. Reactivate the password protection when you have the sign
programmed and do not want unauthorized access to it.
PRODUCT SPECIFICATIONS
Model Number: SLC16H-IR
Pixel Matrix: 7x80
Characters: 13, 2.1”/5cm height.
Memory Size: 8K, 7000 Characters, 100+ Programs, 500+ Pages.
Dimensions: Height: 4”/10cm, Width: 26”/66cm, Depth: 1.3”/3cm
Gross Weight: 6lbs/2.7kg Total Package.
3lbs/1.4kg LED Sign
Power Input: LED Sign: 5V DC Input, 3 Amp
Infrared Remote: 2x AAA 1.5V Batteries
Features: •
24 Display Methods
•
8 Built-in Graphics
•
16 Color Styles
•
8 User Defined Graphics
•
7 Font Styles
•
8 Animations
•
Password Protection
•
30 Symbols
•
Auto On/Off Timer
•
International Character Set
•
Real Time Clock
•
Programmable Alarms
•
Advance Scheduling
•
Memory Backup
COMPUTER SOFTWARE & PROTOCOL
The LED sign can also be programmed using the software, Moving Sign. The
package may or may not contain a floppy diskette with a copy of the software
program. However, if the diskette is not included or lost, please visit our
website to download the latest version of the software. Use the 9 Pin
Serial/RJ11 cable to connect the LED sign to a computer for programming. For
software installation and programming assistance, please consult the Moving
Sign User Manual.
In addition, if you wish to integrate with the LED sign through your own
developed application, you can do so by using the LED sign’s protocol. A copy of
the protocol is available for download from our website as well.
- Page 4 -
• Program files are labeled numerically from 00 to 99. 00 is reserved for the
default factory program and cannot be overwritten. Slots 01-99 are for user
created programs.
• User can create up to 99 different program files as long as the total numbers
of characters in all the program files do not exceed 7,000 characters
including spaces. Each individual command also counts as one character.
The following exercise will help you get familiar with creating a program file.
The instructions are organized into steps, which keys on the infrared remote to
press, a short explanation of each step, and what you should see on the LED
sign after pressing the keys.
HOW TO CREATE A SIMPLE MESSAGE IN SIX EASY STEPS
Step
Keys to Press
Explanation
What is Displayed
PROG
Enters into Edit Mode, which allows
you to create/edit a program1.
OPEN: ??
01 ENT
If prompted for a password, key in
“000”. Follow instruction in the
password protection section to disable
protection for this exercise2.
Select program file slot 01 to create or
edit. If slot 01 had an existing file, you [CYCLIC]
would see the tag “OLDFIL” before the
display method command. [CYCLIC] is
the default display method, which
cycles through all the methods and
colors randomly.
3.
NEXT or PREV
If you wish to change the display
method use those keys to choose a
different option. In this exercise we’ll
use the default. Check Appendix A for
a full list of available options.
[CYCLIC]
4.
GREETINGS
Key in the following message.
GREETINGS
5.
RUN
Ends the edit program mode and
prompts for save changes if any.
SAVE? (Y/N)
6.
Y
Saves the program is slot 01.
Message is shown.
1.
2.
Note: If you made any mistakes, use the DEL key to correct those mistakes.
Congratulations, you have just created your first message. Important things to
remember from the above exercise are:
1. Press PROG to get into Edit Mode after selecting a program slot (01-99).
2. The default password is “000”.
3. [CYCLIC] is the default display method. Use NEXT or PREV to scroll through
the other available display method options. Check Appendix A for other
program commands that can be used to enhance messages.
- Page 5 -
The next exercise will examine more of the basic commands, such as fonts,
colors, and moving around a program file. By the end of the next exercise you
will know enough to create persuasive and dazzling messages.
HOW TO CREATE A MORE SOPHISTICATED MESSAGE
Step
Keys to Press
Explanation
What is Displayed
1.
PROG
Enters into Edit Mode.
OPEN: ??
2.
01 ENT
Select program file 01 to modify.
Previously saved programs will have
the tag “OLDFIL” before the first
display method command.
OLDFIL[CYCLIC]
3.
PREV
Change display method to [SLIDEIN]
[SLIDEIN]
Advance forward the programming
position1 to the end of “GREETINGS”.
IDEIN]GREETINGS
4.
Here are important things to remember about the above exercise:
1. The program position is the right most visible position on the LED screen.
Because the program file is structured as a continuous line, the program
position is where any new command or characters are inserted into the
program. For example, while modifying a program and MET is pressed
[CYCLIC] will appear at the right most position of the LED screen.
2. If the message’s length does not fit within the LED screen, the sign will
ignore any programmed display methods and use the [OPEN ] method
(scrolls the message from right to left automatically like a ticker). For
example, if the message “SPORTING GOODS DEPARTMENT” is entered, the
entire message will not fit on the screen entirely. Therefore, the sign will
scroll the message from right to left. Try to shorten the message or use
display methods to break message into shorter individual messages. Using
the default font, 7x6, up to thirteen (13) characters and spaces can fit on
the LED screen at once.
3. The default color is bright Red. A list of the other color options is located in
Appendix A.
4. Either buttons RUN or PROG can be used to save a modified program. To
save the program and visually see what the program looks like on the LED
screen use the RUN button. To save the program and continue to modify
the same or another program, use the PROG button.
5.
PAU
Insert a pause command.
ETINGS[PAUSE1]
6.
MET
Add a new display method.
[PAUSE1][CYCLIC]
7.
NEXT x3
Change method to [OPEN
8.
ASK ABOUT OUR
Key in the following message2.
ASK ABOUT OUR
9.
PAU
Insert a pause command.
OUR[PAUSE1]
10.
NEXT
Change pause to a 3 second delay.
OUR[PAUSE2]
Step
Keys to Press
Explanation
What is Displayed
11.
MET
Add a new display method.
[PAUSE2][CYCLIC]
1.
RUN
Enter into Run Mode.
RUN: ??
12.
PREV x3
Change method to flash.
[PAUSE2][FLASH]
2.
01 ENT
Selects program file 01 to run.
Message is shown.
].
3
[PAUSE2][OPEN
]
HOW TO RUN A SAVED PROGRAM
Normally, the sign will run the last saved program when the LED sign is turned
on. However, you can choose which specific program to run.
13.
COLOR
Add a color command .
[FLASH][RED]
14.
NEXT x9
Change color to rainbow wave mix.
[FLASH][MIX]
Step
Keys to Press
Explanation
What is Displayed
15.
SPECIALS!!
Key in the following message.
[MIX]SPECIALS!!
1.
PROG
Enter into Edit Mode.
OPEN: ??
16.
PAU
Insert a pause command.
IALS!![PAUSE1]
2.
01 ENT
Select program file 01 or the file you
wish to erase.
OLDFIL[CYCLIC]
17.
RUN
Ends the edit program mode and
prompts for save changes if any.
SAVE? (Y/N)
3.
CLR
Enter into Deletion Mode.
DEL ALL
18.
Y
Saves the program is slot 01.
Message is shown.
4.
NEXT
Select option DEL MSG.
DEL MSG
5.
ENT
Current program file will be erased.
WARNING: There is no way to undo
this command, so be absolutely sure.
[CYCLIC]
Congratulations, you have just created a pretty sophisticated message in less
than twenty steps. The LED sign is so versatile you can create an unlimited
number of different designs for your message by just changing the colors,
display methods and contents. There are even more commands you can add,
such as font sizes, graphic images, sounds, and varying speeds, to make your
messages even more intricate that add sparkle and increase readability.
Remember to be creative with your approach and design of the message. There
is no set method to start each message with. Experiment with all the different
commands that are available and explained in Appendix A.
- Page 6 -
HOW TO DELETE THE CURRENT PROGRAM FILE
HOW TO DELETE A SPECIFIC PROGRAM FILE
Follow above steps 1 to 3 and proceed with step 4 below.
Step
Keys to Press
Explanation
What is Displayed
4.
NEXT x2
Select option DEL FILE??
DEL FILE??
5.
01 ENT
Select program file 01 or the file you
wish to erase. WARNING: There is no
DEL FILE??
way to undo this command, so be
absolutely sure.
- Page 7 -
HOW TO CREATE A SEQUENCE FILE
SEQUENCE FILES
A sequence file combines separate program files into one program and runs
them on the LED sign sequentially. In order to create or use a sequence file,
there must be saved program files. Sequence files have similar naming
conventions to program files. However, sequence files begin with the letter “S”
followed by a single digit number (S0-S9). Therefore, there are only ten slots
available to store sequence files.
Step
Keys to Press
Explanation
What is Displayed
1.
PROG
Enters into Edit Mode.
OPEN: ??
2.
S
Select sequence files instead of
program files to create or edit.
OPEN: S0
1 ENT
Select a sequence file slot, such as S1.
The next step is to specify which days1
of the week the sequence file will run.
0=Sunday, 1=Monday, 2=Tuesday,
3=Wednesday, 4=Thursday, 5=Friday,
6=Saturday.
Some of the benefits of sequence files include the ability to reuse existing
programs files, to quickly create different messages for varying occasions and
promotions, and to schedule programs for a specific run time. The following
scenario illustrates these benefits.
3.
SEQUENCE FILE SCENARIO
Let’s say that the owner of a deli called, John’s Deli, wants to quickly advertise
different daily specials every day. He already has the following program files
created and stored in the LED sign.
4.
Program File No.
10
11
12
13
14
15
16
17
18
20
21
22
30
31
32
40
Message Content
Welcome to John’s Deli
Ask us about our awards program
Our today’s special is
for $3.95
for $4.95
for $5.95
Thank you for not smoking
and a cup of
and a bowl of
Meat Loaf Sandwich
Hot Turkey Club
Chicken Caesar Salad
Minestrone
Chicken Noodle
Clam Chowder
Add chips & large soda for $1.50
By using sequence files, the owner can advertise today’s special of meat loaf
sandwich and a cup of minestrone soup for $3.95 by combining program files
12, 20, 17, 30, and 13 sequentially (in that order) to create the desired
promotion. By changing the selected program files to 12, 21, 18, 32, and 14,
the owner can change the day’s special to hot turkey club and a bowl of clam
chowder for $4.95 relatively easily and quickly. Furthermore, the owner can
also appended additional messages, such as adding chips and soda for $1.50 or
prompting his award program, to the above message by including program files
11 and/or 40 to the sequence file. Lastly, he can schedule the sequence file to
run from 10AM to 2PM every Monday, Wednesday and Friday.
The following exercise illustrates how to create a sequence file based on the
above scenario. The exercise is based on the assumption that the above sample
program files are stored in the LED sign.
- Page 8 -
5.
or
NEXT or PREV
Use the forward or backward button to
DAY 0 1 2 3 4 5 6
move the active cursor. The active
cursor is represented by the green
(Note: Green background
background color. For this exercise,
on red number one.)
move the active cursor to 1.
Toggle the selected day ON/OFF by
using the NEXT or PREV buttons.
When a day is turned ON the number
will turn green. OFF days are colored
red. The background color will also be
inverted as well.
6.
Repeat step 4 and 5 until Day 3 and 5
are also turned on.
7.
Once the days for the sequence file
are set, the next step is to set the
start time. The time format is in 24
hours, so 2PM is 14:00.
S
8.
9.
or
NEXT or PREV
(Note: Red background on
green number one.)
START 00:00
(Note: START is orange,
the first digit is green and
remaining digits are red.)
START 00:00
Use NEXT or PREV buttons to change
the digit’s value.
START 10:00
Repeat steps 8 and 9 until the time
reads 10:00 (10AM).
11.
Once the start time for the sequence
file is set, the next step is to set the
end time. The time format is in 24
hours, so 2PM is 14:00.
12.
DAY 0 1 2 3 4 5 6
Use
or
buttons to move the
active cursor to the desired digit.
10.
S
DAY 0 1 2 3 4 5 6
(Note: DAY is orange, the
numbers are red, and 0’s
background is green.)
END 23:59
(Note: END is orange, the
first digit is green and
remaining digits are red.)
Repeat steps 8 and 9 until the time
reads 14:00 (2PM).
END 14:00
13.
ENT
Confirm the time setting2.
[S1]
14.
12 20 17 30 13
Key in the program file number(s) 3
you want separated by a space, use
the SPA button.
12 20 17 30 13
15.
RUN
Ends the edit sequence file mode and
prompts for save changes if any.
SAVE? (Y/N)
16.
Y
Saves the sequence file to slot S1.
Message is shown.
- Page 9 -
Congratulations, you have just created your first sequence file. Remember the
primary benefit of using sequence files is to compile a long message quickly
and to change any portion of that message easily. Therefore, sequencing saves
you time from having to edit long messages or make cumbersome changes. If
you decide to change the above exercise’s daily special, all you need to do is
change the selected program files.
Here are important things to remember about the above exercise:
1.
2.
3.
4.
The first step to create a sequence file is to set the time setting of when
the sequence file will automatically run and end. To set the time setting,
select the days you wish to have the programs run, follow by the start time,
and then by the end time. The time setting is designed to be flexible. You
can just set the days you want and skip the starting and end time by
pressing the ENT button when you have finished selecting the days you
want.
If you do not wish to set the time setting for sequence files, you can skip
the time setting step altogether by pressing the ENT button, which will take
you into the program file selection step.
IMPORTANT: If there is at least one saved sequence file and the time
setting is valid, the LED sign will automatically run that sequence file even
if you have another program running. If there are multiple saved sequence
files with concurrently valid time setting, the LED sign will run those
sequence files in order from S0 to S9. Therefore, be very careful about the
time settings of the sequence file or just do not use the sequence file’s
time setting.
Writing a short description about each program file will help tremendously
with creating a sequence file. You can use the notes section at the end of
this manual to write those summaries in pencil.
Step
Keys to Press
Explanation
What is Displayed
14.
01
Key in the program file you want to
schedule to run.
[S1] 01
15.
RUN
Ends the edit sequence file mode and
prompts for save changes if any.
SAVE? (Y/N)
Saves the sequence file to slot S1.
Message is shown.
Y
HOW TO DELETE A SEQUENCE FILE
Step
Keys to Press
Explanation
What is Displayed
1.
PROG
Enter into Edit Mode.
OPEN: ??
2.
00 ENT
Select any program file or file 00.
OLDFIL[CYCLIC]
3.
CLR
Enter into Deletion Mode.
DEL ALL
4.
NEXT x2
Select option DEL FILE??
DEL FILE??
S1 ENT
Select the sequence file you wish to
erase. WARNING: There is no way to
undo this command, so be absolutely
sure.
5.
- Page 10 -
The LED sign comes with eight user defined and eight factory installed graphic
images. Graphic images can easily enhance any message by providing a
visualization of products or services offered by your organization.
HOW TO INSERT A GRAPHIC IMAGE INTO A PROGRAM
Step
Keys to Press
Explanation
What is Displayed
1.
PROG
Enter into edit mode.
OPEN: ??
01 ENT
Select a program file you want to add
graphics to.
OLDFIL[CYCLIC]
Move to the desired location in the
program.
(If applicable).
2.
3.
4.
GRA
Enters into graphic selection mode.
GET GRAPH lets you insert a graphic
image into a program.
GET GRAPH
5.
ENT
Inserts a graphic image into program.
[CYCLIC][GRAPH A]
6.
NEXT or PREV
Scroll through the available graphic
images. Continue modifying the rest
of the program.
7.
ENT
To select the desired graphic image.
[GRAPH P][CYCLIC]
8.
RUN
Leaves edit mode and save program.
SAVE? (Y/N)
9.
Y
Saves the program in file slot 01 and
shows your graphic image.
Shows the image.
Note: A list of descriptions for the graphic images is available in Appendix A.
HOW TO SCHEDULE A SINGLE PROGRAM FILE
Follow above steps 1 to 13 and proceed with step 14 below.
16.
GRAPHIC IMAGES
HOW TO CREATE USER DEFINED GRAPHIC IMAGES
Follow above steps 1 to 4 and proceed with step 5 below.
Step
Keys to Press
Explanation
What is Displayed
5.
NEXT
Scroll next to MAKE GRAPH option.
MAKE GRAPH
6.
ENT
MAKE GRAPH will overwrite any saved
graphics file. Use EDIT GRAPH to edit
previously saved graphic images.
NUMBER A
7.
NEXT or PREV
Scroll through available slots (A-H).
(If applicable).
8.
ENT
Enters into graphic editor mode.
A yellow dot (cursor).
9a.
Use the following
keys/buttons to
move the cursor
around.
9b.
DEL FILE??
10.
NEXT or PREV
ENT
F
G
H
J
K
L
N
O
P
Press K to turn on/off draw. For
example, to draw a line press K
and use pointer L to move the
cursor right. A horizontal line will
appear. Press K again to turn
draw off.
Changes the color of the pixel.
Leaves graphic editor and saves the
graphic file in selected slot.
- Page 11 -
Cursor changes color.
HOW TO ADD TIME TO A PROGRAM
Follow above steps 1 to 3 and proceed with step 4 below.
CLOCK, TIMER AND ALARMS
The LED sign is equipped with a real time clock that can be used to
automatically turn the LED sign on and off. In addition, alarms can be set to
notify the top of every hour or at intervals. Note: The clock does not
automatically adjust for day light savings or leap years.
HOW TO ADJUST THE TIME
Step
Keys to Press
Explanation
What is Displayed
4.
NEXT x6
Scroll to option ADD TIME.
ADD TIME
5.
ENT
Time is added to the program.
[CYCLIC] DY HH:MM
HOW TO ADD DATE TO A PROGRAM
Follow above steps 1 to 3 and proceed with step 4 below.
Step
Keys to Press
Explanation
What is Displayed
1.
PROG
Enter into Edit Mode.
OPEN: ??
Step
Keys to Press
Explanation
What is Displayed
2.
01 ENT
Enter program file 01.
[CYCLIC]
4.
NEXT x7
Scroll to option ADD DATE.
ADD DATE
3.
TIME
Enter into Time & Alarm Mode.
SET TIME
5.
ENT
Date is added to the program.
[CYCLIC]MM-DD-YYYY
4.
ENT
Set the time. The green color number
indicates the active cursor.
Current clock time in
format HH:MM:SS.
5.
NEXT or PREV
Change the value. The input time is in
24 hour format.
Current clock time in
format HH:MM:SS.
Move the active green cursor to the
next field. Repeat step 5 & 6.
Current clock time in
format HH:MM:SS.
Save the modified time.
[CYCLIC]
6.
7.
ENT
HOW TO ADJUST THE DATE
Follow above steps 1 to 3 and proceed with step 4 below.
HOW TO SET THE AUTO OFF TIMER
Follow above steps 1 to 3 and proceed with step 4 below.
Step
Keys to Press
Explanation
What is Displayed
4.
PREV x2
Scroll to option OFF TIME.
OFF TIME
5.
ENT
Enter timer setup. The green color
number indicates the active cursor.
Off time in format
HH:MM:SS.
6.
NEXT or PREV
Change the value. The input time is in
24-hour format.
Off time in format
HH:MM:SS.
Move the active green cursor to the
next field. Repeat step 6 & 7.
Off time in format
HH:MM:SS.
Save auto off timer.
[CYCLIC]
Step
Keys to Press
Explanation
What is Displayed
7.
4.
NEXT
Scroll to option SET DATE.
SET DATE
8.
5.
ENT
Change the date. The green color
letters indicates the active cursor.
Current date in format
DY MM-DD-YY.
6.
NEXT or PREV
Change the value.
Current date in format
DY MM-DD-YY.
Move the active green cursor to the
next field. Repeat steps 6 and 7.
Current date in format
DY MM-DD-YY.
Save the modified date.
[CYCLIC]
7.
8.
ENT
HOW TO SET TIME TO 12 HOUR FORMAT
Follow above steps 1 to 3 and proceed with step 4 below.
HOW TO SET THE AUTO ON TIMER
Follow above steps 1 to 3 and proceed with step 4 below.
Step
Keys to Press
Explanation
What is Displayed
4.
PREV
Scroll to option ON TIME.
ON TIME
5.
ENT
Enter timer setup. The green color
number indicates the active cursor.
Off time in format
HH:MM:SS.
6.
NEXT or PREV
Change the value. The input time is in
24-hour format.
Off time in format
HH:MM:SS.
Move the active green cursor to the
next field. Repeat step 6 & 7.
Off time in format
HH:MM:SS.
Save auto on timer.
[CYCLIC]
Step
Keys to Press
Explanation
What is Displayed
7.
4.
NEXT x4
Scroll to option 12H MODE.
12H MODE
8.
5.
ENT
Select 12-hour format for time.
[CYCLIC]
HOW TO SET TIME TO 24 HOUR FORMAT
Follow above steps 1 to 3 and proceed with step 4 below.
Step
Keys to Press
Explanation
What is Displayed
4.
NEXT x5
Scroll to option 24H MODE.
24H MODE
ENT
Select 24-hour format for time.
5.
- Page 12 -
[CYCLIC]
ENT
ENT
HOW TO TURN ON/OFF THE HOURLY ALARM
Follow above steps 1 to 3 and proceed with step 4 below.
Step
Keys to Press
Explanation
What is Displayed
4.
NEXT x3
Scroll to option HOUR ALARM.
HOUR ALARM
5.
ENT
Turn hourly alarm feature on/off. Set
time to a few seconds before the top
of a hour to test to see if on or off.
Off time in format
HH:MM:SS.
- Page 13 -
HOW TO SET AN ALARM
Follow above steps 1 to 3 and proceed with step 4 below.
PASSWORD PROTECTION
Step
Keys to Press
Explanation
What is Displayed
4.
NEXT x2
Scroll to option ALARM.
ALARM
5.
ENT
Enter alarm set up. The green color
number indicates the active cursor.
C:000 M:000
NEXT or PREV
Change the values. C (count) is the
total number of alarms that will. C
maximum number is 255. M (minute)
is the minute interval between each
alarm trigger. For example, C:123
M:001 means 123 alarms at an
interval of one minute apiece.
C:000 M:000
Move the active green cursor to the
next field. Repeat step 6 & 7.
C:000 M:000
Save alarm setting.
[CYCLIC]
6.
7.
8.
ENT
Password protection prevents unauthorized individuals from accessing the sign
or creating any undesirable messages. When password protection is enabled,
you are required to enter the correct password to create or edit any programs.
The factory default password is “000”.
HOW TO TURN OFF PASSWORD PROTECTION
Note: The alarm will automatically start when any program is run after the
alarm is set. The first alarm will not sound until the interval time has elapsed.
For example, if alarm is set to C:123 M:001, the first alarm will sound one
minute after a program is run. The minimum value for M is 001. A value of 000
for M will not activate the alarm.
Step
Keys to Press
Explanation
What is Displayed
1.
PROG
Enter into Edit Mode.
OPEN: ??
2.
00 ENT
Enter default program file 00.
OLDFIL[CYCLIC]
3.
CPW
Enter into Password Mode.
UNUSE PASS
4.
ENT
Select UNUSE PASS, which turns off
password protection, and leaves
Password Mode.
[CYCLIC]
HOW TO TURN ON PASSWORD PROTECTION
Follow above steps 1 to 3 and proceed with step 4 below.
Step
Keys to Press
Explanation
What is Displayed
4.
NEXT
Scroll to USE PASS
USE PASS
5.
ENT
Select USE PASS, which turns on
password protection, and leaves
Password Mode.
[CYCLIC]
HOW TO DELETE ALL ALARMS (INCLUDING HOURLY ALARM)
Step
Keys to Press
Explanation
What is Displayed
1.
PROG
Enter into Edit Mode.
OPEN: ??
2.
01 ENT
Enter program file 01.
[CYCLIC]
3.
CLR
Enter into Deletion Mode.
DEL ALL
Step
Keys to Press
Explanation
What is Displayed
4.
PREV
Scroll to option DEL ALARM.
DEL ALARM.
4.
NEXT x2
Scroll to RES PASS
RES PASS
ENT
All alarm setting will be deleted and
hourly alarm will be turned off.
WARNING: There is no way to undo
this command, so be absolutely sure.
ENT
Select RES PASS, which defaults the
password to “000”, and leaves
Password Mode.
[CYCLIC]
5.
[CYCLIC]
HOW TO RESET THE PASSWORD TO THE DEFAULT VALUE
Follow above steps 1 to 3 and proceed with step 4 below.
5.
HOW TO CHANGE THE PASSWORD
Follow above steps 1 to 3 and proceed with step 4 below.
HOW TO DELETE AUTO ON/OFF TIMER
Follow above steps 1 to 3 and proceed with step 4 below.
Step
Keys to Press
Explanation
What is Displayed
4.
PREV x2
Scroll to option DEL ON/OFF.
DEL ON/OFF.
5.
ENT
Auto on/off timer will be deleted.
WARNING: There is no way to undo
this command, so be absolutely sure.
[CYCLIC]
Step
Keys to Press
Explanation
What is Displayed
4.
NEXT x3
Scroll to CHANGE PASS
CHANGE PASS
5.
ENT
Select CHANGE PASS to change the
password.
CHANGE: ***
8.
111 ENT
Password can be any three-digit
combination of alphanumeric and
symbols. Letters are case sensitive.
AGAIN: ***
9.
111 ENT
Confirm the password. If confirmation
fails, then step 8 & 9 will be repeated.
[CYCLIC]
Note: If the password is lost or forgotten, password protection must be
manually reset using the DIP SWITCH, which is located in the back of the LED
sign (not the infrared). Follow the instructions in Appendix C for further details.
- Page 14 -
- Page 15 -
DELETE COMMANDS
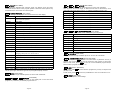
APPENDIX A: KEYS/BUTTONS DESCRIPTIONS
In some circumstance, you may want to delete some of the programs or other
data files. The LED sign comes with the capability to perform such a command.
However, once a data file is erased there is no way to recover the deleted data
file. Therefore, be absolutely sure you want to delete the files before you do so.
Enter into Edit Mode and press the CLR button to enter into Deletion Mode.
A detailed description of each key/button on the infrared remote is provided in
this section. Below is a sample diagram of the infrared remote.
HOW TO DELETE ALL SAVED PROGRAMS AND FILES
All data created and modified by the user will be erased, such as program and
sequence files, alarm settings, graphic images, etc.
Step
Keys to Press
Explanation
What is Displayed
1.
PROG
Enter into Edit Mode.
OPEN: ??
2.
01 ENT
Select program file 01 or any file.
OLDFIL[CYCLIC]
3.
CLR
Enter into Deletion Mode.
DEL ALL
4.
ENT
All saved data will be erased.
WARNING: There is no way to undo
this command, so be absolutely sure.
SYM
COL
ESC
PROG
CPW
RUN
PAU
SPE
MET
TIME
CLR
ENT
GRA
PHR
BEEP
+
1
2
3
4
The default program is
shown.
HOW TO DELETE THE CURRENT PROGRAM FILE
Follow above steps 1 to 3 and proceed with step 4 below.
Step
Keys to Press
Explanation
What is Displayed
4.
NEXT x2
Select option DEL MSG.
DEL MSG
5.
ENT
Current program file will be erased.
[CYCLIC]
-
*
/
%
5
6
7
8
<
>
=
@
9
0
A
B
#
$
&
^
C
D
E
F
\
(
)
~
G
H
I
J
INS
4.
5.
Keys to Press
Explanation
NEXT x3
Select option DEL FILE??
01 ENT
Select a program or sequence file to
delete, such as program file 01.
DEL FILE??
DEL FILE??
HOW TO DELETE AUTO ON/OFF TIMER
Follow above steps 1 to 3 and proceed with step 4 below.
Step
Keys to Press
Explanation
NEXT x4
Scroll to option DEL ON/OFF.
DEL ON/OFF.
5.
ENT
Auto on/off timer will be deleted.
[CYCLIC]
HOW TO DELETE ALL ALARMS (INCLUDING HOURLY ALARM)
Step
Keys to Press
Explanation
What is Displayed
4.
NEXT x4
Scroll to option DEL ALARM.
DEL ALARM.
5.
ENT
All alarm setting will be deleted and
hourly alarm will be turned off.
[CYCLIC]
- Page 16 -
: FORWARD (EDIT MODE)
Scrolls the program position forward one
command or character at a time.
SPA
= ALT +
:
ADVANCE FORWARD (EDIT MODE)
Moves the program position backward several
spaces.
NEXT
O
|
[
]
{
K
L
M
N
,
!
}
`
P
Q
R
S
?
'
"
:
T
U
V
W
What is Displayed
4.
: BACKWARD (EDIT MODE)
Scrolls the program position backward one
command or character at a time. Program
position is the right most visible position on
the LED sign. This is the position where
commands are inserted or removed.
= ALT +
:
ADVANCE BACKWARD (EDIT MODE)
Moves the program position forward several
places.
CAP
What is Displayed
Each key/button on the infrared remote
control correspond to a command, which is
used to program and control the LED sign.
Some commands have additional options;
use the NEXT or PREV keys to scroll through
those options. There are primary two modes,
RUN and EDIT, and in which mode the
buttons could be used. All the keys are listed
in alphabetical order.
DEL
PREV
HOW TO DELETE A SPECIFIC PROGRAM/SEQUENCE FILE
Follow above steps 1 to 3 and proceed with step 4 below.
Step
ON/OFF
FONT
ALT
X
;
.
Y
Z
ALT : ALT (EDIT & RUN MODE)
Most buttons have alternate commands or
characters. ALT lets the programmer access
those second commands. Hold ALT down
while pressing the other button to access the
alternate commands.
Diagram of infrared remote.
BEEP = ALT + 3 : BEEP (EDIT MODE)
Use audible beeps to attract attention to the LED display.
Options
Description
[BEEP1]
A three-tone beep.
[BEEP2]
A multi-tone beep.
[BEEP3]
A quick single tone beep.
- Page 17 -
CAP : CAP LOCK (EDIT MODE)
Switches between lower case and upper case letters.
ENT : ENTER (EDIT & RUN MODE)
Accepts the inputted value or selected option.
CLR : CLEAR/ERASE PROGRAMS (EDIT MODE)
Enters into Deletion Mode. Lets you erase stored programs and data files.
Options
Description
ESC : ESCAPE (EDIT MODE)
Cancels the current command and returns to the upper level of edit mode.
Sometimes the escape button will not work, instead use the program or run
buttons.
DEL ALL
Erase all stored files, including all program files, sequence
files, user defined graphics, alarm setting, etc.
DEL MSG
Erase the current program file.
DEL FILES??
Erase a specific program (01-99) or sequence (S0-S9) file.
FONT = ALT + PROG : FONT (EDIT MODE)
There are eight different font sizes to choose from.
Options
Description
DEL ON/OFF
Erase the Auto ON/OFF timer program.
[5x6]
Short font. 5 pixels high by 6 pixels wide.
DEL ALARM
Erase the alarm program.
[5x11]
Short wide font. 5 pixels high by 11 pixels wide.
[7x6]
Default font. 7 pixels high by 6 pixels wide.
[7x11]
Wide font. 7 pixels high by 11 pixels wide
[7x9]
Double stroke font. 7 pixels high by 9 pixels wide.
[7x17]
Extra wide font. 7 pixels high by 17 pixels wide.
[SMALL]
Small font.
COL = ALT + CPW : COLOR (EDIT MODE)
There are sixteen different color schemes that you can use for your message.
Options
Description
[RED]*
Bright red. Default color.
[RED]
Red.
[ORA]
Orange.
[ORA]*
Bright orange.
GRA = ALT + 1 : GRAPHICS (EDIT MODE)
Select or edit any of the eight user defined or eight built-in graphic images.
Options
Description
[YEL]
Yellow.
[YEL]*
Bright yellow.
GET GRAPH
Inserts any of the sixteen graphic images into the program.
[GRE]
Green.
MAKE GRAPH
Create a new graphic image and store it in slots A-H.
[GRE]*
Bright green.
EDIT GRAPH
Edit any of the sixteen graphic images and store it in A-H.
[MIX]
Stripes, mixed color layers.
[MIX]*
Rainbow wave, mixed color layers.
[MIX]
Red, orange, and green vertical mix.
[MIX]
Red and green saw tooth mix.
[MIX]
Green text on red background.
[MIX]
Red text on green background.
[MIX]
Orange text on red background.
[MIX]
Orange text on green background.
*Note: The color does not actually change, only the brightness.
CPW : CHANGE PASSWORD (EDIT MODE)
Turns on/off and edit and reset password security.
Options
Description
UNUSE PASS
Turns off password security.
USE PASS
Turns on password security.
RES PASS
Reset password to factory default “000”.
CHANGE PASS
Change password to a new value.
DEL : DELETE (EDIT MODE)
Deletes the command and/or letter at the current program position.
- Page 18 -
The below options are accessible after selecting one of the above options.
Options
Description
[GRAPH A]
User defined graphics, slot 1.
[GRAPH B]
User defined graphics, slot 2.
[GRAPH C]
User defined graphics, slot 3.
[GRAPH D]
User defined graphics, slot 4.
[GRAPH E]
User defined graphics, slot 5.
[GRAPH F]
User defined graphics, slot 6.
[GRAPH G]
User defined graphics, slot 7.
[GRAPH H]
User defined graphics, slot 8.
[GRAPH I]
City landscape.
[GRAPH J]
Car.
[GRAPH K]
Teapot and cups.
[GRAPH L]
Telephone.
[GRAPH M]
Outdoors landscape.
[GRAPH N]
Ship.
[GRAPH O]
People swimming.
[GRAPH P]
Cat or mouse.
- Page 19 -
INS : INSERT (EDIT MODE)
Toggles between standard and overwrite insert. By default, users can insert
commands and/or letters at the program position. Overwrite insert replaces any
command and/or letter after the insertion point.
MET : DISPLAY METHODS (EDIT MODE)
How the messages are displayed and removed from the LED display.
Options
Description
PAU = ALT + MET : PAUSE (EDIT MODE)
Duration a message will pause before moving on to the next command.
Hint: To pause for a time longer or different from what is listed below, use a
combination of pauses back to back, i.e. [PAUSE1][PAUSE2] equals 5 sec.
Options
Description
[PAUSE1]
Pauses for a 2 second delay.
[PAUSE2]
Pauses for a 3 second delay.
[CYCLIC]
Default display style. Randomly cycles through all the display
styles and color options.
[PAUSE3]
Pauses for a 4 second delay.
[PAUSE4]
Pauses for a 6 second delay.
[IMMED]
Immediate.
[PAUSE5]
Pauses for a 10 second delay.
Pauses for a 20 second delay.
[OPEN
]*
Open/push from right to left.
[PAUSE6]
[OPEN
]
Open/push from left to right.
[PAUSE7]
Pauses for a 30 second delay.
[OPEN
]
Open from center to edge.
[PAUSE8]
Pauses for a 60 second delay.
[OPEN
]
Open from edge to center.
[COVER
]
Cover from center to edge.
[COVER
]
Cover from right.
[COVER
]
Cover from left.
[COVER
]
Cover from edge to center.
[SCROLL ]
Scroll/push up.
[SCROLL ]
Scroll/push down.
[INTER
Interlace from edge to center with previous screen.
]
[INCOVER]
Interlace cover horizontally with previous screen.
[COVER ]
Cover up.
[COVER ]
Cover down.
[SCANLN]
Yellow dot scan from left to right from top row down,
changing each pixel as it moves over it.
[EXPLODE]
Exploding firework.
[PACMAN]
PAC-Man chomps from left to right.
[FALL]
Falls down and stack up like sand in an hourglass.
[SHOOT]
Pixels are shot from right to left moving up and down.
[FLASH]
Flashes several times.
[RANDOM]
Each pixel is randomly changed.
[SLIDEIN]
Pieces are slide in from right to left.
*Note: If the message’s length does not fit within the LED screen, the sign will
use the push right method and ignored any designated display method.
NEXT : NEXT (EDIT MODE)
Scrolls forward through available options of various edit commands.
ON/OFF = ALT + RUN : ON/OFF (RUN MODE)
Turns the LED display on/off. On power up, the display will run the last saved
program file, otherwise, the default program will run.
- Page 20 -
PHR = ALT + 2 : ANIMATED PHRASES (EDIT MODE)
Eight preprogrammed animations for holidays and general phrases.
Options
Description
[ANIM1]
Merry Christmas.
[ANIM2]
Happy New Year.
[ANIM3]
July 4th, US Independence Day.
[ANIM4]
Happy Easter.
[ANIM5]
Happy Halloween.
[ANIM6]
Don’t Drink and Drive.
[ANIM7]
No Smoking.
[ANIM8]
Welcome.
PREV : PREVIOUS (EDIT MODE)
Scrolls backward through available options of various edit commands.
PROG : PROGRAM/EDIT MODE (EDIT & RUN MODE)
In run mode, press PROG to enter into Edit Mode. If password security is
enabled, the correct password must be entered to gain access to edit mode.
While in edit mode, press PROG to save the current modified program and/or
select another program file to work on.
RUN : RUN (EDIT & RUN MODE)
In run mode, press RUN to select another program file (00-99) or sequence file
(S0-S9) to run.
In edit mode, press RUN to save any modification to the current file and run it.
SPA : SPACE (EDIT MODE)
Inserts a blank space in the message.
- Page 21 -
SPE = ALT + TIME : SPEED (EDIT MODE)
How fast the message will appear in conjunction with display methods.
Options
Description
[SPEED1]
Fastest speed.
[SPEED2]
APPENDIX B: INTERNATIONAL CHARACTER SETS
International characters are accessible by keying the English equivalent for the
character you want and then using the NEXT or PREV keys in Edit Mode to
scroll through the available international characters. For example, key in “?”
and use the NEXT to get “¿” for a Spanish question mark.
[SPEED3]
The following is a list of available international characters and the
corresponding English character. Use the NEXT or PREV keys to scroll through
the character sets.
[SPEED4]
[SPEED5]
[SPEED6]
[SPEED7]
[SPEED8]
English
Slowest speed.
International
SYM = ALT + ESC : SYMBOLS (EDIT MODE)
There are 30 symbols and simple graphical representations of every day things.
A description of each symbol is provided below. The first symbol is that of a
“Sunny Day”, then “Cloudy Day”, and so forth.
Sunny Day
Cloudy Day
Rainy Day
Clock
Phone
Eye Glasses
Faucet
Rocket
Helicopter
Alien Creature
Key
Shirt
Car
Tank
House
Teapot
Pine Trees
Duck
Moped
Bicycle
Crown
Hearts
Right Arrow
Left Arrow
Lower Left Arrow
Upper Left Arrow
Mug
Chair
High Heel Shoe
Martini Glass
Note: In edit mode, the actual symbol appears in the brackets and not the
description, i.e. [ ] for “Left Arrow”.
TIME : TIME & ALARM (EDIT MODE)
Set timer and alarm commands.
Options
Description
SET TIME
Set the current time.
SET DATE
Set the current date.
ALARM
Set the number of alarms and at what interval between each
alarm sound.
HOUR ALARM
Turn the hourly alarm on or off.
12-HOUR
Show time in 12 hour format with AM and PM.
24-HOUR
Show time in 24 hour military format.
ADD TIME
Insert the time into a program.
ADD DATE
Insert the date into a program.
OFF TIME
Set the time to automatically turn the LED sign off.
ON TIME
Set the time to automatically turn the LED sign on.
English
International
A
Ä
Å
Æ
C
Ç
Ć
E
É
Ę
N
Ň
O
Ö
Ó
S
Ś
U
Ü
Z
Ż
Ź
$
¢
£
¥
₧
ƒ
€
a
â
ä
à
å
æ
ạ
á
ą
ą
c
ç
e
é
ê
ë
è
ę
i
ï
î
ì
í
n
ñ
ń
o
ô
ö
ò
ọ
t
ť
u
ü
û
ù
ú
y
ÿ
ADD TEMP*
Insert the temperature into a program.
*Note: Available only on models with temperature function installed.
- Page 22 -
- Page 23 -
?
¿
SPACE
α
β
Γ
π
Σ
σ
µ
τ
Φ
θ
Ω
δ
∞
Ø
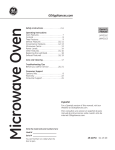
APPENDIX C: DIP SWITCH SETTINGS
TROUBLE SHOOTING
The DIP SWITCH is used for setting up the serial address of an LED sign in a
network configuration and for password protection. To access the DIP SWITCH,
remove the side covering where the power plug is located and pull out the
circuit board carefully. WARNING: Opening the LED sign without authorization
from the manufacturer can invalidate your warranty. Make sure to unplug the
LED sign from the power source before opening the unit.
Problem
Possible Solutions
Nothing appears on
the LED sign.
1.
2.
Below is a diagram on the DIP SWITCH layout.
3.
4.
ON
ON
OFF
OFF
1
2
3
4
5
6
7
There is no response
to the infrared
remote.
1.
2.
8
3.
DIP 1 to 7 are utilize for serial address configuration, while DIP 8 is use for
password protection.
When the DIP is set to the ON position, the address bit value is zero. For
example, if first seven DIP(s) are set to OFF, ON, ON, ON, ON, ON, ON, ON,
then the serial address is 01H in hexadecimal code.
When DIP 8 is set to the ON position, the LED sign’s password protection mode
is deactivated. Password protection cannot be activated using the infrared
remote. When DIP 8 is set to the OFF position, password protection is enabled.
To reset a lost or forgotten password, move DIP 8 to the ON position and then
back to the OFF position. The password is now reset to the default value “000”.
Nothing appears on
the LED sign, but
there is response to
the infrared remote.
1.
2.
Make sure the AC power supply is properly
plugged into an electric outlet and to the back of
the LED sign.
Make sure the electric plug to the AC power supply
is firmly connected.
Check if the electric outlet has power.
Check if the auto on/off timer is properly set.
Check if the infrared remote’s batteries still have
power. If you are not sure, please replace all the
batteries with working batteries.
Check if the batteries of the remote control are
placed in the right polarity. Please follow the
markings in the battery compartment.
When using the infrared remote, make sure you
stand in front of the LED sign and point the remote
directly at the display. Make sure there is nothing
between the remote and the LED display to block
the infrared signal
Check if the auto on/off timer is properly set.
Check if there are no conflicting program files. If
you are not sure, delete the following items.
a. Remove all sequence files.
b. Remove all alarms and on/off settings.
c.
Remove all saved files.
d. Note: There are no ways to undo a delete, so
be absolutely sure before you do so.
If the above procedures do not work, please contact your dealer.
- Page 24 -
- Page 25 -