1
HALCON Version 6.0
MVTec Software GmbH
Getting Started with HALCON
User’s Manual
Getting Started with HALCON, Version 6.0
All rights reserved. No part of this publication may be reproduced, stored in a retrieval system,
or transmitted, in any form or by any means, electronic, mechanical, photocopying, recording,
or otherwise, without prior written permission of the publisher.
1.
2.
3.
4.
5.
Edition
Edition
Edition
Edition
Edition
July 1997
November 1997
March 1998
April 1999
October 2000
c 1997-2000
Copyright by MVTec Software GmbH, München, Germany
MVTec Software GmbH
Microsoft, Windows, Windows NT , and Windows 2000 are either trademarks or registered
trademarks of Microsoft Corporation.
Linux is a trademark of Linus Torvalds.
Sun and Solaris are either trademarks or registered trademarks of Sun Microsystems.
HP, HP-UX , and PA-RISC are either trademarks or registered trademarks of Hewlett-Packard
Company.
Silicon Graphics, SGI , and IRIX are either trademarks or registered trademarks of Silicon
Graphics, Inc..
DIGITAL UNIX, Alpha AXP , and Tru64 are either trademarks or registered trademarks of
Compaq Computer Corporation.
Intel and Pentium are either trademarks or registered trademarks of Intel Corporation.
AMD and AMD Athlon are either trademarks or registered trademarks of Advanced Micro
Devices, Inc..
All other nationally and internationally recognized trademarks and tradenames are hereby recognized.
More information about HALCON can be found at:
http://www.mvtec.com/halcon/
About This Manual
This manual is a quick guide to HALCON – the software solution for machine vision applications. HALCON is a sophisticated image analysis package suitable for product development,
research, and education. It provides operators covering a wide range of applications: Factory automation, quality control, remote sensing and aerial image interpretation, medical image
analysis, and surveillance tasks. For rapid prototyping, HALCON includes HDevelop, a highly
interactive programming environment which allows to design and test image analysis programs
and to generate C, C++, or COM code.
The manual provides all necessary information to install and configure HALCON, to understand
its basic philosophy, and to get acquainted with HDevelop.
The manual is intended for all new users of HALCON. It does not assume that you are an
expert in image processing. Regardless of your skills, it is quite easy to work with HALCON
using HDevelop. Anybody should be able to understand the basic HALCON principles to
solve his image analysis problems quickly. Nevertheless, it is helpful to have an idea about
the functionality of graphical user interfaces (GUI),1 and about some basic image processing
aspects.
The manual is divided into the following chapters:
1
Introducing HALCON
This chapter provides a short overview of the HALCON system and points out additional
sources of information about HALCON.
Installation, Licensing, Configuration
This chapter explains how to install and configure HALCON. Furthermore, it describes
the different types of licenses and how to obtain them.
A First Look at HDevelop
This chapter contains a complete HDevelop session showing how to solve a specific image
analysis task from the scratch.
Philosophy of HALCON
This chapter explains the basic data structures and mechanisms of HALCON.
Using Parallel HALCON
This chapter shows how to use Parallel HALCON.
Tips and Tricks
This chapter contains helpful information, e.g., for troubleshooting.
Consult your platform’s documentation for general information.
Release Notes
Please note the latest updates of this manual:
5th Edition, HALCON 6.0 (October 2000)
The manual has been completely revised regarding structure and content, with exception
of the HDevelop example session. An additional chapter concerning Parallel HALCON
has been introduced. The information about installing, licensing, and configuring HALCON has been extended and moved to an own chapter. The chapter ”Philosophy” has been
extended by a section describing the HALCON frame grabber interface.
4th Edition, HALCON 5.2 (April 1999)
The new Apply button is used in the example session. The extended menu and tool bars of
HDevelop are described in the introduction. The installation process is described in more
detail for UNIX systems.
3rd Edition, HALCON 5.1 (March 1998)
The chapter “About This Manual” has been introduced. A complete revision of the manual
has been done, e.g., concerning the installation or the licensing section in chapter “Getting
Started”. The example session has not changed much. The major difference in handling
HDevelop in this basic example is that when changing the visualization parameters the
iconic object has to be displayed before the parameters are changed because the last iconic
object is automatically re-displayed.
2nd Edition (November 1997)
The visualization capabilities of HDevelop have been greatly enhanced. Zooming into an
image can now be handled very conveniently, for example.
Contents
1 Introducing HALCON
1.1 Facts about HALCON . . . . . .
1.2 System Requirements . . . . . . .
1.3 Introducing Parallel HALCON . .
1.4 Additional Sources of Information
.
.
.
.
.
.
.
.
.
.
.
.
.
.
.
.
.
.
.
.
.
.
.
.
.
.
.
.
.
.
.
.
.
.
.
.
.
.
.
.
.
.
.
.
.
.
.
.
.
.
.
.
.
.
.
.
.
.
.
.
.
.
.
.
.
.
.
.
2 Installation, Licensing, Configuration
2.1 Installation . . . . . . . . . . . . . . . . . . . . . . . . . . . . .
2.1.1 Windows NT / 2000 . . . . . . . . . . . . . . . . . . . .
2.1.2 UNIX . . . . . . . . . . . . . . . . . . . . . . . . . . . .
2.2 The Installed HALCON File Structure . . . . . . . . . . . . . . .
2.3 Uninstallation . . . . . . . . . . . . . . . . . . . . . . . . . . . .
2.3.1 Windows NT / 2000 . . . . . . . . . . . . . . . . . . . .
2.3.2 UNIX . . . . . . . . . . . . . . . . . . . . . . . . . . . .
2.4 Licensing . . . . . . . . . . . . . . . . . . . . . . . . . . . . . .
2.4.1 Extracting Identifying Information . . . . . . . . . . . . .
2.4.2 Runtime Licenses and HALCON Modules . . . . . . . .
2.4.3 Installing the License File . . . . . . . . . . . . . . . . .
2.4.4 Using Floating Licenses . . . . . . . . . . . . . . . . . .
2.5 Configuration . . . . . . . . . . . . . . . . . . . . . . . . . . . .
2.5.1 Windows NT / 2000 . . . . . . . . . . . . . . . . . . . .
2.5.2 UNIX . . . . . . . . . . . . . . . . . . . . . . . . . . . .
2.6 Integrating a HALCON Extension Package . . . . . . . . . . . .
2.6.1 Installing an Extension Package . . . . . . . . . . . . . .
2.6.2 Using an Extension Package Within HDevelop . . . . . .
2.6.3 Using an Extension Package in a Stand-Alone Application
3 A First Look at HDevelop
3.1 The Graphical User Interface of HDevelop
3.1.1 Main window . . . . . . . . . . .
3.1.2 Program Window . . . . . . . . .
3.1.3 Operator Window . . . . . . . . .
3.1.4 Variable Window . . . . . . . . .
3.1.5 Graphics Window . . . . . . . . .
3.2 Editing a HDevelop Program . . . . . . .
3.3 Loading an Image . . . . . . . . . . . . .
3.4 Modifying the Graphics Window . . . . .
3.5 Creating a Region of Interest (ROI) . . . .
3.6 Finding the Right Operator . . . . . . . .
i
.
.
.
.
.
.
.
.
.
.
.
.
.
.
.
.
.
.
.
.
.
.
.
.
.
.
.
.
.
.
.
.
.
.
.
.
.
.
.
.
.
.
.
.
.
.
.
.
.
.
.
.
.
.
.
.
.
.
.
.
.
.
.
.
.
.
.
.
.
.
.
.
.
.
.
.
.
.
.
.
.
.
.
.
.
.
.
.
.
.
.
.
.
.
.
.
.
.
.
.
.
.
.
.
.
.
.
.
.
.
.
.
.
.
.
.
.
.
.
.
.
.
.
.
.
.
.
.
.
.
.
.
.
.
.
.
.
.
.
.
.
.
.
.
.
.
.
.
.
.
.
.
.
.
.
.
.
.
.
.
.
.
.
.
.
.
.
.
.
.
.
.
.
.
.
.
.
.
.
.
.
.
.
.
.
.
.
.
.
.
.
.
.
.
.
.
.
.
.
.
.
.
.
.
.
.
.
.
.
.
.
.
.
.
.
.
.
.
.
.
.
.
.
.
.
.
.
.
.
.
.
.
.
.
.
.
.
.
.
.
.
.
.
.
.
.
.
.
.
.
.
.
.
.
.
.
.
.
.
.
.
.
.
.
.
.
.
.
.
.
.
.
.
.
.
.
.
.
.
.
.
.
.
.
.
.
.
.
.
.
.
.
.
.
.
.
.
.
.
.
.
.
.
.
.
.
.
.
.
.
.
.
.
.
.
.
.
.
.
.
.
.
.
.
.
.
.
.
.
.
.
.
.
.
.
.
.
.
.
.
.
.
.
.
.
.
.
.
.
.
.
1
1
5
5
6
.
.
.
.
.
.
.
.
.
.
.
.
.
.
.
.
.
.
.
7
7
8
9
9
10
10
12
12
13
15
15
16
18
18
19
21
22
22
22
.
.
.
.
.
.
.
.
.
.
.
25
26
26
28
28
28
29
29
29
31
31
34
Contents
ii
3.7
3.8
3.9
3.10
3.11
3.12
Finding the Right Parameter Values . . . . . .
Finding the Board as ROI . . . . . . . . . . . .
Finding Bonding Balls Using Morphology . . .
Working with Control Variables . . . . . . . .
Finding Bonding Balls Using Pattern Matching
Using Control Constructs . . . . . . . . . . . .
.
.
.
.
.
.
.
.
.
.
.
.
.
.
.
.
.
.
.
.
.
.
.
.
.
.
.
.
.
.
.
.
.
.
.
.
.
.
.
.
.
.
.
.
.
.
.
.
.
.
.
.
.
.
.
.
.
.
.
.
35
36
36
38
40
43
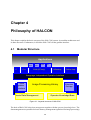
4 Philosophy of HALCON
4.1 Modular Structure . . . . . . . . . . . . . . . . . . . . . . . .
4.2 Handling Iconic and Control Data . . . . . . . . . . . . . . .
4.2.1 Tuple Processing . . . . . . . . . . . . . . . . . . . .
4.2.2 Image Objects . . . . . . . . . . . . . . . . . . . . .
4.2.3 Region Objects . . . . . . . . . . . . . . . . . . . . .
4.2.4 XLD Objects . . . . . . . . . . . . . . . . . . . . . .
4.3 The HALCON Frame Grabber Interface . . . . . . . . . . . .
4.3.1 The Two Modes of Grabbing Images . . . . . . . . .
4.3.2 Using External Triggers . . . . . . . . . . . . . . . .
4.3.3 Volatile Image Grabbing . . . . . . . . . . . . . . . .
4.3.4 Using Frame Grabbers Without a HALCON Interface
4.4 Limitations . . . . . . . . . . . . . . . . . . . . . . . . . . .
.
.
.
.
.
.
.
.
.
.
.
.
.
.
.
.
.
.
.
.
.
.
.
.
.
.
.
.
.
.
.
.
.
.
.
.
.
.
.
.
.
.
.
.
.
.
.
.
.
.
.
.
.
.
.
.
.
.
.
.
.
.
.
.
.
.
.
.
.
.
.
.
.
.
.
.
.
.
.
.
.
.
.
.
.
.
.
.
.
.
.
.
.
.
.
.
.
.
.
.
.
.
.
.
.
.
.
.
45
45
46
46
47
48
49
50
51
51
52
53
53
5 Using Parallel HALCON
5.1 Automatic Parallelization . . . . . . . . . . . . . . . . . . . . . . .
5.1.1 Initialization . . . . . . . . . . . . . . . . . . . . . . . . .
5.1.2 The Three Methods of Automatic Parallelization . . . . . .
5.2 Parallel Programming . . . . . . . . . . . . . . . . . . . . . . . . .
5.2.1 A Closer Look at Reentrancy . . . . . . . . . . . . . . . . .
5.2.2 Style Guide . . . . . . . . . . . . . . . . . . . . . . . . . .
5.3 Additional Information on Parallel HALCON . . . . . . . . . . . .
5.3.1 How to Switch Off Reentrancy or Automatic Parallelization
5.3.2 Using a Frame Grabber in Parallel HALCON . . . . . . . .
5.3.3 Extension Packages and Parallel HALCON . . . . . . . . .
5.3.4 Parallel HALCON and HALCON Spy . . . . . . . . . . . .
.
.
.
.
.
.
.
.
.
.
.
.
.
.
.
.
.
.
.
.
.
.
.
.
.
.
.
.
.
.
.
.
.
.
.
.
.
.
.
.
.
.
.
.
.
.
.
.
.
.
.
.
.
.
.
.
.
.
.
.
.
.
.
.
.
.
55
55
56
56
57
57
58
59
59
59
60
60
6 Tips and Tricks
6.1 Online Help in HDevelop . . . . . . . . . . . . . . .
6.2 Monitoring HALCON Programs with HALCON Spy
6.3 Troubleshooting . . . . . . . . . . . . . . . . . . . .
6.3.1 Problems During Installation . . . . . . . . .
6.3.2 Problems During Uninstallation . . . . . . .
6.3.3 Problems Concerning Licenses . . . . . . . .
6.3.4 Troubleshooting in HDevelop . . . . . . . .
6.3.5 Troubleshooting for Parallel HALCON . . .
6.3.6 Miscellaneous Problems . . . . . . . . . . .
.
.
.
.
.
.
.
.
.
.
.
.
.
.
.
.
.
.
.
.
.
.
.
.
.
.
.
.
.
.
.
.
.
.
.
.
.
.
.
.
.
.
.
.
.
.
.
.
.
.
.
.
.
.
61
61
62
62
62
63
66
67
68
68
Index
Getting Started with HALCON / 2000-11-16
.
.
.
.
.
.
.
.
.
.
.
.
.
.
.
.
.
.
.
.
.
.
.
.
.
.
.
.
.
.
.
.
.
.
.
.
.
.
.
.
.
.
.
.
.
.
.
.
.
.
.
.
.
.
.
.
.
.
.
.
.
.
.
.
.
.
.
.
.
.
.
.
.
.
.
.
.
.
.
.
.
.
.
.
.
.
.
.
.
.
.
.
.
.
.
.
.
.
.
.
.
.
.
.
.
.
.
.
.
.
.
.
.
.
71
Chapter 1
Introducing HALCON
Congratulations! With HALCON you have chosen a sophisticated image analysis package designed for product development, research, and education. HALCON provides a unique library
with more than 900 operators covering a wide range of image analysis tasks, data visualization,
and a comfortable debugging mechanism. HALCON operators can be used within C and C++
programs on Windows NT, Windows 2000, and many UNIX platforms. In addition, under
Windows NT and Windows 2000, HALCON has a COM interface. This allows you to use
HALCON operators from Visual Basic, for example. Furthermore, it is very easy to integrate
your own specific operators into the system.
The HALCON data structures for iconic data provide a very convenient handling of images, regions, and contours. Optimized algorithms allow high performance even on standard hardware.
The HALCON system also includes the programming environment HDevelop which allows to
speed up the design of image analysis programs. A smart online help based on an operator
knowledge base provides information about each HALCON operator, e.g., reasonable successors, possible alternatives, cross references, etc.
From revision 6.0 on, HALCON exists in two versions: Besides “standard” HALCON you
can now choose Parallel HALCON. In addition to HALCON’s image processing functionality, Parallel HALCON automatically exploits multi-processor hardware and supports parallel
programming. See section 1.3 for more information on Parallel HALCON.
Let’s start with some facts describing the main characteristics of both HALCON versions.
1.1 Facts about HALCON
2
HALCON’s comprehensive operator library supports efficient, flexible image processing and eases the development of image analysis programs.
HALCON’s operator library contains more than 900 operators. The operators can be
used in any combination. All HALCON applications (e.g., HDevelop or HALCON C++
programs) make use of the library to perform image processing tasks.
The operators exhibit a broad range of functionality, from simple tasks (e.g., “read image
from file”) to complex processes (e.g., “estimate state by Kalman filtering”). Basically
they all have a rather lean complexity and are meant to process single steps of a task
1
CHAPTER 1. INTRODUCING HALCON
2
instead of the whole task. So, the typical solution of an image analysis problem consists
of a combination of several HALCON operators. This concept allows much greater
flexibility than others based on fewer, but more complex operators that are specialized
to perform a certain task. Specialized operators are only suitable for special tasks and
become worthless when the task changes. In contrast to this, HALCON operators may
be used in any combination.
Among the great number of operators there are some that implement the same task by
different algorithms. This allows to vary how fast and precisely a task is performed.
Consider pattern matching, for example: For a task where only the rough positions of
matching points are needed, but where the results must be returned as fast as possible,
the operator fast match may be used. In contrast to this, best match is the better
choice when needing the exact positions (even with subpixel accuracy) by using a more
time-consuming algorithm.
2
2
2
2
2
2
2
HALCON processes color and multichannel images.
HALCON works on all kinds of image data — binary, monochrome, color, or multichannel images. You may use all these kinds of images in the same manner. Multichannel
images are useful to work on images that were acquired by a multisensor system.
HALCON implements efficient, fast region processing.
This speeds up the processing and eases the handling of regions. Regions may overlap
and can be of any size. They are stored by an optimized encoding to reduce memory
costs.
HALCON allows to focus image processing on a region of interest.
Each image object has a domain — its area of definition — that can be changed by the
user. When performing an image operator, it is processed only within the domain of the
input image. This concept allows to focus image processing and therefore to speed it up.
HALCON provides very fast pattern matching operators.
Pattern matching is very helpful in numerous areas of application, but often not used
due to its costs of computation time. HALCON allows to use pattern matching where
you want to, as it uses a very efficient implementation of various pattern matching algorithms.
HALCON provides shape-based matching operators that work even in the presence
of occlusion or clutter.
From revision 6.0 on, HALCON provides not only pattern matching but also shapebased matching operators. With these operators, you can recognize objects even if they
are partly occluded or in the presence of clutter or changing illumination conditions.
HALCON provides an easy handling of tuple objects and processes tuple elements
simultaneously.
Tuples are very helpful in many areas of application, since they enable you to work with
sets of images, regions, or control data. With HALCON, tuples of objects or control
values can be handled just as one object. Operators can either work on a single or on
a tuple object. You need not bother about the amount of elements within a tuple. You
simply pass one variable containing the tuple to an operator. HALCON decomposes it
and works simultaneously on the tuple elements.
HALCON is based on an efficient management of image and data objects.
Getting Started with HALCON / 2000-11-16
1.1. FACTS ABOUT HALCON
3
The HALCON memory manager uses fast, efficient algorithms to speed up image processing. It provides mechanisms for controlled memory access and services for debugging, such as checking with every deallocation whether any write access exceeded the
allocated memory block. The HALCON image database provides several services for
object handling to allow a fast and transparent access to image data. Images are held in
memory. To reduce memory costs data is shared by different objects whenever possible.
2
2
2
2
2
HALCON provides interfaces to the programming languages C, C++, and COM.
The HALCON system includes interfaces to the programming languages C, C++, and
COM1 . This allows you to use HALCON operators inside your own C, C++, or COM
programs and to build stand-alone applications.
HALCON provides the tool HDevelop for interactive development of image analysis programs.
In most cases, developing image analysis programs is a complex and time-consuming
task. To help the user to find the right operators and parameters for a given task, HALCON provides the Computer Aided Vision Engineering tool HDevelop. This eases developing programs in several ways: First, HDevelop has a graphical user interface that
allows an easy, intuitive handling of operators and image data. Secondly, operators can
be processed and combined interactively. All results are immediately visualized so that
the user can experiment with different operators and parameter values and directly sees
the result. Moreover, HDevelop supports the user by suggesting appropriate operators
and parameter values. An online help explains how the operators work and illustrates
their usage by examples.
If you are satisfied with the result you can save the developed program either in a special
HDevelop file format to load it again into HDevelop later on or export the program as
C, C++, or COM source code. By exporting, the program can be used by other image
analysis applications and can be edited and optimized just like any “hand-written” image
processing program.
HALCON already provides interfaces to more than 30 frame grabbers. HALCON supports more than 30 frame grabbers (the current list can be found at
http://www.mvtec.com/halcon/) by providing interfaces to their SDKs. If you use
one of these frame grabbers, all you need to to do establish a connection to it is to
call the operator open framegrabber, pass it some parameters describing the desired
mode for grabbing images. Then, you can grab images simply by calling the operator
grab image.
New frame grabbers may easily be integrated.
If you use a frame grabber not already supported by HALCON, you can easily integrate a
corresponding interface into HALCON. For this, HALCON provides a transparent frame
grabber interface with sample source code for integrating new frame grabbers. The only
thing you have to do is to adapt this code to a specific frame grabber and to link it to the
HALCON code. The Frame Grabber Integration Programmer’s Manual describes
in detail how to do this.
Alternatively, you can convert your own images to HALCON images by passing HALCON a pointer to the image buffer using the operator gen image1 extern.
HALCON may easily be extended by new operators.
1
COM is a Microsoft standard for component-based software; programs written in COM can be used in environments such as Visual Basic, Visual C++ , or Delphi.
HALCON 6.0
CHAPTER 1. INTRODUCING HALCON
4
Although HALCON already contains more than 900 operators for various tasks, you
may wish to implement a new one, e.g., in order to access a special hardware or to implement an alternative algorithm. To do so, HALCON provides the Extension Package
Interface that allows the integration of new operators (implemented in C). It contains
several predefined routines and macros for the easy handling of image data and memory objects in C. Once a new operator has been successfully integrated, it can be used
like any other HALCON operator. The Extension Package Programmer’s Manual
contains detailed information about extending the operator library.
2
2
2
2
2
HALCON allows continued application of already implemented image processing
software.
Software engineering is a time consuming process and in most cases expensive as well.
So, everyone is interested in using already implemented software as long as possible,
and no one is bent on re-implementing their software with every installation of new
software components. Therefore, HALCON supports the continued application of already implemented software: Convert your programs into new HALCON operators to
use them within HALCON as described above. Moreover, HALCON hardly restricts the
hardware configuration. A wide range of machines and systems can be used. Various
frame grabbers are supported. New ones may be easily integrated (see below). Thus,
you need not change your hardware configuration and therefore also need not to change
your software.
HALCON supports a wide range of platforms.
HALCON is largely architecture independent and therefore allows you to use the system
of your choice. It supports different platforms, such as Windows NT or Windows 2000,
Linux, Solaris, HP-UX, DIGITAL UNIX (now called Tru64 UNIX), or IRIX. See
section 1.2 for more information.
HALCON supports multi-threaded applications by being thread-safe.
HALCON is thread-safe under Windows NT, Windows 2000, Linux, and Solaris. Note,
that for an extensive use of parallel programming techniques, you should choose Parallel
HALCON (see section 1.3).
HALCON supports data exchange with other applications.
For easy exchange of image data HALCON supports several file formats, such as Tiff,
Sun-Raster, Gif, PNM, JPEG, PCX, XWD, BMP, binary. Other data (e.g., integer result
values for image coordinates) may be exchanged via the HALCON language interfaces.
How is HALCON related to HORUS?
HALCON is the commercial successor of the image analysis system HORUS,2 which
was developed at the Chair Informatics IX of Prof. B. Radig at the Technische Universität München from 1988 to 1996 for UNIX systems only. Although MVTec took over
the basic concepts of the system, all the major components have been revised. Furthermore, HALCON provides many new features and operators compared to the last
HORUS version 4.11. Existing HORUS applications can be adapted to the HALCON
system, but since the names and interfaces of many operators have been modified some
amount of programming is necessary to do that.
2
The name was changed mainly due to international trademark considerations.
Getting Started with HALCON / 2000-11-16
1.2. SYSTEM REQUIREMENTS
5
Operating System
Processor
Compiler
Windows NT 4.0,
Windows 2000
Intel Pentium
(or compatible)
Intel Pentium
(or compatible)
SPARC
MIPS
Alpha
PA 1.1 upwards
MS Visual Studio 3
Linux 2.2
Solaris 7
IRIX 6.5
DIGITAL UNIX 4.0
HP-UX 10.x
gcc 2.95
CC 5.0
CC
cxx
CC
1.2 System Requirements
Table 1.2 shows the requirements for running HALCON 6.0 on the different supported operating systems. It should run on newer versions of an operating system; however, we cannot
guarantee this. Windows NT is no longer supported on Alpha processors, following Microsoft’s
corresponding decision.
Note, that under Linux libc6 (glibc-2.1.x) is required, which is the case for most current
Linux distributions like RedHat or SuSE. Please check your distribution’s documentation.
1.3 Introducing Parallel HALCON
To put it in a nutshell, standard HALCON is optimized for running sequential programs on
single-processor boards. Under Windows NT, Windows 2000, Linux, and Solaris, HALCON
is thread-safe, i.e., it can be used in multi-threaded programs. However, all HALCON operators
are executed exclusively, thus threads will have to wait for each other.
In contrast, Parallel HALCON supports parallel programming (e.g., multi-threaded programs)
by being thread-safe and reentrant. This means that multiple threads can call a HALCON
operator simultaneously4.
Besides supporting parallel programming, Parallel HALCON automatically parallelizes operators if started on multi-processor hardware, e.g., a dual-pentium board. This mechanism is fully
compatible to older HALCON versions, i.e., old HDevelop, C++, or C programs do not need to
be changed.
The parallelization mechanism is based on distributing the data which has to be processed, i.e.,
the images, on multiple threads that run on different processors (so-called data parallelism).
For example, for a filtering operation on a four-processor board the image will be split into
four parts which will then be processed in parallel by four threads executing the (same) filtering
operator. Together with HALCON’s philosophy for treating images and regions, this form of
parallelization is very efficient because images need not to be copied.
3
Note, that in order to use HALCON’s language interface to COM inside Microsoft Visual Basic, you need
Visual Basic 6.0!
4
Note, that some operators can only be called exclusively because of functional or technical reasons. See
section 5.2.1 for more information.
HALCON 6.0
CHAPTER 1. INTRODUCING HALCON
6
The degree of parallelization is optimized online to minimize the parallelization overhead. For
example, very small images will not be processed in parallel, as the overhead would surpass the
parallelization speed-up. Moreover, not all HALCON operators lend themselves to parallelization.
To be able to exploit your multi-processor hardware optimally, Parallel HALCON has to check
the hardware once after being installed. Section 5.1.1 describes how to start and configure this
initialization.
Note, that Parallel HALCON is designed for shared-memory systems, i.e., systems in which
multiple processors share a common memory as it is the case for typical multi-processor boards.
The main reason is that only in a shared-memoruy system threads can share the HALCON
object database and do not need to copy images. This limitation means that Parallel HALCON
is not suited to the use on workstation clusters or other multi-processor hardware that does not
offer shared memory.
A further limitation is that Parallel HALCON does not provide a COM interface, i.e., neither
the automatic parallelization mechanism, nor reentrancy can be used in COM programs. The
reason is that Microsoft Visual Basic, the main developing environment for COM programs,
does not support multithreading sufficiently.
1.4 Additional Sources of Information
For further information you may consult the following manuals:
HDevelop User’s Manual
An introduction to the graphical development environment of the HALCON system.
HALCON/C++ User’s Manual
How to use the HALCON library in your C++ programs.
HALCON/C User’s Manual
How to use the HALCON library in your C programs.
HALCON/COM User’s Manual
How to use the HALCON library in your COM programs, e.g., in Visual Basic.
Extension Package Programmer’s Manual
How to extend the HALCON system with your own operators.
Frame Grabber Integration Programmer’s Manual
A guide on how to integrate a new frame grabber in the HALCON system.
HALCON/HDevelop, HALCON/C++, HALCON/C, HALCON/COM
The reference manuals for all HALCON operators (versions for HDevelop, C++, C, and
COM).
All these manuals are available as PDF documents. The reference manuals are available as
HTML documents as well. For the latest version of the manuals please check
http://www.mvtec.com/halcon/
Getting Started with HALCON / 2000-11-16
Chapter 2
Installation, Licensing, Configuration
Before describing how to install and configure HALCON, let’s take a look at the different
HALCON versions and licensing schemes.
You can obtain HALCON in three versions:
1. The demo version is basically a version of HDevelop with the full image processing
functionality but some limitations, e.g., without frame grabber or programming language
interfaces. Using the demo version, you can test all HALCON operators within the
HDevelop environment for an unlimited amount of time.
2. At the other end of the spectrum lies the full version, which is used to develop applications based on HALCON. Besides HDevelop, this version includes interfaces to more
than 30 frame grabbers, language interfaces to C, C++, and COM, and the Extension
Package Interface, which allows you to integrate your own HALCON operators or additional frame grabber interfaces.
3. If you have developed an application based on HALCON, you can obtain a runtime
version of HALCON which only contains the image processing functionality needed in
your application. A runtime version does not include HDevelop.
For the development version and for the runtime version you need a corresponding license key.
The demo version can be used without a license. Independent of the version you use, there are
two possible licensing schemes:
1. Nodelocked licenses are only valid on one specific host (or for a specific hardware dongle).
2. Floating licenses are valid on arbitrary hosts within a local network. A license server
checks the number of currently active HALCON applications. A new application can be
started only if the overall number of licenses is not exceeded.
Please note, that for evaluating purposes you can obtain a temporary license from you distributor
free of charge.
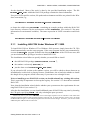
2.1 Installation
This section describes how to install HALCON from CD; the WWW installation is basically
the same. However, the installed file groups have been adapted to limit the bandwidth needed
7
CHAPTER 2. INSTALLATION, LICENSING, CONFIGURATION
8
for the download. Most of the work is done by the provided installation scripts. The file
release notes.html within the HALCON package contains the latest information.
Except of UNIX-specific sections, file paths and environment variables are printed in the Windows convention, e.g.,
%HALCONROOT%nexamplesnextension packagenhalconuser
to denote the subdirectory halconuser containing an example package within the HALCON
base directory referenced by the environment variable HALCONROOT (see section 2.5 for more
information on environment variables). The same expression in UNIX convention would look
like
$HALCONROOT/examples/extension package/halconuser
2.1.1
Installing HALCON Under Windows NT / 2000
To install HALCON on Windows NT or Windows 2000 systems, simply insert the CD. This
should automatically start the setup program. If the setup program doesn’t start automatically,
execute the Setup.exe program located in the directory nt-intel of the CD. Please note, that
you need administrator privileges in order to install HALCON.
The installation wizard allows to specify whether you would like to install
the full HALCON package (Compact, Custom, Typical1 ),
the runtime version only (Runtime), or
just the demo version hdevelop demo.exe (Demo).
If you selected a full version or the runtime version, you will be asked to choose between an
installation for nodelocked or floating licenses. Furthermore, the wizard asks whether to install
the dongle driver program, which is necessary if you want to use a dongle license.
Prior to installing a new HALCON version you should uninstall any existing old version.
This is especially of importance to clean up the registry. See section 2.3.1 about how to uninstall
HALCON.
Note, that the installation wizard checks whether your system meets the requirements for running HALCON 6.0 (see section 1.2).
After the first installation, you can install additional parts of HALCON at any time by inserting
the CD again, specifying Custom, and only selecting the parts you need.
Please note, that if you choose Typical, most of the image sequences are not installed. This means that
example programs based on such an image sequence cannot be run. A quick remedy in such a case is to mount
the HALCON CD again, as the example programs also look there for the images. Of course, you can also install
additional parts of HALCON at a later time.
1
Getting Started with HALCON / 2000-11-16
2.2. THE INSTALLED HALCON FILE STRUCTURE
2.1.2
9
Installing HALCON Under UNIX
To install HALCON on UNIX systems, mount the CD, e.g., on the directory /cdrom. On most
systems, you need root rights to do so. Note that on some systems, most notably Linux, the
default mount entry, usually in /etc/fstab, does not allow user to execute programs on a CD.
In such cases, you have to mount the CD explicitly with a command similar to the following:
mount /dev/cdrom /cdrom
For the installation, start the shell script install-unix which is located in the top-level directory of the CD. This script will ask you in which directory you want to install HALCON;
the environment variable HALCONROOT has to be set to this directory later, see section 2.5.2.
Furthermore, the script asks whether to install various components of HALCON.
Since all directories and files on the CD are read-only, you may get some warnings about
changed permissions if you run the installation script as an ordinary user (as root, no warnings
of this kind should appear). Furthermore, on some systems you may get complaints about the
fact that the CD contains files with file names longer than 32 characters.
Prior to installing a new HALCON version you should uninstall any old HALCON version. See section 2.3.2 for details.
Note, that the installation script checks whether your system meets the requirements for running
HALCON 6.0 (see section 1.2).
After the installation, several environment variables need to be set in order for HALCON to
work. See section 2.5.2 for details.
Note, that you can install additional parts of HALCON at any time by mounting the CD again
and copying the corresponding directories and files to the diectory where you installed HALCON. To copy directories, open a shell, change into the root directory on the CD, and type
tar -cf - <directory_to_be_copied> | ( cd $HALCONROOT; tar -xf - )
2.2 The Installed HALCON File Structure
Let’s take a look at the installed HALCON file structure in the directory %HALCONROOT%. In
the following, the most important directories and files are described briefly. Please note, that
depending on your installation, not all directories will be present.
FLEXlm: This directory contains programs used for licensing (see section 2.4), in subdirectories corresponding to the different platforms.
bin: This directory contains HALCON programs, for example HDevelop (Windows NT
/ 2000: hdevelop.exe; UNIX: hdevelop), again in subdirectories corresponding to the
different platforms. For Windows NT or Windows 2000, this directory also contains the
DLL version of the HALCON libraries and the libraries for the supported frame grabbers
interfaces.
HALCON 6.0
CHAPTER 2. INSTALLATION, LICENSING, CONFIGURATION
10
docnpdf: Here, you find the PDF version of the user’s manuals (subdirectory manuals
and of the reference manuals (subdirectory reference).
examples: The subdirectories of this directory contain example programs for the different
parts of the HALCON system:
. c: Examples for using HALCON within the programming language C (see also the
HALCON/C User’s Manual).
. cpp: Examples for using HALCON within the programming language C++ (see also
the HALCON/C++ User’s Manual).
. extension package: The example user package halconuser (see also the Extension Package Programmer’s Manual).
. fg integration: Example programs for frame grabber interfaces (see also the
Frame Grabber Integration Programmer’s Manual).
. hdevelop: Examples for using HDevelop, together with the example programs described in the manual Getting Started with HALCON (subdirectory
ManualsnGetting Started) and in the HDevelop User’s Manual (subdirectory
ManualsnHDevelop).
. vb: Examples for using HALCON within Microsoft Visual Basic, together with the
example programs described in the HALCON/COM User’s Manual.
Please note, that the examples should not be used directly for two reasons: First, on most
platforms only the user who installed HALCON is allowed to save a (modified) example
program. More importantly, on some operating systems not all users have the permission
to create new files in the example subdirectories; this causes errors in those example programs which contain operators that write data to files. To experiment with examples we
therefore recommend to create a private copy in your own working directory.
images: This directory contains example images and, in subdirectories, image sequences.
These images are used by the example programs described above.
include: This directory contains the header files which are necessary to use HALCON
within the programming languages C or C++.
lib: This directory contains the HALCON libraries and the libraries for the supported
frame grabbers interfaces (Windows NT / 2000: file extension .lib; UNIX: file extension
.so), again in subdirectories corresponding to the different platforms.
license: The license file must be placed in this directory (see section 2.4).
2.3 Uninstallation
2.3.1
Uninstalling HALCON Under Windows NT / 2000
There are three ways to uninstall HALCON, depending on the revision of the HALCON system
you want to uninstall, and the revision of the setup program, i.e., of the HALCON system you
want to install afterwards:
Getting Started with HALCON / 2000-11-16
2.3. UNINSTALLATION
11
1. If the setup program stems from HALCON revisions 5.2 and newer: Use the option that
the setup program will show you automatically if you have old versions installed. This
is the preferred way since it avoids the problem with the path variable described below.
2. If the HALCON installation you want to uninstall is newer than version 5.1: Select
Start . Programs . MVTec HALCON . Uninstall Halcon.
3. In the system control panel choose Add/Remove Programs.
Typically, this is all you have to do. If you encounter any problems, please refer to section 6.3.2.
If you want to uninstall a HALCON version older than 5.2., please check the paragraphs below
for additional information.
Note, that an uninstallation will also remove all examples, images, and the documentation. If
you modified an example or added an image, you might want to copy these files to another
directory before starting the uninstallation.
The uninstallation process will not remove any user-specific settings. This means that registry
entries concerning, e.g., the layout of HDevelop or its file history, will be left in the category
HKEY CURRENT USER . Software . MVTec . Halcon. You may remove these entries manually
without risk.
Uninstalling HALCON 5.0 or 5.1
Please note, that the uninstallation of HALCON versions 5.0 and 5.1 will delete the environment
variable PATH. This is due to an error in the third-party installation software that is used. If you
have installed other software packages that have modified this variable please preserve the old
settings prior to the uninstallation: In the system control panel System (entry Environment),
rename the variable e.g., to PATH . After the uninstallation rename it again (back to PATH) and
remove the HALCON specific directories within this variable manually.
Uninstalling floating licenses for HALCON 5.0 or 5.1
If you uninstall a HALCON version 5.0 or 5.1 with floating licenses the FLEXlm license manager service occasionally is not removed properly. To make sure that the service is removed,
please start a DOS command prompt prior to the uninstallation and type
"%HALCONROOT%\FLEXlm\i586-nt4\installs" -r -n "Halcon Licenses"
Uninstalling the HALCON/COM Beta Version
If you had installed the so-called beta version of the HALCON/COM interface, you must uninstall manually before uninstalling HALCON itself. The reason is that the beta version of the
COM interface was an add-on to HALCON 5.1, whereas the current version is an integral part
of HALCON.
If you installed the beta version of the COM interface by using its InstallShield wizard, it is
quite easy to remove it again: Select Add/Remove Software in Start . Settings . Control
Panel, then select Halcon/COM from the software list and finally click on Add/Remove.
HALCON 6.0
CHAPTER 2. INSTALLATION, LICENSING, CONFIGURATION
12
If you installed the beta version of the COM interface by hand, you must unregister it by hand
as well. For this, open the dialog Start . Run ... and type regsvr32 /u, and open the
browser to locate the place where you copied the corresponding DLL halconx.dll to. Select
halconx.dll and click Open. This will append the complete path behind regsvr32 /u. Now,
click OK to unregister the DLL. After a while a message box should pop up containing something
like this: "DLLUnRegisterServer in halconx.dll succeeded.". Now you may delete the
file halconx.dll itself.
2.3.2
Uninstalling HALCON Under UNIX
To uninstall an existing HALCON system, just remove the contents of the HALCON base
directory $HALCONROOT and all its subdirectories, e.g., by executing
rm -rf $HALCONROOT
The uninstallation process will not remove any user-specific settings. This means that environment variables remain unchanged and have to be adapted or deleted manually.
If you called the operator check par hw potential from Parallel HALCON 6.0 beta to initialize Parallel HALCON (see section 5.1.1), the file .halcon par info which contains the
extracted information about the host computer will be left in the directory referenced by the
environment variable HOME (see section 2.5.2).
2.4 Licensing
HALCON checks whether the product is licensed to the user with the help of the FLEXlm
license manager2 package from GLOBEtrotter. In this section a brief summary of the default
procedure to obtain and install a license will be given.
The first step is of course to select the computer on which (in case of a nodelocked license)
you want to use HALCON on or which (in case of a floating license) is to act as the license
server, i.e., which keeps track of how many licenses of HALCON are currently in use. Note,
that a computer need not be a “server” in the sense that they have to be a “big” server machine
or have a special kind of operating system, e.g., Windows NT Server, installed. If you want to
run HALCON on a stand-alone computer, the license server must be this computer. If you run
HALCON on a network any computer on the network can serve as a license server.
In order to obtain a license for HALCON, you have to extract identifying information about this
computer (see section 2.4.1 for more details) and send it to your local distributor. If you want
to obtain a runtime license, you have to inform your local distributor which HALCON modules
you want to use. Please refer to section 2.4.2 for more information.
You will then receive a license file. Section 2.4.3 describes how to install this file on your
system. Section 2.4.4 contains additional information for the case you want to use a floating
license.
2
The full documentation of FLEXlm can be obtained from the FLEXlm end user manual available at
http://www.globetrotter.com/manual.htm.
Getting Started with HALCON / 2000-11-16
2.4. LICENSING
2.4.1
13
Extracting Identifying Information
The standard method for identifying an computer requires that the computer of your choice is
equipped with a network card. If you are using Windows NT or Windows 2000 and if your
computer is equipped with a Pentium III processor, it can be identified by the so-called CPU ID
as well.
Under Windows NT or Windows 2000, you can also use a hardware dongle. In this case, the
license will be coupled to this dongle, i.e., you can use HALCON on another computer by
moving the dongle. This has the advantage that you don’t commit yourself to using a certain
computer. You can use dongles both for nodelocked and for floating licenses. In the latter
case, the dongle is used for identifying the computer which acts as the license server. You can
obtain such a dongle from your local distributor. The dongle will be delivered together with the
corresponding license file.
2.4.1.1
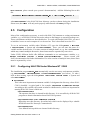
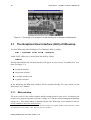
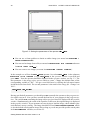
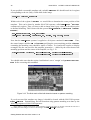
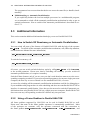
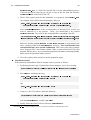
Extracting Information Using HDevelop
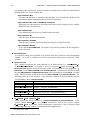
The easiest method to extract identifying information is to start the HDevelop demo version
(which is always installed). You start it under Windows NT or Windows 2000, call Start
. Programs . MVTec HALCON . HDevelop Demo; under UNIX, call hdevelop demo from
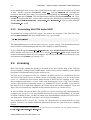
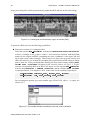
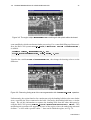
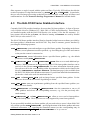
a shell. Now, select the menu item Help . About. A dialog as depicted in figure 2.1 appears.
At the bottom, it shows all the information available on your computer, in the example the three
so-called host IDs corresponding to a network card, a Pentium III, and a dongle. In most cases,
you will see only one ID.
network card ID
dongle ID
CPU ID
Figure 2.1: Identifying information in the HDevelop window About
To obtain a license based on a network card or a Pentium III CPU, send the corresponding ID to
your local distributor together with the hostname of this machine in your network (for example,
halconserver). In the case of a dongle license, this is not necessary, as you will receive the
license file already together with the dongle.
If HDevelop fails to detect any host IDs although your computer does have a network card, a
Pentium III, or a dongle, please try to extract the host IDs manually as described in the following
section.
HALCON 6.0
CHAPTER 2. INSTALLATION, LICENSING, CONFIGURATION
14
2.4.1.2
Extracting Information Using lmhostid
As a (more tedious) alternative, you can extract these IDs by using the program lmhostid
shipped together with the license manager FLEXlm. Under Windows NT or Windows
2000,open a DOS command prompt3. Under UNIX, open a shell, change into the directory
$HALCONROOT/FLEXlm and then into the subdirectory corresponding to your operating system
(e.g., i586-linux2.2 or sparc-sun-solaris7).
To identify a computer by its network card, type:
lmhostid -ether
(or just lmhostid). Following the example of the previous section, the output might look like
this on a Windows NT system:
> lmhostid -ether
lmhostid - Copyright (C) 1989-2000 Globetrotter Software, Inc.
The FLEXlm host ID of this machine is "00e02958e36a"
Send the ID, in this example the string "00e02958e36a", to your local distributor together with
the hostname of this machine in your network (for example, halconserver).
If lmhostid returns "ffffffff" please consult section 6.3.3 for troubleshooting.
To identify a computer by its (Pentium III) CPU number (Windows NT and Windows 2000
only), type:
lmhostid -cpu64
The output now might look like this:
> lmhostid -cpu64
lmhostid - Copyright (C) 1989-2000 Globetrotter Software, Inc.
The FLEXlm host ID of this machine is "0003-C1DE-01C3-E79F"
Send the ID, in this example the string "0003-C1DE-01C3-E79F", to your local distributor
together with the hostname of this machine in your network (for example, halconserver).
If lmhostid returns "", the reason probably is that the service providing the CPU ID is disabled
in the computer’s BIOS. You can check and enable this service in the BIOS configuration mode;
this mode can only be entered during the booting process. Please consult section 6.3.3 for
troubleshooting.
To check the dongle ID (Windows NT and Windows 2000 only), type:
lmhostid -flexid
The output now might look like this:
> lmhostid -flexid
lmhostid - Copyright (C) 1989-2000 Globetrotter Software, Inc.
The FLEXlm host ID of this machine is "FLEXID=7-36c79bd7"
Note, that this number is also written on the back of the dongle.
3
Do not start the program from the Explorer. You must use a DOS command prompt.
Getting Started with HALCON / 2000-11-16
2.4. LICENSING
15
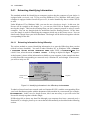
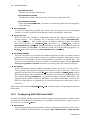
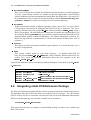
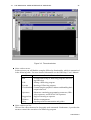
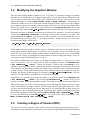
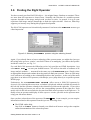
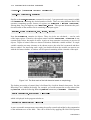
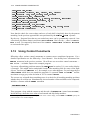
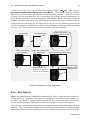
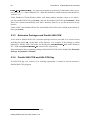
Figure 2.2: Used modules in the example program in chapter 3
2.4.2
Runtime Licenses and HALCON Modules
HALCON operators are grouped into so-called modules. Some modules, e.g., ’Basic Operators’
or ’Image / Region / XLD Management’, are used in all HALCON applications, others like
’Background Estimation’ or ’1D Bar Code Reader’ will only be needed in special applications.
While the development version of HALCON automatically includes all modules, you can limit
a runtime version to the modules you actually need.
You can check which modules are used by an application in two ways:
1. If the application is running in HDevelop (see chapter 3 for more information), select
the menu item File . Modules... which will open a pop-up dialog as depicted in
figure 2.2.
2. If the application is written in a programming language (C, C++, COM), insert the operator get modules (see the corresponding entry in the HALCON Reference Manuals
for more information) at the end of the program.
Send the thus determined module names to your local distributor when requesting a runtime
license.
2.4.3
Installing the License File
Your local distributor will supply you with a license file, which you will have to install on
your system. Normally, this file must be put into the directory %HALCONROOT%nlicense and be
called license.dat (%HALCONROOT% is the HALCON base directory you have chosen during
the installation). See the FLEXlm end user manual on how to configure this location.
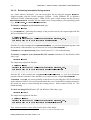
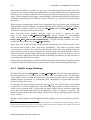
In figures 2.3, 2.4, and 2.5 you find examples for the different types of license files for nodelocked licenses. An example file for a floating license can be found in the following section.
HALCON 6.0
CHAPTER 2. INSTALLATION, LICENSING, CONFIGURATION
16
############################
# MVTec (ID: 0080c77161e2) #
############################
FEATURE MVTec_Halcon mvtecd 6.0 01-jan-0000 0 FC17B37961F326F957A8 \
VENDOR_STRING=65535 HOSTID=0080c77161e2 ck=23
FEATURE MVTec_HDevelop mvtecd 6.0 01-jan-0000 0 CC279389F3566E1D6363 \
VENDOR_STRING=65535 HOSTID=0080c77161e2 ck=32
Figure 2.3: Nodelocked development license, bound to computer
#################################
# MVTec (ID: FLEXID=7-b285ff7f) #
#################################
FEATURE MVTec_Halcon mvtecd 6.0 01-jan-0000 0 3C574319AF86C4A5DE4A \
VENDOR_STRING=65535 HOSTID=FLEXID=7-b285ff7f ck=35
FEATURE MVTec_HDevelop mvtecd 6.0 01-jan-0000 0 7C772379E2D066930D10 \
VENDOR_STRING=65535 HOSTID=FLEXID=7-b285ff7f ck=245
Figure 2.4: Nodelocked development license, bound to dongle
#################################
# MVTec (ID: FLEXID=7-b285ff7f) #
#################################
FEATURE MVTec_Halcon mvtecd 6.0 01-jan-0000 0 3C574319AF86C4A5DE4A \
VENDOR_STRING=65535 HOSTID=FLEXID=7-b285ff7f ck=35
Figure 2.5: Nodelocked runtime license, bound to dongle
As you can see, a license contains the revision number of HALCON in the lines starting with
FEATURE (in the example files: 6.0). However, a license is not exclusively bound to this revision. First, a license is downward compatible, i.e., a license for HALCON 6.0 is also valid for
HALCON 5.2. Secondly, a license is upward compatible within a major revision number, i.e.,
licenses for HALCON 6.0 are also valid for HALCON 6.0.x.
2.4.4
Using Floating Licenses
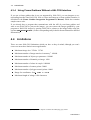
Let’s take a closer look at an example license file for a floating license in figure 2.6:
The line starting with SERVER tells FLEXlm the name of the host computer on which the license server runs (in the example: halconserver), its identifying information (in the example:
network card ID), and the port number (in the example: 744).
You may need to customize the entry for the hostname, e.g., if you are using a dongle-bound
license and want to switch the dongle (and the license server) to another computer in your
network. The same applies if you change the name of your host computer or, in the case the
license is bound to a network card ID, if you move the network card to another computer.
You may also customize the port number.
Finally, depending on where you have installed HALCON, you may have to customize the
path to the daemon mvtecd, which is in charge of managing the HALCON licenses. Normally, the path will be %HALCONROOT%nFLEXlmn%ARCHITECTURE%nmvtecd (see section 2.5 for
Getting Started with HALCON / 2000-11-16
2.4. LICENSING
17
############################
# MVTec (ID: 0080c77161e2) #
############################
SERVER halconserver 0080c77161e2 744
DAEMON mvtecd C:\Progra~1\MVTec\Halcon\FLEXlm\i586-nt4\mvtecd
FEATURE MVTec_Halcon mvtecd 6.0 01-jan-0000 2 4C72DB2EC0F315624FAE \
VENDOR_STRING=16383 ck=97
FEATURE MVTec_HDevelop mvtecd 6.0 01-jan-0000 2 0C52EBFE396EC7015CD5 \
VENDOR_STRING=16383 ck=43
Figure 2.6: Floating development license, bound to computer
information about the environment variable ARCHITECTURE). However, since you cannot use
environment variables in the license file, you must supply this path manually. Paths including blanks are not handled properly under Windows NT: Thus, if you have installed HALCON
to a directory like C:\Program Files\MVTec\Halcon you will have to use the short path
C:\Progra~1\MVTec\Halcon instead.
Finally, you have to make sure that the license manager daemon lmgrd is started at boot time.
Installing the License Manager Under Windows NT or Windows 2000
On Windows NT or Windows 2000 systems, the setup program installs the license manager as
the system service ‘Halcon Licenses’, which will be started automatically at boot time. However, if you first installed HALCON specifying the nodelocked licensing scheme, and then decided to use a floating license, you must install the license daemon lmgrd manually. To install
it, open a DOS command prompt and type (one long command line):
"%HALCONROOT%\FLEXlm\i586-nt4\installs" -n "Halcon Licenses"
-c "%HALCONROOT%\license\license.dat"
-l "%HALCONROOT%\license\license.log"
-e "%HALCONROOT%\FLEXlm\i586-nt4\lmgrd.exe"
where %HALCONROOT% is the HALCON base directory you have chosen during the installation.
Under Windows 2000, you now must reboot the computer.
You can check the success of this command using the system control panel Services. If a new
service called Halcon Licenses appears in the list, you’re done.
With the same technique, you can remove the license manager again:
"%HALCONROOT%\FLEXlm\i586-nt4\installs" -r -n "Halcon Licenses"
Installing the License Manager Under UNIX
On UNIX systems, the license server daemon lmgrd must be started from the appropriate
startup file (called e.g. /sbin/init.d/boot.local, /etc/rc.boot, /etc/rc.local, or
HALCON 6.0
CHAPTER 2. INSTALLATION, LICENSING, CONFIGURATION
18
/etc/localrc, please consult your system’s documentation). Add the following line to this
file:
/etc/lmgrd -c $HALCONROOT/license/license.dat > /etc/license.log 2>&1 &
where $HALCONROOT is the HALCON base directory you have chosen during the installation.
Please note, that lmgrd will only work properly when started with root privileges!
2.5 Configuration
Most of the configuration necessary to work with HALCON amounts to setting environment
variables, e.g., to tell HALCON the directories where to find images or extension packages etc.
These environment variables are described below. To work with Parallel HALCON, you need
to initialize it once on each computer it is to be used on. This is described in section 5.1.1.
To set an environment variable under Windows NT, open the dialog Start . Settings
. Control Panel . System and select Environment. There, you can enter the name of a
variable and the desired value. If a value consists of multiple items, as e.g. the variable %PATH%
which may contain multiple directories, those items must be separated by semicolons.
Under UNIX, different shells offer different commands to set environment variables, e.g.,
setenv <variable> <value> or export <variable>=<value>. Please consult your
shell’s documentation for further information. If a value consists of multiple items, those items
must be separated by colons.
2.5.1
Configuring HALCON Under Windows NT / 2000
The installation program Setup.exe automatically sets the necessary environment variables,
e.g., %HALCONROOT%, %HALCONIMAGES%, and %HALCONEXTENSIONS% (see below). To take a
look at these setting, open the dialog Start . Settings . Control Panel . System and
select Environment.
HALCONROOT
This is the most important environment variable. It designates the directory, where HALCON is installed. A typical path is, for example, C:nProgram FilesnMVTecnHalcon.
According to this variable, the system switches to subdirectories, which are important for
running HALCON. Some of them are:
- %HALCONROOT%nhelp
The operator data base is situated in this directory. It is accessible by all HALCON
programs to obtain information about HALCON operators.
- %HALCONROOT%ndocnhtmlnreferencenhdevelop
HDevelop uses this directory for online help which can be displayed by a suitable
HTML browser like Netscape Communicator.
- %HALCONROOT%nlut
User defined look-up tables are situated in this directory.
Getting Started with HALCON / 2000-11-16
2.5. CONFIGURATION
19
- %HALCONROOT%nocr
This directory includes trained fonts.
- %HALCONROOT%nlicense
This directory contains the license keys necessary for using HALCON.
- %HALCONROOT%nimages
If the variable HALCONIMAGES (see below) is not set the system looks for image files
in this directory.
HALCONIMAGES
To search for image files specified by a relative path, the system uses this environment
variable. As a rule it contains several directory names separated by semicolons.
ARCHITECTURE
HALCON uses this variable to differentiate between the supported platforms (operating systems). On a Windows NT or Windows 2000 system, %ARCHITECTURE%
is set to i586-nt4. The variable appears in different directory paths: Executable
HALCON programs, e.g. hdevelop.exe, and DLLs, e.g. halcon.dll, reside in
%HALCONROOT%nbinni586-nt4. During installation, this path is automatically added to
the environment variable PATH). The libraries which you need for linking programs, e.g.
halcon.lib reside in the directory %HALCONROOT%nlibni586-nt4.
HALCONEXTENSIONS
This is a list of directories in which user-defined extension operators (so-called extension
packages) are kept. Each package consists of a number of operators linked into a shared
library, plus the additional operator documentation in help-files and HTML files. See
section 2.6 for information on how to install an extension package, and the Extension
Package Programmer’s Manual for details on creating your own extension packages.
HALCONSPY
If this environment variable is defined (regardless of the value) before you start a HALCON program, the HALCON debugging tool HALCON Spy is activated. This corresponds to call the HALCON operator set spy with the parameters "mode","on" within a
HALCON program. The main difference between the two modes for activating HALCON
Spy is that by defining %HALCONSPY% it is possible to monitor an already linked HALCON
program during runtime without modifications. For further information on how to use
HALCON Spy and how to parameterize it via this environment variable please refer to
section 6.2.
Please take a look at the file release notes.html within the HALCON package for the latest
information.
2.5.2
Configuring HALCON Under UNIX
The HALCON library and the interactive tool HDevelop use some environment variables, which
are going to be described in the following. It is reasonable to include them in a login script or a
shell resource script (like .cshrc).
HALCONROOT
This is the most important environment variable. It designates the directory, where HALCON is installed. Typical paths are, for example, /usr/local/halcon or /usr/halcon.
HALCON 6.0
CHAPTER 2. INSTALLATION, LICENSING, CONFIGURATION
20
According to this variable the system switches to subdirectories, which are important for
running HALCON. Some of them are:
- $HALCONROOT/help
The operator data base is situated in this directory. It is accessible by all HALCON
programs to obtain information about HALCON operators.
- $HALCONROOT/doc/html/reference/hdevelop
HDevelop uses this directory for online help which can be displayed by a suitable
HTML browser like Netscape.
- $HALCONROOT/lut
User defined look-up tables are situated in this directory.
- $HALCONROOT/ocr
This directory includes trained fonts.
- $HALCONROOT/license
This directory contains the license keys necessary for using HALCON.
- $HALCONROOT/images
If the variable HALCONIMAGES (see below) is not set the system looks for image files
in this directory.
HALCONIMAGES
To search for image files specified by a relative path, the system uses this environment
variable. As a rule it contains several directory names separated by colons on UNIX
systems.
ARCHITECTURE
This variable designates the used platform by an abbreviation (e.g., i586-linux2.2
or sparc-sun-solaris7; its syntax is: processor-hardware vendor-operating system).
ARCHITECTURE appears in several directory paths: Executable HALCON programs, e.g.
hdevelop, reside in $HALCONROOT/bin/$ARCHITECTURE. It is therefore useful to include
the path $HALCONROOT/bin/$ARCHITECTURE in the environment variable PATH of a shell
script. Shared libraries reside in the directory $HALCONROOT/lib/$ARCHITECTURE. The
following table gives an overview of the currently supported UNIX platforms and the
corresponding values of ARCHITECTURE.
4
ARCHITECTURE
Operating System (Platform)
i586-linux2.2
sparc-sun-solaris7
mips-sgi-irix6.5
alpha-dec-osf4.0
hppa1.1-hp-hpux10
Linux 2.2 on Intel Pentium (or compatible)
Solaris 7 on Sparc Workstations
IRIX 6.5 on SGI Workstations (Mips processors)
DIGITAL UNIX 4.0 4 on Alpha processors
HP-UX 10.x on Workstations (at least PA 1.1 processors)
LD LIBRARY PATH and SHLIB PATH
Please include the HALCON library path $HALCONROOT/lib/$ARCHITECTURE in the
system variable SHLIB PATH on a HP-UX architecture, and in the system variable
LD LIBRARY PATH on all other UNIX architectures, respectively. This is necessary both
for running HDevelop and for creating stand-alone applications.
now called Tru64 UNIX
Getting Started with HALCON / 2000-11-16
2.6. INTEGRATING A HALCON EXTENSION PACKAGE
21
HALCONEXTENSIONS
This is a list of directories in which user-defined extension operators (so-called packages)
are kept. Each package consists of a number of operators linked into a shared library,
plus the additional operator documentation in help-files and HTML files. See section 2.6
for information on how to install an extension package, and the Extension Package Programmer’s Manual for details on creating your own extension packages.
HALCONSPY
If this environment variable is defined (regardless of the value) before you start a HALCON program, the HALCON debugging tool HALCON Spy is activated. This corresponds to call the HALCON operator set spy with the parameters "mode","on" within a
HALCON program. The main difference between the two modes for activating HALCON
Spy is that by defining %HALCONSPY% it is possible to monitor an already linked HALCON
program during runtime without modifications. For further information on how to use
HALCON Spy and how to parameterize it via this environment variable please refer to
section 6.2.
DISPLAY
The system uses this environment variable to open windows. It is used in the same way as
for other X applications.
HOME
This system variable points to your home directory. In Parallel HALCON 6.0
beta, the operator check par hw potential which initializes Parallel HALCON (see
section 5.1.1) saved the extracted information about the host computer in the file
$HOME/.halcon par info.
Typically the definition of these environment variables belongs to a start shell script like .cshrc
or .profile).
setenv
setenv
setenv
setenv
setenv
Examples for entries in .cshrc
HALCONROOT
/usr/local/halcon
ARCHITECTURE
i586-linux2.2
PATH
...:$HALCONROOT/bin/$ARCHITECTURE/:...
LD_LIBRARY_PATH ...:$HALCONROOT/lib/$ARCHITECTURE/:...
HALCONIMAGES
$HALCONROOT/images
2.6 Integrating a HALCON Extension Package
The HALCON Extension Package Interface allows to integrate newly developed image processing algorithms into HALCON in the form of so-called extension packages. The same mechanism is used by MVTec to extend the current HALCON release with additional functionality.
Which extensions packages are currently available can be checked at
http://www.mvtec.com/halcon/
This section describes how to integrate a (downloaded) package in order to use it within your
HALCON system.
HALCON 6.0
CHAPTER 2. INSTALLATION, LICENSING, CONFIGURATION
22
2.6.1
Installing an Extension Package
First, move the package to the directory %HALCONROOT% and unpack it there. Then, add the
complete path of the package, e.g.,
%HALCONROOT%npackagesnhalconuser
to the environment variable HALCONEXTENSIONS. Note, that the delimiter between paths in an
environment variable is a semicolon on Windows NT systems and a colon on UNIX systems.
Never change the name of a package or the corresponding names of the libraries or DLLs contained in a package.
These names are encoded within the libraries/DLLs. If you change the names this information
will not match any longer. Thus, the loader of the operating system will fail to open the dynamic
libraries.
If the package contains images used, e.g., within example programs you might want to include the corresponding directory images within the package in the environment variable
HALCONIMAGES (see section 2.5) to access those images without specifying a complete path.
2.6.2
Using an Extension Package Within HDevelop
In order to use a new package within HDevelop under Windows NT, Solaris, IRIX, or DIGITAL UNIX / Tru64 UNIX, you just have to restart the program. HDevelop automatically
integrates all extension packages specified in HALCONEXTENSIONS, i.e., the operators contained
in a package can be accessed and used like any other HALCON operator.
Under HP-UX, you have to include the package library subdirectory lib/hppa1.1-hp-hpux10
in the environment variable SHLIB PATH before starting HDevelop the first time.
Under Linux, you have to include the package library subdirectory lib/i586-linux2.2 in the
environment variable LD LIBRARY PATH before starting HDevelop the first time.
2.6.3
Using an Extension Package in a Stand-Alone Application
If you want to generate a stand-alone application using the package you have to link package
libraries (DLLs under Windows, shared libraries under UNIX) to the application code (besides
the standard HALCON library, of course).
2.6.3.1
Using an Extension Package Under Windows NT / 2000
In order to create new application programs (written in C or C++) you have to link
packagec.lib or packagecpp.lib to your objects. Furthermore, you will need halconc.lib
or halconcpp.lib (as for any HALCON application).
To be able to link the package DLL to your application program, the complete DLL file path of
the new package, e.g.,
Getting Started with HALCON / 2000-11-16
2.6. INTEGRATING A HALCON EXTENSION PACKAGE
23
%HALCONROOT%npackagesnhalconusernbinni586-nt4
has to be added to the environment variable PATH.
Do not copy a package DLL into the Windows system directories, as it would be loaded
twice in this case!
2.6.3.2
Using an Extension Package Under Linux
In order to create new application programs (written in C or C++) you have to link
libpackage.so and libpackagec.so or libpackagecpp.so to your objects (besides
libhalcon.so and libhalconc.so or libhalconcpp.so as for any HALCON application).
Furthermore, you have to add the package library subdirectory lib/i586-linux2.2 to the
environment variable LD LIBRARY PATH , otherwise the loader will fail to access the libraries.
2.6.3.3
Using an Extension Package Under Solaris
In order to create new application programs (written in C or C++) you have to link
libpackage.so and libpackagec.so or libpackagecpp.so to your objects (besides
libhalcon.so and libhalconc.so or libhalconcpp.so as for any HALCON application).
Furthermore, you have to add the package library subdirectory lib/sparc-sun-solaris7
to the environment variable LD LIBRARY PATH , otherwise the loader will fail to access the
libraries.
2.6.3.4
Using an Extension Package Under IRIX
In order to create new application programs (written in C or C++) you have to link
libpackage.so and libpackagec.so or libpackagecpp.so to your objects (besides
libhalcon.so and libhalconc.so or libhalconcpp.so as for any HALCON application).
Furthermore, you have to add the package library subdirectory lib/mips-sgi-irix6.5 to the
environment variable LD LIBRARY PATH, otherwise the loader will fail to access the libraries.
2.6.3.5
Using an Extension Package Under DIGITAL UNIX (Tru64 UNIX)
In order to create new application programs (written in C or C++) you have to link
libpackage.so and libpackagec.so or libpackagecpp.so to your objects (besides
libhalcon.so and libhalconc.so or libhalconcpp.so as for any HALCON application).
Furthermore, you have to add the package library subdirectory lib/alpha-dec-osf4.0 to the
environment variable LD LIBRARY PATH, otherwise the loader will fail to access the libraries.
HALCON 6.0
24
2.6.3.6
CHAPTER 2. INSTALLATION, LICENSING, CONFIGURATION
Using an Extension Package Under HP-UX
In order to create new application programs (written in C or C++) you have to link
libpackage.sl and libpackagec.sl or libpackagecpp.sl to your objects (besides
libhalcon.so and libhalconc.so or libhalconcpp.so as for any HALCON application).
Furthermore, you have to add the package library subdirectory lib/hppa1.1-hp-hpux10 to
the environment variable SHLIB PATH, otherwise the loader will fail to access the libraries.
Getting Started with HALCON / 2000-11-16
Chapter 3
A First Look at HDevelop
In this chapter you will learn how to solve an image analysis problem from the scratch. During an example session the most important features of HDevelop are going to be introduced.
You will become familiar with HDevelop’s graphical user interface (GUI) and learn to use it
efficiently.
The example is chosen from the domain of quality control. The goal is to detect all ball bondings
on a die, see Fig. 3.1. The HDevelop program corresponding to the example session is included
in the HALCON package subdirectory:
%HALCONROOT%\examples\hdevelop\Manuals\GettingStarted\example.dev
In particular it will be shown
how to construct a HDevelop program with HALCON operators,
how to find suitable operators and parameter values,
how to handle iconic and control variables,
how to handle the graphics window,
how to generate a region of interest (ROI),
how to solve the example problem using morphology,
how to solve the example problem by pattern matching, and
how to use control constructs.
Read this chapter very carefully and you will understand the basic interactive features of HDevelop. This will help you to develop your own sophisticated image analysis programs in the
future.
25
CHAPTER 3. A FIRST LOOK AT HDEVELOP
26
Figure 3.1: The image to be analyzed: All ball bondings on a die have to be detected.
3.1 The Graphical User Interface (GUI) of HDevelop
You start HDevelop under Windows NT or Windows 2000 by calling
Start . Programs . MVTec HALCON . HDevelop
Under UNIX, HDevelop is started from the shell by calling
hdevelop
Having started HDevelop, the main window will appear on your screen. It contains four1 windows (see figure 3.2)
a program window,
an operator window,
a variable window, and
a graphics window.
In the following, the HDevelop windows will be explained briefly. For more details see the
HDevelop User’s Manual.
3.1.1
Main window
The main window is the central window and the starting point for your work. It comprises the
creation of a program (operator selection, editing, etc.) and the session management (loading,
saving, etc.). This main window is identified by the title ’HDevelop’ in the window’s title bar.
It also contains a menu bar and a tool bar.
1
Please note that in the UNIX environment the main window, the program window, and the operator window
are combined into one window. Thus, there are only three windows.
Getting Started with HALCON / 2000-11-16
3.1. THE GRAPHICAL USER INTERFACE OF HDEVELOP
27
Figure 3.2: The main window.
Main window menus
In these menus you will find the complete HDevelop functionality, which is summarized
in the following table. For more detailed information see the HDevelop User’s Manual.
Menu
File
Contains Commands for:
Loading and saving of HDevelop programs and exiting HDevelop
Edit
Editing a HDevelop program
Execute
Running a HDevelop program
Visualization Customizing the graphics windows and handling their
output behaviour
Operators
Submenus containing programming constructs, HDevelop operators, and all HALCON operators
Suggestions Support choosing an operator
Window
Window management
Help
Opening online documentation and guides
Main window tool bar
This tool bar offers shortcuts for frequently used commands. Furthermore, it provides the
means to control the execution of an HDevelop program.
HALCON 6.0
CHAPTER 3. A FIRST LOOK AT HDEVELOP
28
Button
New
Open
Save
Cut
Copy
Paste
Run
Step
Stop
Activate
Deactivate
Reset
Set parameters
Pixel info
Zooming
Gray histogram info
Region info
3.1.2
Performs this Operation:
Deletes the current program in the program window
Opens a new HDevelop program
Saves a HDevelop program
Deletes program lines selected in the program window
Copies program lines selected in the program window
Inserts copied lines in the program window
Executes the HDevelop program
Executes the next command of the HDevelop program
Stops the running HDevelop program
Activates the lines selected in the program
Deactivates the lines selected in the program
Resets the program into its initial state and clears all variables
Opens the visualization parameter dialog window
Opens the pixel info window
Opens the online zooming window
Opens the interactive gray histogram inspection window
Opens the interactive region feature inspection window
Program Window
This window is used to display a HDevelop program. This might be an entire program, which
has been loaded, or single operators only. It has two parts: The left area contains marks which
control the running of a HDevelop program. In the initial HDevelop state you will see the
program counter (PC), represented by a green arrow, and the insertion cursor, represented by a
. Additionally you may set a break point during program debugging (see the user HDevelop
User’s Manual for a detailed explanation). The right area contains the program code. It is empty
in the initial state.
3.1.3
Operator Window
This window will show you important information about a chosen operator. It indicates all
parameter names, their types, and their values. It supports you in specifying a parameter value
by displaying a default value and alternative values. Additionally, you may get online help for
each operator.
Another window element is the text field. If you are not quite sure about an operator name
you may specify a substring in this text field. In this case, the system is going to search for all
operators in its operator base which include this substring. They are displayed in a combo box,
where you may choose the appropriate operator.
3.1.4
Variable Window
This is the control unit for variables generated during the execution of the program. Doubleclick on a variable to display its value. If the variable corresponds to an image or a set of regions
(iconic variable), the contained objects are displayed in the Graphics Window.
Getting Started with HALCON / 2000-11-16
3.2. EDITING A HDEVELOP PROGRAM
3.1.5
29
Graphics Window
This window is used to display iconic variables. The visualization modes can be adapted to your
needs with the functions provided in the Visualization menu. You may open an arbitrary
number of graphics windows. Each window can be activated interactively or accessed using its
specific window ID.
3.2 Editing a HDevelop Program
After starting HDevelop, the tool waits for your input. You create an application, in other words,
write your HDevelop program, by adding lines in the Program Window. To add a new line,2
i.e., a new operator, you have to perform two steps:
Position the insertion cursor on the appropriate line of the program where you would
like to insert the new line. This cursor is placed by pressing the <Shift> button on your
keyboard and clicking in the left column beside of the program line with the left mouse
button.
Select the new operator using the Operator menu or type its name in the operator
window’s text field.
Now the new operator is displayed in the operator window. Provide or adapt the input parameters and — if desired — change the names of the output variables. Then click Enter to insert
the operator as a new program line. If you click on Ok instead, the operator is not only inserted,
but also executed immediately. Finally, if you click on Apply the operator is not inserted into
the program, but only executed. This allows you to test the effect of your parameter settings
very quickly and conveniently.
To execute an arbitrary line of a HALCON program you have to position the program counter
(PC) at this line (just click at the left column beside the line). Then press the Step icon in the
main window tool bar. If you press Run instead all subsequent lines will be executed until a
breakpoint or a stop command is encountered. A single-click on a program line selects this
line, a double-click transfers the line back to the operator window.
Once you have finished the program you can save it and load it again later, or you might export
it as C, C++, or COM code to generate a standalone application (see File . Save as...).
These basic steps will be used many times during the example session. So you will have many
opportunities to get used to the different methods of editing program, specifying parameter
values, etc. For now, just continue with applying your first operator to read an image.
3.3 Loading an Image
First of all, you have to create a HALCON object that contains your input image. You may
obtain an image in several ways:
The Copy, Cut, and Paste commands, which are also very convenient to edit a HDevelop program, will be
explained later during this session.
2
HALCON 6.0
CHAPTER 3. A FIRST LOOK AT HDEVELOP
30
Figure 3.3: Setting the parameters of the operator read image.
You can use a frame grabber to obtain an online image (see menu item Operators .
Image . Framegrabber).
You can read an image from a file (see menu item Operators . File . Images and menu
item File . Read image...).
You can create a new image (see menu item Operators . Image . Creation).
In the example we will use the read image operator. Just select read image in the submenu
Operators . File . Images or type read image in the operator window’s text field and
press Enter. Now the operator should be displayed in the operator window, see Fig. 3.3. The
first parameter is the image object you are about to create. Change the default name of the
corresponding variable to ’Die’. You get a text field focus by clicking the left mouse button
inside the desired text field. The second parameter is the name of the image file. Change it to
’die3’:
read_image (Die,'die3')
Having specified all parameters you should press Ok to transfer the operator to the program window and to execute it. Now you have created the first line of your program in the program window. The variable Die containing the image object you just created is displayed in the variable
window. Simultaneously, the result of the operator (in this case the original image) is displayed
in the graphics window. If you encounter an error trying to load the image, check whether your
environment is set up correctly. The image should be located in %HALCONROOT%\images which
is also the default search path for image files as long as you do not provide specific search paths
in the HALCONIMAGES variable, see section 2.5.
Getting Started with HALCON / 2000-11-16
3.4. MODIFYING THE GRAPHICS WINDOW
31
3.4 Modifying the Graphics Window
The size of the initial graphics window is 512 512 pixels. If your image is bigger or smaller
than this size it will therefore be displayed distortedly. You can interactively change the window size just by picking the lower right corner with the mouse, but the easiest way to see the
undistorted image is to select Visualization . Size Window . Original. This enlarges or
shrinks the window to the size of the most recently displayed image. However, in this example
we are going to open a new window with the proper size because we will need its window handle later on. Again, there is a interactive way to do this (see menu Visualization), but we will
use the HDevelop operator dev open window instead to include this task in the program itself.
HDevelop operators are handled in the same way as HALCON operators. You can access them
via the menu Operators . HDevelop or directly via the operator window’s text field. The
parameter Width and Height specify the size of the window. If you do not know the size of
the current image you just specify ’-1’ for both parameters. In that case the size of the most
recently created image will be used.
dev_open_window (0,0,-1,-1,'black',WindowID)
Click on Ok and a new graphics window appears. It has the same size as your image. But the
new graphics display remains dark. It is now the active graphics window and waits for your
input. It is up to you what to display in this window. Double-click on the iconic variable Die
in the variable window by using the left mouse button in order to display this image. Now you
see the input image without distortion, see Fig. 3.1.
The default visualization for an image is to display the image matrix, i.e., the gray (or color)
value of each pixel. You can easily switch to other visualization modes via Visualization
. Set parameters... . paint. Choose for example ’3D-plot’ and select Update to see a
3D plot of the image. The various visualization modes are desrcipted in detail in the HDevelop
Users Manual. Do not forget to change the mode back to ’default’ before continuing with the
example session. All the visualization modes can be modified within your program as well: For
example, the display of the histogram is activated by dev set paint('3D-plot'). See also
section 3.5 to learn how to manipulate the visualization of regions.
Furthermore, it is possible to zoom into the image. Just select the menu item Visualization
. Set parameters... . zoom. Click on the upper Interactive... button. Now you can
specify a rectangle within your graphics window. To do this you press the left mouse button to
indicate the upper left corner. Keep the button pressed and drag the mouse to the lower right
corner of the desired rectangle. Release the left button and click the right button once. Now
you have specified the image part you are interested in. All visualizations are now zoomed to
this image part. This is the interactive way to set an image part. Another possibility is the direct
input of the coordinates of the image part (in Visualization . Set parameters... . zoom
or to use the HDevelop operator dev set part). To visualize the whole image again, click
Reset in Visualization . Set parameters... . zoom.
3.5 Creating a Region of Interest (ROI)
Very often it is useful to specify a ROI which is used in the following processing steps. By restricting the image domain the performance can be increased significantly because all following
HALCON 6.0
CHAPTER 3. A FIRST LOOK AT HDEVELOP
32
image processing tasks will be performed only within this ROI and not on the whole image.
Figure 3.4: A rectangular and an arbitrary region of interest (ROI).
To generate a ROI you have the following possibilities:
Interactive creation of a rectangular ROI:
Select the operator draw rectangle1 from the menu Operators . Graphics . Drawing
to draw a rectangle in the graphics window. Just execute the operator with the default
names for the output variables (containing the pixel coordinates of the upper left and
lower right corner of the rectangle). This creates a new line in the program window and
HDevelop waits for you to draw the rectangle (like you did before while setting an image
part to zoom in). After you finished the drawing, the four control output variables Row1,
Column1, Row2, and Column2 will appear in the variable window, see Fig. 3.5. To generate the corresponding ROI as an HALCON object, use the operator gen rectangle1
from the menu Operator . Regions . Creation with the variables Row1 – Column2
as input parameters. You might use ’ROI’ as the name for the resulting output object:
draw_rectangle1 (WindowID, Row1, Column1, Row2, Column2)
gen_rectangle1 (ROI, Row1, Column1, Row2, Column2)
By executing this operator you create another type of HALCON object — a region, see
section 4.2.3.
Figure 3.5: The variable window containing iconic and control variables.
Getting Started with HALCON / 2000-11-16
3.5. CREATING A REGION OF INTEREST (ROI)
33
The default visualization for a region is the shape of the region (here the rectangle)
drawn with the current color into the graphics window. You may manipulate this
graphics output by choosing items of the menu Visualization or executing the corresponding HDevelop operator dev *. For example, set the drawing color to ’green’
with Visualization . Color, increase the line with for drawing to 3 pixels with
Visualization . Line Width and specify, that only the region boundary (’margin’)
instead of the whole region (’fill’) should be displayed with Visualization . Draw.
Each time you change the visualization, the last iconic object that was drawn into the
currently active graphics window is redisplayed (Fig. 3.4). Therefore, you need only redisplay an object by hand (by double-clicking it in the variables window if you want to
change the display mode of an “older” object.
Interactive creation of an arbitrary ROI:
HALCON supports arbitrary regions as ROI, see Fig. 3.4. Just use draw region from
the menu Operators . Graphics . Drawing instead of the sequence draw rectangle1
and gen rectangle1:
draw_region (ROI, WindowID)
To adapt the program in this way, you may select the line draw rectangle1 (just click
on that line) and deactivate it with Edit . Deactivate. Do the same with the line
gen rectangle1.
Computation of a suitable ROI:
The computation of a suitable ROI based on intermediate results of the image analysis is
the most challenging but also the most flexible approach. In our example we will detect
the board itself and use this as a ROI for the ball detection, see section 3.8.
Once you have generated a ROI you can reduce the image domain to this region with the operator reduce domain from Operators . Image . Domain. Specify Die as input image and ROI
as input region:
reduce_domain (Die, ROI, ImageReduced)
mean_image (ImageReduced, ImageMean, 11, 11)
The resulting image ImageReduced is only defined within the ROI. Clear the window and
double-click on the variable ImageReduced to see this effect. You might apply a couple of
operators to the original image and the reduced image to see the increase in performance. For
example, try mean image from Operators . Filter . Smoothing with Die as input image.
Then clear the window and double-click on the mean image program line to change the input
image to ImageReduced.
To repeat the above sequence with different ROIs just place the PC on draw rectangle or
draw region (depending on which method you have activated) and press Run. In order to stop
the execution of the program before a specific operator is applied, place a break point (BP) in
the program line containing this operator (Control key and mouse click in the left column).
HALCON 6.0
CHAPTER 3. A FIRST LOOK AT HDEVELOP
34
3.6 Finding the Right Operator
You have created your first HALCON object — the original image. But how to continue? There
are more than 900 operators to choose from. Naturally, the selection of a suitable operator
sequence depends on the image analysis task you have to solve. In general, it is up to your
experience and image analysis knowledge to make the right selection. However, HDevelop
supports you in many ways during this program development.
The HALCON operators are hierarchically structured. Just browse the Operators menu to get
a first impression.
Figure 3.6: Selecting the threshold operator using the substring “thresh”.
Again, if you already know at least a substring of the operator name you might also just type
this string in the operator window’s text field. If there is an ambiguity, you choose the operator
inside the combo box, see Fig. 3.6.
For each HALCON operator the HDevelop online help provides an HTML description. Just
select Help . HTML... to start your default browser. You will see the table of contents of all
image analysis modules — structured in the same way as the Operators menu. Simply select
an appropriate chapter and continue browsing until you find your operator. There are also many
cross references according to the relationships between the operators. At the end of the main
page there is an index of all operators, which helps you to jump directly to a specific operator
HTML page.
Furthermore, the menu Suggestions . Keywords offers access to HALCON operators by
keywords. By selecting this menu item, a window is displayed with the available keywords on
the left side and the operators related to the selected keywords on the right side. If you select
a keyword using your mouse you will see the corresponding operators in the right area. Each
mouse click in the left area marks the keyword and adds some operators in the right area. To
finally select an operator and display it in the operator window just click on the operator name
using your left mouse button.
Once you have selected one of the operators, like read image in our example, you can enquire
information related to this operator from the operator knowledge base:
The HTML online help.
Just click on the Help button to launch your default web browser and get the complete
online documentation of the selected operator.
Getting Started with HALCON / 2000-11-16
3.7. FINDING THE RIGHT PARAMETER VALUES
35
Suggestions . Alternatives
If an intermediate result does not fulfill your requirements you might want to choose an
alternative operator which might be more suitable for your task. Note, that in many situations there is a trade off between performance and accuracy of the results. For example,
you might use the high performance smoothing filter mean image in one situation and the
higher quality smoothing filters gauss image or smooth image in another.
Suggestions . See also
The online help of HDevelop also offers references to other operators, which are not
exactly alternatives, but related to the current operator in some way. For example, if you
currently look at read image you might be interested in the write image operator as
well.
Suggestions . Predecessor
Many operators require a specific input provided by other operators. For example, before
computing junction points in a skeleton (junctions skeleton), you have to compute
the skeleton itself (skeleton).
Suggestions . Successor
On the other hand, there are typical sequences of operators. Hence HDevelop suggests
some reasonable operators to be executed following the operator you are currently looking
at. For example, thresholding might be a good idea after applying an edge filter.
In our example you have just created the input image. Naturally, this is a very unspecific situation with lots of different opportunities to continue. However, we will accept one of the
successor suggestions, the threshold operator later on.
3.7 Finding the Right Parameter Values
Once you have selected an operator (from the menu, by typing it’s name, or by double-clicking
on a program line in the program window), it is displayed in the operator window. Now you
have to specify the parameters for the operator. Of course, you can type in every parameter
manually (either a control value or a variable name). In many cases it is more convenient to
use the combo boxes (click on the arrow at the right side of the parameter field) instead, which
provide a listing of meaningful values or names of variables you specified within your program.
Furthermore, for control input parameters default values are provided by HDevelop.
For example, apply a threshold operator to the input image by selecting the operator threshold
from Operators . Segmentation. Specify the input image Die using the combo box. If you
use the default values for the lower and upper threshold, all pixels in the input image with gray
values larger than 128 will be included in the resulting output region. Therefore, you could call
the corresponding output variable BrightRegion. It might be helpful to set the visualization
mode Visualization . Draw to ’fill’. In this case you see all the selected image pixels painted
in the current drawing color in the graphics window. Double-click on Die and BrightRegion
again to underlay the visualization of the region with the original image, see Fig. 3.7.
To choose another parameter value just double-click on the program line containing the corresponding operator, change the parameter, and press Apply. The operator will be executed
immediately and its result will be visualized. Repeat this process until you are satisfied with the
HALCON 6.0
CHAPTER 3. A FIRST LOOK AT HDEVELOP
36
Figure 3.7: The region object BrightRegion containing all pixels with gray values larger or
equal 128.
result, then press Ok. But remember to clear the window or underlay the original image before
each new execution of an operator returning a region. Otherwise, you only see the accumulated
visualization of all regions you generate during the parameter tuning.
3.8 Finding the Board as ROI
Looking at the input image Die you will notice that the surface of the board is quite bright.
Thus, by applying the threshold operator with the default values 128 and 255, a reasonable
raw segmentation of the board can be achieved. We will now transform this raw segmentation
into a region of interest for the ball detection: Select the HALCON operator shape trans
with BrightRegion (the result of the thresholding) as input region and ’rectangle2’ as value
for the parameter ’type’ to obtain the smallest rectangle (of arbitrary orientation) containing
BrightRegion. The resulting region (called ‘ROI’) is a reasonable approximation of the board
in the image. As in section 3.5, reduce the domain of the original image to this ROI with the
reduce domain operator:
threshold (Die, BrightRegion, 128, 255)
shape_trans (BrightRegion, ROI, 'rectangle2')
reduce_domain (Die, ROI, DieROI)
The following computations will be performed only on the resulting image DieROI within the
board.
3.9 Finding Bonding Balls Using Morphology
If you look closer at your image you will notice that the bonding balls to detect are darker
than the die itself. Therefore, another thresholding might be suitable as the next operation, see
Fig. 3.8. Due to noise, the resulting region (all the dark parts within the board) might have
Getting Started with HALCON / 2000-11-16
3.9. FINDING BONDING BALLS USING MORPHOLOGY
37
Figure 3.8: The region object RawSegmentation containing all dark pixels within the board.
some small holes which can obstruct further processing. For a controlled filling up of these artifacts, the HALCON operator fill up shape (in Operators . Regions . Transformation)
is suitable.
threshold (DieROI, RawSegmentation, 0, 50)
fill_up_shape (RawSegmentation, Wires, 'area', 1, 100)
Visualize the variables Wires and RawSegmentation, then change the drawing color to see the
difference.
Figure 3.9: Removing faulty parts of the raw segmentation with the opening circle operation.
Unfortunately, the region found so far contains not only the bonding balls but also some darker
areas, especially the wires connected to the balls. Obviously, the bonding balls have a circular
shape. We use this information to separate the bonding balls from the other dark parts by
using the HALCON operator opening circle (in Operators . Morphology . Region). This
morphological operation will suppress all parts of the region, where the underlying structural
element — a circle with a specific radius — does not fit within the region, see Fig. 3.9.
HALCON 6.0
CHAPTER 3. A FIRST LOOK AT HDEVELOP
38
opening_circle (Wires, BallRegion, 15.5)
Visualize the variables Wires and BallRegion, then change the drawing color to see the effect
of this operation.
Now there is only one artifact left in the segmentation: A large dark rectangular shape, in
which the circular mask for the opening has fitted as well. In order to eliminate this error the
intermediate result — the region BallRegion — is separated into connected regions via the
HALCON operator connection:
connection (BallRegion, Balls)
Note the difference: BallRegion is one region containing all the pixels of the segmentation
so far. The different parts of this region are not connected, but still they form a single region.
Balls is a variable containing seven separated HALCON objects — one per connected region.
Set Visualization . Colored to 12. Now 12 different colors are used cyclically to paint the
region objects. It is a very convenient feature of the HALCON system that iconic variables can
contain not only single objects, but also tuples of objects. Most HALCON operators accept
such tuples as input and perform their task simultanously on all the contained objects. Due
to this mechanism you won’t have to program loops to process objects one by one in most
situations.
Based on the circular shape of balls, the elimination of the rectangular region is now very
simple. Just apply the select shape operator (in Operators . Regions . Features) with
’circularity’ as the selection criterion:
select_shape (Balls, FinalBalls, 'circularity', 'and', 0.85, 1.0)
Double-click on the variable Die, then on FinalBalls to see the selected regions only. Note
again that Balls contains seven objects, from which you select all circular regions with this
single operator call. Now, the ball segmentation is finished. In the next section it will be shown
how to perform measurements based on the segmentation result. But before continuing, recall
how simple it was to detect the balls and handle all the intermediate iconic objects generated:
read_image (Die,'die3')
threshold (Die, BrightRegion, 128, 255)
shape_trans (BrightRegion, ROI, 'rectangle2')
reduce_domain (Die, ROI, DieROI)
threshold (DieROI, RawSegmentation, 0, 50)
fill_up_shape (RawSegmentation, Wires, 'area', 1, 100)
opening_circle (Wires, BallRegion, 15.5)
connection (BallRegion, Balls)
select_shape (Balls, FinalBalls, 'circularity', 'and', 0.85, 1.0)
3.10 Working with Control Variables
So far we have detected the ball bondings within the image. Based on this segmentation we can
now perform some simple measurements. The most obvious measurement is to count the balls
Getting Started with HALCON / 2000-11-16
3.10. WORKING WITH CONTROL VARIABLES
39
via count obj (in Operators . Object . Information):
count_obj (FinalBalls, NumBalls)
Similiar to the draw rectangle1 command in section 3.5 you generated a new control variable
called NumBalls containing the desired number of balls. There are many different HALCON
operators computing specific features of regions (see Operators . Regions . Features).
Among them, one you might try now is smallest circle. This operator determines the position and radius of the smallest circle containing each input region:
smallest_circle (FinalBalls, Row, Column, Radius)
Note that FinalBalls contains six objects. Thus, six circles are calculated — one for each
of the input regions. Therefore, the output control variables Row, Column, and Radius do not
contain single values, but tuples of values. Again, no loop construct is necessary to process all
objects. Tuples of control values are shown in brackets within the variable window. If a tuple
variable contains too many elements to be shown at once, the value list is truncated and three
dots are added. For inspecting such a tuple, just double-click on the variable you want to see
with the left mouse button. A window will be opened containing all the elements of the tuple.
Figure 3.10: The final result of the ball detection based on morphology.
The further processing of control data is facilitated by a built-in formula interpreter. See the
HDevelop User’s Manual for details. For example, you could compute the average value of the
tuple Radius with the following HDevelop assign statement (see Operator . Control)
assign (meanRadius, sum(Radius) / |Radius|)
which is displayed in the program window as
meanRadius := sum(Radius) / |Radius|
A more reasonable measurement concerning the quality control task might be the computation
of the minimum area of the balls. This can be achieved by applying the HALCON operator
HALCON 6.0
CHAPTER 3. A FIRST LOOK AT HDEVELOP
40
area center (in Operators . Regions . Features), which calculates the area of each ball,
followed by another assign statement:
area_center (FinalBalls, Area, RowCenter, ColCenter)
minArea := min(Area)
Of course, tuples of control values can also be used as input parameters. For example, draw
the circles you have computed with the HALCON operator disp circle (in Operators .
Graphics . Output), see Fig. 3.10:
disp_circle (WindowID, Row, Column, Radius)
3.11 Finding Bonding Balls Using Pattern Matching
The morphologic approach detected the desired bonding balls by suppressing spurious parts of
the raw segmentation gained by thresholding. In this section you will encounter a completely
different approach to this detection problem. The pattern matching approach can be divided
into two steps:
1. Creating a so-called template3 (typically during a training phase).
2. Searching for this template in the current image.
Figure 3.11: A template for a ball.
In our example we will create a template containing a single ball. To do this, just copy the two
program lines you used to generate a rectangular search space (section 3.5):
draw_rectangle1 (WindowID, Row1, Column1, Row2, Column2)
gen_rectangle1 (ROI, Row1, Column1, Row2, Column2)
3
another word for the pattern that is searched in the image
Getting Started with HALCON / 2000-11-16
3.11. FINDING BONDING BALLS USING PATTERN MATCHING
41
To do so, select the two program lines, copy them with Edit . Copy, position the insertion
cursor at the end of the program and select Edit . Paste. Then, position the PC on the
draw rectangle1 command, press Run and draw a small rectangle containing nothing but
one of the balls, see Fig. 3.11.
Then copy the program line for reducing the image domain to the resulting region ROI:
reduce_domain (Die, ROI, ImageReduced)
Now you can transform ImageReduced, which is the original image restricted to the rectangular domain you just have specified, to a template. This done by the HALCON operator
create template (in Operators . Filter . Match):
create_template (ImageReduced, 5, 4, 'sort', 'original', TemplateID)
To obtain the center of the template (which will be needed for visualization purposes later) use
the following assign statements:
TemplRow := (Row1 + Row2)/2
TemplCol := (Col1 + Col2)/2
After the creation of the template you have the choice between different matching algorithms.
We will use a two-step strategy. First, a fast matching operator is applied to find all image points
where the template might match. In the second step, within each cluster of such points the exact
position of the template will be determined. The HALCON operator fast match (again in
Operator . Filter . Match) delivers the region Matches containing all possible matching
positions:
fast_match (Die, Matches, TemplateID, 20)
Double-click on the original image Die and the result region Match to see these positions. The
input parameter MaxError is set to 20 in this example. There is a trade-off between performance
and fault tolerance of the matching. Decrease the value and watch the execution time when
applying the operator. For very small values of the tolerated error some of the balls might be
missed. On the other hand, increasing the value decreases the performance significantly.
Besides fast match there is also a HALCON operator fast match mg working on different
resolution levels, which in general increases the performance. Just try
fast_match_mg (Die, Matches, TemplateID, 20, 3)
to perform a search with three resolution levels and compare the execution time with the one
resolution method underlying fast match.
After we have derived all posible matching positions, we decompose the corresponding region
into connected components:
connection (Matches, BallROI)
HALCON 6.0
CHAPTER 3. A FIRST LOOK AT HDEVELOP
42
If you specified a reasonable template and a suitable MaxError this should result in six regions
corresponding to the six (fully) visible balls in the image.
count_obj (BallROI, NumBalls)
Within each of the regions in BallROI we would like to determine the exact position of the
template. This can be done by another HALCON operator, called best match.4 BallROI
contains only regions. Thus, we have to add an image, that is gray values, to the objects prior
to the final matching. This is done with the operator add channels (in Operators . Image .
Channel):
add_channels (BallROI, Die, BallImage)
best_match (BallImage, TemplateID, 20, 'true', Row, Column, Error)
Note that the best match operator is applied to all objects contained in BallImage. Thus,
the control output variables Row and Column specifying the exact matching position and Error
containing the matching error should be tuples of values. To visualize the results we display
rectangles like the one used for the template generation — shifted by the offset beween the
matching positions and the center of the template, see Fig. 3.12.
disp_rectangle1 (WindowID, Row1+Row-TemplRow, Column1+Column-TemplCol,
Row2+Row-TemplRow, Column2+Column-TemplCol)
You should make sure that the region visualization is set to ’margin’ using Visualization .
draw before executing this command.
Figure 3.12: The final result of the ball detection based on pattern matching.
If you do not need the template any longer, it should be cleared with the HALCON operator
clear template. Summarizing, the ball detection using pattern matching was done by the
following sequence of HALCON operators:
4
Again, there is a multi-grid version of this matching operator, but since we already restricted the search to a
very small part of the image, it is not too interesting to use best match mg in this case.
Getting Started with HALCON / 2000-11-16
3.12. USING CONTROL CONSTRUCTS
43
read_image (Die,'die3')
draw_rectangle1 (WindowID, Row1, Column1, Row2, Column2)
gen_rectangle1 (ROI, Row1, Column1, Row2, Column2)
reduce_domain (Die, ROI, ImageReduced)
create_template (ImageReduced, 5, 4, 'sort', 'original', TemplateID)
fast_match_mg (Die, Matches, TemplateID, 20, 3)
connection (Matches, BallROI)
add_channels (BallROI, Die, BallImage)
best_match (BallImage, TemplateID, 20, 'true', Row, Column, Error)
clear_template (TemplateID)
Note that the check for correct shape and area of each ball is implicitly done by the pattern
matching. In the previous approach this was performed by the opening circle operator.
By the way: Program lines that are not needed any more can be permanently removed. Just
select them (left mouse button) and choose Edit . Delete. Don’t be shy — there is an Edit .
Undo as well. To temporarily deactivate a line use Edit . Deactivate and Edit . Activate
to activate the line again.
3.12 Using Control Constructs
HDevelop offers various control statements to construct more complicated programs. For a
detailed specification see the HDevelop Users Manual. You already have encountered the
assign statement in the previous sections. We will now use two other control statements —
for and if — to further improve the example program.
Up to now, all matching positions returned by best match in section 3.11 were used to display
a rectangle. This might lead to undesirable results if the matching fails for some of the input
objects. Just decrease MaxError to 5, for example, to see what happens: For each input object
in BallImage which does not contain the template 0 is returned in Row and Column5 and the
maximum average gray value deviation of 255 is returned in Error.
The correct way to handle these matching errors is to check for all resulting matching positions
whether they are valid or not. Simultanously, the real number of detected balls can be computed:
Initialize a counter with the assign statement
RealNumBalls := 0
Then program a loop with the counter i and the end value NumBalls (control statement for).
Inside the loop, check the error value of each match and skip faulty matches:
A template position which is actually outside of the current image, because Row and Column specify the
position of the center of the template.
5
HALCON 6.0
CHAPTER 3. A FIRST LOOK AT HDEVELOP
44
for i := 1 to NumBalls by 1
if (Error[i-1] < 255)
disp_rectangle1 (Row1+Row[i-1]-TemplRow, Column1+Column[i-1]-TemplCol,
Row2+Row[i-1]-TemplRow, Column2+Column[i-1]-TemplCol)
RealNumBalls := RealNumBalls + 1
endif
endfor
Display the original image Die again and execute the above loop to see the result.
Getting Started with HALCON / 2000-11-16
Chapter 4
Philosophy of HALCON
This chapter explains the basic concepts of the HALCON system: its modular architecture and
its data structures. Furthermore, it describes HALCON’s frame grabber interface.
4.1 Modular Structure
Applications
Visual
Basic
C
C++
MS
Java
Delphi
etc.
COM (NT only)
HDevelop
Online Help
Language Independent Operator Interface
Frame
grabber
Image Processing Library
Interface
Iconic Data Management
Extension
Package
Operator Knowledge Base
Figure 4.1: Layered structure of HALCON.
The basis of HALCON is the data management together with the operator knowledge base. The
data management is reponsible for basic memory management (optimized for image processing)
45
CHAPTER 4. PHILOSOPHY OF HALCON
46
and on top of this for the creation, handling, and deletion of iconic objects and tuples. The
knowledge base stores information about operators, which can be accessed while the system is
running. All other modules make use of it to process image operations and to obtain information
about the configuration and current state of the system.
The knowledge base is also used to automatically generate the HALCON language interface
(for C, C++, and COM), all operator information used by HDevelop, the online help, and the
reference manuals. The operator knowledge base contains information about names and number
of operators, as well as parameter types, assertions and suggested values for the parameters.
This data set is stored in a structured way. There exists a detailed description for each operator
which handles the effects of the operator and which indicates the complexity, the operator class,
as well as cross references and alternatives.
On top of these two modules the operators are implemented. Most of them are contained in
the HALCON Image Processing Library, which is decribed in the Reference Manuals. This
library can be extended dynamically using so-called packages. The operators of these packages
behave like normal HALCON operators, but they contain extensions to the standard library
either generated by MVTec (for easy update) or by the user. This concept permits the user to
extend the system in a very flexible way. For more information see the Extension Package
Programmer’s Manual. Using a similar mechanism, frame grabber interfaces are integrated
using dynamic libraries. This allows the user to integrate his/her own frame grabber or to
download new releases of frame grabber interfaces via the internet for fast and easy update
without further changes of the rest of the system.
The next module is the Language-Independent Operator Interface. It contains modules for
calling operators, handling the input/output and passing data objects to the host language. An
operator call is performed by the Language Interface which is generated automatically by a
compiler using the information in the operator database. It allows to access HALCON operators
within the programming languages C, C++, and COM (Windows NT only). The interface to
C++ allows the development of object-oriented tools.
HDevelop is implemented on top of the language interface using HALCON C and the GUI
toolkit wxWindows developed by the Artificial Intelligence Applications Institute at The University of Edinburgh to get a portable user interface for Windows and UNIX.
4.2 Handling Iconic and Control Data
HALCON distinguishes two types of data: iconic and control data. Iconic data is related to
the original image (images, regions, XLD objects; see below). Control data are all kinds of
“numerical” values, such as integers, floating-point numbers, or strings; this kind of data defines
input values for operator control parameters and is used to build complex structures like bar
charts or arrays of control values. Both — iconic and control data — are processed according
to the “tuple scheme” within HALCON.
4.2.1
Tuple Processing
Whenever an input or output parameter of a HALCON operator contains data, it may be a single
object/value or a tuple of objects/values. If a tuple is passed HALCON processes the operator
Getting Started with HALCON / 2000-11-16
4.2. HANDLING ICONIC AND CONTROL DATA
47
simultaneously on all tuple members. For example, if you want to process a median filter on
six different images, you might call the operator median image six times with varying input
images. Or you might generate a tuple containing all six images and call median image once
with the tuple as input object. HALCON filters all tuple elements simultaneously and returns a
tuple containing six filtered images. We have seen another example before in chapter 3, where
several regions have been extracted from an input image. The regions became elements of one
region tuple. If you want to know the center of all regions, you simply have to pass this tuple to
the operator area center. HALCON then returns a tuple of integer pairs containing the pixel
positions of all centers.
Now that we know how tuples are processed we can have a closer look at the different object
classes of iconic data: images, regions, and XLD objects.
4.2.2
Image Objects
Image objects contain the pixel data for image processing. They may be tuple objects containing
more than one image object or a single image object. Every single image object consists of one
domain describing its area of definition and one or more channels containing the gray values
of the pixels (cf. Fig. 4.2). The number of channels is not restricted. A monochrome image
may only have one channel, a color image may contain three channels according to the RGB
scheme, a multisensor image may have several channels.
The domain of an image object may be of any size and is represented by a region. Thus, it can
have holes or may consist of several, unconnected areas (see Fig. 4.3). The default domain of
an image object is the smallest rectangle enclosing the image. It may be changed to any size,
e.g., via the operator reduce domain, so that every image has its individual domain.
Introducing an area of definition for an image has the following advantage: All image operators
work only within this image domain. This allows to focus the processing on a region of interest.
The amount of data to work on becomes smaller so that the processing is sped up. An example
that explicitly makes use of this can be found as HDevelop program named autobahn.dev
under the path %HALCONROOT%\examples\hdevelop\Applications\Sequences.
tuple image object
image object 1
domain
runlength
encoding
image object 2
channel 1
gray value
matrix
channel 2
gray value
matrix
Figure 4.2: Structure of HALCON image objects.
HALCON 6.0
CHAPTER 4. PHILOSOPHY OF HALCON
48
region 1
region 3
image
regions may contain holes
regions may be compact
region 2
region 4
regions may consist of
several, unconnected areas
regions may exceed
the image size
Figure 4.3: Different forms and sizes of regions.
4.2.3
Region Objects
Regions define areas in images, e.g., the domain of an image or the light areas of an image.
Region objects consist of one or more regions. They are handled as separate objects independent
from any image object, although they may represent an area within a specific image. This allows
to use flexible shapes and sizes for regions and to store them efficiently. Only the region area
must be represented in memory — independent from the gray values of the pixels. Moreover,
this allows to define overlapping regions for the same image without the implicit merging that
would happen when storing regions as matrices.
Region data is represented by a special variant of the runlength encoding — by a chord encoding: for every line (chord) of a region its row index (y-coordinate of chord; “line number”) and
the x-coordinates of its start- and end-point is stored. Both — the start-point and the end-point
— belong to the region. This allows a very compact representation of regions in memory and
an efficient region processing, especially with morpholgic operations.
Regions may be of any size and therefore even may exceed the image size. This is an additional advantage, since it prevents artifacts. For example, imagine you want to close a
region with a circular structuring element to smooth the region’s boundaries and to close
holes within the region, e.g., via the operator closing circle. You use this to extract
Getting Started with HALCON / 2000-11-16
4.2. HANDLING ICONIC AND CONTROL DATA
49
a little fin (see Fig. 4.4 or cf. the HDevelop program example fin2.dev under the path
%HALCONROOT%\examples\hdevelop\Applications\FA). The closing is done by a dilation
followed by an erosion, both with the same circular structuring element — in our case a circle
of radius 250 (you may think that 250 is rather large, but with the advanced performance of
HALCON this causes no performance problem). Now imagine that the maximum region size
would be restricted to the image size. Thus after processing the first step (the dilation) the resulting region has to be clipped to the image size (see Fig. 4.4.a). The following erosion would
work on a restricted area and therefore result in a much smaller area than the correct processing
(see Fig. 4.4.b). This would make the correct extraction of the fin impossible.
original image
region after dilation
within background region
background region
region after clipping
to image size
region after erosion within
clipped region
region after erosion without clipping
a
b
resulting region is too
small; correct extraction
of the fin is not possible!
difference between this region
and the background region
exctracts the fin!
Figure 4.4: Example of region processing.
4.2.4
XLD Objects
XLD is the abbreviation for eXtended Line Description. This is a data structure used for describing areas (e.g., arbitrarily sized regions or polygons) or any closed or open contour, i.e.,
also lines. In contrast to regions, which represent all areas at pixel precision, XLD objects
provide subpixel precision. There are two basic XLD structures: contours and polygons.
An XLD object is built up by setting base points along the contour/lines and connecting them
with lines. They can represent a contour (or set of lines) at any precision by varying the number
and position of the base points at subpixel precision. Additional information, such as gradient,
HALCON 6.0
CHAPTER 4. PHILOSOPHY OF HALCON
50
filter response, or angle is stored with the points and lines. Typically, XLD objects describe the
result of operators for edge/line detection (e.g., edges sub pix, lines gauss). In particular,
they are used for image processing at subpixel precision and offer a wide range of features and
transformations. See the Extension Package Programmer’s Manual for internal details.
4.3 The HALCON Frame Grabber Interface
Currently, HALCON provides interfaces for more than 30 frame grabbers1 , in form of dynamically loadable libraries (Windows NT / 2000: DLLs; UNIX: shared libraries). These libraries
are installed together with the HALCON libraries (see section 2.2 for the file structure). Library names start with the prefix HFG; the libraries starting with parHFG are used by Parallel
HALCON (see also section 5.3.2).
The HALCON frame grabber interface libraries form the bridge between software provided by
the frame grabber’s manufacturer and HALCON. They form a common, generic interface by
providing the following operators:
open framegrabber opens and configures a specified frame grabber. Depending on the frame
grabber, several parameters must be specified, e.g. describing the type of the used camera
or the port the camera is connected to.
info framegrabber returns information about a specified frame grabber, e.g., the default
parameters used by open framegrabber.
set framegrabber param and get framegrabber param allow to set or read additional parameters. Which parameters are supported by a HALCON frame grabber interface can be
queried via the operator info framegrabber. For more information about the parameters please refer to the corresponding online documentation which can be found in the
directory %HALCONROOT%ndocnhtmlnmanuals. The html start page is also available from
the HALCON folder in the Windows start menu. If you did not install the documentation,
please take a look at the web site mentioned above.
grab image and grab image async grab an image from a specified frame grabber. For the
difference between the two modes of grabbing see below.
grab image start starts an asynchronous grabbing from the specified frame grabber (see
below for more details).
close framegrabber and close all framegrabbers close the connection to one or all
frame grabbers and release the corresponding resources, e.g., free the previously allocated memory.
set framegrabber lut and get framegrabber lut allow to set or read a frame-grabberspecific lookup table. These operators are only supported by some frame grabbers.
If you successfully installed your frame grabber, all you need to do to access it from HALCON
is to call the operator open framegrabber, specifying the name of the frame grabber and some
additional information, e.g., regarding the connected camera (see the corresponding entry in
1
Please refer to http://www.mvtec.com/halcon/framegrabber for an up-to-date list.
Getting Started with HALCON / 2000-11-16
4.3. THE HALCON FRAME GRABBER INTERFACE
51
the Reference Manual for detailed information). Then, images can be grabbed by calling the
operator grab image (or grab image async, see below).
Please note, that the HALCON frame grabber interfaces may change more often than the HALCON library itself. One reason is that MVTec continuously develops new interfaces; furthermore, if the software provided by the frame grabber manufacturers changes, e.g., if new features are integrated, the corresponding HALCON interfaces will be adapted. You can find
the latest information together with downloadable interfaces (including documentation) under
http://www.mvtec.com/halcon/framegrabber.
4.3.1
The Two Modes of Grabbing Images
HALCON distinguishes two grabbing modes: synchronous and asynchronous grabbing. Synchronous grabbing means that the application tells the frame grabber to grab a new image by
calling the operator grab image, and waits until the image is ready. In other words, the application synchronizes itself with the grabbing process. The advantage of this mode is that grabbed
images are always up to date. However, because the grabbing process can take quite a time
to complete, e.g., 40ms with standard PAL, real-time image processing becomes difficult (if
not impossible) using synchronous grabbing. Synchronous grabbing is even more problematic
when using an external trigger (see the following section), as then the application will wait for
the trigger.
The second mode, asynchronous grabbing, supports real-time image processing. In this mode,
the grabbing process is divided into two steps: First, the application tells the frame grabber
to start grabbing a new image by calling the operator grab image start. This operator immediately returns; thus, the application can continue with its own task, e.g., process the previous image while the frame grabber grabs a new image. To actually fetch the new image, the
application calls the operator grab image async. If the frame grabber has already finished
grabbing the image, grab image async returns directly with the image; otherwise the operator
waits until the frame grabber has finished. Furthermore grab image async allows to specify
“how old” the grabbed image is allowed to be. If the image is too old, grab image async
automatically starts a new grab and waits for its completion. Before returning, the operator
grab image async automatically starts a new grab; therefore, you do not need to call the operator grab image start anymore after the first grab.
Note, that asynchronous grabbing is the more powerful of the two modes, but requires a careful
timing on the part of the user. In other words, image processing (application side) and grabbing
process (frame grabber) can only run asynchronously if the operator grab image async is
called when the image is already grabbed (and not too old already)!
4.3.2
Using External Triggers
Independent of the grabbing mode, you can use an external trigger signal to start the actual
grabbing process in the camera (if the frame grabber supports this option) and thereby synchronize the image grabbing to a physical process, e.g., by using photoelectric barriers that report
when a part has arrived for inspection. All you need to do to use this feature from HALCON is
to specify a corresponding parameter in the call to open framegrabber.
HALCON 6.0
CHAPTER 4. PHILOSOPHY OF HALCON
52
Please note the difference between the two ways of synchronizing described here and in the
previous section: In the synchronous grabbing mode, your application software is synchronized
with the process of image grabbing so that image processing starts directly after getting a new
image. When using an external trigger, image grabbing is synchronized with an external process
so that the grabbed image corresponds to a certain situation, e.g. with an object directly under
the camera.
When using an external trigger signal, keep in mind that after being told to grab an image the
frame grabber waits for this signal – possibly ad infinitum if this signal is not triggered! Together
with the frame grabber, calls to the operator grab image (and even grab image async, if
called before the signal comes) have to wait.
Most HALCON frame grabber interfaces allow to specify a timeout for grabbing via the operator set framegrabber param (please consult the corresponding
online documentation in the directory %HALCONROOT%ndocnhtmlnmanuals or under
http://www.mvtec.com/halcon/framegrabber). If a grab runs into a timeout, the corresponding operator returns the value H ERR FGTIMEOUT.
Please note, that in order to really synchronize the grabbing process with an external event,
the camera must be able to start a new image immediately. This feature is typically called
asynchronously resettable. If a camera does not have this feature, the frame grabber must wait
for the camera to finish its current frame before starting to grab. This means that there will be a
delay between the external trigger and the start of the grabbing. Even worse from the point of
view of real-time applications, the exact duration of this delay is unknown, as it may lie between
zero and the time needed for one frame.
Summarizing, in applications with hard real-time constraints external triggers should be used in
conjunction with an asynchronously resetable camera and the asynchronous grabbing mode.
4.3.3
Volatile Image Grabbing
By default, the operators grab image and grab image async copy the image data written by
the frame grabber into a certain memory area into a HALCON image object. The advantage
of this mode is that your application can process the returned image object as long as it likes
without it being “overwritten” by a subsequent grab. Furthermore, the application can keep a
history of images if necessary.
As copying costs processing time (typically about 2 3ms for a NTSC image) which might
be precious in a real-time application, some HALCON frame grabber interfaces offer the socalled volatile grabbing mode. In this mode, the frame grabber directly writes the image data
into a HALCON image object used by the application. Thus, no copying is required. The
drawback of this mode is that older images will be overwritten by subsequent grabs2 , thus the
name “volatile”.
Whether a frame grabber interface supports volatile grabbing is noted in its online documentation.
2
In fact, the HALCON frame grabber interfaces internally use a so-called double buffering strategy to assure
that a HALCON application can process one image while the next image is grabbed. Then, buffers are switched
so that with the third grab the first image is overwritten.
Getting Started with HALCON / 2000-11-16
4.4. LIMITATIONS
4.3.4
53
Using Frame Grabbers Without a HALCON Interface
If you use a frame grabber that is not yet supported by HALCON, you can integrate a corresponding interface into HALCON. How to create and integrate a frame grabber interface is
described in the Frame Grabber Integration Programmer’s Manual, which also contains
sample source code.
If you already have a program that communicates with the API of your frame grabber and
want to use HALCON to process the images, you can convert the images grabbed by your
program to HALCON images by passing HALCON a pointer to the image buffer using the
operator gen image1 extern (see the corresponding entry in the Reference Manual for detailed
information).
4.4 Limitations
There are some HALCON limitations which you have to keep in mind, although you won’t
come even near these limits in most applications:
3
Maximum image size: 32768 32768
Maximum number of image matrices in memory3: 100000
Maximum number of objects per parameter: 100000
Maximum number of channels per image: 1000
Maximum number of values in a tuple: 1000000
Maximum number of contour points: 30000
Maximum number of polygon control points: 10000
Range for coordinates: from
32768 to +32767
Maximum length of strings: 1024 characters
Not to be confused with image objects, since objects can share the underlying gray values.
HALCON 6.0
54
Getting Started with HALCON / 2000-11-16
CHAPTER 4. PHILOSOPHY OF HALCON
Chapter 5
Using Parallel HALCON
This chapter explains how to use Parallel HALCON, concentrating on the main features of
Parallel HALCON: automatic parallelization and the support of parallel programming.
Like standard HALCON, Parallel HALCON can be used in two ways: You can integrate the
corresponding libraries in your own C++ or C programs1, or you can use the parallelized variant
of HDevelop, Parallel HDevelop.
Parallel HALCON and HDevelop
Like the HALCON library, HDevelop exists in two variants: The standard HDevelop builds
upon the standard HALCON library; as before the corresponding executable is called hdevelop
(or hdevelop.exe). The second variant builds upon Parallel HALCON and therefore automatically parallelizes operators if used on a multi-processor hardware. The corresponding executable is called parhdevelop (or parhdevelop.exe); under Windows NT, you can start it
via the menu Start . Programs . MVTec HALCON . Parallel HDevelop.
Note, that Parallel HDevelop differs from standard HDevelop only insofar that it uses the automatic parallelization mechanism. You cannot write parallel programs inside Parallel HDevelop.
Parallel HALCON in a Stand-Alone Application
To create an application using Parallel HALCON, you must link the corresponding libraries
to your C or C++ programs. Under Windows NT, you need the libraries parhalconc.dll
or parhalconcpp.dll, depending on the used programming language. Under UNIX,
you need the library libhalcon.so and, depending on the used programming language,
libparhalconc.so or libparhalconcpp.so. Please consult the HALCON/C User’s Manual and the HALCON/C++ User’s Manual for more detailed information.
5.1 Automatic Parallelization
If Parallel HALCON is used on multi-processor hardware, it will automatically parallelize image processing operators. Section 5.1.1 describes how to initialize Parallel HALCON in order to
1
Note, that Parallel HALCON does not provide an interface to COM, in contrast to standard HALCON.
55
CHAPTER 5. USING PARALLEL HALCON
56
use this mechanism. Section 5.1.2 explains the different methods which are used by HALCON
operators for their automatic parallelization.
5.1.1
Initializing Parallel HALCON
In order to adapt the parallelization mechanism optimally to the actual hardware, Parallel HALCON needs to examine this hardware once. Afterwards, HALCON programs will be automatically parallelized without needing any further action on your part. Even existing HALCON
programs will run and be parallelized without needing to be changed.
You trigger this initial examination by calling the operator check par hw potential (see the
corresponding entry in the HALCON Reference Manuals for further information). Note, that
this operator will only work correctly if called from Parallel HALCON; if you call the standard
HALCON version (e.g., from HDevelop instead of Parallel HDevelop), a corresponding error
message is returned. Similarly, if you call the operator on a single-processor computer, it will
return an error message. As a shortcut, you may call the executable hcheck parallel which
resides in the directory %HALCONROOT%nbinn%ARCHITECTURE% .
Upon calling check par hw potential, Parallel HALCON examines every operator that can
be sped up in principle by an automatic parallelization. Each examined operator is processed
several times - both sequentially and in parallel - with a changing set of input parameter values,
e.g., images. The latter helps to evaluate dependencies between an operator’s input parameter
characteristics (e.g. the size of an input image) and the efficiency of its parallel processing. This
examination may take up to 10 minutes, depending on your computer.
The extracted information is stored in the registry (under Windows NT or Windows 2000) or
in the file .halcon par info in the directory $HALCONROOT (under UNIX). Please note, that
on some operating systems you need special privileges to initialize Parallel HALCON successfully, otherwise the operator check par hw potential is not able to store the extracted
information. Under Windows 2000, you need administrator privileges or the group privileges
'Power User'. Under UNIX, per default only the user who installed HALCON can create (or
modify) the file .halcon par info. Please note, that the operator check par hw potential
returns without an error if it cannot store the extracted information. In contrast, the program
hcheck parallel checks privileges and writing permissions beforehand and returns with a
corresponding error message.
5.1.2
The Three Methods of Automatic Parallelization
For the automatic parallelization of operators, Parallel HALCON exploits data parallelism, i.e.,
the property that parts of the input data of an operator can be processed independently of each
other. Data parallelism can be found at three levels: :
1. tuple level
If an operator is called with input parameters containing tuples, it can be parallelized by
distributing the tuple elements on parallel threads. This method requires that all input
parameters contain the same number of tuple elements (or contain a single object or
value).
Getting Started with HALCON / 2000-11-16
5.2. PARALLEL PROGRAMMING
57
2. channel level
If an operator is called with input images containing multiple channels, it can be parallelized by distributing the channels on parallel threads. This method requires that all
input image objects contain the same number of channels or a single channel image.
3. domain level
Every operator can be parallelized by dividing its domain and distributing its parts on
parallel threads.
The description of a HALCON operator in the Reference Manuals contains an entry called
’Parallelization Information’, which specifies its behavior when using Parallel HALCON. This
entry indicates whether the operator will be automatically parallelized by Parallel HALCON
and by which method (tuple, channel, or domain).
5.2 Parallel Programming Using Parallel HALCON
Parallel HALCON supports parallel programming by being thread-safe and reentrant, i.e., different threads can call HALCON operators simultaneously without having to wait. However,
not all operators are fully reentrant. This section takes a closer look at the reentrancy of Parallel
HALCON. Furthermore, it points out issues that should be kept in mind when writing parallel
programs that use Parallel HALCON.
The example program example multithreaded1.c in the directory examplenc shows how to
use multithreading to extract different types of components on a board in parallel using Parallel
HALCON/C.
5.2.1
A Closer Look at Reentrancy
In fact there are different “levels” of reentrancy for HALCON operators:
1. reentrant
An operator is fully reentrant if it can be called by multiple threads simultaneously
independent of the data it is called with.
2. local
This level of reentrancy is only relevant under Windows NT.
Under Windows NT, operators marked as local should be called only from the main
thread (and not from an external thread). Typical examples are operators that use graphical I/O functions. The reason is that under Windows NT, there exists a direct mapping
between program threads and graphical elements, such as windows, dialog boxes or button controls. In short, a graphical element only exists in the context of its associated
thread. This can cause severe problems (for example, hang the application) if a thread
tries to perform user interactions via graphical elements that belong to another thread.
For example, you may get a deadlock if one thread opens a window via open window
and another thread tries to get input from this window via draw circle.
As it is not always obvious whether an operator works with critical (graphical) elements
or not, such operators are marked as local. Note, that you can still use them outside the
main thread, however, you might get problems.
HALCON 6.0
CHAPTER 5. USING PARALLEL HALCON
58
3. single write multiple read
A certain group of operators should be called simultaneously only if the different calling
threads work on different data. For example, threads should not try to modify the same
template for pattern matching simultaneously by calling adapt template with the same
handle. Exactly the same applies to the case that one thread should not modify a data set
that is simultaneously read by another thread. Other groups of operators with this behavior are concerned with file I/O (e.g., write image – read image, fwrite string –
fread string but also non-HALCON file commands) or background estimation (e.g.,
update bg esti – give bg esti).
As this thread behavior is not recommended quite generally, Parallel HALCON does not
actively prevent it and thus saves overhead. This means that if you (accidentally) call
such operators simultaneously with the same data no thread will block, but you might
get unwelcome effects.
4. mutual exclusive
Some operators cannot be called simultaneously by multiple threads but may be executed in parallel to other HALCON operators. Examples for mutual exclusive operators
are combine roads xld, pouring, or concat ocr trainf.
5. completely exclusive
A group of operators is executed exclusively by Parallel HALCON, i.e., while such an
operator is executed, all other threads cannot call another HALCON operator. Examples
are all OCR/OCV operators that modify OCR classificators, all operators that create
or delete files, display operators like open window or disp image, and the operator
reset obj db. For the latter, a programmer has to assure that all operators that are to
be executed before reset obj db is called have already finished, because this operator
resets HALCON and therefore strongly influences its behavior.
As mentioned already, the description of a HALCON operator in the Reference Manuals contains an entry called ’Parallelization Information’, which specifies its behavior when using Parallel HALCON. This entry specifies the level of reentrancy as described above.
5.2.2
Style Guide
Initialization
Before calling HALCON operators in parallel in a multithreaded program, you have to
call one operator exclusively. This is necessary to allow HALCON to initialize internal
structures.
In principle, you can choose any HALCON operator for this initial call; we recommend
reset obj db as this operator initializes the global image size.
I/O
Under Windows NT, use I/O operators (including graphics operators like open window
or disp image) only in the main thread, otherwise you might get a deadlock. This means
that you should not open a window in one thread and request a user interaction in it from
another thread. In the Reference Manual, these operators are marked as locally reentrant
(see section 5.2.1).
Keep in mind that operators which create or delete files work exclusively, i.e., other threads
have to wait.
Getting Started with HALCON / 2000-11-16
5.3. ADDITIONAL INFORMATION ON PARALLEL HALCON
59
The programmer has to assure that threads do not access the same file (or handle) simultanously!
Multithreading vs. Automatic Parallelization
If you explicitely balance the load on multiple processors in a multithreaded program,
we recommend to switch off the automatic parallelization mechanism in order to get an
optimal performance. How to switch of the automatic parallelization is described in section 5.3.1.
5.3 Additional Information
This section contains additional information that helps you to use Parallel HALCON.
5.3.1
How to Switch Off Reentrancy or Automatic Parallelization
You can switch off parts of the features of Parallel HALCON with the help of the operator
set system. To switch off the automatic parallelization mechanism, call (HDevelop notation,
see the Reference Manual for more information)
set_system('parallelize_operators','false')
To switch of reentrancy, call
set_system('reentrant','false')
Of course, you can switch on both behaviors again by calling set system with the 'true'
as the second parameter. Please note, that by switching off reentrancy you also switch off
automatic parallelization, as it requires reentrancy.
Switch off these features only if you are sure you don’t need them but want to save the corresponding computing overhead. If you write sequential programs to be run on a single-processor
computer, the best way to save overhead is to use standard HALCON, of course.
A reason for switching off the automatic parallelization mechanism could be for debugging or
if your multithreaded program does its own scheduling and does not want Parallel HALCON to
interfere via automatic parallelization. Note, that you do not need to switch off automatic parallelization when using Parallel HALCON on a single-processor computer; Parallel HALCON
does not create any corresponding overhead if it detects only one processor.
5.3.2
Using a Frame Grabber in Parallel HALCON
All frame grabbers supported by HALCON can be used in Parallel HALCON as well.
Please note, that none of the frame grabber operators is automatically parallelized. Most
of the operators are reentrant, only the operators concerned with the connection to
the frame grabber (open framegrabber, info framegrabber, close framegrabber, and
HALCON 6.0
CHAPTER 5. USING PARALLEL HALCON
60
close all framegrabbers) are processed completely exclusively. Furthermore, these operators are local, i.e., under Windows NT / 2000 they should be called from the main thread (see
section 5.2.1).
Under Windows NT and Windows 2000, each frame grabber interface comes as two DLLs2 ,
one for standard HALCON (prefix HFG) and one for Parallel HALCON (prefix parHFG). Both
HALCON versions automatically load “their” interface libraries, so you do not need to worry
about it.
Under UNIX, both standard HALCON and Parallel HALCON work with the same shared library (prefix HFG).
5.3.3
Extension Packages and Parallel HALCON
To be used in Parallel HALCON, extension packages must be provided in a second version
including the prefix par in the name of the libraries. For example, if the package is called
halconuser, Parallel HALCON looks for the libraries parhalconuser.dll under Windows
NT / 2000 or libparhalconuser.so under UNIX, respectively.
More information about extension packages in Parallel HALCON can be found in the Extension
Package Programmer’s Manual.
5.3.4
Parallel HALCON and HALCON Spy
As HALCON Spy (see section 6.2) is working sequentially, it cannot be used to monitor a
Parallel HALCON program.
2
see section 2.2 for the file structure of HALCON
Getting Started with HALCON / 2000-11-16
Chapter 6
Tips and Tricks
This chapter contains information that helps you working with HALCON, including sections
on troubleshooting.
6.1 Online Help in HDevelop
HDevelop offers you a broad range of support.
System suggestions
Based on the operator knowledge base the system offers specific advice to choose an
appropriate operator. Thus, there are suggestions for reasonable predecessors and successors. If you are searching for different ways of solving an image analysis problem
you may have a look at alternatives or references of an operator. If you only have some
keywords or thematic aspects in mind which an operator has to fulfill, but you cannot remember the operator’s name, you have the possibility to obtain an operator by specifying
one or more keywords.
Online help on operators
HALCON offers a detailed online help for each HDevelop operator. These manual pages
are highly structured, thus allowing you to easily get an understanding of an operator.
Moreover, cross references immediately give you a survey of the operator’s relations. To
use this help you only need an appropriate HTML browser.
Debugging help
You may choose between different modes of running a program. You have the possibilities
to perform single steps of a program, to set breakpoints, or to run a program continuously.
To get meaningful debugging support you may also specify the environment variable
HALCONSPY (see chapter 2.5.2).
Result visualization
HDevelop offers the immediate inspection of an operator’s results. This visualization
mechanism helps you to spot problems quickly. Additionally, it is very easy for you to
modify graphics output parameters to optimize your graphics results.
61
CHAPTER 6. TIPS AND TRICKS
62
6.2 Monitoring HALCON Programs with HALCON Spy
HALCON Spy helps you to debug image processing programs realized with HALCON operators by monitoring calls to HALCON operator and displaying their input and output data in
graphical or textual form. Furthermore, it allows you to step through HALCON programs.
HALCON Spy is activated within a HALCON program by inserting the line (in HDevelop
notation)
set_spy('mode','on')
Alternatively, you can activate HALCON Spy for an already linked program by defining the
environment variable %HALCONSPY% (i.e., by setting it to any value). How to set environment
variables is described in section 2.5.
You specify the monitoring mode by calling the operator set spy again with a pair of parameters, for example
set_spy('operator','on')
set_spy('input_control','on')
to be informed about all operator calls and the names and values of input control parameters.
The monitoring mode can also be specified via the environment variable %HALCONSPY%. Under
Windows NT, set %HALCONSPY% to the value
operator=on;input_control=on
to get the same mode as in the example above. Under UNIX, use a colon instead of a semicolon
to separate options.
Please take a look at the entry for set spy in the HALCON Reference Manuals for detailed
information on all the debugging options. Note, that HALCON Spy does not work properly
under Parallel HALCON.
6.3 Troubleshooting
This section offers help for problems encountered during installing or uninstalling HALCON,
when using HDevelop, or when using Parallel HALCON.
6.3.1
Problems During Installation
Registration of halconx.dll failed
On some systems you might get a warning message that the HALCON/COM interface
library halconx.dll failed to self-register. A possible cause for this may be that the
Microsoft library atl.dll was not registered properly. This library resides in the directory %SystemRoot%nsystem32, e.g., C:nWINNTnsystem32. To register the library, open
Getting Started with HALCON / 2000-11-16
6.3. TROUBLESHOOTING
63
a DOS command prompt, change into the directory miscni586-nt4 on the CD execute
the supplied program reg halconx as follows:
>
>
>
>
E:
cd misc\i586-nt4
reg_halconx atl.dll
reg_halconx
The first call of reg halconx registers atl.dll, the second one registers halconx.dll.
Installing and uninstalling the license manager
Occasionally, the FLEXlm license manager service needed for floating licenses is not installed properly by the installation wizard. To install it manually, type1 in a DOS command
prompt:
"%HALCONROOT%\FLEXlm\i586-nt4\installs" -n "Halcon Licenses"
-c "%HALCONROOT%\license\license.dat"
-l "%HALCONROOT%\license\license.log"
-e "%HALCONROOT%\FLEXlm\i586-nt4\lmgrd.exe"
where %HALCONROOT% is the HALCON base directory you have chosen during the installation. You can check the success of this command using the system control panel
Services. If a new service called Halcon Licenses appears in the list, you’re done.
With the same technique, you can remove the license manager again:
"%HALCONROOT%\FLEXlm\i586-nt4\installs" -r -n "Halcon Licenses"
6.3.2
Problems During Uninstallation
Unregistration of halconx.dll
If you had to register the HALCON/COM interface library halconx.dll manually as
described in section 6.3.1, you must unregister it manually before you can uninstall HALCON. To do so, open a command prompt, change into the directory miscni586-nt4 on
the CD execute the supplied program reg halconx as follows:
> E:
> cd misc\i586-nt4
> reg_halconx /u
Removal of the license server
As mentioned in section 2.3.1, if you uninstall a HALCON 5.0 or 5.1 version with floating
licenses the FLEXlm license manager service occasionally is not removed properly. To
make sure that the service is removed, please start a DOS command prompt prior to the
uninstallation and type
"%HALCONROOT%\FLEXlm\i586-nt4\installs" -r -n "Halcon Licenses"
1
The following is one long command line.
HALCON 6.0
CHAPTER 6. TIPS AND TRICKS
64
Note that the DOS command prompt cannot handle paths including blanks properly. Thus,
if you have installed HALCON to a directory like
C:\Program Files\MVTec\Halcon
you will have to type either (one line)
C:\Progra~1\MVTec\Halcon\FLEXlm\i586-nt4\installs -r -n
"Halcon Licenses"
or quote the command as suggested here (one line)
"C:\Program Files\MVTec\Halcon\FLEXlm\i586-nt4\installs" -r -n
"Halcon Licenses"
Alternatively, you can also change the directory via
cd %HALCONROOT%\FLEXlm\i586-nt4
which is possible even without quotes and type
installs -r -n "Halcon Licenses"
afterwards.
“Internal Error”
If the uninstall process is terminates with a message like
“Internal Error, unable to load or call external DLL. Please contact your
distributor for more information.”
the most likely reason is that a new HALCON version was installed over an existing one
without completely removing the old files first.
Other possible reasons might be that the whole HALCON directory was moved to another position on the hard disk, or the environment variable %HALCONROOT% was changed
manually. You have to follow the following steps to recover from the error:
1. Check if the environment variable %HALCONROOT% matches the location of your
HALCON directory. You can check this via the system control panel System
(look for Environment) or in a DOS command prompt via echo %HALCONROOT%.
If the variable contains nothing or the files are in some other location, you have to
set HALCONROOT manually via the System control panel.
2. Check if these two files are present:
In your %HALCONROOT% directory: Uninst.isu
In the directory %HALCONROOT%nFLEXlmi586-nt4: HalconUninst.dll2
Note that by default the Windows NT Explorer doesn’t show DLL files, unless
you explicitly tell it to do so. Uninst.isu has been created during the installation. If this file has been removed, an automatic uninstallation is not possible.
2
For HALCON 5.0 and 5.1, this DLL was called CSUninst.dll.
Getting Started with HALCON / 2000-11-16
6.3. TROUBLESHOOTING
65
HalconUninst.dll is a HALCON specific DLL for the uninstallation process.
If this file has been removed you can get a copy of the file from the directory
FLEXlmi586-nt4 on the HALCON CD.
3. Check, if the registry entry for the uninstaller is set properly: Start regedit.exe
(for example from a DOS command prompt), and go to
HKEY_LOCAL_MACHINE -> SOFTWARE -> Microsoft -> Windows ->
CurrentVersion -> Uninstall -> Halcon <Version-Number>,
where <Version-Number> is the version number of the HALCON version you
want to uninstall or is not present. There, you should find a key named
UninstallString. The value of this string should be something3 like this:
C:\WINNT\IsUninst.exe -f"C:\Program Files\MVTec\Halcon\Uninst.isu"
-c"C:\Program Files\MVTec\Halcon\FLEXlm\i586-nt4\HalconUninst.dll"
Make sure that the path C:nProgram FilesnMVTecnHalcon (or equivalent) in the
above example points to the %HALCONROOT% directory. Note that filenames that
contain blanks have to be quoted with "path". This is true in the above example
since “Program Files” does contain a blank. Older versions of the HALCON setup
program failed to do so. If you encounter unquoted path names containing blanks,
please insert the quotation marks yourself.
4. Close the registry editor and try to run the uninstaller again.
Unistallation failed
If the automatic uninstallation fails for another reason, proceed as follows:
1. For floating licenses only: Uninstall the license manager service by executing
"%HALCONROOT%\FLEXlm\i586-nt4\installs" -r -n "Halcon Licenses"
2. Start regedit and delete the keys
HKEY_LOCAL_MACHINE -> SOFTWARE -> Microsoft -> Windows ->
CurrentVersion -> Uninstall -> Halcon
and
HKEY_LOCAL_MACHINE -> SOFTWARE -> MVTec
3. Using, e.g., the NT Explorer, delete the directory
%SystemRoot%\Profiles\All Users\Start Menu\Programs\Halcon
Note that %SystemRoot% usually is C:nWINNT.
4. Finally, delete the HALCON base directory %HALCONROOT%.
3
The option -c... is only included if you have chosen an installation with floating licenses.
HALCON 6.0
CHAPTER 6. TIPS AND TRICKS
66
6.3.3
Problems Concerning Licenses
If you encounter problems with your HALCON license even though your license file exists and
is located in the correct directory, a first step is always to check if the information identifying
your computer (or dongle) (see section 2.4.1) matches the corresponding entries in the license
file (see section 2.4.3). If the two do not match, please send the new identifying information to
your distributor.
See below if you encounter problems with extracting the identifying information.
“About HDevelop” does not show any host IDs
If HDevelop fails to detect any host IDs although your computer does have a network
board, a Pentium III, or a dongle, please try to extract the host IDs manually as described
in section 2.4.1.2.
lmhostid -ether returns "ffffffff"
If lmhostid returns "ffffffff", this usually indicates that you do not have a network
board. If you do have one, on Windows NT systems this might mean that you do not have
the NetBEUI and TCP/IP protocols installed for the network board. This can be checked
in the dialog Start . Settings . Control Panel . Network . Protocol. If the protocols
do not appear in the dialog, please install these two protocols by adding them in the dialog.
Then, repeat the steps described in section 2.4.1.1 or 2.4.1.2.
lmhostid -cpu64 returns ""
If lmhostid returns an output like
> lmhostid -cpu64
lmhostid - Copyright (C) 1989-2000 Globetrotter Software, Inc.
The FLEXlm host ID of this machine is ""
lmhostid: FLEXlm function not available in this version <-45,520>
this indicates that the processor of your computer does not provide a CPU ID. As described
in section 2.4.1.2, the most probable reason is that the service providing the CPU ID is
disabled in the computer’s BIOS. You can check and enable this service in the BIOS
configuration mode.
If you cannot find a corresponding service entry in the BIOS of your computer, this means
that its processor does not provide a CPU ID. Note, that currently only Pentium III processors provide this ID; the output above, e.g., stems from an AMD Athlon processor.
lmhostid -flexid does not return the dongle ID
If lmhostid does not return the ID that is printed on the back of the dongle, check
whether the dongle driver is installed. For this, open the dialog Start . Settings
. Control Panel . Devices. If there is no entry called Sentinel, you must install the dongle driver manually. Please note, that you need administrator privileges to install the driver! Open a DOS shell and change into the directory
%HALCONROOT%nFLEXlmndongleni586-nt4. Here, start the program Setupx86.exe. In
the appearing window, select the menu item Functions . Install which starts the installation process. Afterwards, reboot your computer. Then, the driver should appear in
the dialog described above. Note, that if you try to install the driver without administrator
privileges, the setup program might falsely state that the installation was successful.
Getting Started with HALCON / 2000-11-16
6.3. TROUBLESHOOTING
67
If the driver is installed but lmhostid still does not return the correct ID, please check the
parallel port of your computer, before requesting a new dongle.
6.3.4
Troubleshooting in HDevelop
This section explains some typical errors while starting HDevelop and their reasons.
No license found
This error message might have several reasons:
- The file %HALCONROOT%nlicensenlicense.dat is missing and/or not readable.
- Your license is not valid on this machine.
- In case of floating licenses: There are too many licenses active.
Lost connection to license server
Verify if the license server is running. You may also check whether your machine is
properly connected with the server. For this you may need to contact your system administrator.
No license for this operator
The operator which you try to execute belongs to a HALCON module which is not licensed. Obtain a new license including this module.
Wrong architecture
This error indicates that you are using an architecture which is not compatible with your
HALCON version. Check the variable ARCHITECTURE or try to install the proper HALCON version.
hdevelop: Command not found
Check your system environment variable PATH. It has to include the path
$HALCONROOT/bin/$ARCHITECTURE.
lib* : can’t open file
If you work with HP-UX you have to check whether the system variable SHLIB PATH
is set correctly. For all other UNIX architectures you have to check the system variable
LD LIBRARY PATH (see 2.5.2).
No help files for package <package-name> in directory <directory>
Possible reasons for this error message are:
No files %HALCONROOT%nhelpn* (if the package name is “system”) or no help files
in one of the user packages.
If the package name is “system”: Wrong HALCONROOT
Check the file protection. Probably HDevelop cannot access important files.
Help file for package <package-name> is corrupt
Possible reasons for this error message are:
If the package name is “system”: Inconsistent version of %HALCONROOT%nhelpn* or
wrong HALCONROOT
HALCON 6.0
CHAPTER 6. TIPS AND TRICKS
68
Can’t open display
If you see an error message like this you may have a wrong system variable DISPLAY
and/or your program is not allowed to open a window by the specified X-server.
6.3.5
If the package name is that of a user package: Inconsistent version of the help files
of this package.
Troubleshooting for Parallel HALCON
Parallel HALCON does not achieve any speedup
If Parallel HALCON does not achieve any speedup on a multi-processor hardware, maybe
you forgot to initialize Parallel HALCON as described in section 5.1.1. You must initialize Parallel HALCON once on each parallel hardware it is to be used on. With this
initialization, Parallel HALCON scans the hardware and checks its potential for parallel
processing.
If you already initialized Parallel HALCON, you can check whether Parallel HALCON
really “found” the processors by calling the operator get system with the parameter
'processor num' (see the corresponding entry in the Reference Manual for more information). Please note, that this operator must be called from Parallel HALCON to yield
meaningful results; from standard HALCON, it returns 1 regardless of the actual number
of processors.
Please remember that Parallel HALCON only works on shared-memory systems!
A Parallel HALCON program runs slower than expected within Visual Studio
Please note, that the developing environment Microsoft Visual Studio massively influences
the scheduling on a multi-processor computer. As a consequence, programs using Parallel
HALCON run slower than expected when started within Visual Studio. This concerns
both the automatic parallelization mechanism and multithreaded programs in general.
To get the full performance, create a corresponding executable (.exe-file) and start it
outside Visual Studio.
An operator returns different results in HALCON and Parallel HALCON, respectively
This problem can occur if you called the operator with input parameters containing tuples. Note, that certain input parameters of HALCON operators must not receive tuple
values; however, some operators will work without returning an error in such a case. You
can check whether a parameter may receive tuples in the operator’s description (on-line
help or reference manual): Parameters that can receive tuples are marked with the suffix
’(-array)’ after their type, e.g., ’region(-array)’.
6.3.6
Miscellaneous Problems
No refresh of window content on a UNIX system
On some UNIX systems the default behavior regarding occluded windows may be set in
an inconvenient way for HALCON. The result is that if a window is temporarily occluded
by another window, its content is not saved and restored anymore, i.e., windows remain
Getting Started with HALCON / 2000-11-16
6.3. TROUBLESHOOTING
69
“black” after uncovering. An example is the Linux distribution SuSE 7.0. The corresponding property is called “backing-store”; you can check the current setting of this property
by typing (the following example corresponds to a SuSE 7.0 Linux system)
xdpyinfo | grep backing-store
which should result in the output like
options:
backing-store YES, save-unders YES
if the window content is saved and restored. You can change this behavior by modifying
the file Xservers residing in the directory /usr/lib/X11/xdm (or similar, see your system’s documentation). Note, that you probably need root privileges to modify this file.
Append the option +bs (i.e., “plus backing-store”) to the line that starts the local X server:
:0 local /usr/X11R6/bin/X :0 vt07 +bs
Now, stop and start the X server again (by using the appropriate commands or by rebooting
your computer); the command xdpyinfo now should yield the output shown above.
HALCON 6.0
70
Getting Started with HALCON / 2000-11-16
CHAPTER 6. TIPS AND TRICKS
Index
Aerial image interpretation, 3
Area of definition, 2, 47
area center, 47
Assertions, 46
ocr, 19
Environment variables
SHLIB PATH, 20
Environment variables, 19
ARCHITECTURE, 19, 20
DISPLAY, 21
HALCONEXTENSIONS, 19, 21
HALCONIMAGES, 19, 20
HALCONROOT, 18, 19
doc/html/reference/hdevelop, 20
help, 18, 20
images, 20
license, 19, 20
lut, 18, 20
ocr, 20
HALCONSPY, 19, 21
HOME, 21
LD LIBRARY PATH, 20
Erosion, 49
Example session, 25
Extended line description, 49
Extension Package Interface, 4
Ball bondings, 25
best match, 2
BP, 33
Break point, 28, 33
C, 1, 3, 46
Export of source code, 3
C++, 1, 3, 46
Export of source code, 3
Chord encoding, 48
closing circle, 48
Color images, 2
COM, 1, 3, 46
Export of source code, 3
Combo box, 28, 34
Contour, 49
Control data, 46
Cross references, 61
FA, 3
Factory automation, 3
fast match, 2
Frame Grabber
Parallel HALCON, 59
Frame grabber, 3
Asynchronous grabbing, 51
External trigger, 51
Interface, 46, 50
Synchronous grabbing, 51
Volatile Grabbing, 52
Data
Control, 46
Exchange, 4
Floating point numbers, 46
Iconic, 46
Image, 47
Integers, 46
Pixel, 47
Strings, 46
Debugging, 1, 3, 28, 61
DIGITAL UNIX, 4, 23
Dilation, 49
Domain, 47
Graphics window, 26, 29–31, 35
Gray value, 35, 47
edges sub pix, 50
Environment variables
HALCONROOT
doc/html/reference/hdevelop, 18
images, 19
HALCON
Demo version, 7
Full (development) version, 7
Runtime version, 7
71
Index
72
Halcon, 1
File Structure, 9
Installation, 7
Library, 19
Operator, 29
Packages
Installation, 21
Uninstallation, 10
Halcon configuration, 18
UNIX, 19
Windows NT, 18
HALCON extension package, 3, 46
and Parallel HALCON, 60
HALCONEXTENSIONS, 19, 21
Installation, 22
HALCON Spy, 19, 21, 62
and Parallel HALCON, 60
HALCONEXTENSIONS, 22
HDevelop, 3, 19
Help, 61
Program, 29
Troubleshooting, 67
Help
HDevelop, 61
HORUS, 4
Host language, 46
HP-UX, 4, 24
Iconic data, 46
Iconic variable, 31
Image, 47
Color, 2
Matrix, 47
Multichannel, 2
Object, 47
Sequence, 8
Image file, 30
Image file formats, 4
Binary, 4
BMP, 4
Gif, 4
JPEG, 4
PCX, 4
PNM, 4
Sun-Raster, 4
Tiff, 4
XWD, 4
Image object, 30
Insertion cursor, 28, 29
Getting Started with HALCON / 2000-11-16
Installation, 7
Troubleshooting, 62
IRIX, 4, 23
Keywords, 34
Language interface, 4, 46
Language-independent operator interface,
46
LD LIBRARY PATH, 22, 23
License
Development, 7
Floating, 7, 8, 16, 63
Key, 12, 15
Nodelocked, 7, 8
Runtime, 7
Temporary, 7
Licensing
Troubleshooting, 66
Limitations, 53
Maximum image size, 53
Maximum length of strings, 53
Maximum number of channels per image, 53
Maximum number of contour points, 53
Maximum number of image matrices in
memory, 53
Maximum number of objects per parameter, 53
Maximum number of polygon control
points, 53
Maximum value for coordinates, 53
lines gauss, 50
Linux, 4, 5, 23
Loading an image, 29
Main window, 26
Menu, 27
Edit, 27
Execute, 27
File, 27
Help, 27
Operators, 27
Suggestions, 27
Visualization, 27
Window, 27
Tool bar, 27
Activate, 28
Copy, 28
Cut, 28
Index
Deactivate, 28
Gray histogram info, 28
New, 28
Open, 28
Paste, 28
Pixel info, 28
Region info, 28
Reset, 28
Run, 28
Save, 28
Set parameters, 28
Step, 28
Stop, 28
Zooming, 28
Matching
pattern matching, 2
shape-based matching, 2
median image, 47
Medical image analysis, 3
Memory management, 3
Multichannel images, 2
Object
Image, 47
Region, 48
Tuple, 2, 46
XLD, 49
Online help, 34, 61
Operating systems, 4
Operator
Description, 46
Operator library
Extension, 3
Operator knowledge base, 1, 34, 61
Operator library, 1
Operator window, 26, 28–30
Text field, 29–31, 34
Parallel HALCON, 5
Configuration, 56
Extension package, 60
Frame Grabber, 59
HALCON Spy, 60
Programming, 57
Switch off, 59
Troubleshooting, 68
Pattern matching, 2
PC, 29
Performance, 35
Platforms, 4
73
DIGITAL UNIX, 4
HP-UX, 4, 20
IRIX, 4
Linux, 4
Solaris, 4
Tru64 UNIX, 4
Windows 2000, 4
Windows NT, 4
Portable applications, 1
Program counter, 28, 29
Program creation, 26
Program window, 26, 28, 30
Quality control, 3
Raw segmentation, 36
Re-using code, 4
reduce domain, 47
Region, 48
Form, 48
Object, 48
Size, 48
Region of interest, 2, 31, 36, 47
Remote sensing, 3
Result visualization, 61
ROI, 2, 31, 47
Runlength encoding, 48
Session management, 26
Shape-based matching, 2
SHLIB PATH, 22, 24
Solaris, 4, 5, 23
Subpixel precision, 49
Surveillance tasks, 3
System suggestions
Alternatives, 61
Predecessors, 61
System requirements, 5
System suggestions, 61
Keywords, 61
References, 61
Successors, 61
Troubleshooting
HDevelop, 67
Installation, 62
Licensing, 66
Miscellaneous, 68
Parallel HALCON, 68
Uninstallation, 63
HALCON 6.0
74
Tru64 UNIX, 4, 23
Tuple, 2, 46
Tuple object, 2, 46
Uninstallation, 10, 17, 63
Troubleshooting, 63
UNIX, 1, 9, 12, 17, 19
User extensions, 19, 21
Variable window, 26, 28, 30, 31
Visual Basic, 1
Visualization
Images, 31
Regions, 33, 35
Windows 2000, 1, 4, 5, 8, 10, 14, 17
Windows NT, 1, 4, 5, 8, 10, 14, 17, 18, 22
XLD, 49
Getting Started with HALCON / 2000-11-16
Index
Index
75
HALCON 6.0