1
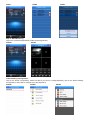
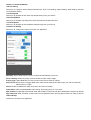
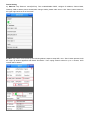
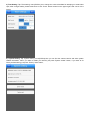
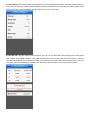
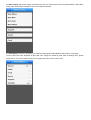
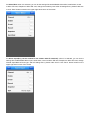
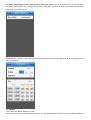
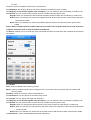
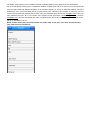
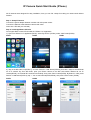
IP Camera Quick Start Guide (iPhone)
All IP cameras were designed for easy installation; here you can find 3 steps for making our camera work without
hassles
Step 1: Setup IP Camera
Connect the power adapter between camera and main power socket
Connect the Ethernet cable between camera and router
Insert micro SD card (not included)
Step 2: Install App&Scan QR Code
Go to Apple Store to search and install the “IPCam Live” application
1.) Open the “IPCam Live” application(PIC#1), select “By Device” (PIC#2), select “Add” button(PIC#3)
PIC#1
PIC#2
PIC#3
2.) Tap on the QR code icon(PIC#4-1), or Press “Search in LAN” button(PIC#4-2),there are 2 ways to access Serial
ID of IP camera: By Scan QR Code, point your iPhone camera to the QR code sticker attached at our IP
camera(PIC#5), once Serial ID is scanned successfully, then press “Save” button(PIC#6), By Search in LAN, press
Search in LAN button(PIC#4-2), tap “+” icon to add camera(PIC#8,PIC#9), then press “Save” button (PIC#6),
PIC#4
PIC#5
PIC#6
PIC#7
PIC#8
PIC#9
Step 3: Start Monitoring
Tap on the camera name(PIC#10) to start monitoring(PIC#11)
PIC#10
PIC#11
Camera Setting Configuration:
Tap on the “Home” icon(PIC#11), select the device you want to configure(PIC#12), tap on the “Device Setting”
menu(PIC#13), then start to configure your device(PIC#14)
PIC#12
PIC#13
PIC#14
IPCam Live Contents(PIC#13)
>Device Setting
Allows you to configure camera settings like Ethernet, Wi-Fi, Time Setting, System Setting, Video Setting, SD Card
Info and Alarm Setting
>Local Playback
Allows you to playback all the video clips stored directly from your iPhone
>Remote Playback
Allows you to playback remotely all the video clips stored into Micro SD card
>Local Snapshot
Allows you to playback all the snapshots stored directly from your iPhone
>IPCam Live Setting
Allows you to configure the setting of IPCam Live application
AutoPlay: When camera fail to connect, the app will automatically reconnect
Screen Setting: Select how many screens showed in main screen of App.
Priority Type: Select RealTime or Fluency when watch the live video of camera
Alear Sound: When there is a trigger alarm from video motion,video blind or alarm input, you will be notified by
alarm sound in 3 types
Audio: Enable or Disable the audio when watch live video of camera
Video Ratio: Used to enable/disable video scaling, like scaling down or not to scale
WiFi network: Enable app to be worked under WiFi network or Both 3G and WiFi network(WiFi nework only default)
App Password: When it enable, it need to have correct password when opening App to watch live video of camera
>About & Help
Introduction of IPCam Live application
Device Setting
1.) Ethernet: Tap “Ethernet” menu(PIC#14), Then enable/disable DHCP, configure IP address, Subnet Mask,
Gateway, DNS as below picture showed,after changes made, please make sure to click “Save” button located on
the upper right hand corner of the screen
2.) Wi-Fi: Tap “Wi-Fi” menu(PIC#14), then following below 5 steps to setup WiFi, once “ Save” button pressed, it will
be a pop up window appeared with“Saved Successful”. Then unplug ethernet cable for up to 1 minutes, Wi-Fi
network will be started
3.)Time Setting: Tap “Time setting” menu(PIC#14), then change the correct time/date for stamping on actual video
clips, after changes made, please make sure to click “Save” button located on the upper right hand corner of the
screen
4.) System Setting: Tap “System setting” menu(PIC#14),then you can find the camera version and other system
related information, also if you want to restart you camera, just press “System restart” button, if you want to do
factory default setting, just press “Factory reset” button,
5.) Video Setting: Tap “Video setting” menu(PIC#14), then change Main/Extra stream, Video Recording Resolution
and Frame Per Seconds, Video Recording Quality, Bitrate Type, BitRate here, after changes made, please make
sure to click “Save” button located on the upper right hand corner of the screen
6.) SD card info: Tap “SD card info” menu(PIC#14), then,you can find Micro SD Card information from camera like
total capacity, and available capacity, if you want to format sd card, just press “Format SD Card” button, a pop up
message widow appear with “Proceed to format?”, just click “OK” to proceed. There are two options when micro sd
card is full, one is Overwrite(Factory Default), the other one is Stop recording, so you can do what you like.
7.) Alarm setting: Tap “Alarm setting” menu(PIC#14), then you will find seven sub-menu(Video Motion, Video Blind,
Alarm Input, Alarm output, Snapshot, Record, E-mail) from this part.
7.1 Video Motion: when it is selected, you can do the settings like enable/disable video motion, email alarm,
record to Micro SD card, Snapshot to Micro SD card, change the sensitivity level. after all settings done, please
make sure to click “Save” button located on the upper right hand corner of the screen
7.2 Video Blind: when it is selected, you can do the settings like enable/disable video blind, email alarm, record
to Micro SD card, Snapshot to Micro SD card, change the sensitivity level. after all settings done, please make sure
to click “Save” button located on the upper right hand corner of the screen
7.3 Alarm input(Only can be worked for the camera with I/O terminal!): when it is selected, you can do the
settings like enable/disable alarm input, email alarm, record to Micro SD card, Snapshot to Micro SD card, change
Normal Open/Normal Close type. after all settings done, please make sure to click “Save” button located on the
upper right hand corner of the screen
7.4 Alarm output(Only can be worked together with Alarm input!): when it is selected, you can change alarm
modes(Off, Configuration, On), after all settings done, please make sure to click “Save” button located on the upper
right hand corner of the screen
7.5 Snapshot: it allows you to snapshot all the pictures stored into Micro SD card when all the settings done and
save successfully.
7.5.1 Enable
None: means to disable snapshot function
Manul: means to enable manual snapshot function, the camera will snapshot pictures and save to Micro SD directly
by itself
Schedule: means to snapshot the pictures in specified time
7.5.2 Snapshot: the qantity of pictures you need to take when snapshot function is enable
7.5.3 Day(Ony can be worked together with “Schedule”): you can select the day from Monday to Sunday or All
7.5.4 Period: You can choose 00::00 to 24:00 hours for schedule recording time if need
Regular: When it is selected,the camera will self snapshot pictures to Micro SD card directly in certain time
Detect: When it is selected, the camera will snapshot pictures to Micro SD card when video motion and video
blind function enable
Alarm: When it is selected, the camera will snapshot pictures to Micro SD card when alarm input function
enable
Notice: Before snapshot pictures to Micro SD card, you need to have snapshot disk first.for how to partition
snapshot disk,please refer to detail IP Camera User Manual!
7.6 Record: it allows you to record all the video clips stored into Micro SD card when all the settings done and save
successfully.
7.6.1 Enable
None: means to disable video recording function
Manul: means to enable manual video recording function, the camera will record videos and save to Micro SD
directly by itself
Schedule: means to record the videos in specified time
7.6.2 PreRecord: you can specify the seconds of Pre-record
7.6.3 Length: You can specify the length per video files
7.6.4 Day(Ony can be worked together with “Schedule”): you can select the day from Monday to Sunday or All
7.6.5 Period: You can choose 00::00 to 24:00 hours for schedule recording time if need
Regular: When it is selected,the camera will self record video to Micro SD card directly in certain time
Detect: When it is selected, the camera will record video to Micro SD card when video motion and video blind
function enable
Alarm: When it is selected, the camera will record video to Micro SD card when alarm input function enable
7.7 Email Email - used to enable/disable email alert notifications
The EMAIL service allows you to enable (checked) or disable (default, unchecked) email alert notifications.
Tap on E-mail button to bring up the configuration window as listed below. When an event occurs, the system will
send you alert email with attached snapshot of the camera’s images. To set up an email alert feature; check the
Enable box, put in your email SMTP server (ie. smtp.1and1.com), mail server port number (ie. 465, 25), check or
uncheck if the mail server requires SSL security, input your mail user name account(I.E [email protected]), input your
mail password account, fill in the sender and recipient email account(I.E sender:[email protected], receiver:
[email protected]), and give it a familiar title name or subject (where this email is coming from). Click Save to confirm
set up or click Back to cancel
NOTE: Please check with your email provider for proper smtp server, port, user name and password of
your email account informations.