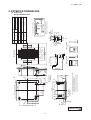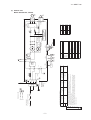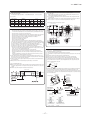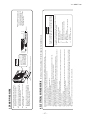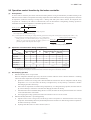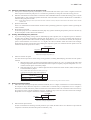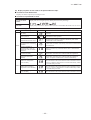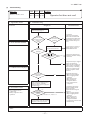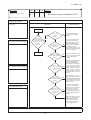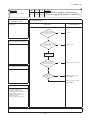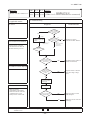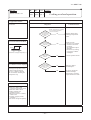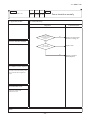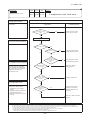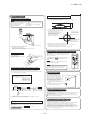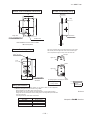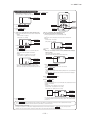
1
.BOVBM/Pht43,5 TECHNICAL MANUAL INVERTER RESIDENTIAL AIR CONDITIONERS (Split system, air to air heat pump type) Ceiling cassette-4way compact type '%5$7' '%5$7' '12 • SRK-T-126 CONTENTS 1. SPECIFICATIONS ........................................................................................ 2. EXTERIOR DIMENSIONS ......................................................................... (1) Indoor units .......................................................................................... 3. 4. 5. 6. 3 5 5 (2) Outdoor units ....................................................................................... 6 (3) Wired remote controller ................................................................................ 7 ELECTRICAL WIRING .............................................................................. 8 (1) Indoor units .......................................................................................... 8 (2) Outdoor units ....................................................................................... 9 NOISE LEVEL ............................................................................................ 10 PIPING SYSTEM ...................................................................................... 12 RANGE OF USAGE & LIMITATIONS ..................................................... 13 7. CAPACITY TABLES ................................................................................... 8. APPLICATION DATA .................................................................................. 8.1 Installation of indoor unit ..................................................................... 8.2 Installation of outdoor unit ................................................................... 15 16 9. OUTLINE OF OPERATION CONTROL BY MICROCOMPUTER .............. 9.1 Wired remote controller (option parts) ................................................ 9.2 Operation control function by the wired remote controller ............... 9.3 Operation control function by the indoor controller ........................ 9.4 Operation control function by the outdoor controller ....................... 29 29 30 31 40 10. MAINTENANCE DATA ............................................................................. ............................................ 10.1 Diagnosing of microcomputer circuit (1) Selfdiagnosis function .......................................................................... (2) Troubleshooting procedure ................................................................. 46 46 46 49 ..................................................... Troubleshooting at the indoor unit Check of anomalous operation data with the remote controller .......... Inverter checker for diagnosis of inverter output ................................ Outdoor unit controller failure diagnosis circuit diagram ..................... 49 (3) (4) (5) (6) - 1- 16 22 53 54 55 '12 • SRK-T-126 10.2 Troubleshooting flow .......................................................................... ,ISTOFTROUBLES ...................................................................................... 4ROUBLESHOOTING .................................................................................... 11. OPTION PARTS ....................................................................................... 56 56 57 95 11.1 Instullation of wired remote controller (RC-E5) ............................... 95 11.2 Wireles kit (RCN-TC-24W-ER) ............................................................101 11.3 Simple wired remote controoller (RCH-E3) ......................................105 عHow to read the model name Example: Indoor unit FDTC 25 VF Series code Product capacity Model name 䈀Ceiling cassette-4way compact type䈁 Outdoor unit SRC 25 Z JX-S Series code Inveter type Product capacity Model name 䈀Outdoor unit䈁 - 2- '12 • SRK-T-126 1. SPECIFICATIONS Adapted to RoHS directive FDTC25VF Model Indoor unit FDTC25VF Item Outdoor unit SRC25ZJX-S Panel TC-PSA-25W-E Power source 220/230/240V~50Hz Operation data Nominal capacity kW Power consumption Cooling Heating 2.55 [ 0.9 (Min.)~3.2 (Max.)] 3.45 [ 0.9 (Min.)~4.7 (Max.)] kW 0.6 0.84 Running current A 3.0/2.9/2.8 4.1/4.0/3.8 Power factor % 91 Inrush current A 92 4.1 Sound Pressure Level dB(A) Cooling P-Hi : 38 Hi : 36 Me : 32 Lo : 29 Heating P-Hi : 39 Hi : 38 Me : 33 Lo : 29.5 47 Exterior dimensions Height x Width x Depth mm Unit 248 × 570 × 570 Panel 35 × 700 × 700 595 x 780 x 290 Plaster White ( 6.8Y8.9/0.2 ) near equivalent Stucco White ( 4.2Y7.5/1.1 ) near equivalent UNIT 15 PANEL 3.5 38 — RM-B5077MDE1 (Rotary type) x 1 Exterior appearance (Munsell color) Net weight kg Refrigerant equipment Compressor type & Q'ty Starting method — Direct line start Refrigerant oil — 0.35 (DIAMOND FREEZE MA68) Louver fin & inner grooved tubing M shape fin & inner grooved tubing — Electronic expansion valve Turbo fan × 1 Propeller fan × 1 W 33 <Direct line start> 24 <Direct line start> CMM Cooling P-Hi : 10 Hi : 9 Me : 8 Lo : 6.5 Heating P-Hi : 10.5 Hi : 9.5 Me : 8.5 Lo : 7 Cooling 29.5 Heating 27.0 Heat exchanger Refrigerant control Air handling equipment Fan type & Q'ty Motor <Starting method> Air flow (Standard) Available static pressure Pa Outdoor air intake Air filter, Q'ty — Rubber sleeve (for fan motor) Rubber sleeve (for Compressor) Insulation (noise & heat) W Remote controller Polyurethane form — — — wired : RC-E5, RC-EX1A (option) wireless : RCN-TC-24W-ER (option) Room temperature control Safety equipment Installation data Refrigerant piping size — — Pocket plastic net × 1 (Washable) Shock & vibration absorber Electric heater 0 Not possible Thermostat by electronics — Overload protection for fan motor Frost protection thermostat Internal thermostat for fan motor Abnormal discharge temperature protection. Liquid line : I/U φ6.35 (1/4") Pipe φ6.35 (1/4") × 0.8 O/U φ6.35 (1/4") Gas line : φ9.52 (3/8") φ9.52 (3/8") × 0.8 φ9.52 (3/8") Flare piping Flare piping mm Connecting method Refrigerant line (one way) length Max. 15m Vertical height difference between outdoor unit and indoor unit Max. 10m (Outdoor unit is higher) Max. 10m (Outdoor unit is lower) Refrigerant Quantity R410A 1.2kg in outdoor unit (incl. the amount for the piping of : 15m) Drain pump Drain Built-in Drain pump — Hose Connectable with VP20 — Insulation for piping Necessary (Both liquid & Gas lines) Standard Accessories Mounting kit, Drain hose Drain elbow, Drain hole grommet Notes (1) The data are measured at the following conditions when the air flow is high mode. Item Indoor air temperature Outdoor air temperature Operation DB WB DB WB Cooling 27˚C 19˚C 35˚C 24˚C 7˚C 6˚C Heating 20˚C (2) This packaged air-conditioner is manufactured and tested in conformity with the ISO. (3) Sound pressure level indicates the value in an anechoic chamber. During operation these value are somewhat higher due to ambient temperature. (4) The operation data indicates when the air-conditioner is operated at 220/230/240V 50Hz. (5) When wireless remote controller is used, fan is 3 speed setting (Hi-Me-Lo) only. RWA000Z234 B - 3- '12 • SRK-T-126 Adapted to RoHS directive FDTC35VF Model Indoor unit FDTC35VF Item Outdoor unit SRC35ZJX-S Panel TC-PSA-25W-E Power source 220/230/240V~50Hz Operation data Nominal capacity kW Power consumption Cooling Heating 3.6 [ 0.9 (Min.)~4.1 (Max.)] 4.25 [ 0.9 (Min.)~5.1 (Max.)] kW 1.07 1.16 Running current A 4.9/4.7/4.5 5.3/5.1/4.9 Power factor % 99 Inrush current A 99 5.3 Sound Pressure Level dB(A) Cooling P-Hi : 41 Hi : 40 Me : 36 Lo : 30 Heating P-Hi : 43 Hi : 42 Me : 35 Lo : 32 50 Exterior dimensions Height x Width x Depth mm Unit 248 × 570 × 570 Panel 35 × 700 × 700 595 x 780 x 290 Plaster White ( 6.8Y8.9/0.2 ) near equivalent Stucco White ( 4.2Y7.5/1.1 ) near equivalent UNIT 15 PANEL 3.5 38 — RM-B5077MDE1 (Rotary type) x 1 Exterior appearance ( Munsell color ) Net weight kg Refrigerant equipment Compressor type & Q'ty Starting method — Direct line start Refrigerant oil — 0.35 (DIAMOND FREEZE MA68) Louver fin & inner grooved tubing M shape fin & inner grooved tubing — Electronic expansion valve Turbo fan × 1 Propeller fan × 1 W 33 <Direct line start> 24 <Direct line start> CMM Cooling P-Hi : 11 Hi : 9.5 Me : 9 Lo : 7 Heating P-Hi : 11.5 Hi : 10.0 Me : 9 Lo : 8 Cooling 32.5 Heating 29.5 0 — Not possible — Heat exchanger Refrigerant control Air handling equipment Fan type & Q'ty Motor <Starting method> Air flow (Standard) Available static pressure Pa Outdoor air intake Air filter, Q'ty Pocket plastic net × 1 (Washable) — Rubber sleeve (for fan motor) Rubber sleeve (for Compressor) Shock & vibration absorber Insulation (noise & heat) Electric heater W Remote controller — — — wired : RC-E5, RC-EX1A (option) wireless : RCN-TC-24W-ER (option) Room temperature control Safety equipment Installation data Refrigerant piping size Polyurethane form Thermostat by electronics — Overload protection for fan motor Frost protection thermostat Internal thermostat for fan motor Abnormal discharge temperature protection. Liquid line : I/U φ6.35 (1/4") Pipe φ6.35 (1/4") × 0.8 O/U φ6.35 (1/4") Gas line : φ9.52 (3/8") φ9.52 (3/8") × 0.8 φ9.52 (3/8") Flare piping Flare piping mm Connecting method Refrigerant line (one way) length Max. 15m Vertical height difference between outdoor unit and indoor unit Max. 10m (Outdoor unit is higher) Max. 10m (Outdoor unit is lower) Refrigerant Quantity R410A 1.2kg in outdoor unit (incl. the amount for the piping of : 15m) Drain pump Drain Built-in Drain pump — Hose Connectable with VP20 — Insulation for piping Necessary (Both liquid & Gas lines) Standard Accessories Mounting kit, Drain hose Drain elbow, Drain hole grommet Notes (1) The data are measured at the following conditions when the air flow is high mode. Item Indoor air temperature Outdoor air temperature Operation DB WB DB WB Cooling 27˚C 19˚C 35˚C 24˚C 7˚C 6˚C Heating 20˚C (2) This packaged air-conditioner is manufactured and tested in conformity with the ISO. (3) Sound pressure level indicates the value in an anechoic chamber. During operation these value are somewhat higher due to ambient temperature. (4) The operation data indicates when the air-conditioner is operated at 220/230/240V 50Hz. (5) When wireless remote controller is used, fan is 3 speed setting (Hi-Me-Lo) only. RWA000Z234 B - 4- G A B □570 325 192 132 223 C F Drain hose piece ( Accessory ) ( Installed on site) Control box G G D 35 21 200 Notes(1)The model name label is attached on the control box lid. (2)Prepare the connecting socket(VP20)on site. (3)This unit is designed for 2x2 grid ceiling. If it is installed on a ceiling other than 2x2 grid ceiling, provide an inspection port on the control box side. Hanger plate for suspension bolt 145 185 190 88 530 ( Suspension bolts pitch) 350 326 or more 45 556 67 210 248 35 548 口120 ( Option ) Remote controller 295 ∼325 19 口413 口700 Air supply 100 88 □120 (Option) 19 Air outlet opening for ducting G G 100 Hole 140 60 Liquid piping Drain piping Hole for wiring Suspension bolts B C D F (Knock out) Content 25,35 : ф 9.52 (3/8") (Flare) 40-60 : ф 12.7 (1/2") (Flare) ф 6.35(1/4") (Flare) VP20(I.D.20,O.D.26)Note(2) ф 25 (M10 or M8) Model Holes for tapping screws 6-Ø4 Make a space of 4000 or more between the units when installing more than one. Obstacle 1000 or more Space for installation and service Gas piping A Symbol Remote controller Air return grille Decorative panel 140 - 600 or less ( Max. Drain lift ) 1000 or more 530( Suspension bolts pitch ) '12 • SRK-T-126 2. EXTERIOR DIMENSIONS (1) Indoor units Models FDTC25VF, 35VF PJA003Z338 C 290 595 111.6 390.6 390.6 D 780 510 E 12 50.6 D E A B C 158.4 Content Service valve connection㧔gas side㧕 Service valve connection㧔liquid side㧕 Pipe㧛cable draw-out hole Drain discharge hole Anchor bolt hole 24.3 312.5 61.9 17.9 14.8 63.4 69.4 15.8 642.5 - B 138.4 33.5 A C Terminal block M10 × 4places Ǿ20 × 2places Ǿ9.52㧔3㧛8"㧕㧔Flare㧕 Ǿ6.35㧔1㧛4"㧕㧔Flare㧕 40° 97.7 351.6 Symbol L1 L2 L3 L4 Dimensions Outlet Intake L1 L3 Open 100 100 250 㧵 280 75 80 Open 㧵 㧵 Minimum installation space Examples of installation Intake L2 280 Open 80 250 㧵 㧵 㧵 ( L4 Service space ) Unit:mm 80 Open 180 Open 㧵㨂 Notes 㧔1㧕 It must not be surrounded by walls on the four sides. 㧔2㧕 The unit must be fixed with anchor bolts. An anchor bolt must not protrude more the 15mm. 㧔3㧕 Where the unit is subject to strong winds, lay it in such a direction that the blower outlet faces perpendicularly to the dominant wind direction. 㧔4㧕 Leave 1m or more space above the unit. 㧔5㧕 A wall in front of the blower outlet must not exceed the units height. 㧔6㧕 The model name label is attached on the lower right corner of the front panel. '12 • SRK-T-126 (2) Outdoor units Models SRC25ZJX-S, 35ZJX-S 40° RCV000Z007 A '12 • SRK-T-126 (3) Wired remote controller (option parts) Model : RC-E5 PJZ000Z295 - 7- - 8TB1 1 2 3 Y/GN WH 1 3 Y 2 Y 1 5 6 7 6 4 3 6 4 3 FMI M RD BL BR OR WH 5 RD BL BR OR WH 5 RD BL BR OR WH 1 4 F202 (1.0A) X4 WH BR M DM 1∼ BL CNR2 WH CNR F203 (0.16A) 1 F201(3.15A) BL CNW0 3 Power PCB t° Power circuit ThC X Y 2 2 WH CNM4 RD RD BL CNW1 CNM3 WH CNM BK WH CNW2 X Y TB2 M LM4 M LM3 M LM2 M LM1 5 4 1 2 3 2 3 4 5 1 1 2 3 4 5 1 2 3 4 5 1 2 3 4 5 1 2 3 4 5 Indication lamp(Red-Inspection) Louver motor Remote controller communication address Plural units Master/Slave setting Model capacity setting Operation check,Drain motor test run Remote controller Y/GN F200(3.15A) 5 7 Y/GN WH RD Y/GN Y/GN Y/GN SW5 SW6 SW7-1 LED・3 LM1∼4 SW2 Notes 1. indicates wiring on site. 2. TB1 is the terminal block for heavy current(connecting line between indoor unit and outdoor unit), and TB2 is the terminal block for weak current(remote controller). 3. See the wiring diagram of outside unit about the line between inside unit and outside unit. 4. Use twin core cable(0.3mm 2 X2)at remote controller line. See spec sheet of remote controller in case that the total length is more than 100m. 5. Do not put remote controller line alongside power source line. [ Power source line 1 2 3 Signal line Earth ] Connector Drain motor Fuse Fan motor Float switch Indication lamp (Green-Normal operation) Connecting line between indoor unit and outdoor unit CNB∼Z DM F200∼203 FM I FS LED・2 1 2 3 4 5 6 7 8 9 10 11 12 13 14 15 16 17 18 19 20 WH CNJ2 BK BK BK BK BK BK BK BK BK BK BK BK BK BK BK BK BK BK BK BK BL BL BL BL BL RD RD RD RD RD BK BK BK BK BK BK BK BK BK BK BK BK BK BK BK BK BK BK BK BK RD CNW3 WH CNB 1 2 3 4 5 6 7 8 9 10 CNJ 11 WH 12 13 14 15 16 17 18 19 20 1 CNW4 3 BL 4 5 2 2 3 4 5 1 3 1 TB2 Thc ThI-A ThI-R1,2,3 X4 ■ mark TB1 LED・2 SW7 SW6 SW5 SW2 LED・3 Control PCB 1 3 6 5 4 +12 1 2 CNT 3 BL 4 5 6 Y CNN 2 1 BK 2 CNH 1 BL 2 CNI XR3 XR1 Option BK BK Y Y RD RD BL BL WH WH XR4 6 5 4 3 2 1 2 1 2 1 BK CNN2 BK BK BK BK BK BK WH CNH2 BK BK WH CNI2 RD RD (Operation) (Heating) (Compressor ON) (Inspection) WH CNC XR2 10 9 8 7 6 5 4 3 2 1 t° t° t° t° FS ThI-R3 ThI-R2 ThI-R1 ThI-A Color Marks Mark Color BK Black BL Blue BR Brown OR Orange RD Red WH White Y Yellow Y/GN Yellow/Green XR5(Remote operation input:volt-free contact) BK BK Y Y RD RD BL BL WH WH Terminal block(Power source) (□ mark) Terminal block(Signal line) (□mark) Thermistor(Remote controller) Thermistor(Return air) Thermistor(Heat exchanger) Relay for DM Closed-end connector '12 • SRK-T-126 3. ELECTRICAL WIRING (1) Indoor units Models FDTC25VF, 35VF PJA003Z340 C SIGNAL WIRE POWER WIRES ] - 9- 8 MAX running current 㧔A㧕 1 2 N 2.0 Power cable size 㧔mm 2 㧕 3 32 Power cable length 㧔m㧕 TERMINAL BLOCK T 2 N 3 1 L 1.5mm2 x 3 indoor-outdoor wire size x number 㧔Y㧛G㧕 250V 15A The specifications shown in the above table are for units without heaters. For units with heaters, refer to the installation instructions or the construction instructions of the indoor unit. Switchgear of Circuit breaker capacity which is calculated from MAX. over current should be chosen along the regulations in each country. The cable specifications are based on the assumption that a metal or plastic conduit is used with no more than three cables contained in a conduit and a voltage drop is 2%. For an installation falling outside of these conditions, please follow the internal cabling regulations. Adapt it to the regulation in effect in each country. 35 25 Model Power cable, indoor-outdoor connecting wires POWER SOURCE 㨪220㨺240V 50Hz㧛㨪220V 60Hz [ 1.5mm2 Earth wire size 㧔Y㧛G㧕 G1 㧔RD㧕 C-2 NOISE FILTER 20S CN20S 㧔WH㧕 S.IN 㧔BK㧕 R.IN L 㧔Y㧕 CNTH tࠑ F1 250V 20A F2 Terminal block Heat exchanger sensor㧔outdoor unit㧕 Outdoor air temp.sensor Discharge pipe temp.sensor Solenoid valve for 4 way valve TH2 TH3 20S Reactor L TH1 Fan motor FMo T Electric expansion valve㧔coil㧕 EEV Red White Yellow Yellow㧛Green WH Y Y㧛G OR Connector CN20S CNTH CNEEV CNFAN RD Black Orange BK Color F3 250V 1A N P 㧔WH㧕 W 㧔BK㧕 V U 㧔RD㧕 CNFAN W V U POWER TRANSISTOR PWB ASSY Compressor motor Mark SWITCHING POWER CIRCUIT PAM CIRCUIT 5 or 6 wires Description M EEV CNEEV 250V 10A F4 + + 250V 2A CM Item TH1 TH2 TH3 tࠑ tࠑ tࠑ T1 T2 㧔OR㧕 TO INDOOR UNIT M FMo M CM 3㨪 '12 • SRK-T-126 (2) Outdoor units Models SRC25ZJX-S, 35ZJX-S RWC000Z227 B '12 • SRK-T-126 4. NOISE LEVEL Model FDTC25VF Condition ISO-T1,JIS C9612 (Indoor Unit) Model FDTC25VF Cooling 38 dB(A) Noise Level Heating 39 dB(A) × ...... Cooling, Heating 70 70 N70 60 60 Sound Pressure Level (dB) (standard 2×10- 5 Pa ) N60 50 50 N50 40 40 N40 30 30 N30 20 20 N20 10 63 125 250 500 1000 2000 4000 10 8000 Mid Octave Band frequency (Hz) (Outdoor Unit) Model SRC25ZJX-S Cooling 47 dB(A) Noise Level Heating 47 dB(A) × ...... Cooling, Heating 70 70 N70 60 60 Sound Pressure Level (dB) (standard 2×10⁻⁵ P a ) N60 50 50 N50 40 40 N40 30 30 N30 20 20 N20 10 63 125 250 500 1000 Mid Octave Band frequency (Hz) - 10 - 2000 4000 10 8000 '12 • SRK-T-126 Model FDTC35VF Condition ISO-T1,JIS C9612 (Indoor Unit) Model FDTC35VF Cooling 41 dB(A) Noise Level Heating 43 dB(A) × ...... Cooling, Heating 70 70 N70 60 60 Sound Pressure Level (dB) (standard 2×10- 5 Pa ) N60 50 50 N50 40 40 N40 30 30 N30 20 20 N20 10 63 125 250 500 1000 2000 10 8000 4000 Mid Octave Band frequency (Hz) (Outdoor Unit) Model SRC35ZJX-S Cooling 50 dB(A) Noise Level Heating 50 dB(A) × ...... Cooling, Heating 70 70 N70 60 60 Sound Pressure Level (dB) (standard 2×10⁻⁵ Pa ) N60 50 50 N50 40 40 N40 30 30 N30 20 20 N20 10 63 125 250 500 1000 Mid Octave Band frequency (Hz) - 11 - 2000 4000 10 8000 '12 • SRK-T-126 5. PIPING SYSTEM Models FDTC25VF, 35VF Cooling cycle Indoor unit Room temp. sensor (Th1) Flare connection Heat exchanger sensor (Th22) Gas pipie (Ǿ9.52) Heating cycle Outdoor unit Service valve (Gas) Discharge pipe temp. sensor (TH3) Check joint 4way valve Muffler Muffler Accumlator Heat exchanger Heat exchanger Heat exchanger sensor (Th21) Outdoor air temp. sensor (TH2) Compressor Heat exchanger sensor (TH1) Liquid pipe (Ǿ6.35) Flare connection Capillary tube Electronic expansion valve (EEV) Capillary tube Service valve (Liquid) Strainer Muffler - 12 - '12 • SRK-T-126 6. RANGE OF USAGE & LIMITATIONS Models Item FDTC25, 35VF Indoor return air temperature (Upper, lower limits) Cooling operation : Approximately 18 to 32㷄 D.B. Heating operation : Approximately 10 to 27㷄 D.B. Outdoor air temperature (Upper, lower limits) Cooling operation : Approximately -15 to 46㷄 D.B. Heating operation : Approximately -15 to 21㷄 D.B. Refrigerant line (one way) length Max. 15m Vertical height difference between outdoor unit and indoor unit Max. 10m (Outdoor unit is higher) Max. 10m (Outdoor unit is lower) Power source voltage Rating 㫧10% Voltage at starting Min. 85% of rating Max. 4 times/h (Inching prevention 10 minutes) Frequency of ON-OFF cycle ON and OFF interval Min. 3 minutes Selection chart Correct the cooling and heating capacity in accordance with the conditions as follows. The net cooling and heating capacity can be obtained in the following way. Net capacity = Capacity shown on specication Correction factors as follows. (1) Coefcient of cooling and heating capacity in relation to temperatures Coefficient of cooling & Heating capacity in relation to temperature 1.3 1.2 Cooling 1.1 1.0 Heating 0.9 0.8 0.7 0.6 Cooling operation Outdoor air D.B. temperature °C D. B. Applicable range 46 40 35 30 25 20 26 24 Heating operation Indoor air D.B. temperature °C D. B. 0 -5 -10 -15 Depends on installed situation 14 16 18 20 22 Indoor air W.B. temperature °C W.B. ISO-T1 Standard Condition 27 25 20 15 10 -15 -10 -5 0 10 15 ISO-T1 Standard Condition Outdoor air W.B. temperature °C W.B. - 13 - 5 '12 • SRK-T-126 (2) Correction of cooling and heating capacity in relation to one way length of refrigerant piping Piping length [m] 7 10 15 20 25 30 Cooling 1.0 0.99 0.975 0.965 0.95 0.935 Heating 1.0 1.0 1.0 1.0 1.0 1.0 (3) Correction relative to frosting on outdoor heat exchanger during heating Air inlet temperature of outdoor unit in °CWB -15 -10 -9 -7 -5 -3 -1 1 3 5 or more Adjustment coefficient 0.95 0.95 0.94 0.93 0.91 0.88 0.86 0.87 0.92 1.00 = 3510 How to obtain the cooling and heating capacity The net cooling capacity of the model FDTC35VF with 3600 FDTC35VF - 14 - '12 • SRK-T-126 7. CAPACITY TABLES Model FDTC25VF Cool Mode Heat Mode Indoor air temp Air flow Hi 9.0 3 (m /min) Outdoor air temp. 21˚CDB 23˚CDB 26˚CDB 27˚CDB 28˚CDB 31˚CDB 33˚CDB 14˚CWB 16˚CWB 18˚CWB 19˚CWB 20˚CWB 22˚CWB 24˚CWB Air flow indoor air temp outdoor air temp. 20˚CDB 22˚CDB 24˚CDB TC SHC TC SHC TC SHC TC SHC TC SHC TC SHC TC SHC -15˚CWB 2.12 2.08 2.03 1.99 1.94 10 2.87 2.46 3.01 2.42 3.12 2.54 3.17 2.51 3.23 2.48 3.32 2.58 3.41 2.51 -10˚CWB 2.40 2.36 2.33 2.27 2.22 12 2.82 2.44 2.96 2.40 3.07 2.52 3.13 2.49 3.19 2.46 3.28 2.56 3.38 2.50 -5˚CWB 2.60 2.56 2.51 2.48 2.44 14 2.77 2.41 2.90 2.38 3.03 2.50 3.09 2.47 3.14 2.45 3.25 2.55 3.34 2.49 0˚CWB 2.73 2.69 2.64 2.61 2.57 16 2.71 2.39 2.85 2.35 2.98 2.48 3.04 2.46 3.10 2.43 3.21 2.54 3.31 2.48 5˚CWB 3.47 3.43 3.42 3.35 3.30 18 2.66 2.36 2.80 2.33 2.93 2.46 3.00 2.43 3.05 2.41 3.17 2.52 3.27 2.46 6˚CWB 3.53 3.49 3.45 3.41 3.36 20 2.60 2.33 2.74 2.30 2.88 2.44 2.95 2.42 3.01 2.39 3.13 2.51 3.23 2.45 10˚CWB 3.75 3.72 3.69 3.64 3.61 22 2.54 2.30 2.68 2.27 2.83 2.42 2.90 2.40 2.96 2.37 3.08 2.49 3.19 2.44 15˚CWB 4.08 4.05 4.02 3.97 3.94 24 2.48 2.27 2.62 2.25 2.78 2.40 2.85 2.38 2.91 2.36 3.04 2.48 3.15 2.43 20˚CWB 4.39 4.35 4.33 4.28 4.25 26 2.42 2.25 2.56 2.22 2.72 2.37 2.80 2.36 2.86 2.34 2.99 2.46 3.10 2.41 28 2.35 2.22 2.49 2.20 2.67 2.35 2.75 2.34 2.81 2.32 2.95 2.45 3.06 2.40 30 2.29 2.17 2.43 2.17 2.61 2.33 2.69 2.32 2.75 2.30 2.90 2.43 3.01 2.39 32 2.22 2.10 2.36 2.14 2.55 2.31 2.64 2.30 2.70 2.28 2.85 2.42 2.96 2.36 34 2.15 2.04 2.29 2.11 2.49 2.28 2.58 2.28 2.64 2.26 2.79 2.39 2.91 2.35 35 2.12 2.01 2.26 2.10 2.46 2.27 2.55 2.27 2.61 2.25 2.77 2.39 2.89 2.34 36 2.08 1.97 2.22 2.08 2.43 2.25 2.52 2.25 2.58 2.24 2.74 2.38 2.86 2.33 38 2.01 1.91 2.15 2.04 2.36 2.23 2.46 2.23 2.52 2.21 2.69 2.36 2.81 2.32 39 1.97 1.87 2.11 2.00 2.33 2.21 2.43 2.22 2.49 2.20 2.66 2.35 2.78 2.31 Model FDTC35VF Hi 9.5 (m3/min) Cool Mode 16˚CDB 18˚CDB Heat Mode Indoor air temp Air flow Hi 9.5 3 (m /min) Outdoor air temp. 21˚CDB 23˚CDB 26˚CDB 27˚CDB 28˚CDB 31˚CDB 33˚CDB Air flow indoor air temp outdoor air temp. 16˚CDB 18˚CDB 20˚CDB 22˚CDB 24˚CDB TC SHC TC SHC TC SHC TC SHC TC SHC TC SHC TC SHC -15˚CWB 2.61 2.56 2.50 2.45 2.39 10 4.06 3.08 4.25 3.02 4.40 3.12 4.48 3.08 4.55 3.04 4.69 3.11 4.81 3.01 -10˚CWB 2.96 2.91 2.87 2.79 2.74 12 3.98 3.04 4.17 2.99 4.34 3.09 4.42 3.05 4.50 3.01 4.64 3.09 4.77 3.00 -5˚CWB 3.20 3.16 3.09 3.06 3.01 14 3.91 3.00 4.10 2.95 4.28 3.06 4.36 3.02 4.44 2.98 4.58 3.07 4.72 2.98 0˚CWB 3.36 3.31 3.25 3.21 3.17 16 3.83 2.96 4.02 2.92 4.21 3.03 4.29 2.99 4.38 2.95 4.53 3.05 4.67 2.96 5˚CWB 4.28 4.23 4.21 4.12 4.07 18 3.75 2.92 3.95 2.88 4.14 3.00 4.23 2.96 4.31 2.93 4.47 3.03 4.61 2.94 6˚CWB 4.35 4.30 4.25 4.20 4.15 20 3.67 2.88 3.87 2.84 4.07 2.97 4.16 2.94 4.25 2.90 4.41 3.01 4.56 2.91 10˚CWB 4.62 4.58 4.55 4.49 4.44 22 3.59 2.83 3.78 2.80 4.00 2.93 4.10 2.91 4.18 2.88 4.35 2.98 4.50 2.89 15˚CWB 5.03 4.99 4.95 4.90 4.85 24 3.50 2.79 3.70 2.76 3.92 2.90 4.02 2.88 4.11 2.85 4.29 2.95 4.44 2.87 20˚CWB 5.41 5.36 5.34 5.28 5.23 26 3.41 2.75 3.61 2.72 3.84 2.87 3.95 2.85 4.04 2.82 4.23 2.92 4.38 2.85 28 3.32 2.70 3.52 2.68 3.76 2.83 3.88 2.82 3.96 2.79 4.16 2.90 4.32 2.83 30 3.23 2.65 3.43 2.63 3.68 2.80 3.80 2.79 3.89 2.76 4.09 2.88 4.25 2.81 32 3.14 2.61 3.33 2.59 3.60 2.76 3.72 2.75 3.81 2.73 4.02 2.85 4.18 2.79 34 3.04 2.56 3.23 2.54 3.51 2.73 3.64 2.72 3.73 2.70 3.94 2.83 4.11 2.77 35 2.99 2.54 3.18 2.52 3.47 2.70 3.60 2.71 3.68 2.68 3.91 2.81 4.07 2.75 36 2.94 2.52 3.13 2.50 3.42 2.69 3.56 2.68 3.64 2.66 3.87 2.80 4.04 2.74 38 2.84 2.46 3.03 2.46 3.33 2.65 3.47 2.65 3.56 2.63 3.79 2.77 3.96 2.72 39 2.79 2.44 2.98 2.43 3.29 2.63 3.43 2.63 3.51 2.61 3.75 2.76 3.92 2.70 14˚CWB 16˚CWB 18˚CWB 19˚CWB 20˚CWB 22˚CWB 24˚CWB Hi 10.0 (m3/min) ISC10008 A - 15 - '12 • SRK-T-126 8. APPLICATION DATA 8.1 Installation of indoor unit 22 - 16 - '12 • SRK-T-126 ① Before installation ③ Preparation before installation c Accessory items Accessory itme Ceiling opening, Suspension bolts pitch, Pipe position 530 (Suspension bolts pitch) F F ② Selection of installation location for the indoor unit M Select the suitable areas to install the unit under approval of the user. xAreas where the indoor unit can deliver hot and cold wind sufficiently. Suggest to the user to use a circulator if the ceiling height is over 3m to avoid warm air being accumulated on the ceiling. xAreas where there is enough space to install and service. xAreas where it can be drained properly. Areas where drain pipe descending slope can be taken. xAreas where there is no obstruction of airflow on both air return grille and air supply port. xAreas where fire alarm will not be accidentally activated by the air conditioner. xAreas where the supply air does not short-circuit. xAreas where it is not influenced by draft air. xAreas not exposed to direct sunlight. xAreas where dew point is lower than around 28°C and relative humidity is lower than 80%. This indoor unit is tested under the condition of JIS (Japan Industrial Standard) high humidity condition and confirmed there is no problem. However, there is some risk of condensation drop if the air conditioner is operated under the severer condition than mentioned above. If there is a possibility to use it under such a condition, attach additional insulation of 10 to 20mm thick for entire surface of indoor unit, refrigeration pipe and drain pipe. xAreas where TV and radio stays away more than 1m. (It could cause jamming and noise.) xAreas where any items which will be damaged by getting wet are not placed such as food, table wares, server, or medical equipment under the unit. xAreas where there is no influence by the heat which cookware generates. xAreas where not exposed to oil mist, powder and/or steam directly such as above fryer. xAreas where lighting device such as fluorescent light or incandescent light doesn’t affect the operation. (A beam from lighting device sometimes affects the infrared receiver for the wireless remote controller and the air conditioner might not work properly.) N Check if the place where the air conditioner is installed can hold the weight of the unit. If it is not able to hold, reinforce the structure with boards and beams strong enough to hold it. If the strength is not enough, it could cause injury due to unit falling. O If there are 2 units of wireless type, keep them away for more than 5m to avoid malfunction due to cross communication. P When plural indoor units are installed nearby, keep them away for more than 4m. Decorative panel Symbol A B C D E F F Content Gas piping Liquid piping Drain piping Hole for wiring Suspension bolts Air outlet opening for ducting Control box 185 190 21 200 B □413 □700 48 Drain hose piece (Accessory) (Installed on site) □570 325 A Air return Air supply grille D 223 C 145 140 60 E Hole 6-Ǿ4 Holes for tapping screws 140 1 For drain hose mounting 88 1 For drain pipe connecting 100 1 For heat insulation of drain socket 35 1 For heat insulation of drain socket Hose clamp 556 67 4 For pipe cover fixing Drain hose 210 248 1 For heat insulation of liquid tube Pipe cover(big) Pipe cover(small) 88 8 4 1 For adjustment For heat For unit hanging in hoisting in the insulation unit's main body of gas pipe For draom pipe Strap 100 35 For refrigerant pipe Pipe cover (small) 530( Suspension bolts pitch) 350 326 Pipe cover(big) 192 132 For unit hanging Flat washer Level gauge (M10) (Insulation) z If suspension bolt becomes longer, do reinforcement of earthquake resistant. c For grid ceiling When suspension bolt length is over 500mm, or the gap between the ceiling and roof is over 700mm, apply earthquake resistant brace to the bolt. c In case the unit is hanged directly from the slab and is installed on the ceiling plane which has enough strength. When suspension bolt length is over 1000mm, apply the earthquake resistant brace to the bolt. z Prepare four (4) sets of suspension bolt, nut and spring washer (M10 or M8) on site. 45 or more z Install correctly according to the installation manual. z Confirm the following points: c Unit type/Power supply specification c Pipes/Wires/Small parts Hanger plate for suspension bolt F ④ Installation of indoor unit Work procedure 1. This units is designed for 2 x 2 grid ceiling. If necessary, please detach the T bar temporarily before you install it. If it is installed on a ceiling other than 2 x 2 grid ceiling, provide an inspection port on the control box side. 2. Arrange the suspension bolt at the right position (530mm×530mm). 3. Make sure to use four suspension bolts and fix them so as to be able to hold 500N load. 4. Ensure that the lower end of the suspension bolt should be 45mm above the ceiling plane. Temporarily put the four lower nuts 88mm above the ceiling plane and the upper nuts on distant place from the lower nuts in order not to obstruct hanging the indoor unit or adjust the indoor unit position, and then hang the indoor unit. Control box Space for installation and service T bar z When it is not possible to keep enough space between indoor unit and wall or between indoor units, close the air supply port where it is not possible to keep space and confirm there is no short circuit of airflow. z Install the indoor unit at a height of more than 2.5m above the floor. 5. Adjust the indoor unit position after hanging it by inserting the level gauge attached on the package into the air supply port and checking if the gap between the ceiling plane and the indoor unit is appropriate. In order to adjust the indoor unit position, adjust the lower nuts while the upper nuts are put on distant place. Confirm there is no backlash between the hanger plate for suspension bolt and the lower nut and washer. 4000mm or more Indoor unit Ceiling panel Indoor unit Drain piping uspension bolt S 1000mm or more ut (upper ) N 2500mm or more Decorative panel 1000mm or more lat washer F bstacle O p ring washer S Floo r ut (lo wer) N 8mm 45mm Level gauge Use level gauges as reference, adjust the bottom to the face of the indoor unit. Use level gauges as reference, adjust the bottom to the face of the indoor unit. 30 Ceiling surface 30 Wall Refrigerant piping Ceiling surface Diffuser Level gauge (insulation) Diffuser Ceiling panel Level gauge (insulation) T-bar Ceiling panel T-bar When the ceiling panel comes below the T bar, align the bottom of the level gauge to the lower face of the ceiling panel. Correct Unit Touch the nut (lower) and washer without any play - 17 - Wrong Unit Play is left between the fixture and the nut (lower) and washer. '12 • SRK-T-126 ④ Installation of indoor unit (continued) ⑥ Drain pipe (continued) 6. Make sure to install the indoor unit horizontally. Confirm the levelness of the indoor unit with a level gauge or transparent hose filled with water. Keep the height difference at both ends of the indoor unit within 3mm. 7. Tighten four upper nuts and fix the unit after height and levelness adjustment. Work procedure 1. Make sure to insert the drain hose (the end mode of soft PVC) to the end of the step part of drain socket. Attach the hose clamp to the drain hose around 10mm from the end, and fasten the screw within 5mm left to the nut. z Do not apply adhesives on this end. Inodor unit hose Caution z Do not adjust the height by adjusting upper nuts. It will cause unexpected stress on the indoor unit and it will lead to deformation of the unit, failure of attaching a panel, and generating noise from the fan. z Make sure to install the indoor unit horizontally and set the gap between the unit underside and the ceiling plane properly. Improper installation may cause air leakage, dew condensation, water leakage and noise. z Even after decorative panel attached, still the unit height can be adjusted finely. Refer to the installation manual for decorative panel for details. z Make sure there is no gap between decoration panel and ceiling surface, and between decoration panel and the indoor unit. The gap may cause air leakage, dew condensation and water leakage. z In case decorative panel is not installed at the same time, or ceiling material is installed after the unit installed, put the cardboard template for installation attached on the package (packing material of cardboard box) on the bottom of the unit in order to avoid dust coming into the indoor unit. pipe cover (big) (For insulation) (Accessory) Joint for VP-20 (Prepare on site) Unit Drain socket he step pa rt T Drain hose Drain hose (Accessory) Clamp Drain socket (Accessory o adhesi N ev allowed VP-20 (Prepare on site) Connect Pipe cover (small) (For insulation) (Prepare on site) Pipe cover (small) (For insulation) (Accessory) Fasten the screw within 5 mm left to the nut. Hose clamp Drain hose Drain socket ⑤ Refrigerant pipe Caution Metal plate z Use the new refrigerant pipe. When re-using the existing pipe system for R22 or R407C, pay attention to the following items. xChange the flare nuts with the attached ones (JIS category 2), and reprocess the flare parts. xDo not use thin-walled pipes. z Use phosphorus deoxidized copper alloy seamless pipe (C1220T specified in JIS H3300) for refrigeration pipe installation. In addition, make sure there is no damage both inside and outside of the pipe, and no harmful substances such as sulfur, oxide, dust or a contaminant stuck on the pipes. z Do not use any refrigerant other than R410A. Using other refrigerant except R410A (R22 etc.) may degrade inside refrigeration oil. And air getting into refrigeration circuit may cause over-pressure and resultant it may result in bursting, etc. z Store the copper pipes indoors and seal the both end of them until they are brazed in order to avoid any dust, dirt or water getting into pipe. Otherwise it will cause degradation of refrigeration oil and compressor breakdown, etc. z Use special tools for R410 refrigerant. 10mm 2. Prepare a joint for connecting VP-20 pipe, adhere and connect the joint to the drain hose (the end made of rigid PVC), and adhere and connect VP-20 pipe (prepare on site). As for drain pipe, apply VP-20 made of rigid PVC which is on the market. z Make sure that the adhesive will not get into the supplied drain hose. It may cause the flexible part broken after the adhesive is dried up and gets rigid. z Do not bend or make an excess offset on the drain hose as shown in the picture. Bend or excess offset will cause drain leakage. O v er 20mm Work procedure 1. Remove the flare nut and blind flanges on the pipe of the indoor unit. Make sure to loosen the flare nut with holding the nut on pipe side with a spanner and giving torque to the nut with another spanner in order to avoid unexpected stress to the copper pipe, and then remove them. (Gas may come out at this time, but it is not abnormal.) z Pay attention whether the flare nut pops out. (as the indoor unit is sometimes pressured.) 2. Make a flare on liquid pipe and gas pipe, and connect the refrigeration pipes on the indoor unit. Bend the pipe with as big radius as possible and do not bend the pipe repeatedly. In addition, do not twist and crush the pipes. Do a flare connection as follows: z Make sure to loosen the flare nut with holding the nut on pipe side with a spanner and giving torque to the nut with another spanner in order to avoid unexpected stress to the copper pipe, and then remove them. z When fastening the flare nut, align the refrigeration pipe with the center of flare nut, screw the nut for 3-4 times by hand and then tighten it by spanner with the specified torque mentioned in the table below. Make sure to hold the pipe on the indoor unit securely by a spanner when tightening the nut in order to avoid unexpected stress on the copper pipe. 3. Cover the flare connection part of the indoor unit with attached insulation material after a gas leakage inspection, and tighten both ends with attached straps. z Make sure to insulate both gas pipes and liquid pipes completely. Incomplete insulation may cause dew condensation or water dropping. 4. Refrigerant is charged in the outdoor unit. As for the additional refrigerant charge for the indoor unit and piping, refer to the installation manual attached to the outdoor unit. trap (Accesso ry) S Pipe diameter I 6.35 I 9.52 I 12.7 I 15.88 I 19.05 Tightening torque N·m 14 to 18 34 to 42 49 to 61 68 to 82 100 to 120 Pipe cover (Accessory) 3. Make sure to make descending slope of greater than 1/100 and do not make up-down bend and/or trap in the midway. z Pay attention not to give stress on the pipe on the indoor unit side, and support and fix the pipe as close place to the unit as possible when connecting the drain pipe. z Do not set up air vent. 1.5m ~ 2m Supporting metal No bump Trapped air will generate noises. No trap Air vent Not touching the water Insulation material Descending slope greater than 1/100 z When sharing a drain pipe for more than one unit, lay the main pipe 100mm below the drain outlet of the unit. In addition, select VP-30 or bigger size for main drain pipe. As wide as possible (about10mm) VP-30or bigge r escending stop greater than /10 D 4. Insulate the drain pipe. z Be sure to insulate the drain socket and rigid PVC pipe installed indoors otherwise it may cause dew condensation and water leakage. After drainage test implementation, cover the drain socket part with pipe cover (small size), then use the pipe cover (big size) to cover the pipe cover (small size), clamps and part of the drain hose, and fix and wrap it with tapes to wrap and make joint part gapless. Drain up The thic kness of insulation shouldbe 20mm or more . z The position for drain pipe outlet can be raised up to 600mm above the ceiling. Use elbows for installation to avoid obstacles inside ceiling. If the horizontal drain pipe is too long before vertical pipe, the backflow of water will increase when the unit is stopped, and it may cause overflow of water from the drain pan on the indoor unit. In order to avoid overflow, keep the horizontal pipe length and offset of the pipe within the limit shown in the figure below. ⑥ Drain pipe Caution z Install the drain pipe according to the installation manual in order to drain properly. Imperfection in draining may cause flood indoors and wetting the household goods etc. z Do not put the drain pipe directly into the ditch where toxic gas such as sulfur, the other harmful and inflammable gas is generated. Toxic gas would flow into the room and it would cause serious damage to user’s health and safety (some poisoning or deficiency of oxygen). In addition, it may cause corrosion of heat exchanger and bad smell. z Connect the pipe securely to avoid water leakage from the joint. z Insulate the pipe properly to avoid condensation drop. z Check if the water can flow out properly from both the drain outlet on the indoor unit and the end of the drain pipe after installation. z Make sure to make descending slope of greater than 1/100 and do not make up-down bend and/or trap in the midway. In addition, do not put air vent on the drain pipe. Check if water is drained out properly from the pipe during commissioning. Also, keep sufficient space for inspection and maintenance. - 295to 23m 5m 100 or less 600mm or less Drain hose Joint for VP-20 (Prepare on site) 18 - '12 • SRK-T-126 ⑥ Drain pipe (continued) ⑧ Panel installation z After wiring work finished, install the panel on the indoor unit. z Refer to attached panel installation manual for details. (see next page) Drain test z After installation of drain pipe, make sure that drain system work in good condition and no water leakage from joint and drain pan. Check if the motor sound of drain pump is normal or not. z Do drain test even if installation of heating season. z For new building cases, make sure to complete the test before hanging the ceiling. 1. Pour water of about 1000cc into the drain pan in the indoor unit by pump so as not to get the electrical component wet. 2. Make sure that water is drained out properly and there is no water leakage from any joints of the drain pipe at the test. Confirm that the water is properly drained out while the drain motor is operating. At the drain socket (transparent), it is possible to check if the water is drained out properly. 3. Unplug the drain plug on the indoor unit to remove remaining water on the drain pan after the test, and re-plug it. And insulate the drain Drain plug pipe properly finally. Accessory items 1 Hook 1 piece 2 Chain 2 pieces 3 Bolt 4 pieces For installing the panel 4 5 Screw Screw 1 piece 2 pieces For attaching a hook For attaching a chain z Attach the panel on the indoor unit after electrical wiring work. z Refer to attached manual for panel installation for details. (see next page) Drain pump operation ⑨ Check list after installation c In case electrical wiring work finished Drain pump can be operated by remote controller (wired). For the operation method, refer to Operation for drain pump in the installation manual for wiring work. c In case electrical wiring work not finished Drain pump will run continuously when the dip switch“SW7-1” on the indoor unit PCB is turned ON, the Connector CNB is disconnected, and then the power supply (220-240VAC on the terminal block [ ① and ②] or [ Ⓛ and Ⓝ ] ) is turned ON. Make sure to turn OFF “SW7-1” and reconnect the Connector CNB after the test. ⑦ Wiring-out position and wiring connection z Check the following items after all installation work completed. Check if The indoor and outdoor units are fixed securely? Inspection for leakage is done? Insulation work is properly done? Water is drained properly? Supply voltage is same as mentioned in the model name plate? There is mis-wiring or mis-connection of piping? Earth wiring is connected properly? Cable size comply with specified size? Any obstacle blocks airflow on air inlet and outlet? z Electrical installation work must be performed according to the installation manual by an electrical installation service provider qualified by a power provider of the country, and be executed according to the technical standards and other regulations applicable to electrical installation in the country. Be sure to use an exclusive circuit. z Use specified cord, fasten the wiring to the terminal securely, and hold the cord securely in order not to apply unexpected stress on the terminal. z Do not put both power source line and signal line on the same route. It may cause miscommunication and malfunction. z Be sure to do D type earth work. z For the details of electrical wiring work, see attached instruction manual for electrical wiring work. 1. 2. 3. 4. For fixing temporarily Remove a lid of the control box (1 screws). Hold each wiring inside the unit and fasten them to terminal block securely. Fix the wiring with clamp. Install a lid of the control box back to original place. Single split (PAC) series 6 6 Power source side terminal block Earth Wiring between indoor and outdoor unit Remote controller line Wiring clamp Signal side terminal block VRF (KX) series 6 6 Power source side terminal block Earth Indoor power source line Signal line (shielded cord) Remote controller line Wiring clamp Earth (signal line) Signal side terminal block - 19 - Expected trouble Falling, vibration, noise Insufficient capacity Water leakage Water leakage PCB burnt out, not working at all PCB burnt out, not working at all Electric shock PCB burnt out, not working at all Insufficient capacity Check '12 • SRK-T-126 PJA012D783 (See page 16) - 20 - a '12 • SRK-T-126 *1 5 7 9 *1 This function is not able to be set with wireless remote controls or simple remote control (RCH-H3). *2 For setting the swing range of other louvers, return to 1 and proceed same procedure respectively. - 21 - Models R4 10ARE RIG F RAN E E S U T 25·35 RWC012A030A D D Observe instructions with great care - 22 • Do not bundling, winding or processing for the power cord. Or, do not deforming the power plug due to tread it. This may cause fire or heating. • Do not run the unit with removed panels or protections. Touching rotating equipments, hot surfaces or high voltage parts can cause personal injury due to entrapment, burn or electric shocks. • Ensure that no air enters in the refrigerant circuit when the unit is installed and removed. If air enters in the refrigerant circuit, the pressure in the refrigerant circuit becomes too high, which can cause burst and personal injury. • Do not processing, splice the power cord, or share a socket with other power plugs. This may cause fire or electric shock due to defecting contact, defecting insulation and over-current etc. • Do not perform any change of protective device itself or its setup condition. The forced operation by short-circuiting protective device of pressure switch and temperature controller or the use of non specified component can cause fire or burst. • Use the prescribed cables for electrical connection, tighten the cables securely in terminal block and relieve the cables correctly to prevent overloading the terminal blocks. Loose connections or cable mountings can cause anomalous heat production or fire. • Arrange the wiring in the control box so that it cannot be pushed up further into the box. Install the service panel correctly. Incorrect installation may result in overheating and fire. • Be sure to fix up the service panels. Incorrect fixing can cause electric shocks or fire due to intrusion of dust or water. • Be sure to switch off the power supply in the event of installation, inspection or servicing. If the power supply is not shut off, there is a risk of electric shocks, unit failure or personal injury due to the unexpected start of fan. • Stop the compressor before disconnecting refrigerant pipes in case of pump down operation. If disconnecting refrigerant pipes in state of opening operation valves before compressor stopping, air can be sucked, which can cause burst or personal injury due to anomalously high pressure in the refrigerant circuit • Only use prescribed optional parts. The installation must be carried out by the qualified installer. If you install the system by yourself, it can cause serious trouble such as water leaks, electric shocks, fire. Provide proper earthing • Carry out the electrical work for ground lead with care. Do not connect the ground lead to the gas line, water line, lightning conductor or telephone line’s ground lead. Incorrect grounding can cause unit faults such as electric shocks due to short-circuiting. • Tighten the flare nut by torque wrench with specified method. If the flare nut were tightened with excess torque, this may cause burst and refrigerant leakage after a long period. • Do not open the operation valves for liquid line and gas line until completed refrigerant piping work, air tightness test and evacuation. If the compressor is operated in state of opening operation valves before completed connection of refrigerant piping work, air can be sucked into refrigerant circuit, which can cause bust or personal injury due to anomalously high pressure in the refrigerant. • The electrical installation must be carried out by the qualified electrician in accordance with “the norm for electrical work” and “national wiring regulation”, and the system must be connected to the dedicated circuit. Power supply with insufficient capacity and incorrect function done by improper work can cause electric shocks and fire. • Be sure to shut off the power before starting electrical work. Failure to shut off the power can cause electric shocks, unit failure or incorrect function of equipment. • Be sure to use the cables conformed to safety standard and cable ampacity for power distribution work. Unconformable cables can cause electric leak, anomalous heat production or fire. • This appliance must be connected to main power supply by means of a circuit breaker or switch (fuse:16A) with a contact separation of at least 3mm. • Installation must be carried out by the qualified installer. If you install the system by yourself, it may cause serious trouble such as water leaks, electric shocks, fire and personal injury, as a result of a system malfunction. • Install the system in full accordance with the instruction manual. Incorrect installation may cause bursts, personal injury, water leaks, electric shocks and fire. • Be sure to use only for household and residence. If this appliance is installed in inferior environment such as machine shop and etc., it can cause malfunction. • Use the original accessories and the specified components for installation. If parts other than those prescribed by us are used, It may cause water leaks, electric shocks, fire and personal injury. • Install the unit in a location with good support. Unsuitable installation locations can cause the unit to fall and cause material damage and personal injury. • Ensure the unit is stable when installed, so that it can withstand earthquakes and strong winds. Unsuitable installation locations can cause the unit to fall and cause material damage and personal injury. • Ventilate the working area well in the event of refrigerant leakage during installation. If the refrigerant comes into contact with naked flames, poisonous gas is produced. • Use the prescribed pipes, flare nuts and tools for R410A. Using existing parts (for R22 or R407C) can cause the unit failure and serious accidents due to burst of the refrigerant circuit. Strictly prohibited • Keep the installation manual together with owner’s manual at a place where any user can read at any time. Moreover if necessary, ask to hand them to a new user. • For installing qualified personnel, take precautions in respect to themselves by using suitable protective clothing, groves, etc., and then perform the installation works. • Please pay attention not to fall down the tools, etc. when installing the unit at the high position. • If unusual noise can be heard during operation, consult the dealer. • Symbols which appear frequently in the text have the following meaning: WARNING • We recommend you to read this “SAFETY PRECAUTIONS” carefully before the installation work in order to gain full advantage of the functions of the unit and to avoid malfunction due to mishandling. WARNING and CAUTION . The matters with • The precautions described below are divided into possibilities leading to serious consequences such as death or serious personal injury due to erroneous handling WARNING and the matters with possibilities leading to personal injury or damage of the are listed in the unit due to erroneous handling including probability leading to serious consequences in some cases are listed CAUTION . These are very important precautions for safety. Be sure to observe all of them without fail. in • Be sure to confirm no anomaly on the equipment by commissioning after completed installation and explain the operating methods as well as the maintenance methods of this equipment to the user according to the owner’s manual. SAFETY PRECAUTIONS • This installation manual deals with outdoor units and general installation specifications only. For indoor units, refer to page 16 • When install the unit, be sure to check whether the selection of installation place, power supply specifications, usage limitation (piping length, height differences between indoor and outdoor units, power supply voltage and etc.) and installation spaces. Models SRC25ZJX-S, 35ZJX-S 8.2 Installation of outdoor unit '12 • SRK-T-126 CAUTION - 23 - Q’ty 1 1 Accessories for outdoor unit 1 Grommet (Heat pump type only) 2 Drain elbow (Heat pump type only) • Model name and power source • Refrigerant piping length • Piping, wiring and miscellaneous small parts • Indoor unit installation manual heck before installation wor k C 1 1 1 1 1 1 Q’ty 1 2 3 4 5 6 7 8 Plus headed driver Knife Saw Tape measure Hammer Spanner wrench Torque wrench [14.0~62.0N·m (1.4~6.2kgf·m)] Hole core drill (65mm in diameter) 9 Wrench key (Hexagon) [4m/m] 10 Vacuum pump Vacuum pump adapter (Anti-reverse flow type) 11 (Designed specifically for R410A) 12 Gauge manifold (Designed specifically for R410A) 13 Charge hose (Designed specifically for R410A) 14 Flaring tool set (Designed specifically for R410A) 15 Gas leak detector (Designed specifically for R410A) Gauge for projection adjustment 16 (Used when flare is made by using conventional flare tool) the system, and cause malfunctions and breakdowns. The system can also affect medical equipment and telecommunication equipment, and obstruct its function or cause jamming. • Do not install the outdoor unit in a location where insects and small animals can inhabit. Insects and small animals can enter the electric parts and cause damage or fire. Instruct the user to keep the surroundings clean. • Do not use the base flame for outdoor unit which is corroded or damaged due to long periods of operation. Using an old and damage base flame can cause the unit falling down and cause personal injury. • Do not use any materials other than a fuse with the correct rating in the location where fuses are to be used. Connecting the circuit with copper wire or other metal thread can cause unit failure and fire. • Do not touch any buttons with wet hands. It can cause electric shocks. • Do not touch any refrigerant pipes with your hands when the system is in operation. During operation the refrigerant pipes become extremely hot or extremely cold depending the operating condition, and it can cause burn injury or frost injury. • Do not touch the suction or aluminum fin on the outdoor unit. This may cause injury. • Do not put anything on the outdoor unit and operating unit. This may cause damage the objects or injury due to falling to the object. Necessary tools for the installation work • Do not install the outdoor unit in the locations listed below. • Locations where discharged hot air or operating sound of the outdoor unit can bother neighborhood. • Locations where outlet air of the outdoor unit blows directly to plants. • Locations where vibration can be amplified and transmitted due to insufficient strength of structure. • Locations where vibration and operation sound generated by the outdoor unit can affect seriously (on the wall or at the place near bed room). • Locations where an equipment affected by high harmonics is placed (TV set or radio receiver is placed within 5m). • Locations where drainage cannot run off safely. It can affect surrounding environment and cause a claim. • Do not install the unit near the location where leakage of combustible gases can occur. If leaked gases accumulate around the unit, it can cause fire. • Do not install the unit where corrosive gas (such as sulfurous acid gas etc.) or combustible gas (such as thinner and petroleum gases) can accumulate or collect, or where volatile combustible substances are handled. Corrosive gas can cause corrosion of heat exchanger, breakage of plastic parts and etc. And combustible gas can cause fire. • Do not install nor use the system close to the eq uipment that generates electromagnetic fields or high freq uency harmonics. Equipment such as inverters, standby generators, medical high frequency equipments and telecommunication equipments can affect Sealing plate Sleeve Inclination plate Putty Drain hose (extension hose) Piping cover f (for insulation of connection piping) a b c d e Option parts • Do not install the unit in the locations listed below. • Locations where carbon fiber, metal powder or any powder is floating. • Locations where any substances that can affect the unit such as sulphide gas, chloride gas, acid and alkaline can occur. • Vehicles and ships. • Locations where cosmetic or special sprays are often used. • Locations with direct exposure of oil mist and steam such as kitchen and machine plant. • Locations where any machines which generate high frequency harmonics are used. • Locations with salty atmospheres such as coastlines. • Locations with heavy snow (If installed, be sure to provide base flame and snow hood mentioned in the manual). • Locations where the unit is exposed to chimney smoke. • Locations at high altitude (more than 1000m high). • Locations with ammonic atmospheres. • Locations where heat radiation from other heat source can affect the unit. • Locations without good air circulation. • Locations with any obstacles which can prevent inlet and outlet air of the unit. • Locations where short circuit of air can occur (in case of multiple units installation). • Locations where strong air blows against the air outlet of outdoor unit. It can cause remarkable decrease in performance, corrosion and damage of components, malfunction and fire. • When perform the air conditioner operation (cooling or drying • Take care when carrying the unit by hand. • Use the circuit breaker with sufficient breaking capacity. operation) in which ventilator is installed in the room. In this If the unit weights more than 20kg, it must be carried by two or more If the breaker does not have sufficient breaking capacity, it can cause case, using the air conditioner in parallel with the ventilator, persons. Do not carry by the plastic straps, always use the carry the unit malfunction and fire. there is the possibility that drain water may backflow in handle when carrying the unit by hand. Use gloves to minimize the risk • Earth leakage breaker must be installed. accordance with the room lapse into the negative pressure of cuts by the aluminum fins. If the earth leakage breaker is not installed, it can cause electric status. Therefore, set up the opening port such as incorporate • Dispose of any packing materials correctly. shocks. the air into the room that may appropriate to ventilation (For Any remaining packing materials can cause personal injury as it • Install isolator or disconnect switch on the power supply wiring example; Open the door a little). In addition, just as above, so contains nails and wood. And to avoid danger of suffocation, be sure in accordance with the local codes and regulations. set up the opening port if the room lapse into negative to keep the plastic wrapper away from children and to dispose after • After maintenance, all wiring, wiring ties and the like, should be pressure status due to register of the wind for the high rise tear it up. returned to their original state and wiring route, and the apartment etc. • Be sure to insulate the refrigerant pipes so as not to condense necessary clearance from all metal parts should be secured. the ambient air moisture on them. • Secure a space for installation, inspection and maintenance Insufficient insulation can cause condensation, which can lead to specified in the manual. moisture damage on the ceiling, floor, furniture and any other Insufficient space can result in accident such as personal injury due to valuables. falling from the installation place. '12 • SRK-T-126 Heavy Over 500mm Wind direction 2.Install so the direction of the air from the blowing outlet will be perpendicular to the direction of the wind. 1.Place the unit outlet pipe perpendicular to the wind direction. Wind direction Be careful of the following conditions and choose an installation place. 〇 Where air is not trapped. 〇 Where the installation fittings can be firmly installed. 〇 Where wind does not hinder the intake and outlet pipes. 〇 Out of the heat range of other heat sources. 〇 A place where stringent regulation of electric noises is applicable. 〇 Where it is safe for the drain water to be discharged. 〇 Where noise and hot air will not bother neighboring residents. 〇 Where snow will not accumulate. 〇 Where strong winds will not blow against the outlet pipe. 〇 A place where no TV set or radio receiver is placed within 5m. (If electrical interference is caused, seek a place less likely to cause the problem) 〇 If a operation is conducted when the outdoor air temperature is -5℃ lower, the outdoor unit should be installed at a place where it is not influenced by natural wind. 〇 Where it is likely that the unit is subjected to strong winds, provide wind guards according to the following guidelines. Strong winds can cause performance degradation, an accidental stop due to a rise of high pressure and a broken fan. 3) Selecting the installation location right hand side of the unit as viewed from the front (diffuser side) is heavier. A person carrying the right hand side must take heed of this fact. A person carrying the left hand side must hold with his right hand the handle provided on the front panel of the unit and with his left hand the corner column section. ● The 2) Portage Pad 1L L2 L3 L4 Example installation Outlet Intake 510 Ⅱ 280 75 80 Open Ⅲ 280 Open 80 250 odel 20, 25, 35 M 158.4 Ⅰ Open 100 100 250 Intake L2 Outlet Intake Use a long block to extend the width. L3 L1 L4 service ( space ) Improper installation can result in a compressor failure, broken piping within the unit and abnormal noise generation. winds, etc. Use a thicker block to anchor deeper. Fasten with bolts (M10-12) ② Notabilia for installation Ⅳ 180 Open 80 Open The height of a wall is 1200mm or less. ● In installing the unit, fix the unit’s legs with bolts specified on the left. ● The protrusion of an anchor bolt on the front side must be kept within 15 mm. ● Securely install the unit so that it does not fall over during earthquakes or strong ● Refer to the above illustrations for information regarding concrete foundations. ● Install the unit in a level area. (With a gradient of 5 mm or less.) 111.6 ① Anchor bolt fixed position 5) Installation Size (mm) or wider interval between them as a service space. In order to facilitate servicing of controllers, please provide a sufficient space between units so that their top plates can be removed easily. ● Where a danger of short-circuiting exists, install guide louvers. ● When more than one unit are installed, provide sufficient intake space consciously so that short-circuiting may not occur. ● Where piling snow can bury the outdoor unit, provide proper snow guards. ● Walls surrounding the unit in the four sides are not acceptable. ● There must be a 1-meter or larger space in the above. ● When more than one unit are installed side by side, provide a 250mm 4) Installation space When a unit is hoisted with slings for haulage, take into consideration the offset of its gravity center position. If not properly balanced, the unit can be thrown off-balance and fall. the unit as close as possible to the installation site before removing it from the packaging. ● When you have to unpack the unit for a compelling reason before you haul it to the installation point, hoist the unit with nylon slings or ropes and protection pads so that you may not damage the unit. ● Deliver CAUTION 1) Delivery (Take particular care in carrying in or moving the unit, and always perform such an operation with two or more persons.) 24.3 1. HAULAGE AND INSTALLATION not use any refrigerant other than R410A. R410A will rise to pressure about 1.6 times higher than that of a conventional refrigerant. A cylinder containing R410A has a pink indication mark on the top. ● A unit designed for R410A has adopted a different size indoor unit operation valve charge port and a different size check joint provided in the unit to prevent the charging of a wrong refrigerant by mistake. The processed dimension of the flared part of a refrigerant pipe and a flare nut's parallel side measurement have also been altered to raise strength against pressure. Accordingly, you are required to arrange dedicated R410A tools listed in the table on the right before installing or servicing this unit. ● Do not use a charge cylinder. The use of a charge cylinder will cause the refrigerant composition to change, which results in performance degradation. ● In charging refrigerant, always take it out from a cylinder in the liquid phase. ● All indoor units must be models designed exclusively for R410A. Check connectable indoor unit models in a catalog, etc. (A wrong indoor unit, if connected into the system, will impair proper system operation) 290 24 - 312.5 351.6 - 14.8 ● Do Notabilia as a unit designed for R410A '12 • SRK-T-126 - 25 - 10m or less When the outdoor unit is positioned lower, Ǿ9.52 Ǿ9.52 Refrigerant piping (branch pipeL) Indoor unit connected Ǿ6.35 Ǿ6.35 Ǿ6.35 lFare pipes having a wall thickness larger than the specified minimum pipe thickness. ● Select ●Tighten a flare joint securely. O-type pipe 0.8 9.52 Brazing ide cover S crew S Nitrogen gas A Copper In the case of a rigid (clutch) type pipe outer diameter With an R410A tool With a conventional tool Ǿ6.35 0∼0.5 1.0∼1.5 Ǿ9.52 (mm) L Indoor unit Copper pipe protrusion for flaring : B Flared pipe end : A (mm) Copper pipe outer A 0 ー0. 4 diameter Ǿ6.35 9. 1 Ǿ9.52 13.2 Hand 0.5MPa Secondary side Relief valve Primary side Station valve *Phosphorus deoxidized seamless copper pipe ICS 23.040.15, ICS 77.150.30 O-type pipe 0.8 Minimum pipe wall thickness [mm] the operation valve fully closed. (compressed and blazed, or with an adhesive tape) so that water or foreign matters may not enter the piping. ● Bend a pipe to a radius as large as practical.(R100∼R150) Do not bend a pipe repeatedly to correct its form. ● Flare connection is used between the unit and refrigerant pipe. Flare a pipe after engaging a flare nut onto it. Flare dimensions for R410A are different from those for conventional R407C. Although we recommend the use of flaring tools designed specifically for R410A, conventional flaring tools can also be used by adjusting the measurement of protrusion B with a protrusion control gauge. ● Carry out the on site piping work with ● Give sufficient protection to a pipe end <N2> Only use nitrogen gas (N2) Taping Plug the end of the pipe with tape, or other material, and fill the pipe with nitrogen gas. 6.35 Please remove the screw of a side cover and remove to the front. Outdoor unit Without nitrogen gas, a large quantity of foreign matters (oxidized film) are created, causing a critical failure from capillary tube or expansion valve clogging. Pipe diameter [mm] Pipe material* H Brazing must be performed under a nitrogen gas flow. About brazing When pipe is brazing. Take care so that installed pipes may not touch components within a unit. If touching with an internal component, it will generate abnormal sounds and/or vibrations. How to remove the side cover IMPORTANT 4) On-site piping work NOTE refrigerant pipes of the table shown on the right wall thickness and material as specified for each pipe size. 3) Refrigerant pipe wall thickness and material Ǿ9.52 Flare Outdoor unit connected Model 20, 25, 35 Gas pipe Liquid pipe ● Determine refrigerant pipe size pursuant to the following guidelines based on the indoor unit specifications. 2) Determination of pipe size ● Select H H L ● The use restrictions appearing in the table above are applicable to the standard pipe size combinations shown in the table below. 10m or less When the outdoor unit is positioned higher, 15m or less Main pipe length Marks appearing in the drawing on the right Nitrogen CAUTION Elevation difference between indoor and outdoor units Dimensional restrictions Restrictions ● Check the following points in light of the indoor unit specifications and the installation site. ● Observe the following restrictions on unit installation and use. Improper installation can result in a compressor failure or performance degradation. dditional refrigerant charge is not required at all. ● A 1) Restrictions on unit installation and use B 2. REFRIGERANT PIPING WORK '12 • SRK-T-126 34∼42 Ǿ9.52 (3/8") 30∼45 45∼60 Tightening angle (°) 200 150 Recommended length of a tool handle (mm) <Work flow> - 26 Fill refrigerant Vacuum gauge check Confirm that the vacuum gauge indicator does not rise even if the system is left for one hour or more. Vacuuming completed Run the vacuum pump for at least one hour after the vacuum gauge shows -101kPa or lower. (-755mmHg or lower) Vacuuming begins Airtighteness test completed Improper heat insulation/anti-dew dressing can result in a water leak or dripping causing damage to household effects, etc. ● ● ● ● Check joint Operation Valve Cap rize ssu Vacuum pump adapter (Anti-reverse flow type) (Designed specifically for R410A) Charge hose (Designed specifically for R410A) Handle Hi. Gauge Manifold (Designed specifically for R410A) Compound pressure gauge Pressure gauge Indoor unit Vacuum pump Charge hose (Designed specifically for R410A) Operation Valve (three-way valve) Handle Lo -0.1MPa (-76cmHg) Operation Valve Cap Pre Gas side operation valve Check joint Use a torque wrench. If a torque wrench is not available, fasten the flare nut manually first and then tighten it further, using the left table as a guide. Ǿ9.52 (3/8") Operation valve size (mm) Ǿ6.35 (1/4") All gas pipes must be securely heat insulated in order to prevent damage from dripping water that comes from the condensation formed on them during a cooling operation or personal injury from burns because their surface can reach quite a high temperature due to discharged gas flowing inside during a heating operation. Wrap indoor units’ flare joints with heat insulating parts (pipe cover) for heat insulation (both gas and liquid pipes). Give heat insulation to both gas and liquid side pipes. Bundle a heat insulating material and a pipe tightly together so that no gaps may be left between them and wrap them together with a connecting cable by a dressing tape. Both gas and liquid pipes need to be dressed with 20 mm or thicker heat insulation materials above the ceiling where relative humidity exceeds 70%. iquid piping L iW res for connecting indoor and outdoor units Insulation as piping G xterior tape E Pipe cover (accessory) 10∼12 20∼30 and (accessory) B Check joint blind nut tightening torque (N·m) Operation valve cap tightening torque (N·m) Securely tighten the operation valve cap and the check joint blind nut after adjustment. Operation Valve (two-way valve) (2) Use a heat insulating material that can withstand 120℃ or a higher temperature. Poor heat insulating capacity can cause heat insulation problems or cable deterioration. ● (1) Dress refrigerant pipes (both gas and liquid pipes) for heat insulation and prevention of dew condensation. 7) Heating and condensation prevention prevent a different oil from entering, assign dedicated tools, etc. to each refrigerant type. Under no circumstances must a gauge manifold and a charge hose in particular be shared with other refrigerant types (R22, R407C, etc.). ○ Use a counterflow prevention adapter to prevent vacuum pump oil from entering the refrigerant system. ○ To Pay attention to the following points in addition to the above for the R410A and compatible machines. When the system has remaining moisture inside or a leaky point, the vacuum gauge indicator will rise. Check the system for a leaky point and then draw air to create a vacuum again. 6) Evacuation Outdoor unit Do not hold the valve cap area with a spanner. ① Although outdoor and indoor units themselves have been tested for air tightness at the factory, check the connecting pipes after the installation work for air tightness from the operation valve’s check joint equipped on the outdoor unit side. While conducting a test, keep the operation valve shut all the time. a) Raise the pressure to 0.5 MPa, and then stop. Leave it for five minutes to see if the pressure drops. b) Then raise the pressure to 1.5 MPa, and stop. Leave it for five more minutes to see if the pressure drops. c) Then raise the pressure to the specified level (4.15 MPa), and record the ambient temperature and the pressure. d) If no pressure drop is observed with an installation pressurized to the specified level and left for about one day, it is acceptable. When the ambient Temperature fall 1℃, the pressure also fall approximately 0.01 MPa. The pressure, if changed, should be compensated for. e) If a pressure drop is observed in checking e) and a) – d), a leak exists somewhere. Find a leak by applying bubble test liquid to welded parts and flare joints and repair it. After repair, conduct an air-tightness test again. ② In conducting an air-tightness test, use nitrogen gas and pressurize the system with nitrogen gas from the gas side. Do not use a medium other than nitrogen gas under any circumstances. 5) Air tightness test 14∼18 Tightening torque (N ·m) Ǿ6.35 (1/4") Operation valve size (mm) Fix both liquid and gas operation valves at the valve main bodies as illustrated on the right, and then fasten them, applying appropriate fastening torque. Close CAUTION Do not apply force beyond proper fastening torque in tightening the flare nut. '12 • SRK-T-126 Where you are likely to have several days of sub-zero temperatures in a row, do not use a drain elbow and drain grommets. (There is a risk of drain water freezing inside and blocking the drain.) ● Grommet Drain elbow Drain hose (To be procured on the installer's part) Do not put a grommet on this hole. This is a supplementary drain hole to discharge drain water, when a large quantity of it is gathered. CAUTION - 27 - ● ● ● ● ● ● ● ● ● ● ● ● ● ● Electrical installation work must be performed by an electrical installation service provider qualified by a power provider of the country. Electrical installation work must be executed according to the technical standards and other regulations applicable to electrical installations in the country. Do not use any supply cord lighter than one specified in parentheses for each type below. braided cord (code designation 60245 IEC 51), ordinary tough rubber sheathed cord (code designation 60245 IEC 53) flat twin tinsel cord (code designation 60227 IEC 41); Use polychloroprene sheathed flexible cord (code designation 60245 IEC57) for supply cords of parts of appliances for outdoor use. Ground the unit. Do not connect the grounding wire to a gas pipe, water pipe, lightning rod or telephone grounding wire. If impropery grounded, an electric shock or malfunction may result. A grounding wire must be connected before connecting the power cable. Provide a grounding wire longer than the power cable. The installation of an impulse withstanding type earth leakage breaker is necessary. A failure to install an earth leakage breaker can result in an acccident such as an electric shock or a fire. Do not turn on the power until the electrical work is completeted . Do not use a condensive capacitor for power factor improvement under any circumstances. (It dose not improve power factor, while it can cause an abnormal overheat accident) For power supply cables, use conduits. Do not lay electronic control cables (remote control and signaling wires) and other cables together outside the unit. Laying them together can result in the malfunctioning or a failure of the unit due to electric noises. Fasten cables so that may not touch the piping, etc. When cables are connected, make sure that all electrical components within the electrical component box are free of loose connector coupling or terminal connection and then attach the cover securely. (Improper cover attachment can result in malfunctioning or a failure of the unit, if water penetrates into the box.) Always use a three-core cable for an indoor-outdoor connecting cable. Never use a shield cable. CAUTION Clearance ● When condensed water needs to be led to a drain, etc., install the unit on a flat base (supplied separately as an optional part) or concrete blocks. Then, please secure space for the drain elbow and the drain hose. H05RNR4G1.5 (Example) or 245IEC57 H Harmonized cable type 05 300/500 volts R Natural-and/or synth. rubber wire insulation N Polychloroprene rubber conductors insulation R Stranded core 4or5 Number of conductors G One conductor of the cable is the earth conductor (yellow/green) 1.5 Section of copper wire (mm2) Use cables for interconnection wiring to avoid loosening of the wires. CENELEC code for cables Required field cables. In case of faulty wiring connection, the indoor unit stops, and then the run lamp turns on and the timer lamp blinks. 4. ELECTRICAL WIRING WORK For details of electrical cabling, refer to the indoor unit installation manual. Condensed water may flow out from vicinity of operation valve or connected pipes. ● may drip where there is a larger amount of drain water. Seal around the drain elbow and drain grommets with putty or adequate caulking material. ● Water drain piping by using a drain elbow and drain grommets supplied separately as optional parts, where water drained from the outdoor unit is a problem. ● Execute 3. DRAIN PIPING WORK '12 • SRK-T-126 - 28 - Power cable 3 3 Indoor unit Outdoor unit 35 25 15A,30mA, 0.1sec or less Model Earth leakage breaker 30A 2.0mm2 the installation instructions or the construction instructions of the indoor unit. 1.5mm2×4 (minimum) regulations in each country. three cables contained in a conduit and a voltage drop is 2%. For an installation falling outside of these conditions, please follow the internal cabling regulations. Adapt it to the regulation in effect in each country. ●The cable specifications are based on the assumption that a metal or plastic conduit is used with no more than The pipe joints for indoor and outdoor pipes have been insulated. The reverse flow check cap is attached. The cover of the pipe cover (A) faces downward to prevent rain from entering. Gaps are properly sealed between the pipe covers (A) (B) and the wall surface / pipes. The power supply voltage is correct as the rating. The drain hose is fixed securely. Operational valve is fully open. No gas leaks from the joints of the operational valve. 16A (minimum) Power souce Interconnecting and grounding wires ●Switchgear or Circuit breaker capacity which is calculated from MAX. over current should be chosen along the Power cables and connecting wires are securely fixed to the terminal block. After installation Switchgear or Circuit Breaker Switch breaker Over current protector rated capacity ●The specifications shown in the above table are for units without heaters. For units with heaters, refer to Single-phase Phase Always use an earth leakage circuit breaker designed for inverter circuits to prevent a faulty operation. perform grounding system installation work with the power cord unplugged. CAUTION ● Always Check the following points again after completion of the installation, and before turnig on the power. Conduct a test run again and ensure that the unit operates properly. Explain to the customer how to use the unit and how to take care of the unit following the instruction manual. INSTALLATION TEST CHECK POINTS power cable, indoor - outdoor connecting wire circuit diagram Indoor - Outdoor connecting wire CAUTION 2/N 2/N 1 2/N 1 1 Switchgear or Circuit breaker Earth leakage breaker (Harmonic resistant type) Power cable, indoor-outdoor connecting wires Please connect the earthed line of indoor and outdoor connecting wire to a bracket part of the illustration grounding work. ○Please be sure to carry out D-type (type III) Grounding terminal ○It has stuck on the lid of a control box. Cable name plate connection from external force. ○This clamp is for the cable in the outside diameter 9~15mm. Please adjust it when not suitable. ○It holds cables in place and protect the terminal Cable clamp Power supply terminal block '12 • SRK-T-126 '12 • SRK-T-126 9. OUTLINE OF OPERATION CONTROL BY MICROCOMPUTER 9.1 Wired remote controller (option parts) The figure below shows the remote controller with the cover opened. Note that all the items that may be displayed in the liquid crystal display area are shown in the figure for the sake of explanation Characters displayed with dots in the liquid crystal display area are abbreviated. The figure below shows the remote control with the cover opened. Ventilaion display Displayed during ventilation operation Weekly timer display Displays the settings of the weekly timer. Centeal control display Displayed when the air conditioning system is controlled by centralized remote control. Operation setting display area Displays setting temperature, airflow volume, operation mode and oparation message. Timer operation display Displays the timer operation setting. Operation/check indicator light During oparation: Lit in green In case of error: Flashing in red Temperature setting buttons These buttons are used to set the temperature of the room. Operation/stop button This button is used to operate and stop the air conditioning system. Press the button once to operate the system and press it once again to stop the system. Timer button This button is used to set the timer mode. MODE button This button is used to change the operation mode. Timer setting buttons These buttons are used to set the timer mode and the time. FAN SPEED button This button is used to set the airflow volume. VENT button This button is used to operate external ventilator. ESP button This button is used to select the auto static pressure adjustment mode. LOUVER button This button is used to operate/stop the swing louver. Cover AIR CON No. button Display the indoor unit number connected to this remote controller. SET button This button is used to fix the setting. This button is used to set the silent mode. ٨ ٨ CHECK button This button is used at servicing. RESET button Press this button while making settings to go back to the previous operation. This button is also used to reset the "FILTER CLEANING" display. (Press it after cleaning the air filter) ٨ TEST button This button is used during test operation. ٨ 䋪㩷All displays are described in the liguid crystal display for explanation. - 29 - '12 • SRK-T-126 9.2 Operation control function by the wired remote controller (a) Switching sequence of the operation mode switches of remote controller $29 #//, &!. (%!4 !54/ (b) [CPU reset] (c) This functions when “CHECK” and “ESP” buttons on the remote controller are pressed simultaneously. Operation is same as that of the power supply reset. [Power failure compensation function]...Electric power supply failure • This becomes effective if “Power failure compensation effective” is selected with the setting of remote controller function. • Since it memorizes always the condition of remote controller, it starts operation according to the contents of memory no sooner than normal state is recovered after the power failure. Although the auto swing stop position and the timer mode are cancelled, the weekly timer setting is restored with the holiday setting for all weekdays. After recovering from the power failure, it readjusts the clock and resets the holiday setting for each weekday so that the setting of weekly timer becomes effective. • Content memorized with the power failure compensation are as follows. Note (1) Items, and are memorized regardless whether the power failure compensation is effective or not while the setting of silent mode is cancelled regardless whether the power failure compensation is effective or not. At power failure – Operating/stopped If it had been operating under the off timer mode, sleep timer mode, the state of stop is memorized. (Although the timer mode is cancelled at the recovery from power failure, the setting of weekly timer is changed to the holiday setting for all weekdays.) Operation mode $LUÀRZYROXPHPRGH Room temperature setting Louver auto swing/stop However, the stop position (4-position) is cancelled so that it returns to Position (1). “Remote controller function items” which have been set with the remote controller function setting (“Indoor function items” are saved in the memory of indoor unit.) Upper limit value and lower limit value which have been set with the temperature setting control Sleep timer and weekly timer settings (Other timer settings are not memorized.) [Parts layout on remote controller PCB] Master/ slave setting when more than one remote controllers are used A maximum of two remote controllers can be connected to one indoor unit (or one group of indoor units.) Switch Indoor units SW2 SW1 Setting Contents M Master remote controller S Slave remote controller SW2 A Remote controller cord (no polarity) B Upper 親 M SW1 Master Remote controller SW1 "Master" S SW1子 Remote controller SW1 "Slave" Slave SW1 SW2 SW1 Board Lower X Y Set SW1 to “Stave” for the slave remote controller. It was factory set to “Master” for shipment. Note: The setting “Remote controller thermistor enabled” is only selectable with the master remote controller in the position where you want to check room temperature. The air conditioner operation follows the last operation of the remote controller regardless of the master / slave setting of it. Caution When using multiple remote controllers, the following dispiays or settings cannot be done with the slave remote controller. It is available only with the master remote controller. ޓLouver position setting (set upper or lower limit of swinging range) ޓSetting indoor unit functions ޓSetting temperature range ޓOperation data display ޓError data display ޓSilent mode setting ޓTest operation of drain pump ޓRemote controller sensor setting - 30 - '12 • SRK-T-126 9.3 Operation control function by the indoor controller (a) Auto operation If “Auto” mode is selected by the remote controller, the heating and the cooling are automatically switched according to the difference between outdoor air temperature and setting temperature and the difference between setting temperature and return air temperature. (When the switching of cooling mode ¢ heating mode takes place within 3 minutes, the compressor does not operate for 3 minutes by the control of 3-minute timer.) This will facilitate the cooling/heating switching operation in intermediate seasons and the adaptation to unmanned operation at stores, etc. Cooling operation Heating operation -3 +3 Room temperature setting temperature Room temperature (detected with ThI-A) [deg] Note (1) Room temperature control during auto cooling/auto heating is performed according to the room temperature setting temperature. (DIFF: ±1 deg) (2) If the indoor heat exchanger temperature rises to 59°C or higher during Heating operation stopped (cooling) heating operation, it is switched automatically to cooling operation. In Heating OK addition, for 1 hour after this switching, the heating operation is not performed, regardless of the temperature shown at right. 56 59 Indoor heat exchanger temperature (°C) (b) Operations of functional items during cooling/heating Cooling Operation Functional item Heating Thermostat Thermostat ON OFF Fan Thermostat Thermostat ON OFF Hot start (Defrost) Dehumidify Compressor / 4-way valve () Outdoor unit fan () / Indoor unit fan / / / / Louver motor / /× / Drain pump (3) (2) / / (2) (2) / Thermostat ON: Thermostat OFF: (2) /: Turned ON/OFF by the control other than the room temperature control. Note (1) : Operation : Stop (2) ON during the drain motor delay control. (3) Drain pump ON setting may be selected with the indoor unit function setting of the wired remote controller. (c) Dehumidifying operation 1) When the humidity sensor is not provided Return air temperature thermistor [ThI-A (by the remote controller when the remote controller thermistor is enabled)] controls the indoor temperature environment simultaneously. a) Operation is started in the cooling mode. When the difference between the return air temperature and the setting temperature is 2°C or less, the indoor unit fan tap is brought down by one tap. That tap is retained for 3 minutes after changing the indoor unit fan tap. b) If the return air temperature exceeds the setting temperature by 3°C during defrosting operation, the indoor unit fan tap is raised. That tap is retained for 3 minutes after changing the indoor unit fan tap. c) If the thermostat OFF is established during the above control, the indoor unit fan tap at the thermostat ON is retained so far as the thermostat is turned OFF. d) 2) After stopping the cooling operation, the indoor unit continues to run at Lo for 15 seconds. When the humidity thermistor is provided [Optional] a) Operation starts in the cooling mode, and the target relative temperature is determined based on the setting temperature. If the humidity detected by the humidity thermistor becomes lower than the target relative temperature, the indoor unit fan tap is retained. b) Anything other than a) above is same as the item 1) above. - 31 - '12 • SRK-T-126 (d) Timer operation 1) Sleep timer Set the duration of time from the present to the time to turn off the air-conditioner. It can be selected from 10 steps in the range from “OFF 1 hour later” to “OFF 10 hours later”. After the sleep timer setting, the remaining time is displayed with progress of time in the unit of hour. 2) OFF timer Time to turn OFF the air-conditioner can be set in the unit of 10 minutes. 3) ON timer Time to turn ON the air-conditioner can be set. Indoor temperature can be set simultaneously. 4) Weekly timer Timer operation (ON timer, OFF timer) can be set up to 4 times a day for each weekday. 5) Timer operations which can be set in combination Item Item Sleep timer OFF timer ON timer Weekly timer Sleep timer OFF timer ON timer Weekly timer Note (1) : Allowed : Not (e) Remote controller display during the operation stop 1) 2) (f) “Centralized control ON” is displayed always on the LCD under the “Center/Remote” and “Center” modes during the operation stop (Power ON). This is not displayed under the “Remote” mode. If this display is not shown under the “Center/Remote” mode, check if the indoor unit power switch is turned on or not. Hot start (Cold draft prevention at heating) At the startup of heating operation, at resetting of the thermostat, during defrost operation and at returning to heating, the indoor fan is controlled by the indoor heat exchanger temperature (detected with ThI-R) for preventing the cold draft. Judgment by heating start thermostat Thermostat OFF Thermostat ON Set airflow volume Lo Fan Lo Set airflow volume Fan OFF 35 25 Indoor heat exchanger temperature (˚C) 35 Indoor heat exchanger temperature (˚C) Heat exchanger temp. 35˚C or higher, or after 7 minutes Heat exchanger temp. 35˚C or higher, or after 7 minutes Normal condition/Set airflow volume Compressor ON Compressor OFF Defrosting start End of defrosting Set airflow volume Lo Set airflow volume Fan OFF (1) Fan Lo 35 45 25 Indoor heat exchanger temperature (˚C) 35 45 Indoor heat exchanger temperature (˚C) 1RWH +HDWLQJSUHSDUDWLRQLVGLVSOD\HGGXULQJWKHKRWVWDUWZKHQWKHFRPSUHVVRULVRSHUDWLQJDQGWKHLQGRRUIDQGRHVQRWSURYLGHWKHVHWDLUÀRZYROXPH - 32 - '12 • SRK-T-126 (g) Hot keep Hot keep control is performed at the start of the defrost control. 1) Control a) 2) (h) When the indoor heat exchanger temperature (detected with ThI-R1 or R2) drops to 35°C or lower, the speed of indoor fan is changed to the lower tap at each setting. b) During the hot keep, the louver horizontal control signal is transmitted. Ending condition :KHQWKHLQGRRUIDQLVDWWKHORZHUWDSDWHDFKVHWWLQJLWUHWXUQVWRWKHVHWDLUÀRZYROXPHDVWKHLQGRRUKHDWH[FKDQJHU temperature rises to 45°C or higher. Fan control during the heating thermostat OFF When the heating thermostat is turned OFF, the setting of the fan control is selectable using the indoor function of wired remote controller [ 1) 2) 3) 4) (i) FAN CONTROL]. Low fan speed (Factory default) If the indoor heat exchanger temperature drops below 35°C with the heating thermostat OFF, the indoor fan operate at the lower speed tap at each setting. Set fan speed Even if the indoor heat exchanger temperature drops below 35°C with the heating thermostat OFF, the indoor fan FRQWLQXHVWRUXQDWWKHVHWDLUÀRZYROXPH Intermittence If the indoor heat exchanger temperature drops below 35°C with the heating thermostat OFF, the indoor fan operates at the lower speed tap at each setting and, when the indoor heater exchanger temperature drops below 25°C, the indoor fan stops for 5 minutes. Then the fan runs at the low speed tap for 2 minutes, and the judgment is made by the thermostat. Fan OFF If the indoor heat exchanger temperature drops below 35°C with the heating thermostat OFF, the indoor fan is turned OFF. The same applies also when the remote controller sensor is effective. Filter sign As the operation time (Total ON time of ON/OFF switch) accumulates to 180 hours (1), “FILTER CLEANING” is displayed on the remote controller. (This is displayed when the unit is in trouble and under the centralized control, regardless of ON/OFF) 1RWH7LPHVHWWLQJIRUWKH¿OWHUVLJQFDQEHPDGHDVVKRZQEHORZXVLQJWKHLQGRRUIXQFWLRQRIZLUHGUHPRWHFRQWUROOHU³),/7(56,*16(7´,WLVVHWDWDWWKH shipping from factory.) Filter sign setting Function TYPE 1 Setting time: 180 hrs (Factory default) TYPE 2 Setting time: 600 hrs TYPE 3 Setting time: 1,000 hrs TYPE 4 Setting time: 1,000 hrs (Unit stop) (2) (2) After the setting time has elapsed, the “FILTER CLEANING” is displayed and, after operating for 24 hours further (counted also during the stop), the unit stops. (j) Auto swing control 1) Louver control a) Press the “LOUVER” button to operate the swing louver when the air conditioner is operating. “SWING E ” is displayed for 3 seconds and then the swing louver moves up and down continuously. 7R¿[WKHVZLQJORXYHUDWDSRVLWLRQSUHVVRQHWLPHWKH³/289(5´EXWWRQZKLOHWKHVZLQJORXYHULVPRYLQJVRWKDW four stop positions are displayed one after another per second. When a desired stop position is displayed, press the “LOUVER” button again. The display stops, changes to show the “STOP 1 c) ” for 5 seconds and then the swing louver stops. Louver operation at the power on with a unit having the louver 4-position control function The louver swings one time automatically (without operating the remote controller) at the power on. This allows inputting the louver motor (LM) position, which is necessary for the microcomputer to recognize the louver position. Note (1) If you press the “LOUVER” button, the swing motion is displayed on the louver position LCD for 10 second. The display changes to the ” display 3 seconds later. “SWING - 33 - '12 • SRK-T-126 2) Automatic louver level setting during heating 3) At the hot start with the heating thermostat OFF, regardless whether the auto swing switch is operated or not (auto swing or louver stop), the louver takes the level position (In order to prevent the cold start). The louver position display LCD continues to show the display which has been shown before entering this control. Louver-free stop control When the louver-free stop has been selected with the indoor function of wired remote controller “ POSITION”, the louver motor stops when it receives the stop signal from the remote controller. If the auto swing signal is received from the remote controller, the auto swing will start from the position where it was before the stop. Note (1) When the indoor function of wired remote controller “ POSITION” has been switched, switch also the remote control function “ POSITION” in the same way. ,QGLYLGXDOÀDSORXYHUFRQWUROV\VWHP 7KHLQGLYLGXDOÀDSVORXYHUVIRUGLUHFWLRQVFDQEHFRQWUROOHGWRVZLQJZLWKLQWKHUDQJHVEHWZHHQXSSHUOLPLWDQGORZHU limit selected with wired remote controller respectively. For detail setting method, refer to ⑦ in page 21. Note (1) This function is not able to be set with wireless remote controller or simple remote controller (RCH-E3) (k) Compressor inching prevention control 1) 3-minute timer When the compressor has been stopped by the thermostat, remote controller operation switch or anomalous condition, 2) its restart will be inhibited for 3 minutes. However, the 3-minute timer is invalidated at the power on the electric power source for the unit. 3-minute forced operation timer • Compressor will not stop for 3 minutes after the compressor ON. However, it stops immediately when the unit is stopped by means of the ON/OFF switch or by when the thermister turned OFF the change of operation mode. • If the thermostat is turned OFF during the forced operation control of heating compressor, the louver position (with the auto swing) is returned to the level position. Note (1) The compressor stops when it has entered the protective control. (l) Drain motor 1) Drain motor (DM) is operated during the cooling or dehumidifying mode operations and simultaneously with the compressor ON. The DM continues to operate for 5 minutes after the operation stop, anomalous stop, thermostat stop or when it was switched from the cooling and dehumidifying operations to the fan or heating operation. Indoor unit operation mode Stop (1) Cooling Dehumidifying Compressor ON Compressor OFF a) Fan (2) Control A Heating Note (1) Including the stop from the cooling, dehumidifying, fan and heating, and the anomalous stop (2) Including the “Fan” operation according to the mismatch of operation modes Control B Control A L b) ,IWKHÀRDWVZLWFKGHWHFWVDQ\DQRPDORXVGUDLQLQJFRQGLWLRQWKHXQLWVWRSVZLWKWKHDQRPDORXVVWRSGLVSOD\V E9) and the drain pump starts. After detecting the anomalous condition, the drain motor continues to be ON. LL ,WNHHSVRSHUDWLQJZKLOHWKHÀRDWVZLWFKLVGHWHFWLQJWKHDQRPDORXVFRQGLWLRQ Control B 2) ,I WKH ÀRDW VZLWFK GHWHFWV DQ\ DQRPDORXV GUDLQ FRQGLWLRQ WKH GUDLQ PRWRU LV WXUQHG 21 IRU PLQXWHV DQG DW VHFRQGVDIWHUWKHGUDLQPRWRU2))LWFKHFNVWKHÀRDWVZLWFK,ILWLVQRUPDOWKHXQLWLVVWRSSHGXQGHUWKHQRUPDO mode or, if there is any anomalous condition, E9 is displayed and the drain motor is turned ON. (The ON condition is maintained during the drain detection.) Drain motor (DM) interlock control a) Start conditions Depending on the function setting by the remote controller, the drain motor is turned ON under either one of the following conditions. i) During heating mode operation (Both the thermostat ON/OFF) ii) During heating mode operation (Both the thermostat ON/OFF) + Fan operation iii) Fan operation b) End conditions The drain motor is turned OFF 5 minutes after the stop of operations i) to iii) above. - 34 - '12 • SRK-T-126 (m) Operation check/drain pump test run operation mode 1) 2) If the power is turned on by the dip switch (SW7-1) on the indoor PCB when electric power source is supplied, it enters the mode of operation check/drain pump test run. It is ineffective (prohibited) to change the switch after turning power on. When the communication with the remote controller has been established within 60 seconds after turning power on by the dip switch (SW7-1) ON, it enters the operation check mode. Unless the remote controller communication is established, it enters the drain pump test run mode. Note (1) To select the drain pump test run mode, disconnect the remote controller connector (CNB) on the indoor PCB to shut down the remote controller communication. 3) (n) Operation check mode There is no communication with the outdoor unit but it allows performing operation in respective modes by operating the remote controller. 4) Drain pump test run mode As the drain pump test run is established, the drain pump only operates and during the operation protective functions by the microcomputer of indoor unit become ineffective. Cooling, dehumidifying frost protection 1) To prevent frosting during cooling mode or dehumidifying mode operation, the of compressor speed is reduced if the indoor heat exchanger temperature (detected with ThI-R) drops to 1.0 °C or lower at 4 minutes after the start of compressor operation. If the indoor unit heat exchanger temperature is 1.0 °C or lower after 20 seconds, the compressor speed is reduced further. If it becomes 2.5 °C or higher, the control terminates. When the indoor heat exchanger temperature has become as show below after reducing the compressor speed, it is switched to the fan operation. For the selection of indoor fan speed, refer to item 2). Cooling operation Fan operation 1.0 10 Indoor heat exchanger temperature (°C) 2) Selection of indoor fan speed If it enters the frost prevention control during cooling operation (excluding dehumidifying), the indoor unit fan speed is switched. a) When the indoor return air detection temperature (detected with ThI-A) is 23°C or higher and the indoor heat exchanger temperature (detected with ThI-R) detects the compressor frequency drop start temperature A°C+1°C, of indoor unit fan speed is increased by 20rpm. b) If the phenomenon of i) above is detected again after the acceleration of indoor unit fan, indoor unit fan speed is increased further by 20rpm. Note (1) Indoor unit fan speed can be increased by up to 2 taps. • Compressor frequency drop start temperature Symbol Item Temperature - Low (Factory default) Temperature - High A 1.0 2.5 Note (1) Frost prevention temperature setting can be selected with the indoor unit function setting of the wired remote controller. (o) Heating overload protection 1) If the indoor heat exchanger temperature (detected with ThI-R) at 63°C or higher is detected for 2 seconds continuously, the compressor stops. When the compressor is restarted after a 3-minute delay, if a temperature at 63°C or higher is detected for 2 seconds continuously within 60 minutes after initial detection and if this is detected 5 times consecutively, the compressor stops with the anomalous stop (E8). Anomalous stop occurs also when the indoor heat exchanger temperature at 63°C or higher is detected for 6 minutes continuously. Compressor O FF Compressor O N 56 63 Indoor heat exchanger temperature (°C) 2) Indoor unit fan speed selection If, after second detection of heating overload protection up to fourth, the indoor fan is set at Me and Lo taps when the compressor is turned ON, the indoor fan speed is increased by 1 tap. - 35 - '12 • SRK-T-126 (p) Anomalous fan motor After starting the fan motor, if the fan motor speed is 200rpm or less is detected for 30 seconds continuously and 4 times within 60 minutes, then fan motor stops with the anomalous stop (E16). (q) Plural unit control – Control of 16 units group by one remote controller 1) Function One remote controller switch can control a group of multiple number of unit (Max. 16 indoor units). “Operation mode” which is set by the remote controller switch can operate or stop all units in the group one after another in the order of unit No.(1). Thermostat and protective function of each unit function independently. Note (1) Unit No. is set by SW2 on the indoor unit control PCB. Unit No. setting by SW2 is necessary for the indoor unit only. SW2: For setting of 0 – 9, A – F Outdoor unit Signal wiring between outdoor unit and indoor units 0 1 2 3 F Indoor unit R Remote controller wiring Remote controller (2) Unit No. may be set at random unless duplicated, it should be better to set orderly like 0, 1, 2…, F to avoid mistake. 2) (r) Display to the remote controller a) Center or each remote controller basis, heating preparation: the youngest unit No. among the operating units in the remote mode (or the center mode unless the remote mode is available) is displayed. b) Inspection display, filter sign: Any of unit that starts initially is displayed. c) Confirmation of connected units Pressing “AIR CON No.” button on the remote controller displays the indoor unit address. If “S” “T” button is pressed at the next, it is displayed orderly starting from the unit of youngest No. d) In case of anomaly i) If any anomaly occurs on a unit in a group (a protective function operates), that unit stops with the anomalous stop but any other normal units continue to run as they are. ii) Signal wiring procedure Signal wiring between indoor and outdoor units should be made on each unit same as the normal wiring. For the group control, lay connect with sires wiring between rooms using terminal blocks (X, Y) of remote controller. Connect the remote controller communication wire separately from the power supply wire or wires of other electric devices (AC220V or higher). High ceiling control In the case of indoor unit installed in a higher ceiling room, the airflow volume mode control can be changed with the wired remote controller indoor unit function “FAN SPEED SET”. Indoor unit airflow setting UH - Hi - Me - Lo Hi - Me - Lo Hi - Lo Hi - Me STANDARD FAN SPEED SET HIGH SPEED1, 2 UH - UH - Hi - Me UH - Hi - Me UH - Me UH - Hi Fan tap Notes (1) Factory default is Standard. (2) At the hot-start and heating thermostat OFF, or other, the indoor unit fan is operated at the low speed tap of each setting. (3) This function is not able to be set with wireless remote controller or simple remote controller (RCH-E3) (s) Abnormal temperature thermistor (return air/indoor heat exchanger) wire/short-circuit detection 1) 2) Broken wire detection When the return air temperature thermistor detects -50°C or lower or the heat exchanger temperature thermistor detect -50°C or lower for 5 seconds continuously, the compressor stops. After a 3-minute delay, the compressor restarts but, if it is detected again within 60 minutes after the initial detection for 6 minutes continuously, stops again (the return air temperature thermistor: E7, the heat exchanger temperature thermistor: E6). Short-circuit detection If the heat exchanger temperature thermistor detects 70°C or higher for 5 seconds continuously at 2 minutes and 20 seconds after the compressor ON during cooling operation, the compressor stops (E6). - 36 - '12 • SRK-T-126 (t) Operation permission/prohibition (In case of adopting card key switches or commercially available timers) When the indoor function setting of wired remote controller for “Operation permission/prohibition” is changed from “Invalid (Factory default)” to “ Valid”, following control becomes effective. 1 2 CnT Blue 12V Optional XR1 3 4 5 XR2 XR3 Card key switch XR5 XR4 6 XR5 Normal operation (Factory default) ON CnT-6 *1 Operation Operation permission/prohibition mode “Valid” (Local setting) OFF ON OFF Stop Operation permission*1 Operation prohibition (Unit stops) Only the “LEVEL INPUT” is acceptable for external input, however when the indoor function setting of “Level input (Factory default)” or “Pulse input” is selected by the function for “External input” of the wired remote controller, operation status will be changed as follows. *(1) *(2) (3) (u) In case of “Level input” setting In case of “Pulse input” setting Unit operation from the wired remote controller becomes available*(1) Unit starts operation *(2) In case that “Operation permission/prohibition mode” setting is “Valid” and “External input” setting is “Level input (Factory default)”; ① When card key switch is ON (CnT-6 ON: Operation permission), start/stop operation of the unit from the wired remote controller becomes available. ② When card key switch is OFF (CnT-6 OFF: Operation prohibition), the unit stops operation in conjunction with OFF signal, and start/stop operation of the unit from the wired remote controller becomes not available. In case that “Operation permission/prohibition mode” setting is “Valid” and “External input” setting is “Pulse input (Local setting)”; ① When card key switch is ON (Operation permission), the unit starts operation in conjunction with ON signal. and also start/stop operation of the unit from the wired remote controller becomes available. ② When card key switch is OFF (Operation prohibition), the unit stops operation in conjunction with OFF signal, and start/stop operation of the unit from the wired remote controller becomes not available. This function is invalid only at “Center mode” setting done by central controller. External input/output control (CnT) Be sure to connect the wired remote controller to the indoor unit. Without wired remote controller remote operation by CnT is not possible to perform. 1 2 CnT Blue 12V Optional ①Operation output XR1 3 4 5 XR2 XR3 XR4 6 (CnT-2: XR1) ②Heating output (CnT-3: XR2) ③Thermostat ON output (CnT-4: XR3) ④Error output (CnT-5: XR4) ⑤Remote operation input (CnT-6: No-voltage contactor) XR5 1) Output for external control (remote display) Following output connectors (CnT) are provided on the indoor control PCB for monitoring operation status. ① Operation output: Outputs DC12V signal for driving relay during operation ② Heating output: Outputs DC12V signal for driving relay during heating operation ③ Thermostat ON output: Outputs DC12V signal for driving relay when compressor is operating. ④ Error output: Outputs DC12V signal for driving relay when anomalous condition occurs. - 37 - '12 • SRK-T-126 2) Remote operation input Remote operation input connector (CnT-6) is provided on the indoor control PCB. However remote operation by CnT-6 is not effective, when “Center mode” is selected by center controller. In case of plural unit (twin, triple, double twin), remote operation input to CnT-6 on the slave indoor unit is invalid. Only the “LEVEL INPUT” is acceptable for external input, however when the indoor function setting of “Level input (Factory default)” or “Pulse input” is selected by the function for “External input” of the wired remote controller, operation status will be changed as follows. a) In case of “Level input” setting (Factory default) ,QSXWVLJQDOWR&Q7LV2))ĺ21««XQLW21 ,QSXWVLJQDOWR&Q7LV21ĺ2))««XQLW2)) Operation is not inverted. N O N O FF O T-6 in n C t u p FF O F OF N O it n U A it n U B N O FF O FF O FF O N O N O FF O FF O Note: The latest operation has priority b) It is available to operate/stop by remote controller or center controller In case of “Pulse input” setting (Local setting) ,WLVHIIHFWLYHRQO\ZKHQWKHLQSXWVLJQDOWR&Q7LVFKDQJHG2))ĺ21DQGDWWKDWWLPHXQLWRSHUDWLRQ>212))@LV inverted. N O N O FF O T-6 in n C t u p FF O FF O N O it n U A it n U B FF O FF O N O N O FF O Remote operation a) In case of multiple units (Max. 16 indoor units group) are connected to one wired remote controller When the indoor function setting of wired remote controller for “External control set” is changed from “Individual (Factory default)” to “ For all units”, all units connected in one wired remote controller system can be controlled by external operation input. Outdoor unit Outdoor unit Outdoor unit Outdoor unit ① ② ③ ④ 123 123 Signal & Power Outdoor unit Ⓝ 123 123 123 123 123 123 External input 123 XY Indoor unit ① XY Cn 3) 123 XY XY XY XY Indoor unit ② Indoor unit ③ Indoor unit ④䇭(master) Indoor unit Ⓝ Wired remote controller Ex. Indoor units = ①+②+③+④+……Ⓝ ≦16 units - 38 - '12 • SRK-T-126 Individual operation (Factory default) ON CnT-6 All units operation (Local setting) OFF Only the unit directly connected to the remote controller can be operated. Unit ① only Only the unit directly connected to the remote controller can be stopped opeartion. Unit ① only ON OFF All units in one remote controller system can be stopped operation. All units in one remote controller system can be operated. Units ①−Ⓝ Units ①−Ⓝ When more than one indoor unit (Max. 16 indoor units) are connected in one wired remote controller system: (1) With the factory default, external input to CnT-6 is effective for only the unit ①. (2) When setting “For all unit” (Local setting), all units in one remote controller system can be controlled by external input to CnT-6 on the indoor unit ①. (3) (v) Fan control at heating startup 1) 2) 3) (w) External input to CnT-6 on the other indoor unit than the unit ① is not effective. Start conditions At the start of heating operation, if the difference of setting temperature and return air temperature is 5°C or higher after the end of hot start control, this control is performed. Contents of control a) Sampling is made at each minute and, when the indoor unit heat exchanger temperature (detected with ThI-R) is 37°C or higher, present number of revolutions of indoor unit fan speed is increased by 10min-1. b) If the indoor unit heat exchanger temperature drops below 37°C at next sampling, present number of revolutions of indoor unit fan speed is reduced by 10min-1. End conditions ,QGRRUIDQVSHHGLVUHGXFHGWRWKHVHWWLQJDLUÀRZYROXPHZKHQWKHFRPSUHVVRU2))LVHVWDEOLVKHGDQGDWPLQXWHVDIWHU the start of heating operation. Room temperature detection temperature compensation during heating :LWKWKHVWDQGDUGVSHFL¿FDWLRQWKHFRPSUHVVRULVWXUQHG212))ZLWKWKHWKHUPRVWDWVHWWLQJWHPSHUDWXUH:KHQWKHWKHUPRVWDW is likely to turn OFF earlier because the unit is installed at the ceiling where warm air tends to accumulate, the setting can be changed with the wired remote controller indoor unit function “ ”. The compressor and the heater are turned ON/OFF at one of the setting temperature +3, +2 or +1°C in order to improve the feeling of heating. The setting temperature, however, has the upper limit of 30°C. Standard Operation Compressor When it is set at +3°C Compressor Operation Stop -1 Stop +1 +2 Setting temperature Room temperature (deg) (x) +4 Setting temperature Room temperature (deg) Return air temperature compensation This is the function to compensate the deviation between the detection temperature by the return air temperature thermistor and the measured temperature after installing the unit. 1) It is adjustable in the unit of 0.5°C with the wired remote controller indoor unit function “RETURN AIR TEMP”. • +1.0°C, +1.5°C, +2.0°C 2) • -1.0°C, -1.5°C, -2.0°C Compensated temperature is transmitted to the remote controller and the compressor to control them. Note (1) The detection temperature compensation is effective on the indoor unit thermistor only. - 39 - '12 • SRK-T-126 9.4 Operation control function by the outdoor controller Defrosting operation 1) Starting conditions (Defrosting operation can be started only when all of the following conditions are met.) a) After start of heating operation When it elapsed 45 minutes. (Accumulated compressor operation time) b) After end of defrosting operation When it elapsed 45 minutes. (Accumulated compressor operation time) c) Outdoor heat exchanger sensor (TH1) temperature When the temperature has been below –5ºC for 3 minutes continuously. d) The difference between the outdoor air sensor temperature and the outdoor heat exchanger sensor temperature f The outdoor air temperature ≧ 0°C : 7°C or higher f -15°C ≦ The outdoor air temperature < 0°C : 4/15 × The outdoor air temperature + 7°C or higher f The outdoor air temperature < -15°C : -5°C or higher 0 Outdoor heat exchanger temperature (㷄) (a) -5 re tu ra pe -10 em tt r n io sta t ra Defrost operation start e st -15 op fro e D -20 -20 -15 -10 -5 0 5 10 Outdoor air temperature (㷄) e) During continuous compressor operation In addition, when the speed command from the indoor controller of the indoor unit during heating operation has counted 0 rps 10 times or more and all conditions of a), b), c) and e) above and the outdoor air temperature is 3°C or OHVVDUHVDWLV¿HGQRWHWKDWZKHQWKHWHPSHUDWXUHIRURXWGRRUKHDWH[FKDQJHUVHQVRU7+LV&RUOHVVUSVRU more, -4°C or less: less than 62 rps), defrost operation is started. 2) Ending conditions (Operation returns to the heating cycle when either one of the following is met.) a) Outdoor heat exchanger sensor (TH1) temperature: 13ºC or higher b) &RQWLQXHGRSHUDWLRQWLPHRIGHIURVWLQJĺ)RUPRUHWKDQPLQXWHVDQGVHFRQGV ¡Defrast operation Heating operation Max. 16 minutes and 50 seconds 2~7 minutes ̪ Hot keep operation ̪Depends on an operation condition, the time can be longer than 7 minutes. - 40 - '12 • SRK-T-126 (b) Cooling overload protective control 1) Operating conditions: When the outdoor air temperature (TH2) has become continuously for 30 seconds at 41ºC or more, or 47ºC or more with the compressor running, the lower limit speed of compressor is brought up. Model Item Outdoor air temperature FDTC25, 35VF More than 41 at less than 47 47°C or more 30 rps 40 rps Lower limit speed 2) Detail of operation a) The outdoor fan is stepped up by 3 speed step. (Upper limit 7th speed.) b) The lower limit of compressor command speed is set to 30 or 40 rps and even if the calculated result becomes lower than that after fuzzy calculation, the speed is kept to 30 or 40 rps. However, when the thermo becomes OFF, the speed is reduced to 0 rps. 3) (c) Reset conditions::KHQHLWKHURIWKHIROORZLQJFRQGLWLRQLVVDWLV¿HG a) The outdoor air temperature is lower than 40ºC or 46ºC. b) The compressor command speed is 0 rps. Cooling high pressure control 1) Purpose: Prevents anomalous high pressure operation during cooling. 2) Detector: Outdoor heat exchanger sensor (TH1) 3) Detail of operation: (Example) Fuzzy (3) 6rps After lapse of 30 sec. or over (1) (3) 6rps After lapse of 30 sec. or over (1) lower limit speed 30 rps (3) After lapse of 30 sec. or over 0rps 58 53 63 Outdoor unit heat exchanger temperature (°C) Notes (1) When the outdoor heat exchanger temperature is in the range of 58~63 ºC, the speed is reduced by 6 rps at each 30 seconds. (2) When the temperature is 63 ºC or higher, the compressor is stopped. (3) When the outdoor heat exchanger temperature is in the range of 53~58 ºC, if the compressor command speed is been maintained and the operation has continued for more than 30 seconds at the same speed, it returns to the normal cooling operation. (d) Cooling low outdoor temperature protective control 1) Operating conditions: When the outdoor air temperature (TH2) is 22ºC or lower continues for 20 seconds while the compressor command speed is other than 0 rps. 2) Detail of operation: a) The lower limit of the compressor command speed is set to 44 (30) rps and even if the speed becomes lower than 44 (30) rps, the speed is kept to 44 (30) rps. However, when the thermo becomes OFF, the speed is reduced to 0 rps. b) The upper limit of the compressor command speed is set to 50 (60) rps and even if the calculated result becomes higher than that after fuzzy calculation, the speed is kept to 50 (60) rps. Note (1) Values in ( ) are for outdoor air temperature is 22ºC or 25ºC ON Upper limit 50 rps Lower limit 44 rps ON Upper limit 60 rps Lower limit 30 rps f Values of A, B, C, D Outdoor air temp. (˚C) OFF A B C D Outdoor air temperature (°C) - 41 - A B C D First time 0 3 22 25 Since the seconds times 7 10 25 28 '12 • SRK-T-126 3) (e) Reset conditions::KHQHLWKHURIWKHIROORZLQJFRQGLWLRQLVVDWLV¿HG a) 7KHRXWGRRUDLUWHPSHUDWXUH7+LV'Û&RUKLJKHU b) The compressor command speed is 0 rps. Heating high pressure control 1) Purpose: Prevents anomalous high pressure operation during heating. 2) Detector: Indoor heat exchanger sensor (THI-R) 3) Detail of operation: (Example) Fuzzy After lapse of 20 sec. or over(3) 4rps (1) (3) 8rps 4rps After lapse of 20 sec. or over (1) (2) 8rps (2) lower limit speed 30 rps (3) After lapse of 20 sec. or over 0rps C B A D Indoor unit heat exchanger temperature(°C) Notes (1) When the indoor heat exchanger temperature is in the range of B~C ºC, the speed is reduced by 4 rps at each 20 seconds. (2) When the indoor heat exchanger temperature is in the range of C~D ºC, the speed is reduced by 8 rps at each 20 seconds. When the temperature is D ºC or higher continues for 1 minute, the compressor is stopped. (3) When the indoor heat exchanger temperature is in the range of A~B ºC, if the compressor command speed is been maintained and the operation has continued for more than 20 seconds at the same speed, it returns to the normal heating operation. (4) Indoor blower retains the fan tap when it enters in the high pressure control. Outdoor blower is operated in accordance with the speed. f Temperature list Unit : ºC A B C D 48 53 55 58 48.5 56 58 61 95 < = RPSmin < 97 97 < = RPSmin < 104 48.5 56 ~ 55.5 58 61 48.5 55.5 ~ 51.5 58 ~ 53.5 61 104 < = RPSmin < 115 115 < = RPSmin 48.5 ~ 42.1 51.5 ~ 44 53.5 ~ 47.3 61 42.1 44 47.3 61 RPSmin < 50 50 < = RPSmin < 95 Note (1) RPSmin: The lower one between the outdoor speed and the compressor command speed (f) Heating overload protective control 1) Operating conditions: When the outdoor air temperature (TH2) is 22ºC or higher continues for 30 seconds while the 2) Detail of operation: compressor command speed other than 0 rps. a) Taking the upper limit of compressor command speed range at 60 rps, if the output speed obtained with the fuzzy calculation exceeds the upper limit, the upper limit value is maintained. b) The lower limit of compressor command speed is set to 40 rps and even if the calculated result becomes lower than that after fuzzy calculation, the speed is kept to 40 rps. However, when the thermo becomes OFF, the speed is reduced to 0 prs. c) Inching prevention control is activated and inching prevention control is carried out with the minimum speed set at 40 rps. 3) d) The outdoor fan is set on 2nd speed. e) The indoor fan is stepped up by 1 speed step. Reset conditions: The outdoor air temperature (TH2) is lower than 21ºC. - 42 - '12 • SRK-T-126 (g) Heating low outdoor temperature protective control 1) Operating conditions: When the outdoor air temperature (TH2) is lower than -10ºC or higher continues for 30 sec- 2) Detail of operation: onds while the compressor command speed is other than 0 rps. 7KHORZHUOLPLWFRPSUHVVRUFRPPDQGVSHHGLVFKDQJHDVVKRZQLQWKH¿JXUHEHORZ Lower limit 45 rps Normal operation -10 -7 Outdoor air temperature (°C) 3) (h) :KHQHLWKHURIWKHIROORZLQJFRQGLWLRQLVVDWLV¿HG Reset conditions: a) The outdoor air temperature (TH2) becomes -7ºC. b) The compressor command speed is 0 rps. Compressor overheat protection 1) Purpose: It is designed to prevent deterioration of oil, burnout of motor coil and other trouble resulting from the compressor overheat. 2) Detail of operation a) Speeds are controlled with temperature detected by the sensor mounted on the discharge pipe. (Example) Fuzzy 4 rps (1) After lapse of 3 min. or over (3) After lapse of 3 min. or over (3) After lapse of 3 min. or over (3) 4 rps Lower limit (4) 0 rps 100 Discharge pipe temperature (˚C) 90 110 Notes (1) When the discharge pipe temperature is in the range of 100~110ºC, the speed is reduced by 4 rps. (2) When the discharge pipe temperature is raised and continues operation for 20 seconds without changing, then the speed is reduced again by 4 rps. (3) If the discharge pipe temperature is in the range of 90~100ºC even when the compressor command speed is maintained for 3 minutes when the temperature is in the range of 90~100ºC, the speed is raised by 1 rps and kept at that speed for 3 minutes. This process is repeated until the command speed is reached. (4) Lower limit speed Item Model Lower limit speed b) (i) Cooling Heating 20 rps 30 rps If the temperature of 110ºC is detected by the sensor on the discharge pipe, then the compressor will stop immediately. When the discharge pipe temperature drops and the time delay of 3 minutes is over, the unit starts again within 1 hour but there is no start at the third time. Current safe 1) Purpose: Current is controlled not to exceed the upper limit of the setting operation current. 2) Detail of operation: ,QSXW FXUUHQW WR WKH FRQYHUWHU LV PRQLWRUHG ZLWK WKH FXUUHQW VHQVRU ¿[HG RQ WKH SULQWHG FLUFXLW board of the outdoor unit and, if the operation current value reaches the limiting current value, the compressor command speed is reduced. If the mechanism is actuated when the compressor command speed is less than 30 rps, the compressor is stopped immediately. Operation starts again after a delay time of 3 minutes. (j) Current cut 1) Purpose: Inverter is protected from overcurrent. 2) Detail of operation: Output current from the inverter is monitored with a shunt resistor and, if the current exceeds the setting value, the compressor is stopped immediately. Operation starts again after a delay time of 3 minutes. - 43 - '12 • SRK-T-126 (k) Outdoor unit failure This is a function for determining when there is trouble with the outdoor unit during air conditioning. 7KHFRPSUHVVRULVVWRSSHGLIDQ\RQHRIWKHIROORZLQJLQLWHPLVVDWLV¿HG2QFHWKHXQLWLVVWRSSHGE\WKLVIXQFWLRQLWLVQRW restarted. 1) When the input current is measured at 1 A or less for 3 continuous minutes or more. 2) If the outdoor unit sends a 0 rps signal to the indoor unit 3 times or more within 20 minutes of the power being turned on. (l) Rotor lock If the motor for the compressor does not turn after it has been started, it is determined that a compressor lock has occurred and the compressor is stopped. (m) Outdoor fan motor protection If the outdoor fan motor has operated at 75 rpm or under for more than 30 seconds, the compressor and fan motor are stopped. (n) Outdoor fan control at low outdoor temperature U Cooling 1) Operating conditions: When the outdoor air temperature (TH2) is 22ºC or lower continues for 30 seconds while the 2) Detail of operation: After the outdoor fan operates at A speed for 60 seconds; the corresponding outdoor heat compressor command speed is other than 0 rps. exchanger temperature shall implement the following controls. f Value of A Outdoor fan a) Outdoor temperature > 10˚C 2nd speed Outdoor temperature < = 10˚C 1st speed Outdoor heat exchanger temperature < = 21ºC After the outdoor fan speed drops (down) to 1 speed for 60 seconds; if the outdoor heat exchanger temperature is b) lower than 21ºC, gradually reduce the outdoor fan speed by 1 speed. (Lower limit 1st speed) 21ºC < Outdoor heat exchanger temperature < = 38ºC After the outdoor fan speed maintains at A speed for 20 seconds; if the outdoor heat exchanger temperature is 21ºC~ 38ºC, maintain outdoor fan speed. c) Outdoor heat exchanger tempeature > 38ºC After the outdoor fan speed rises (up) to 1 speed for 60 seconds; if the outdoor heat exchanger temperature is higher than 38ºC, gradually increase outdoor fan speed by 1 speed. (Upper limit 3rd speed) 3) Reset conditions::KHQHLWKHURIWKHIROORZLQJFRQGLWLRQVLVVDWLV¿HG a) The outdoor air temperature (TH2) is 25ºC or higher. b) The compressor command speed is 0 rps. U Heating 1) Operating conditions: When the outdoor air temperature (TH2) is 4ºC or lower continues for 30 seconds while the 2) Detail of operation: The outdoor fan is stepped up by 2 speed step at each 20 seconds. (Upper limit 8th speed) compressor command speed is other than 0 rps. 3) Reset conditions::KHQHLWKHURIWKHIROORZLQJFRQGLWLRQVLVVDWLV¿HG a) The outdoor air temperature (TH2) is 6ºC or higher. b) The compressor command speed is 0 rps. - 44 - '12 • SRK-T-126 (o) Refrigeration cycle system protection 1) Starting conditions a) When 5 minutes have elapsed after the compressor ON or the completion of the defrost control b) Other than the defrost control c) When, after meeting the conditions of a) and b) above, the compressor speed, indoor air temperature (Th1) and indoor heat exchanger temperature (Th2) have met the conditions in the following table for 5 minutes: 2) 3) Operation mode Compressor speed (N) Indoor air temperature (Th1) Indoor air temperature (Th1)/ Indoor heat exchanger temperature (Th2) Cooling 50 < =N 10 < = Th1< = 40 Th1−4<Th2 Heating 50 < =N 0< = Th1< = 40 Th2<Th1+6 Contents of control a) When the conditions of 1) above are met, the compressor stops. b) Error stop occurs when the compressor has stopped 3 times within 60 minutes. Resetting condition When the compressor has been turned OFF - 45 - '12 • SRK-T-126 10. MAINTENANCE DATA 10.1 Diagnosing of microcomputer circuit (1) Selfdiagnosis function (a) Check indicator table Whether a failure exists or not on the indoor unit can be know by the contents of remote controller error code, indoor unit green LED (power pilot lamp and microcomputer normality pilot lamp) or red LED (check pilot lamp). (i) Indoor unit Remote controller Error code Red LED Indoor control PCB Green LED (1) Red LED Stays OFF Keeps flashing No-indication Stays OFF Stays OFF Stays OFF or INSPECT I/U WAIT * 3 times flash Keeps flashing Stays OFF Keeps flashing Stays OFF * Keeps flashing 2 times flash Keeps flashing 2 times flash Keeps flashing 2 times flash Keeps flashing 1 time flash Keeps flashing Location of trouble — 1 time flash Keeps flashing • Normal operation 1 time flash Keeps flashing Stays OFF 1 time flash Stays OFF 64 Repair Repair Remote controller • Defective remote controller PCB Indoor-outdoor units connection • Poor connection, breakage of indoor-outdoor units connection wire wire Remote controller • Poor connection of remote controller signal wire (White) * For wire breaking at power ON, the LED is OFF • Intrusion of noise in remote controller wire Remote controller indoor control PCB *• Defective remote controller or indoor control PCB (defective communication circuit)? Indoor-outdoor units connection wire • Poor connection of wire between indoor-outdoor units during operation (disconnection, loose connection) • Anomalous communication between indoor-outdoor units by noise, etc. (Noise) Outdoor control PCB Outdoor control PCB Fuse Indoor heat exchanger temperature thermistor Indoor return air temperature thermistor • CPU-runaway on outdoor control PCB *• Occurrence of defective outdoor control PCB on the way of power supply (defective communication circuit)? • Defective outdoor control PCB on the way of power supply Drain trouble • Defective drain pump (DM), broken drain pump wire, disconnected connector Keeps flashing Fan motor 66 ∼ 70 Repair Replacement of remote controller or PCB 71 Repair Power reset or Repair Replacement of PCB 72 Replacement Replacement, repair of temperature thermistor Replacement of *• Defective indoor control PCB (Defective temperature thermistor input circuit)? PCB Replacement, repair • Defective indoor return air temperature thermistor(defective element, broken wire, short-circuit) of temperature • Poor contact of temperature thermistor connector thermistor Replacement of *• Defective indoor control PCB (Defective temperature thermistor input circuit)? PCB *• Defective indoor control PCB (Defective temperature thermistor input circuit)? Number of connected indoor units Repair • Defective indoor heat exchanger temperature thermistor(defective element, broken wire, short-circuit) • Poor contact of temperature thermistor connector Indoor control PCB Indoor control PCB 65 • Blown fuse Indoor heat exchanger tempera• Defective indoor heat exchanger temperature thermistor (short-circuit) ture thermistor Float switch Replacement of remote controller • Improper setting of master and slave by remote controller Remote controller wires (Noise) Keeps flashing Keeps flashing Keeps flashing — • Poor connection, breakage of remote controller wire * For wire breaking at power ON, the LED is OFF. Option Stays OFF — • Power OFF, broken wire/blown fuse, broken transformer wire Installation or operating condi• Heating over-load (Anomalously high indoor heat exchanger temperature) tion Keeps flashing Reference page Remote controller wires Indoor control PCB 1 time flash Repair method Indoor unit power supply Indoor control PCB Keeps flashing Description of trouble • Anomalous float switch operation (malfunction) *• Defective indoor control PCB (Defective float switch input circuit) *• Defective indoor control PCB (Defective DM drive output circuit)? Repair Repair • Defective indoor control PCB Indoor control PCB • Improper operation mode setting Remote controller temperature • Broken wire of remote controller temperature thermistor thermistor 75 Repair Replacement of PCB • Defective optional parts (At optional anomalous input setting) Indoor control PCB 74 Repair Replacement of temperature thermistor Replacement of PCB Replacement, repair of DM • When multi-unit control by remote controller is performed,the number of units is over • Defective fan motor 73 Replacement, repair Replacement 76 77 78 Repair 79 Repair 80 Note (1) Normal indicator lamp (Indoor unit: Green) extinguishes (or lights continuously) only when CPU is anomalous. It keeps flashing in any trouble other than anomalous CPU. PDUNLQWKH'HVFULSWLRQRIWURXEOHPHDQVWKDWLQRUGLQDU\GLDJQRVLVLWFDQQRWLGHQWLI\WKHFDXVHGH¿QLWHO\DQGLIWKHWURXEOHLVUHSDLUHGE\UHSODFLQJ the part, it is judged consequently that the replaced part was defective. - 46 - '12 • SRK-T-126 (ii) Outdoor unit Remote controller Error code Red LED Indoor control PCB Green LED Red LED Location of trouble Installation, operation status Stays OFF Keeps flashing Outdoor heat exchanger temperature sensor Outdoor control PCB Installation, operation status Stays OFF Keeps flashing Discharge pipe temperature sensor Outdoor control PCB Stays OFF Keeps flashing Outdoor heat exchanger temperature sensor • Higher outdoor heat exchanger temperature • Defective outdoor heat exchanger temperature sensor *• Defective outdoor control PCB (Defective temperature sensor input circuit)? • Higher discharge temperature • Defective discharge pipe temperature sensor *• Defective outdoor control PCB (Defective temperature sensor input circuit)? • Defective outdoor heat exchanger temperature sensor, broken wire or poor connector connection Repair method Stays OFF Keeps flashing Stays OFF Keeps flashing Stays OFF Keeps flashing Stays OFF Keeps flashing Outdoor control PCB Fan motor Outdoor control PCB Reference page Repair Replacement, repair of temperature sensor Replacement of PCB 81 Repair Replacement, repair of temperature sensor Replacement of PCB Replacement, repair of temperature sensor Replacement of PCB Replacement, repair of temperature Outdoor air temperature sensor • Defective outdoor air temperature sensor, broken wire or poor connector connection Keeps Stays OFF sensor flashing Replacement of Outdoor control PCB *• Defective outdoor control PCB (Defective temperature sensor input circuit)? PCB Replacement, repair Discharge pipe temperature • Defective discharge pipe temperature sensor, broken wire or poor connector of temperature Keeps sensor connection Stays OFF sensor flashing Replacement of Outdoor control PCB *• Defective outdoor control PCB (Defective temperature sensor input circuit)? PCB Replacement of Keeps Outdoor control PCB, compressor • Current cut (Anomalous compressor over-current) PCB Stays OFF flashing Installation, operation status • Service valve closing operation Repair Outdoor control PCB Keeps flashing Description of trouble 82 83 *• Defective outdoor control PCB (Defective temperature sensor input circuit)? • Defective active filter • Defective fan motor • Defective outdoor control PCB Power transistor error (outdoor • Power transistor error control PCB) 84 85 86・87 Repair PCB replacement 88 Replacement 89 Replacement of PCB 90 Operation status • Shortage in refrigerant quantity Repair Installation status • Service valve closing operation Service valve opening check 91 Replacement 92 Replacement 93 Replacement 94 • Overload operation Keeps • Current safe stop • Overcharge flashing • Compressor locking Keeps Stays OFF Compressor, outdoor control PCB • Anomalous compressor startup flashing Keeps Stays OFF Compressor • Anomalous compressor rotor lock flashing Stays OFF 1RWHPDUNLQWKH'HVFULSWLRQRIWURXEOHPHDQVWKDWLQRUGLQDU\GLDJQRVLVLWFDQQRWLGHQWLI\WKHFDXVHGH¿QLWHO\DQGLIWKHWURXEOHLVUHSDLUHGE\UHSODFLQJWKH part, it is judged consequently that the replaced part was defective. - 47 - '12 • SRK-T-126 (iii) Display sequence of error codes or inspection indicator lamps N Occurrence of one kind of error Displays are shown respectively according to errors. N Occurrence of plural kinds of error Section Category of display Error code on remote controller • Displays the error of higher priority (When plural errors are persisting) Red LED on indoor control PCB • Displays the present errors. (When a new error has occurred after the former error was reset.) N Error detecting timing Section Error description Drain trouble (Float switch activated) Communication error at initial operation Error code “ WAIT Remote controller communication circuit error Communication error during Indoor operation Excessive number of connected indoor units by controlling with one remote controller Return air temperature thermistor anomaly Indoor heat exchanger temperature thermistor anomaly Whenever excessively connected indoor units is detected after power ON. -50°C or lower is detected for 5 seconds continuously within 60 minutes after initial detection of this anomalous temperature. -50°C or lower is detected for 5 seconds continuously within 60 minutes after initial detection of this anomalous temperature. Or 70°C or higher is detected for 5 seconds continuously. -55°C or lower is detected for 5 seconds continuously 3 times within 40 minutes after initial detection of this anomalous sensor. Or -55°C or higher is detected for 5 seconds continuously within 20 seconds after power ON. -55°C or lower is detected for 5 seconds continuously 3 times within 40 minutes after initial detection of this anomalous sensor. Or -55°C or lower is detected for 5 seconds continuously within 20 seconds after power ON. -25°C or lower is detected for 5 seconds continuously 3 times within 40 minutes after initial detection of this anomalous sensor. Outdoor air temperature sensor anomaly Outdoor Error detecting timing Whenever float switch is activated after 30 second had past since power ON. No communication between indoor and outdoor units is ” established at initial operation. Communication between indoor unit and remote controller is interrupted for mote than 2 minutes continuously after initial communication was established. Communication between indoor and outdoor units is interrupted for mote than 2 minutes continuously after initial communication was established. Outdoor heat exchanger temperature sensor anomaly Discharge pipe temperature sensor anomaly - 48 - '12 • SRK-T-126 N Error log and reset Error indicator Memorized error log Remote controller display • Higher priority error is memorized. Red LED on indoor control PCB • Not memorized. Reset • Stop the unit by pressing the ON/OFF switch of remote controller. • If the unit has recovered from anomaly, it can be operated. N Resetting the error log • Resetting the memorized error log in the remote controller Holding down “CHECK” button, press “TIMER” button to reset the error log memorized in the remote controller. • Resetting the memorized error log The remote controller transmits error log erase command to the indoor unit when “VENTI” button is pressed while holding down “CHECK” button. Receiving the command, the indoor unit erase the log and answer the status of no error. (2) Troubleshooting procedure When any trouble has occurred, inspect as follows. Details of respective inspection method will be described on later pages. Trouble (3) Confirmation of power supply (Indoor/ outdoor unit) Confirmation of remote controller and LEDs on the PCB of indoor unit (Indoor, remote controller) Check of the anomalous operation data on the remote controller Inspection of the unit/ controller Replacement/ repair of faulty part, test run, adjustment Troubleshooting at the indoor unit :LWKWKHWURXEOHVKRRWLQJ¿QGRXWDQ\GHIHFWLYHSDUWE\FKHFNLQJWKHYROWDJH$&'&UHVLVWDQFHHWFDWUHVSHFWLYHFRQQHFWRUV at around the indoor PCB, according to the inspection display or operation status of unit (the compressor does not run, fan does not run, the 4-way valve does not switch, etc.), and replace or repair in the unit of following part. (a) Replacement part related to indoor PCB’s Control PCB, power supply PCB, temperature thermistor (return air, indoor heat exchanger), remote controller switch and fuse Note (1) With regard to parts of high voltage circuits and refrigeration cycle, judge it according to ordinary inspection methods. (b) Instruction of how to replace indoor control PCB SAFETY PRECAUTIONS Read the "SAFETY PRECAUTIONS" carefully first of all and then strictly follow it during the replacement in order to protect yourself. ٨ The precautionary items mentioned below are distinguished into two levels, WARNING and CAUTION. Both mentions the important items to protect your health and safety so strictly follow them by any means. WARNING Wrong installation would cause serious consequences such as injuries or death. CAUTION Wrong installation might cause serious consequences depending on circumstances. ٨ After completing the replacement, do commissioning to confirm there are no anomaly. ٨ ޓޓޓޓޓޓޓޓޓޓ WARNING Replacement should be performed by the specialist. If you replace the PCB by yourself, it may lead to serious trouble such as electric shock or fire. ٨ Replace the PCB correctly according to these instructions. Improper replacement may cause electric shock or fire. ٨ Shut off the power before electrical wiring work. Replacement during the applying the current would cause the electric shock, unit failure or improper running. It would cause the damage of connected equipment such as fan motor,etc. ٨ Fasten the wiring to the terminal securely, and hold the cable securely so as not to apply unexpected stress on the terminal. Loose connections or hold could result in abnormal heat generation or fire. ٨ Check the connection of wiring to PCB correctly before turning on the power, after replacement. Defectiveness of replacement may cause electric shock or fire. ٨ ޓޓޓޓޓޓޓޓޓCAUTION In connecting connector onto the PCB, connect not to deform the PCB. It may cause breakage or malfunction. ٨ Insert connecter securely, and hook stopper. It may cause fire or improper running. ٨ Bundle the cables together so as not to be pinched or be tensioned. It may cause malfunction or electric shock for disconnection or deformation. ٨ - 49 - '12 • SRK-T-126 • Control PCB PSB012D931F D Replace and set up the PCB according to this instruction. ԘSet to an appropriate address and function using switch on PCB. ޓSelect the same setting with the removed PCB. item switch Content of control Address SW2 Plural indoor units control by 1 remote controller Test run SW7-1 Normal Operation check/drain motor test run 䋭 䇳 䇳㪑㪦㪥䇭䋭㪑㪦㪝㪝 ԙSet to an appropriate capacity using the model selector switch(SW6). Select the same capacity with the PCB removed from the unit. ޓ SW6 SW6 -1 -2 -3 -4 ON ޚ 㧙 㧙 㧙 25VF 35VF 㧙 ޚ㧙 㧙 1 2 3 4 Example setting fro 25VF ԚReplace the PCB 1. Fix the PCB so as not to pitch the cords. 2. Connect connectors to the PCB. Connect a cable connector with the PCB connector of the same color. 3.Do not pass CPU surrounding about wirings. ԛControl PCB Parts mounting are different by the kind of PCB. 㪚㪥㪡㩿㪮㪿㫀㫋㪼䋩 㪣㫆㫌㫍㪼㫉㩷㫄㫆㫋㫆㫉 㪚㪥㪱㩿㪮㪿㫀㫋㪼䋩 㪟㪘 㪚㪥㪫䋨㪙㫃㫌㪼䋩 㪜㫏㫋㪼㫉㫅㪸㫃㩷㫊㫎㫀㫋㪺㪿 㪚㪥㪭䋨㪩㪼㪻䋩 㪘㫌㫋㫆㩷㫃㫀㪽㫋 㪪㪮㪉㩷㩿㪙㫃㫌㪼㪀 㪘㪻㪻㫉㪼㫊㫊㩷㫊㪼㫋㫋㫀㫅㪾 㪚㪥㪮㪋㩿㪙㫃㫌㪼䋩 㪧㫆㫎㪼㫉㩷㪧㪚㪙 㪪㪮㪌 㪤㪸㫊㫋㪼㫉㪆㪪㫃㪸㫍㪼 㫊㪼㫋㫋㫀㫅㪾 㪚㪥㪮㪊㩿㪩㪼㪻䋩 㪧㫆㫎㪼㫉㩷㪧㪚㪙 㪚㪥㪜㩿㪮㪿㫀㫋㪼䋩 㪩㪘㪤㩷㪺㪿㪼㪺㫂㪼㫉 㪚㪥㪞䋨㪙㫃㫌㪼䋩 㪪㪮㪍 㪚㪸㫇㪸㪺㫀㫋㫐㩷㫊㪼㫋㫋㫀㫅㪾 㪧㪸㫉㫋㩷㫅㫌㫄㪹㪼㫉 - 50 - 㪚㪥㪙㩿㪮㪿㫀㫋㪼䋩 㪩㪼㫄㫆㫋㪼 㪺㫆㫅㫋㫉㫆㫃㫃㪼㫉 㪚㪥㪠㩿㪙㫃㫌㪼䋩 㪝㫃㫆㪸㫋㩷㪪㪮 㪚㪥㪚㩿㪩㪼㪻䋩 㪟㫌㫄㫀㪻㫀㫋㫐 㫊㪼㫅㫊㫆㫉 㪚㪥㪟㩿㪙㫃㪸㪺㫂䋩 㪫㪿㪼㫉㫄㫀㫊㫋㫆㫉 㩿㪩㪼㫋㫌㫉㫅㩷㪸㫀㫉㪀 㪚㪥㪭㪉㩿㪙㫃㪸㪺㫂㪀 㪘㫌㫋㫆㩷㫃㫀㪽㫋 㪪㪮㪎 㪝㫌㫅㪺㫋㫀㫆㫅㩷㫊㪼㫋㫋㫀㫅㪾 㪚㪥㪥㩿㪰㪼㫃㫃㫆㫎䋩 㪫㪿㪼㫉㫄㫀㫊㫋㫆㫉 㩿㪟㪼㪸㫋㩷㪼㫏㪺㪿㪸㫅㪾㪼㫉㪀 '12 • SRK-T-126 • Power PCB PSB012D953A This PCB is a general PCB. Replace the PCB according to this instruction. ԘReplace the PCB (refer to below dwg.) 1. Unscrew terminal of the wiring(yellow/green) soldered to PCB from the box. 2. Cut the band that binds the wiring (red and blue) from connector CNW1 and CNW2, and the wiring (yellow/green) from PCB (T2/T3) . (Note 1) 䇭 (However, do not cut the band that binds only the red and blue wirings.) 3. Replace the PCB only after all the wirings connected to the connector are removed. 4. Fix the board such that it will not pinch any of the wires. 5. Reconnect the wirings to the PCB. Wiring connector color should match with the color of connector of the PCB. (Note 2) 6. Let the wiring (red and blue) pass beneath the (yellow/green) wiring and bind together with band. 7. Screw back the terminal of wiring (yellow/green) from PCB(T1䋬T2/T3), that was removed in 1. In that case, do not place the crimping part of the wiring under the PCB. 䇭 1): It might not be applicable on some models. (Note 䇭 2): After replacing PCB, connection between capacitor assy and connector CNP is no longer needed. (Note ԙPower PCB Parts mounting are different by the kind of PCB. 㪚㪥㪤㩿㪮㪿㫀㫋㪼䋩 㪝㪸㫅㩷㫄㫆㫋㫆㫉 㪚㪥㪮㪇䋨㪮㪿㫀㫋㪼䋩 㪫㪼㫉㫄㫀㫅㪸㫃㩷㪹㫃㫆㪺㫂 䌔䋱㩿㪰㪼㫃㫃㫆㫎㪆㪞㫉㪼㪼㫅䋩 㪜㪸㫉㫋㪿 㪚㪥㪮㪈㩿㪙㫃㫌㪼䋩 㪚㫆㫅㫋㫉㫆㫃㩷㪧㪚㪙 㪚㪥㪮㪉㩿㪩㪼㪻䋩 㪚㫆㫅㫋㫉㫆㫃㩷㪧㪚㪙 㪫㪉㩿㪰㪼㫃㫃㫆㫎㪆㪞㫉㪼㪼㫅䋩 㪜㪸㫉㫋㪿 㪫㪊㩿㪰㪼㫃㫃㫆㫎㪆㪞㫉㪼㪼㫅䋩 㪜㪸㫉㫋㪿 㩿㪥㫆㫋㪼㩷㪉㪀㩷㪚㪥㪧㩿㪮㪿㫀㫋㪼㪀 㪚㪸㫇㪸㪺㫀㫋㫆㫉㩷㪸㫊㫊㫐 㪧㪸㫉㫋㩷㫅㫌㫄㪹㪼㫉 - 51 - 㪚㪥㪩䋨㪮㪿㫀㫋㪼䋩 㪛㫉㪸㫀㫅㩷㫄㫆㫋㫆㫉 '12 • SRK-T-126 ٨DIP switch setting list Switches SW2 SW6-1 SW6-2 SW6-3 SW6-4 SW7-1 SW7-2 SW7-3 SW7-4 JSL1 Description Default setting Address No. setting at plural indoor units control by 1 R/C As per model Test run, Drain motor Reserved Powerful mode Reserved Superlink terminal spare Normal*/Test run Valid*/Invalid Normal*/switch to spare * Default setting Table 1: Indoor unit model selection with SW6-1-SW6-4 SW6-1 SW6-2 SW6-3 SW6-4 0-F 0 Model selection 0: OFF 1:ON 25VF 35VF 1 0 0 1 0 0 0 0 - 52 - OFF OFF ON OFF With Remarks See table 1 Normal keep OFF Valid keep OFF '12 • SRK-T-126 (4) Check of anomalous operation data with the remote Number 01 Data Item (Operation Mode) 02 (Set Temperature) 03 (Return Air Temperature) 04 (Remote Controller Thermistor Tempeature) 05 (Indoor Heat Exchanger Thermistor / U Bend) 06 (Indoor Heat Exchanger Thermistor /Capillary) 07 (Indoor Heat Exchanger Thermistor /Gas Header) 08 (Indoor Unit Fan Speed) loading). 09 (Frequency Requirements) Next, operation data of the indoor unit will be displayed. Skip to step . 10 (Response Frequency) When plural indoor units is connected, the smallest address number 11 (Pulse of Indoor Unit Expansion Value) controller Operation data can be checked with remote control unit operation. button. Press the The display change “ Press the ” (SET) button while “ ” is displayed. When only one indoor unit is connected to remote controller, “ ” is displayed (blinking indication during data of indoor unit among all connected indoor unit is displayed. [Example]: ” (blinking 1 seconds) © “ “ ” blinking. Select the indoor unit number you would like to have data displayed button. with the Determine the indoor unit number with the (SET) button. (The indoor unit number changes from blinking indication to continuous indication) “ ” (The address of selected indoor unit is blinking for 2 seconds.) “ ” (A blinking indication appears while data loaded.) Next, the operation data of the indoor unit is indicated. button, the current operation data is Upon operation of the displayed in order from data number 01. 12 (Total Running Hours of The Indoor Unit) 21 (Outdoor Air Temperature) 22 (Outdoor Heat Exchanger Thermistor) 23 24 (Outdoor Heat Exchanger Thermistor) (Compressor Frequency) 25 (High Pressure) 26 27 (Low Pressure) (Discharge Pipe Temperature) 28 (Comp Bottom Temperature) 29 (Current) 30 (Target Super Heat) 31 (Super Heat) 32 (Discharge Pipe Super Heat) 33 (Protection State No. of The Compressor) 34 (Outdoor Unit Fan Speed) 35 (63H1 On/Off) 36 (Defrost Control On/Off) 37 (Total Running Hours of The Compressor) 38 (Pulse of The Outdoor Unit Expansion Valve EEVC) (Pulse of The Outdoor Unit Expansion Valve EEVH) 39 The items displayed are in the above table. *Depending on models, the items that do not have corresponding data are not displayed. To display the data of a different indoor unit, press the button, which allows you to go back to the indoor unit selection screen. Pressing the Pressing the button will stop displaying data. (RESET) button during remote control unit operation will undo your last operation and allow you to go back to the previous screen. ~If two (2) remote controllers are connected to one (1) inside unit, only the master controller is available for trial operation and FRQ¿UPDWLRQRIRSHUDWLRQGDWD7KHVODYHUHPRWHFRQWUROOHULVQRWDYDLODEOH - 53 - '12 • SRK-T-126 (5) Inverter checker for diagnosis of inverter output 䇭㩷䃂Checking method (a) Setup procedure of checker. 1) Power OFF (Turn off the breaker). 2) Remove the terminal cover of compressor and disconnect the wires (U, V, W) from compressor. 3) Connect the wires U (Red) , V (White) and W (Black) of the checker to the terminal of disconnected wires (U, V, W) from compressor respectively. (b) Operation for judgment. 1) Power ON and start check operation on cooling or heating mode. 2) Check ON/OFF status of 6 LED's on the checker. 3) Judge the PCB by ON/OFF status of 6 LED's on the checker. ON/OFF status of LED If all of LED are ON/OFF according to following pattern Outdoor PCB Normal Power ON Anomalous During this period, ON/OFF status of LED is repeated cyclically according to following pattern 3 min. 4) If all of LED stay OFF or some of LED are ON/OFF Start check operation Stop check operation Stop check operation within about 2minutes after starting check operation. ޛInverter Checkerޜ LED LED ON/OFF pattern LED1 LED3 LED5 LED2 LED4 LED6 LED1 LED3 LED5 LED2 LED4 LED6 LED1 LED3 LED5 LED2 LED4 LED6 LED1 LED3 LED5 Cyclically Faston terminal Red White U Black V W Connect to the terminal of the wires which are disconnected from compressor. - 54 - LED2 LED4 LED6 LED1 LED3 LED5 LED2 LED4 LED6 LED1 LED3 LED5 LED2 LED4 LED6 䃂䇭ON 䂾䇭OFF '12 • SRK-T-126 Outdoor unit controller failure diagnosis circuit diagram 89. (6) - 55 - '12 • SRK-T-126 10.2 Troubleshooting flow (1) List of troubles No. Remote controller display Description of trouble Reference page 1 None Operates but does not cool. 57 2 None Operates but does not heat. 58 3 None Earth leakage breaker activated 59 4 None Excessive noise/vibration (1/3) 60 5 None Excessive noise/vibration (2/3) 61 6 None Excessive noise/vibration (3/3) 62 7 None Louver motor failure 63 8 None Power supply system error (Power supply to indoor control PCB) 64 65 9 None Power supply system error (Power supply to remote controller) 10 INSPECT I/U INSPECT I/U (When 1 or 2 remote controllers are connected) 66 11 INSPECT I/U INSPECT I/U (Connection of 3 units or more remote controllers) 67 12 WAIT Communication error at initial operation 68~70 13 E1 Remote controller communication circuit error 71 14 E5 Communication error during operation 72 15 E6 Indoor heat exchanger temperature thermistor anomaly 73 16 E7 Return air temperature thermistor anomaly 74 17 E8 Heating overload operation 75 18 E9 Drain trouble 76 19 E10 Excessive number of connected indoor units (more than 17 units) by controlling with one remote controller 77 20 E16 Indoor fan motor anomaly 78 21 E19 Indoor unit operation check, drain motor check setting error 79 22 E28 Remote controller temperature thermistor anomaly 80 23 E35 Cooling overload operation 81 24 E36 Discharge pipe temperature error 82 25 E37 Outdoor heat exchanger temperature sensor anomaly 83 26 E38 Outdoor air temperature sensor anomaly 84 27 E39 Discharge pipe temperature sensor anomaly 28 E42 Current cut 29 E47 Active filter voltage error 88 30 E48 Outdoor fan motor anomaly 89 31 E51 Power transistor anomaly 90 32 E57 Insufficient refrigerant amount or detection of service valve closure 91 33 E58 Current safe stop 92 34 E59 Compressor startup failure 93 35 E60 Anomalous compressor rotor lock 94 85 86, 87 - 56 - '12 • SRK-T-126 (2) Troubleshooting Error code Remote controller: None 1. Applicable model LED Green Red Content Operates but does not cool Indoor .HHSVÀDVKLQJ Stays OFF 5. Troubleshooting All models Diagnosis Countermeasure Check the indoor unit fan operation. Check the temperature differnce between return and supply air. 2. Error detection method Is the temperature differnce between return and supply air 10-20degC at cooling? YES Does the heat load increase after installtion? NO It is normal. (This unit is designed to start in the soft start mode by detecting the under dome temperature of compressor when it restart after power reset. YES NO It is necessary to replace to higher capacity one or to install additional unit. Mistake in model selection. Calculate heat load once more. Is the compressor operating? NO “ WAIT ” message is displayed (for 3 seconds) when performing cooling, defrosting and heating operations from the remote controller. YES NO 3. Condition of Error displayed Is the compressor rotation speed low? NO YES 4. Presumable cause • Poor compression of compressor • Faulty expansion valve operation YES Check which control “Determination control of conpressor rotation speed” or “Protective control by controlling compressor rotation speed” is appropriate to this phenomenon. (1) Are the temperature conditions of room and outdoor air close YES to the rated conditions? Note (1) Outdoor: 35°C, Indoor: 27°C NO The unit is operating normally but is operating under the contol for protecting compressor or other respective parts. Note: - 57 - Compressor refrigerant oil protection control at starting is activated. Compressor may be stopped by the error detection control. For the contents of control, refer to anomalous stop control by controlling compressor rotation speed of microcomputor control functions. Inspect the followings. • Minor clogging of filter • Minor clogging of heat exchanger • Minor short-circuit • Minor shortage of refrigerant amount • Poor compression of compressor Considering appropriate operation control, check suspicious points. Inspect the followings for reference. • Major clogging of filter • Major clogging of heat exchanger • Major short-circuit • Major shortage of refrigerant amount • Compressor protection ON • Indoor fan tap '12 • SRK-T-126 Error code Remote controller: None 1.Applicable model LED Green Red Content Operates but does not heat Indoor .HHSVÀDVKLQJ Stays OFF 5. Troubleshooting All models Diagnosis Countermeasure Check the indoor unit fan operation. Check the temperature differnce between return and supply air. 2. Error detection method Is the temperature differnce between return and supply air 10-30degC at heating? YES Does the heat load increase after installtion? NO It is normal. (This unit is designed to start in the soft start mode by detecting the under dome temperature of compressor when it restart after power reset. YES NO It is necessary to replace to higher capacity one or to install additional unit. Mistake in model selection. Calculate heat load once again. Is the compressor operating? NO “ WAIT ” message is displayed (for 3 seconds) when performing cooling, defrosting and heating operations from the remote controller. YES NO 3. Condition of Error displayed Is the compressor rotation speed low? NO YES 4. Presumable cause • Faulty 4-way valve operation • Poor compression of compressor • Faulty expansion valve operation YES Check which control “Determination control of conpressor rotation speed” or “Protective control by controlling compressor rotation speed” is appropriate to this phenomenon. (1) Are the temperature conditions of room and outdoor air close YES to the rated conditions? Note (1) Outdoor: 7°C, Indoor: 20°C NO The unit is operating normally but is operating under the contol for protecting compressor or other respective parts. Note: - 58 - Compressor refrigerant oil protection control at starting is activated. Compressor may be stopped by the error detection control. For the contents of control, refer to anomalous stop control by controlling compressor rotation speed of microcomputor control functions. Inspect the followings. • Minor clogging of filter • Minor clogging of heat exchanger • Minor short-circuit • Minor shortage of refrigerant amount • Poor compression of compressor Considering appropriate operation control, check suspicious points. Inspect the followings for reference. • Major clogging of filter • Major clogging of heat exchanger • Major short-circuit • Major shortage of refrigerant amount • Compressor protection ON • Indoor fan tap '12 • SRK-T-126 Error code Remote controller: None 1.Applicable model LED Green Red Content Earth leakage breaker activated Indoor Stays OFF Stays OFF 5. Troubleshooting All models Diagnosis Are OK the insulation resistance and coil resistance of compressor? Countermeasure NO Replace compressor.* NO Secure insulation resistance. YES 2. Error detection method Is insulation of respective harnesses OK? Is any harness bitten between pannel and casing or etc? YES Check the outdoor unit grounding wire/earth leakage breaker. 3. Condition of Error displayed Check of the outdoor unit grounding wire/earth leakage breaker Run an independent grounding wire from the grounding screw of outdoor unit to the grounding terminal on the distribution panel. (Do not connect to another grounding wire.) In order to prevent malfunction of the earth leakage breaker itself, confirm that it is conformed to higher harmonic regulation. * Insulation resistance of compressor 4. Presumable cause • Defective compressor • Noise • Immediately after installation or when the unit has been left for long time without power supply, the insulation resistance may drop to a few M because of refrigerant migrated in the compressor. When the earth breaker is activated at lower insulation resistance, check the following points. 6 hours after power ON, check if the insulation resistance recovers to normal. When power ON, crankcase heater heat up compressor and evaporate the refrigerant migrated in the compressor. Check if the earth leakage breaker is conformed to higher harmonic regulation or not. Since the unit is equipped with inverter, it is necessary to use components conformed to higher harmonic regulation in order to prevent malfunction of earth leakage breaker. Note: - 59 - '12 • SRK-T-126 Error code Remote controller: None 1.Applicable model LED Green Red Indoor – – Content Excessive noise/vibration (1/3) 5. Troubleshooting All models Diagnosis Does noise/vibration occur during or soon after stopping operation of air-conditioner? 2. Error detection method If excessive noise/vibration SHUVLVWVZKHQVXI¿FLHQW time has elapsed after stopping the unit, it is considered that the airconditioner is not the source. NO YES YES [Installation work] Does noise/vibration occur not only from the air-conditioner but also from entire building? Does the installation of indoor/outdoor unit loose? YES NO Are pipes touching the wall, etc? YES [Product] Does noise/vibration occur from operating fan (fan only)? YES Is there a fan or louver touching other components? NO NO To next page 4. Presumable cause Improper installation work • Improper anti-vibration work at instllation • Insufficient strength of mounting face Defective product • Before/after shipping from factory Improper adjustment during commissioning • Excess/shortage of refrigerant, etc. Note: - 60 - Check the installed condition carefully, and correct the position or insert rubber cushions or others into the gap, if necessary. Prevent the vibration from transmitting to wall and etc E\¿[LQJSLSHVRQWKHZDOO or wrapping rubber cushion around the pipe which goes through the hole in the wall or applying other appropriate means. Strength of ceiling ZDOOÀRRUHWFPD\EH LQVXI¿FLHQW5HYLHZWKH installing position or reinforce it. NO NO 3. Condition of Error displayed Countermeasure YES Check for leaning of installed unit or anomalous mounting of fan, louver or motor and specify the contacting point and correct it. When the heat exchanger RU¿OWHULVFORJJHGFOHDQ them. In case that the unit is installed at the site where background noise is very low, small noise from indoor unit can be heard, but it is normal. Before installation, check for background noise. If backgound nois is very low, convince client prior to installation. '12 • SRK-T-126 Error code Remote controller: None 1.Applicable model LED Green Red Indoor – – Content Excessive noise/vibration (2/3) 5. Troubleshooting All models Diagnosis Countermeasure From previous page Are the pipes contacting the casing? 2. Error detection method [Unit side] Does noise/vibration occur when the cooling/ heating operation is performed normally? YES Rearrange the piping to avoid contact with the casing. YES It is noise/vibration that is generated when the refrigerant gas or liquid ÀRZWKURXJKLQVLGHRI piping of air-conditioner. It is likely to occur particularly during cooling or defrosting in the heating mode. It is normal. YES NO Is it heard continuous hissing or roaring sound? NO NO To next page Are hissing sounds heard at the startup or stopping? YES NO Is blowing sound heard at the start/stop of defrosting during heating? 3. Condition of Error displayed YES NO Is cracking noise heard during heating operation? YES NO 4. Presumable cause Hissing noise is heard during cooling operation or after stopping. NO Note: - 61 - YES The noise/vibration occurs when the refrigerant starts RUVWRSVÀRZLQJ,WLV normal. When the defrosting starts or stops during heating, WKHUHIULJHUDQWÀRZLV reversed due to switching 4-way valve. This causes a large change in pressure which produces a blowing sound. It may accompany also the hissing sounds as mentioned above. They are normal. After the start or stop of heating operation or during defrosting, abrupt changes in temperature cause resin parts to shrink or expand. This is normal. It is the sound produced by the drain pump that discharges drain from the indoor unit. The pump continues to run for 5 minutes after stopping the cooling operation. This is normal. Apply the damper sealant at places considered to be the sources such as the pressure reducing mechanism (expansion valve), capillary, etc. '12 • SRK-T-126 Error code Remote controller: None 1.Applicable model LED Green Red Indoor – – Content Excessive noise/vibration (3/3) 5. Troubleshooting All models Diagnosis Countermeasure From previous page 2. Error detection method Adjustment during commissioning Does noise/vibration occur when the cooling/heating operation is in anomalous condition? ,ILQVXI¿FLHQWFRROLQJ heating problem happens due to anomalous operating conditions at cooling/ heating, followings are suspicious. • Overcharge of refrigerant • Insufficient charge of refrigerant • Intrusion of air, nitrogen, etc. In such occasion, it is necessary to recover refrigerant, vacuum-dry and recharge refrigerant. * Since there could be many causes of noise/ vibration, the above do not cover all. In such case, check the conditions when, where, how the noise/vibration occurs according to following check point. 3. Condition of Error displayed • Indoor/outdoor unit • Cooling/heating/fan mode • Startup/stop/during operation • Operating condition (Indoor/outdoor temperatures, pressure) • Time it occurred • Operation data retained by the remote controller such as compressor rotation speed, heat exchanger temperature, EEV opening degree, etc. • Tone (If available, record the noise) • Any other anomalies 4. Presumable cause Note: - 62 - '12 • SRK-T-126 Error code Remote controller: None 1.Applicable model LED Green Red Content Louver motor failure Indoor .HHSVÀDVKLQJ Stays OFF 5. Troubleshooting All models Diagnosis Countermeasure Check at the indoor unit side. Operate after waiting for more than 1 minute. 2. Error detection method Does the louver operate at the power on? NO NO Is LM wiring broken? YES YES Is LM locked? NO YES Is the louver operable with the remote controller? YES Repair wiring. Defective indoor control PCB ª Replace. Replace LM. Normal 3. Condition of Error displayed NO LM: louver motor 4. Presumable cause • Defective LM • LM wire breakage • Faulty indoor control PCB Note: - 63 - Adjust LM lever and then check again. '12 • SRK-T-126 Error code Remote controller: None 1.Applicable model LED Green Indoor Red Power supply system error Stays OFF Stays OFF (Power supply to indoor control PCB) Content 5. Troubleshooting All models Diagnosis Is AC220/230/240V detected between 1 and 2 on the terminal block of indoor unit? Countermeasure NO Is AC220/230/240V for 1-phase unit detected between 1 and 2 on the terminal block of outdoor unit? YES 2. Error detection method NO Misconnection or breakage of connecting wires YES Are fuses OK (F200, F201)? Defective outdoor control 3&%1RLVH¿OWHU NO Is the check of resistance between , of CNW0 OK? YES NO Defective indoor control or power PCB ª Replace. NO Replace FM, LM, etc. YES Is the checked result of resistance of FM, LM, etc OK? 3. Condition of Error displayed (1) Is DC5V detected between - of CNW2? YES Replace fuse. NO Defective indoor power PCB ª Replace. NO Open JX1. Note (1) for GND YES Is JX1 open? YES 4. Presumable cause • Misconnection or breakage of connecting wires • Blown fuse • Faulty indoor control or power PCB • Broken harness • Faulty outdoor control PCB (Noise filter) Note: - 64 - Defective indoor control PCB ª Replace. '12 • SRK-T-126 Error code Remote controller: None 1.Applicable model LED Green Red Indoor .HHSVÀDVKLQJ Stays OFF Content Power supply system error (Power supply to remote controller) 5. Troubleshooting All models Diagnosis Isn't there any loose connection of remote controller wires? Countermeasure YES Correct. YES Replace wires. YES Replace remote controller. NO Defective indoor power PCBªReplace. NO 2. Error detection method Isn't remote controller wire broken or short-circuited? NO Disconnect remote controller wires. 3. Condition of Error displayed Is DC15V or higher detected between X-Y of indoor unit terminal block? NO Is DC180V between - of CNW2? YES Defective indoor control PCBªReplace. 4. Presumable cause • Remote controller wire breakage/short-circuit • Defective remote controller • Malfunction by noise • Faulty indoor power PCB • Broken harness • Faulty indoor control PCB Note: - 65 - '12 • SRK-T-126 Error code Remote controller: INSPECT I/U 1.Applicable model LED Green Red Content Indoor .HHSVÀDVKLQJ Stays OFF INSPECT I/U (When 1 or 2 remote controllers are connected) 5. Troubleshooting All models Diagnosis Countermeasure Are 2 units of remote controller connected? YES NO ⑴, ⑵ 2. Error detection method Communication between indoor unit and remote controller is disabled for more than 30 minutes after the power on. ⑵ Is it set at the slave remote controller? Set one remote controller for “Master” and the other for “Slave” Note (1) Use SW1 to set at master or slave. YES Set SW1 on remote controller PCB at “Master”. Note (2) “Slave” is displayed on the remote controller LCD. NO Does it become normal? NO Do more than one indoor units have the same address? Set address again. (SW2 on indoor control PCB) YES Separate remote controller wires from high voltage wires. NO 3. Condition of Error displayed Same as above YES Are remote controller wires laid along high voltage wires? NO Disconnect the connecting wire between the indoor and outdoor unit. 4. Presumable cause • Improper setting • Surrounding environment • Defective remote controller communication circuit • Faulty indoor control PCB Power supply reset Does DM start 60 seconds later automatically. YES NO Note: If any error is detected 30 minutes after displaying “ WAIT “INSPECT I/U”. - 66 - Defective indoor control PCBªReplace. Defective remote controller ªChange. ” on the remote controller, the display changes to '12 • SRK-T-126 Error code Remote controller: INSPECT I/U 1.Applicable model LED Green Red Content Indoor .HHSVÀDVKLQJ Stays OFF INSPECT I/U (Connection of 3 units or more remote controller) 5. Troubleshooting All models Diagnosis Are more than 3 units of remote controller connected? Countermeasure YES Reduce to 2 units or less. NO 2. Error detection method Indoor unit cannot communicate for more than 30 minutes after the power on with remote controller. Does remote controller display “Slave”? YES Change remote controller setting to “Master”. (SW1 on remote controller PCB) NO Do more than one indoor units have the same address? YES Change address. (SW2 on indoor control PCB) YES Change to master. (SW5-1, 2 on indoor control PCB) YES Correct NO Correct NO Defective outdoor control PCBªReplace. NO Broken connecting wireª Correct. NO Is it set to a slave indoor unit. SW5-1, 2? NO 3. Condition of Error displayed Is there loose or wrong connection at the termanal of wiring between indoor and outdoor units? NO Same as above Is the grounding wire connected properly? YES Is approx. DC20V detected between - on the outdoor unit terminal block? YES 4. Presumable cause • Improper setting • Surrounding environment • Defective remote controller communication circuit • Faulty indoor control or power PCB • Faulty outdoor control PCB Is approx. DC20V detected between - on the indoor unit terminal block? YES Defective indoor control or power PCBªReplace. Note: If any error is detected 30 minutes after displaying “ “INSPECT I/U”. - WAIT 67 - ” on the remote controller, the display changes to '12 • SRK-T-126 LED Error code Remote controller: WAIT 1.Applicable model Green Red Communication error at initial operation (1/3) Indoor Keeps flashing Stays OFF 5. Troubleshooting All models When the remote controller LCD displays “ WAIT ” 2 minutes after the power on. Content Diagnosis The remote controller LCD displays “ WAIT ” 2 minutes after the power on. Countermeasure Turn the breaker off once and then back on again 3 minutes later. Is normal condition restored? NO 2. Error detection method Isn’t blown the power supply fuse (15A) on the outdoor unit controller? NO Replace the power supply fuse. See next page. YES Is AC220/240V detected at the secondary side of outdoor PCB? NO Defective outdoor PCB¡Replace. NO Defective indoor control PCB¡Replace. YES Is the green LED of indoor unit flashing? YES 3. Condition of Error displayed Are wires connected properly between the indoor and the outdoor units? YES Is approx. DC20V detected between - on the outdoor unit terminal block? YES Is approx. DC20V detected between - on the indoor unit terminal block? NO Replace indoor control PCB. Correct connection wires between indoor and outdoor units. NO Defective outdoor PCB¡Replace. NO Defective connection wire (broken wire) Noise YES Defective indoor control PCB¡Replace. 4. Presumable cause • Blown fuse • Faulty outdoor PCB • Connection between PCB’s • Faulty indoor control PCB • Defective remote controller • Broken remote controller wire Note: If any anomaly is detected during communication, the error code E5 is displayed. Inspection procedure is same as above. (Excluding matters related to connection) When the power supply is reset after the occurrence of E5, the LED will display “ WAIT ” if the anomaly continues. If the breaker ON/OFF is repeated in a short period of time (within 1 minute), “ WAIT ” may be displayed. In such occasion, turn the breaker off and wait for 3 minutes. - 68 - '12 • SRK-T-126 LED Error code Remote controller: WAIT 1.Applicable model Green Red Indoor Keeps flashing Stays OFF Diagnosis Isn’t there a short-circuit between phases of outdoor PCB? Countermeasure NO Replace the outdoor PCB YES 2. Error detection method Communication error at initial operation (2/3) 5. Troubleshooting All models When the fuse is blown, the method to inspect outdoor PCB before replacing the power supply fuse Content Aren’t there cracks or burning on the power ransistor module or diode stack? NO Replace the outdoor control PCB YES Isn’t reactor the anomalous? NO Replace the reactor. YES Replace fuse. 3. Condition of Error displayed 4. Presumable cause • Blown fuse • Faulty outdoor PCB • Faulty reactor Note: - 69 - '12 • SRK-T-126 LED Error code Remote controller: WAIT 1.Applicable model Green Red Communication error at initial operation (3/3) Indoor Keeps flashing Stays OFF 5. Troubleshooting All models When the remote controller display is extinguished after the power on. Content Diagnosis Countermeasure Remote controller display is extinguished after the power on. Is the green LED on the indoor unit flashing? NO Is the fuse on the indoor control PCB OK? 2. Error detection method NO Replace fuse. YES Is approx. 10-11V detected between wires at the remote controller side after disconnecting the remote controller? YES YES Are wires connected properly between the indoor and the outdoor units? NO Short-circuit on remote controller wire Defective remote controller NO Correct wires. NO Defective outdoor PCBªReplace. NO Defective connection wire (Broken wire) Noise NO Defective indoor control PCBªReplace. YES 3. Condition of Error displayed Is approx. DC20V detected between - on the outdoor unit terminal block? YES Is approx DC20V detected between - on the indoor unit terminal block? YES 4. Presumable cause • Blown fuse • Connection between PCB’s • Blown fuse • Faulty indoor control PCB • Defective remote controller • Wire breakage on remote controller • Faulty outdoor PCB Note: - 70 - '12 • SRK-T-126 Error code Remote controller: E1 1.Applicable model LED rGeen Red Content Indoor .HHSVÀDVKLQJ Stays OFF Remote controller communication circuit error 5. Troubleshooting All models Diagnosis Is it possible to reset normally by the power reset? Countermeasure Malfunction by noise Check peripheral environment. YES NO 2. Error detection method When normal communication between the remote controller and the indoor unit is interrupted for more than 2 minutes. (Detectable only with the remote controller) Turn SW7-1 to OFF. ON Remove the wire connecting between indoor/outdoor units. Power reset Does the drain pump restart automatically 1 minute later? Defective indoor control PCB ª Replace. YES NO Note (2) Does the remote controller still display “ after 3 minutes? WAIT ” even Defective remote controller ª Replace. 3. Condition of Error displayed Same as above 4. Presumable cause • Defective communication circuit between remote controller-indoor unit • Noise • Defective remote controller • Faulty indoor control PCB Note:If the indoor unit cannot communicate normally with the remote controller for 180 seconds, the indoor unit PCB starts to reset automatically. - 71 - '12 • SRK-T-126 Error code Remote controller: E5 1.Applicable model LED rGeen Red Content Communication error during operation Indoor .HHSVÀDVKLQJ 2 WLPHVÀDVK 5. Troubleshooting All models Diagnosis Countermeasure Note (1) Inspect faulty connections (disconnection, looseness) on the outdoor unit terminal block. Is the connection of signal wires at the outdoor unit side OK? 2. Error detection method When normal communication between indoor and outdoor unit is interrupted for more than 2 minutes. NO Repair signal wires. YES Note (2) Check for faulty connection or breakage of signal wires between indoor-outdoor units. Is the connection of signal NO wires between indoor-outdoor units OK? Repair signal wires. YES Power reset Has the remote controller LCD returned to normal state? NO YES 3. Condition of Error displayed Same as above is detected during operation. 4. Presumable cause • Unit No. setting error • Broken remote controller wire • Faulty remote controller wire connection • Faulty outdoor PCB Note: - 72 - Defective outdoor PCB (Defective network communication circuit) ª Replace. Unit is normal. (Malfunction by temporary noise, etc.) '12 • SRK-T-126 Error code Remote controller: E6 1.Applicable model LED rGeen Red Content Indoor heat exchanger temperature thermistor anomaly Indoor .HHSVÀDVKLQJ WLPHÀDVK 5. Troubleshooting All models Diagnosis Countermeasure Is the connection of indoor heat exchanger temperature thermistor connector OK? NO Correct. ª Insert connector securely. YES 2. Error detection method Anomalously low temperature or high temperature (resistance) is detected on the indoor heat exchanger thermistor (ThI-R1, R2 or R3). Are characteristics of indoor heat exchanger temperature thermistor OK? NO YES 3. Condition of Error displayed Temperature-resistance characteristic (Broken wire) 15 Temperature thermistor resistance (k) • When the temperature thermistor detects -50°C or lower for 5 seconds continuously, the compressor stops. After 3-minutes delay, the compressor starts again automatically, but if this error occurs again within 60 minutes after the initial detection. • Or if 70°C or higher is detected for 5 seconds continuously. 10 5k at 25°C 5 (Shot circuit) 4. Presumable cause 0 10 20 30 Temperature (°C) • Defective indoor heat exchanger thermistor connector • Indoor heat exchanger temperature thermistor anomaly • Faulty indoor control PCB Note: - 73 - 40 50 Defective indoor heat exchanger temperature thermistor ª Replace. Defective indoor control PCB ª Replace. (Defective indoor unit heat exchanger temperature thermistor input circuit) '12 • SRK-T-126 Error code Remote controller: E7 1.Applicable model LED rGeen Red Content Indoor .HHSVÀDVKLQJ WLPHÀDVK Return air temperature thermistor anomaly 5. Troubleshooting All models Diagnosis Is the connection of return air temperature thermistor connector OK? Countermeasure NO Correct. ª Connect connector. NO Defective return air temperature thermistor ª Replace. YES Defective indoor control PCB ª Replace. (Defective return air temperature thermistor input circuit) YES Anomalously low temperature or high temperature (resistance) is detected by indoor return air temperature thermistor (Thi-A) 3. Condition of Error displayed • When the temperature thermistor detects -50°C or lower for 5 seconds continuously, the compressor stops. After 3-minute delay, the compressor starts again automatically, but if this error occurs again within 60 minutes after the initial detection. 4. Presumable cause Are the characteristics of return air temperature thermistor OK? Temperature-resistance characteristic (Broken wire) Temperature thermistor resistance (k) 2. Error detection method 15 10 5k at 25°C 5 (Shot circuit) 0 • Defective return air temperature thermistor connector • Defective return air temperature thermistor • Faulty indoor control PCB 10 20 30 Temperature (°C) Note: - 74 - 40 50 '12 • SRK-T-126 Error code Remote controller: E8 1.Applicable model LED rGeen Red Content Heating overload operation Indoor .HHSVÀDVKLQJ WLPHÀDVK 5. Troubleshooting All models Diagnosis Is the air filter clogged? NO 2. Error detection method Indoor heat exchanger temperature thermistor (ThI-R1, R2, R3) Countermeasure Is the indoor heat exchanger temperature thermistor connection OK? YES Wash. NO Defective indoor heat exchanger temperature thermistor connectorª Correct. NO Defective indoor heat exchanger temperature thermistor. NO Check refrigerant system. YES Adjust YES (2) Are the characteristics of indoor heat exchanger temperature thermistor OK? YES Check the error data with the remote controller. 3. Condition of Error displayed Is the unit operating in the state of heating overload? When it is detected 5 times within 60 minutes from initial detection or when the overload condition is detected for 6 minutes continuously. Note (1) Judge if it is in the state of overload or not as follows. Is there any short-circuit of air? Isn’t there any fouling or clogging on the indoor heat exchanger? Is the outdoor fan control normal? Isn't the indoor and outdoor air temperature too high? Note (2) For characteristics of indoor heat exchanger temperature thermistor, see the error display E6. Error stop 4. Presumable cause Reset • Clogged air filter • Defective indoor heat exchanger temperature thermistor connector • Defective indoor heat exchanger temperature thermistor • Anomalous refrigerant system 56 63 Indoor heat exchanger temperature (°C) Note: During heating operation; After starting compressor, compressor rotation speed is decreased by detecting indoor heat exchanger temperature (ThI-R) in order to control high pressure. - 75 - '12 • SRK-T-126 Error code Remote controller: E9 1.Applicable model LED rGeen Red Content Drain trouble Indoor .HHSVÀDVKLQJ WLPHÀDVK 5. Troubleshooting All models Diagnosis Countermeasure Check the error data in the remote controller. Is there any overflow? NO 2. Error detection method Float switch is activated Is the CNI connected firmly? YES NO Defective indoor control PCB ª Replace. NO Defective indoor control PCB ª Replace. YES Is there any anomaly on the optional equipment? Is the humidifier connected? Check optional equipment YES YES Is the humidifier Drain Motor interlocked by the indoor unit function setting of remote controller? 3. Condition of Error displayed ,IWKHÀRDWVZLWFK23(1 is detected for 3 seconds FRQWLQXRXVO\RULIÀRDW switch connector or wire is disconnected. Correct setting to ³+XPLGL¿HU'0LQWHUORFN´ NO NO YES Drain motor ON from the remote controller Is AC220/230/240V detected at CNR connector? NO Does DM operate? NO YES YES 4. Presumable cause • Defective indoor control or power PCB • Float switch setting error • Humidifier DM interlock setting error • Optional equipment setting error • Drain piping error • Defective drain motor • Disconnection of drain motor wiring Is the drain piping unclogged? Is the drain pipe slop OK? NO YES Defective indoor power PCB ª Replace. Check wiring of drain motor Correct. Check drain motor. Note::KHQWKLVHUURURFFXUUHGDWSRZHU21GLVFRQQHFWLRQRIZLUHRUFRQQHFWRURIWKHÀRDWVZLWFKLVVXVSHFWHG&KHFNDQG correct it (or replace it, if necessary). - 76 - '12 • SRK-T-126 Error code Remote controller: E10 1.Applicable model LED rGeen Excessive number of connected indoor units (more than 17 units) by controlling with one remoto controller Red Content Indoor .HHSVÀDVKLQJ Stays OFF 5. Troubleshooting All models Diagnosis Aren't more than 17 indoor units connected to one remote controller? Countermeasure NO YES 2. Error detection method When it detects more than 17 of indoor units connected to one remote contorller 3. Condition of Error displayed Same as above 4. Presumable cause • Excessive number of indoor units connected • Defective remote controller Note: - 77 - Defective remote controller ª Replace. Reduce to 16 or less units. '12 • SRK-T-126 Error code Remote controller: E16 1.Applicable model LED rGeen Red Content Indoor fan motor anomaly Indoor .HHSVÀDVKLQJ Stays OFF 5. Troubleshooting All models Diagnosis Countermeasure Does any foreign material intervene in rotational area of fan propeller? Remove foreign material. YES NO 2. Error detection method Does the fan rotate smoothly when turned by hand? Replace the fan motor. NO Detected by rotation speed of indoor fan motor YES Note (1) for GND (1) Is DC280V detected between - of fan motor connector CNM? YES NO NO Is the fuse F202 blown? Power supply reset YES 3. Condition of Error displayed When actual rotation speed of indoor fan motor drops to lower than 200rpm for 30 seconds continuously, the compressor and the indoor fan motor stop. After 2-seconds, it starts again automatically, but if this error occurs 4 times within 60 minutes after the initial detection. NO Is it normalized? YES 4. Presumable cause • Defective indoor power PCB • Foreign material at rotational area of fan propeller • Defective fan motor • Dust on control PCB • Blown fuse • External noise, surge Note: - 78 - Check power voltage. Replace faulty fan motor and power PCB. Replace fan motor. (If the error persists after replacing the fan motor, replace the indoor control PCB.) Malfunction by temporary noise '12 • SRK-T-126 Error code Remote controller: E19 1.Applicable model LED rGeen Red Content Indoor .HHSVÀDVKLQJ WLPHÀDVK Indoor unit operation check, drain motor check setting error 5. Troubleshooting All models Diagnosis Countermeasure E19 occurs when the power ON 2. Error detection method After indoor operation check, when the communication between indoor and outdoor unit is established and SW7-1 is still kept ON. Is SW7-1 on the indoor control PCB ON ? NO Defective indoor control PCB (Defective SW7) ªReplace Turn SW7-1 on the indoor control PCB OFF and reset the power YES 3. Condition of Error displayed Same as above 4. Presumable cause Mistake in SW7-1 setting (Due to forgetting to turn OFF SW7-1 after indoor operation check) Note: - 79 - '12 • SRK-T-126 Error code Remote controller: E28 1.Applicable model LED rGeen Red Detection of anomalously low temperature (resistance) of remote controller temperature thermistor (Thc) Remote controller temperature thermistor anomaly Indoor .HHSVÀDVKLQJ Stays OFF 5. Troubleshooting All models 2. Error detection method Content Diagnosis Is the remote controller temperature thermistor connected properly? Countermeasure NO YES Are the characteristics of remote controller temperature thermistor OK? Is the thermistor wire OK? NO YES 3. Condition of Error displayed When the temperature thermistor detects -50°C or lower for 5 seconds continuously, the compressor stops. After 3-minutes delay, the compressor starts again automatically, but if this error occurs again within 60 minutes after the initial detection. 4. Presumable cause • Faulty connection of remote controller temperature thermistor • Defective remote controller temperature thermistor • Defective remote controller PCB Correct. Defective remote controller temperature thermistor ª Replace. Defective remote controller PCB ª Replace. (Defective remote controller temperature thermistor input circuit) Resistance-temperature characteristics of remote controller temperature thermistor (ThC) Temperature (°C) Resistance value (k) Temperature (°C) Resistance value (k) 0 65 30 16 1 62 32 15 2 59 34 14 4 53 36 13 6 48 38 12 8 44 40 11 10 40 42 9.9 12 36 44 9.2 14 33 46 8.5 16 30 48 7.8 18 27 50 7.3 20 25 52 6.7 22 23 54 6.3 24 21 56 5.8 26 19 58 5.4 28 18 60 5.0 Note: After 10 seconds has passed since remote controller thermistor was switched from valid to invalid, E28 will not be displayed even if the thermistor harness is disconnected. At same time the thermistor, which is effective, is switched from remote controller thermistor to indoor return air temperature thermistor. Even though the remote controller thermistor is set to be Effective, the return air temperature displayed on remote controller for checking still shows the value detected by indoor return air temperature thermistor, not by remote controller temperature thermistor. - 80 - '12 • SRK-T-126 D E L rror code E Remote controller: E35 1.Applicable model Indoor rGeen Red Content Cooling overload operation Keeps flashin g Stays OF F 5. Troubleshooting All models Diagnosis Countermeasure * For the characteristics of outdoor heat exchanger temperature Are normal sensor, refer to E37. the characteristics of outdoor heat exchanger NO temperature sensor normal? Replace outdoor heat exchanger temperature sensor. YES 2. Error detection method Anomalous stop Is the unit operating in the state of cooling overload? YES Reset NO 53 63 Outdoor heat exchanger temperature (°C) Is the high pressure control normal Check unit side. • Isn’t the air circulation of outdoor unit shortcircuited? • Are installation spaces adequate? • Isn’t there any fouling or clogging on heater exchanger? NO Control operation check* NO Defective outdoor PCBªReplace. YES 3. Condition of Error displayed When anomalous outdoor heat exchanger temperature occurs 5 times within 60 minutes or 63°C or higher continues for 10 minutes, including the compressor stop. Is the temperature (measured actually) at direction of error correct? YES 4. Presumable cause • Defective outdoor heat exchanger temperature sensor • Defective outdoor PCB • Indoor, outdoor unit installation spaces • Short-circuit of air on indoor, outdoor units • Fouling, clogging of heat exchanger • Excessive refrigerant quantity Note: - 81 - Excessive refrigerant amount: Recharge refrigerant by weighing proper amount on a scale. '12 • SRK-T-126 Error code Remote controller: E36 1.Applicable model LED rGeen Red Content Discharge pipe temperature error Indoor .HHSVÀDVKLQJ Stays OFF 5. Troubleshooting All models Diagnosis Countermeasure * For the characteristics of discharge Are the pipe temperature, refer to E39. characteristics of discharge pipe temperature NO sensor normal? Replace discharge pipe temperature sensor. YES 2. Error detection method For the error detection method, refer to the protective control by controlling compressor rotation speed and cooling high pressure protective control of micro computer control function for corresponding models. Is the discharge pipe temperature error persisted during cooling operation? YES ,QVXI¿FLHQWUHIULJHUDQW amount : Recharge refrigerant by weighing proper amount on a scale. NO Is the discharge pipe temperature control normal? NO Control operation check * NO Defective outdoor PCBªReplace. YES 3. Condition of Error displayed Is the temperature (measured actually) at detection of error correct? When discharge pipe temperature anomaly is detected 2 times within 60 minutes is compressor stop. YES * For the contents of control, refer to the protective control by controlling compressor rotation speed and cooling high pressure protective control of micro computer control function for corresponding models. 4. Presumable cause • Defective outdoor PCB • Defective discharge pipe temperature sensor • Clogged filter • Indoor, outdoor unit installation spaces • Short-circuit of air on indoor, outdoor units • Fouling, clogging of heat exchanger Note: - 82 - Check unit side: • Isn’t filter clogged? • Are adequate indoor, outdoor unit installation spaces? • Isn’t there any shortcircuit of air? • Isn’t there any fouling, clogging on indoor heat exchanger? '12 • SRK-T-126 Error code Remote controller: E37 1.Applicable model LED rGeen Red Content Outdoor heat exchanger temperature sensor anomaly Indoor .HHSVÀDVKLQJ Stays OFF 5. Troubleshooting All models Diagnosis Countermeasure Is the outdoor heat exchanger temperature sensor connector connected properly? For the characteristics of outdoor heat exchanger temperature sensor, see the following graph. Are the characteristics of outdoor heat exchanger temperature sensor OK? NO Defective outdoor heat exchanger temperature sensorªReplace. YES Defective outdoor PCBªReplace. (Defective outdoor heat exchanger temperature sensor input circuit) Temperature-resistance characteristics 3. Condition of Error displayed (Broken wire) 4. Presumable cause 15 Temperature sensor resistance (k) • When the temperature sensor detects -55 °C or lower for 20 seconds continuously within 2 minutes to 2 minutes 20 seconds after the compressor ON, the compressor stops. After 3-minutes delay, the compressor starts again automatically, but if this anomalous temperature is detected 3 times within 40 minutes. • When -55 °C or lower is detected for within 20 second after power ON. Correct connector. YES 2. Error detection method Detection of anomalously low temperature (resistance) on the outdoor heat exchanger temperature sensor NO (Shot circuit) 10 5k at 25°C 5 0 10 20 30 40 Temperature (°C) • Defective outdoor PCB • Broken sensor harness or temperature sensing section • Disconnected wire connection (connector) Note: - 83 - 50 '12 • SRK-T-126 Error code Remote controller: E38 1.Applicable model LED rGeen Red Content Outdoor air temperature sensor anomaly Indoor .HHSVÀDVKLQJ Stays OFF 5. Troubleshooting All models Diagnosis Countermeasure Is the outdoor air temperature sensor connector connected properly? NO Correct connector. YES For the characteristics of outdoor air temperature sensor, see the following graph. Is the characteristics of the NO outdoor air temperature sensor OK? 2. Error detection method Detection of anomalously low temperature (resistance) on outdoor air temperature sensor • When the temperature sensor detects -55 °C or lower for 5 seconds continuously within 2 minutes to 2 minutes 20 seconds after the compressor ON, the compressor stops. After 3-minutes delay, the compressor starts again automatically, but if this anomalous temperature is detected 3 times within 40 minutes. • When -55 °C or lower is detected for within 20 second after power ON. Temperature-resistance characteristics (Broken wire) 15 Temperature sensor resistance (k) 3. Condition of Error displayed YES 10 (Shot circuit) 4. Presumable cause 5k at 25°C 5 0 10 20 30 Temperature (°C) • Defective outdoor PCB • Broken sensor harness or temperature sensing section (Check molding.) • Disconnected wire connection (connector) Note: - 84 - 40 50 Defective outdoor air temperature sensorª Replace. Defective outdoor PCBªReplace. (Defective outdoor air temperature sensor input circuit) '12 • SRK-T-126 Error code Remote controller: E39 1.Applicable model LED Green Red Content Discharge pipe temperature sensor anomaly Indoor .HHSVÀDVKLQJ Stays OFF 5. Troubleshooting All models Diagnosis Countermeasure Is the discharge pipe temperature sensor connector connected properly? Correct connector. NO YES 2. Error detection method For the characteristics of discharge pipe Are the temperature sensor, see the following graph. characteristics of discharge pipe NO temperature sensor OK? Detection of anomalously low temperature (resistance) on the discharge pipe temperature sensor Defective outdoor PCBªReplace. (Defective temperature sensor input circuit) YES 3. Condition of Error displayed (Broken wire) Temperature-resistance characteristics Temperature sensor resistance (k) 100 When the temperature sensor detects -25 °C or lower for 5 seconds continuously within 10 minutes to 10 minutes 20 seconds after the compressor ON, the compressor stops. After 3-minutes delay, the compressor starts again automatically, but if this anomalous temperature is detected 3 times within 40 minutes. 50 [T 90°C] 00 20 (Shot circuit) 40 60 80 Temperature (°C) 4. Presumable cause • Defective outdoor PCB • Broken sensor harness or temperature sensing section (Check molding.) • Disconnected wire connection (connector) Note: - 85 - Defective discharge pipe temperature sensorª Replace. 100 120 140 '12 • SRK-T-126 LED Green Red Indoor control PCB Keeps flashing Stays OFF Error code Remote controller: E42 1.Applicable model Content Current cut (1/2) 5. Troubleshooting All models Diagnosis Is the Power supply voltage OK? Countermeasure NO Check power supply. NO Open the valves. YES 2. Error detection method In order to prevent from overcurrent of inverter, if the current exceeds the VSHFL¿FDWLRQVLWPDNHVWKH compressor stopping. Are the service valves opened? YES Is the high pressure during operation OK? NO YES 3. Condition of Error displayed Is the checked result of insulation resistance and NO coil resistance (1) of compressor motor OK? (1) 1.703 (U-V, V-W, U-W) or more at 20°C YES • If the output current of inveter H[FHHGVWKHVSHFL¿FDWLRQV it makes the compressor stopping. To next page. 4. Presumable cause • The valves closed • Faulty power supply • Insufficient refrigerant amount • Faulty compressor • Faulty power transistor module Note: - 86 - Check refrigerant amount and refregerant circuit *In case of transitional increase of high pressure and/or test run, several times restarting may recover it, because liquid refrigerant (migrated) in the compresser is discharged from the compressor. Replace compressor. '12 • SRK-T-126 Error code Remote controller: E42 1.Applicable model LED Green Red Content Current cut (2/2) Indoor Keeps flashing Stays OFF 5. Troubleshooting All models Diagnosis Countermeasure From previous page Is the checked result of power transistor module OK? 2. Error detection method In order to prevent from overcurrent of inverter, if the current exceeds the VSHFL¿FDWLRQVLWPDNHVWKH compressor stopping. NO • Defective outdoor PCBªReplace. YES • Is the space for installation of indoor and/or outdoor unit enough? • Is there any short circuit of air on indoor and/or outdoor unit? • At cooling, does the outdoor fan motor run? Are the service valves fully opened? Is the filter clogged? • At heating, does the indoor fan motor run? Are the service valves fully opened? Is the filter clogged? • Is there any liquid flooding? Is the superheat within normal range? Is the low pressure sensor and suction pipe temperature thermistor normal? • Is there any anoumalous sound on the compressor? YES 3. Condition of Error displayed • If the output current of inveter H[FHHGVWKHVSHFL¿FDWLRQV it makes the compressor stopping. After resetting power for several times does it become normal? NO YES Temporary noise may cause of anomaly. If noise source can be found, take countermeasure. 4. Presumable cause • Defective outdoor PCB • Faulty power supply • Insufficient refrigerant amount • Faulty compressor • Faulty power transistor module Note: - 87 - • Defective outdoor PCBªReplace. '12 • SRK-T-126 Error code Remote controller: E47 1.Applicable model LED Green Red Content $FWLYH¿OWHUYROWDJHHUURU Indoor Keeps flashing Stays OFF 5. Troubleshooting All models Diagnosis Countermeasure Is the power supply normal? NO Restore normal condition. NO Restore normal condition. NO Remove foreign matter like dust, fouling, etc. YES 2. Error detection method Error is displayed if the converter voltage exceeds DC340V (3 times within 20 minutes). Remote controller may be set after 3 minutes delay. Is voltage within the specified range? YES Check soldered surfaces on the outdoor PCB for foreign matter like dust, fouling, etc. YES 3. Condition of Error displayed Same as above 4. Presumable cause • Defective outdoor PCB • Dust on outdoor PCB • Anomalous power supply Note: - 88 - Defective outdoor PCBªReplace. '12 • SRK-T-126 Error code Remote controller: E48 1.Applicable model LED Green Red Content Outdoor fan motor anomaly Indoor Keeps flashing Stays OFF 5. Troubleshooting All models Diagnosis Countermeasure Does any foreign material intervene in rotational area of fan propeller? Remove foreign matter. YES NO 2. Error detection method Does the fan rotate smoothly when turned by hand? Replace fan motor. If resistance between (Vm):blue -(GND):black is detected 1k: or lower, it is faulty. NO Detected by rotation speed of outdoor fan motor YES Is DC308~336V detected between (CNFAN (black)- (red)) of fan motor connector? NO Is F3 (250V1A) fuse blown? YES 3. Condition of Error displayed When actual rotation speed of outdoor fan motor drops to 75min-1 or lower for 30 minutes continuously, the compressor and the outdoor fan motor stop. After 3-minutes delay, it starts again automatically, but if this anomaly occurs 3 times within 60 minutes after the initial detection. NO Check power supply voltage. Power supply reset YES Replace faulty fan motor and outdoor PCB. Is normal state restored? NO Replace fan motor (If anomaly persists after replacing fan motor, replace outdoor PCB.) YES Malfunction by temporary noise 4. Presumable cause • Defective outdoor PCB • Foreign material at rotational area of fan propeller • Defective fan motor • Dust on outdoor PCB • Blown F3 fuse Note: When E48 error occurs, in almost cases F3 fuse (1A) on the outdoor PCB is blown. There are a lot of cases that fuse is blown and E48 occurs due to defective fan motor. And even though only the outdoor PCB ( or fuse) is replaced,, another trouble could occur. Therefore when fuse is blown, check whether the fan motor is OK or not. $IWHUFRQ¿UPLQJWKHIDQPRWRUQRUPDOFKHFNE\SRZHU21'RQ WSRZHU21ZLWKRXWFRQ¿UPLQJWKHIDQPRWRUQRUPDO - 89 - '12 • SRK-T-126 Error code Remote controller: E51 1.Applicable model LED Green Red Content Power transistor anomaly Indoor Keeps flashing Stays OFF 5. Troubleshooting All models Diagnosis Check soldered surfaces on the outdoor control PCB for foreign matter like dust, fouling,etc. 2. Error detection method Power transistor primary current Countermeasure NO Remove foreign matter like dust, fouling, etc. YES Isn’t F2 fuse (250V, 20A)blown? Replace fuse. NO 3.Condition of Error displayed If the power transistor primary current exceeds the setting value for 3 seconds, the compressor stops. 4. Presumable cause • Faulty outdoor PCB • Dust on control PCB • Blown F2 fuse Note: - 90 - Defective outdoor PCBªReplace. '12 • SRK-T-126 Error code Remote controller: E57 1.Applicable model LED Green Red Content ,QVXI¿FLHQWUHIULJHUDQWDPRXQW or detection of service valve closure Indoor Keeps flashing Stays OFF 5. Troubleshooting All models Diagnosis Countermeasure Is the service valve fully opened? NO Open fully. NO Correct indoor heat exchanger, return air temperature thermistor connector connections. NO Defective indoor heat exchanger, return air temperature thermistor ª Replace. NO Charge refrigerant. YES 2. Error detection method • Judge insufficient refrigerant amount by detecting the temperature differnce between indoor heat exchanger (ThI-R) and indoor return air (ThI-A). Are the connections of indoor heat exchanger and/or return air temperature thermistor connectors OK? YES Are the characteristics of indoor heat exchanger and/or return air temperature thermistor OK? YES Is the low pressure during operation normal? YES 3. Condition of Error displayed :KHQWKHLQVXI¿FLHQWUHIULJHUDQW amount is detected 3 times within 60 minutes. Indoor heat exchanger, return air temperature thermistor Temperature-resistance characteristics Defective indoor control PCBªReplace. (Defective indoor heat exchanger, return air temperature thermistor input circuits) 4. Presumable cause • Defective indoor heat exchanger temperature thermistor • Defective indoor return air temperature thermistor • Defective indoor control PCB • Insufficient refregerant amount Temperature thermistor resistance (k) (Broken wire) (Shot circuit) 15 10 5k at 25°C 5 0 10 20 30 40 50 Temperature (°C) Note: When the compressor speed is 50 rps or under at 5 minutes after the start of compressor or the completion of defrosting, the low refrigerant protection control judges, by detecting the difference between the indoor heat exchanger temperature (ThI-R) and the indoor return air temperature (ThI-A), that it is in the state of gas low, and stops the compressor. Cooling: Indoor return air temperature (ThI-A) – Indoor heat exchanger temperature (ThI-R) ≧ 4 deg Heating: Indoor heat exchanger temperature (ThI-R) – Indoor return air temperature (ThI-A) ≦ 6 deg - 91 - '12 • SRK-T-126 Error code Remote controller: E58 1.Applicable model LED Green Red Content Current safe stop Indoor Keeps flashing Stays OFF 5. Troubleshooting All models Diagnosis Is the refrigerant amount nomal ? Countermeasure NO Adjust the refrigerant amount properly. NO Secure space for inlet and outlet. NO Replace compressor. NO Replace sensor. YES 2. Error detection method When the current safe control has operated at the compressor speed of 30 rps or under: Is outdoor ventilation condition good ? YES Inspect compressor YES Inspect outdor air temp. sensor 3.Condition of Error displayed Same as above NO 4. Presumable cause • Excessive refrigerant amount • Indoor,outdoor unit installation spaces • Faulty compressor • Defective outdor air temp. sensor • Defective outdoor PCB Note: - 92 - Defective outdoor PCB¡Replace. (Defective outdor air temp. sensor input circuit) '12 • SRK-T-126 Error code Remote controller: E59 1.Applicable model LED Green Red Content Compressor startup failure Indoor Keeps flashing Stays OFF 5. Troubleshooting All models Diagnosis Compressor does not start at all. Neither noise nor vibration cannot be heard Does compressor startup? Countermeasure Disconnect the outdoor fan motor connector and try to startup YES Replace outdoor fan motor NO 2. Error detection method If it fails to change over to the rotor detection operation of compressor motor Is power supply voltage OK? NO Check power supply voltage NO Check refrigerant amount and refrigerant circuit NO Repalce compressor NO Defective outdoor PCBªReplace YES Is the pressure balance at starting OK? YES Is the insulation resistance and coil resistance of compressor OK ? YES 3. Condition of Error displayed If compressor fails to startup for 42 times Is power transistor module OK? YES Is the output of inverter checker OK ? YES 4. Presumable cause • Faulty outdoor fan motor • Faulty outdoor PCB • Anomalous power supply voltage • Improper refrigerant amount and refrigerant circuit • Faulty compressor (Motor bearing) Try to startup several times Does it start? NO Defective outdoor PCBªReplace Note: Several times restarting may resolve it, because migrated liquid refrigerant in the compresser is discharged from the compressor. NO Repalce compressor Note: Insulation resistance • The unit is left for long period without power supply or soon after installation, migrated liquid refrigerant may dissolve in the refrigerant oil in the compressor. In such case insulation resistance decreases upto several M: or lower. If the electric leakage breaker is activated due to low insulation resistance, check followings. Check whehter the insulation resistance can recover or not, ater 6 hours has passed since power ON. (By energize the crankcase heater, migrated liquid refrigerant in the refrigerant oil in compressor can be evaporated) &KHFNZKHWKHUWKHHOHFWULFOHDNDJHEUHDNHFRQIRUPVWRKLJKKHUPRQLFVSHFL¿FDWLRQV (As units has inverter, in order to prevent from improper operation, be sure to use high-hermonic one.) - 93 - '12 • SRK-T-126 Error code Remote controller: E60 1.Applicable model LED Green Red Content Compressor rotor lock error Indoor Keeps flashing Stays OFF 5. Troubleshooting All models Diagnosis Is the power supply voltage OK? Countermeasure Check and correct the power supply voltage NO YES Reset the power supply and restart operation. 2. Error detection method Compressor rotor position Does the compressor start? NO Does E59 occur? Correct it based on the troubleshooting of E59 YES YES NO Does the compressor run without occurrence of E42? 3. Condition of Error displayed If it fails again to detect the rotor position after shifting to the compressor rotor position detection operation, the compressor stops. Is the output from inverter checker OK? • Defective outdoor fan motor • Defective outdoor PCB • Anomalous power supply voltage • Improper refrigerant amount and refrigerant circuit • Defective compressor (motor, bearing) Correct it based on the troubleshooting of E42 NO Defective outdoor PCBªReplace. NO Replace compressor. YES Is the noise or vibration of compressor normal? 4. Presumable cause NO YES Does it start up normally without recurrence of E60. NO Check compressor for insulation, resistance. Replace compressor if necessary. YES Defective outdoor PCBª Replace. Note: Insulation resistance • The unit is left for long period without power supply or soon after installation, migrated liquid refrigerant may dissolve in the refrigerant oil in the compressor. In such case insulation resistance decreases upto several M: or lower. If the electric leakage breaker is activated due to low insulation resistance, check followings. Check whehter the insulation resistance can recover or not, ater 6 hours has passed since power ON. (By energize the crankcase heater, migrated liquid refrigerant in the refrigerant oil in compressor can be evaporated) &KHFNZKHWKHUWKHHOHFWULFOHDNDJHEUHDNHFRQIRUPVWRKLJKKHUPRQLFVSHFL¿FDWLRQV (As units has inverter, in order to prevent from improper operation, be sure to use high-hermonic one.) - 94 - '12 • SRK-T-126 11. OPTION PARTS PJA012D730 11.1 Installation of wired remote controller (RC-E5) Read together with indoor unit's installation manual. WARNING Fasten the wiring to the terminal securely and hold the cable securely so as not to apply unexpected stress on the terminal. Loose connection or hold will cause abnormal heat generation or fire. Make sure the power supply is turned off when electric wiring work. Otherwise, electric shock, malfunction and improper running may occur. CAUTION DO NOT install the remote controller at the following places in order to avoid malfunction. (1) Places exposed to direct sunlight (2) Places near heat devices (3) High humidity places (4) Hot surface or cold surface enough to generate condensation (5) Places exposed to oil mist or steam directly (6) Uneven surface DO NOT leave the remote controller without the upper case. In case the upper cace needs to be detached, protect the remote controller with a packaging box or bag in order to keep it away from water and dust. Accessories Prepare on site Remote controller, wood screw (ø3.5t16) 2 pieces Remote controller cord (2 cores) the insulation thickness in 1mm or more. [In case of embedding cord] Erectrical box, M4 screw (2 pieces) [In case of exposing cord] Cord clamp (if needed) Installation procedure Open the cover of remote controller , and remove the screw under the buttons without fail. Remove the upper case of remote controller. Insert a flat-blade screwdriver into the dented part of the upper part of the remote controller, and wrench slightly. Screw [In case of embedding cord] Embed the erectrical box and remote controller cord beforehand. Controller cord Erectrical box (Prepare on site) Prepare two M4 screws (recommended length is 12-16mm) on site, and install the lower case to erectrical box. Choose either of the following two positions in fixing it with screws. Upper part Upper part Lower case Wiring oulet Lower case Tighten the screws after cutting off the thin part of screw mounting part. Lower part Wiring oulet Lower part Connect the remote controller cord to the terminal block. Connect the terminal of remote controller (X,Y) with the terminal of indoor unit (X,Y). (X and Y are no polarity) Install the upper case as before so as not to catch up the remote controller cord, and tighten with the screws. [In case of exposing cord] You can pull out the remote controller cord from left upper part or center upper part. Cut off the upper thin part of remote controller lower case with a nipper or knife, and grind burrs with a file etc. M4 screw 2 (Prepare on site) The thin part Upper Lower case Lower Upper Lower case Install the lower case to the flat wall with attached two wooden screws. Lower - 95 - '12 • SRK-T-126 Connect the remote controller cord to the terminal block. Connect the terminal of remote controller (X,Y) with the terminal of indoor unit (X,Y). (X and Y are no polarity) Wiring route is as shown in the right diagram depending on the pulling out direction. Sheath Upper Upper case Board Lower Sheath Upper Board Lower Wiring In case of pulling out from upper left Upper case Wiring In case of pulling out from upper center The wiring inside the remote controller case should be within 0.3mm2 (recommended) to 0.5mm2. The sheath should be peeled off inside the remote controller case. The peeling-off length of each wire is as below. Pulling out from upper left Pulling out from upper center X wiring : 215mm X wiring : 170mm Y wiring : 195mm Y wiring : 190mm The peeling-off length of sheath Install the upper case as before so as not to catch up the remote controller cord, and tighten with the screws. In case of exposing cord, fix the cord on the wall with cord clamp so as not to slack. Installation and wiring of remote controller Wiring of remote controller should use 0.3mm2 t 2 core wires or cables. (on-site configuration) Maximum prolongation of remote controller wiring is 600 m. If the prolongation is over 100m, change to the size below. But, wiring in the remote controller case should be under 0.5mm2 . Change the wire size outside of the case according to wire connecting. Waterproof treatment is necessary at the wire connecting section. Be careful about contact failure. 100 - 200m.........................0.5mm2 t 2 cores Under 300m .......................0.75mm2 t 2 cores Under 400m .......................1.25mm2 t 2 cores Under 500m .......................2.0mm2 t 2 cores Master/ slave setting when more than one remote controllers are used A maximum of two remote controllers can be connected to one indoor unit (or one group of indoor units.) Switch Indoor units SW1 Setting Contents M Master remote controller S Slave remote controller Remote controller cord (no polarity) Upper Master Remote controller SW1 "Master" Remote controller SW1 "Slave" Slave Board Lower Set SW1 to "Slave" for the slave remote controller. It was factory set to "Master" for shipment. Note: The setting "Remote controller thermistor enabled" is only selectable with the master remote controller in the position where you want to check room temperature. The air conditioner operation follows the last operation of the remote controller regardless of the master/ slave setting of it. The indication when power source is supplied When power source is turned on, the following is displayed on the remote controller until the communication between the remote controller and indoor unit settled. Master remote controller : " " Slave remote controller : " " At the same time, a mark or a number will be displayed for two seconds first. This is the software's administration number of the remote controller, not an error cord. The left mark is only an example. Other marks may appear. When remote controller cannot communicate with the indoor unit for half an hour, the below indication will appear. Check wiring of the indoor unit and the outdoor unit etc. - 96 - '12 • SRK-T-126 The range of temperature setting When shipped, the range of set temperature differs depending on the operation mode as below. Heating : 16~30˚C (55~86˚F) Except heating (cooling, fan, dry, automatic) : 18~30˚C (62~86˚F) Upper limit and lower limit of set temperature can be changed with remote controller. Upper limit setting: valid during heating operation. Possible to set in the range of 20 to 30˚C (68 to 86˚F). Lower limit setting: valid except heating (automatic, cooling, fan, dry) Possible to set in the range of 18 to 26°C (62 to 79°F). When you set upper and lower limit by this function, control as below. 1. When TEMP RANGE SET, remote controller function of function setting mode is "INDN CHANGE" (factory setting), If upper limit value is set During heating, you cannot set the value exceeding the upper limit. If lower limit value is set During operation mode except heating, you cannot set the value below the lower limit. 2. When TEMP RANGE SET, remote controller function of function setting mode is "NO INDN CHANGE" If upper limit value is set During heating, even if the value exceeding the upper limit is set, upper limit value will be sent to the indoor unit. But, the indication is the same as the temperature set. If lower limit value is set During except heating, even if the value lower than the lower limit is set, lower limit value will be sent to the indoor unit. But, the indication is the same as the temperature set. How to set upper and lower limit value 1. Stop the air-conditioner, and press (SET) and (MODE) button at the same time for over three seconds . The indication changes to "FUNCTION SET ". 2. Press button once, and change to the "TEMP RANGE " indication. 3. Press (SET) button, and enter the temperature range setting mode. 4. Select "UPPER LIMIT " or "LOWER LIMIT " by using button. 5. Press (SET) button to fix. 6. When "UPPER LIMIT " is selected (valid during heating) Indication: " SET UP" "UPPER 30˚C " Select the upper limit value with temperature setting button . Indication example: "UPPER 26˚C " (blinking) Press (SET) button to fix. Indication example: "UPPER 26˚C" (Displayed for two seconds) After the fixed upper limit value displayed for two seconds, the indication will return to "UPPER LIMIT ". 7. When "LOWER LIMIT " is selected (valid during cooling, dry, fan, automatic) Indication: " SET UP" "LOWER 18˚C " Select the lower limit value with temperature setting button . Indication example: "LOWER 24˚C " (blinking) Press (SET) button to fix. Indication for example: "LOWER 24˚C" (Displayed for two seconds) After the fixed lower limit value displayed for two seconds, the indication will return to "LOWER LIMIT ". 8. Press ON/OFF button to finish. It is possible to finish by pressing ON/OFF button on the way, but unfinished change of setting is unavailable. During setting, if you press (RESET) button, you return to the previous screen. Previous button - 97 - '12 • SRK-T-126 The functional setting The initial function setting for typical using is performed automatically by the indoor unit connected, when remote controller and indoor unit are connected. As long as they are used in a typical manner, there wiil be no need to change the initial settings. If you would like to change the initial setting marked “ ”, set your desired setting as for the selected item. The procedure of functional setting is shown as the following diagram. [Flow of function setting] Start : Stop air-conditioner and press “ ” (SET) and Record and keep the “ ” (MODE) buttons at the same time for over three seconds. setting Finalize : Press “ ” (SET) button. Reset : Press “ ” (RESET) button. Select : Press button. Consult the technical data etc. for each control details End : Press ON/OFF button. It is possible to finish above setting on the way, and unfinished change of setting is unavailable. Stop air-conditioner and press “ ” : Initial settings (SET) + (MODE) buttons “ ” : Automatic criterion at the same time for over three seconds. To next page (Remote controller function) Function 01 setting Validate setting of ESP:External Static Pressure Invalidate setting of ESP 02 03 Automatical operation is impossible Temperature setting button is not working 04 Mode button is not working 05 On/Off button is not working 06 Fan speed button is not working 07 Louver button is not working 08 Timer button is not working 09 Remote thermistor is not working. Remote thermistor is working. Remote thermistor is working, and to be set for producing +3.0˚C increase in temperature. Remote thermistor is working, and to be set for producing +2.0˚C increase in temperature. Remote thermistor is working, and to be set for producing +1.0˚C increase in temperature. Remote thermistor is working, and to be set for producing -1.0˚C increase in temperature. Remote thermistor is working, and to be set for producing -2.0˚C increase in temperature. Remote thermistor is working, and to be set for producing -3.0˚C increase in temperature. 10 11 In case of Single split series, by connecting ventilation device to CNT of the indoor printed circuit board (in case of VRF series, by connecting it to CND of the indoor printed circuit board), the operation of ventilation device is linked with the operation of indoor unit. In case of Single split series, by connecting ventilation device to CNT of the indoor printed circuit board (in case of VRF series, by connecting it to CND of the indoor printed circuit board), you can operate /stop the ventilation device independently by (VENT) button. 12 13 If you change the range of set temperature, the indication of set temperature will vary following the control. If you change the range of set temperature, the indication of set temperature will not vary following the control, and keep the set temperature. Airflow of fan becomes of Airflow of fan becomes of . Airflow of fan becomes of . Airflow of fan is fixed at one speed. 14 or the four speed of If you change the remote controller function "14 you must change the indoor function "04 You can select the louver stop position in the four. The louver can stop at any position. - - - . ", " accordingly. 15 16 If you input signal into CNT of the indoor printed circuit board from external, the indoor unit will be operated independently according to the input from external. If you input into CNT of the indoor printed circuit board from external, all units which connect to the same remote controller are operated according to the input from external. 17 18 In normal working indication, indoor unit temperature is indicated instead of airflow. (Only the master remote controller can be indicated.) Heating preparation indication should not be indicated. 19 Temperature indication is by degree C Temperature indication is by degree F To next page ON/OFF button (finished) - 98 - '12 • SRK-T-126 Note 1: The initial setting marked “ Item Function No. Remote controller function02 Remote controller function06 Remote controller function07 Remote controller function13 ” is decided by connected indoor and outdoor unit, and is automatically defined as following table. Default Model "Auto-RUN" mode selectable indoor unit. Indoor unit without "Auto-RUN" mode Indoor unit with two or three step of air flow setting Indoor unit with only one of air flow setting Indoor unit with automatically swing louver Indoor unit without automatically swing louver Indoor unit with three step of air flow setting Indoor unit with two step of air flow setting Indoor unit with only one of air flow setting Heat pump unit Exclusive cooling unit Remote controller function15 Note 3: As for plural indoor unit, set indoor functions to each master and slave indoor unit. But only master indoor unit is received the setting change of indoor unit function “05 EXTERNAL INPUT” and “06 PERMISSION / PROHIBISHION”. Note2: Fan setting of "HIGH SPEED" From previous page (Indoor unit function) Indoor unit No. are indicated only when plural indoor units are connected. Function setting 02 Fan tap STANDARD FAN SPEED HIGH SET SPEED1, 2 - - - Indoor unit air flow setting - - UH - Hi - Me - Lo Hi - Me - Lo Hi - Lo Hi - Me UH - UH - Hi - Me UH - Hi - Me UH - Me UH - Hi Initial function setting of some indoor unit is "HIGH SPEED". 4 speed is not able to be set with wireless remote controller. 03 The filter sign is indicated after running for 180 hours. The filter sign is indicated after running for 600 hours. The filter sign is indicated after running for 1000 hours. The filter sign is indicated after running for 1000 hours, then the indoor unit will be stopped by compulsion after 24 hours. To set other indoor unit, press AIRCON NO. button, which allows you to go back to the indoor 04 unit selection screen (for example: I/U 000 ). If you change the indoor function "04 ", you must change the remote controller function "14 You can select the louver stop position in the four. The louver can stop at any position. " accordingly. 05 06 Permission/prohibition control of operation will be valid. 07 With the VRF series, it is used to stop all indoor units connected with the same outdoor unit immediately. When stop signal is inputed from remote on-off terminal "CNT-6", all indoor units are stopped immediately. 08 To be reset for producing +3.0˚C increase in temperature during heating. To be reset for producing +2.0˚C increase in temperature during heating. To be reset for producing +1.0˚C increase in temperature during heating. 09 To be reset producing +2.0˚C increase in return air temperature of indoor unit. To be reset producing +1.5˚C increase in return air temperature of indoor unit. To be reset producing +1.0˚C increase in return air temperature of indoor unit. To be reset producing -1.0˚C increase in return air temperature of indoor unit. To be reset producing -1.5˚C increase in return air temperature of indoor unit. To be reset producing -2.0˚C increase in return air temperature of indoor unit. 10 When heating thermostat is OFF, fan speed is low speed. When heating thermostat is OFF, fan speed is set speed. When heating thermostat is OFF, fan speed is operated intermittently. When heating thermostat is OFF, the fan is stopped. When the remote thermistor is working, "FAN OFF" is set automatically. Do not set "FAN OFF" when the indoor unit's thermistor is working. 11 Change of indoor heat exchanger temperature to start frost prevention control. 12 Working only with the Single split series. To control frost prevention, the indoor fan tap is raised. 13 Drain pump is run during cooling and dry. Drain pump is run during cooling, dry and heating. Drain pump is run during cooling, dry, heating and fan. Drain pump is run during cooling, dry and fan. 14 After cooling is stopped, the fan does not perform extra operation. After cooling is stopped, the fan perform extra operation for half an hour. After cooling is stopped, the fan perform extra operation for an hour. After cooling is stopped, the fan perform extra operation for six hours. 15 After heating is stopped or heating thermostat is OFF, the fan does not perform extra operation. After heating is stopped or heating thermostat is OFF,the fan perform extra operation for half an hour. After heating is stopped or heating thermostat is OFF,the fan perform extra operation for two hours. After heating is stopped or heating thermostat is OFF, the fan perform extra operation for six hours. 16 During heating is stopped or heating thermostat is OFF, the fan perform intermittent operation for five minutes with low fan speed after twenty minutes' OFF. During heating is stopped or heating thermostat is OFF, the fan perform intermittent operation for five minutes with low fan speed after five minutes' OFF. 17 Connected “OA Processing” type indoor unit, and is automatically defined. From previous page - 99 - '12 • SRK-T-126 Operation message Function description: setting description: How to set function (SET) (MODE) 1. Stop air-conditioner and press buttons at the same time for over three seconds, and the "FUNCTION SET " will be displayed. , Function No. Fixing button 2. Press (SET) button. 7 Finishing button 2 Starting button 3. Make sure which do you want to set, " FUNCTION " (remote controller function) or "I/U FUNCTION " (indoor unit function). 4. Press or button. Selecct " FUNCTION " (remote controller function) or "I/U FUNCTION " (indoor unit function). 1 6 5. Press 6. Indoor unit selection button Previous screen button (SET) button. On the occasion of remote controller function selection On the occasion of indoor unit function selection "DATA LOADING" (Indication with blinking) "DATA LOADING" (Blinking for 2 to 23 seconds to read the data) Display is changed to "01 Indication is changed to "02 FAN SPEED SET". Go to . ". Press or button. "No. and function"are indicated by turns on the remote controller function table, then you can select from them. (For example) [Note] (1) If plural indoor units are connected to a remote controller, the indication is "I/U 000" (blinking) The lowest number of the indoor unit connected is indicated. Function No. Function Press (SET) button. The current setting of selected function is indicated. (for example) "AUTO RUN ON" If "02 AUTO RUN SET" is selected Setting (2) Press or button. Select the number of the indoor unit you are to set If you select "ALL UNIT ", you can set the same setting with all unites. (3) Press (SET) button. Press or button. "No. and function" are indicated by turns on the indoor unit function table, then you can select from them. (For example) Press or button. Select the setting. Function No. Function Press (SET) button. The current setting of selected function is indicated. (For example) "STANDARD" If "02 FAN SPEED SET" is selected. Press (SET) "SET COMPLETE" will be indicated, and the setting will be completed. Then after "No. and function" indication returns, Set as the same procedure if you want to set continuously ,and if to finish, go to 7. Setting Press or button. Select the setting. Press (SET) button. "SET COMPLETE" will be indicated, and the setting will be completed. Then after "No. and function" indication returns, set as the same procedure if you want to set continuously , and if to finish, go to 7. 7. Press ON/OFF button. Setting is finished. When plural indoor units are connected to a remote controller, press the AIRCON NO. button, which allows you to go back to the indoor unit selection screen. (example "I/U 000 ") It is possible to finish by pressing ON/OFF button on the way, but unfinished change of setting is unavailable. During setting, if you press (RESET) button, you return to the previous screen. Setting is memorized in the controller and it is saved independently of power failure. How to check the current setting When you select from "No. and funcion" and press set button by the previous operation, the "Setting" displayed first is the current setting. (But, if you select "ALL UNIT ", the setting of the lowest number indoor unit is displayed.) - 100 - '12 • SRK-T-126 11.2 Wireles kit (RCN-TC-24W-ER) Notes : Following functions of FDTC Type-F indoor unit series are not able to be set with this wireess remote controller (RCN-TC-24W-ER). 1. Individual flap control system 2. 4-fan speed setting (PHi/Hi/Me/Lo) ĺ 3-fan speed setting (Hi/Me/Lo) PJA012D758 WARNING Fasten the wiring to the terminal securely and hold the cable securely so as not to apply unexpected stress on the terminal. Loose connection or hold will cause abnormal heat generation or fire. <To change the settings> 2 Remove the cover by unscrewing two screws from the back of receiver. 3 Change the setting by the switch on PCB. Make sure the power supply is turned off when electric wiring work. Otherwise, electric shock, malfunction and improper running may occur. Default settings CAUTION Screws DO NOT install the wireless kit at the following places in order to avoid malfunction. (8) Places where the receiver is influenced by (1) Places exposed to direct sunlight the fluorescent lamp (especially inverter (2) Places near heat devices type) or sunlight. (3) High humidity places (9) Places where the receiver is affected by (4) Hot surface or cold surface enough to infrared rays of any other communication generate condensation devices (5) Places exposed to oil mist or steam directly (10)Places where some object may obstruct the (6) Uneven surface communication with the remote controller (7) Places affected by the direct airflow of the AC unit. Receiver Backside DO NOT leave the wireless kit without the cover. In case the cover needs to be detached, protect the receiver with a packaging box or bag in order to keep it away from water and dust. Cover Backside 4 When SW1 is turned to OFF position, change the corresponding remote controller setting as follows: How to change the remote controller setting Pressing ACL switch with AIR FLOW button kept pressing or Note Instruct the customer how to operate it correctly referring to the instruction manual. For the installation method of the air conditioner itself, refer to the installation manual enclosed in the package. inserting the batteries with pressing AIR FLOW button will customize the signal. Note When the batteries are removed, the setting will return to the default setting. Please make sure to reset it when the batteries are replaced. Accessories Please make sure that you have all of the following accessories. Caution Receiver Remote controller holder Wireless remote controller Wood screw for holder Parts set AAA dry cell battery (RO3) Instruct the customer to set the mentioned above when replacing the batteries. (How to set is also mentioned in the user’s manual attached on the air conditioner.) Radio interference prevention mode Installation of the receiver 1 Attach the receiver to the panel according to the panel installation manual. 2 Remove two screws and detach the lid from the control box. 3 Put the wiring in the control box with other wiring as shown below. 4 Connect the wiring to the terminal block (X,Y) provided in the control box.(Non-polarized) 5 Fix the wiring with the clamp as shown below. 6 Reattach the control box lid with 2 screws removed. How to install the receiver The receiver can be installed by replacing with a corner panel on the applicable decorative panel. Preparation before installation Note: Make sure wires not to be pinched by any other parts like panel and control box. 1 Attach the decorative panel onto the air conditioner according to the installation manual for the panel. 2 Remove the air return grille. 3 Remove a corner panel located on the refrigerant pipes side. 4 Remove two screws and detach the lid from the control box of the air conditioner. Drain plug Control box Drain pipe Refrigerant pipes Setting on site 1 PCB on the receiver has the following switches to set the functions. Default setting is shown with mark. Customized signal setting to avoid mixed communication Normal Remote Receiver master/slave setting Master Slave Buzzer valid/Invalid Valid Invalid Auto restart Valid Invalid Terminal block ( X,Y ) in the indoor unit control box Wiring - 101 - 2,6 4Terminal block(X,Y) 3 5Clamp '12 • SRK-T-126 PJA012D758 Remote controller Wireless remote controller’s operable area 1 Standard reachable area of the signal [condition] Illuminance at the receiver: 300lux (when no lighting is installed within 1m of the receiver in an ordinary office.) Installation of the controller holder Caution 1.4m Reachable area of the signal 2.4m Ceiling surface 4. Hot surface or cold surface enough to generate condensation 5. Places exposed to oil mist or steam directly. 6. Uneven surface 1m DO NOT install it on the following places 1. Places exposed to direct sunlight 2. Places near heat devices 3. High humidity places 4m 3m 2m 1m 0 1m 2m 3m 2 Correlation between illuminance at the receiver and reachable area of the signal in a plain view. The drawing in the right shows the correlation between the reachable area of the signal and illuminance at the receiver when the remote controller is operated at 1m high under the condition of ceiling height of 2.4m. 4m The receivable area of the signal when the illuminance at the receiver is 300lux 4m 3m 2m 1m 1m 2m Wood screw 3m 4m The receivable area of the signal when the illuminance at the receiver is 600lux 3 Installation tips when several receivers are installed close Minimum distance between the indoor units which can avoid cross communication is 5m under the condition of 300lux of illuminance at the receiver. (When no lighting is installed within 1m of the receiver in an ordinary office ) Holder for remote controller Installation tips for the remote controller holder Adjust and keep the holder upright Tighten the screw to the end to avoid scratching the remote controller. DO NOT attach the holder on plaster wall. How to disable the Auto mode operation How to insert batteries 1 Detach the back lid. 2 Insert the batteries. (two AAA batteries) 3 Reattach the back lid. VRF series (except heat recovery 3-pipe systems) cannot be operated in Auto mode. Make sure to set the remote controller for the models so as not to be able to choose Auto mode. Ensure the correct polarity when inserting. Pressing ACL switch with MODE button kept pressing or inserting the batteries with pressing MODE button will make auto mode operation. Note When the batteries are removed, the setting will return to the default setting (Auto mode is valid). Caution Instruct the customer to set the mentioned above when replacing the batteries. (How to set is also mentioned in the user’s manual attached on the air conditioner.) Control plural indoor units with one remote controller Auto mode operation setting Up to 16 indoor units can be connected. 1 Connect the XY terminal with 2-core wire. As for the size, refer to the following note. 2 For Single packaged air conditioner series, set the indoor unit address with SW2 on the indoor unit PCB from [0] to [F] so as not to duplicate. Backup button A Backup button is provided on the receiver. Even when the operation from the wireless remote controller is not possible (due to flat batteries, controller lost, or controller failure), still it possible to operate as temporary means. Press the button directly when operating it. (1) The air conditioner starts the operation with the condition of Auto mode, 23˚C of set point, High fan speed and horizontal louver position. (2) The air conditioner stops the operation when the button is pressed when in operation. Restrictions on the thickness and length of wire (Maximun total extension 600m.) Standard Within 100m x 0.3 mm2 Within 200m x 0.5 mm2 Within 300m x 0.75mm2 Within 400m x 1.25mm2 Within 600m x 2.0 mm2 Backup button Terminal block Indoor unit (1) Address (0) Indoor unit (2) Address (1) Indoor unit (16) Address ( F ) Cooling test run operation Receiver After safety confirmation, turn on the power. Transmit a cooling operation command with wireless remote controller, while the backup button on the receiver is pressed. If the backup button on the receiver is pressed during a test run, it will end the test run. If you cannot operate the unit properly during a test run, please check by consulting with inspection guides on the wiring diagram of outdoor units. Remote controller 3 For VRF series, set the indoor unit address with SW1, SW2 and SW5-2 on the indoor unit PCB from [000] to [127] so as not to duplicate. How to read the two-digit display Master/Slave setting when using plural remote controllers Up to two receivers can be installed in one indoor unit group. When two receivers are used, it is necessary for a receiver to turn OFF SW2 on the receiver PCB to set it as slave. (For the method of switching, please see Setting on site in the section of 2 How to install the receiver in this manual.) - On the receiver of a wireless kit, a two-digit (7-segment) display is provided. (1) An indication will be displayed for one hour after power on. (2) An indication will be displayed for 3.5 seconds after transmitting a “STOP” command from the wireless remote controller or the operation of the backup button to stop the unit. (3) An indication appearing in (1) or (2) above will go off as soon as the unit starts operation. (4) When there are no error records to indicate, addresses of all the connected units are displayed. (5) When there are some error records remaining, the error records are displayed. (6) Error records can be cleared by transmitting a “STOP” command from the wireless remote controller, while the backup button is pressed. 102 - '12 • SRK-T-126 150 Exterior dimension 60 17 - 103 - '12 • SRK-T-126 Indication section Indicates set temperature. Indicates the status of swing louver. Indicates selected operation with . Indicates the selected airflow volume Indicates for two seconds when FILTER button is pressed. Indicates when ON-TIMER is set. Indicates when OFF-TIMER is set. Indicates the ON-TIMER setting time. Nothing displayed when ON-TIMER is not set. Indicates OFF-TIMER setting time. Indicates the current time when the OFF-TIMER is not set. Operation section Sends signal to the air conditioner. When this is pressed once, the unit starts to operate and when this is pressed once again, it stops operating. Every time this button is pressed, the mode is switched as below. Used to swing the louver. Used to reset (turn off) the filter sign. Press the button only after completing the filter cleaning. Every time this button is pressed, as below. displays switch Sets ON TIMER operation. Sets room temperature by pressing Sets time when setting the time. Sets OFF TIMER operation. Used to cancel the TIMER SETTINGS. Sets current time. Used to reset the microcomputer. * All displays are described in the liquid crystal display for explanation - 104 - or button. '12 • SRK-T-126 11.3 Simple wired remote controller (RCH-E3) Notes : Following functions of Type-F indoor unit series are not able to be set with this simple wired remote controller (RCH-E3). 1. Individual flap control system (for FDTC) 2. 4-fan speed setting (PHi/Hi/Me/Lo) ĺ 3-fan speed setting (Hi/Me/Lo) (for FDTC) 㪥㪸㫄㪼㫊㩷㪸㫅㪻㩷㪽㫌㫅㪺㫋㫀㫆㫅㫊㩷㫆㪽㩷㫊㪼㪺㫋㫀㫆㫅㫊 㪩㪼㫄㫆㫋㪼㩷㪺㫆㫅㫋㫉㫆㫃㫃㪼㫉㩷㫊㪼㫅㫊㫆㫉 㪦㪥㪆㪦㪝㪝㩷㪹㫌㫋㫋㫆㫅 㪦㫇㪼㫉㪸㫋㫀㫆㫅㪆㪠㫅㫊㫇㪼㪺㫋㫀㫆㫅㩷㫃㪸㫄㫇 㪙㫌㫋㫋㫆㫅㩷㫋㫆㩷㫊㫋㪸㫉㫋㪆㫊㫋㫆㫇㩷㫋㪿㪼㩷㪸㫀㫉㩷㪺㫆㫅㪻㫀㫋㫀㫆㫅㪼㫉 㪛㫌㫉㫀㫅㪾㩷㫆㫇㪼㫉㪸㫋㫀㫆㫅㪑㩷㪞㫉㪼㪼㫅 㪽㪸㫀㫃㫌㫉㪼㪑㩷㪩㪼㪻㩷 㪤㪦㪛㪜㩷㪹㫌㫋㫋㫆㫅 㪬㫊㪼㩷㫋㫆㩷㫊㪼㫃㪼㪺㫋㩷㫋㪿㪼㩷㫄㫆㪻㪼㪅 㪝㪘㪥㩷㪪㪧㪜㪜㪛㩷㪹㫌㫋㫋㫆㫅 㪙㫌㫋㫋㫆㫅㩷㫋㫆㩷㫊㪼㫋㩷㫋㪿㪼㩷㪽㪸㫅㩷㫊㫇㪼㪼㪻㩷 㪫㪜㪤㪧㩷㪹㫌㫋㫋㫆㫅 㪬㫊㪼㩷㫋㫆㩷㫉㪸㫀㫊㪼㩷㫋㪿㪼㩷㫊㪼㫋㫋㫀㫅㪾㩷㫋㪼㫄㫇㪼㫉㪸㫋㫌㫉㪼㪅 㪘㪠㪩㩷㪚㪦㪥㩷㪥㫆㪅㩷㪹㫌㫋㫋㫆㫅 㪫㪜㪤㪧㩷㪹㫌㫋㫋㫆㫅 㪠㫅㪻㫀㪺㪸㫋㪼㫊㩷㫋㪿㪼㩷㪥㫆㪅㩷㫆㪽㩷㪸㫀㫉㩷㪺㫆㫅㪻㫀㫋㫀㫆㫅㪼㫉㩷 㫎㪿㫀㪺㪿㩷㫀㫊㩷㪺㫆㫅㫅㪼㪺㫋㪼㪻㪅 㪬㫊㪼㩷㫋㫆㩷㫃㫆㫎㪼㫉㩷㫋㪿㪼㩷㫊㪼㫋㫋㫀㫅㪾㩷㫋㪼㫄㫇㪼㫉㪸㫋㫌㫉㪼㪅 㪦㫇㪼㫉㪸㫋㫀㫆㫅㩷㫄㫆㪻㪼㩷㪻㫀㫊㫇㫃㪸㫐 㪠㫅㪻㫆㫆㫉㩷㫌㫅㫀㫋㩷㪥㫆㪅㩷㪻㫀㫊㫇㫃㪸㫐 㪭㪩㪝㩷㫊㪼㫉㫀㪼㫊㩷㫆㫌㫋㪻㫆㫆㫉㩷㫌㫅㫀㫋㩷㪥㫆㪅㩷㪻㫀㫊㫇㫃㪸㫐 㪑㩷㪚㫆㫆㫃㫀㫅㪾 㪑㩷㪛㫉㫐㫀㫅㪾 㪑㩷㪝㪸㫅㩷㫆㫇㪼㫉㪸㫋㫀㫆㫅 㪑㩷㪟㪼㪸㫋㫀㫅㪾 㪝㪸㫅㩷㫊㫇㪼㪼㪻㩷㪻㫀㫊㫇㫃㪸㫐 㪑㩷㪘㫌㫋㫆㩷㫄㫆㪻㪼 㪚㪼㫅㫋㫉㪸㫃㩷㪺㫆㫅㫋㫉㫆㫃㩷㪻㫀㫊㫇㫃㪸㫐 㪛㫀㫊㫇㫃㪸㫐㪼㪻㩷㫎㪿㪼㫅㩷㪺㫆㫅㫋㫉㫆㫃㫃㫀㫅㪾㩷㫋㪿㪼 㫌㫅㫀㫋㩷㫎㫀㫋㪿㩷㫋㪿㪼㩷㪺㪼㫅㫋㫉㪸㫃㩷㪺㫆㫅㫋㫉㫆㫃㫃㪼㫉㪅 㪭㪼㫅㫋㫀㫃㪸㫋㫀㫆㫅㩷㪻㫀㫊㫇㫃㪸㫐 㪫㪿㫀㫊㩷㫀㫊㩷㫃㫀㫋㩷㪻㫌㫉㫀㫅㪾㩷㫋㪿㪼㩷㫍㪼㫅㫋㫀㫃㪸㫋㫀㫆㫅㩷 㫆㫇㪼㫉㪸㫋㫀㫆㫅㪅 㪚㫆㫅㫋㫉㫆㫃㩷㪻㫀㫊㪸㪹㫃㪼㩷㪻㫀㫊㫇㫃㪸㫐 㪪㪼㫋㫋㫀㫅㪾㩷㪫㪜㪤㪧㩷㪻㫀㫊㫇㫃㪸㫐㩷 㪜㫉㫉㫆㫉㩷㪺㫆㪻㪼㩷㪻㫀㫊㫇㫃㪸㫐 㪫㪿㪼㩷㫃㪸㫄㫇㩷㫀㫊㩷㫃㫀㫋㩷㪽㫆㫉㩷㪊㩷㫊㪼㪺㫆㫅㪻㫊㩷 㫎㪿㪼㫅㩷㪸㩷㪻㫀㫊㪸㪹㫃㪼㪻㩷㪹㫌㫋㫋㫆㫅㩷㫀㫊㩷 㫇㫉㪼㫊㫊㪼㪻㪅 㪠㫅㫊㫋㪸㫃㫃㪸㫋㫀㫆㫅㩷㫆㪽㩷㫉㪼㫄㫆㫋㪼㩷㪺㫆㫅㫋㫉㫆㫃㫃㪼㫉 㪛㪦㩷㪥㪦㪫㩷㫀㫅㫊㫋㪸㫃㫃㩷㫋㪿㪼㩷㫉㪼㫄㫆㫋㪼㩷㪺㫆㫅㫋㫉㫆㫃㫃㪼㫉㩷㪸㫋㩷㫋㪿㪼㩷㪽㫆㫃㫃㫆㫎㫀㫅㪾㩷㫇㫃㪸㪺㪼㫊㩷㫀㫅㩷㫆㫉㪻㪼㫉㩷㫋㫆㩷㪸㫍㫆㫀㪻㩷㫄㪸㫃㪽㫌㫅㪺㫋㫀㫆㫅㪅 㩷㩿㪈㪀㩷㪧㫃㪸㪺㪼㫊㩷㪼㫏㫇㫆㫊㪼㪻㩷㫋㫆㩷㪻㫀㫉㪼㪺㫋㩷㫊㫌㫅㫃㫀㪾㪿㫋 㩷㩿㪉㪀㩷㪧㫃㪸㪺㪼㫊㩷㫅㪼㪸㫉㩷㪿㪼㪸㫋㩷㪻㪼㫍㫀㪺㪼㫊 㩷㩿㪊㪀㩷㪟㫀㪾㪿㩷㪿㫌㫄㫀㪻㫀㫋㫐㩷㫇㫃㪸㪺㪼㫊 㩿㪋㪀㩷㪟㫆㫋㩷㫊㫌㫉㪽㪸㪺㪼㩷㫆㫉㩷㪺㫆㫃㪻㩷㫊㫌㫉㪽㪸㪺㪼㩷㪼㫅㫆㫌㪾㪿㩷㫋㫆㩷㪾㪼㫅㪼㫉㪸㫋㪼㩷㪺㫆㫅㪻㪼㫅㫊㪸㫋㫀㫆㫅 㩿㪌㪀㩷㪧㫃㪸㪺㪼㫊㩷㪼㫏㫇㫆㫊㪼㪻㩷㫋㫆㩷㫆㫀㫃㩷㫄㫀㫊㫋㩷㫆㫉㩷㫊㫋㪼㪸㫄㩷㪻㫀㫉㪼㪺㫋㫃㫐 㩿㪍㪀㩷㪬㫅㪼㫍㪼㫅㩷㫊㫌㫉㪽㪸㪺㪼 - 105 - PJZ000Z272 '12 • SRK-T-126 㪠㫅㩷㪺㪸㫊㪼㩷㫆㪽㩷㪼㫄㪹㪼㪻㪻㫀㫅㪾㩷㫎㫀㫉㫀㫅㪾 㪩㪼㫄㫆㫋㪼㩷㪺㫆㫅㫋㫉㫆㫃㩷㫀㫅㫊㫋㪸㫃㫃㪸㫋㫀㫆㫅㩷㪻㫀㫄㪼㫅㫊㫀㫆㫅㫊 㪮㪸㫃㫃㩷㫊㫌㫉㪽㪸㪺㪼 㪍㪎 㪈㪈㪎 㪏㪊㪅㪌 㪮㫀㫉㫀㫅㪾 㪊㪊㪅㪌 㪈㪍 㪮㫀㫉㫀㫅㪾㩷㫆㫌㫋㫃㪼㫋 㩿㪠㫅㩷㪺㪸㫊㪼㩷㫆㪽㩷㪼㫄㪹㪼㪻㪻㫀㫅㪾㩷㫎㫀㫉㫀㫅㪾㪀 㪈㪉㬍㪎㩷㪪㫃㫆㫋㩷㪿㫆㫃㪼 㪜㫃㪼㪺㫋㫉㫀㪺㪸㫃㩷㪹㫆㫏 䋨㪧㫉㪼㫇㪸㫉㪼㩷㫆㫅㩷㫊㫀㫋㪼䋩 㪠㫅㫊㫋㪸㫃㫃㪸㫋㫀㫆㫅㩷㪿㫆㫃㪼 㪐㬍㪋㪅㪌㩷㪪㫃㫆㫋㩷㪿㫆㫃㪼㩷䋨㪉㩷㫇㫃㪸㪺㪼㫊䋩 㪥㫆㫋㪼㪑㩷㪠㫅㫊㫋㪸㫃㫃㪸㫋㫀㫆㫅㩷㫊㪺㫉㪼㫎㩷㪽㫆㫉㩷㫉㪼㫄㫆㫋㪼㩷㪺㫆㫅㫋㫉㫆㫃㫃㪼㫉 㪤㪋㩷㪪㪺㫉㪼㫎㩷㩿㪉㩷㫇㫀㪼㪺㪼㫊㪀 㪈㪌 㪠㫅㩷㪺㪸㫊㪼㩷㫆㪽㩷㪼㫏㫇㫆㫊㫀㫅㪾㩷㫎㫀㫉㫀㫅㪾 㪫㪿㪼㩷㫉㪼㫄㫆㫋㪼㩷㪺㫆㫅㫋㫉㫆㫃㫃㪼㫉㩷㫎㫀㫉㫀㫅㪾㩷㪺㪸㫅㩷㪹㪼㩷㪼㫏㫋㫉㪸㪺㫋㪼㪻㩷㪽㫉㫆㫄㩷㫋㪿㪼㩷㫌㫇㫇㪼㫉㩷㪺㪼㫅㫋㪼㫉㪅㩷 㪘㪽㫋㪼㫉㩷㫋㪿㪼㩷㫋㪿㫀㫅㩷㫇㪸㫉㫋㩷㫀㫅㩷㫋㪿㪼㩷㫌㫇㫇㪼㫉㩷㫊㫀㪻㪼㩷㫆㪽㩷㫋㪿㪼㩷㫉㪼㫄㫆㫋㪼㩷㪺㫆㫅㫋㫉㫆㫃㫃㪼㫉㩷㫌㫇㫇㪼㫉㩷 㪺㪸㫊㪼㩷㫀㫊㩷㫊㪺㫉㪸㫇㪼㪻㩷㫎㫀㫋㪿㩷㪸㩷㫅㫀㫇㫇㪼㫉㩷㫆㫉㩷㫂㫅㫀㪽㪼㪃㩷㫉㪼㫄㫆㫍㪼㩷㪹㫌㫉㫉㩷㫎㫀㫋㪿㩷㪸㩷㪽㫀㫃㪼㪅 㪫㪿㫀㫅㩷㫇㪸㫉㫋 㪇㪅㪊㫄㫄㪉㬍㪉㩷㪺㫆㫉㪼㫊㪅 㪬㫇㫇㪼㫉㩷㪺㪸㫊㪼 㪣㩷㪚㩷㪛 㪈㪉㪇 㪪㪿㪼㪸㫋㪿 㪬㫇㫇㪼㫉㩷㪺㪸㫊㪼 㪯㪰 㪎㪇 㪯㪃㩷㪰㩷㪫㪼㫉㫄㫀㫅㪸㫃㩷㪹㫃㫆㪺㫂 㪘㫋㫋㪸㪺㪿㩷㪤㪊㩷㫊㪺㫉㪼㫎㩷 㫎㫀㫋㪿㩷㫎㪸㫊㪿㪼㫉 㫎㫀㫉㫀㫅㪾 㪫㪿㪼㩷㫇㪼㪼㫃㫀㫅㪾㩷㫃㪼㫅㪾㫋㪿㩷㫆㪽㩷㪼㪸㪺㪿㩷㫎㫀㫉㫀㫅㪾㩷㫀㫊㩷㪸㫊㩷㪽㫆㫃㫃㫆㫎㫊㪑 㪯㩷㫎㫀㫉㫀㫅㪾㩷㪑㩷㪈㪍㪇㫄㫄 㪰㩷㫎㫀㫉㫀㫅㪾㩷㪑㩷㪈㪌㪇㫄㫄 㪮㫀㫉㫀㫅㪾㩷㫊㫇㪼㪺㫀㪽㫀㪺㪸㫋㫀㫆㫅㫊 㩿㪈㪀㩷㪮㫀㫉㫀㫅㪾㩷㫆㪽㩷㫉㪼㫄㫆㫋㪼㩷㪺㫆㫅㫋㫉㫆㫃㫃㪼㫉㩷㫊㪿㫆㫌㫃㪻㩷㫌㫊㪼㩷㪇㪅㪊㫄㫄㪉㩷×㩷㪉㩷㪺㫆㫉㪼㩷㫎㫀㫉㪼㫊㩷㫆㫉㩷㪺㪸㪹㫃㪼㫊㪅㩷㩿㫆㫅㪄㫊㫀㫋㪼㩷㪺㫆㫅㪽㫀㪾㫌㫉㪸㫋㫀㫆㫅㪀㩷 㩿㪉㪀㩷㪤㪸㫏㫀㫄㫌㫄㩷㫇㫉㫆㫃㫆㫅㪾㪸㫋㫀㫆㫅㩷㫆㪽㩷㫉㪼㫄㫆㫋㪼㩷㪺㫆㫅㫋㫉㫆㫃㫃㪼㫉㩷㫎㫀㫉㫀㫅㪾㩷㫀㫊㩷㪍㪇㪇㫄㪅 㩷㩷㩷㩷㩷㪠㪽㩷㫋㪿㪼㩷㫇㫉㫆㫃㫆㫅㪾㪸㫋㫀㫆㫅㩷㫀㫊㩷㫆㫍㪼㫉㩷㪈㪇㪇㫄㪃㩷㪺㪿㪸㫅㪾㪼㩷㫋㫆㩷㫋㪿㪼㩷㫊㫀㫑㪼㩷㪹㪼㫃㫆㫎㪅 㩷㩷㩷㩷㩷㪙㫌㫋㪃㩷㫋㪿㪼㩷㫎㫀㫉㫀㫅㪾㩷㫀㫅㩷㫋㪿㪼㩷㫉㪼㫄㫆㫋㪼㩷㪺㫆㫅㫋㫉㫆㫃㫃㪼㫉㩷㪺㪸㫊㪼㩷㫊㪿㫆㫌㫃㪻㩷㪹㪼㩷㪇㪅㪊㫄㫄㪉㩷㩿㫉㪼㪺㫆㫄㫄㪼㫅㪻㪼㪻㪀㩷㫋㫆㩷㪇㪅㪌㫄㫄㪉㪅 㩷㩷㩷㩷㩷㪚㪿㪸㫅㪾㪼㩷㫋㪿㪼㩷㫎㫀㫉㪼㩷㫊㫀㫑㪼㩷㫆㫌㫋㫊㫀㪻㪼㩷㫆㪽㩷㫋㪿㪼㩷㪺㪸㫊㪼㩷㪸㪺㪺㫆㫉㪻㫀㫅㪾㩷㫋㫆㩷㫎㫀㫉㪼㩷㪺㫆㫅㫅㪼㪺㫋㫀㫅㪾㪅㩷㪮㪸㫋㪼㫉㫇㫉㫆㫆㪽㩷㫋㫉㪼㪸㫋㫄㪼㫅㫋㩷㫀㫊 㩷㩷㩷㩷㩷㫅㪼㪺㪼㫊㫊㪸㫉㫐㩷㪸㫋㩷㫋㪿㪼㩷㫎㫀㫉㪼 㩷㩷㩷㩷㩷㪺㫆㫅㫅㪼㪺㫋㫀㫅㪾㩷㫊㪼㪺㫋㫀㫆㫅㪅㩷㪙㪼㩷㪺㪸㫉㪼㪽㫌㫃㩷㪸㪹㫆㫌㫋㩷㪺㫆㫅㫋㪸㪺㫋㩷㪽㪸㫀㫃㫌㫉㪼㪅 㪣㪼㫅㪾㫋㪿 㪮㫀㫉㫀㫅㪾㩷㫋㪿㫀㪺㫂㫅㪼㫊㫊 㪈㪇㪇㩷㫋㫆㩷㪉㪇㪇㫄 㪬㫅㪻㪼㫉㩷㪊㪇㪇㫄 㪬㫅㪻㪼㫉㩷㪋㪇㪇㫄 㪬㫅㪻㪼㫉㩷㪍㪇㪇㫄 㪇㪅㪌㫄㫄㪉㬍㪉㩷㪺㫆㫉㪼㫊 㪇㪅㪎㪌㫄㫄㪉㬍㪉㩷㪺㫆㫉㪼㫊 㪈㪅㪉㪌㫄㫄㪉㬍㪉㩷㪺㫆㫉㪼㫊 㪉㪅㪇㫄㫄㪉㬍㪉㩷㪺㫆㫉㪼㫊 - 㪪㪿㪼㪸㫋㪿 㪧㪼㪼㫃㫀㫅㪾㩷㫃㪼㫅㪾㫋㪿 㪬㫅㫀㫋㪑㫄㫄 㪘㪻㪸㫇㫋㪼㪻㩷㫋㫆㩷RoHS㩷㪻㫀㫉㪼㪺㫋㫀㫍㪼 106 - '12 • SRK-T-126 Simple Remote Controller Installation Manual PJZ012D069 In case of exposing cord ⑴ Make certain to remove a screw on the bottom surface of the remote controller. Read together with indoor unit's installation manual. WARNING ⑴ Screw ● Fasten the wiring to the terminal securely and hold the cable securely so as not to apply unexpected stress on the terminal. Loose connection or hold will cause abnormal heat generation or fire. ● Make sure the power supply is turned off when electric wiring work. Otherwise, electric shock, malfunction and improper running may occur. ⑵ Remove the upper case of the remote controller. Insert a flat-blade screwdriver to a concave portion of the bottom surface of the remote control and slightly twist it, and the case is removed. Upper case CAUTION ⑵ ● DO NOT install the remote controller at the following places in order to avoid malfunction. (4) Hot surface or cold surface enough to generate condensation (1) Places exposed to direct sunlight (5) Places exposed to oil mist or steam directly (2) Places near heat devices (6) Uneven surface (3) High humidity places ⑶ The remote controller cord can be extracted from the upper center. After the thin part in the upper side of the remote controller upper case is scraped with a nipper or knife, remove burr with a file. ● DO NOT leave the remote controller without the upper case. In case the upper cace needs to be detached, protect the remote controller with a packaging box or bag in order to keep it away from water and dust. Thin part ⑶ Accessories Remote controller, wood screw (Ǿ3.5×16) 2 pieces Prepare on site Remote controller cord (2 cores) (Refer to [2. Installation and wiring of remote controller]) [In case of embedding cord] Electrical box, M4 screw (2 pieces) [In case of exposing cord] Cord clamp (if needed) ⑷ The lower case of the remote controller is mounted to a flat wall with two accessory wood screws. 1. Installation procedure Lower case In case of embedding cord Wall surface ⑴ Make certain to remove the screw on the bottom surface of the remote controller. ⑴ Screw ⑵ Remove the upper case of the remote controller. Insert a flat-blade screwdriver to a concave portion of the bottom surface of the remote controller and slightly twist it, and the case is removed. 㪯㪰 Upper case ⑸ ⑵ 2 2 The wiring in the remote controller case should be 0.3 mm (recommended) to 0.5 mm at maximum. Further, peel off the sheath. The peeling length of each wiring is as follows: ⑶ Pre-bury the electrical box and remote controller cord. Remote controller cord X wiring : 160mm Y wiring : 150mm Electrical box Prepare on site Sheath Peeling length ⑹ Mount the upper case for restoring to its former state so as not to crimp the remote controller cord, and secure with the removed screw. ⑶ ⑷ Prepare two M4 screws (recommended length: 12 – 16mm), and install the lower case to the electrical box. Do not use a screw whose screw head is larger than the height of the wall around the screw hole. ⑺ In the case of exposing installation, secure the remote controller cord to the wall surface with a cord clamp so as not to loosen the remote controller cord. 2. Installation and wiring of remote controller Lower case Wiring outlet ⑷ ⑸ Connect the remote controller cord to the terminal block. Connect the terminals (X and Y) of the remote controller and the terminals (X and Y) of the indoor unit. (No polarity of X and Y) The wiring route is as shown in the right. ⑷ Two M4 screws (head: ø8 or less) (prepare on site) ⑸ Connect the remote controller cord to the terminal block. Connect the terminals (X and Y) of the remote controller and the terminals (X and Y) of the indoor unit. (No polarity of X and Y) ⑹ Mount the upper case for restoring to its former state so as not to crimp the remote controller cord, and secure with the removed screw. - 2 ⑴ Wiring of remote controller should use 0.3mm × 2 core wires or cables. (on-site configuration) ⑵ Maximum prolongation of remote controller wiring is 600 m. If the prolongation is over 100m, change to the size below. But, the wiring in the remote controller case should be 0.3mm2 (recommended) to 0.5mm2. Change the wire size outside of the case according to wire connecting. Waterproof treatment is necessary at the wire connecting section. Be careful about contact failure. 100 - 200m・・・・・・・・・・・・・・・・・0.5mm2 × 2 cores Under 300m・・・・・・・・・・・・・・・・・0.75mm2 × 2 cores Under 400m・・・・・・・・・・・・・・・・・1.25mm2 × 2 cores Under 600m・・・・・・・・・・・・・・・・・2.0mm2 × 2 cores 107 - '12 • SRK-T-126 3. Master/ slave setting when more than one remote controller are used ⑴ Up to two remote controllers can be connected to one unit (or one group) of indoor unit. Switch indoor unit㩷 㩷 SW1-1 㩷 Setting Function detail Slave remote controller ON OFF Master remote controller 䌘䂾 䌙㩷 䂾 Remote controller line (nonpolarity) 䂾 䌘䂾 䌙㩷 Remote controller “Master” 㩷 SW1-1 “OFF” 㩷 䂾 䌘䂾 䌙㩷 Remote controller “Slave” 㩷 SW1-1 “ON” SW1-1 of the slave remote controller is “Slave” (ON). The factory default is set as “Master” (OFF). ⑵ Set the switch 㩷 (Note) • The remote controller thermistor enabled setting can be set only to the master remote controller. • Install the master remote controller at the position to detect room temperature. • The air conditioner operation follows the last operation of the remote controller in case of the master / slave setting. SW1 ON OFF 1 2 3 4 5 6 7 8 9 0 SW1-1:ON (Slave remote controller) SW1-1:OFF(Master remote controller) 4. The indication when power source is supplied ⑴ At the time of turning the power source on, after the light is on for the first 2 seconds, the display becomes as shown below. The number displayed on the upper side of LCD in the remote control is the software number, and this is not an error code. Software number (The number in the left is one example. Another number may be shown.) ⑵ Then, “88.0 °C” blinks on the remote controller until the communication between the remote controller and the indoor unit is established. ⑶ In the case of connecting one remote controller with one unit (or one group) of indoor unit, make certain to set the master remote controller (factory default). If the slave remote control is set, a communication cannot be established. ⑷ If a state where the communication between the remote controller and the indoor unit cannot be established continues about for 30 minutes, “E” is displayed. Confirm the wiring of the indoor unit and the outdoor unit and master/slave setting of the remote controller. 5. Confirmation method for return air temperature Return air temperature can be confirmed by the remote controller operation. ⑴ Press AIR CON NO. button for over 5 seconds. “88” blinks on the temperature setting indicator. (“88” blinks for approximately 2 seconds while data is read.) ↓ Then, the return air temperature is displayed. (Example) return air temperature: “27 °C” (blinking) (Note) For the return air temperature, in the normal case, the return air temperature of the indoor unit is displayed; however, in the case that the remote control thermistor is effective, detected temperature by the remote controller thermistor is displayed. ON/OFF button. ⑵ Press End. [In the case that the remote thermistor is ineffective and plural indoor units are connected to one remote controller ] ⑴ Press AIR CON NO. button for over 5 seconds. indoor unit No. indicator: “U 000” (blinking) (Among the connected indoor units, the lowest number is displayed.) ⑵ Press TEMP△ or TEMP▽ button. Select the indoor unit No. ⑶ Press MODE button. Dectder the indoor unit No. (Example) indoor unit No. indicator: “U 000” “88” blinks on the temperature setting indicator. (blinking for approximately 2 to 10 seconds while data is read) Then, the return air temperature is displayed. When AIR CON NO. is pressed, return to the indoor unit selection display (example, “U 000”). ON/OFF button. ⑷ Press End. - 108 - '12 • SRK-T-126 6. Function setting Each function of the remote controller and the indoor unit is automatically set to the initial setting, which is the standard use, on the occasion of connecting the remote controller with the indoor unit. In the case of the standard use, the setting change is unnecessary. However, if you whould like to change the initial setting “ ○ ”, change the setting for only the item of the function number. Record the setting contents and stored them. ⑴ Function setting item by switch on PCB Switch No. Setting ON OFF ON OFF ON OFF ON OFF SW1-1 SW1-2 SW1-3 SW1-4 SW1 Setting detail Slave remote controller Master remote controller Remote controller thermistor enabled Remote controller thermistor disabled “MODE” button prohibited “MODE” button enabled “ON/OFF” button prohibited “ON/OFF” button enabled Initial setting ○ ○ ○ ○ Switch No. SW1-5 SW1-6 SW1-7 SW1-8, 9, 0 Setting ON OFF ON OFF ON OFF ON OFF Setting detail “TEMP” button prohibited “TEMP” button enabled “FAN SPEED” button prohibited “FAN SPEED” button enabled Auto restart function enabled Auto restart function disabled ON Initial setting OFF 1 2 3 4 5 6 7 8 9 0 ○ ※ Note 1 ※ Note 1 • As for the slave remote controller, function setting is impossible other than SW1-1. • In the indoor unit with only one fan speed, “FAN SPEED” button cannot ○ Not used be enabled. ⑵ Function setting item by button operation Classification Function No. Function 01 Indoor unit fan speed 03 Remote controller thermistor at the time of cooling 04 Remote controller thermistor at the time of heating Remote controller function 05 Ventilation setting 06 “Auto” operation setting 07 Operation permission/ prohibition 08 External input 09 Fan speed setting 10 Fan remaining operation at the time of cooling 11 Fan remaining operation at the time of heating 12 Setting temperature offset at the time of heating 13 Heating fan controller Setting No. 01 02 03 04 01 02 03 04 05 06 07 01 02 03 04 05 06 07 01 Indoor unit function 14 Return air temperature offset Setting Fan speed: three steps Fan speed: two steps (Hi-Lo) Fan speed: two steps (Hi-Me) Fan: one step Remote controller thermistor: no offset Remote controller thermistor: +3.0 °C Remote controller thermistor: +2.0 °C Remote controller thermistor: +1.0 °C Remote controller thermistor: -1.0 °C Remote controller thermistor: -2.0 °C Remote controller thermistor: -3.0 °C Remote controller thermistor: no offset Remote controller thermistor: +3.0 °C Remote controller thermistor: +2.0 °C Remote controller thermistor: +1.0 °C Remote controller thermistor: -1.0 °C Remote controller thermistor: -2.0 °C Remote controller thermistor: -3.0 °C No ventilator connection 02 Ventilator links air-conditioner 01 02 01 02 01 02 01 02 03 01 02 03 04 01 02 03 04 01 02 03 04 01 02 03 “Auto” operation enabled “Auto” operation disabled Disabled Enabled Level input Pulse input Standard High speed 1 High speed 2 No remaining operation 0.5 hours 1 hour 6 hours No remaining operation 0.5 hours 2 hours 6 hours No offset Setting temperature offset + 3.0 °C Setting temperature offset + 2.0 °C Setting temperature offset + 1.0 °C Low fan speed Setting fan speed Intermittent operation 04 Fan off 01 02 03 04 05 06 07 No offset Return air temperature offset +2.0 °C Return air temperature offset +1.5 °C Return air temperature offset +1.0 °C Return air temperature offset -1.0 °C Return air temperature offset -1.5 °C Return air temperature offset -2.0 °C Initial setting Remarks . ※ Note 1 The fan speed is three steps, . ※ Note 1 The fan speed is two steps, The fan speed is two steps, . ※ Note 1 The fan speed is fixed to one step. ○ At the time of cooling, in the case of remote controller thermistor enabled, offset temperature at +3.0°C. At the time of cooling, in the case of remote controller thermistor enabled, offset temperature at +2.0°C. At the time of cooling, in the case of remote controller thermistor enabled, offset temperature at +1.0°C. At the time of cooling, in the case of remote controller thermistor enabled, offset temperature at -1.0°C. At the time of cooling, in the case of remote controller thermistor enabled, offset temperature at -2.0°C. At the time of cooling, in the case of remote controller thermistor enabled, offsett temperature at -3.0°C. ○ At the time of heating, in the case of remote controller thermistor enabled, offset temperature at +3.0°C. At the time of heating, in the case of remote controller thermistor enabled, offset temperature at +2.0°C. At the time of heating, in the case of remote controller thermistor enabled, offset temperature at +1.0°C. At the time of heating, in the case of remote controller thermistor enabled, offset temperature at -1.0°C. At the time of heating, in the case of remote controller thermistor enabled, offset temperature at -2.0°C. At the time of heating, in the case of remote controller thermistor enabled, offset temperature at -3.0°C. ○ In case of Single split series, by connecting ventilation device to CNT of the indoor printed circuit board (in case of VRF series, by connecting it to CND of the indoor printed circuit board), the operation of ventilation device is linked with the operation of indoor unit. ※ Note 1 ※ Note 1 “Auto” operation disabled ○ Operation permission/prohibition controller is enabled. ○ Note2 Note2 Note2 ○ ○ After cooling stopped, no fan remaining operation After cooling stopped, fan remaining operation for 0.5 hours After cooling stopped, fan remaining operation for 1 hour After cooling stopped, fan remaining operation for 6 hours After heating stopped or after heating thermostat OFF, no fan remaining operation After heating stopped or after heating thermostat OFF, fan remaining operation for 0.5 hours After heating stopped or after heating thermostat OFF, fan remaining operation for 2 hours After heating stopped or after heating thermostat OFF, fan remaining operation for 6 hours ○ ※ Note 1 ※ Note 1 The setting temperature at the time of heating is offset by +3.0 °C. The setting temperature at the time of heating is offset by +2.0 °C. The setting temperature at the time of heating is offset by +1.0 °C. At the time of heating thermostat OFF, operate with low fan speed. At the time of heating thermostat OFF, operate with the setting fan speed. At the time of heatingr thermostat OFF, intermittently operate. At the time of heating thermostat OFF, a fan will be stopped. When the remote controller thermistor is enabled, automatically set to “Fan off”. Do not set at the time of the indoor unit thermistor. ○ Offset the return air temperature of the indoor unit by +2.0 °C. Offset the return air temperature of the indoor unit by +1.5 °C. Offset the return air temperature of the indoor unit by +1.0 °C. Offset the return air temperature of the indoor unit by -1.0 °C. Offset the return air temperature of the indoor unit by -1.5 °C. Offset the return air temperature of the indoor unit by -2.0 °C. Note 1: The symbol “ ※ ” in the initial setting varies depending upon the indoor unit and the outdoor unit to be connected, and this is automatically determined as follows: Swith No. Function No. Function Setting Product model “FAN SPEED” button prohibited Product model whose indoor fan speed is only one step Product model whose indoor fan speed is two steps or three “FAN SPEED” button enabled steps Fan speed: three steps Product model whose indoor unit fan speed is three steps Indoor unit fan Fan speed: two steps (Hi-Lo) Product model whose indoor unit fan speed is two steps Remote controller function 01 Fan speed: two steps (Hi-Me) speed Fan: one step Product model whose indoor unit fan speed is only one step Product model where “Auto” mode is selectable “Auto” operation “Auto” operation enabled Remote controller function 06 setting “Auto” operation disabled Product model without “Auto” mode Low fan speed Product model except FDUS Heating fan Indoor unit function 13 control Intermittent operation FDUS SW1-6 “FAN SPEED” button - 109 - Note 2: Fan speed of “High speed” setting Fan speed setting Standard High speed 1・2 - - Hi − Mid − Lo UHi − Hi − Mid Indoor unit fan speed setting Hi − Lo UHi − Mid Hi − Mid UHi − Hi Initial setting of some indoor unit is “High speed”. Note 3: As for plural indoor unit, set indoor functions to each master and slave indoor unit. But only master indoor unit is received the setting change of indoor unit function “07 Operation permission/ prohibition” and “08 External input”. '12 • SRK-T-126 7. How to set functions by button operation ⑴ Stop air-conditioning, and simultaneously press AIR CON NO. and at the same time for over three seconds. The function number “01” blinks in the upper right. MODE buttons Function number End button ⑵ Press TEMP△ or TEMP▽ button. Select the function number. Decide button Select button MODE button. ⑶ Press Decide the function number. Start button ⑷ [In the case of selecting the remote controller function (01-06)] ① The current setting number of the selected function number blinks (Example) Function number: “01” (lighting) Setting number: “01” (blinking) [In the case of selecting the indoor unit function (07-14)] ① “88” blinks on the temperature setting indicators. (blinking for approximately 2 to 10 seconds while data is read) ↓ After that, the current setting number of the selected function number blinks. (Example) Function number: “07” (lighting) Setting number: “01” (blinking) Function number Function number Setting number ② Press TEMP△ or TEMP▽ button. Select the setting number. MODE button. ③ Press The setting is completed. Light is on for approximately 3 to 20 seconds while data of the decided function No. and setting No. is transmitted. (Example) Function number: “01” (lighting for 3 to 20 seconds) Setting number: “01” (lighting for 3 to 20 seconds) Setting number Proceed to ② . [Note] a. In the case of connecting one remote control to plural indoor units, the display will be as follows: Indoor unit No. display: “U 000” (blinking) (Display the lowest number among the connected indoor units.) Indoor unit No. Function number Function number Setting number b. Press TEMP△ or TEMP▽ button. Select the indoor unit No. to be set. If “U ALL” is selected, the same setting can be set to all units. MODE button. c. Press Decide the indoor unit No. “88” blinks on the temperature setting indicators. (blinking for 2 to 10 seconds while data is read) When AIR CON NO. button is pressed, go back to the indoor unit selection display (for example, “U 000” blinking). Then, the screen goes back to the function number blinking indication ⑴ , if the setting is sequentially conducted, continue with the same procedures. If the setting is finished, proceed to ⑸ . ② Press TEMP△ or TEMP▽ button. Select the setting number MODE button. ③ Press The setting is completed. Light is on for approximately 3 to 20 seconds while data of the decided function No. and setting No. is transmitted. (Example) Indoor unit No.: “U 000” (lighting for 3 to 20 seconds) Function number: “07” (lighting for 3 to 20 seconds) Setting number: “01” (lighting for 3 to 20 seconds) Indoor unit No. (In the case of connecting plural indoor units) Function number Setting number Then, the screen goes back to the function number blinking indication ⑴ , if the setting is sequentially conducted, continue with the same procedures. If the setting is finished, proceed to ⑸ . ON/OFF button. ⑸ Press The setting is completed. ON/OFF button is pressed during setting, the setting is ended. However, any details where the setting has not been completed will be ineffective. ・Even if ・The setting contents are stored in the controller, and even if the power failure occur, this will not be lost. [Confirmation method for current setting] According to the operation, the “setting number” displayed first after selecting “function number” and pressing MODE button is the currently set content. (However, in the case of selecting “U ALL” (all units), the setting number of the lowest number among the indoor units is displayed.) - 110 - INVERTER RESIDENTIAL AIR CONDITIONERS Air-Conditioning & Refrigeration Systems 16-5, Konan 2-chome, Minato-ku, Tokyo, 108-8215 Japan http://www.mhi.co.jp Because of our policy of continuous improvement, we reserve the right to make changes in all specifications without notice. C Copyright MITSUBISHI HEAVY INDUSTRIES, LTD.