1
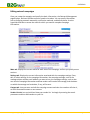
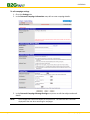
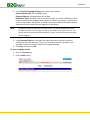
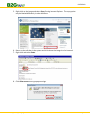
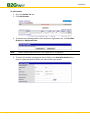
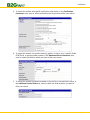
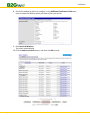
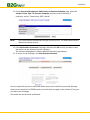
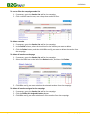
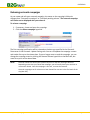
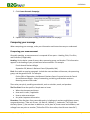
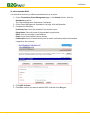
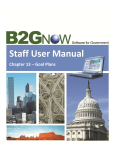
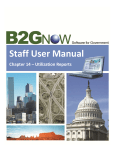
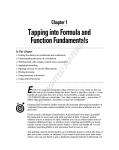
Staff User Manual Chapter 5 – Outreach Copyright © 2013 by B2Gnow/AskReply, Inc. All rights reserved. Published in the United States by B2Gnow/AskReply, Inc. www.B2Gnow.com B2Gnow is a registered trademark of AskReply, Inc. Printed in the United States of America Third Edition Chapter 5. Outreach....................................................................................... 5-1 The Power of Outreach Management ......................................................................................................... 5-1 Creating and editing outreach campaigns ................................................................................................... 5-2 Creating outreach campaigns ....................................................................................................................5-2 Editing outreach campaigns ......................................................................................................................5-3 Releasing outreach campaigns .................................................................................................................. 5-15 Copying outreach campaigns .................................................................................................................... 5-16 Composing your message ......................................................................................................................... 5-17 Composing your announcement .............................................................................................................5-17 Sample messages ...................................................................................................................................... 5-18 Creating Vendor Lists ................................................................................................................................ 5-23 Working with vendor lists ......................................................................................................................... 5-25 Creating events ......................................................................................................................................... 5-30 Managing events ...................................................................................................................................... 5-32 B2Gnow Support [email protected] B2Gnow Support [email protected] Chapter 5 – Outreach Chapter 5. Outreach Communications between the organization and its vendors is critical to the success of your program. The Outreach module includes multiple components to support the creation of content, publication and management of events, and tracking of notice distribution and event attendance. Components include: Outreach Management – rapid distribution of information to many contacts Vendor List – creation and management of vendor lists for specific activities Event Management – hosting of onsite or online events and attendee registration The Power of Outreach Management Your organization is having an event to target a specific group of vendors, such as certified WBEs or DBEs in your area. How do you get the message to them? How do you compose your mailing list? How many hours do you take to compose, create a mail merge, print, collate, stuff envelopes, and mail your announcement? With the Outreach Module, you can create an Outreach Campaign in minutes, drastically cutting the time required to manage the process. B2Gnow Support [email protected] Examples Features Seminars Bid solicitations Classes/training sessions Conferences General announcements Open houses Certification outreach Announcement regarding a contract News and updates Comprehensive vendor search Control visible information Send reminders Post notice to Bulletin Board Revise and add to a notice instantly No mail merge, printing, or postage Easily add/edit vendors on the list Page 5-1 OUTREACH Creating and editing outreach campaigns The Outreach module lets you easily communicate with your vendors. You specify all the details for your campaign, such as the campaign message, the frequency with which your vendors receive campaign notifications, and the vendors to which you want to send the campaign notifications. Creating outreach campaigns To begin creating the campaign, you specify basic information, such as the campaign title and who can view and edit it. However, the campaign is incomplete until you edit the campaign settings. To create an outreach campaign 1. From the navigation menu, click Create. 2. Click New Outreach. 3. In the Outreach Campaign Parameters box, select your options. 4. Click Create Outreach Campaign. NOTE: Page 5-2 Some options may be different based on your organization’s configuration. B2Gnow Support [email protected] OUTREACH Editing outreach campaigns Once you create the campaign and specify the basic information, the Outreach Management page displays. Red text indicates an action needs to be taken. You can specify information such as assigning outreach ownership, notification methods, and delivery dates. Use the hyperlinks and tabs to access the areas for which you need to complete campaign information. Main tab. Displays the current status for each area of the campaign, and lets you quickly access sections. Settings tab. Displays the current information associated with the campaign settings. Enter, edit, or select settings for the campaign information; the campaign message, such as the message subject and the email address you want to use; the campaign settings, such as who can view the campaign information and how vendors will receive the message; and the dates on which the message and reminders, if any, will be sent. Content tab. Lets you enter and edit the campaign content and view it as vendors will view it, as HTML formatted content or text content. Vendor List tab. Lets you build and view your vendor list. You begin by entering the search parameters and then add vendors to your list. B2Gnow Support [email protected] Page 5-3 OUTREACH To edit campaign settings 1. Go to the Settings tab. 2. In the Outreach Campaign Information area, edit or enter campaign details. 3. In the Outreach Campaign Message Settings area, enter or edit the subject and email details. NOTE: Page 5-4 The message title is the email subject the recipient sees. The outreach title is the label displayed to the user when searching for campaigns. B2Gnow Support [email protected] OUTREACH 4. In the Outreach Campaign Settings area, specify your options. Outreach Ownership. The campaign owner. Outreach Publicity. Viewing options for vendors. Notification Types. The way in which you want vendors to receive notifications. Email sends the notice to the recipient email address, as listed in the system. Fax sends the notice to the vendor’s fax number, as listed in the system. Bulletin Board lets vendors view the notification when they are logged in to the system. NOTE: Fax notices require the activation of the fax service. The Bulletin Board option can be limited to only firms on your project or open to any vendor in the system to view. Your agency may also have a public Bulletin Board for anyone to view the outreach campaign without logging in. 5. In the Outreach Dates area, schedule the dates and times on which to send the notification and each reminder, if any. You can send up to three reminders. Each reminder contains the same content as the original message. 6. Click Save, and then click OK. To enter campaign content 1. Go to the Content tab. 2. Click the Edit button. B2Gnow Support [email protected] Page 5-5 OUTREACH 3. In the Outreach Campaign Content area, enter the notification content or paste content from an external editor, such as Microsoft Word. For suggestions on composing messages, see Composing your message later in this chapter. TIP: To maximize the size of the edit box, click the Maximize the Edit Size icon in the top line of the editor menu. 4. To insert an image, first access the webpage that contains the image. The image must be publicly accessible on the Internet. Page 5-6 B2Gnow Support [email protected] OUTREACH 5. Right click on the image and select Copy if using Internet Explorer. The copy option may be labeled differently in other browsers. 6. Return to the edit box in the system and click where the image is to be inserted. 7. Right click and select Paste. 8. Click Allow access on any popup warnings. B2Gnow Support [email protected] Page 5-7 OUTREACH 9. The image will appear. 10. To attach files, click the Attach Files button. A popup window will display. 11. In the Select File area, click the Browse button and locate and select the file. 12. In the File Title and File Description fields, enter the title and description of the file. Page 5-8 B2Gnow Support [email protected] OUTREACH 13. Click Attach File. To include an additional file, click Attach Another File and repeat the process. You can attach as many files as needed. 14. To close the window, click Close Window. 15. Click Save & Return. An HTML formatted preview of your message displays on the page. From here, you can edit the content or view the text version. B2Gnow Support [email protected] Page 5-9 OUTREACH To add vendors 1. Go to the Vendor List tab. 2. Click Add Vendors. 3. To quickly view and add vendors of all certified or registered firms, click Certified Directory or Registered Firms. NOTE: Buttons displayed will be based on your organization’s configuration 4. To search for vendors using general search fields, in the Search Parameters area, enter or select the fields by which you want to filter your search. Page 5-10 B2Gnow Support [email protected] OUTREACH 5. To search for vendors with specific certification information, in the Certification Parameters area, enter or select the fields by which you want to filter your search. 6. To search for vendors of a specific ethnicity, gender, or status, or by a specific DUNS, FEIN/Tax ID, or system vendor number, in the Advanced Search Parameters area, enter or select the fields by which you want to filter your search. 7. To search for vendors by reference number or by site list or concessionaire status, in the Additional Vendor Fields area, enter or select the fields by which you want to filter your search. B2Gnow Support [email protected] Page 5-11 OUTREACH 8. Search for vendors by district or category, in the Additional Certification Fields area, enter or select the fields by which you want to filter your search. 9. Click Search All Matches. The search results display. 10. Click the Add to Outreach button, and then click OK to verify. Page 5-12 B2Gnow Support [email protected] OUTREACH 11. On the Outreach Management: Add Vendors to Outreach Campaign page, select the Vendor Contact Type and Outreach Campaign, and then enter a comment, if necessary, such as “Construction, DBE, Expired.” NOTE: Use a comment/label that describes the type of search you ran. This differentiates vendors added from multiple searches. 12. Click Add Vendors to Outreach Campaign, and then click OK to verify you want to add the vendors to the selected outreach campaign. The Outreach Management: Vendors Added to Outreach page displays. 13. To return to the campaign, click View Outreach Summary. You can repeat this process to search and add as many sets of vendors as you need. Although there is a per search limit of 5,000 matches, this limit does not apply to the number of firms you can add to your campaign. The vendor list can be sorted and filtered. B2Gnow Support [email protected] Page 5-13 OUTREACH To sort or filter the campaign vendor list 1. If necessary, go to the Vendor List tab for the campaign. 2. Click a column heard to sort, use a drop down menu to filter. To delete a vendor 1. If necessary, go to the Vendor List tab for the campaign. 2. In the Delete column, select the check box for the vendor you want to delete. 3. Click the Delete button, and then click OK to verify you want to delete the vendor from the campaign. To delete all vendors on the page 1. If necessary, go to the Vendor List tab for the campaign. 2. Select the check box to the left of the Delete button, and then click Delete. 3. Click OK to verify you want to delete the selected vendors from the campaign. To delete all vendors assigned to the campaign 1. If necessary, go to the Vendor List tab for the campaign. 2. Click the Delete ALL Assigned Vendors button. 3. Click OK to verify you want to delete all of the vendors from the campaign. Page 5-14 B2Gnow Support [email protected] OUTREACH Releasing outreach campaigns As you create and edit your outreach campaign, the status on the campaign’s Main tab changes from “Outreach incomplete” to “Outreach pending release.” The outreach campaign will not be sent or displayed until you release it. To release a campaign 1. If necessary, locate and open the campaign. 2. Click the release campaign hyperlink. The first campaign notification will be released on the date you specified in the Outreach Dates area on the Outreach: Update Settings tab. You can still update the campaign content and vendor lists up to the release date. If you no longer want to send the campaign, you can change the campaign status by clicking the Reverse Release hyperlink on the Main tab, but must do so prior to the release date. NOTE: Outreach notices are sent by the system every hour on the hour starting at 8am EST. Depending on the time you release the campaign, you will usually have up to one hour to reverse the release. Once the campaign is sent out, it cannot be reversed. Outreach campaigns set for release on a later date will be sent out in the first batch of the day (8am EST). B2Gnow Support [email protected] Page 5-15 OUTREACH Copying outreach campaigns If you need to create a similar campaign to one you already created, you can copy the existing campaign instead of creating a new one. When copying a campaign, you can specify which settings you want to retain, such as the vendor list or the campaign settings. To copy a campaign 1. Locate and open the campaign you want to copy. 2. Click the Copy Outreach hyperlink. 3. In the Outreach Campaign Title field, update the campaign title to something new. 4. In the Campaign Copy Options area, select the items you want to copy to the new campaign. Page 5-16 B2Gnow Support [email protected] OUTREACH 5. Click Create Outreach Campaign. 6. Update the incomplete settings, and then release the campaign. Composing your message When composing your message, make your information and instructions easy to understand. Composing your announcement Generally speaking, an announcement is composed of four parts – Heading, Pitch, Fine Print, and Directions (if applicable). Heading: List the basics: name of event, date, sponsoring group, and location. This information appears in the heading of your printed event announcement. For example: Fourth Annual Business Mingle September 30, Women’s Business Council (Hopedale, MA) Pitch: Start with an opening paragraph. Include the name and date of the event, the sponsoring group, and the general focus. For example: On the 30th of September, the Women’s Business Council is proud to host the Fourth Annual Business Mingle - a day of networking, socializing, and business seminars featuring secrets of the trade. Then write your pitch, providing event details, such as activities, meals, and speakers. The Fine Print: Enter the specifics. People want to know: When the site opens and closes. How much it costs, if applicable. How to make reservations. Any other important information. Directions: Give directions from reasonable points, including exit numbers and highway names; compass directions ("Take exit 32 east - W. Main St., Millbury."); landmarks ("Turn right after the Dairy Queen."), but use them in addition to, not in place of, street names and numbers; and mileage from one point to another ("Follow Rte 32 for three miles, then left onto Jones Rd."). B2Gnow Support [email protected] Page 5-17 OUTREACH Sample messages The following are sample messages. Please note that the events posted are fictional events. Samples are what the vendors would view in their email. Sample – Open House MWDBE.com Outreach Notification Organization: B2Gnow Project: Town Government Open House Town Government Open House Begins Tuesday, October 10 at 7:00 PM Morse Institute Library 2013 Town Government Open House The public is invited to a Town Government Open House on Tuesday, October 10 at 7pm at the Town Library, lower level. This event will provide an opportunity for citizens to meet representatives of many of the Town's boards and committees, including their Town Meeting Members, to better understand what they do, and to explore volunteer opportunities. The Open House is sponsored by the Town Board of Selectmen and the Town Chapter of the League of Women Voters. (The LWV is an independent organization promoting citizen participation in government.) Town Meeting Members, as well as chairs and members of the Town's elected and appointed boards, commissions and committees are encouraged to attend and to submit information in advance that will be provided to attendees. This may be done by completing a form at http://www.ourtown.org/openhouse. Business owners interested in doing business with Town are also encouraged to register and attend. They may register at http://ourtown.org/OpenHouse. For more information, please call the Selectmen's office at (555) 555-5555, or contact the LWV at [email protected]. To view the notice, visit: http://www.mwdbe.com/L.asp?GO=1062&TID=ABCD To view all notices, visit: http://www.mwdbe.com/L.asp?GO=1061&TID=ABCD MWDBE.com Diversity Management System, powered by B2Gnow http://www.MWDBE.com/ Sample – Conference Sponsorship MWDBE.com Outreach Notification Organization: B2Gnow Project: MWDBE Conference - Sponsorship Info 2013 MWDBE Annual Conference Sponsorship Information Why Should You Be A Sponsor? Conference sponsorship is a way to showcase your organization’s technologies, products and services to substance abuse professionals, managers, staff and decision-makers. Sponsorship creates exposure for your organization, provides an opportunity to broaden your contact with substance abuse professionals, allows you to promote your message and services with these professionals and assists you in increasing your awareness of new trends and Page 5-18 B2Gnow Support [email protected] OUTREACH pressing concerns in the Illinois addictions field. Expected Attendance 250-300 Conference Sponsorship Organizations wanting to become a Sponsor have numerous price ranges and options from which to choose. The following descriptions are designed to provide you with the information you need to allow your organization to choose your desired level of involvement and exposure to attendees of the MWDBE Conference. The following sponsorship opportunities are available: Co-Host: MWDBE Member- $5,000 Nonmember- $7,500 Conference Sponsor: MWDBE Member- $1,500 Nonmember- $2,000 Activity Sponsor- For organizations wishing to target a specific day, materials, or social event during the conference, activity sponsorship provides an attractive option. This allows your organization to choose your desired level of involvement and exposure to attendees at the MWDBE Conference. One key reason why attendees come to the MWDBE Conference is to network and establish contact with other professionals in the field, so social events such as the Awards Reception, Luncheons and Breaks are very well attended. Breaks- Choose Monday morning, Monday afternoon, Tuesday morning, Tuesday afternoon, or Wednesday morning: Sole Sponsor- $500 Co-Sponsor- $300 Breakfast- Choose Monday, Tuesday or Wednesday morning: Sole Sponsor- $1,500 Co-Sponsor- $800 Lunch- Choose Monday, Tuesday or Wednesday Sole Sponsor- $4,000 Co-Sponsor- $2,500 Awards Reception Sole Sponsor- $6,000 Co-Sponsor- $2,500 Keynote- Choose Monday, Tuesday or Wednesday Sole Sponsor- $1,500 Co-Sponsor- $800 Workshop- Contact Dawn Anderson to select the workshop to be sponsored Sole Sponsor- $500 Co-Sponsor- $300 We have limited sponsorship opportunities available which will be awarded first-come, first-served, so please act quickly! Should your organization be interested in a sponsorship package not listed, please contact Dawn Anderson to discuss your interests. Please Log in to your MWDBE account at http://www.mwdbe.com for additional information regarding applications and terms and conditions. To view the notice, visit: http://www.mwdbe.com/L.asp?GO=1062&TID=ABCD MWDBE.com Diversity Management System, powered by B2Gnow http://www.MWDBE.com/ B2Gnow Support [email protected] Page 5-19 OUTREACH Sample – Training Notification MWDBE Outreach Notification Organization: MWDBE.com Project: B2Gnow Training Announcement ATTN: ALL INTERESTED STAFF at the Contract Compliance Office From: Staff Development & Training Division Subject: B2Gnow Contract Compliance Software Training Personal Computer Software training on B2Gnow Contract Compliance Software is being delivered on an ongoing basis. Each one-day session provides hands-on instruction. The beginning levels are designed for those employees with limited access to the system, and intermediate and advance classes will be available to those in Diversity Management and Contract Compliance Offices. Who Should Attend: All interested Equal Opportunity, Purchasing, Diversity, and Contract Compliance office personnel who have DIRECT access B2Gnow Contract Compliance Software. Trainees must commit to immediate practice and utilization following each class in order to derive any benefits from this training. All log in information will be given on the first day of the class. Dates: See our schedule and sign up online at http://www.mwdbe.com/ Time: 9:00 am - 4:00 pm Room 494 North Towers Building, State Office Pre-Registration: REQUIRED. Supervisors must register participants for B2Gnow Contract Compliance Software training by contacting SD&T as outlined above. Training is limited to 10 participants per class and no one will be admitted without prior approval. NOTE: DUE TO OVERWHELMING DEMANDS, SOFTWARE CLASSES FILL QUICKLY AND WAITING LISTS FORM. IF YOU CAN NOT ATTEND A CLASS, PLEASE CALL TO CANCEL SO THAT SOMEONE ELSE HAS THE OPPORTUNITY TO FILL THAT SLOT. IF YOU DO NOT CALL TO CANCEL, YOU WILL NOT BE RESCHEDULED FOR THAT CLASS. Please share this information with appropriate staff. Refer content questions to any SD&T Computer Instructor at (800) 123-4567. To view the notice, visit: http://www.mwdbe.com/L.asp?GO=1062&TID=ABCD MWDBE.com Diversity Management System, powered by B2Gnow http://www.MWDBE.com/ Page 5-20 B2Gnow Support [email protected] OUTREACH Sample – Bid Solicitation MWDBE.com Outreach Notification Organization: B2Gnow Project: Summer Food Service Program (SFSP) Contract and Competitive Bidding Process The Invitation for Bid and Contract, used to procure vended meals for the Summer Food Service Program (SFSP), must be used for all contracts and must be competitively bid if the contract will exceed $10,000. The materials were developed to assist program sponsors in procuring a contract and include required materials and instructions for completing the competitive bid process. Included in The Booklet: - Procurement Procedures - Instructions for Completing the Invitation for Bid and Contract - Sample Food Specifications - Sample Cold Lunch Menus - Sample Cold Breakfast Menus - Sample Vendor Letter - List of Known Vendors Included in The Packet: - Contracts, Grants, Loans and Cooperative Agreement - Invitation for Bid and Contract Prototype - Menu Forms - Performance Guidelines - Post-Contract Award Summary Sheet - Required Meal Patterns - Schedule A—Program Sites A draft copy of the completed Invitation for Bid and Contract, the proposed menus, and a list of intended vendors must be submitted by April 10, 2007 to the Arizona State Board of Education, Dawn Anderson, Nutrition Programs, 1111 Broadway, Houston, Houston, TX 77003, for approval. The Invitation for Bid and Contract package must be approved by AzSBE before you can begin soliciting bids. This year the bid materials may be downloaded from the website or you may contact Dawn Anderson at 555-555-5555 or email your request to [email protected] to receive a copy of the bid materials. To view additional information regarding this bid solicitation, please log into your account. To view the notice, visit: http://www.mwdbe.com/L.asp?GO=1062&TID=ABCD MWDBE.com Diversity Management System, powered by B2Gnow http://www.MWDBE.com/ B2Gnow Support [email protected] Page 5-21 OUTREACH Sample – Certification Class MWDBE.com Outreach Reminder Organization: B2Gnow Project: Town Government Open House How to Complete the M/WBE Certification Class Organized by: Department of Small Business Services Division of Economic and Financial Opportunity Get your application right the first time! Receive assistance from trained certification counselors on how to complete the M/WBE application. January 27, 2013, 6:00-7:30 P.M. Department of Small Business Services 1111 Broadway, Houston, Houston, TX 77003This workshop is free of charge! Who Should Attend The Department of Small Business Services’ Minority- and Women-owned Business Enterprise Program (M/WBE) ensures the participation of minority- and women-owned businesses in the procurement process. Firms that have been in business for more than one year and are at least 51 percent owned by a minority or woman are eligible for certification. Under Local Law 129 of 2005, City buyers are held accountable for specific purchasing goals from Citycertified M/WBE vendors. Prime contractors are also asked to meet certain M/WBE goals in their subcontracting. All certified M/WBEs have access to free counseling and seminars to help them access City contracting opportunities and are listed in a searchable public online directory that is used by purchasing officers and contracting agencies to find the goods and services they need. Access info about the M/WBE program, including downloadable applications at: http://www.mwdbe.com/getcertified Additional Information: Telephone: 555-555-5555 To view the notice, visit: http://www.mwdbe.com/L.asp?GO=1062&TID=ABCD MWDBE.com Diversity Management System, powered by B2Gnow http://www.MWDBE.com/ Page 5-22 B2Gnow Support [email protected] OUTREACH Creating Vendor Lists If you expect to send multiple outreach campaigns to the same vendor lists, or would like to create lists for other staff to use, you can create them for easy access. You create the list, specifying list settings, such as who can view the list, and then you add vendors to the list. To create a vendor list 1. Open the Create menu, and then click New Vendor List. 2. In the Vendor List Parameters box, complete the following: Vendor List Title: Enter a title for the list. Description: Describe the list. Vendor List Editing: Specify who can edit the list. Vendor List Access: Specify who can view and use the list. 3. Click Create Vendor List. A list with the basic parameters is created. 4. Click Add Vendors. 5. On the Search: Vendors page, enter the criteria by which you want to complete the search, and then click Search All Matches. B2Gnow Support [email protected] Page 5-23 OUTREACH 6. At the bottom of the search results page, click Add to Vendor List. 7. Click OK to confirm you want to add the vendors to the vendor list. 8. On the Outreach: Add Vendors to Vendor List page, select the name of the list to which you want to add vendors, click Add Vendors to Vendor List, and then click OK. NOTE: Page 5-24 Use a comment/label that describes the type of search you ran. This will differentiate vendors added from multiple searches. B2Gnow Support [email protected] OUTREACH You can repeat this process to search and add as many sets of vendors as you need. Although there is a per search limit of 5,000 matches, this limit does not apply to the number of firms you can add to your campaign. To view all vendor lists 1. Open the View menu, and then click Vendor Lists. 2. To view a specific list, click the View hyperlink for the list. Working with vendor lists You can work with and manage your vendor lists by adding or deleting vendors, adding the list to an outreach campaign, exporting vendor details into a comma-separated values (.csv) file, editing list settings, and copying the vendor list. To delete a vendor from a vendor list 1. On the Outreach: Vendor List page, click the View hyperlink for the list you want to open. 2. To delete a specific vendor, select the check box for the vendor you want to delete, click the Delete button, and then click OK. B2Gnow Support [email protected] Page 5-25 OUTREACH 3. To delete the entire list, click Delete ALL Assigned Vendors, click OK, and then click OK again. To add a vendor list to an outreach campaign 1. On the Outreach: Vendor List page, click the View hyperlink for the list you want to open. 2. Click Transfer to Outreach, and then click OK to confirm you want to add the vendors in the selected list to a campaign. The Outreach Management: Add Vendors to Outreach Campaign page displays. 3. From the Vendor Contact Type list, select the contact to which you want to send the campaign. 4. From the Outreach Campaign List, select the name of the campaign. 5. Click Add Vendors to Outreach Campaign, and then click OK to confirm you want to add the list to the campaign. Page 5-26 B2Gnow Support [email protected] OUTREACH To export vendor details 1. On the Outreach: Vendor List page, click the View hyperlink for the list you want to open. 2. Click Export List. The Search: Export Vendors page displays. 3. Select the fields you want to export to a .csv file, click Export Records, and then save the file. To edit vendor list settings 1. On the Outreach: Vendor Lists page, click the View hyperlink for the list you want to open. 2. Click Edit Vendor List Parameters. B2Gnow Support [email protected] Page 5-27 OUTREACH 3. Edit the settings, and then click Save Changes. To copy a vendor list 1. On the Outreach: Vendor Lists page, click the View hyperlink for the list you want to open. 2. Click Copy Vendor List. The Outreach: Create Vendor List page displays. Page 5-28 B2Gnow Support [email protected] OUTREACH 3. In the Vendor List Copy Options box, select Copy Vendors/Contacts. 4. Click Create Vendor List. B2Gnow Support [email protected] Page 5-29 OUTREACH Creating events Through the Event Management module, you can create and manage events and track attendees. When you create an event, you can specify the event type and who can view and RSVP for the event. For example, you can create a Training event for staff users or a Vendor Fair event available to all vendors and the general public. Users view the event list and RSVP to specific events through the Transactions: Event Management page. To create an event 1. Open the Create menu, and then click New Event. The Event Management: Add Event page displays. 2. In the Event Information box, complete the following: Event Title: Enter the title of the event Event Information: Enter information about the event. Event Instructions: Enter special instructions about the event. Event Instructions in Confirmation: Enter attendee-only information you want to show after a contact accepts the event invitation. 3. In the Event Settings box, complete the following: Event Type: Select the type of event you want to create. Event Date: Select the date on which the event will take place. Event Start Time: Select the time at which the event will start. Event End Time: Select the time at which the event will end. Attendance Limit: Specify the maximum number of attendees. User Types: Specify the types of users who can see the event. Page 5-30 B2Gnow Support [email protected] OUTREACH Require RSVP: Specify whether an RSVP is required to attend the event. RSVP Cut-Off Date: Select the latest date on which attendees can RSVP. Event Coordinator: Select the name of the person coordinating the event. 4. In the Notifications box, complete the following: Send Confirmation Notice After RSVP: Specify whether you want to send a confirmation notice to attendees after they RSVP. Send First Reminder Notice: Specify whether you want to send a reminder notice about the event, and then select the number of days prior to the event that you want attendees to receive the reminder. Send Second Reminder Notice: Specify whether you want to send a second reminder notice about the event, and then select the number of days prior to the event that you want attendees to receive the reminder. Send Third Reminder Notice: Specify whether you want to send a third reminder notice about the event, and then select the number of days prior to the event that you want attendees to receive the reminder. Send Thank You Notice After Event: Specify whether you want to send a thank you notice to attendees after they attend the event. B2Gnow Support [email protected] Page 5-31 OUTREACH 5. In the Additional Information box, enter any notes or comments you want internal users to view. Additional Information is not displayed publicly. 6. Click Save, and then click OK. After you create events, users can view and RSVP to them. Managing events You view and manage events through the Transactions: Event Management page. You can access and update event settings and work with the attendance list. After an event, you should always log attendants for all registrants. To view the event list 1. Open the View menu, and click Events. 2. To edit an event, in the Actions column, click the Settings hyperlink. 3. To view the list of attendees, in the Actions column, click the Attendance hyperlink. Page 5-32 B2Gnow Support [email protected] OUTREACH To manage the attendee list 1. On the Transactions: Event Management page, in the Actions column, click the Attendance hyperlink. The Event Management: Attendance List displays. 2. To mark all attendees as having attended the event, click Mark All Attended. 3. To cancel all RSVPs, click Cancel All RSVPs, and then click OK. To manage a specific attendee 1. On the Transactions: Event Management page, in the Actions column, click the Attendance hyperlink. The Event Management: Attendance List displays. 2. To mark the attendee as having attended the event, click the Attended hyperlink for the attendee. 3. To mark the attendee as not having attended the event, click No Show. 4. To cancel the RSVP, click Cancel, and then click OK. 5. To send a message to the attendee, click the attendee’s name or the Message hyperlink, complete the fields, click Review/Next, and then click Send. B2Gnow Support [email protected] Page 5-33 OUTREACH To add an attendee RSVP It is sometimes necessary to add an attendee directly to an event. 1. On the Transactions: Event Management page, in the Actions column, click the Attendance hyperlink. The Event Management: Attendance List displays. 2. On the Event Management: Attendance List page, click Add Attendee. 3. Complete the following: First Name, Last: Enter the attendee’s first and last name. Organization: Enter the name of the attendee’s organization. Email: Enter the attendee’s email address. Phone: Enter the attendee’s phone number. Confirmation: Select to automatically send an email confirmation when the attendee responds to the invitation. 4. Click RSVP for Event. 5. Click OK to confirm you want to add the RSVP, and then click OK again. Page 5-34 B2Gnow Support [email protected] OUTREACH To add notes about the event 1. On the Transactions: Event Management page, in the Actions column, click the Setting hyperlink. The Event Management: Edit Event page displays. 2. In the Additional Information box, enter any event notes. This information is not displayed publicly. B2Gnow Support [email protected] Page 5-35