1
1078 60th Street Oakland, CA 94608
888.537.1401
2
3
1
1
4
1
7
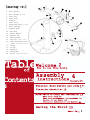
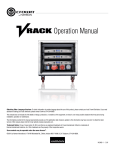
1. Rear Upright
2. Rear Bridge (No Step)
3. Long Stay
4. Brake Post
5. Dropout
6. Short Stay
7. Kickstand Plate (Serial#)
8. Front Upright
9. Dropout Boss
10. Boss Hog
11. Spacer Washer
12. Special Nut
13. Front Bridge
14. Top Stay (Grab to lift)
15. Front Attachment Plate
(FAP)
16.
17.
18.
19.
20.
Rubber pad attached
Tongue
V-rack
SnapDeck
FreeLoader
H-rack (Optional
8
5
14
1
6
13
16
8
4
15
12
9
11
18
17
10
19
20
Accessory)
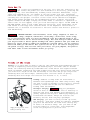
Yippee!
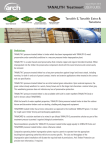
We congratulate and thank you for joining the growing ranks of Xtracycle owners people
around the world figuring out happier, hipper, friendlier, richer, cooler, more soulful
ways to get around and live and have fun. For us, this company and our products are
about making the world a better place; by, among other things, minimizing pressure on
the environment and giving people satisfying transportation choices. We re confident
that in some way the Xtracycle sport utility bicycle will change your world and leave
you inspired. We appreciate your business. Ride on!
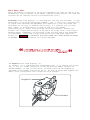
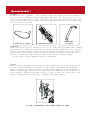
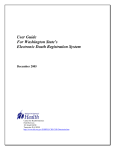
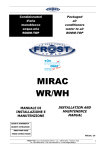
Anatomy of a FreeRadical
FAP Bolt
Top Stay (Use as Handle)
Front Upright
Tongue
Rear Iso View
Front Attachment Plate
Washer
Nut
A
Boss Hog
Tube of Gibralter
Brake Post
Bottom Stay
Kickstand Plate (Serial #)
Boss Hog
Dropout Boss
Disc Brake Caliper Mount
32mm Bolt
Fender Boss
FreeLoader Boss
Spacer Washer
Long Stay
French Nut
Fender Boss
Front Bridge
Rear Upright
Rear Bridge (No Step)
Short Stay
Derailleur Hanger
& Dropout
Fender Boss
A
Bottom Stay
Boss Hog
FreeLoader Boss
Chainring Bolt
15mm Bolt
Dropout Boss
32mm Bolt
FreeLoader Boss
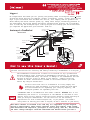
This manual is an introduction to owning, using, and caring for a FreeRadical. It also
contains instructions for correctly and safely installing a FreeRadical on a bicycle.
The FreeRadical installation is meant to be carried out by a professional
bicycle mechanic only! Installing a FreeRadical incorrectly, or installing
it on an incompatible bike, can result in damage to the FreeRadical and the
bicycle as well as injury or death to the rider!!! Always follow the
"Before You Ride" instructions included in this manual before you ride.
That’s why they’re called that!
You will also find a bit of information on living simply and
fighting for good and beauty in the world. Please do! And check
out the accessories for expanding your carrying capacity, and
Xtracycle goodies for spreading the love.
A WARRANTY CARD is included with this Owner s Manual. Please fill it out
immediately and return it to Xtracycle at the address on the back of this
manual; doing so will greatly facilitate future warranty claims and help us
know you and your needs better. You can also fill out the warranty
registration on line at www.xtracycle.com, if you prefer. (You needn’t
worry about us selling your name to anyone; we don’t believe in junk mail.)
This Owner’s Manual is intended to be used only as a supplement to your original
bicycle’s owners manual, which covers essential topics like braking, night riding,
bike maintenance and inspection, principles of safe cycling, bike fit, and off-road
and other riding techniques. Read and understand both manuals before you ride!!!
! WARNING FAILURE TO
These are instructions for properly attaching a FreeRadical to a bicycle.
FOLLOW THESE INSTRUCTIONS PRECISELY MAY RESULT IN INJURY OR DEATH! Conversely, following these
instructions precisely may result in healthy robustness and increased life expectancy! This
installation should only be undertaken by a professional bicycle mechanic. Please read through the
entire assembly instructions before proceeding.
Tools required for installation and adjustment:
5mm allen wrench
6mm allen wrench
8mm allen wrench
adjustable wrench
cable and housing cutter
phillips-head screwdriver
chain tool
metric ruler˚
repair stand (optional)
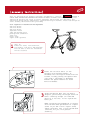
Okay, go!
Remove the chain, rear derailleur,
rear brakes, rear wheel, and kickstand
from the bike to which the FreeRadical
will be attached.
Insert the two short bolts (or the
optional Quick Release skewers, if
included) into the Dropout Bosses from the
outside, loosely placing the Special Nuts
(see "Step 3 continued" to determine
whether the Spacer Washers not shown
here are needed).
Slide the Special Nuts into the bike’s
dropouts, positioning the Tongue above the
bike s chainstay bridge (or kickstand
plate if it has one). Do not tighten the
bolts yet.
NOTE: Attaching the FreeRadical is easiest
with the bike held upside-down in a repair
stand. If you don’t have a repair stand,
remove the bike’s seat to work upside-down
(the bike, not you) with greater
stability.
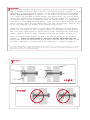
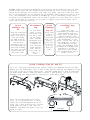
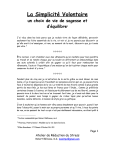
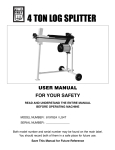
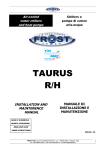
NOTE: The Front Uprights are spaced for bikes with a 135mm over-locknut dimension*
(O.L.D.) standard on mountain bikes since 1997 and 7mm-thick dropouts (diagram 3a). On an
older bike or a bike with thinner dropouts, you may need to add Spacer Washers between
the Boss Hogs and the dropouts (diagram 3b). If the dropouts still aren’t wide enough
(i.e., there’s space between the Spacer Washers and the Boss Hogs), the rear triangles
can be safely spread by many professional bicycle shops with specialty tools.(Exceptions
are composite frames, and very inexpensive steel and aluminum frames, i.e. departmentstore quality, which CANNOT be safely spread.) Doing so will not weaken the frame but may
void its warranty. Check with the manufacturer to be sure. Alternatively, a Narrow O.L.D.
Fit Kit that addresses this problem can be ordered from Xtracycle.
Conversely, on an aluminum bike with a 135mm over-locknut dimension the thick dropouts
require that you squeeze the rear triangles together. If the dropouts are 9mm thick or
less, this slight squeeze does not require special tools. Breezer/Ritchey flange style
dropouts require a spacer to keep the flange from hitting the upright (diagram 3a).
Do not put a Spacer Washer between the Special Nut and the dropout in any situation
(diagram 3c). DO NOT USE SPACER WASHERS IF THE BIKE’S DROPOUTS ARE THICKER THAN 7mm!
Doing so will prevent the Special Nuts from seating in the Boss Hogs (see "Step 5") and
will make it impossible to securely fasten the FreeRadical to the bike (diagram 3d)!
* The
over-locknut dimension is the measurement from the outer face of one locknut on the axle to the outer face
of the other locknut. The locknuts are the parts of the axle set that butt up against the inside face of the
dropouts when the wheel is installed normally.
Upright
3b
3a
Spacer
Washer
Boss Hog
Bolt
Special Nut
Bike’s
Dropout (D.O.)
<135mm O.L.D. and/or <7mm D.O.
135mm O.L.D. and 7mm D.O.
3c
Spacer on wrong side of D.O.
3d
D.O. >7mm; don’t use Spacer Washer
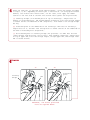
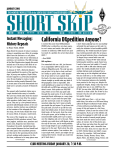
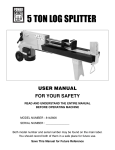
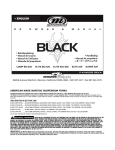
Using the long bolt (or optional quick-release skewer), attach the Tongue according
to step a, b, OR c depending on the bicycle s construction. (If using quick-release
skewers, also follow their instructions.) In all cases, first apply the rubber
cushion to the flat side of the FAP. The cushion rests against the bicycle frame.
{a} Chainstay bridge (or kickstand plate on top of chainstays): Tongue rests on
bridge (or kickstand plate); FAP placed beneath chainstays; bolt runs through Tongue
to washer and nut on underside of FAP (diagram 4a). Bolt needn t run through bridge
but may.
{b} Kickstand plate on the underside of the chainstays: FAP rests on chainstays,
Tongue rests on it, and bolt runs through both to washer and nut on the underside of
the bike s kickstand plate (diagram 4b).
{c} No
(order
on top
FAP to
kickstand plate or chainstay bridge (not pictured): two FAPs must be used
another from Xtracycle: 888.537.1401); FAPs sandwich chainstays; Tongue rests
of upper FAP; bolt runs through Tongue, through upper FAP, and through lower
washer and nut.
4a
chainstay
bridge
OR
4b
kickstand
plate
FAP
FAP
Remember, the bikes pictured
here are upside down!
Tighten the Tongue bolt to 100in•lbs (11.3Nm), being careful to center the Tongue
between the chainstays. Next, tighten the dropout bolts to 120in•lbs (13.6 Nm) by
turning the Allen heads.
! WARNING IT IS CRUCIAL THAT THE NUTS FOR THE DROPOUT BOLT BE SEATED INSIDE THE
BOSS HOGS! If they aren't, the FreeRadical can't be tightened onto the bike
sufficiently and will come off during use! DO NOT USE SPACER WASHERS IF THE BIKE'S
DROPOUTS ARE THICKER THAN 7mm!
Turn the bike right side up in the repair stand. Mount the rear
derailleur and rear brakes on the FreeRadical as per the original
bicycle's owner's manual or component manufacturer's assembly guide.
NOTE: The FreeRadical is designed for long-arm cantilever brakes
(aka V-Brakes and linear-pull brakes) and won't work safely
without them. If needed these can be ordered from Xtracycle.
{6.7}
smile, you're more than half way there!
Place the rear wheel into the FreeRadical's dropouts as per the original bicycle's
owner's manual. (Many companies have this information on their Web site.)
! WARNING
When installing the wheel on an older bike, you may need to
replace the axle with a longer one: Measure the axle. For a quick-release
system, the axle MUST be between 138mm and 146mm long! For a non-QR system,
the axle must be at least 170mm! Don't take any chances with a mis-sized axle;
either too long or too short and the wheel could fall off when least expected.
If it doesn't meet the specifications above, replace it.
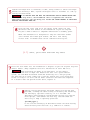
Replace old rear derailleur and brake cables with the new ones
provided, trimming new cable housing as necessary and installing
the Rollamajig (optional accessory) if it's included. The
derailleur cable should be routed between the seat stay and the
Front Upright, then beneath the Boss Hog, and then under the
Short Stay to keep it optimally protected.
{Rollamajiggin'}
Do not use the Rollamajig on derailleurs where the cable housing
enters directly from the front (e.g. SRAM Di.R.T. models).
* line
up
¥ The bottom of the Rollamajig should
line up approximately with the bottom
of the derailleur (as shown in diagram).
¥ If you are using Gore cables, cut the
liner back so it doesn’t touch the
pulley.
¥ Make sure the cable is fully seated in
the cable groove.
Re-install the chain, adding links from the kit to the existing chain. Create a chain
one link longer than what’s needed to stretch around the big cog and big ring and
through the rear derailleur simultaneously. (The chain supplied is sized such that if
the bike’s chain was sized correctly, joining the two will yield the correct length for
the sport utility bicycle.) Unless a special size was ordered, the supplied chain is
intended to mate with 8-, 7-, and 6-speed chains. Do not attempt to mate the chain with
other sizes. Additionally, not all brands of chain are compatible with each other. Only
a professional bicycle mechanic can make the call. If the bike’s chain is worn, or a
special size is needed, or the makes are incompatible, the appropriate chain can be
ordered from Xtracycle. ! WARNING
Attempting to connect incompatible chains can
result in sudden chain breakage while riding and lead to a crash. Improper/inadequate
chain pin connections can also lead to chain separation under stress while riding and
lead to a crash.
Adjust the brakes and derailleur as per the original bicycle’s owner’s manual or
component manufacturer’s assembly guide. Bolt the supplied kickstand to the
Kickstand Plate of the FreeRadical, aligning it such that, viewed from above,
the arm (NOT the mounting plate) is parallel to the Front Bridge when extended.
Make sure it doesn’t protrude into the spokes when stowed.
NOTE: With internally geared bikes and single-speeds, proper chain tension is
achieved by adjusting the fore/aft position of the entire FreeRadical in the
bicycle’s dropouts.
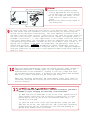
Don t stop following directions now!!! Excellent FreeRadical performance
DEPENDS on proper strapping and tensioning of the FreeLoaders!
{1} Make sure that the FreeLoader is taut on the V-rack. Squeeze the rack
sides together (stand the V-rack on the floor oriented like a "C" while
pushing down on the top) and stretch the FreeLoader flaps tight, i.e.
towards the V-rack ends.
{2} Place the right V-rack in the right-side Uprights, making sure both
ends seat all the way. This takes practice, and is often best achieved by
guiding the front and rear simultaneously, with each hand grabbing an
Upright while feeding in the V-rack ends.
11a
1
3
2
front
11b
{3} Tension the bottom of the FreeLoaders
by tightening the straps equally. The front
strap goes to the outside of the Front
Upright, passes behind the chainstay, then
returns to the outside of the Front Upright
and into the ladder-lock buckle (diagram
10a). The rear strap goes to the outside of
the Long Stay, goes under, then comes
around behind the Rear Upright to the
ladder-lock buckle (diagram 10b). It DOES
NOT go around the Rear Bridge. The
FreeLoader should be completely taut, i.e.
no wrinkles! If the straps are completely
tight and the FreeLoader isn’t completely
taut, remove the assembly from the
FreeRadical frame and go back to step 1 to
re-tension the FreeLoader on the V-rack.
{4} Repeat steps 1—3 for the left V-rack.
2
NO
STE
P
3
12a
1
rear
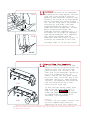
{1} Position the SnapDeck so the snap
pieces on one side are placed against the
inside of the V-rack. The front snap
piece should be just in front of the
front flap of the FreeLoader, nesting in
the V-rack’s indentation (not all
models), and the rear snap piece should
be just in front of the rear flap of the
FreeLoader (figure 12a). When installed
correctly, the SnapDeck’s nose should be
even with the plane of the V-racks’
nearly vertical front legs.
{2} With one side seated, simply press
down on the top of the deck until it
snaps into place. ! DANGER Keep your
thumbs and fingers from getting between
the SnapDeck and the V-racks while
installing to avoid pinching.
12b
Removal
To remove, use your thumbs to push in and
up on the SnapDeck edge while your
fingers pull on the V-rack (figure 12b).
Questions? Please see the technical FAQ on our Web site <www.xtracycle.com>
or call 888.537.1401
Xtracycle LLC warrants Xtracycle products to be free from defects in material and workmanship
subject to the conditions and limitations set forth below. Xtracycle’s sole obligation under
this warranty is to repair or replace the product(s), at Xtracycle’s option.
¥ The FreeRadical frame is warranted for the lifetime of the product while with the
original owner.
¥ Components are warranted for one year.
¥ In no event shall Xtracycle be liable for any loss, inconvenience or consequential
damages.
¥ This warranty does not cover damage due to wear and tear, overloading, misuse, abuse,
neglect, accidents, improper assembly or repair, or anything else beyond Xtracycle s
immediate control. A partial list of preventable damage not covered by this
warranty: rusting of the FreeRadical; delamination of the SnapDeck; galvanic
corrosion at FreeRadical/V-rack joints; bending of the FreeRadical s Long Stays by
overloading behind the dropouts (more than 100 pounds is too much here); failure of
your rear wheel; disfiguration of the rack sockets; plastic buckle failure due to
over-tightening straps; and damage resulting from stunt riding, jumping, acrobatics,
competitive riding, or commercial use.
¥ Xtracycle will be the sole arbiter of whether or not damage is due to defects in
materials and workmanship.
¥ Warranty claims require proof of purchase and must be made through an authorized
dealer.
¥ The labor required to remove and/or re-fit and readjust the FreeRadical is not
covered by this warranty.
¥ Any postage, insurance or shipping costs incurred in sending your FreeRadical for
service are your responsibility.
We of course want you to get the utmost enjoyment and utility from your FreeRadical and will
seek to assist you, for a nominal charge, in remedying any injuries that it may sustain. You
should be aware that installation of the FreeRadical may void the manufacturer s warranty on
your bicycle.
! WARNING
In addition to being good for your mind, your body, your community, and your planet, cycling can be very
dangerous. Cycling with two people on one bike and/or with cargo can be even more dangerous. The user of this
product should know that participating in cycling may involve serious injury or death.
Always wear a helmet; this includes any passengers. There is absolutely, positively no question that they
help prevent injury and save lives.
Standing, kneeling, or sitting backwards or sideways (both legs on the same side of the bike) on the SnapDeck
while the bike is moving or stopped can easily result in broken limbs, loss of control of the bike, destroyed
rims, a destroyed bike frame, or worse.
Carrying a load and riding a long-wheelbase bike both require getting accustomed to. Practice maneuvering and
braking on a flat, hazard- and traffic-free street with and without a load before going out into the world.
Carrying a seated passenger or heavy load involves risks, foremost of which can be decreased braking power
and increased stopping distance. Always make sure you have at least two well-adjusted brakes. Drum, roller,
or coaster brakes ARE NOT suited to hilly riding or heavy loads and can fail under serious strain when you
need them most! We strongly recommend rim and/or disc brakes, though these carry their own risks: under
severe loads (as when carrying a passenger or cargo at high speed) a very strong front brake can lead to
failure of the front fork. For this reason, don’t use the front brake by itself; the rear or rear and front
brake should be used in all braking situations.
The user of this product acknowledges both an understanding and an assumption of the risks involved in
cycling, cycling with cargo, and cycling with a passenger. Children incapable of riding a bike on their own
or under the age of 6 should not ride on the FreeRadical as passengers, unless it’s equipped with the
Xtracycle Child Seat accessory. Children should not ride as passengers without an adult operating the
Xtracycle SUB.
No warning is a substitute for good judgement. Use yours always. If you have reason to suspect that your own
judgement isn’t great, share your plans with somebody you respect, and ask for a second opinion.
! WARNING
1. check to see that your wheels are securely fastened,
2. that your helmet (and head) is securely fastened,
3. that your FreeRadical is securely fastened to your bicycle at its
three attachment points,
4. that the FreeLoaders are taut and that no straps are dangling where
they could get caught in the wheels,
5. that your brakes are well adjusted;
6. that no components or frame members are cracked or broken (in
general, if at any time you notice a crack or bend in your
FreeRadical or in the frame, stem, forks, or bars of your bicycle,
stop riding immediately; take your rig to your local bike shop and
have them inspect it);
7. examine the Snap Pieces (the plastic pieces bolted to the SnapDeck)
for looseness and tighten if necessary;
8. double check your load for security and stability.
What does what
Take a few minutes to learn how to set-up your FreeRadical the right way and you ll be
rewarded with a smooth-running, easy-loading, righteous-looking vehicle. (For terms and
locations see the "Anatomy" section on the inside front cover.)
FreeLoaders serve three purposes: (1) they keep your load away from the wheel; (2) they
add rigidity to the entire load-hauling assembly; and, (3) they carry a dizzying array
of cargoes their open ends and expandable girth enable you to carry big things that
would never fit in a bag. To maximize their utility, it s essential that you cinch
them, tightly, to the bike exactly as shown in step 11 of the assembly
instructions (pg 14). Adjust the load straps like little seatbelts, and hook the
Slackers (the c-shaped plastic pieces on the end of the straps) back to the straps to
minimize dangle. SideWinders, the horizontal straps on either end of each FreeLoader
(on some models), can be used to wrap around your load to keep small things from
falling out. ! CAUTION The SideWinders MUST LOOP AROUND THE V-RACKS BEFORE THE BUCKLE
IS FASTENED! Otherwise the tension can rip the FreeLoader.
The SnapDeck serves three purposes, too:
(1) foremost, it s a loading platform and passenger seat; (2) it tensions the V-racks;
and, (3) acts as a fender (though you’ll want the Xtracycle Fender accessory for
maximum fendage). To make all this groove, you need to position the SnapDeck as
described in the assembly instructions (pg 15). Oh yeah, an upside-down SnapDeck also
makes a great cutting board. Don’t forget the vin et fromage!
SnapDeck
FreeLoader
V-racks support the entire FreeRadical load-carrying system. Make sure they are fully
seated in the Front and Rear Uprights before hitting the road. V-racks can also be
installed horizontally for carrying long loads, big boxes, and other loads that don’t
fit in the FreeLoaders or are unstable on the SnapDeck. When using the V-rack as an Hrack, the FreeLoader can be removed or bundled up, or its tensioning straps can be
attached to the FreeRadical and it can be used to buckle in a load. Only one V-rack at
a time can be used as an H-rack. If you want to support loads on both sides, get Hracks (see accessories section)!
Quick
loading tip
#1
Load the kickstand
side of the bike
first, and load it
with the things
you need the most.
Not only will the
load be more
accessible, but it
will help keep the
bike from falling
over when you load
heavy things on
the other side.
Kickstand
tip
If your bike
wants to fall
over every time
you put a load
on the right
side, consider
shortening your
kickstand with
a hacksaw so
that the bike
leans farther
left. Trim no
more than 1/4"
(6mm) at a
time.
Quick
loading
tip #2
Carry long
loads on
the nonkickstand
side of the
bike so
they will
be out of
your way
when you
mount.
Loading Tip
#3
Note that one
FreeLoader’s straps have
male buckles and the
other one’s straps have
female buckles. This
allows you to buckle from
one FreeLoader to the
other, across the top of
the SnapDeck. Doing so
can stabilize a load,
keep the SnapDeck from
rattling on a bumpy road,
and make it easier to
buckle in tall things
that extend above the Vracks. Try it!
Quick loading tips #4 and #5
Run a 4—6’ cam strap (see Accessories section) under your SnapDeck and let the ends
dangle into the FreeLoaders. This is most easily done by removing the SnapDeck, laying
the strap across the V-racks (below left), and then sandwiching it down by replacing
the deck (below center). When you need to secure a load quickly, just put it on the
SnapDeck, wrap the strap around it, and cinch it down (below right).
4
Don’t use the above method for heavy
cargo, as it’s possible that it could
wrench the load and SnapDeck off the Vracks. For a more secure set-up, run the
strap under the left V-rack, over the
SnapDeck, and under the right V-rack (as
shown at right).
SNAP DECK
3
Repeat
2
1
FreeLoaders
! CAUTION
Don t leave your FreeRadical in the rain. If it gets wet, make sure to dry
out the upright sockets. We powder coat each FreeRadical at the factory, producing the
highest quality, most environmentally friendly finish available. Nonetheless, if you
leave your FreeRadical wet, the insides of the rack sockets will rust, guaranteed.
Remove and clean V-racks with a rag at least once/month to keep them from galvanically
corroding into the uprights. Corrosion of the V-racks can be removed with sandpaper.
Keep unused sockets plugged with the included black plastic thingies. This guards
against oxidation and dings. Dinging the sockets makes it difficult or impossible to
insert racks. If that happens, visit your local bike shop for repair. DO NOT STAND ON
THE REAR BRIDGE; doing so will likely bend your Long Stays. Dirty FreeLoaders can be
hand washed in cold soapy water and line dried. If the SnapDeck’s varnish wears or
weathers off, it should be re-coated with a non-toxic outdoor wood finish to protect it
from delaminating.
! WARNING
MAXIMUM PAYLOADS: each FreeLoader, 50 lbs (23kg); SnapDeck, in front of
axle, 200 lbs (90kg); SnapDeck, behind axle, 50 lbs(23kg); each H-rack, 60 lbs (27kg);
not to exceed 200 lbs (90kg) for entire FreeRadical load! The combined weight of the
rider and the load is not to exceed 350 lbs (160kg)! Note that Xtracycle cannot warrant
your bicycle frame or wheels against breakage and cannot guarantee that your frame and
wheels are strong enough to handle the FreeRadical’s payload limits. Use the strongest
wheels and frame you can afford. Most cyclists are not up to the task of carrying even
100 pounds of cargo, much less 200. Know your limits, use good judgment, and practice
with small loads in safe environments before you go big!
Gravity: it’s there when you need it! Why not take advantage? GravityAdvantage JuJu is
our way of expressing the Xtracycle SUB handling magic. Our minds (and our friends’
minds) are continually blown by loaded SUBs that corner better than regular mountain
bikes in downhill singletrack and climb steeper hills and start uphill easier and ride
just fine with a kayak on one side and nothing on the other and you get the picture.
Something about the extra length, something about the lower center of gravity,
something about more weight over the back tire whatever it is, it works!
Loading: endeavor to keep loads low and forward to
maximize GravityAdvantage JuJu. When using H-racks, keep
the load as close as possible to the bicycle to increase
stability. Please see our Web site for additional
loading ideas and examples.
Passenger carrying: ! WARNING Keep your passengers
seated in front of the rear axle. This is necessary to
keep the Long Stays from bending; more importantly, it
greatly improves the bicycle’s handling by keeping the
load between the wheels. Always use Footsies (see
Accessory section) when carrying a passenger.
Happy Xtracyclist with
funny-looking foot.
SUB carrying: your bike is easily carried (up stairs,
for instance), even while loaded, by holding a handlebar
grip with one hand while the other lifts the Top Stay.
If there’s an Escalator handy, roll your bike on and
lock the brakes for a free ride! Fancy department
stores are good places to practice this.
Footsies
An important pair of pieces o wood (a pretty light, very pretty, birch-fir laminate)
that can mean the difference between happy feet and angry feet. They install in a hair
less than 10 seconds, with no tools, and remove just as easily. One of these days we’re
going to patent the Footsie and get rich! Your passengers will love you for them. Heck,
you will love you for them.
Footsie in space
Footsies on bike
LongLoader
in space
LongLoader
Carry a whitewater kayak or longboard (or two) with ease. This attachment makes loading
your watercraft a snap and also helps with other long loads. Windsurfers too! The rack
installs in seconds without tools and works by holding the lengthy load to the outside
of your pedal. The package includes an H-rack, and two cam straps for buckling down
your boat, surfboard, ladder, bikebox, 2x4s, fishin’ pole, or massage table.
(We also make a special padded carrier for surfboards.)
H-racks
These horizontal aluminum racks provide a perfect platform for carrying big boxes and
the like, and are essential if you plan to carry really long things like flagpoles,
kayaks, or lumber. To install H-racks, you simply slide them into the FreeRadical’s
Front and Rear Bridges (the horizontal tubes). When not needed they can be removed and
stowed compactly against the upright V-racks, or left at home. You can use one, or two.
Keep your eyes peeled for the X-wing, a highfalutin folding version.
H-rack, LongLoader, and ladder ready to zoom!
Quick-release kit
If you travel by aeroplane or need to remove your FreeRadical to use your bike for
trials riding on the weekends, this kit makes the job jiffier. Includes 3 QR skewers
for the 3 FreeRadical attachment points, and a break-by-hand chain link.
Cam straps
Tough buckles and tough nylon webbing for advanced loading options. These come in
various lengths to suit your needs.
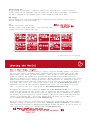
Fun
organic long-sleeve surf shirt
stickers (small size shown below, 3"x4" versions also)
"trucks are sissy" redneck mesh cap
my
xtracycle
xtracycle
xtracycle
the bike that hauls
www.xtracycle.com
xtracycle
xtracycle
xtracycle
xtracycle
xtracycle
xtracycle
xtracycle
practice random acts of stickering
There s a shortage of people working to create a bicycle-friendly planet. Yet there s
the will and there s the money. Polls regularly show that more Americans would ride
their bikes, more often, if they had better, safer places to ride. And Congress has
shown its support for spending on cycling infrastructure by allocating literally
billions of dollars to the effort in the past decade. But most of the money isn t being
spent because there aren t enough people out there asking for it! Chances are there s
an understaffed cycling advocacy organization in your neck of the woods that could use
your help, even if for just a few hours a month. Contact the Thunderhead Alliance, a
national coalition of bike-advocacy organizations (Goal: 15% of trips by bicycle by
2015), to find out who your local group is. www.thunderheadalliance.org
We support an organization called the Center for a New American Dream. It s a rootsy
group that epitomizes the new culture idea of doing more and having less. "The Center
works to help individuals and institutions to reduce and shift consumption to enhance
our quality of life and protect the environment." We joined and we’re having more fun
already! 6930 Carroll Ave., Suite 900, Takoma Park, MD 20912 301-891-ENUF (3683)
877-68 DREAM [email protected] www.newdream.org
How d you like to learn to teach someone in Africa how to build her own utility bike?
Consider joining our non-profit sister ship, Xtracycle Access Foundation, that works to
bring the Xtracycle dream to disadvantaged people around the world. If you’re short on
time, they accept money, too. [email protected] www.xaccess.org
Ever wish there was a guide to doing right? Co-op America is a non-profit organization
that produces a book called the National Green Pages. It’s a directory of thousands of
socially and environmentally responsible businesses, products, and services. Whether
you’re looking for the most environmentally friendly toilet paper you can buy or for an
insurance company with values you respect, you’ll find it in this book. We consult it
for most all our purchases. 1612 K Street NW, Suite 600, Washington, DC 20006
(202)872-5307,(800)58-GREEN www.coopamerica.org
Please make frequent visits to www.xtracycle.com to learn more about the people,
organizations, and media that inspire us and to find resources for waging your own
campaigns.
I’ve grown impatient with the kind of debate we used to have
whether the optimists or the pessimists are
about
right. Neither are right.
There is too much bad news to justify complacency.
There is too much good news to justify despair.
Donella Meadows
Dreams
More bikes, fewer cars, more green spaces, fewer parking places, more
paths, less pavement, a world without smog. Smokestackless factories,
broken-down dams, free-flowing rivers, meaningful jobs, meaningful products,
a new society that has outgrown consumerism. We dream of a people
motivated by beauty and fighting for it.
Xtracycle LLC is a manufacturer, educator, and vehicle for social change whose products
enable an entirely new means of mobility all over Earth. We promote the Xtracycle Sport
Utility Bicycle in the developed world as a boundary-pushing bicycle and a soulsatisfying alternative to automobile dependence. Profits support developing world
initiatives, making Xtracycle technology accessible to all. We are committed to
creating a new model of business that adds to the natural wealth of humanity and the
planet. We seek to leave beauty in our tire tracks.
Xtracycle, the sweet-ass X logo, FreeRadical, SnapDeck, FreeLoader, SideWinder, I lost 3500 lbs
in one day, friends don’t let friends drive, God grant me the courage to sell my car, honk if
you’re a wuss in an SUV, ride to believe, the bike that hauls, and GravityAdvantage JuJu are
trademarks of Xtracycle LLC. US Patent No. 6,092,820. US and International patents pending. VBrake is a Shimano trademark. Rollamajig is an Avid trademark. '5/2001 Xtracycle LLC
Keep this booklet on your coffee table for quick reference, and ride, ride, ride, ride, ride.
the bike that hauls
In 1963, physicist Edward Lorenz stumbled upon a profound new way of looking at the
world. Searching for better ways to predict the weather, a mistake in his research led
him to a principle he called "sensitivity to initial conditions." In essence, he
realized that even a minute action in a remote part of a system can have a dynamic
impact on the entire system. "If the theory were correct, one flap of a butterfly's
wings would be enough to alter the course of the weather forever," wrote Lorenz. Not
only would the impact be dynamic, but it would cascade in unpredictable ways. At
Xtracycle, we believe that individuals affect the world similarly. This optimism keeps
us fighting for what we believe, confident that untold and unanticipated good will
unfold. If a butterfly can cause a tornado, so can you. Make it a good one.
4300 West Street Oakland, CA 94702 888.537.1401 www.xtracycle.com