1
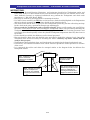
SOUTH DAKOTA
FREEMASONS
In cooperation with
SOUTH DAKOTA SHERIFFS’ ASSOCIATION
SOUTH DAKOTA DENTAL ASSOCIATION
The National Center for Missing and Exploited Children
and The Amber Alert
Operations Manual – Computer Equipment
Second Edition (February 5, 2008)
Table of Contents
Cover Page
SDCHIP Funding Letter
Introduction .................................................................................................. 1
SDCHIP Event Checklist………………………………………………………..2
SDCHIP Organization Protocol ............................................................... 3
Grand Lodge SDCHIP Committee (GLC) and SDCHIP Coordinator .... 3
SDCHIP Area Organizing Committee (AC) ............................................ 3
SDCHIP Local Organizing Committee (LOC)......................................... 4
Initiation of SDCHIP Events ................................................................... 5
General Guidelines............................................................................... 5
School Based Programs ........................................................................ 5
Community Events............................................................................... 5
Stand-alone Events .............................................................................. 6
SDCHIP Event Procedures ........................................................................ 7
Local Committee....................................................................................... 7
General Setup and Flow Patterns ........................................................... 7
Pre-event Site Inspection ......................................................................... 7
Ordering of Supplies from Coordinator ................................................... 7
Supplies not available from Coordinator................................................. 7
Setup ......................................................................................................... 8
Additional Suggestions............................................................................. 8
Registration Station – Setup & Instructions ......................................... 9
Webcam Still Photograph, Interview
& Fingerprint Scanner Station - Instructions................................. 10
Initial Considerations............................................................................. 10
Lighting ........................................................................................... 10
Space ................................................................................................ 10
Staff.................................................................................................. 10
Computer Operator .................................................................. 10
Photo Assistant ........................................................................ 10
Instructions............................................................................................. 10
Interview Suggestions ............................................................................ 11
Printing Suggestions .............................................................................. 11
Fingerprint Suggestions......................................................................... 11
Toothprints® and Cheek Swab Stations............................................... 12
Instructions............................................................................................. 12
Dental Procedures .................................................................................. 13
Toothprint® Procedures.................................................................. 13
Cheek Swab Procedures.................................................................. 13
Additional Information ................................................................... 14
Laminating/Check Out Station – Instructions .................................... 15
Clean Up & Breakdown ............................................................................ 16
Instructions............................................................................................. 16
Close Out................................................................................................. 16
APPENDIX
APPENDIX A – SDCHIP Publicity Procedures
How to Promote your Masonic Child Identification Program
Opportunity for Publicity
How to Prepare Effective News Releases
How to Prepare a Public Service Announcement
Preparing Broadsides and Flyers
Placing Promotional Materials & Editorial Contact
Follow Up
Sample News Release
Appendix B – SDCHIP School Event Procedures
EXHIBITS
Introduction
Masonry has long held a commitment to children and families. A parent’s worst nightmare is the
disappearance of a child. In today’s society with over one million children being reported missing each year,
the problem cannot be ignored. SDCHIP is designed to give families a measure of protection against this
ever-increasing problem.
SDCHIP is the most comprehensive child identification currently available to our communities. With the
Grand Lodge acting as the coordinating body, the South Dakota Freemasons, The South Dakota Dental
Association, and the South Dakota Sheriffs’ Association are working together and attempting to make this
program available to every South Dakota family who wishes to participate. Through the benevolence of
the Grand Lodge of Masons and other sponsoring organizations this service is brought at no
charge to the participants. No attempt to raise funds at an event is to be allowed. In the event
that an attendee requests information on making a donation, he/she should be taken to an offsite location where a potential donation can be discussed. A Donation sheet is enclosed for this
purpose.
The program consists of five major components: 1) a Webcam still photograph, 2) a brief (10 to 20 second)
Webcam interview, 3) Fingerprinting by scanner 4) a dental bite registration, 5) and a DNA cheek swab. The
CD each child takes home contains a still photo, interview and the fingerprints. The “movie” interview is a
recovery tool that provides far more individual characteristics and mannerisms than any still photograph
could possibly accomplish. Fingerprinting is a tried and true method of individual identification. The dental
bite impression (Toothprints®) provides an impression of the biting surface of teeth that, like fingerprints,
are unique to each individual. In addition, enough saliva is on the bite impression to provide a DNA sample
and a source for scent in canine recovery. The cheek swab, when frozen, can provide a DNA sample for 25-30
years. The child’s CD can be readily used for purposes of the Amber Alert program. Together they provide a
most powerful identification and recovery tool.
SDCHIP also provides Masons with the opportunity to bring before their communities by example the
principles of their craft. By increasing awareness of what Masonry means and what Masons do, we promote
the public image of our Fraternity. In this way, we strengthen our ability to grow and provide even more
good to our communities and to those whom we so dearly love, our families. Through our example it is our
aim that others too will become stronger in their desire to make our communities better places in which to
live.
All ID packets are provided at no cost to the parents. Funding for SDCHIP is raised by the Masonic family
members and communities holding SDCHIP events. Program financing is channeled through the South
Dakota SDCHIP Program. All contributions to SDCHIP will be tax deductible charitable contributions
(501c(10), tax ID #46-0105292).
To be successful, SDCHIP must be made consistently available throughout this jurisdiction, as well as the
entire United States and Canada. All Masons are encouraged to support their lodges and other community
groups in this project. There are many opportunities in the schools, at community functions, and at specific
SDCHIP oriented events to make this service available to the communities.
This section of the SDCHIP Manual is designed to bring forth protocols associated with SDCHIP to assist all
Masons in making this program available. Grand Lodge has worked hard to provide guidance in this
program so that SDCHIP can be brought to our communities in a consistent and successful manner. All
persons involved in organizing a SDCHIP event should be intimately familiar with the information
contained in these protocols. SDCHIP is an evolving program and is open to your suggestions.
Any suggestions for changes or enhancements of SDCHIP should be forwarded by email to
[email protected], [email protected], or by telephone to the South Dakota Grand Lodge Office at 605332-2051 or 800-462-7661.
We thank you for your interest in SDCHIP and your efforts in promoting this excellent community service
program throughout South Dakota.
-1-
SDCHIP Event Checklist
ρ
1.
ρ
2. Local event organizers should read and follow the SDCHIP event procedures in the SDCHIP
Manual.
ρ
3. Local event organizers should form their local committee (if not already done).
ρ
4. Start to raise funding for the event in the community. The organizing lodge needs to raise funding to
cover the cost of each kit for the estimated number of children to go through the program on the
event date. Approach local businesses, civic groups and individuals to help with the cost of the
SDCHIP events. (Ex., Ask them to pay for X number of kits for the event.) Most donations are tax
deductible through the South Dakota Grand Lodge SDCHIP Program. Sponsors may be listed on
a poster at the event. Consider a community fundraising event to get community buy in. No
fund raising activities are to be conducted at the event.
ρ
5. The event organizer should report back to the Area Chairman how the event is going to be organized
and implemented, the number of volunteers, means of financing the event, etc.
ρ
6. Arrange and/or send out press releases at appropriate times. This is VERY IMPORTANT.
ρ
7. Fill out a Staffing Sheet provided by the Coordinator. The numbers indicated are minimum
requirements. More help is always advisable and welcome. This sheet should be returned to the Area
Chairman no later than two weeks prior to the event. Volunteers can be had from many sources
other than the Lodge. Try local Star Chapters and youth groups, Scottish and York Rite groups, City
Mayor and/or City Council, civic groups, High School National Honor Society members, and private
individuals. If it’s a school event, enlist the help of the Parent/Teacher Organization and teaching
staff.
ρ
8. Do a site check at least one week in advance.
ρ
9. The Area SDCHIP Chairman or a Area SDCHIP Committee Member will continue correspondence
with the local event organizers. Upon receipt of the Host Contract, the State SDCHIP Coordinator
will schedule the equipment and all necessary forms and supplies to be at event at least two hours
prior to the event, or as deemed necessary, and the return of said items to the Grand Lodge Storage
Site.
Any Lodge wishing to host a SDCHIP event needs to complete a Host Contact Application. Request
a date with the Area or State SDCHIP Chairman. Once a date is approved, the State SDCHIP
Chairman will make contact with the Area Chairman who will begin the planning process for the
event with the local area committee. A copy of the Host Contact Application, once approved, will be
returned to the contact person by the SDCHIP Chairman.
ρ 10. Confirm all commitments one week in advance. Volunteers should be ready to be trained at the event
at least one hour prior to the event start time. Please keep in mind that it takes a minimum of two
hours to setup and test the equipment. If it is to be an all-day event, it’s advisable to have shifts of
the appropriate number of volunteers to cover all stations. Lunch and snacks should be provided for
volunteers.
ρ 11. HAVE A GREAT SDCHIP EVENT!
ρ 12. After the event – Repack all equipment and supplies in their proper boxes and cases, and return the
equipment to the SDCHIP Coordinator at the Grand Lodge Office.
ρ 13. Send Thank You Notes to all who helped with the event or contributed funds.
-2-
SDCHIP Organizational Protocol
A) Grand Lodge SDCHIP Committee (GLC) and Grand Lodge SDCHIP Chairman and Grand
Lodge SDCHIP Coordinator
B) Area Committee (AC) – Regional oversight and Organization – For the purposes of SDCHIP, the
SDCHIP Committee has designated Area Chairmen throughout the state.
C) Lodge Organizing Committee (LOC) – Organization of specific events
A) Grand Lodge SDCHIP Committee will be made up of the following:
• The Chairman, (a Mason). A Co-chair may also be named.
• The SDCHIP Coordinator, (a Mason).
• South Dakota Freemasons (All Masons on the GLC are appointed by the Grand Master, and intended
to include all members of our Masonic Family)
Ex-officio Members:
• South Dakota Dental Association (SDDA)
• South Dakota Sheriffs’ Association
(Non-Masonic representatives will be designated by their respective organizations.)
The Grand Lodge SDCHIP Committee (GLC) will perform and be responsible for the following duties:
• GLC exercises general supervision of funding, resources, communications, implementation and
direction of SDCHIP in South Dakota.
• Makes recommendations and sets guidelines for publicity, promotion and marketing for use by the ACs
and LOCs.
• Provides resources for use by the ACs and LOCs.
• Provides training materials, sets quality standards and exercises general control over the coordination
of programs statewide.
• Maintains inventories of all supplies/equipment necessary to implement SDCHIP events and provides
for distribution of these materials.
• Develops resources where possible on a statewide basis in all areas helpful to LOCs programs
including communication, finances, manpower and vision.
• Recommends appointment of members of the ACs and gives them direction, support and assistance in
all areas where it can be helpful.
• GLC will meet when called together by the Chairman.
• It will make periodic reports to the Grand Lodge of South Dakota Masons, as well as to the other
organizations that make up the SDCHIP Team, including an annual report.
B) SDCHIP Area Committee will be made up of the following:
• A South Dakota Freemason appointed by the Grand Master to be its chairman.
• Other South Dakota Freemasons appointed by the Grand Master.
Ex-officio Members appointed by their respective organizations:
• A South Dakota Dental Association (SDDA) member.
• A South Dakota Sheriffs’ Association member.
.
The SDCHIP Area Committee will perform and be responsible for the following:
• Report directly to the GLC and/or SDCHIP Chairman.
• Be responsible for establishing LOCs for all events deemed appropriate to be held within their Areas.
• Will maintain communication with outside persons and organizations that are assisting the LOC.
• Develop and maintain manpower resources, developing a volunteer database including individuals,
agencies and organizations that will help SDCHIP events in their area.
• Implement guidelines for working with volunteers including recruitment, training and follow-up.
• Develop resources that will be helpful to local committees including, but not limited to,
communication, promotion, marketing and finances.
• Develop/maintain a list of local events, which would attract children and would be venues for SDCHIP
participation.
• Make sure all scheduled events are reported to Grand Lodge Office for purposes of communication and
posting on the Grand Lodge SDCHIP web site.
• Track events and provide statistics/commentary of local events in an effort to improve SDCHIP.
• Serve as event troubleshooters should problems arise.
• Maintain general supervision over all local SDCHIP events.
-3-
• The role of the AC is supervisory in organization, development of resources and communication
including marketing. The members of the AC are encouraged to participate in local events.
• It is strongly recommended that the AC Chairman appoint a person for the Area to oversee and assist
in publicity and media contact.
C) SDCHIP Local Organizing Committee (LOC) will be made up of the Lodge:
• Members appointed by the LOC to represent the SDCHIP Team.
• Other persons the LOC deems appropriate pending general approval by the AC Chairman. “Others”
may include individuals, representatives of agencies, civic groups/organizations and town/city officials
who will be helpful to a given event.
• A PR person to oversee publicity and media contact.
NOTE: The members of the sponsoring Lodge become the LOC, with help from other sponsoring
organizations.
The LOC is “event specific,” meaning that it is responsible for organizing a specific event – it is not
responsible for organizing multiple events in a specific area unless specifically charged with that
responsibility. The LOC is established by the AC when a reasonable request for a SDCHIP event is
made. All requests for events will be channeled through the AC.
The SDCHIP Local Organizing Committee (LOC) will perform and be responsible for the following
duties:
• Making all local arrangements for specific SDCHIP events. This shall include but not be limited to
preliminary arrangements, arranging for volunteers to man the stations at the event and to see that
the Staffing List is completed and returned, promotion, marketing, site arrangements, training of
volunteers, publicity, development of sponsors, finances and follow up.
• Are expected to work within the guidelines of the GLC/AC but are encouraged to be innovative and
creative according to local needs. The objective of the program is to furnish a high quality public
service while promoting a positive image of SDCHIP as well as any local sponsoring organizations.
• Will properly schedule their event though the SDCHIP Chairman, informing him of date, time,
estimated number of children to be processed and anticipated equipment needs and completing the
necessary paperwork.
• Will be responsible for procuring the equipment/supplies from SDCHIP Coordinator and returning the
equipment/unused supplies in a timely fashion, in good working order, and following up with the
necessary paperwork at the completion of the event. They will also provide the AC with any
suggestions for improvement of the SDCHIP Program.
• Will be responsible for fundraising to cover the estimated cost of each SDCHIP event. Approach local
businesses, civic groups and individuals to help with the cost of the SDCHIP kits needed. (Ex., Ask
them to pay for X number of kits for the event.) Most donations are tax deductible through the South
Dakota Grand Lodge SDCHIP Fund. Sponsors may be listed on a poster at the event. Consider
holding a community fundraising event to get community buy-in. No attempt to raise funds
at an event is to be allowed at the event. In the event that an attendee requests
information on making a donation, he/she should be taken to an off-site location where a
potential donation can be discussed. A Donation Sheet is enclosed for this purpose.
• The LOCs are the backbone of SDCHIP. It is on their performance that SDCHIP will succeed or fail.
They need to take their responsibility to excellence very seriously. The LOC must be able to adapt this
program to their local needs without compromising the integrity and purposes of the program at large.
-4-
INITIATION OF SDCHIP EVENTS:
A)
B)
C)
D)
General Guidelines
School Events
Community Events
Stand-Alone Events
A) General Guidelines – Anyone may initiate inquiry into a local SDCHIP event by contacting the
SDCHIP Chairman. The Chairman will in turn contact the Chairman of the AC in the SDCHIP District
where that event is requested. After the AC has decided that an inquiry represents a reasonable
opportunity for SDCHIP, they will then contact a local lodge for support.
As soon as the LOC has determined preliminary information for an event including dates, times and the
number of children anticipated to participate along with general sponsoring information, the event
should be scheduled through the SDCHIP Chairman. The LOC then continues to develop and refine
arrangements for the event under the general supervision of the AC.
B) School Events – Experience has shown that SDCHIP provided within the school is one of the best
ways of reaching children within a community. It should be remembered, however, that schools be
approached with proper respect for the sometimes-delicate position under which they operate within a
community.
The best way to approach a school system is by building community consensus. After forming the LOC,
building support of the county and local law enforcement officers, civic leaders and elected officials is
extremely important. From that point of consensus it is then much easier to approach the
Superintendent of Schools and school committees. All local communities are different and the LOC must
approach this challenge in a way it feels to be most effective.
Organization is particularly important in school-based events. It is suggested that 4-6 months of leadtime is appropriate in this scenario. It is suggested that the LOC request a “point of contact person” to
work with in planning events. If planned/approached properly, school/community officials can be
extremely helpful in providing manpower, financial and public relations. Remember our objective is to
provide a community service as effectively as possible.
It is particularly difficult to provide Masonic manpower for school events held within the working day.
LOCs involved in school events are particularly encouraged to develop outside manpower resources such
as parent groups, civic groups, etc. Not only does this ease manpower burdens but it also gives a
community greater ownership in the SDCHIP Program.
In school-based programs, the parents will typically give permission prior to the event. SDCHIP provides
a school-based form for that purpose. Because the approximate number of students who will go through
the program is known based on the returned permission forms, if time allows, event volunteers can fill
out forms and envelopes ahead of time and organize them by class to facilitate a faster flow of the
children. Kits can be put together by child, with names written on the envelopes, name/date sheet,
SDCHIP ID Information form, permission form, and all other informational flyers that will be given in
the kit. To prevent accidental cross-contamination, the cheek swab envelope and Toothprint® Ziploc bag
should not be placed in the bag ahead of time. Instructions on school event procedures can be
found in Appendix A – Suggested Procedures for School Events, and Appendix B – SDCHIP
School Event Process. School-based programs will be instrumental in generating the numbers needed
to legitimize the SDCHIP program statewide. They also provide the best and greatest access to protect
the children within an entire community.
C) Community SDCHIP Events – The varieties of community events that constitute ideal SDCHIP
situations are numerous. Some would include health fairs, fairs, festivals, Saturdays at the mall,
open houses, etc. The only requirement is that most successful SDCHIP Events are held where there
is a concentration of children.
Community events also have shown to be excellent venues for promoting the positive public image of
SDCHIP Team members and other sponsoring organizations. The media “loves a parade” and that is
where one is most likely to find cameras.
After a Community Event has been proposed and the LOC organized, the local committee should strive
to build a broad-based committee of general support. The broader the committee is (within reason), the
-5-
stronger the event. SDCHIP is a terrific program and it is well received when properly placed before the
community.
Another very important purpose of Community Events is that they provide opportunities for family
members who might not be of school age or attend school. They also provide opportunities for updates of
family members who are no longer in the grades covered by the school SDCHIP programs.
D) Stand-alone Events – Events held with the sole purpose of presenting the SDCHIP program have been
among SDCHIP’s greatest challenges. The most important element of a stand-alone event, and crucial to
its success, is Public Relations. Many weeks of planning need to take place. Newspapers, local cable TV,
local cable community bulletin boards, flyer drops to DARE officers, dentists, store fronts, day care
centers, churches, synagogues, and schools should all be considered; as well as presentations to civic
groups, PTO’s, and church groups. The SDCHIP Committee recommends that stand-alone events be
limited to a 4-hour period. If a parent wants their child to go through the event, they will bring them
during the allotted time frame.
-6-
SDCHIP Event Procedures
This set of procedures is designed to assist in the setup and operation of a SDCHIP Event. Local committees
must be flexible and innovative to meet the individual challenges of a specific event.
Local Committee
• All arrangements for specific events are made by the local committee.
• The local committee will include participants of all organizations represented in a given event.
• Prior to event, the local committee should make sure all dental personnel have been provided with a
copy of the Dental Procedures (page 25).
• Members of the local committee should take responsibility for specific functions such as publicity,
manpower, finances, procurement of supplies and equipment, site development, etc. to satisfy the
given needs of a specific event.
• All lists of volunteers should be made in advance if there are admission requirements to the event.
That list should be furnished to the event organizers.
• The local committee MUST designate supervisors – at least one to be present at all times during
operation. These individuals should have a good overall working knowledge of SDCHIP.
• Volunteer sign-up sheets will be provided in the kits to be filled out the day of the event. Please have
each volunteer sign in. This will provide a list to be used for thank you cards or notes to be sent to each
person who assisted with the event by the local committee. This list and all permission forms must
be sent back to the SDCHIP Coordinator with the return of the kit so that he can file them for
retention in the Grand Lodge office.
General setup and flow patterns
• There are generally four stations: Registration, Laptop (still photo, interview, digital fingerprints),
Dental (Toothprints® & Cheek Swab), and Check Out.
• Sequence will be Registration, Laptop, Dental and Check out. If backups occur in one area, the
sequence can be altered to allow better flow through.
• Allowance should be made for a waiting area with coloring books, colors and other supplies to
entertain children should a backup occur. If space allows, waiting areas with chairs between stations
is helpful.
• If possible, space should be left between areas to keep each one defined and well organized.
• If possible, flow corridors can be set up using yellow caution tape or rope. Other suggestions are using
footprints or arrows on the floor to show the flow of the event from station to station.
• Manpower should include a Traffic Director at each station to direct the child to the station they need
next, and to monitor backup. The Active Event Supervisors should be there to help out where problems
arise.
Pre-event site inspection
• A site inspection should be made for all events at least one week in advance, preferably 30 days in
advance.
• Determine setup position for various stations and work out flow pattern.
• Check for electricity, lighting needs etc.
• Make arrangements for tables, chairs, etc.
• Note future positions for backdrops and height charts.
• Estimate setup difficulty and time.
Ordering of Supplies from the Coordinator
• Supplies are ordered on the basis of the number of children expected. The Grand Lodge will determine
the amount of supplies needed based on the estimate provided on the event application. Kits will
include the following, as well as other items:
• Computer setups (Webcam, laptop, fingerprint scanner, backdrop & poles, etc.) are based on
numbers of children. Figure approximately 10 to 12 children per laptop per hour of operation. The
Grand Lodge has 4 laptops, so we have a maximum ability to run 40 to 50 children through an
hour with all 4 laptops in use. It’s good to figure on the conservative side to allow for problems
that may arise.
• Toothprint® “Hot Pots” (ratio of one pot per two laptops).
• CDs, Child ID Information form, Toothprint® wafers, cheek swabs permission forms, parent
information checklists, Name/Date sheets, South Dakota Masons Child ID Program paper, and
SDCHIP envelopes to carry completed ID items.
Supplies not available from the Coordinator
• Tables and chairs
• Distilled water for warming of Toothprint® wafers
• Paper towels
• Additional pens and pencils
• Scales for parents to weigh children at registration
• Publicity supplies specific for an event – guidelines and sample handouts and poster are available, but
the actual posters to be used are the responsibility of the Local Committee.
-7-
Setup
• Allow plenty of time for setup (two hours minimum).
• Have event set up two hours before start time to insure time for equipment check and personnel
training. Volunteers should be ready to be trained at least one hour prior to the event start time. If it
is to be an all-day event, it’s advisable to have shifts of the appropriate number of volunteers to cover
all stations.
• Make sure all equipment is in good working order as soon as possible to allow time to improvise if
necessary or seek additional supplies.
• Make sure all personnel know and understand their assignments and responsibilities and are
proficient in their areas (if a second shift is involved, be sure they arrive in time to be trained and to
review tasks and responsibilities).
• There is a lot of typing involved at the computer stations. Volunteers assigned to the
computers should be familiar with a computer and have the ability to type fairly quickly
and accurately.
• If possible, it is suggested that a separate table be available near the registration table to facilitate
parents’ filling out the Child ID Information Forms. Small height charts and scales are provided for
this area for parents to obtain their children’s correct height and weight.
• Place all backdrops so they maximize visibility – usually about 6-10 feet from the webcam. Backdrop
stands are provided and easy to assemble.
• Make sure all extension cords are taped down to floor in traffic areas.
• Make sure all electrical cords are safely secured (especially hot pots which could be pulled off a table).
• Waste disposal should be available in all areas – in the Toothprint® and Cheek Swab area, plastic
liners should be used in all containers.
• CDs will be kept at the Laptop station, where the name of the child and date will be written on the CD
jacket as each child is photographed.
• Self-sealing envelopes are provided for storage of the cheek swabs. The name of the child and date
should be written on each envelope. It is also written on the Ziploc Toothprint® bag at the Dental
station by volunteers.
• Dental clips will be kept at the Laptop station, to attach the Name/Date sheet to each child.
Additional Suggestions
• Snacks and beverages should be available for the volunteers, including lunch if they are
expected to work through the day. Perhaps a lodge hospitality committee can be in charge of this.
• It is good to have a few floater volunteers who can give relief to volunteers who need breaks during the
event.
• In the event you have inquiries about Masonry, remember to have some pamphlets and petitions
available for handouts as needed.
• The National Center for Missing & Exploited Children puts together very informative and nicely
printed information flyers. Individuals can go to www.missingkids.com in the Publications section and
request 50 copies of various flyers (one time per address). If numerous members do this, a lodge can
accumulate enough flyers to be handed out with each kit. A simpler way is to call 1-800-THE-LOST (1800-843-5678, identify yourself as a SDCHIP service provider and ask for a supply of literature
appropriate for a Masonic Child Identification event. Order early, and allow at least two weeks for
delivery.
• Providing self-adhesive name tags for the volunteers can add value so that volunteers are recognizable
to participants.
-8-
Registration Station – Setup & Instructions
• NUMBERED ENVELOPES are provided for use by each child. The starting and ending numbers
must be recorded at the start and end of the event. The number of children identified (and final billing
to the sponsoring lodge) will be calculated by using those numbers. The numbering system will also
allow orderly sequencing of children in the event they have to wait for equipment to be available for
them to be processed.
• Items to be filled out: Permission form, Child ID Information form, Name/Date sheet. Name/Date sheets
need to be PRINTED legibly in bold black ink. A sample and markers are provided in the forms boxes. It
is suggested that one or two people with neat handwriting perform this task at the registration table,
rather than having each individual parent fill these in.
• All permission forms are to be filled out in ink (ballpoint pen).
• Make sure parent or guardian signs permission form. Retain permission forms at
registration table. They are to be returned to the SDCHIP Coordinator for filing in the
Grand Lodge office at the end of the event.
• The permission form asks if the child is latex sensitive. If that is marked “yes,” circle the answer to
assure the dental station will see it clearly. This will alert the dental personnel that they need to use
latex sensitive gloves.
• Explain program and answer questions while a family is registering (If any questions are asked that
registration personnel cannot answer with confidence, immediately call the Masonic supervisor).
• Refer any questions about legalities, any problems, or any serious complaints immediately to the event
supervisor present at the time of the problem.
• The registration area should have a minimum of four volunteers – two registration people, an
assistant and a traffic director.
• Registration controls the flow of persons into the processing area.
• All materials are given to parents, EXCEPT the permission form, which is retained. These forms
are filed at the Grand Lodge Office and are not used in any name/address database for future use.
• Keep family groups together.
• Consider translators for bilingual help if appropriate.
• If possible, it is suggested that a separate table be available after the registration table to facilitate
parents’ filling out the Child ID form. A small height chart and a scale are provided for this area for
parents to use in verifying correct height and weight for each child.
• Please do not pre-stuff the SDCHIP envelopes with the forms that the parents are to receive. Instead,
hand the forms to the parents for them to put in the envelope. This provides more assurance that they
will look at them.
-9-
Webcam Still Photograph, Interview & Fingerprint Scanner – Instructions
Refer to EZChild ID User Manual in Exhibits Section for Technical Information
on equipment description and setup
Initial Considerations
One of the very valuable services provided to children within the SDCHIP program is the production of a
Webcam still photo and a Webcam interview of the child from a distance of approximately six feet. The
benefit of these two images is that it provides a clear and close-up view of the child standing alongside a
height chart to indicate the child’s stature. It also provides an opportunity to note any unique physical
characteristics or qualities of the individual. The CD given to the child will include photo, interview,
fingerprints, and information about the child.
The equipment that is to be used in this function is basically simple and easy to use. Instructions for setting
up the equipment and using it will follow in the ensuing pages.
Prior to setting up the equipment, however, due attention should be given to the environment in which the
photography is to be done. The Webcam photo and interview of the child is a valuable component of the
SDCHIP process. Close scrutiny should be given to the lighting conditions of the area in which the webcab
will be operated, as well as the amount of physical space that can afforded to the total photography
endeavor.
LIGHTING: The Webcam (Logitech Quick Cam Orbit MP), recommends the following lighting:
The Logitech Rightlight Technology will automatically provide the best image in a variety of lighting
conditions. However, for best results shoot videos with bright light sources behind the camera and out of the
picture area whenever possible.
(see page 6 of the Logitech instruction book included with Kit A)
SPACE: An appropriate space in which to setup the Laptop, Webcam, Scanner and printer equipment,
backdrops and poles would be approximately 8 to 10 feet wide by 15 or 20 feet long. These measurements
are only approximations. However, enough space is required to accommodate a photo crew of 2 to 3 people. A
distance of approximately 6 to 10 feet is required between the Webcam and the photo subject.
STAFF: It is recommended 2 people staff the Laptop/Webcam/ Scanner area:
Computer Operator: This person operates Laptop; enters information from the Child ID Information
form; takes still photo; gives interview; directs child and assistant with fingerpring procedure with
scanner; writes name and date on CD; and burns CD.
Photo Assistant: The assistant will clip the Name/Date form to the child, using the dental clips; position
the child for the still photo; and hand the microphone to the child for the interview. This person will also
assist with fingerprinting; remove the Name/Date paper from the child and retrieve the dental chain;
place the CD and documents into the child’s plastic bag; and direct the child to the next station. At the
completion of this station, the Child ID Information form should be placed inside the child’s bag. Do not
keep this form.
SPECIAL NOTE: It is recommended that volunteers with laptop computer, webcam and printer experience
be selected to operate the laptop.
TIP: Stuffed toys can be used to get the attention of small children when having difficulty getting a good
photo.
INSTRUCTIONS:
• Both the laptop operator and assistant should read the EzChild Instructions on pages 17-22 and be
familiar with the laptop and procedures before beginning.
• Keep family units together at the same laptop station in case the parent’s assistance is needed.
• Instruct child before interview begins: Smile, speak up and talk to the camera.
• A handheld microphone will be handed to the child, or held for the child for the interview.
• Interviewer should sit or stand out of range of the Webcam – speak to the child so the microphone can
pick up the voice. There is also an internal microphone on the laptop.
• Limit interview to no more than three questions provided by the SDCHIP committee.
INTERVIEW SUGGESTIONS:
-10-
• Do not start the video capture until ready to ask the first question. Limit total time for
interview to 15 seconds or less, since the length of the interview dramatically increases the
CD burn time.
• Take only one family member at a time.
• Make the child feel at ease – this experience should be fun.
• Do not ask any questions about other family members.
• Have the child remove any hat or cap that impairs the photo process.
• The position of the interviewer should be coordinated with the laptop operator to minimize the
presence of the interviewer in the interview.
• Guide the child to a standing position in the center of the height chart; the interviewer may touch the
child slightly if their parent is immediately present. Parents with a baby or very young child may sit
during the interview. All other children should be standing.
• Hand the microphone to the child, or hold the microphone for the child. The interviewer should speak
clearly to the child.
• Do not ask any questions about other family members.
• Help relax the child so that they will show natural mannerisms during the interview.
• Improvise when necessary for effective presentation.
Situations will vary with age and personality – try to remain relaxed and informal.
• Make sure the label and the name/date sheet agree.
• Focus on any distinctive features and make sure they are included in the tape.
• Periodically view a CD you have done to check for quality and possible improvements in technique.
The CD is the best chance we have of retrieving a child while they are alive and healthy. The quality of this
interview is IMPORTANT. Please, do the very best job possible!
PRINTING SUGGESTIONS:
• Always use the printer that has the same number as the laptop you are using. This should
alleviate a new printer being added to the computer if the printer is unplugged and plugged back into the
laptop.
• If you are having trouble getting the ID form to print, go to the print menu and click on the drop-down box
next to the printer name. Try printing to one of the different printers on the list until you find the one that
prints. Once you do this, it should default to that printer unless the printer is unplugged and plugged back
in, in which case you will need to go through the step again.
FINGERPRINT SUGGESTIONS:
• The fingerprinting scanner requires a very soft touch. The trick is to lightly touch the finger to the scanner
and lift. Do not press hard on the scanner.
• If you have trouble getting a child’s fingerprints to take, try using an alcohol wipe (provided) to wipe down
each of the fingers to cool them off. Sometimes having the child hold a Ziploc bag of ice will help. It is a
biometric scanner, and the temperature of the fingers makes a difference. It is also a good idea to use an
alcohol wipe to clean the scanner.
• If possible, press the finger below the white square on the scanner.
• If the scanner is not recognizing or scanning anything, and the red light is not on, it may be necessary to
unplug the scanner at the USB port and plug it back in. This should reset the scanner with the computer.
• If the child to be identified is an infant, a thumbprint only will suffice. Do not attempt to get prints of all
fingers.
-11-
Toothprints® and Cheek Swab Stations – Instructions & Dental Procedures
INSTRUCTIONS:
• ONLY gloved Licensed Dentists, Hygienists, and Assistants should place Toothprint® wafers and
DNA cheek swabs in a child’s mouth. In the event that dental personnel are not available for an event,
other medically licensed or registered individuals may perform the Toothprint® and cheek swab
procedures (i.e., RN, LPN, Doctor, EMT).
• They may be assisted by gloved personnel in warming the wafers.
• If a child is latex sensitive, the YES box on the form was checked and highlighted at the Registration
desk to let dental personnel know that they should use the latex-free gloves.
• The child’s name and the date are placed on the Toothprints® plastic bag and the self-sealing envelope
for the cheek swab using a permanent Sharpie-type marking pen.
• Never touch the Toothprint® wafers with bare hands. Doing so will transfer your own DNA to
the wafer. Gloves must be worn when handling the Toothprint® wafers. The personnel performing the
Toothprints® and cheek swab procedures will change gloves for each child. Assisting personnel need
not change gloves that frequently unless they handle Toothprint® impressions after they have been in
the mouth.
• Chairs should be available for children as well as dental personnel.
• Hot pots should be kept clean and distilled water periodically checked for adequate levels. One gallon
of distilled water will be necessary for warming the wafers. Ordinary tap water should NOT be
used for this purpose.
• Toothprint® wafers and plastic bags, and cheek swabs are supplied at the dental professional area.
• If necessary, note Dental Procedures below, which should be provided to dental personnel in advance
of the event.
• It is suggested that tables and chairs be arranged similar to the diagram below for efficient flow
through the station.
Step 1 - Assistants sit here
to fill out cheek swab
envelopes and Toothprint
Ziploc bags
Hotpots and supplies
are placed on this
table
Other gloved assistants stand
between the procedure chairs
warming Toothprints and
removing cheek swabs from
wrappers to create an efficient
fl
Step 2 - Children sit in these
chairs for Toothprint and
cheek swab. One individual
does both procedures at the
ti
A-12
DENTAL PROCEDURES
This protocol is intended to help dental professionals who are participating in the South Dakota Freemasons
SDCHIP (Child Identification Program) Program. The South Dakota Dental Association is committed to
furnishing professionals to perform the Toothprint® and DNA cheek swab portions of that program. A dental
professional is either a dentist, dental hygienist, or dental assistant properly licensed, registered or certified
in the state of South Dakota.
Needed materials: All Toothprint® and cheek swab materials are furnished at the site by the organizers of
the event. Gloves are also provided. Gloves must be worn and changed after each child. If possible, it is also
suggested that 2X2 gauze pads also be brought by dental personnel in case of an unexpected incident (e.g.
exfoliation of a deciduous tooth). A dental water bath may be brought by professionals (a less sophisticated
“hot pot” is provided).
It is advisable to have one person available to perform the Toothprint® and cheek swab, while another
gloved member of dental personnel (or volunteer staff) prepares the Toothprint® in the water bath and
unwraps the cheek swab. This individual need not change gloves after each procedure. Another volunteer
should be available to fill out the information on the Toothprint® Ziploc bag and the label on the self-sealing
envelope for the cheek swab. The person preparing the materials and writing on the envelopes need not be a
licensed dental professional.
Toothprints® Procedure – DO THIS FIRST
Toothprints® are made using a thermoplastic material. The Toothprint® wafer is heated in the hot distilled
water bath until it is soft (about 140°F) and then it is inserted in the mouth. The wafer will become soft and
pliable as it is moved back and forth in the hot water bath. Never touch the Toothprint® wafers with bare
hands. Doing so will transfer your own DNA to the wafer. Gloves must be worn when handling the
Toothprint® wafers. The child is instructed to close down hard and hold for 20-30 seconds. When the wafer
hardens the child is instructed to open, the Toothprint® removed, and placed in the provided plastic bag. For
younger children, the wafer can be adapted by pushing the pads together. Young children (less than 6 yrs.
old) tend to close VERY quickly. The wafer needs to be placed very quickly so that if the child closes and
then opens, the wafer can be removed and held vertically until it hardens. The child’s name and date should
be written on plastic bag with a fine point Sharpie-type permanent marking pen. It is helpful for assistants
to mark the name and soften the wafer in the distilled water bath prior to the professional’s use. This saves
much time. Upon completion, place the wafer in the Ziploc bag and close. The Toothprint® impressions are
to be placed with other SDCHIP materials in the Masonic SDCHIP plastic bag and given to the parents.
Prudence should be used in the Toothprint® procedure. It is not worth forcing a bad experience upon an
uncooperative child. Children under age 3 are usually the most apprehensive but it can happen with anyone.
Should it not be possible to obtain a Toothprint® this time, inform them that it may be possible at the next
area event.
Cheek Swab Procedure
The cheek swab should be removed from the plastic protective sleeve. The sleeve should be labeled with the
child’s name and date of the event. With gloved hands, unclip the plastic cover over the swab and slip it
slightly down the stick of the swab. Explain to the child that you’re going to put the swab in the inside of
their cheek and rub it around a few times before doing so. The plastic cover should then be replaced over the
cheek swab and reinserted into the protective sleeve that has been labeled with the child’s name.
Cheek swabs should be stored in a freezer at home. Doing so will preserve the DNA for up to 25-30 years. If
kept in a dark closet or cabinet, the DNA only lasts an average of 5-8 years.
A-13
Additional Information
1. For large numbers, it is advisable to have at least four personnel (two on either side of an 8 or 10 foot
table) to facilitate control during the event. Each dental person may do both the Toothprint® and the
cheek swab.
2. There should be one scribe or person who will be printing the names on Ziploc bags Toothprint bags
and cheek swab envelopes for each two dental personnel.
3. If there will be more than one shift, each shift should have the same number, depending on the total
number. (6 for large events, 3 for small events)
4. Two trashcans with liners should be available on either side of the table for cheek swab envelopes
and used glove disposal.
5. Hot pot electrical lines should be stabilized with duct tape.
6. Four chairs are needed for seating children during Toothprints® and cheek swabs.
7. All materials should be stored under the table during the event.
A-14
Laminating / Check Out Station – Instructions
INSTRUCTIONS:
• This is the final step in the program and the impression left upon the family by the people in the
laminating / check out area will be a lasting one.
• Cut the bottom portion of the printout from the printed data sheet and laminate it with a plastic sleeve
provided. The top portion of the sheet will be placed in the SDCHIP envelope, and the laminated ID
card presented to the family.
• Insure that the child has completed each step in the program by inspecting the SDCHIP envelope for
each component. If they have missed a step, have an escort assist in getting that completed. Make
sure the permission form is not in the envelope. If it is, keep it and return it to the registration
table for the final count. The Child ID Information Sheet should also be placed in the envelope. DO
NOT KEEP THESE INFORMATION SHEETS.
• Briefly review the contents of the envelope with the parents and give it to them to take home.
Introduce the practice of spitting and touching as many things as possible if the child should ever be
abducted or find themselves in trouble. This provides a vital scent trail for the police and search dogs
to facilitate an earlier recovery of children. The cheek swab and Toothprint® provide the scent of the
child for the dogs to track.
• Instruct the parent / guardian to protect the envelope and its contents by placing it in the freezer
compartment of their home refrigerator.
• Thank the parent and the child(ren) for participating in the program.
• If available, someone can instruct the children after the check out station about safety in the event
they find themselves in a situation with a stranger or abducted. For example, kicking and screaming,
spitting in the car for scent trail, touching everything and pulling out hair for tracking purposes, etc.
A-15
Clean Up & Breakdown – Instructions & Close Out
INSTRUCTIONS:
• Cleanup and breakdown is just as important as any part of the event because:
• It leaves a lasting impression on the host organizations.
• It repacks the equipment in the proper condition and location for the next use.
• Make sure the persons in charge of clean up are fresh and have not worked all day. Getting the
equipment back to its proper location is extremely important and if workers are tired they may not be
meticulous in repacking.
• Return all equipment to its proper location.
• Note any missing equipment or equipment that does not work properly (clearly note problem).
• Return permission forms in Forms Box.
• Dispose of all trash.
• Offer to put away any tables and chairs that may have been provided.
• Make sure the host is satisfied with the clean up.
CLOSE OUT:
• Report to SDCHIP Coordinator any problems or suggestions.
• Thank all persons involved – a written thank you note is the best form in which to do this.
A-16
APPENDIX
SDCHIP Publicity Procedures ………………………………………………………………….A1
How to promote your SDCHIP Program using Publicity
Opportunities for Publicity
How to prepare effective News Releases ………………………………………….……A2
Preparing Broadsides and Flyers ………………………………………………………..A3
How to prepare a Public Service Announcement script …………...……………………A3
Placing Promotional Materials and Editorial Contact …………………………………..A3
Follow Up, You’re not done yet ………………………………………………………..A4
Sample News Release …………………………………………………………………..A4
SDCHIP School Event Process …………………………………………………………………B1
A-17
Appendix A – SDCHIP Publicity Procedures
How to promote your Masonic Child Identification Program (SDCHIP) using publicity.
Promoting your SDCHIP program through publicity can be an economical and effective way to insure the
success of your Masonic Child Identification Program. It is less costly than advertising but does require a
measure of planning and effort. Advertising, too, can be effective if a sufficient budget exists to place
newspaper ads or buy radio time. This protocol, however, is focused on generating effective publicity for your
SDCHIP event.
Generally, there are three types of SDCHIP events:
1. Stand-Alone – Where the Child Identification Program is the only program being conducted;
2. Community/Shared – Integrated where the SDCHIP program is only one portion of a larger event.
3. School-based – Program run during school time. The manner in which you handle publicity is
slightly different for each.
In stand-alone SDCHIP events, the entire energy of the PR effort can be directed toward that event. In
shared events, it is advisable to interface with the publicity committee or person for the larger event to make
sure what you say or write about the event conforms to the overall message. In most cases, you should issue
a separate news release for the SDCHIP event because a paragraph or less is often all the SDCHIP portion
might receive in a “shared” news release. In the latter case, it should be incumbent upon you to provide copy
for the shared news release and also for an event brochure, and ask to be shown any edits prior to release or
publication. Be sure to extend the same courtesy to your colleagues by framing the larger event within your
specific SDCHIP news release using their copy or phraseology.
With school-based programs, special care should be taken to interface with the principal and/or
superintendent of schools. Some school systems have special procedures to protect the privacy of the children
and/or individual children from media coverage. Special procedures to have media teams get clearance in
SDCHIP events at schools should always be arranged in advance through the proper school authorities.
There are abundant publicity opportunities available in almost every region of South Dakota. There are very
few areas that are not covered by daily and/or weekly newspapers, radio stations, television stations, cable
TV companies and even supermarket bulletin boards. In your area hundreds of people visit your local
supermarkets and other stores every day. It’s easy to prepare a “broadside” that can be easily duplicated and
posted in these locations. Be sure to ask permission before posting.
Finally, the single element that will be critical to the success or failure of your promotion is simply—effort. If
you make the effort to write a news release, print or duplicate a flyer and then do the legwork and make the
telephone calls to place these materials in the hands of editors and news directors, you are almost
guaranteed a successful event.
There is one very important thing to remember, however. Editors and news directors owe you or our
organization nothing. Press contact is, or should be, very much a mutually beneficial activity. You are
providing them with information that is of interest to their readers, viewers or listeners and they are
providing you with a forum to deliver your message to people who have the potential of attending your
SDCHIP event. Encourage and respect that relationship.
We suggested that you would be reaching an audience of people who may potentially participate in your
SDCHIP program. You must convince them in your materials that your SDCHIP program is worth attending
and that it will provide a benefit for them. The art of preparing the most effective promotional materials will
be discussed, with examples, in the next few pages.
Opportunities for publicity
Many opportunities exist in your area to promote your SDCHIP event.
These include:
• Daily & Weekly Newspapers—news releases and photos
• Radio Stations—news releases and Public Service Announcement (PSA) scripts
• Television Stations—-news releases and Public Service Announcement scripts
• Cable TV Systems—Public Service Announcement scripts
• Bulletin Boards/Store Windows—Flyers/broadside
How to prepare effective news releases
A-1
The heading of a news or press release should contain the name of the organization—such as “South Dakota
Freemasons”—the date that you want the information to be released, (in most cases: FOR IMMEDIATE
RELEASE), and the name, telephone number or perhaps email address where the editor can get additional
information. This is illustrated in the examples we’ve attached.
There are five key elements that MUST be in every piece of promotional material you develop:
Who
What
Where
Why
When
These five elements should also appear in the very first part of your news release and, in a condensed form,
in the headline. Again look at the examples to see how they have been incorporated into our sample releases.
Who, of course, could be “South Dakota Freemasons” and your local Masonic Lodge, Lodge or a group of
Lodges in an area. Typically, other sponsoring bodies in our SDCHIP events are the South Dakota Dental
Association and the South Dakota Sheriffs’ Association (local law enforcement) and other local organizations.
What is where you describe a Child Identification Program (SDCHIP) that consists of a brief Webcam
interview with the child to show his or her mannerisms and speech patterns, as well as Webcam still
photographs. Additionally, fingerprints are recorded by scanner. All three items—interview, photograph
and fingerprints are recorded on a CD, which can then be used for Amber Alert.
A Toothprint® impression and a DNA cheek swab are taken by professional dental personnel. It is very
important that you make the statement that ALL materials are given to the parent or guardian once the
child has been processed. Only the parent permission form is retained by the Masons. It is also important to
state that the program is at no charge and no appointment is necessary. If a community fundraising event is
to be held as well, include information on that event as well.
Where and When. You would be amazed at how often a news release goes out WITHOUT the location,
date, and time of the event. This is not only embarrassing but makes more work for the editor. State these
facts clearly, using the full day and date and using AM or PM to note the times. If the location is not
generally well known, write in short directions using landmarks, street names and route numbers where
possible, perhaps include a small map. Make it easy for your potential customers to find you. It is sometimes
also a good idea to insert a name and telephone number at the end of the release where people may call for
more information. But unless there is someone to answer this telephone at least during normal business
hours who is prepared to answer many calls and questions from the general public, it may be best to leave
this out of your release. Be careful.
Why. The reason we do Child Identification Programs is to facilitate the recovery, and, if necessary,
identification of lost, missing or exploited children, once they are found. Please consider the enormous
sensitivity of this purpose. No one ever wants to think that his or her child may become a victim and to dwell
on this aspect may even have a negative impact without the proper explanation. It is best to use phrases
such as “to promote child safety.”
The new SDCHIP brochure handles this in one short paragraph that may be copied into your release: The
South Dakota Freemasons Child Identification Program (SDCHIP) addresses the alarming fact that one
child is reported missing every 43 seconds in the United States each year. While most are found, many are
not. Also, the abduction of children is both under-reported and rapidly increasing in our society.
Although the next information comes under the “who” element, it belongs at the end of the release and is
called “the motherhood statement.” SDCHIP programs are a vital part of our Masonic Family Awareness
Program, the goal of which is to educate the public as to who Freemasons are and what we do. We do this by
associating Freemasonry with things that are relatively well known. The following is a typical “motherhood
statement” that belongs at the end of the release but before the final “for more information” paragraph:
“Freemasonry was constituted in South Dakota in 1863 and currently there are over 6600 Masons in over 90
Lodges in South Dakota communities.”
This is a lot of information, but it really positions South Dakota Freemasonry as a worthwhile organization.
This kind of information can produce a positive image and help change negative perceptions held by the
public and by too many members of the press.
A-2
These are the very basics in preparing a news release. There are, of course, variations and exceptions such
when a celebrity or a local political official has promised to attend the SDCHIP event. This should be written
into the first or second paragraph of the release. As for timing, you should have your news releases in the
hands of the media three to four weeks prior to the date of your event.
How to prepare a Public Service Announcement script
The same news release may be given to both newspaper editors and broadcast news directors. But, in
broadcasting, you have another opportunity for promotion through public service directors. These are the
people who coordinate announcements or non-paid commercials known in the trade as PSAs or public service
announcements and are broadcast by the radio or TV station as a public service. The same script could also
be used for Community Bulletin Board programs and cable TV system bulletin boards.
PSAs must contain the same information as in a news release but the tone can be a little more
conversational. For example, you might begin a PSA script; Parents with children 18 and younger are
invited to participate in a comprehensive SD Child Identification Program that will be conducted by South
Dakota Freemasons. The program is at no charge to the parents and you’re under no obligation…etc.
News releases can be as long as two pages, as long as they’re tightly written, but PSAs should not be longer
than 30 seconds. That’s about 75 words. And remember, each number counts for a word.
Preparing broadsides and flyers
With the availability of computer desktop publishing programs, it’s relatively easy to prepare a professionallooking broadside or flyer that can be used effectively in several ways to promote your SDCHIP event. There
is a sample at the end of this material for guidance. Clip art with the Square & Compasses logo is easily
accessible from several sites on the Internet.
They can be inexpensively duplicated at neighborhood copy centers for distribution to other organizations.
Don’t forget to post them on the bulletin boards of your local supermarkets where they will be seen by moms
and dads of small children who are our prime candidates for participating in SDCHIP programs. Many copy
centers will also enlarge and duplicate your flyer on index card stock and many merchants are more than
happy to post these in the windows of their stores. Distributing flyers and getting posters up takes a lot of
legwork but the results make it a very worthwhile activity and an effective promotional tool.
Placing promotional materials & editorial contact.
All of the news releases, public service announcements and flyers you worked so hard to produce are only
effective if they get used, or placed. If needed, a list of daily and weekly newspapers, radio stations and
television stations can be obtained from the Grand Lodge of South Dakota. But even with these frequent
updates, there is great turnover in the media, so we encourage you to make personal contact with the editors
and news directors in your area. Telephone numbers are readily accessible in the Yellow Pages as is
information on local cable TV systems.
There is excellent opportunity to build a relationship with local editors and news directors. Most are anxious
to establish good relations with local civic and service organizations and will go out of their way to help you.
But you must take the first step.
At the very least, make a telephone call, introduce yourself and your Lodge and tell the editor a little about
the SDCHIP program and how successful it has become. Mention that you would like to send them (or
better, deliver in person) a news release about your program and invite them to attend.
If the editor expresses enthusiasm and desires to expand on the information that you are able to provide, we
can provide people for an in-depth interview. We can also provide experienced people who are available for
broadcast interviews or even to appear on radio and TV talk shows. The Child Identification Program
provides a wonderful awareness vehicle to promote SDCHIP sponsoring organizations in South Dakota.
Again, the success of your promotion will directly reflect the effort that you put into it.
Follow up. You’re not done yet.
If the local media does not cover your event by sending a reporter or photographer, this gives you another
opportunity to prepare and send out a second news release following your event that contains information
including the number of children processed and how successful it was. If you’ve taken photos yourself, choose
one or two of the best and send them along with your release.
A-3
At very least, if an editor or news director has made the effort to print your release or broadcast news of your
SDCHIP program, send them a note afterwards thanking them for helping to make the event successful. No
other thing you do will pave the way to making the promotion of your next event successful, not just for your
future SDCHIP events, but also for other Lodge activities that you should promote on a regular basis.
Building a positive relationship with your region’s editors will pay dividends well into the future. The effort
is well worth it.
(Sample News Release)
SDCHIP – South Dakota Freemasons Child Identification Program
SDCHIP — The South Dakota Freemasons Child Identification Program — is coming to Memorial Stadium
Tuesday evening, August 1, 2008 as Mitchell participates in National Night Out for Crime Prevention.
South Dakota Freemasons invite children, age 18 and younger, to participate in a comprehensive Child
Identification Program at the National Night Out program at the Memorial Stadium, 1st & Main Street in
Mitchell on Tuesday evening, August 1, 2008 from 6:00 PM until 8:00 PM (Rain date: Tuesday August 8th).
Each child will have a brief Webcam interview and still photograph, finger prints recorded by scanner, and
all will be recorded on a CD. Each child will have a Toothprint® made and DNA cheek swabs taken by
professional dental personnel (may list actual personnel). All materials are given to the parents for
safekeeping. No copies are kept on file, and the program is at no charge to the participants.
SDCHIP events are conducted by members of South Dakota Masonic Lodges in cooperation with the South
Dakota Dental Association, the South Dakota Sheriffs’ Association and other cooperating organizations.
The Toothprint® impression is a relatively new means of identification where the child bites down on a
wafer, making a permanent, archivable record of their teeth. Toothprints® were developed by Dr. David
Hart, a forensic dentist who developed the technology as another means of identifying a child that
fingerprints alone may not guarantee.
Mr. Peter Banks, Director of the National Center for Missing and Exploited Children, was the first to
suggest that the saliva on the Toothprint® wafers might be a suitable sample for nuclear DNA testing and
scent recovery by bloodhound recovery dogs; both have been clinically documented. It has been shown that 3
years after a toothprint has been taken, the saliva is still viable for DNA testing. He also stated that, since
the Toothprint® wafer is sealed in a “zipper”-type plastic bag, enough scent remains for a trained dog to
identify and track it. Cheek swabs provide DNA and, when frozen, are stated to last for up to 30 years.
SDCHIP Child Identification programs are held periodically throughout South Dakota and may be
sponsored by a local Masonic Lodge as part of its community service programs. Many school officials have
requested that the program be brought into the school systems in their municipalities.
An average of 2,185 children were reported missing in the United States every day in a recent 1year period, with 58,200 abductions by non-family members for the same period. 1 in 5 girls and
1 in 10 boys will be sexually victimized before reaching adulthood. Approximately 1 in 7
children age 10 through 17 received sexual solicitation or approach over the Internet. When you
consider these frightening statistics, the value of this program is enormous.
A-4
Appendix B – SDCHIP School Event Procedures
SDCHIP School Event Process
An SDCHIP Event that takes place at a school during the school day runs slightly different than a
traditional event where parents and children are walking in on a first come, first served basis. The steps
outlined below are guidelines to follow. They can be modified, as needed, to fit the needs of the school and
the local organizers.
1. AN SDCHIP permission form will be given to the school for their approval prior to distribution. The
school then distributes the permission forms to children approximately two weeks prior to the event.
SDCHIP brochures can also be copied to send home additional information about the event and what
is involved in the child identification process. A shorter, modified form with event information can be
supplied if requested. It works well to use the modified form and copy it directly on the back of the
permission form.
2. Permission forms should be filled out by the parents or guardians and returned to the school about
one week prior to the event. This way the organizers will have an idea of how many children will be
identified during the school day.
3. If requested, school events can be set up so that school children that will be going through the
SDCHIP process are identified from roughly 9:00 a.m. to 3:00 p.m., and then the event can be opened
up to walk-ins for preschool children or other area children whose parents wish for them to be
identified. Time and parameters can be set by the school to fit their own needs, including the bus
schedule.
4. It takes approximately one and one-half to two hours to set up the equipment for an event. After
setup, it will be necessary to set aside an additional hour to train volunteers who will be running the
stations during the event. Because of the time needed for setup and training, when possible, it is
helpful to setup the event the night before and train volunteers the morning of the event. Keep in
mind that each event requires approximately 50 volunteers at a time to run the stations. If an event
is scheduled for all day, it is advisable to have either a second crew or back up volunteers to fill in for
breaks, as needed.
5.
Because permission forms have been returned in advance and it will be known how many children
per classroom will be participating, children can be taken through the SDCHIP process by pulling a
classroom or two at a time. This will alleviate congestion and provide for a smooth flow for the event.
After a classroom is almost completed, another classroom can be released to start the process. It
takes approximately one-half hour for a child to go through the process from start to finish.
B-1
EXHIBITS
SDCHIP Funding Guidelines – Grand Master’s Letter
Equipment Inventory List
Workstation Supplies Checklist
EZCHILD ID User Manual
Items placed in SDCHIP Document Envelope returned to Parent/Guardian
SDCHIP Brochure
SDCHIP Overview
SDCHIP Host Contact Information Sheet
SDCHIP Letterhead/Logo sheet
SDCHIP list of Volunteers
SDCHIP Volunteer Sign In Sheet (2/page)
SDCHIP Dental Protocol
SDCHIP Parent/Guardian Permission Form
SDCHIP Child Data Form
SDCHIP Child Name Sheet (2/page)
SDCHIP Donation Form
SDCHIP Document Envelope
Acknowledgements
Equipment Inventory List
Supplies to be provided for each event by the SDCHIP Coordinator:
4 Metal Printer cases numbered 1 through 4, each containing:
1 – HP printer,
50 – CDs,
100 – CD Envelopes,
1 – 25’ extension cord,
1 – Wood block,
1 – Plug strip,
1 – Instruction manual for computer operation
4 Metal Computer cases numbered 1 through 4, each containing:
1 – Laptop Computer,
1 – Microphone,
1 – Camera,
1 – Keyboard,
1 – Mouse,
1 – Fingerprint pad,
1 – Mouse pad
(Place 1 printer and 1 computer case with matching numbers at each data entry station)
Box 1 – Forms Case: (Locate at Registration station)
Hanging file box containing all forms (200 each of child forms)
3 – Reams of paper,
12 – Contract forms,
24 – Volunteer signup forms,
200 – Volunteer sign-in forms, 200 “what is SDCHIP”
200 – Child ID,
200 – Permission slips,
50+ Donation forms,
Directional arrows,
Station labels
Box 2 - Laminator case:
(Locate at Checkout station)
2 – Laminators,
2 – Paper cutters,
200 – Plastic sleeves, (Each box of sleeves has a carrier used for laminating.)
1 – Plug strip,
1 – 25’ Extension cord.
Box 3 - Dental Station case:
(Locate at Dental Station)
2 – Hot pots,
3 – Boxes of Toothprints (100/box with 100 envelopes),
1 – 25’ extension cord,
1 – Plug strip,
Labels for use in resealing DNA swab envelopes after sample is taken.
Box 4 contains:
5 – Rolls paper towels,
4 – Wet wipes,
4 – Bottles alcohol,
4 – First aid boxes
(Locate near Computer stations)
Box 5 contains:
(Locate near Computer stations)
2 – 100 CD disc packages,
200 – Sleeves for laminator,
2 – Boxes of CD envelopes,
2 – Packages of black #21 plus 1 black/color combination inkjet cartridges for printers, 1 1 – Roll
Masking tape,
1 – Roll Scotch Tape,
1 – Roll packaging tape
Box 6 contains
200 – DNA swabs, labels for sealing DNA swab envelopes
Box 7 contains:
3 – 50’ Extension cords
(Locate near Computer stations)
Box 8 contains:
2 – Rolls Duct tape,
1 – Roll packaging tape,
1 – Scale,
Pencils & pens, scissors, Scotch tape
1 – Spare finger print pad,
1 – Spare camera,
1 – Spare USB hub, extra ink cartridges, misc.
(Locate near Computer stations)
1 – Cardboard box containing 4 small, 4 medium, 2 large, and 2 X-large gloves
(Locate near Dental Station)
1 – Cardboard box of coloring sheets and colors
(Locate in Child waiting area)
1 – Cardboard box of Masonic & Child Alert information handouts
(Locate at Literature table)
5 – Webcam backdrop & poles (packed loose)
(Locate 1 at registration, 1 at each computer station)
Workstation Supplies Checklist
REGISTRATION STATION (1)
Permission Forms
Name/Date Sheets
Child ID Info Form
SDCHIP Kit Envelopes
Fine point Sharpies
Laminated Name/Date Sheet Sample
3x6 ft. Vinyl SDCHIP Banner & poles
Scale
Web Cam Backdrop & poles
Table
Chairs
Quantity
200
200
200
200
4
1
1
1
1
2
6
COMPUTER STATIONS (4 each)
Web Cam Backdrop & poles
Extension Cord
Duct Tape (Use for taping down cords)
Power Strip (in case of sharing outlet with other stations)
Block for supporting lid or mounting camera
Metal Computer Case containing laptop, mouse, keyboard,
fingerprint scanner, Webcam, microphone, power cable
HP Printer (remove from metal carrying case)
CDs with Envelopes
Printer Paper (sheets)
Fine Point Sharpies
Alcohol Swabs
Alcohol
Paper towels
Laminated interview questions
Clips for ID forms
Table
Chairs
Quantity
1
1
1 roll
1
1
DENTAL STATION (1 station, 4 people)
Duct Tape for Taping Electric Cords to Floor
Sterile Cheek Swabs in sealed envelopes
Scotch Tape for resealing Cheek Swab Envelopes after use
Assorted Gloves (8 boxes: 3 Small, 4 Medium, 1 Large)
Toothprint Water Warmer
Toothprint Wafers & Ziploc Bags
Extension Cords
Power Strip
Fine Point Sharpies
Distilled water
Tables
Chairs
Quantity
1 Roll
200
2 Rolls
800
2
200
1
1
4
1 gallon
2
6
1
1
50
100
4
1 tube
1 bottle
1 roll
1
2
1
4
CHECKOUT STATION
Duct Tape for Taping Floor Electric Cords
Extension Cord
Power Strip
Fine Point Sharpies
Scissors
Laminator
Plastic Sleeves
Paper Cutter
Table
Chairs
Quantity
1 Roll
1
1
2
2
2
200
2
1
3
Other Stations
Waiting Area
Crayons
Coloring books
Drawing paper
Tables
Chairs
Quantity
Assorted
Assorted
Assorted
2-3
8-12
Information Desk
Masonic information
SDCHIP Brochures
Current Masonic Messenger
Petition for membership
Pens and pencils
Note pad or paper
Table
Chairs
Assorted
100
100
25
Assorted
Assorted
1
2
Event Coordinator
List of Volunteers
Volunteer sign-in sheet
Refreshments for workers
Pens and pencils
Note pad or paper
Table
Chairs
Quantity
5
50
1
4
Refer to Procedures Handbook for number and placement of tables and chairs.
NOTE - Do not click on the red “X” to close the camera assistant. If the camera assistant
(shown in red box above) disappears, you can open it again by clicking on the picture of the
webcam in the taskbar at the bottom right. Click on Enable Quick Assistant.
This form is for illustration only – use
SDCHIP – specific form corresponding
to the computer screen layout found
in the Exhibits section of this manual.
Items placed in SDCHIP Envelope for return to parent/guardian (in
addition to data sheet, ID card, printed sheet with fingerprints & photo, etc.)
DNA Swab – Dental staff removes from envelope, takes cheek swab,
returns to envelope, seals with tape and labels envelope with child’s name.
Toothprint® wafer – Dental staff warms with water bath in hot pot, gets
tooth imprint of child, returns to envelope, labels and dates envelope.
CD output from computer containing data sheet, fingerprints, still photo
and full motion video. Envelope to be labeled with child’s name and date.
Acknowledgements
This book was developed by the Grand Lodge of South Dakota AF & AM (February 1, 2008). The
Grand Lodge of South Dakota would like to thank the Grand Lodge of Nebraska for its help in
developing and the SDCHIP program and for the use of their publications.