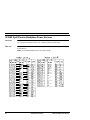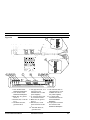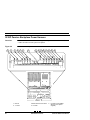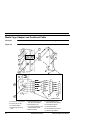
1
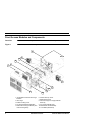
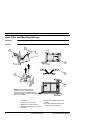
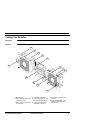
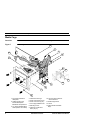
Technical Reference
Manual
55xx
Series Chassis
24926A
April, 1998
© Texas Micro Inc.
All Rights Reserved
Printed in USA
About This Manual
This technical reference manual provides detailed information about these Texas Micro Inc. products:
•
•
•
•
SP5500 Xtended Xpress ® Server Platform
55xx Passive Backplane Chassis
55xx-48 Volt Passive Backplane Chassis
55xxSP Split Passive Backplane Chassis
Topics covered include:
•
•
•
•
•
•
•
•
•
•
i
Disassembling the computer
Identifying the modules, components, and cabling
Cable and Header pinouts
-48 volt chassis components
Split passive backplane chassis components
Alarm Board jumpers, messages and functions
Technical topics specific to Texas Micro Inc. components
IRQ-PCI interrupt assignment and operation
Texas Micro Inc. SCSI components
Hot-swapping requirements
55xx Series Chassis
Technical Reference Manual
Document Conventions
Typography
Title Case
Bold Title Case
Titles of menus, windows, tabs, lists, and groups.
Names of menu items, fields, buttons, icons, check boxes,
list items, group items, and keystrokes.
UPPER CASE
Acronyms and abbreviations.
Italics
Emphasis.
Sans Serif Type
Items in tables, illustrations, and notations.
Monospace Type Output from a printer or monitor. Graphic items will be
displayed as an image.
Symbols
Caution: indicates an item for special consideration.
!
!
Warning: indicates a hazard that can cause personal injury
and/or damage to the equipment.
High Voltage: indicates the presence of a high electrical
current that can cause serious personal injury and/or damage
to the equipment.
ESD: indicates sensitive electronic parts that can be
damaged by electrostatic discharge (ESD).
Technical Reference Manual
55xx Series Chassis
ii
Customer Support
Calling
Technical
Support
Step
1
2
3
Returning
Products for
Service
Step
1
2
3
4
Accessing
the BBS
Step
1
2
3
Using the
InfoLine Fax
Service
Step
1
2
3
!
iii
Action
Have the Texas Micro product model and serial number available.
• In the Continental USA, Monday — Friday, 7:00 a.m. — 6:00 p.m.,
Central Time, dial 1-800-627-8700 in the USA. Outside the USA, dial
713-541-8200 (add long distance/international access codes).
• In Europe, Monday through Friday between 8:00 a.m. and 6:00 p.m.,
dial +31-36-5365595.
Upon answer, press for Technical Support.
Action
Have the Texas Micro product model and serial number available.
• In the Continental USA, Monday — Friday, 7:00 a.m. — 6:00 p.m.,
Central Time, dial 1-800-627-8700 inside the USA. Outside the USA,
dial 713-541-8200 (add long distance/international access codes).
• In Europe, Monday through Friday between 8:00 a.m. and 6:00 p.m.,
dial +31-36-5365595.
Upon answer, press for Technical Support.
When you are assigned a Returned Goods Authorization (RGA) number
from a Technical Support Representative, place it, along with the product
serial number, on the packaging materials and correspondence. The
factory will be unable to accept delivery without these numbers.
Note: The factory does not accept RGA's sent freight collect.
Action
24 hours a day, 7 days a week, dial 713-541-8250 (add long distance/
international access codes).
Set your modem/communications equipment to:
Protocol: ANSI
Data Bits: 8
Parity:
None
Stop Bits: 1
Note: Refer to your modem and communication software documentation
for configuration and operation instructions.
When you connect, follow the online instructions to download software.
Action
24 hours a day, 7 days a week, dial 713-541-8200 or 800-627-8700
(add long distance/international access codes).
Note: You can use this service only with a touch-tone telephone.
Upon answer, press 190 for the InfoLine fax service.
Follow the instructions to request documents.
Upon receiving your equipment, inspect the packaging, shipping materials, and contents.
If damaged, return the equipment to Texas Micro Inc. in the original packaging and shipping
materials.
If you are satisfied with your equipment, retain the packaging and shipping materials in case
of future need.
55xx Series Chassis
Technical Reference Manual
Table of Contents
Chapter 1
Front Access Components
1
Front Access Modules and Components .......................................................... 2
Front Bezel ....................................................................................................... 3
Door, Filter, and Mounting Springs ................................................................... 4
Cooling Fan Modules ........................................................................................ 5
SCA Cage.......................................................................................................... 6
SCA Cage Disassembly .................................................................................... 7
Media Cage ...................................................................................................... 8
DC Power Distribution Backplane ..................................................................... 9
Chapter 2
Rear and Internal Components
11
Rear Panel and Top Cover Access ................................................................. 12
Alarm Board and Power Supplies ................................................................... 13
AC Power Entry Assembly .............................................................................. 14
Front Panel Display ........................................................................................ 15
Passive Backplane or Baseboard.................................................................... 16
Chapter 3
Power Components
17
AC Power Entry Assembly, J4 Pinout and Fuse ............................................. 18
Connectors on the DC Power Distribution Backplane .................................... 20
Rear of the DC Power Distribution Backplane ................................................ 21
Drive Power Cables ........................................................................................ 24
Signals to the Front Panel Display .................................................................. 26
Power to the Baseboard/Passive Backplane .................................................. 28
Chapter 4
DC Power Components
29
-48 Volt Information ......................................................................................... 30
DC Power Entry Harness ................................................................................ 32
DC Power Supply Pinouts ............................................................................... 34
DC Breakers ................................................................................................... 36
Chapter 5
Harness and Cables
37
SP5500 Baseboard Power Harness ............................................................... 38
5520P Passive Backplane Power Harness .................................................... 40
5512PE Passive Backplane Power Harness ................................................... 42
5518SP Split Passive Backplane Power Harness ........................................... 44
5518P Passive Backplane Power Harness ..................................................... 46
Technical Reference Manual
55xx Series Chassis
iv
Table of Contents
Chapter 6
55xxSP Components
47
Power Cables for Two Media Cages .............................................................. 48
Keyboards and Resets for Two Media Cages ................................................ 49
Media Cage Adapter and Combined Cable .................................................... 50
55xxSP Cables ............................................................................................... 51
Keyboards and Rests for the SCA and Media Cages ..................................... 53
Chapter 7
Alarm Board Module
55
Alarm Board Features ..................................................................................... 56
Front Panel Displayed Alarm Messages ......................................................... 57
Printed Alarm Messages ................................................................................. 58
J9 96-Pin Connector ....................................................................................... 61
Jumpers on the Alarm Board .......................................................................... 62
Alarm Board Operating Characteristics .......................................................... 64
Chapter 8
Technical Topics
65
PCI-IRQ Interaction ........................................................................................ 66
PCI Interrupt Rotation ..................................................................................... 68
Resolving PCI-IRQ Conflicts ........................................................................... 72
Exceptions ...................................................................................................... 73
Automatic/Manual PCI-IRQ Assignment ......................................................... 74
SCSI Information ............................................................................................ 75
SCA Cage, Termination, and SCSI ID Addition .............................................. 76
Hot-Swapping Requirements .......................................................................... 78
Chapter 9
v
Specifications
79
55xx Series Chassis
Technical Reference Manual
List of Figures
1
2
3
4
5
6
7‘
8
9
10
11
12
13
14
15
16
17
18
19
20
21
22
23
24
25
26
27
28
29
30
31
32
33
34
35
36
37
38
39
40
Front Access Modules and Components ............................................................................... 2
Front Bezel and Components................................................................................................. 3
Front Bezel Doors, Air Filters, and Bezel Mounting Springs .................................................. 4
Cooling Fan Modules ............................................................................................................. 5
SCA Cage — Remove Cables and Remove the Cage from the Chassis .............................. 6
Disassemble the SCA Cage — Remove the SCSI Backplane — Disassemble Sleds........... 7
Media Cage ............................................................................................................................ 8
DC Power Distribution Backplane .......................................................................................... 9
Rear Panel, Internal Modules, and Components ................................................................. 12
Alarm Board Module and Power Supply Modules ................................................................ 13
AC Power Entry Assembly ................................................................................................... 14
Front Panel Display .............................................................................................................. 15
Disconnect and Remove Baseboard or Backplane .............................................................. 16
AC Power Entry Harness ..................................................................................................... 19
Power (and Signal) Connectors ........................................................................................... 20
Rear of DC Power Distribution Backplane............................................................................ 21
Power Sharing — DC Backplane (left) and Power/Signal Connectors (Right)..................... 23
SCA and Media Cage Power Cables ................................................................................... 25
Display-Alarm Board Connections; J11, J9 and J8 .............................................................. 27
Baseboard/Passive Backplane Power; J6 and J5 ................................................................ 28
DC Power Harness Connection J4 on DC Power Distribution Backplane............................ 31
DC Power Entry Harness ..................................................................................................... 33
Power Supply Pins and Communication Block..................................................................... 35
CB1 Controls IN1 and CB2 Controls IN2.............................................................................. 36
SP5500 Baseboard Power Harness..................................................................................... 39
5520P Passive Backplane Power Harness .......................................................................... 41
5512PE Passive Backplane Power Harness........................................................................ 43
5518SP Passive Backplane Power Harness........................................................................ 45
5518P Passive Backplane Power Harness .......................................................................... 46
55xxSP Power Cable Routing .............................................................................................. 48
55xxSP Keyboard Connections, Pinouts, Wiring and the Reset Buttons ............................. 49
55xxSP Media Cage Keyboard Connector and Reset Button Adapter ................................ 50
55xxSP Cables ..................................................................................................................... 51
55xxSP Power Cables for the SCA and Media Cages ......................................................... 52
55xxSP Keyboard and Reset Cable Routing. ...................................................................... 53
Alarm Board Rear Panel ...................................................................................................... 60
Pinout and Illustration of the Alarm Board Connection......................................................... 61
Jumper Block and Switch on the Alarm Board ..................................................................... 63
PCI Interrupt Rotation........................................................................................................... 69
Central Processing Area, PCI chip set and Related Components ....................................... 71
Technical Reference Manual
55xx Series Chassis
vi
List of Figures
41
42
vii
SCSI ID OR’ed ..................................................................................................................... 77
Hard Drive SCSI ID Jumpers— Preset SCSI ID on the SCA Slot ........................................ 77
55xx Series Chassis
Technical Reference Manual
Front Access Components
This chapter shows removing the components and modules accessible from the
front of the chassis. The illustrations identify modules and components. Visual
instructions, such as arrows and dotted lines, are provided. The topics covered
are these:
•
•
•
•
•
•
Before Working
on the Unit
Remove the Front Bezel
Disassemble the Front Bezel
Remove the Cooling Fan Modules
Remove and disassemble the SCA Cage
Remove and disassemble the Media Cage
Remove the DC Power Distribution Backplane
For your safety and the longevity of the electronic components in the chassis,
please observe the following warning and caution before working on the unit.
!
Technical Reference Manual
Only qualified, experienced electronics personnel should access the
interior of the chassis and handle the equipment.
To avoid damage or injury, always power-off the system and disconnect all
power cords from their power source before handling the internal
components.To help prevent accidental damage that can be caused by static
discharge, always use a grounding wrist strap or other static-dissipating
device when accessing the interior of the chassis and handling the
equipment.
55xx Series Chassis
1
Front Access Components
Front Access Modules and Components
Overview
This section shows an exploded view of the front-accessible components and modules.
Figure 1
Front Access Modules and Components
6
5
4
3
2
1
5
7
8
9
11
10
1. Vented Plate Insert If No SCA Cage
Installed
2. SCA Cage
3. Plastic Insulting Cover
4. DC Power Distribution Backplane
5. Redundant Cooling Fan Module (Two
fans linked together)
2
6. Chassis with Top Cover
7. Media Cage Frame
8. Insert for empty 3.5” Floppy Diskette
Drive bay
9. 3.5” Floppy Diskette Drive
10. Blank Panel for Media Bays
11. Front Bezel (with filters)
55xx Series Chassis
Technical Reference Manual
Front Access Components
Front Bezel
Overview
In this section, remove and disassemble the Front Bezel.
Figure 2
Front Bezel and Components
2
1
3
8
4
7
6
3
4
5
1. Front Bezel Frame
2. Air Filters (5.5” H, 6.7”W)
3. Metal Frame Air Filter
Retainer
Technical Reference Manual
4. Door Air Filter (6.25” H,
8.25” W)
5. Bezel Door with Lock
(Right)
55xx Series Chassis
6. Key Lock Assembly
7. Bezel Door (Left)
8. Key (One of Two Keys)
3
Front Access Components
Door, Filter, and Mounting Springs
Overview
In this section, disassemble Front Bezel doors and adjust the mounting springs.
Figure 3
Front Bezel Doors, Air Filters, and Bezel Mounting Springs
2
1
3
4
6
5
NOTE: The wire frame and door
can be removed. 1) Pull the frame
away from the door. 2) Slide the hinge
rod into the bezel. 3) Pull the frame then
door from the bezel.
1. Front Bezel
2. Air Filter (6.25” H, 8.25” W)
3. Metal Frame Air Filter Retainer
4. Metal Spring Retains the Front Panel
Ball Studs
4
5. Recess allowing Metal Frame to be
installed.
6. Under Side of the Front Bezel which
Shows Metal Spring Installed
55xx Series Chassis
Technical Reference Manual
Front Access Components
Cooling Fan Modules
Overview
In this section, remove the Cooling Fan Modules from the Front Panel.
Figure 4
Cooling Fan Modules
1
2
3
4
5
6
2
3
1
8
5
7
6
1. Mounting Tab
2. Front Cooling Fan Secured
to Assembly Grill
3. Rear Cooling Fan Secured
to Front Fan
Technical Reference Manual
4. Fan Power Connector
5. Power Receptacle on Fan
Monitoring/Display Board
6. Thumbscrew to Secure
Assembly in Chassis
55xx Series Chassis
7. Fan Power Connector (not
in view)
8. Front Panel Display — All
display models have Fan
connections.
5
Front Access Components
SCA Cage
Overview
In this section, disconnect and remove the SCA Cage and remove SCA SCSI-2 Hard
Drives.
Figure 5
SCA Cage — Remove Cables and Remove the Cage from the Chassis
1
2
3
4
5
6
7
8
9
10
1. Fast and Wide SCSI Cable
(68-pin)
2. Power Cable, J3
3. DC Power Distribution
Backplane
6
4. SCA Hard Drive Activity
Cable for the Six Amber
LEDs on the Front Panel
(10-pins)
5. SCA Cage (Metal Frame)
6. SCSI Backplane (Visible
Through Oval Vent Holes)
55xx Series Chassis
7. Sled Guides
8. 10-Pin Hard Drive Activity
LED Cable
8. Metal Sleds for SCA Fast/
Wide SCSI Hard Drives
10. SCA Cage Mounting
Screws
Technical Reference Manual
Front Access Components
SCA Cage Disassembly
Overview
In this section, disassemble the SCA Cage components.
Figure 6
Disassemble the SCA Cage — Remove the SCSI Backplane — Disassemble Sleds.
2
1
3
4
5
6
7
8
1. SCA Cage Power
Connector (16-pin)
2. Rear View of SCSI
Backplane — SCA Slots
on the Other Side
Technical Reference Manual
3. Fast/Wide SCSI
Connector (68-Pin)
4. SCA Hard Drive Activity
Connector for the Six
Amber LEDs on the Front
Panel ((10-pins)
55xx Series Chassis
5. Screw
6. Washer
7. SCSI Backplane (with SCA
Connectors in View)
8. Flat-head Screws
7
Front Access Components
Media Cage
Overview
In this section, disconnect and disassemble the Media Cage.
Figure 7
Media Cage
1
2
3
10
4
9
11
12
7
5
13
6
7
8
1. DC Power Distribution
Backplane
2. Cables routed to the
Passive Backplane/
Baseboard Compartment
3. 3.5” Floppy Diskette Drive
Cable (34-Pin with a twist)
8
4. Cable Pass-Through
5. Power Connectors (4-pin)
6. Power Connector (2-pin)
7. 3.5” Floppy Diskette Drive
8. Mounting Screw
9. Cable for an IDE Hard
Drive (34-pin)
55xx Series Chassis
10. Two-Connector Cable for
SCSI-2 Devices
11. Media Cage Frame
12. Screw
13. Blank Panels for Media
Bays
Technical Reference Manual
Front Access Components
DC Power Distribution Backplane
Overview
In this section, remove the DC Power Distribution Backplane.
Figure 8
DC Power Distribution Backplane
6
4
5
3
1
2
7
8
1. Power Entry Harness
2. Power Entry Harness
Disconnected from J4
3. SCA Cage Power Cable
4. Media Cage Power Cable
5. Top of the Power Supply
Compartment in a CutAway View of the Chassis
Technical Reference Manual
9
6. Power Cables for the
Passive Backplane/
Baseboard Compartment
7. Compartment for Alarm
Board Module
55xx Series Chassis
8. DC Power Distribution
Backplane
9. Plastic Insulating Cover
(shown separated from
backplane, but actually
part of the DC Power
Distribution Backplane)
9
Front Access Components
Notes:
10
55xx Series Chassis
Technical Reference Manual
Rear and Internal Components
This chapter shows removing components and modules form the rear of the
chassis. This chapter also shows removing the top cover to remove components
inside the chassis. The topics covered are these:
•
•
•
•
•
Before Working
on the Unit
Remove the Alarm Board Module
Remove the Power Supply(ies)
Remove the AC (or DC) Power Entry Assembly
Remove the Front Panel Display/Display Board
Remove the baseboard or passive backplane
For your safety and the longevity of the electronic components in the chassis,
please observe the following warning and caution before working on the unit.
!
Technical Reference Manual
Only qualified, experienced electronics personnel should access the
interior of the chassis and handle the equipment.
To avoid damage or injury, always power-off the system and disconnect all
power cords from their power source before handling the internal
components.To help prevent accidental damage that can be caused by
static discharge, always use a grounding wrist strap or other staticdissipating device when accessing the interior of the chassis and handling
the equipment.
55xx Series Chassis
11
Rear and Internal Components
Rear Panel and Top Cover Access
Overview
This section shows an exploded view of the rear panel modules and internal
components.
Figure 9
Rear Panel, Internal Modules, and Components
1
2
3
4
8
5
6
7
1. Top Cover
2. 15” Xtended Xpress ® Baseboard —
For other Models: Passive Backplane
or Split Passive Backplane
12
3. Power Entry Assembly — Cables on
the Other Side
4. Two Power Supplies (One Supply in
Some Models)
5. Alarm Board Module (In Some
Models)
6. I/O Plate (SP5500 Models only)
7. Chassis
8. Front Panel Display (with Display
Board
55xx Series Chassis
Technical Reference Manual
Rear and Internal Components
Alarm Board and Power Supplies
Overview
In this section, remove the Alarm Board Module and Power Supply Modules.
Figure 10
Alarm Board Module and
Power Supply Modules
1
2
!
Always power down the system before
removing the Alarm Board Module.
When the system is powered, removing
the Alarm Board damages the board
circuitry.
3
4
5
1. Thumbscrew (Two Secure the
Module)
2. Alarm Board Module (Rear Panel)
3. Thumbscrew (Two Secure each
Power Supply)
4. Power Supply (One or Two Supplies
— A Blank Panel for an Empty Bay)
5. AC Power Entry Assembly
(Described in a following section)
Note: The DC Power Entry Assembly
removes the same way as AC assembly.
Technical Reference Manual
55xx Series Chassis
13
Rear and Internal Components
AC Power Entry Assembly
Overview
In this section, disconnects cables, remove screws and slide the AC Power Entry
Assembly through the SCA Cage cavity. AC and DC assemblies remove the same way.
Figure 11
AC Power Entry Assembly
2
3
1
4
5
6
11
7
1
8
9
1. Screw and Washer
2. Chassis Grounding
Wire (One of Two)
3. Primary Power Connector
for DC Power Distribution
Backplane (J4)
4. Screw and Washer
Securing Power Entry
Assembly — Removed
Through SCA Bay
14
10
5. Power Harness Connector
to J4 (AC or DC Models)
6. Screw and Washer
Securing Power Supply
Grounding Wire
7. Power Supply Grounding
Wire
55xx Series Chassis
8. Power Supply Support
Slide — Power Supply
Board Grounding
Connection
9. Nut Securing the Chassis
Grounding Wire/Screw.
10. Flange for Assembly
Screw (One of Two
Flanges)
11. Fuse
Technical Reference Manual
Rear and Internal Components
Front Panel Display
Overview
In this section, disconnect and remove the Front Panel Display and Display Board.
Figure 12
Front Panel Display
5
4
3
2
6
7
1
4
8
9
10
1. Mounting Screw
2. Display Standoff
3. Front Panel Display (Not in
all Models)
4. Cooling Fan Power
Receptacle
Technical Reference Manual
5. Display Cable (40-pin)
6. SCA Hard Drive Activity
LEDs (Amber)
7. Cable from Board to
Display
55xx Series Chassis
8. Cooling Fan Fault LED
(Red).
9. Fault LEDs or Display
Opening in the Front Panel
10. Front Panel
15
Rear and Internal Components
Passive Backplane or Baseboard
Overview
In this section, remove the 15” Xtended Xpress ®.Baseboard. Similar considerations
apply to removing passive backplanes.
Figure 13
Disconnect and Remove Baseboard or Backplane
1
2
5
3
4
5
6
1. Baseboard/Passive
Backplane Mounting
Screw
2. I/O Mounting Screws
(SP5500 Only)
16
3. Horizontal Bulkhead
between CPU and Power
Supply Area
55xx Series Chassis
4. Standoff
5. Cable Pass-Through
6. Cooling Fan/Front Panel
Display Compartment
Technical Reference Manual
Power Components
This chapter shows the power components common to the AC and DC models as
well as featuring the AC power supply, AC Power Entry Assembly and AC
Power Harness. The next chapter shows the components specific to the DC
models.Topics covered are these:
•
•
•
•
•
•
•
•
Technical Reference Manual
AC Power Entry Assembly
AC Fuse
DC Power Distribution Backplane
Internal DC Power Connections
Power Sharing and AC Power Supply Pinouts
Media Cage and SCA Cage Power Cable Pinouts
Front Panel Display Signals and Power Pinout
Connectors for the Passive Backplane or Baseboard Power Harness
55xx Series Chassis
17
Power Components
AC Power Entry Assembly, J4 Pinout, and Fuse
Overview
This section describes the AC Power Entry Assembly, the power harness and the pinout
of the power connection to J4 on the DC Power Distribution Backplane. The connectors
are the same for AC and DC models, but the power signals over the wires are different.
For DC, see the next chapter.
J4 Pinout
The table shows the pinout for the power connector to the DC Power Distribution
Backplane. “DC” does not mean that the power coming into the supplies is necessarily
DC.
#
Description
Description
1
AC Line 1 -- Brown
4
Not used
2
Ground -- Green
5
Not used
3
AC Line 2 -- Blue
6
Not used
Fuse Ratings
The table shows the rating and other information about the fuses used in the chassis.
Region
18
#
Amperes /
Volts
Type
Suggested
manufacturer
Fuse part
number
Fuse carrier
part number
North America
12A / 250V
SB
Littlefuse
326.012
Schurter
FEK031.1666
International
6.3A / 250V
T
Schurter
001.2512
Schurter
FEK031.1663
55xx Series Chassis
Technical Reference Manual
Power Components
Figure 14
AC Power Entry Harness
1
4
5
3
6
7
2
1
8
9
10
11
1. Chassis Grounding Wire/
Screw Connection
2. Fuse/Fuse Housing (Inside
the Chassis)
3. AC Power Entry Housing
4. AC Switch Housing
Technical Reference Manual
5. Green Wire (AC Model)
6. Brown Wire (AC Model)
7. Power Entry Harness
Connector to J4
8. Grounding Wire/Connector
(Green)
55xx Series Chassis
9. Blue Wire (AC Model)
10. J4 Connector on the DC
Power Distribution
Backplane
11. DC Power Distribution
Backplane
19
Power Components
Connectors on the DC Power Distribution Backplane
Overview
This section describes the connectors on the DC Power Distribution Backplane.
Figure 15
Power (and Signal) Connectors
4
11
Primary input
3
Ground 2
1
10
1
6
5
4
Ground
5
34
J4
1
Preproduction
primary input
3
2
1
2
J8
10
1
24
9
13
3
14
8
39
12
18
J6
2
J5
1
7
33
J7
J11
40
2
1
1
J4
J8
J4
J5
J6
J3
J7
J11
J10
Ground
to chassis
16
9
J3
8
8
1. J6 powers the passive
backplane/baseboard
(connects to PS5 on
Xtended Xpress ®
Baseboard)
2. J5 powers the Passive
Backplane/Baseboard
(connects to PS3 and PS4
on Xtended Xpress ®
Baseboard)
3. J7 powers Media Cage
drives
20
9
1
J10
7
4. J8 40-pin Connector
transmits signals from the
Alarm Board to the Front
Panel Display and Powers
the Display and Cooling
Fan Modules
5. J11 34-Pin Connector on
the Alarm Board receives
signals from the “Display”
header on the 15” Xtended
Xpress ® Baseboard
6. J12 Reset Button Wires
(SP5500 Only)
55xx Series Chassis
J12
1
1
2
J12
6
7. J10 10-Pin Connector for
SCA Hard Drive Activity
LEDs
8. J3 powers the SCA Cage
9. Grounding Screw for the
Power Supply Housings
10. J4 for Pre-Production
Models
11. J4 primary power entry
for power supplies
Technical Reference Manual
Power Components
Rear of the DC Power Distribution Backplane
Overview
This section describes the connections on the rear (power supply) side of the DC Power
Distribution Backplane.
Figure 16
Rear of DC Power Distribution Backplane
2
C32
4
A32
11
C1
J9
C1
A1
4
3
B1
A1
J1
A1
B1
J2
1 3
3 1
C1
4
11
1
J9
J2
J1
1. Cut-out for the J11 34-Pin Connector
on the Alarm Board
2. 96-pin Connector — Collects Status
Signals from Power Supplies through
the DC Power Distribution Backplane
and the Cooling Fans through J8.
The Alarm Board Transmits Alarm
Messages to the Display Through J8
by the DC Power Distribution
Backplane.
Technical Reference Manual
3. Power and Signal Connector for the
power supply in the lower bay
4. Power and signal connector for the
power supply in the upper bay
55xx Series Chassis
21
Power Components
Power Sharing and Power/Signal Connectors
Overview
This section describes the pinout of the Power Supply connections.
Communication Block
Pinout
The table shows the pinout of the Communication Block.
A (top row)
Pin
Power Pinout
B Comm (middle row)
Circuit
Pin
Circuit
Pin
Circuit
1
Ground (with A5
and C8)
1
ENAB
1
- Return (with C2
and C3)
2
5 volts SH
2
12 volts SH
2
- Return (with C1
and C3)
3
5 volts -S
3
Not used
3
- Return (with C1
and C2)
4
5 volts +S
4
Not used
4
- 5 volts (with C5)
5
Ground (with A1
and C8)
5
Not used
5
- 5 volts (with C4)
6
3.3 volts SH
6
Power OK 2
6
- 12 volts (with C7)
7
3.3 volts -S
7
Power OK 1
7
- 12 volts (with C6)
8
3.3 volts +S
8
LCOM
8
Ground (with A1
and A5)
The table shows the pinout of the power connections on the power supply.
Pin
Circuit
AC Input Power
22
C (bottom row)
Pin
Circuit
6
DC return 5 volts (with # 7)
1
AC in Line 1
7
DC return 5 volts (with # 6)
2
AC in Line 2
8
DC return 3.3 volts
3
AC in safety ground
9
DC out +3.3 volts
Power Supply DC Output Power
10
DC return 12 volts
4
DC out +5 volts (with # 5)
11
DC out +12 volts
5
DC out +5 volts (with # 4)
55xx Series Chassis
Technical Reference Manual
Power Components
Figure 17
Power Sharing — DC Backplane (left) and Power/Signal Connectors (Right)
A8
A1
B1
C1
B8
Communication
Block
1
2
Inputs
Technical Reference Manual
3
4
5
6
7
C8
8 9 10 11
Power Supply Outputs
55xx Series Chassis
23
Power Components
Drive Power Cables
Overview
This section shows the power wire lists for the Media Cage and SCA Cage drives.
SCA Cage
Power Cable
The table shows the wire list for the SCA Cage.
Wire Number
Media Cage
Power Cable
The table shows the wire list for the Media Cage
Wire Number
24
55xx Series Chassis
Technical Reference Manual
Power Components
Figure 18
SCA and Media Cage Power Cables
J8
J4
J5
J6
J3
J7
J11
J10
9
16
1
8
7
1
J12
2
1
8
J3
1
14
J7
3
2
4
1. J3 Powers the SCA Cage
and pinout diagram
Technical Reference Manual
2. J7 Powers the Drives in
the Media Cage and pinout
diagram
55xx Series Chassis
3. SCA Power Cable
4. Media Cage Drives power
Cable
25
Power Components
Signals to the Front Panel Display
Overview
This section shows the signal connection between J8, J9 and J11.
J11 34 Pins,
J9 96 Pins and
J11 40 Pins
The table shows the pinout of the signals form the 15” Xtended Xpress ® Baseboard
connector “Display.” These signals are routed in J11 to the DC Power Distribution
Backplane and into the 96-pin J9 connector to the Alarm Board. The 34-pin “Display”
signals are routed with Alarm Board-sensed signals through the 40-pin cable in J8.
In passive backplane units, the signals generated by the Alarm Board are the only
signals sent to the Front Panel Display through J8. J11 is not used. The table shows
“Display” signals J11.
26
55xx Series Chassis
Technical Reference Manual
Power Components
Figure 19
Front
Panel
Display
Display-Alarm Board Connections; J11, J9 and J8
40-Pin
“Display” 34-Pin
J9
96-Pin
Alarm BoardSensed Signals
DB-9
Alarm Board
J9
DC Power Distribution Backplane
J11
J11
34-Pin J8
40-Pin
15” Xtended Xpress ® Baseboard
Signal Connection on the
DC Power Distribution Backplane
Technical Reference Manual
55xx Series Chassis
27
Power Components
Power to the Baseboard/Passive Backplane
Overview
This section shows the power connections on the DC Power Distribution Backplane for
the baseboard or passive backplane.
Figure 20
Baseboard/Passive Backplane Power; J6 and J5
1
2
3
1
9
24
13
10
18
12
1
J5
J6
1. J6 power for the baseboard or
passive backplane
2. J5 power for the baseboard or
passive backplane
28
3. Cables route through the passthrough
55xx Series Chassis
Technical Reference Manual
DC Power Components
This chapter describes the DC Power Supplies, the DC Power Entry Assembly
and the power wiring.
The SP5500 is AC only. The 55xx is available in -48 volt versions.
Similar DC and AC
Supply Exteriors
The DC and AC power supplies have very similar exteriors.
!
Technical Reference Manual
The AC and DC Power Supplies have the same outer constructions. The
55xx-48 will not operate with an AC power supply. The 55xx will not operate
with -48 VDC Power Supplies. Damage to the equipment may occur by
installing the wrong power supply(s) in the chassis.
55xx Series Chassis
29
DC Power Components
-48 Volt Information
Overview
This section contains information about the -48 volt power subsystem.
Specifications
This DC Power Supply outputs these voltages and amperages:
• +5 V, 50 A
• +12 V, 8 A
• -12 V, 0.75 A.
One Supply
Required
One DC power supply can operate the entire fully loaded 55xx-48 system. The power
supply for a one supply configuration is installed in the upper, not lower bay.
Nominal -48
volts
The DC Power Supply has a nominal -48 volt input which is rated between 36 -72VDC.
20 Ampere
Circuit
Breakers
The 55xx-48 nominal -48 volt power input has a 20 ampere fuse. The 55xx-48 positive
lead is normally tied to ground at the input power source. The 55xx-48 power input
assembly has power inputs for two power sources. Each power input has a single-pole
circuit breaker.
Combined
Current
The -48 volt inputs from external power source 1 and 2 are wired together after the
circuit breakers. The positive inputs from external power source 1 and 2 are also wired
together after the circuit breakers. DC power is available to both power supplies from
the combined -48 volt current and combined positive current from the external sources.
DC Power
Entry Wiring
The illustrations below and on the opposing page show the wiring of the DC Power
Entry Harness.
30
55xx Series Chassis
Technical Reference Manual
DC Power Components
Figure 21
DC Power Harness Connection J4 on DC Power Distribution Backplane
-48 Volt Power Entry Assembly
-48 IN1
IN1
External
Power
Source 1
+ IN1
Circuit
Breaker
IN 1
-48 Volts
Ground
External
Power
Source 2
-48 IN2
IN2
+ IN2
J4
DC Power
Distribution
Backplane
+ Nominal
Circuit
Breaker
IN 2
GND
DC Power
Entry Harness
From the Power
Entry Assembly
-48 Volts(Black)
Input Connection
on the DC Power
Distribution Backplane
4
Ground (Green)
4
+ Nominal (Blue or Orange)
Wire Number
Technical Reference Manual
55xx Series Chassis
31
DC Power Components
DC Power Entry Harness
Overview
This section shows the power harness for the 55xx-48.
NOTE: The DC power has been OR’ed (-48 Volt lines combine and + Nominal lines
combined) before the power reaches this harness.
Wire List
32
The table below identifies the wires in the DC Power Entry Harness.
55xx Series Chassis
Technical Reference Manual
DC Power Components
Figure 22
DC Power Entry Harness
E9
E10
E11
E12
GND
GND
Technical Reference Manual
55xx Series Chassis
33
DC Power Components
DC Power Supply Pinouts
Overview
This section describes the wire list for the communications block and the power pins of
the DC Power Supply.
Signal Block
Connection
The block of 24 pins (8 columns, 3 rows) is between the three (3) DC Power Input Pins
and the eight (8) DC Output Power Pins
A (top row)
B Comm (middle)
Pin
Circuit
Pin
A1
Ground (with A5 and C8)
B1
A2
5 volts SH
A3
Pin
Circuit
ENAB
C1
- Return (with C2 and C3)
B2
12 volts SH
C2
- Return (with C1 and C3)
5 volts -S
B3
Not used
C3
- Return (with C1 and C2)
A4
5 volts +S
B4
Not used
C4
- 5 volts (with C5)
A5
Ground (with A1 and C8)
B5
Not used
C5
- 5 volts (with C4)
A6
Not used
B6
Power OK 2
C6
- 12 volts (with C7)
A7
Not used
B7
Power OK 1
C7
- 12 volts (with C6)
A8
Not used
B8
LCOM
C8
Ground (with A1 and A5)
Power Pins
The table shows the power pins of the power supply.
DC Inputs
Pin
34
Circuit
C (bottom row)
Circuit
DC Outputs
Pin
Circuit
DC Output
Pin
Circuit
1
DC Nominal -48 Volts
4
DC out +5 volts (with # 5)
8
Not used
2
DC positive (+)
5
DC out +5 volts (with # 4)
9
Not used
3
DC in safety ground
6
DC return 5 volts (with # 7)
10
DC return 12 volts
7
DC return 5 volts (with # 6)
11
DC out +12 volts
55xx Series Chassis
Technical Reference Manual
DC Power Components
Figure 23
Power Supply Pins and Communication Block
A8
A1
B1
C1
B8
Communication
Block
1
2
Inputs
Technical Reference Manual
3
4
5
6
7
C8
8 9 10 11
Power Supply Outputs
55xx Series Chassis
35
DC Power Components
DC Breakers
Overview
This section describers the two circuit breakers on the DC Power Entry Assembly.
Figure 24
CB1 Controls IN1 and CB2 Controls IN2
2
3
1
4
1. Circuit Breaker 1
2. Power Input 1 controlled by Circuit
Breaker 1
3. Circuit Breaker 2
4. Power Input 2 controller by Circuit
Breaker 2
5. Grounding Studs
5
Always switch OFF (0) both breakers CB1 and CB2 before:
• Opening the top cover to work on the components in the chassis.
• Working inside the chassis on the components in the DC Power Entry
Area.
• Working around the DC Power Distribution Backplane.
DC power enters the system through IN1 and IN2 and is combined in the DC
Power Entry Assembly for the J4 connector. The system can still be powered
if both IN1 and IN2 are connected and only one breaker is OFF (0).
36
55xx Series Chassis
Technical Reference Manual
Harness and Cables
This chapter shows the power harness which connects the DC power backplane
to the passive backplane or baseboard for the chassis.
The harnesses describes are for these chassises.
•
•
•
•
•
Technical Reference Manual
SP5500
5520P
5512PE
5518P
5518SP
55xx Series Chassis
37
Harness and Cables
SP5500 Baseboard Power Harness
Overview
This section describes the SP5500 baseboard power harness.
Wire Lists
The tables below show the color, signal and connection points of the wires in the
SP5500 baseboard power harness.
38
55xx Series Chassis
Technical Reference Manual
Harness and Cables
Figure 25
SP5500 Baseboard Power Harness
1
2
3
4
7
5
7
Enlarged View of the
Xtended Xpress ® Baseboard
Power Connections
6
1. PS3 Power Connection
from Cable J5
2. PS4 Power Connection
from Cable J5
3. PS1 Power Connection
from Cable J5
Technical Reference Manual
4. PS5 Power Connection
from Cable J6
5. PS2 (lowest in view) —
J5 Power Cable runs
into the pass-through
to the DC Power
Distribution Backplane
55xx Series Chassis
6. Cable J6 connecting to
PS5
7. Cable J5 Connecting to
PS1, 2, 3, and 4.
39
Harness and Cables
5520P Passive Backplane Power Harness
Overview
This section shows the wire list, power harness and power connections for the 16 ISA
slot / 1 CPU slot and 3 PCI slot Passive Backplane.
Wire List
The table shows the color, signal and connections for the 16/1/3 Passive Backplane
Power Harness.
40
55xx Series Chassis
Technical Reference Manual
Harness and Cables
Figure 26
5520P Passive Backplane Power Harness
1
2
3
2 3 2 3
4
2
3 2
3
2
6
5
6
7
1. 5520P Passive Backplane
Power Harness
2. Ground
3. +5 Volts
Technical Reference Manual
4. External Power Source
Connector (12pins)
5. +12 Volts
55xx Series Chassis
6. +3.3 Volts (Not available
from AC or DC Power
Supply)
7. 16/1/3 ISA/PCI Passive
41
Harness and Cables
5512PE Passive Backplane Power Harness
Overview
This section describes the power harness for the 8 ISA/EISA slot, 1 SBC slot, and 3 PCI
slot Passive Backplane.
Wire List
The table shows the color, signal and connections for the wires in the power harness.
Note:+3.3 Volts Not available from AC or DC Power Supply.
42
55xx Series Chassis
Technical Reference Manual
Harness and Cables
Figure 27
5512PE Passive Backplane Power Harness
1
2
3
1. 3.3 Volt Power
Technical Reference Manual
2. Power Header
55xx Series Chassis
3. Power Header
43
Harness and Cables
5518SP Split Passive Backplane Power Harness
Overview
This section describes the power harness for the split passive backplane which support
two computer consisting of 5 ISA slots, 1 SBC slot and 3 PCI slots each.
Wire List
This table shows the wire list, color and connections for the 5518SP Passive Backplane
Power Harness.
Note:+3.3 Volts Not available from AC or DC Power Supply.
B
A
44
55xx Series Chassis
Technical Reference Manual
Harness and Cables
Figure 28
5518SP Passive Backplane Power Harness
1
Pin 1
10
9
18
1
9
13
24
2
3
4 5
6
7
1. J6 on the DC Power
Distribution Backplane
2. J5 on the DC Power
Distribution Backplane
3. Black wire, E1, ground
for PC 2
4. Red wire, E2, +5 volt for
PC 2
5. Two black wires, E3,
ground for PC 2
Technical Reference Manual
8
9
24
12
13
Pin 1
10 11 12
6. Two gray wires, E4, +3.3
volt for PC 2 (not
available from Ac or DC
power supplies).
7. J4, connector for PC 2. 8.
J3, connector for PC 1.
8. Black wire, E5, ground
for PC 1
9. Red wire, E6, +5 volt
power connector for PC
1
10. Two black wires, E7,
ground for PC 1
55xx Series Chassis
11. Two red wires, E8, 3.3
volt power for PC 1 (not
available from AC or
DC power supplies)
12. J1, 18-pin power
connector from the DC
Power Distribution
Backplane
J2, 24 pin power connector
from the DC Power
Distribution Backplane
45
Harness and Cables
5518P Passive Backplane Power Harness
Overview
This section shows the connections and signals of the power harness for the 11 ISA slot
/ 1 SBC slot and 6 PCI slots passive backplane.
Figure 29
5518P Passive Backplane Power Harness
1
2
1
2
1. Ground
2. + 5 Volts
46
1
2
3
1
2
1
2
1
3. External Power Connector
4. +12 Volts
55xx Series Chassis
4
5
5
5. + 3.3 Volts (not available
with AC or DC power
supplies)
Technical Reference Manual
55xxSP Components
This chapter shows the cables, blank panels and drive cages for the two drive
options available for the split passive backplane chassis, 55xxSP.
A dual computer chassis, a 55xxSP, contains two separate computers. Though the
two computers receive power and cooling from the same subsystems, the
processors, add-in boards and media devices are not shared.
Topics covered are these:
•
•
•
•
•
Technical Reference Manual
The Two Media Cage Model
The SCA Cage and Media Cage Model
Power Cabling for both models
Keyboard and Reset Button adaptations for a split backplane
Adapter Plates and Unique Cables
55xx Series Chassis
47
55xxSP Components
Power Cables for Two Media Cages
Overview
This section shows the power cables for the Two Media Cage.
Figure 30
55xxSP Power Cable Routing
SBC
SBC
PC 2
1
PC 1
44
22
33
1. J3 16-pin (not 14-pin) Media Cage
Power Cable
2. J7 14-pin Media Cage Power Cable
48
3. Media Cages (same metal frame)
4. Adapter Plate with keyboard
Connector and Reset Button for PC2
(Left)
55xx Series Chassis
Technical Reference Manual
55xxSP Components
Keyboards and Resets for Two Media Cages
Overview
This section shows the front and rear keyboard connections and the reset buttons.
Figure 31
55xxSP Keyboard Connections, Pinouts, Wiring and the Reset Buttons
3
1
Black
3
Green
1
GROUND
White
4
KBD DATA
Red
5
+5 VDC
Brown
2
KBD RESET
5
2
4
KBD CLOCK
11
22
SBC
SBC
44
PC 2
37
PC 1
55
4
4
55
Technical Reference Manual
55xx Series Chassis
1. Keyboard Connector
and Wiring Diagram
2. Pre-installed Rear keyboard
Connectors
3. SBC Connector for Front
Keyboard/Reset Button
4. Cable Pass-Through
5. Keyboard/Reset Button
Combined Cable
49
55xxSP Components
Media Cage Adapter and Combined Cable
Overview
This section shows the components unique to the Two Media Cages.
Figure 32
55xxSP Media Cage Keyboard Connector and Reset Button Adapter
1
5
2
4
3
13
4
6
12
11
BLUE
GREEN
SW1
J1
C1
10
3
5
J2
2
4
1
BLUE
KBD
BLACK
GREEN
KBD
WHITE
RED
KBD
BROWN
C2
8
5
7
4
2
6
8
J3
BLACK
3
GREEN
1
WHITE
4
RED
5
BROWN
2
7
9
FERRITE BEADS
1. PC1 Keyboard Connector
2. Screw (6-32 x 5/16”)
3. PC1 Reset Button
4. Media Cage Mounting
Hole
50
5. Keyboard Mounting Hole
with Two Screw Holes
6. Reset Button Hole
7. J3 is the Connector for the
Rear Keyboard Cable
8. SBC Connector
55xx Series Chassis
9. Front Keyboard Pinout
(Same as Rear Keyboard)
10. Reset Button Wires
11. PC2 Reset Button
12. PC2 Keyboard Connector
13. Media Cage Adapter
Technical Reference Manual
55xxSP Components
55xxSP Cables
Overview
This section shows two of the cables used in the 55xxSP.
Figure 33
55xxSP Cables
2
1
2
4
3
P1
Pin 1
34 33
5
P2
2 1
2
1
33
34
33
34
11
8
10
9
1. P1 Connector (3.5” Floppy
Diskette Drive)
2. Red Stripe (Pin 1) of the
Dual Floppy Cable
3. P2 Connector
4. Single Board Computer
Connector
Technical Reference Manual
5. The Same Connector as #
4. View Rotated 90″
6. Connect # 7. View Rotated
90″
7. Connector which attaches
to a Rear keyboard Cable
55xx Series Chassis
7
6
8. Single Board Computer
Connector for the
Combined Cable.
Note: Both the Computer
PC1 and PC2 have this
cable though the length
may be different for the
SCA Cage.
9. Front Panel Keyboard
Connector
10. Reset Button
11. Floppy Cable Twist
51
55xxSP Components
Power Cables for the SCA and Media Cage
Overview
This section shows the power cables for the SCA Cage and Media Cage.
Figure 34
55xxSP Power Cables for the SCA and Media Cages
SBC
11
SBC
PC 2
PC 1
22
4
33
1. 16-pin SCA Cage Power Cable
2. 14-pin for Media Cage Drives
3. Adapter for 3.5” Floppy Diskette
Drive
4. SCA Cage Adapter Plate for PC2
Keyboard and Reset Button — Can
also be installed in SCA Slot 0 (Left)
52
55xx Series Chassis
Technical Reference Manual
55xxSP Components
Keyboards and Resets for the SCA and Media Cages
Overview
This section shows the keyboard and reset cable routing for the SCA and Media Cages.
Figure 35
55xxSP Keyboard and Reset Cable Routing.
33
11
Black
Black 33 K80
KBD
KBDCLOCK
K80
CLOCK
Green
Green 11 GROUND
GROUND
White
White 44 K80
KBD
KBD
K80DATA
DATA
Red
Red 55 +5
+5VOC
VOC
55
22
44
Brown
Brown 22 K80
KBD
KBDRESET
K80
RESET
11
11
22
SBC
4
4
SBC
PC 2
3
PC 1
44
5
Technical Reference Manual
55xx Series Chassis
1. Rear Keyboard Pinout
(Same as Front)
2. Rear Keyboard Connectors
3. Single Board Computer Connectors
for Combined Cables
4. Cable Pass-Through
5. Front Keyboard Connector and Reset
Buttons for PC1 and PC 2
53
55xxSP Components
Notes:
54
55xx Series Chassis
Technical Reference Manual
Alarm Board Module
The Alarm Board receives error messages and clear error messages from the
components inside the chassis. This chapter describes those messages, where the
Alarm Board sends them. Topics covered are these:
•
•
•
•
•
•
•
Technical Reference Manual
Alarm Board Features
Alarm Messages Displayed
Alarm Messages Printed
Serial Connector
Alarm Board Connection to the DC Power Distribution Backplane
Jumpers on the Alarm Board
Alarm Board Operating Characteristics
55xx Series Chassis
55
Alarm Board Module
Alarm Board Features
Overview
This section discusses the features of the Alarm Board Module.
4-way Alarm
Board
response to
error
conditions
The Alarm Board responds to an error conditions in the following ways.
1. The alarm relay activates whenever an error is presented to the Alarm Board.
2. The Alarm Board displays the error message on the Front Panel Display. The
display can cycle between error messages for multiple error conditions.
3. The Alarm Board sends a serial message for each error detected once out through
the serial port.
4. The Alarm board sounds an audible alarm when any error occurs and continues to
sound the alarm until all error conditions are corrected.
Note: There is no provision for silencing the audible alarm except by correcting the
error condition.
Clearing
Alarms
The Alarm board sends a “clear” message when an error is cleared. The Alarm Board
sends and displays a “SYSTEM NORMAL” message when going from one or more
errors to a state of no errors.
A passive
monitor
The Alarm Board does poll any other components. The Alarm Boards receives a good/
bad signal from the monitored modules and sends that signal once out the serial port on
the Alarm Board rear panel. These are the errors messages generated by the Alarm
Board in response to the bad message of over-temperature or a failing module.
•
•
•
•
56
Over-temperature error
CPU fan error
CPU power error
BIOS detected error (Intel Xtended Xpress ® Baseboard only)
55xx Series Chassis
Technical Reference Manual
Alarm Board Module
Front Panel Displayed Alarm Messages
Overview
The following are messages sent by the Alarm Board to the front panel display (the
vacuum fluorescent character display.
Messages Displayed by the Alarm Board
Message
Description
OVER TEMP 1
The chassis ambient temperature exceeds a level set by....
CPU 0 FAN ERR 1
or
CPU 1 FAN ERR 1
Cooling fan 0 has failed and sent an error message to the Alarm
Board.
• One of the two fans in the assembly has failed and the other fan
spins up to move the same amount of air. The error condition does
still exist with this automatic response. Or...
• Both fans may have failed in the dual fan assembly. In this case,
the air cooling the chassis has been reduced by 30%.
CPU 1 PWR ERR 1
The Alarm Board received an error message from the power supply
1 (the upper supply). The secondary power output has exceeded the
voltage/amperage tolerances for the supply.
CPU 2 PWR ERR 1
The Alarm Board received an error message from the power supply
2 (the lower supply). The secondary power output has exceeded the
voltage/amperage tolerances for the supply.
XPRESS ERROR "BIOS Error
Message"
The Intel Xtended Xpress ® sends an error code message to the
Alarm Board. The Alarm Board forwards the message in this form.
For Xtended Xpress ® systems, see the SP5500 user’s manual for
the Intel error codes.
SYSTEM NORMAL
The system is operating with no error conditions.
Technical Reference Manual
55xx Series Chassis
57
Alarm Board Module
Printed Alarm Messages
Overview
This section lists the printed Alarm Board Messages.
Messages Generated for print by the Alarm Board
Message
58
Description
OVER TEMP
The chassis ambient temperature exceeds a level set by....
OVER TEMP
NORMAL
The chassis operates under the temperature ceiling recommended
for the unit.
CPU 0 FAN ERR
Cooling fan 0 has failed and sent an error message to the Alarm
Board.
One of the two Cooling Fans in the dual assembly has failed and the
other fan spins up to move the same amount of air. The error
condition does still exist with this automatic response. Or...
Both Cooling Fans may have failed in the dual fan assembly. In this
case, the air cooling the chassis has been reduced by 30%.
CPU 0 FAN
NORMAL
Cooling fan 0 now operates normally and has sent a “clear” message
the Alarm Board.
CPU 1 FAN ERR
Cooling Fan 1 has failed and sent an error message to the Alarm
Board.
One of the two Cooling Fans in the dual assembly has failed and the
other fan spins up to move the same amount of air. The error
condition does still exist with this automatic response.
Both Cooling Fans may have failed in the dual fan assembly. In this
case, the air cooling the chassis has been reduced by 30%.
CPU 1 FAN
NORMAL
Cooling fan 1 now operates normally and has sent a “clear” message
the Alarm Board.
CPU O PWR ERR
The Alarm Board received an error message from the power supply
0 (the upper supply). The secondary power output has exceeded the
voltage/amperage tolerances for the supply.
CPU 0 PWR
NORMAL
The secondary power output form power supply 0 (the upper supply)
is now within voltage/amperage tolerances. The Alarm Board
receives and transmits a “clear” (CPU 0 PWR error) message
CPU 1 PWR ERR
The Alarm Board received an error message from the power supply
1 (the lower supply). The secondary power output has exceeded the
voltage/amperage tolerances for the supply.
CPU 1 PWR
NORMAL
The secondary power output form power supply 1 (the lover supply)
is now within voltage/amperage tolerances. The Alarm Board
receives and transmits a “clear” (CPU 1 PWR error) message
55xx Series Chassis
Technical Reference Manual
Alarm Board Module
Messages Generated for print by the Alarm Board
Message
Description
XPRESS ERROR "BIOS Error
Message "
The Intel Xtended Xpress ® sent an error code message to the
Alarm Board. The Alarm Board forwards the message in this form.
For Xtended Xpress ® systems, see the SP5500 user’s manual for
the Intel error codes.
XPRESS ERR CLEAR
SYSTEM NORMAL
The Intel Xtended Xpress ® has sent a “clear” message for the error
condition or conditions it reported earlier.
Technical Reference Manual
55xx Series Chassis
59
Alarm Board Module
Serial Connector — External Maintenance Port
Overview
This section describes the serial connector on the module rear plate.
Serial 9-pin
port on rear
panel
The Alarm Board communications are unidirectional. The serial messages are produced
as conditions present themselves. The serial message is not repeated. The messages are
simple ASCII text messages with no protocol. The messages are sent out at 19.2K
Baud, no parity, 8 bits, 1 stop bit The connector pinout is similar to a standard PC 9-pin
serial with the addition of the relay contacts.
Figure 36
Alarm Board Rear Panel
Serial 9-pin port on the rear panel
of the Alarm Board
Pin 5
Pin
Pin 1
60
Pin 9
Description
1
Alarm Relay Normally Open
2
Receive data from Remote (RS-232)
3
Transmit data to Remote (RS-232)
4
N.C
5
Ground
6
Alarm Relay Normally Closed
7
N.C.
8
Alarm Relay Common
9
N.C.
55xx Series Chassis
Technical Reference Manual
Alarm Board Module
J9 96-Pin Connector
Overview
This section describes the 96-pin connector on the rear of the DC Power Distribution
Backplane which connects to the Alarm Board Module.
Power
Distribution
Connector
The table and illustration below shows the connector and pinout for the interface
between the Alarm Board and the chassis Power Distribution Board (power supply
side). Connector J11 passes though the Power Distribution Backplane to bring signals
and error messages from the “Front Panel” header on the 15“ Xtended Xpress ®
Baseboard. For passive backplane units, this connector is not used and CPU error codes
cannot reach the Alarm Board.
Figure 37
Pinout and Illustration of the Alarm Board Connection
33C
33A
1C
1A
Technical Reference Manual
55xx Series Chassis
61
Alarm Board Module
Jumpers on the Alarm board
Overview
This section describes the features enabled or disabled by setting jumpers on the board.
Setting
Jumpers on
the Alarm
Board
The jumpers on the Alarm Board enable/disable sensing and display functions. The
default setting enables the sensing or display. The default setting is with the jumper
removed. These are the functions controlled by the jumpers
JP6: Do Not
Change
The Alarm Board was originally designed to interface with the Intel Xtended Xpress ®
Baseboard. Leave the jumper installed over both pins to disable the alarm for an open
door on the Intel chassis. This door does not exist on the Texas Micro chassis. Leave the
jumper installed to disable the alarm anyway.
Disarming
“No Power” in
Bottom Bay
Jumper Block 1, JP5 — Jumper both pins to instruct the Alarm Board to ignore that the
“no power signal” coming from the bottom power supply. Jumper both pins when one
power supply is used and install that supply in the support power bay.
Ensure that both pins are NOT jumpered to allow the alarm board to sense power status
from both upper and lower power supply bays.
JP4
Jumper Block 1, JP4 — Not used.
Display or No
Display
Jumper Block 1, JP3 Jumper both pins to configure the Alarm Board to send alarm
signals to the full array of LEDs. If this jumper is not installed over both pins, the
Alarm Board will not send the correct format of signals to the front panel display.
To instruct the Alarm Board to send alarm messages, alarm corrected messages, and
“System Normal” messages to the LCD on the front panel, jumper both pins of JP3.
Factory
Feature Test
62
Switch Bank 2 Testing ports for alarm failures.
55xx Series Chassis
Technical Reference Manual
Alarm Board Module
Figure 38
Jumper Block and Switch on the Alarm Board
1
2
1. Jumper Block
Technical Reference Manual
55xx Series Chassis
2. Switch Block — Do Not
Change Settings.
63
Alarm Board Module
Alarm Board Operating Characteristics
Overview
This section discusses the Alarm Board characteristics; what the board can and cannot
do.
Alarm Board
and message
system
characteristics
The serial channel is external to the chassis only. Any connection to the host processor
in the chassis must be accomplished by separate wiring. The Alarm Board does not
connect to the host computer except for "snooping the Intel Xtended Xpress ® boards
LCD display." These are characteristics of the Alarm Board and alarm message system:
64
•
The Alarm Board cannot reset the CPU.
•
An operator at a remote site cannot reset the CPU through the Alarm Board.
•
The front panel display is not accessible to the user in any way. The message
displayed on the front panel LCD cannot be changed from the messages stated
earlier in this chapter.
•
If an audible alarm is connected to the Alarm Board relays, that alarm will sound
until all error conditions are cleared. The Alarm Board does not have a feature to
silence the audible alarm before all error conditions are cleared.
55xx Series Chassis
Technical Reference Manual
Technical Topics
This chapter discusses these topics:
•
•
•
•
•
•
•
Technical Reference Manual
PCI-IRQ Relations
PCI Rotation
PCI Access to the CPU
Resolving PCI-IRQ Conflicts
BIOS: Auto/Manual PCI-IRQ Assignment
SCSI Strategies
Hot-Swaps, RAID and SCA
55xx Series Chassis
65
Technical Data
PCI-IRQ Interaction
Overview
The PCI bus provides four interrupt lines for add-in devices to use. The PCI interrupt
signals pass through a translation device to the IBM-PC compatible part of the
computer. This document refers to the translation device as a PCI chip set Texas Micro
improves interrupt access to the processor by rotating the PCI interrupt line traces on a
slot by slot basis to the single board computer (SBC). This section and those following
also discuss details of the interrupt process to improve troubleshooting.
PCI Chip Set
All IBM-PC comparable computers with a PCI bus have a PCI chip set that translates
the PCI interrupts into IRQs (interrupt requests) to the processor chip.
• How the PCI chip set function is not defined by the PCI 2.1 specification. The PCI
bus is a processor independent interface. As such, the PCI specification allows the
developer of the computer system to best determine how to handle PCI interrupts.
• The PCI interrupts and PC IRQ lines are not directly electrically compatable.The
PCI chip set transmits the PCI interrupts into ISA IRQs.
• The CMOS setup controls the PCI interrupt to ISA IRQ translation (mapping).
Note: The Texas Micro Inc. PCI chip set follows the PCI SIG and PICMG
specifications for PCI interrupt rotation.
PCI Interrupts
The following are characteristics of the PCI Interrupt Lines.
• There are four PCI Interrupt Lines: INTA, INTB, INTC and INTD.
Note: On Texas Micro products, the PCI interrupts are called either INTA-D or
Line 1-4. INTA = Line 1, INTB = Line 2, INTC = Line 3 and INTD = Line 4.
• Each PCI device can possibly use up to all 4 PCI interrupts. Most PCI devices will
only use one interrupt.
• PCI Interrupt Lines are sharable. Several PCI devices can signal for service on the
same interrupt line at the same time.
Note: The PCI specification states that PCI interrupts are sharable.
• Any PCI device can initiate an interrupt any time during the clock cycle.
Note: The CPU modules on the 15” Xtended Xpress Baseboard ™ are high speed
interfaces on a Intel ® proprietary bus. The memory modules have nothing to do with
the PCI bus. The processor boards include PCI slots to communicate with the PCI
device in slots on the baseboard.
66
55xx Series Chassis
Technical Reference Manual
Technical Data
ISA-IRQ
(Interrupt
Requests)
The following are characteristics of ISA-IRQs.
• An IRQ signals the CPU to pause what it is doing and execute an interrupt handler
routine to service the interrupt.
• IRQs can be blocked so that the CPU continues its current activity. Generally
speaking, IRQs are blocked for only very small periods of time because they
represent request for essential services.
Interrupt
Controller
The interrupt controller feeds the CPU the highest priority ISA IRQ. When the
processor has serviced this interrupt, if there is any other interrupt pending, the interrupt
controller interrupts the CPU again.
Technical Reference Manual
55xx Series Chassis
67
Technical Data
PCI Interrupt Rotation
Overview
This section describes PCI interrupt rotation used by Texas Micro Inc. on the PCI slots.
Texas Micro
PCI Interrupt
Rotation
The following information provide the basis for PCI interrupt rotation.
Rotation
Scheme
without PCIPCI Bridges
By PCI specification, a PCI device that only needs on interrupt uses PCI INTA. If the
device requires a second interrupt for service, the interrupt uses PCI INTB. More
concurrent interrupts from the device use PCI INTC then PCI INTD. If all the PCI
devices issue interrupts at once, PCI INTA line is constantly occupied. To increase
throughput, Texas Micro Inc. rotates the hardwired traces as described below. Interrupt
rotation:
• PICMG defines how the PCI interrupts are rotated on PCI Bus 0 for passive
backplane designs (like Texas Micro Inc. SBCs).
Note: PICMG is a group of SBC manufacturers that have gotten together to define
how PCI interrupts are rotated on passive backplanes to allow for interoperabiltiy
between different manufacturers.
• The PCI specifications does not define how PCI interrupts are rotated on PCI Bus 0,
but does specific how the PCI interrupts are rotated behind a PCI-PCI bridge chip.
• Texas Micro Inc. produces passive backplanes that are compliant with the PICMG
and PCI specifications.
• PCI INTA is connected to the Adaptec ® SCSI controller on SBCs which have an
on-board SCSI controller.
Note: This is a Texas Micro Inc. convention.
• On the first PCI slot, the PCI interrupts are wired as B/C/D/A.
• On the second PCI slot, the PCI interrupts are wired as C/D/A/B.
• On the third PCI slot before the PCI-PCI bridge chip, the PCI interrupts are wired as
D/A/B/C.
PICMG PCI
Rotation
Specification
68
As far as the add-in PCI device is concerned, the PCI interrupt signals are INTA, B, C,
and D even though the actual wire trace to the PCI chip set may be C, D, A and B.
The PICMG specification resolves interrupt overcrowding. If all PCI add-in devices
issued interrupts as described in the PCI specification, INTA and INTB will be crowded
with interrupt requests and INTC and INTD rarely get used. According to the PICMG
PCI Interrupt Rotation Specification, passive backplane manufacturers lay out the PCI
Interrupt traces to the PCI slots in a rotating pattern. All four interrupt lines are used
more evenly. An interrupt’s wait at the PCI chip set for ISA IRQ service is shorter.
(Several PCI devices can request on the same PCI line, but only one interrupt from that
PCI line at a time can to the CPU for service.)
55xx Series Chassis
Technical Reference Manual
Technical Data
Bridge Chips
If there are PCI bridge chips on the backplane, the passive backplane must comply with
the PCI and PICMG specifications for a Texas Micro Inc. SBC to operate properly with
the PCI boards installed behind the PCI-PCI bridge(s).
Note: If the add-in PCI board is not specified as PCI 2.1 compliant, it may not function
behind a PCI-PCI bridge chip.
Figure 39
PCI Interrupt Rotation
Note: Diagram represents the BPCI-13 Passive Backplane.
CPU
D PCI-IRQ:
C PCI
B
Chip
A
Set
PCI Slot 2
PCI slot 1
Processor
1
2
B
C
D
A
A
B
C
D
PCI Slot 3
Note: Interrupts at the Slots are used by the PCI devices from top to bottom.
2
1
C
D
A
B
A
B
C
D
2
1
D
A
B
C
A
B
C
D
A
B
C
D
PCI Bus
1. The PCI Interrupt Lines as Received
by the PCI chip set. According to the
PICMG Specification Interrupt Line
Rotation Scheme
Technical Reference Manual
2. PCI Interrupts as Issued by the PCI
Device According to the PCI 2.1
Specification.
55xx Series Chassis
69
Technical Data
PCI Interrupt Access to the CPU
Overview
This section discusses the interrupt path to the CPU and describes how the PCI chip set
translates interrupt signals.
Simultaneous
Interrupts: One
IRQ Interrupt
Issued
Two PCI devices send the PCI chip set a interrupt request at the same time on the same
interrupt line, INTB. The PCI specification states that simultaneous interrupts are
allowed. More than one PCI device can generate an electrical impulse, an interrupt on
INTB. When the PCI chip set senses the INTB interrupt request, the PCI chip set will
generate an interrupt request on the ISA IRQ line mapped to INTB.
The interrupt goes to the PCI chip set to the CPU. The CPU may or may not halt what it
is doing to serve the interrupt. The CPU calls the interrupt driver to server the request.
When the device driver has serviced the PCI device, the driver instructs the device to
release the PCI interrupt. When the first PCI device releases the PCI INTB, the PCI
chip set issues another ISA IRQ for second PCI device which requires service (if one is
pending.)
Caution: Fast
Devices Can
Monopolize
PCI Interrupt
Lines
70
The danger of putting several devices on the same A, C, B or D PCI interrupt is that a
significantly faster device whose device driver loads after a slower device will be
served while the slower device according to the loading position of its drivers will not
be served.
If moving one of the PCI boards does not resolve the problem, determine the order that
the drivers are loaded. The problem may be in the PCI device driver or in the loading
procedure used by the operating system.
55xx Series Chassis
Technical Reference Manual
Technical Data
Figure 40
Central Processing Area, PCI chip set and Related Components
Single Board Computer or Central Processing Area
Central
Processing
Chip Set
Small chip set,
Junction to CPU
Video Data
PC IRQ paths
to/from CPU
On-Board
PCI SCSI
Controller
(Takes INTA)
PCI to IRQ
PCI Chip Set
Interrupt
Interpreter/
Gateway
ISA Bus to
Backplane/
Baseboard
Technical Reference Manual
On-Board
PCI
Ethernet
Controller
(Takes INTB)
PCI Video
Adapter (OnBoard or
Separate
Chip/
Board)
PCI Bus to
Backplane/
Baseboard
55xx Series Chassis
71
Technical Data
Resolving PCI-IRQ Conflicts
Overview
This section describes actions taken by some PCI devices that affect PCI-IRQ
assignment or add PCI devices to specific PCI Interrupt Lines.
PCI Overrides
IRQ interrupts
Assignments
A PCI Interrupt Line assignment to an IRQ line takes precedence over x86 devices
requiring the same IRQ. Some x86 devices require a specific IRQ hardwired in the
device.
Example
For example, a network board is hardwired to request IRQ 10. If the user or PCI BIOS
automatically assigns a PCI Interrupt Line to IRQ 10, the x86 network board cannot
send an interrupt to the processor for service. The PCI assignment overrides any other
assignment and instructs the PCI chip set to “ignores” ISA board-generated interrupt
requests for IRQ 10. Effectively, the network board is voiceless. In addition, if no PCI
device sends an interrupt through that PCI interrupt line, the IRQ is wasted. Some
devices, like VGA video boards, do not need to interrupt the processor to request
service.
On-board SCSI
Texas Micro Inc. single board computer which have on-board SCSI chips take PCI
INTA for SCSI interrupt.
PCI Video
Boards
PCI VGA video boards do not require an IRQ.
72
55xx Series Chassis
Technical Reference Manual
Technical Data
Exceptions
Overview
This section describes the know problems and unique aspects of BIOS and SBC.
Exception to
the PCI
dominance
rule
In the Phoenix PCI BIOS when the user enables the PS/2 mouse (IRQ12 default) and
IDE hard drive (IRQ14 default and possibly IRQ15). These also apply:
• The BIOS assigns these interrupts before assigning PCI interrupts to IRQ interrupts.
• An asterisk (*) reminds the user not to choose that selected IRQ for a PCI interrupt.
The asterisk appears on P5000HX and PV5000HX with BIOS 4.05A.
• Using the P5000HX and the PV5000HX SBCs if the user selects IRQ12 or IRQ14
for a PCI interrupt line (say, B), the BIOS appears to accept the user’s selection, but
the BIOS will “ignore” PCI interrupt requests from line B. The devices on PCI
interrupt Line B will not be served by the processor unless the operating system/
processor polls them for help requests — not likely.
PS/2 Mouse
(IRQ12) & IDE
Hard Drive
(IRQ14)
To avoid blocking out x86 devices with PCI assignments, find the required IRQs of the
x86 devices before setting the PCI assignments. Some Texas Micro Inc. single board
computers use specific IRQs to perform tasks. IRQ12 is for the PS/2 mouse port. Most
Texas Micro Inc. SBCs require IRQ14 for the IDE hard drive. (If the SBC supports a
second IDE controller on-board, IRQ 15 is taken for that second controller.)
Technical Reference Manual
55xx Series Chassis
73
Technical Data
Automatic/Manual PCI-IRQ Assignment
Overview
This sections shows the Texas Micro Inc. single board computers affected by automatic
or manual PCI-IRQ assignment in BIOS. PCI device availability on Texas Micro Inc.
passive Backplane is also displayed in a table.
Automatic/
Manual
These ar the single board computer with automatic/manual or manual interrupt links.
Texas Micro Inc. Single Board Computers: PCI-ISA IRQ Assignment in BIOS
Automatic as Default /
Selectable as Manual
P575 / P590 / P5120
P5000HX-WMB
P2000FX
Access to PCI /
ISA Devices
PF5000HX(-M)
PF5000HX2(-M)
P6000FX
Manual Assignment
P5000HX
PE5000HX
PV5000HX
PV5000HX(-M)
The tables describes access to PCI and ISA devices with different passive backplane.
To Install or OnBoard Features
74
Manual as Default / Auto
as Selectable
ISA
Passive
Backplane
ISA/PCI
Passive
Backplane
EISA/PCI
Passive
Backplane
15”
XXpress
Baseboard
Third-party PCI
Boards
No
Yes
Yes
Yes
On-Board (Texas
Micro SBC) PCI
Devices
Yes
Yes
Yes
Intel
Devices on
Baseboard
ISA Third-Party
Boards
Yes
Yes
Yes
Yes
ISA RAID Controller
Board
Yes
Yes
Yes
Yes
PCI RAID Controller
Board
No
Yes
Yes
Yes
55xx Series Chassis
Technical Reference Manual
Technical Data
SCSI Information
Overview
This section describes the SCSI systems in the SP5500 and 55xx.
SCSI
Characteristics
The following are characteristics of the SCSI devices, chains and buses.
• The SCSI bus must be terminated at both ends of the chain of SCSI devices.
• Each device on a SCSI bus must have a unique ID.
• The A and B bus connectors on the 15” Xtended Xpress ® Baseboard buses are
Fast/Wide SCSI-2.
• Fast/Wide SCSI-2 allows up to 15 unique SCSI ID’s.
• The highest ID numbered devices are serviced first on the SCSI bus.
• The SCSI booting device must be set to SCSI ID zero (0).
Note: IDE booting devices take precedence over SCSI Devices. A device on s
SCSI Bus A takes precedence over a booting device on SCSI Bus B. In the SP5500,
SCSI Bus A cables go to the Media Cage. SCSI Bus B cables go to the SCA Cage.
Unless the operating system and BIOS support booting from SCA Hard Drive ID 0
on Bus B, you can use either the IDE hard drive or the SCSI hard drive (if installed)
in the Media Cage for booting.
• At power ON, the computer loads SCSI BIOS before loading the operating system.
The SCSI BIOS polls the SCSI devices to gather their identifying information. The
computer displays the SCSI devices according to ID on the monitor.
Notes
The following are notes about the SCSI systems in SP5500 and 55xx.
• Up to 6 SCA Fast/Wide SCSI-2 hard drives fit into the SCA Cage.
• Nothing in the chassis precludes using a three device cable to connect three SCSI-2
devices in the Media Cage.
Technical Reference Manual
55xx Series Chassis
75
Technical Data
SCA Cage, Termination, and SCSI IDs
Overview
This section describes the SCA Cage.
SCA Cage
SCSI Specifics
The following describe the SCA Cage and SCSI termination.
• A Single Connector Architecture (SCA) 80-pin connector is used in the SCA Cage
to route all data, control signals, and power to a Fast/Wide SCSI-2 hard drive.
Single connector architecture is a connector style used for hot-pluggable drives.A
68-pin Fast/Wide connector on the back of the SCA backplane connects the SCA
Cage to the SCSI controller.
• The SCA Cage backplane has an on-board active (as opposed to a passive)
termination.
• The SCA Cage is terminated even if no hard SCSI SCA hard drives are install.
• Do not set the terminator jumper on SCSI SCA hard drives to “ON.” The SCA Cage
provides termination.
SCA Cage
Preset SCSI
IDs
The following describe the SCSI ID system in the SCA Cage.
• Do not set the SCSI ID jumpers on SCA hard drives to anything other than zero (0).
• The SCA backplane into has a hardwired SCSI ID preset for each slot.
• In the SCA Cage, the left slot is SCSI ID 0. The slot on the right is SCSI ID 5.
CAUTION: Always remove the three SCSI ID jumpers from the SCA SCSI hard
drive. With SCSI jumpers removed the hard drive is set ID zero (0). The SCA
slot determines the SCSI ID of the hard drive.
Binary SCSI ID
Addition
If the user sets anything other than zero (0) on the three SCSI ID jumpers on the hard
drive, an error may occur. The SCSI or RAID controller registers the binary sum of slot
binary bits and the hard drive binary bits. The binary bits add as shown in the
illustration on the following page.
Fast/Wide SCSI devices can have an ID of 0 to 15.
If two drives have the same binary sum ID, an error will occur.
Later when a drive is installed with the same combined binary ID, an error will occur.
Set the hard drive jumpers to zero (0) to avoid conflicts.
Controlling
SCSI ID
76
The user can manually set the ID of the SCSI controller to a number other than the
automatically assigned 7. Use the Adaptec ® setup utility to change this value.
55xx Series Chassis
Technical Reference Manual
Technical Data
Figure 41
SCSI ID OR’ed
Note: Binary Addition registers false ID number in the controller as shown below.
Figure 42
Hardwired binary bit
on the SCA slot
Binary bit set by hard
drive jumper
Resulting bit setting
seen by controller
ON
ON
ON
ON
OFF
ON
OFF
ON
ON
OFF
OFF
OFF
Hard Drive SCSI ID Jumpers— Preset SCSI ID on the SCA Slot
Hardwired to
SCSI ID O
Hardwired to
SCSI ID 5
Hard Drive SCSI
ID Jumpers
4 2 1
Binary Bit OR’ed
0 + 2 + 1 = ID 3 (jumper setting)
ID Hardwired on
SCSI Backplane + 4 + 0 + 1 = ID 5 (Backplane hardwire setting)
For Slot 5
4 + 2 + 1 = ID 7 (Combined SCSI ID
4 2 1
registered by controller)
Technical Reference Manual
55xx Series Chassis
77
Technical Data
Hot-Swapping Requirements
Overview
This section describes the requirements for hot-swapping in a RAID array for the 55xx
or SP5500.
Hot-Swapping
Requirements
RAID Plus Operating System Support Equal Hot-Swapping. For SP5500 and 55xx hotswapping SCA hard drives requires the following:
• The operating system and / or RAID controller must recognize that a new drive has
been installed (formatted or un-formatted)
Note: The operating system interacts with the RAID array through the controller
and considers the array to be a single volume. For example, the operating system
instructions the “RAID array” to save “X” to volume “24” The hard drive holding
volume 24 has been replaced with an un-formatted hard drive. The operating system
and RAID controller must handle the absence of volume 24 without having a fatal
error to the system.
• Many RAID controller allow hot-swapping. Some do not. Before purchasing a
RAID controller for the SP5500, 55xx or 55xx-48, or 55xxSP ensure that the
controller supports hot-swaps.
• The operating system must accept this new configuration without an error.
• The operating system to must allow the RAID controller to format and operate the
new SCA hard drive.
SCSI and
RAID Hard
Drive Support
These notes describe the support available in the SCSI devices for the SCSI or RAID
controller functions.
• The individual SCSI drives keep a record of the mapped locations of data and
accept controller commands for those blocks of data. The drive itself handles the
details of read and write functions.
Read the RAID or SCSI manufacturer’s user documentation. The manufacturer is the
best source for detailed information to help you operate or troubleshoot the controller.
78
55xx Series Chassis
Technical Reference Manual
Specification
This chapter presents the chassis specification.
Factor
Technical Reference Manual
Information
AC Power Input SP5500,
55xx, and 55xxSP
90-240 VAC @ 47-63 HZ
AC Power Supply
SP5500, 55xx, and
55xxSP
400 Watt (Autoswitching)
DC Power Output for AC
Models (SP5500, 55xx,
and 55xxSP)
+5 V @ 50.0 A
+12 V @ 8.0 / 12 Peak A
+3.3 V @ 15.0 A (SP5500 only, not on passive or split
passive backplane chassises)
-12 @ 1.0 A
-5 @ 0.5 A
DC Power Input:
55xx-48
Nominal -48 Volt Input @ 36-72 HZ
DC Power Supply: 55xx48
400 Watt (Autoswitching)
DC Power Output on AC
Models
+5 V @ 50.0 A
+12 V @ 8.0 A
-12 V, 0.75 A.
55xx Series Chassis
79
Specifications
Factor
80
Information
Dimensions
12.5’ H, 19” W, 19.25” D
317mmH, 482mmW, 489mmD
Construction
Heavy-gauge steel, zinc-plated
Weight
55 lbs. (24.75 kg), without peripherals or power
supplies
75 lbs. (34 kg) typical
Temperature
Operating: 0 to 45oC (32o to 113oF)
Non-Operating: -40o to 70oC (-40o to 158oF)
Humidity
Operating: 10% to 85%, Non-Condensing @ 45oC
Non-Operating: 0% to 95%, Non-Condensing @ 55oC
Shock
Operating: 10G max @ 11ms duration
Non-Operating: 40G @ 11ms duration
Vibration
Operating: 0.05G max @ 53-500 Hz
Non-Operating: 1.5G @ 53-500 Hz
Altitude
Operating: 0 to 10,000 ft. (3048 meters)
Non-Operating: 0 to 50,000 ft. (15,240 meters)
Acoustics
<48 dB (peripherals idle, @ 1m)
Static Discharge
Per EN50082-1
55xx Series Chassis
Technical Reference Manual