1
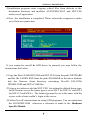
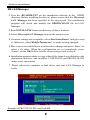
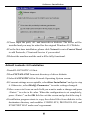
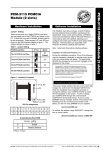
FPC-0102TX
Fast Ethernet PC Card
Introduction
REGULATORY STATEMENTS
FCC Certification
Part15, Class B
FCC ID: MQ4FE1KA
The United States Federal Communication Commission (FCC) and the Canadian
Department of Communications have established certain rules governing the use of
electronic equipment.
FCC Part 15 Registration
This device complies with Part 15 of FCC rules. Operation is subject to the following two
conditions:
1)This device may not cause harmful interface, and
2)This device must accept any interface received,
including interface that may cause undesired operation.
This equipment has been tested and found to comply
with the limits for a Class B digital device, pursuant to
Part 15 of the FCC Rules. These limits are designed to
provide reasonable protection against harmful
interference in a residential installation. This equipment
generates, uses and can radiate radio frequency energy,
and if not installed and used in accordance with the
instructions, may cause harmful interference to radio
communications. However, there is no guarantee that
interference will not occur in a particular installation. If
this equipment does cause harmful interference to radio
or television reception, which can be determined by
turning off and on, the user is encouraged to try to
correct the interference by one or more of the following
measures:
w
w
w
Reorient or relocate the receiving antenna.
Increase the distance between the
equipment and receiver.
Connect the equipment in to an outlet on a circuit
different from that to which the receiver is
connected.
Introduction
CONTENTS
INTRODUCTION .........................................................................................1
HARDWARE INSTALLATION.................................................................1
SOFTWARE INSTALLATION..................................................................1
Novell Netware ....................................................................................1
MS LAN Manager................................................................................5
Packet Driver .......................................................................................6
Windows for Workgroups 3.11.........................................................7
Windows NT 3.51.............................................................................. 10
Windows NT 4.0 ................................................................................ 10
Windows 95 Installation ................................................................. 11
Artisoft Lantastic 6.0 Installation ................................................. 12
IBM OS/2 Warp ................................................................................. 13
GENERAL INFORMATIONFEHLER! TEXTMARKE NICHT DEFINIERT.
NOTES FOR NDIS DRIVER ...............................................................1
NOTES FOR PACKET DRIVER.........................................................2
NOTES FOR WINDOWS FOR WORKGROUPS DRIVER...............2
QUESTIONS AND ANSWERS..................................................................1
SPECIFICATIONS .......................................................................................1
INTRODUCTION
ABOUT THIS MANUAL
This manual will explain how to install and use your FPC-0102TX Fast
Ethernet PC Card. The following guideline will help you through the
installation process.
How to install the Card and Connect it to network
à Chapter 1. Hardware Installation
How to install the network driver
à Chapter 2. Software Installation
How to do trouble shooting
à Chapter 4. Questions and Answers
Detail Specification
à Appendix A Specifications
SYSTEM REQUIREMENTS
•
•
•
•
•
An IBM compatible notebook computer with 386SX or faster processor
At least one type II PC Card socket
Drivers and utilities provided with this product
PCMCIA release 2.1 compliant Card Services and Socket Services
100Base-TX Fast Ethernet or 10BaseT Ethernet connectivity to your
local area network.
OPERATING ENVIORNMENTS
•
•
•
•
•
•
•
•
•
Novell Netware 3.x, 4.x
Microsoft LAN Manager
Packet Driver Applications
Microsoft Windows for Workgroups 3.11
Microsoft Windows 3.1
Microsoft Windows NT 3.51, NT 4.0
Windows 95
Lantastic 6.0
IBM OS/2 Warp Version 3
Introduction
CONTENTS IN THE PACKAGE
•
•
•
•
•
FPC-0102TX Fast Ethernet PC Card
Media coupler with single RJ-45 connector for 10BASE-T and
100BASE-TX network.
3.5” driver diskette
User’s Manual
Plastic protection case for base PC Card
Hardware installation
HARDWARE INSTALLATION
This chapter describes how to install the FPC-0102TX Fast Ethernet PC Card
in your notebook computer and connect it to network. It’s referred to “the PC
Card” in this manual.
The FPC-0102TX Fast Ethernet PC Card could be connected to either
100Mbps Fast Ethernet or 10Mbps Ethernet over unshielded twisted pair
(UTP) calbe. The FPC-0102TX Fast Ethernet PC Card have the ability
automatic sensing and operating on either speed without manual
recofiguration.
Please refer to Chapter.3 Software Installation on how to install network
drivers using menu driven installation utility.
Inserting the FPC-0102TX Fast Ethernet PC Card
1.Hold the FPC-0102TX Fast Ethernet PC Card with wide connector toward
the slot and the brand lable facing upward.
2.Insert the FPC-0102TX Fast Ethernet PC Card and push it firmly into the
bottom.
( Please see the figuer on the next page for reference)
Removing the FPC-0102TX Fast Ethernet PC Card
It’s quite different for various computer mechanical design. Please refer to the
PC Card removal instruction in the document for your notebook computer.
Hardware Installation
Connecting and removing the Cable of Media Coupler to the
FPC-0102TX Fast Ethernet PC Card
Grasp the FPC-0102TX Fast Ethernet PC Card 15-pins connector at the end of
the media coupler with the pointing triangle facing upward. Gently insert it
into the mating connector on the PC Card until it clicks in place at both sides.
Attention should be paid when removing the 15-pins connector. Please press
the both sides of the connectors before dragging out of the PC Card.
Connecting to the Network
Connect unshielded twisted pair (UTP) cable to the RJ-45 connector of media
coupler before loading any network driver.
l For operation in the100Mbps (100Base-TX) Ethernet network, a Category 5
unshielded twisted pair (UTP) cable should be used to connect between
media coupler and 100Mbps hub or switch.
l For operation in the 10Mbps (10Base-T) Ethernet network, Category 3, 4 or
5 unshielded twisted pair (UTP) cable could be used to connect between the
media coupler and a 10Mbps hub or switch.
Hardware installation
LED Indicators
Software installation
SOFTWARE INSTALLATION
Plug the driver diskette into the floppy drive and set the current drive to the
floppy drive. Then run INSTALL to install the real mode drivers such as ODI
or NDIS 2.x or Packet Drivers into the target disk.
Novell Netware
There are two methods to install the Netware client ODI driver, the menu
installation and Netware 3.12 or 4.x Client installation.
Menu Installation
1.Run INSTALL.EXE from the root directory of driver diskette.
2.Select Netware 3.x and 4.x Workstation” item from menu.
3.If current settings are acceptable, select Start Installation and go to step
5. Otherwise, select Modify Parameters to make settings changed
4.Move cursor to focus on the setting you want to make change and press
<Enter>” to select a fit value. When the configurations are set completely,
press <Enter> on the OK” field to exit the screen and go back to step 3.
Software Installation
5.Installation program starts copying related files from diskette to the
destination directory and modifies AUTOEXEC.BAT and NET.CFG
under user’s agreement
6.Now, the installation is completed. Please reboot the computer to make
your Netware connection.
If you wanted to install the ODI driver by manual, you may follow the
instructions list below.
1.Copy the files LE100ODI.COM and NET.CFG from the path \NETWARE
and the file LANEN.EXE from the path \ENABLER in the driver diskette
into the Netware client directory containing Novell's LSL.COM,
IPXODI.COM and NETx.COM files.
2.Using a text editor to edit the NET.CFG for setting the default frame type.
In the Netware server the frame type is set to 802.3 for NW3.11 and 802.2
for NW3.12 and NW4.x . The frame type must be set to the same with the
server or the client couldn’t login to the server.
3.Follow Novell's instructions on using ODI programs. You can substitute
the LE100ODI.COM whenever a reference is made to the Hardware
Specific Module.
Software installation
4.A typical ODI workstation startup batch file includes:
>LANEN /IRQ=dd /IOP=xxx Card Enabler
>LSL
;Link Support Layer Module provided by Novell
>LE100ODI
;Hardware Specific Module
>IPXODI
;IPX Protocol Stack Module provided by Novell
>NETx
;Shell Support Module provided by Novell
>LOGIN
Novell Client Installation
1.Run the NetWare Client Install V1.21
-Get the 4 Client disks from the network administrator, or
-Run the \NWCLIENT\INSTALL.EXE in a previous Installation
2.A message appears on the screen asking you whether or not you want the
program to perform modifications on your AUTOEXEC.BAT and
CONFIG.SYS files.
3.Answer "Yes". The program then modifies your AUTOEXEC.BAT and
CONFIG.SYS files accordingly and creates backup copies.
4.The following message appears:
-Install support for MS Windows? (Y/N):
5.Answer accordingly and provide a path if necessary.
6.The program displays the following:
-Configure your workstation for backup by a NetWare server running
software such as BACKUP? (Y/N):
7.Answer accordingly and provide a path if necessary.
8.Select a driver for your network board.
9.From the driver list, select Other Drivers.
10.Go to the Insert the Driver Disk dialog box and specify the path where the
ODI driver and INS files reside. For example: C:\ODI.DOS.
11.Press Enter and select the target ODI driver.
Software Installation
12.Specify the driver's optional settings.
13.Press F10 to save to new configuration.
14.Highlight "Install press here" and press <Enter> to install.
The program copies the necessary files for NetWare Client. Continue the
installation procedure to completion. Upon completion, a new NET.CFG file
will be created in your DOS directory. Typically, this file contains the
following lines:
Link Driver LE100ODI
#FRAME Ethernet_802.3
FRAME Ethernet_802.2
:
15.Copy the file LANEN.EXE from the directory \ENABLER in the driver
diskette to Netware Client directory.
16.Edit the STARTNET.BAT by a text editor. Add an running LANDEN
command at the beginning of the file. An STARTNET.BAT for the ODI
workstation performs as the following
LANEN /IOP=nnn /IRQ=n
--Card Enabler
SET NWLANGUAGE=ENGLISH
--Set NetWare 4.X to English
language
LSL
--Link Support Layer Module
provided by Novell
LE100ODI
--Hardware Specific Module
IPXODI
--IPX Protocol Stack Module provided by Novell
VLM
--DOS Support Module provided by Novell
F:
--Change to connected device
LOGIN xxx --Login to file server as user xxx
17.Run
network.
STARTNET
to
access
the
Novell
Software installation
MS LAN Manager
1.View the README.TXT on the installation diskette in the \NDIS2
directory. Before installing the drivers, please ensure that the Microsoft
LAN Manager has been installed in the target path. The installation
program will check and modify the PROTOCOL.INI file for LAN
Manager.
2.Run INSTALL.EXE from root directory of driver diskette.
3.Select Microsoft LAN Manager item on the menu screen.
4.If current settings are acceptable, select Start Installation” and go to step
6. Otherwise, select Modify Parameters” to make setting changed.
5.Move cursor to each field you want to make a change and press <Enter> to
select a fit value. When the configuration are set completely, press
<Enter> on the OK field to exit the screen and go back to step 4.
6.Installation program starts to copy related files from driver diskette to the
destination directory and modifies CONFIG.SYS and PROTOCOL.INI
under user’s agreement.
7. Please reboot the computer to load driver and start LAN Manager in
batch.
Example of PROTOCOL.INI: used by LAN
Software Installation
Manager
[PROTMAN]
DRIVERNAME = PROTMAN$
DYNAMIC = YES
PRIORITY = NETBEUI
[NETBEUI_XIF]
Drivername = netbeui$
SESSIONS = 6
NCBS = 12
BINDINGS = "LE100NDS_NIF"
LANABASE = 0
[LE100NDS_NIF]
; protocol.ini session for LAN driver.
IOADDRESS = 0x320
INTERRUPT = 11
DRIVERNAME = LE100NDS$
Packet Driver
1.Run INSTALL.EXE from root directory of driver diskette.
2.Select Packet Driver item on the menu screen.
3.If current settings are acceptable, select Start Installation and go to step
5. Otherwise, select Modify Parameters” to make setting changed.
4.Move cursor to focus on the field you want to make a change and press
<Enter> to select a fit value. When the configuration are set completely,
press <Enter> on the OK” field to exit the screen and go back to step 3.
5.Installation program starts to copy related files from diskette to the
destination directory and modifies AUTOEXEC.BAT under user’s
agreement.
6.Please reboot the computer to load the driver.
Software installation
Windows for Workgroups 3.11
NDIS3 Driver for Workgroups
1.Run Windows for Workgroups and click Network Setup icon in Network
group.
2.In Network Settings dialog box, click Networks...” button to select the
network operating system.
3.In Networks dialog box, check the radio button before Install Microsoft
Windows Network and No Additional Network. Press OK to go back the
Network Settings screen.
4.Click Drivers...” button to select network driver.
5.In Network Drivers dialog box, press Add Adapter...” button to enter Add
Network Adapter dialog box. Select Unlisted or Updated Network
Adapter and press OK”.
6.Windows will prompt a Install Driver dialog box. In this time, put the driver
diskette into floppy drive and press OK”.
7.Select the Enhanced mode NDIS3 for.... string and press OK”.
8.Follow Windows instructions to complete the installation and exit
Windows
9.Run INSTALL.EXE from root directory of driver diskette.
10.Select Windows for Workgroup in Network Operating System screen.
11.If current settings are acceptable, select Start Installation and go to step
13. Otherwise, select Modify Parameters to make settings changed.
12.Move cursor to focus on the setting you want to make a change and press
<Enter>” to select a fit value. When the configuration is accepted, press
<Enter> on the OK” field to exit the screen and go back to step 11.
13.Select NDIS Server(LAN Manager,...)” as the network server you will
attach to and press <Enter> key.
Software Installation
14.Installation program starts to copy related files to the destination
directory and modifies AUTOEXEC.BAT and under user’s agreement.
15.Please reboot the computer to have the driver take effect.
NDIS2 Driver for Workgroups
1.Run Windows for Workgroups and click Network Setup icon in
Network” group.
2.In Network Settings dialog box, click Networks... button to select the
network operating system.
3.In Networks dialog box, check the radio button before Install Microsoft
Windows Network and No Additional Network”. Press OK to go back
the Network Settings” screen.
4.Click Drivers...” button to select network driver.
5.In Network Drivers dialog box, press Add Adapter...” button to enter Add
Network Adapter dialog box. Select Unlisted or Updated Network
Adapter and press OK“.
6.Windows will prompt a Install Driver dialog box. In this time, put the driver
diskette into floppy drive and press OK”.
7.Select the Real mode NDIS2 for....” string and press OK”.
8.Follow Windows instructions to complete the installation and exit
Windows.
9.Run INSTALL.EXE from root directory of driver diskette.
10.Select Windows for Workgroups in Network Operating System screen.
11.If current settings are acceptable, select Start Installation” and go to step
13. Otherwise, select Modify Parameters” to make settings changed.
12.Move cursor to focus on the setting you want to make a change and press
<Enter> to select a fit value. When the configuration is set completely,
press <Enter> on the OK field to exit the screen and go back to step 11.
Software installation
13.Select NDIS Server(LAN Manager,...)” as the network server you will
attach to and press <Enter> key.
14.Installation program starts to copy related files to the destination
directory and modifies AUTOEXEC.BAT under user’s agreement.
15.Please reboot the computer to have the driver take effect.
ODI Driver for Workgroups
1.Run Windows for Workgroups and click Network Setup” icon in
Network group.
2.In Network Setup dialog box, click Networks...” button to select the
network operating system.
3.In Networks dialog box, check Install Microsoft Windows Network and
Others, thereafer select Novell NetWare (Workstation Shell, 3.X) or
Novell NetWare
(Workstation 4.0 and above) and press OK to enter the screen of
PXODI.COM and LSL.COM”
4. Press OK to go back the Network Setup“ screen.
5.Click on Drivers...” button to select network driver.
6.In Network Drivers dialog box, press Add Adapter...” button to enter Add
Network Adapter dialog box. Select Unlisted or Updated Network
Adapter and press OK.
7.Windows will prompt a Install Driver dialog box. In this time, put the
driver diskette into floppy drive and press OK.
8.Select the Netware ODI Driver ....” string and press OK.
9.Follow Windows instructions to complete the installation and exit
Windows.
10.Run INSTALL.EXE from root directory of driver diskette.
11.Select Windows for Workgroups” in Network Operating System screen.
Software Installation
12.If current settings are acceptable, select Start Installation” and go to step
13. Otherwise, select Modify Parameters” to make settings changed.
13.Move cursor to focus on the setting you want to make a change and press
<Enter> to select a fit value. When the configuration is set completely,
press <Enter> on the OK field to exit the screen and go back to step 11.
14.Select Novell Netware Server as the network server you will attach to and
press <Enter> key.
15.Installation program starts to copy related files to the destination
directory and modifies AUTOEXEC.BAT and NET.CFG under user’s
agreement.
16.Please reboot the computer to have the driver take effect.
Windows NT 3.51
1.In Main Group of NT 3.51, open Control Panel” and click on Network
icon.
2.In Network Settings dialog box, push Add Adapter...” button. The Add
Network Adapter dialog box will appear.
3.Choose <Other> requires disk from manufacturer” from the network
adapter card list and press Continue.”.
4.When Windows NT prompts for manufacturer disk, insert driver diskette
and press OK until the Network Setting Change dialog box appears.
5.Restart now to have the card take effect.
Windows NT 4.0
Assumed that the Network Services already installed in the NT 4.0 system.
1.Insert the FPC-0102TX Fast Ethernet PC Card into any one of PC Card
Slots in system.
2.Power up Windows NT 4.0
Software installation
3.Open My Computer
4.Open Control Panel
5.Run the Network
6.Select Adapters page
7.Press Add to add network adapter
8.Press Have Disk button
9.Insert the driver disk into drive A:
10.Specify the path to ” A:\ and press OK
11.A dialog box will appear to adjust the driver's settings. The resources
assignment to the adapter must be unique in the system.
12.Press OK when all setting are completed.
13.Press Close to complete network setting
Windows 95 Installation
1.Assumed that the drivers of PC Card slot are well installed. The System
Icon in the Control Panel can report on its functionality. Apart from
above mentioned, any questions on this layer need to be taken up with
the computer's manufacturer.
2.Insert the FPC-0102TX Fast Ethernet PC Card into the slot. In New
Hardware Found dialog box, select Driver from disk provided by
hardware manufacturer”.
Software Installation
3.Please input the path, A:\ and insert driver diskette. The driver will be
installed and you may be asked for the original Windows 95 CD/disks.
4.For the first time installation, please click Network icon in Control Panel
to add Protocols, Client and Service if you needed
5.Reboot the machine and the card will be fully functional.
Artisoft Lantastic 6.0 Installation
1.Install LANTASTIC 6.0 first.
2.Run INSTALL.EXE from root directory of driver diskette.
3.Select LANTASTIC 6.0 in Network Operating System screen.
4.If current settings are acceptable, select Start Installation” and go to step
6. Otherwise, select Modify Parameters” to make settings changed.
5.Move cursor to focus on each field you want to make a change and press
<Enter>” to select a fit value. When the configuration is set completely,
press <Enter>” on the OK field to exit the screen and go back the step 4.
6.Installation program starts to copy the related files from diskette to the
destination directory and modifies CONFIG.SYS, PROTOCOL.INI, and
STARTNET.BAT under user’s agreement.
Software installation
7. Please reboot the computer to have the driver take effect.
IBM OS/2 Warp
NDIS2 Driver for OS2 Warp
Before the driver installation, please ensure that the PCMCIA Service was
installed and worked properly. If the PCMCIA Service of OS/2 Warp has been
enabled already, please jump to portion B for driver installation otherwise
please follow the instructions in the following to install the PCMCIA Service.
A. Enable PCMCIA Service of OS/2 Warp
1.In the OS/2 Desktop group, double-click on the OS/2 System icon.
2.Double-click on the System Setup icon.
3.Double-click on the Selective Install icon.
4.Select the PCMCIA Support button.
5.Select PCMCIA system.
For example : select IBM ThinkPad 750
6.Click OK”.
7.Click Install
8.Select the source drive and directory
For Example D:\OS2IMAGE
9.Click Install
10.Click OK
B. Install NDIS2 driver for IBM LAN Server 4.0
1.In the OS/2 Desktop group, double-click on the MPTS icon.
Software Installation
2.Click on the Configure button.
3.Select the LAN adapters and protocols option.
4.Click on the Configure button.
5.Select the Other adapters ...” option.
6.Insert the driver diskette and type the driver
path:
A:\OS2\NDIS2
Click on the OK button.
7.Select PCMCIA Ethernet Adapter, and then click on the Add button.
8.Select IBM OS/2 NETBIOS , and then click on the Add button.
9.Click OK”.
10.Click Close”.
11.Click Exit”.
12.Shutdown and restart your system.
ODI Driver for IBM OS/2 Warp
Before the driver installation, please ensure that the PCMCIA Service was
installed and worked properly. If the PCMCIA Service of OS/2 Warp has been
enabled already, please jump to portion B for driver installation, otherwise
please follow the instructions in the following to install the PCMCIA Service.
A. Enable PCMCIA Service of OS/2 Warp
1.In the OS/2 Desktop group, double-click on the OS/2 System icon.
2.Double-click on the System Setup icon.
3.Double-click on the Selective Install icon.
4.Select the PCMCIA Support button.
5.Select PCMCIA system.
Software installation
For example : select IBM ThinkPad 750
6.Click OK”.
7.Click Install
8.Select the source drive and directory
For Example D:\OS2IMAGE
9.Click Install
10.Click OK
B. Install Netware Request
1.Insert diskette labeled WSOS2_1 to diskette drive A:
2.Change current drive to A:
3.Run INSTALL.EXE
4.Select Installation
5.Select Requester on workstation...
6.Set Target Directory
Assume C:\NETWARE
7.Click OK”
8.Select Edit CONFIG.SYS and Copy All Files...
9.Click OK
10.Insert diskette labeled WSDRV_1 and Click OK
11.Select NE2000.SYS driver
12.Click Continue button
13.Insert diskette labeled WSOS2_1 and Click OK
14.Click Continue button
Software Installation
15.Select the SPX Support for OS/2 Sessions
16.Click Save button
17.Click OK”
18.Click Copy” button
19.Insert diskette labeled WSOS2_2 and Click OK
20.Insert diskette labeled WSOS2_3 and Click OK
21.Insert diskette labeled OS2UTIL1 and Click OK
22.Insert dis kette labeled WSDRV_1 and Click OK
23.Insert diskette labeled OS2DOC_1 and Click OK
24.Insert the FPC-0102TX Fast Ethernet PC Card driver diskette
25. Close Installation window to exit install
26. Copy following driver to C:\NETWARE directory
COPY A:\OS2\ODI\LE100ODI.SYS C:\NETWARE
COPY A:\OS2\ODI\LANEN.OS2 C:\NETWARE
27.EDIT C:\CONFIG.SYS file
28.Delete DEVICE=C:\NETWARE\NE2000.SYS
For Example
REM -- ODI-Driver Files BEGIN -REM DEVICE=C:\NETWARE\NE2000.SYS
REM -- ODI-Driver Files END -29.Add
DEVICE=C:\NETWARE\LANEN.OS2
and DEVICE=C:\NETWARE\LE100ODI.SYS
For Example
REM -- ODI-Driver Files BEGIN --
Software installation
DEVICE=C:\NETWARE\LANEN.OS2
DEVICE=C:\NETWARE\LE100ODI.SYS
REM -- ODI-Driver Files END -30.Save C:\CONFIG.SYS
31.Shutdown and restart your system.
General Information
GENERAL INFORMATION
NOTES FOR NDIS DRIVER
The following are examples of partial CONFIG.SYS file and AUTOEXEC.BAT
for loading SystemSoft Card Services and NDIS2 driver:
Examples of partial CONFIG.SYS file:
DEVICE=C:\CARDSOFT\SS365SL.EXE
DEVICE=C:\CARDSOFT\CS.EXE
DEVICE=C:\CARDSOFT\CSALLOC.EXE C:\CARDSOFT\CSALLOC.INI
DEVICE=C:\CARDSOFT\CARDID.EXE
device=c:\lanman.dos\drivers\ethernet\le100\lanen.exe
device=c:\lanman.dos\drivers\protman.dos /I:c:\lanman.dos
device=c:\lanman.dos\drivers\ethernet\le100\le100nds.dos
Examples of partial AUTOEXEC.BAT file:
SET PATH=C:\LANMAN.DOS\NETPROG;%PATH%
NET START WORKSTATION
LOAD NETBEUI
The Ethernet function configuration information for the DOS NDIS driver is
contained in the PROTOCOL.INI file. The section of the PROTOCOL.INI file
that contains configuration information for this card must begin with
"[LE100NDS2_NIF]". The valid entries in the file are listed below:
[LE100NDS2_NIF]
DRIVERNAME - LE100NDS$
this line must always be present
IOADDRESS - value
where value is one of 32 bytes boundary from 0x200 to 0x3e0.
The leading "0x" for the hex notation is required.
To have Card Services select the address base
from it's pool of available address then use a
value of 0.
INTERRUPT - value
General Information
where values is one of the following interrupts:
3, 4, 5, 7, 9, 10, 11, 12, 15.
To have Card Services select an available
interrupt resource then place a value of 0 at this
location.
NOTES FOR PACKET DRIVER
The following are examples of partial CONFIG.SYS file for loading SystemSoft
Card Services and Packet Driver:
Examples of partial CONFIG.SYS file:
DEVICE=C:\CARDSOFT\SS365SL.EXE
DEVICE=C:\CARDSOFT\CS.EXE
DEVICE=C:\CARDSOFT\CSALLOC.EXE C:\CARDSOFT\CSALLOC.INI
DEVICE=C:\CARDSOFT\CARDID.EXE
device=c:\tcpip\lanen.exe
device=c:\tcpip\le100pd.sys
NOTES FOR WINDOWS FOR WORKGROUPS DRIVER
The following are examples of partial CONFIG.SYS file and AUTOEXEC.BAT
for loading SystemSoft Card Services and drivers for Windows for
Workgroups:
Examples of partial CONFIG.SYS file:
DEVICE=C:\CARDSOFT\SS365SL.EXE
DEVICE=C:\CARDSOFT\CS.EXE
DEVICE=C:\CARDSOFT\CSALLOC.EXE C:\CARDSOFT\CSALLOC.INI
DEVICE=C:\CARDSOFT\CARDID.EXE
device=c:\wfw311\lanen.exe
DEVICE=C:\WFW311\IFSHLP.SYS
Examples of partial AUTOEXEC.BAT file:
C:\WFW311\NET START
General Information
QUESTIONS AND ANSWERS
This chapter provides a number of examples of Questions (Q:), Causes (C:),
and Answers (A:). If your LAN is not functioning properly, look up the
problem here, or ask your dealer for technical assistance.
Q:The Card Service cannot enable my card. When I run LANEN the error
message show Fail to enable PC card
C:No memory space to map the attribute memory of PCMCIA card.
A:If memory management software e.g. EMM386 has been installed, you
have to reserve some area in upper memory (C000:0 -- EFFF:F) for attribute
memory of PCMCIA card during enabling the card. Example:
Device=C:\DOS\EMM386.EXE RAM X=D000-D3FF. Reserve D000 - D3FF
for attribute memory.
Q:How can I know the FPC-0102TX Fast Ethernet PC Card has been
enabled or not ?
A:1.If the Card Service is installed, you can check by hearing the beep when
card insertion.
2.Run LANEN /CHK to check, if the card has been enabled. the resources
allocated for the card are shown as below at the last line of display
message.
“ IO=xxx IRQ=nn Slot=nn”
Q:How to enable the FPC-0102TX Fast Ethernet PC Card ?
A:1.The FPC-0102TX Fast Ethernet PC Card can be enabled by the Card
Service installed in the laptop directly. The drivers associated with the
card in the driver diskette can be run over Card Service directly.
2.In case the Card Service cannot enable the PCMCIA card, you may run
LANEN to enable it.
General Information
Q:How to make the card work under Systemsoft Card Service ?
A:There are some procedures have to do for making the card enabled by
Cardsoft.
1.Copy across the LE100.CLB file.
Copy FROM
A:\PCMCIA\CARDSOFT\LE100.CLB
TO
C:\CARDSOFT\LE100.CLB
Depends on where the Cardsoft be saved.
2.Edit the CARDID.INI file and add the library LE100.CLB.
Edit C:\CARDSOFT\CARDID.INI
Find the section which starts "[Libraries]", and add the line
CardLib=le100.clb”
before any other "CardLib=" lines.
When the card is inserted it will beep. Use CARDINFO /V to check if the
card has been configured correctly.
3.If the card cannot work properly, you may edit CARDID.INI again to
change the resources allocation.
In [Common] section you may find the strings as following
Lan1Port=300
Lan1IRQ=5
Lan1MemoryBase1=D0
Lan1MemoryBase2=D4
Lan2Port=320
Lan2IRQ=11
Lan2MemoryBase1=D8
General Information
Lan2MemoryBase2=DC
You may change the Lan1Port or Lan1IRQ to another value (e.g.
Lan1Port=320, Lan1IRQ=11) to request Cardsoft allocate the resources
you wanted.
4.If the resources cannot allocate properly, you may run
\CARDSOFT\CONFIG or edit \CARDSOFT\CSALLOC.INI directly to
set the system resources available for allocation. The file content of
CSALLOC.INI are listed as below.
# The available resources described by the "MEM=", "IO=", and "IRQ=" lines
# It may have been altered by the "xINCLUDE" and/or "xEXCLUDE" lines
below!
# The "MEM=", "IO=" and "IRQ=" lines are provided for Read-Only purposes.
#
MEM=D000-DFFF
IO=100-3F7
IRQ=5,7,9-C,E-F
#
# *** Resource modifications should be made below this line. ***
#
RIO=170-177,370-377
MEMEXCLUDE=C000-CFFF,E000-EFFF
IOEXCLUDE=3F8-3FF,2F8-2FF
IRQEXCLUDE=3-4,6,13-14
You may edit the file to guide the Cardsoft which resources are available
in your computer.
Q:How to make the card work under Phoenix Socket/Card Service ?
A:You have to add a card to PCM. If the card has been added, you may use
PCM to modify the resources requested for the card.
1.Insert the FPC-0102TX Fast Ethernet PC Card into any one of the slots.
2.Execute PCM.EXE that supported by Phoenix PCM
3.Select the right socket by PageUp, PageDown key
General Information
4.Choose Configure item by ALT-C.
5.Choose Add Card to List item and Enter for first time or choose Edit
Config Parameters for further edition
6.Set the IO range and IRQ for the card
7.Press Enter key and then save the configuration
8.Exit PCM.EXE by Alt-V and select Exit item
9.Reboot
Q:How to make the card work under Award Socket/Card Service ?
A:You need to run the 'PC Card Control for Windows' program under
Windows. If you do not have Windows, edit the CARDWARE.INI file as
indicated below.
Before running PC Card Control for Windows, make sure the
FPC-0102TX Fast Ethernet PC Card is inserted into one of your PC's
sockets.
1.Run ‘PC Card Control’ for Windows’from the Cardware sub-directory.
2.Press 'OK' buttons on any card detect errors until you get to the main
menu.
3.Select the 'Cards' option and choose 'Edit'.
4.Select right Socket and press Enter
If you already have a device in the Defined box called LE100, go to step
(11).
5.Select 'New Device' under the 'Defined' devices box.
6.Edit the new device to be named 'LE100'.
7.Select IO range 1 Base(Hex) = 320, Length = 32 (16 bit).
8.Do not alter MEM range 1 or 2.
9.Select IRQ level 11. And OK to make changes.
10.Back on the 'Edit card' screen, highlight the 'LE100' device in the defined
devices box.
11.Transfer the LE100 to the 'Associated' box with the 'Include' command.
12.Select OK to complete editing and return to main screen.
13.If the LE100 card is not graphically depicted, choose 'Card' and
'Reconfigure' the socket which contains the LE100 card.
General Information
If you still have problems with CARDWARE software try to replace your
CARDWARE.INI file with the one supplied on the Ethernet Adapter
Drivers Disk.
In DOS mode, you may use PCCARD /D or DOSCARD /D command to
check the resources allocated for the card.
Q:The ODI driver is run successfully but fail to login to the Netware
server
C:Frame type imcompatiable with server or Interrupt miss match.
A:1.The default frame type for Netware 3.11 and before is 802.3 but it is
changed to 802.2 in Netware 4.x and 3.12. You may check the content of
NET.CFG to see if the frame type is acceptable by the server. If the frame
type cannot accept by server, please edit NET.CFG to change the frame
type at client site or add the frame type can be accepted at sever site.
driver.
Specifications
SPECIFICATIONS
Network Interface Specifications
u10Mbps
Ethernet: IEEE 802.3 standard 10BaseT baseband CSMA/CD local area
network.
u100Mbps Ethernet: IEEE 802.3u standard 100Base-TX baseband CSMA/CD local
area network.
u20/200Mbps full duplex support
uAutonegotiation between all four operation modes.
Host Interface and Physical Specifications
uPCMCIA
2.0/2.1 and PC Card Standard compliant.
II PC Card
u3.37” x 2.128” x 0.197” (86mm x 54mm x 5.0mm)
u30gw in weight
uType
Operating Environments
Novell Netware 3.x, 4.x
Microsoft LAN Manager
Packet Driver Applications
Microsoft Windows for Workgroups 3.11, Windows 3.1
Microsoft Windows NT 3.51, NT 4.0
Windows 95
Lantastic 6.0
IBM OS/2 Warp Version 3
Power Requirements:
uNormal
uSleep
Operation: +5V DC, 250mA max
Mode
: +5V DC, 50mA max
Specifications
General Specification
LEDs: Link Integrity, Power / Activity, 10/100Mbps
Enviroments Ranges:
Operating:
32°F to 149°F (0°C to 65°C)
Storage:
-4°F to 158°F (0°C to 70°C)
Humidity:
10% - 90% , noncondensing
Certifications: FCC, Part 15, Class B
CE Mark (EN55022,ClassB, EN50082-1)