1
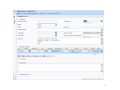
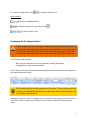
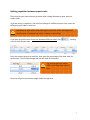
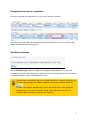
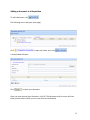
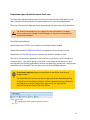
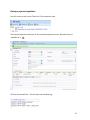
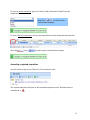
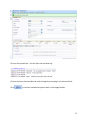
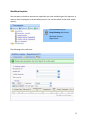
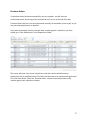
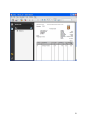
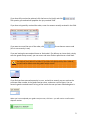
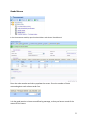
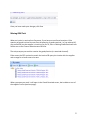
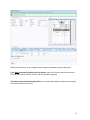
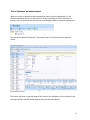
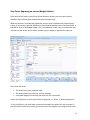
Agresso Procurement Instructions
Raising a Requisition
A requisition is an initial request to procure goods or services. In Agresso, a completed
requisition, once approved, will automatically generate a purchase order document.
Completing a Standard Requisition
To access the Standard
Requisition screen, go to
-
Procurement
Requisitioning
And click to open
Requisitions - Standard
The following screen will open (see next page)
1
2
3
The screen is split into five sections:
•
•
•
•
•
The REQUISITION section
The REQUISITION DETAILS section
The GL ANALYSIS section
The PRODUCT TEXT box
The WORKFLOW LOG
Completing the Standard Requisition screen
Complete the screen by tabbing through the fields, entering information where applicable.
Fields marked * are mandatory fields.
Requisition Number: The requisition number is set at zero, until the requisition is saved.
Requisitioner:
External ref:
This is to be the main contact for the Purchase Order. Enter your
employee number or use field help
to select an alternative
contact (the requisitioner will also receive the purchase order email)
If you are given a reference number by the supplier, it must be entered here.
Internal message:
Not currently in use – leave blank
Supplier ID:
Enter the Supplier ID code, or use the field help button
for the code by Supplier name.
to search
Delivery Address:
Leave as default or choose from the drop down menu – once selected, the address will
appear in the text box below.
Project code:
Enter the project code that the purchase is to be allocated to.
If the purchase is to be allocated to more than one project code, enter the first
or main project code here. See page 6 for instructions on splitting the cost of a
requisition between multiple codes.
4
Manual Print override
where a supplier has opted to receive their purchase orders
via email, Agresso will automatically send the order to the
supplier when it is generated. If you wish to override this, and
have the purchase order emailed to you instead, change the
default ‘N’ to a ‘Y’.
Completing the Requisition details section
Product Code:
Enter the Product Code, or use field help
code by name.
Description:
The description field will be automatically populated with the general
description of the code you have selected, i.e. “training courses”.
Please overtype this with a more specific description of the
product/service.
Unit:
Leave as default
Supp.ID:
This should be the same as the Supplier ID chosen in the
Requisition section.
to search for the correct
You must only select one supplier per requisition. If you wish to procure
goods/services from more than one supplier, you must raise a separate requisition.
Quantity:
Enter the quantity you require
Price:
Enter the price you have been quoted by the Supplier (or an estimate
if this is the case)
Your completed Requisition detail section should look like the one below:
5
For multi-line requisitions, click
to complete another line.
Other options
will copy the highlighted line
will delete any/each line you have ticked
is not currently in use.
Completing the GL Analysis Section
The GL Analysis section is very important and must be checked in all cases, as it can
very easily be overlooked, particularly when amending details on the screen. Please
ensure you check the GL Analysis section before saving your requisition, and each
time you make an amendment. Pay particular attention to the Project code field.
This section is used to define
-
Which project code each line in the requisition is being allocated to
changing the tax code from the default
The GL Analysis section should automatically populate with the information you inputted in
the requisition details screen.
The GL Analysis section will only show one line at a time – click on the line you want
to check in the Requisition details section (it will turn a darker shade of blue) to see
the GL Analysis details below
Although information in the GL Analysis section is used for many things, its main function in
this screen is that it enables you to split the cost of each line between multiple project
codes.
6
Splitting requisition between project codes
There may be some cases where a purchase value is being allocated to more than one
project code.
If you are raising a requisition, and each line belongs to a different project code, enter the
different project codes in each line.
Remember to select each line by clicking on the relevant line in the Requisition
details section. A selected line will turn a darker shade of blue..
If you want to split the cost of one item between different codes, click
a line for each project code.
, creating
Enter the relevant project on each line, then enter the percentage of the total value for
each project. The total percentage and cost will total at the bottom.
The percentages must add to
100%, or the requisition will not
save.
Each row will go to the relevant budget holder for approval.
7
Changing the tax code on a requisition
Once you've entered your requisition line, click in the GL Analysis line below:
Enter the correct tax code in the box and tab (use field help if you are unsure of the code).
Repeat the same process for every line.
Workflow Log Section
Use the Workflow Log to leave message for the Budget Holder/Approver, or any other
information that will aid the approval or audit trail. This is a free text box and can be viewed
via workflow enquiry screens and Approval screens.
You can leave one workflow log for the whole requisition, or leave a log line by line.
To leave a general log for the whole requisition, enter your comment and click
.
To leave a line-specific workflow log, click on the relevant line in the requisition
details section, enter your comment and tab, then click on the next line. The
comment will save when you tab onto the next line.
8
Product Text section
For each line of your requisition, you can enter further product details by entering text in
this field. The text will appear just under each line of the Purchase order.
You can enter product
text for each line of your
purchase order. Click on
each line of your
requisition and enter text,
then move onto the next.
Once you have completed and reviewed your Requisition, click
generate a transaction number.
– this will
Document Check Step
Once you have saved your requisition, it will immediately workflow back into your own Task
List, to prompt you to check and attach any relevant documents.
If you do not have any documents to attach, simply click
on for approval.
to move the requisition
**If you use account code 557 (hospitality) you must attach a document giving the
names and company of the people in receipt of the hospitality. Check the Finance
Web Page for the appropriate form.
9
Adding a document to a Requisition
To add a document, click
.
The following screen will open (next page):
Click
to open the folder, then click
.
A new window will open:
Click
to select your document.
Once you have selected your document, click OK. The Document archive screen will now
show your document listed. you can now close the window and
10
Now click
This document can now be accessed
from approval screens, and will remain
archived even once the requisition is
approved and created as a purchase
order. Requisitions that have
Click on
moved on.
to remove the task from your list, and ensure the requisition has
Once your Requisition has moved from the Document Check step, it will enter workflow for
approval.
11
Requisition Workflow – budget holder approval
All Requisitions go through a two step approval process (see ‘Agresso Guide for Budget
Holders and Approvers’ for further details on the approval process)
The first approval step goes to the nominated Budget Holder. This is the person with
responsibility for the PROJECT CODE(s) selected on the requisition.
The Budget Holder will receive a task in their Tasks List.
As well as receiving a task, an email will be sent to the relevant person’s inbox. This
ensures that those who are not regularly logging in to Agresso are alerted to tasks
requiring action.
Approving/Rejecting Requisitions
Click to open the task.
The task will open in the Approval screen (see next page).
12
Check documents
The Approval Screen
Workflow comments appear at the
top of the screen – check for any
further info in support of the
requisition.
The name of the Requisitioner and summary
details are here.
The value and percentage of cost for your
project code are here
13
14
Checking the Requisition
Check the details of the goods/services to be purchased.
Pay particular attention to the percentage and amount to be approved – this might
not be the total cost of the requisition
Check the workflow log and read any comments in support of the requisition. If the
documents button is glowing orange
then click to check supporting documents.
You have three options when actioning a requisition. You can:
•
•
•
Approve the Requisition, which will workflow to the next approval stage
Reject the requisition and leave instructions to cancel the request completely
Reject the requisition and leave instructions on amendments to be made
Approving a Requisition
To Approve a requisition, click
You will receive a confirmation message:
The Requisition will automatically workflow to the next approval stage
Rejecting a Requisition to close
To Reject a requisition, click
You will be prompted to leave a message in the workflow log:
15
.
All rejections require a comment in the workflow log – your rejection will not save
without one. This is to ensure that the requisitioner is clear about what action to
take.
Once you have entered your comment, click
message.
- you will receive a confirmation
The requisition will return to the Originator and be closed.
Rejecting a requisition to amend
Rejecting a requisition to amend is exactly the same process as rejecting to close,
it’s just the workflow comment you leave that is different. By rejecting, you are
essentially returning the requisition to its originator to be actioned, whether that
means closing it down, or making amendments.
click
You will be prompted to leave a message in the workflow log:
Once you have entered your comment, click
message.
- you will receive a confirmation
16
Once a requisition has been amended by the originator, it will return to you for re-approval
Rejecting/Approving in Advanced Mode
There will be times when you need to be more specific about what you want to approve,
and what you want to reject. This is particularly relevant when considering mulit-line
requisitions.
Advanced Mode enables you to action a requisition line by line.
When reviewing multi-line requisitions, click on each line of the requisition, to
review workflow logs and percentage of cost, as these may be line specific.
Click
17
The Requisition Details section will change slightly:
Tick on a line you wish to approve, and click
. The line will be marked.
Click on a line you wish to reject, ENTER A COMMENT IN THE WORKFLOW LOG and click
.
You will not be prompted for a comment, but your actions will not be saved if you
don’t leave a comment, and you will receive and error message.
Once you have actioned each line, click
. You will receive a confirmation message.
A note about the workflow log
In all screens, next to workflow Log comment boxes, you will see a ‘Copy’ button. Clicking
on this button will insert the comment into every line of the requisition. Please ensure that
you do not cause confusion by clicking ‘Copy’ and leaving the same instructions for every
line, when you did not intend to!
All rejections will return to the originator to be actioned. All approvals with
continue on the next step of the approval process
18
Requisition approval and document check step
The Requisiton approval and document check step is the second and final approval step,
and is routed to the nominated Procurement Approver for your school/department.
There are 3 Procurement Approver levels, depending on the total value of the requisition.
The financial thresholds may vary slightly for your school/dept. If in doubt,
please speak to your College Finance Manager, or the person responsible for
departmental budgets.
The default thresholds are:
Requisitions from £0-£5000 are routed to a nominated member of staff
Requisitions between £5000 and £100,000 are routed to a senior member of staff
Requisitions of £100,000 and over are routed to an executive member of staff
The role of a Procurement Approver is to ensure that a requisition is fit for transfer to a
Purchase Order – they will be giving a final check to the details of the requisition, and
ensuring that the relevant groundwork has been completed (e.g. tenders etc.) and relevant
documentation is attached. They may also serve as a second budget approver
Procurement Approvers approve requisitions in exactly the same way as
Budget Holders.
The only differences are that the task for approval will be labelled depending
on the financial threshold (see below), and their approval/rejection objectives
are different (see above). Requisitions approved at this stage will be
automatically generated into Purchase Orders
19
Closing a rejected requisition
You will receive a task in your Tasks List. Click to open the task.
The rejected requisition will open in the standard requisition screen. Rejected lines are
marked with a
Click on the rejected line – this will open the workflow log:
20
To close an entire requisition, go to the ‘Status’ field, and choose ‘Parked’ from the
dropdown list.
Now click
. You will receive a
confirmation message.
To close a line of a requisition, click on the requisition line to be closed and check the box:
Now click
then
. You will receive a confirmation message:
Amending a rejected requisition
You will receive a task in your Tasks List. Click to open the task.
The rejected requisition will open in the standard requisition screen. Rejected lines are
marked with a
21
Click on the rejected line – this will open the workflow log:
Click on the line to be amended and make changes by overtyping in the relevant fields.
Click
to send the amended requisition back to the Budget Holder.
22
Other Requisition options
In the Standard Requisition screen, there is a tool bar on the left hand side:
This is the Copy Requisition button. Clicking on this
button once you have completed and saved a
requisition will automatically generate an identical
requisition and send for approval.
This is the Start from Template button. Clicking on this
button opens a search list, where you can choose a
template you’ve saved earlier and amend or save as a
new requisition
This is the Save as Template button. You can
complete a standard requisition screen and instead of
saving as normal, click this button and save as a
template that you can use again and again.
How to create a Requisition Template
Complete a standard requisition screen as normal, with the information you require on your
template. DO NOT SAVE.
Click the Save as Template button. You will be prompted to give your template a name:
Once you have named your template, click
You will receive a confirmation message:
23
Although this
confirmation message
gives a Requisition
number, this is NOT a
requisition – this is the
template number.
Click
to clear the screen.
Retrieve your template whenever you are ready.
Retrieving a requisition template
Click on the start from template button:
A search window will open. Type in the name of your template, or leave blank and click
Agresso will only return templates that you have saved.
Click on the template you want – this will open in the standard requisition screen.
24
Workflow Enquiries
You may want to check to see where a requisition you have raised has gone for approval, or
want to check its progress in the workflow process. You can check both in the same simple
enquiry:
In Procurement, go to
Requisitioning and choose:
Workflow Enquiry Requisitions
The following screen will open:
25
Enter your requisition number in the RequisitionNo field
Click
The results show whether or not the requisition is ‘finished’ or is still ‘workflow in progress’.
Under the ‘Step’ column, it will display at what point in the workflow process the requisition
is at.
To find out more information, click on the ‘workflow in progress’ hyperlink:
A new window will open, displaying a
flowchart with the names of the people
who are involved in the approval
process for the particular requisition.
GREEN boxes denotes steps that have
been actioned and approved
YELLOW boxes denote the current step
– the step waiting to be action.
If a RED box appears, this is a step that
has been rejected.
If you hover your mouse over a box, you
will be able to read the workflow log for
that action.
26
Purchase Orders
If a purchase order has been automatically sent to a supplier, you will receive a
confirmation email, and a copy of the email will be sent to you at the end of the day.
Purchase Orders that are to be sent/presented manually are emailed to you as a pdf, so you
can print and send/present as required.
If you want to manually check a purchase order number against a requisition you have
raised, go to ‘Own Requisitions’ in the Requisitions folder.
The screen will show a list of your requisitions, and their current workflow status.
Requisitions with a workflow status of ‘finished’ will be ready to be automatically generated
into a Purchase Order. Check the ‘Purchase Order’ column to see the purchase order
number against your requisition number.
27
Retrieving a copy Purchase Order
If you want to retrieve and send/print a copy purchase order, go to Procurement/Purchase
Orders, and choose ‘Order amendment/confirmation screen’.
Enter your purchase order in the relevant field and tab:
click on the ‘Documents’ icon:
A pdf of the purchase order is available from this screen – double click to retrive the pdf:
Click to open the file:
You will receive a file download alert. Click ‘Open’. Your copy purchase order will open in
pdf format (next page).
28
29
Goods Receiving
When an invoice is received in the Payments department, it will only be paid if you have confirmed
that you have received the goods/service you ordered.
You must confirm by recording this information in Agresso.
In Procurement, go to Purchase Orders, and open Goods Receipt:
Enter the Purchase Order number in the field and tab to populate the screen.
The order details section has three columns to record:
•
•
•
the quantity you originally ordered
the quantity you have previously received (if any)
the quantity you are receiving now
Once you have ensured the delivery date is correct, and checked any quantities received
previously, enter the quantities received.
30
If you have fully received as ordered, click the box on the line(s) and click
The quantity you ordered will populate the ‘qty received’ field.
.
If you have only partially received the order, enter the amount actually received in the field.
If you want to cancel the rest of the order, click
(this is not currently in use)
. Do not leave a reason code
If you are leaving the unreceipted items on ‘back order’ (for delivery at a later date), simply
save the goods receipt screen; you can return and enter further quantities at a later date.
You cannot ‘over receive’ an order. If you enter a higher quantity than ordered,
you will not be able to save the goods receipt screen.
If you find you have entered a quantity in error, and wish to amend, you can retrieve the
purchase order number in the goods receipt screen, and enter a minus figure. You can
amend a goods received screen as long as the invoice has not yet been matched against it.
When you have completed your goods receipt screen, click Save – you will receive a confirmation
dispatch number:
31
Goods Returns
In the Procurement module, open Purchase Orders and choose ‘Goods Return’
Enter the order number and tab to populate the screen. Enter the number of items
returned against each relevant order line.
It is also good practice to leave a workflow log message, so that you have a record of the
reason for the return.
32
Once you have made your changes, click Save
Missing GRN Task
When an invoice is received into Payments, if you have not confirmed receipt or if the
quantity of goods invoiced is more than the quantity of goods received, i.e. you ordered 10,
you received 8, but the supplier is invoicing you for 10, then a ‘Missing Goods Received’ task
will be sent to the Finance Administrators task list.
The task prompts you to either receive the goods/service (or remainder thereof).
Either enter the QTY received to match the invoice OR query the invoice with the supplier
and arrange for a credit note to be sent.
When you open your task, it will open in the Goods Received screen, but includes a scan of
the supplier invoice (see next page).
33
Review the quantities on the supplier invoices against the goods receipt information.
If you have received the goods as per the invoice, enter the relevant quantities and save.
This will then match with the invoice, and be posted for payment.
If you have not received these quantities, then contact the supplier to discuss and arrange
for a credit note to be sent out.
34
‘Out of tolerance’ purchase invoices
When an invoice is registered, and the quantities match, but the value doesn’t, if the
difference between the two is more than 1% of the total value (or £5.00, whichever is
greater), then an approval task will be sent to the Budget Holder to sanction the payment.
The task will be labelled ‘Approval’. The task will open in a Purchase Invoice approval
screen:
The screen will show a scanned image of the invoice (not available in this screenshot), and
the original order and GRN details against the purchase order details.
35
To accept the invoice and sanction payment, click
To reject the invoice, click
rejection.
and leave a comment explaining the reason for
If you reject the invoice, you will need to contact the supplier to arrange for a
credit note to be sent to the finance department, in order for the invoiced
amount to match.
36
Cancelling a Requisition
You can cancel a requistion at any point whilst it is still in workflow.
In Procurement, open the Requisitioning folder and click to open Requisitions – standard:
Click the ‘open’ icon:
This will allow you to enter your requisition number.
enter the number and TAB to populate the screen. Now go to the ‘Status’ field and click to
see the drop-down menu:
Choose ‘Parked’, then Save your changes
Choosing ‘Parked’ rather than ‘Closed’ will take the requisition directly out of
workflow to save confusion. It will then be scooped up and closed down by an
internal process overnight.
37
Cancelling a Purchase Order
To completely cancel a purchase order, go to Procurement, and choose the ‘Purchase
Orders’ folder.
Open ‘Order amendment/confirmation’.
Enter your purchase order number in the required field and tab:
The order details will appear:
Click to ‘tick’ each line of the purchase order, then tick the ‘terminate’ button. you will be
asked to confirm the cancellation.
yIf the purchase order has already been dispatched to the supplier, you will need to
contact them to confirm the cancellation. A cancellation email will NOT be sent by
Agresso.
38
Call off Orders
(One purchase order for regular payments or payment by installment)
Call off orders come in many varieties, depending on your purchasing activity, and the
specifics of the order. If in doubt about any of the details, please get in touch with the
Helpdesk (2636) for advice and guidance.
Step One: Create the order
Open the standard requisition screen:
Enter the details on the requisition screen.
If you will be invoiced for more than one product or service, ensure you have a different line
for each product/service, with the corresponding account (category) code.
Use the ‘quantity’ field to denote the amount of invoices you will receive against
the purchase order. For example, if your purchase order is for a year, and you are
invoiced quarterly, then enter a quantity of 4; if you are invoiced monthly, enter a
quantity of 12.
Save the Requisition.
39
Step Two: ‘Receiving’ an invoice
‘Receiving’ an invoice releases the payment for that particular instalment.
You can ‘receive’ an invoice in two ways.
If you receive the invoice in your department before sending to Finance, or you have set a
reminder for each anticipated invoice date, you can confirm the receipt of the
goods/service by completing the Goods Receipt Screen.
If the invoice goes directly to the Finance Office and you have not completed the Goods
Received screen, a Missing Goods Received task will be sent to you. This is simply a prompt
– clicking on the task with open the Goods Receipt screen with the purchase order details
already loaded.
Completing a goods received screen
For each ‘product line’ showing on the invoice, enter a quantity of 1 (thereby releasing
payment for one instalment/invoice). do not worry about invoice amount at this stage (see
Step 3). Click SAVE.
If you cease to use a supplier before the specified ‘quantity’ of invoices are
received, simply click ‘Rest Cancelled’ and save the Goods Receipt screen.
40
Step Three: Approving an Invoice (Budget Holders)
Often with call off orders, you will not know the exact amount you are to be invoiced,
therefore the Purchase Order amount will be an estimate only.
When the invoice is received and registered, and you have completed the Goods Receipt
screen, if the amount invoiced differs from the estimated amount on the Purchase Order, a
task will be sent to the Budget Holder. This is an additional ‘check’ step, to ensure that you
are aware of the actual invoice value, and that you are happy to approve the payment.
The screen will show:
•
•
•
The details from your purchase order
The details from the invoice (so you can compare
A scanned image of the invoice (not shown in this screenshot)
Simply click ‘Approve’ to action the invoice for payment, or ‘Reject’ to hold the payment*
*If you click Reject, you must leave a comment to explain the reason for your rejection. If
you have been invoiced incorrectly, you must contact the supplier to arrange a credit note*.
41
42