1
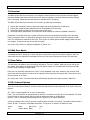
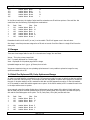
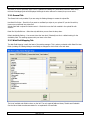
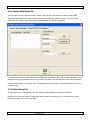
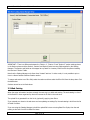
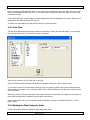
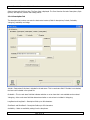
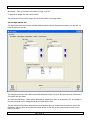
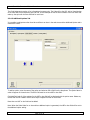
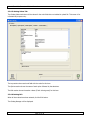
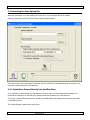
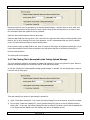
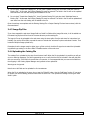
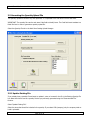
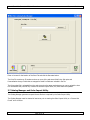
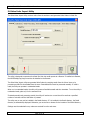
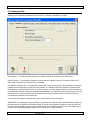
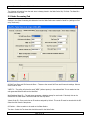
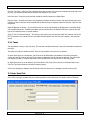
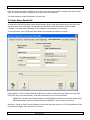
Yahoo! Store Web Connector V8 User Manual Document Revision: 1 M & M Enterprises, Inc. User Manual Yahoo! Store Web Connector v1.0 for Retail Pro V8 8.52 and Above Page 1 of 38 Yahoo! Store Web Connector V8 User Manual Document Revision: 1 Table of Contents 1.0 Overview ............................................................................................................................................... 4 2.0 Web Store Basics ................................................................................................................................... 4 2.1 Item Tables ........................................................................................................................................ 4 2.2 ID, Code and Options .......................................................................................................................... 4 2.3 Images .............................................................................................................................................. 5 2.4 Retail Pro Styles and ID, Code, Options and Image ................................................................................ 5 2.4 Path and Sections ............................................................................................................................... 6 2.5 Extra Inventory Fields ......................................................................................................................... 6 3.0 Web Catalog Manager ............................................................................................................................ 7 3.1 Catalog File and Setup......................................................................................................................... 8 3.2 Web Catalog Manager Setup ................................................................................................................ 8 3.2.1 General Tab ................................................................................................................................. 9 3.2.2 Web Field Mapping Tab ................................................................................................................. 9 3.2.3 Mapping a Field .......................................................................................................................... 10 3.2.4 Custom Web Fields Tab ............................................................................................................... 11 3.2.5 Path Setting Tab ......................................................................................................................... 11 3.3 Web Catalog..................................................................................................................................... 12 3.3.1 Item Filter .................................................................................................................................. 14 3.3.2 Building the Web Catalog for Styles .............................................................................................. 14 3.3.2.1 A/S/B................................................................................................................................... 15 3.3.2.2 Why Would You Use A or S? .................................................................................................. 16 3.3.2.3 Status Column ...................................................................................................................... 16 3.3.2.4 Save Changes....................................................................................................................... 16 3.3.2.5 Exiting the Style Assignment Screen ....................................................................................... 16 3.3.2.6 A/S/B Examples .................................................................................................................... 16 3.3.3 Building the Web Catalog for Items .............................................................................................. 17 3.3.4 Web Catalog Form View .............................................................................................................. 17 3.3.4.1 Description Tab .................................................................................................................... 18 3.3.4.2 Style Options Tab ................................................................................................................. 19 3.3.4.3 Additional Options Tab .......................................................................................................... 20 3.3.4.4 Sections Tab......................................................................................................................... 21 3.3.4.5 Catalog Values Tab ............................................................................................................... 22 3.3.4.6 Catalog Exit.......................................................................................................................... 22 3.4 Generating the Item Upload File......................................................................................................... 23 3.4.1 Items Were Entered Directly Into the Web Store ........................................................................... 23 3.4.2 The Catalog File Is Generated by the Catalog Upload Manager........................................................ 24 3.4.3 Image Zip Files ........................................................................................................................... 25 3.4.4 Uploading the Catalog File ........................................................................................................... 25 3.5 Generating the Quantity Upload File ................................................................................................... 26 3.5.1 Update Existing File..................................................................................................................... 26 3.5.2 Generate New File....................................................................................................................... 27 3.5.3 Using the MMYSQtyGen8.exe Utility.............................................................................................. 27 3.6 Generating the Price Upload File......................................................................................................... 27 3.7 Catalog Manager and Order Import Utility ........................................................................................... 28 4.0 Item Quantity File Utility (MMYSQtyGen8.exe) ........................................................................................ 29 5.0 Sales Order Import Utility...................................................................................................................... 30 5.1 Customers Tab ................................................................................................................................. 31 5.2 Order Processing Tab ........................................................................................................................ 32 5.2.1 Taxes......................................................................................................................................... 33 5.3 Order Email Tab................................................................................................................................ 33 5.3 Order Status Emails Tab .................................................................................................................... 34 5.4 Order Status Settings Tab.................................................................................................................. 35 5.4.1 Shipment Status Line Item Wording.............................................................................................. 35 Page 2 of 38 Yahoo! Store Web Connector V8 User Manual Document Revision: 1 5.4.2 Web Sale Receipt “WEB” Field...................................................................................................... 36 5.5 Generating Sales Orders .................................................................................................................... 37 5.5.1 Using Email ................................................................................................................................ 37 5.5.2 Using An Order File ..................................................................................................................... 37 5.5.3 Log............................................................................................................................................ 38 5.5.4 Orders Are Saved........................................................................................................................ 38 6.0 Web Store Settings............................................................................................................................... 38 6.1 Processing Order Emails .................................................................................................................... 38 6.2 Order Status Updates ........................................................................................................................ 38 Page 3 of 38 Yahoo! Store Web Connector V8 User Manual Document Revision: 1 1.0 Overview The M&M Yahoo! Web Store Connector is an integration between Retail Pro V8 and Yahoo! Merchant-Starter Merchant-Standard web stores. Note that these are Yahoo’s complete e-commerce solutions and are different than Y! Shopping. (Although these web stores can interface with Y! Shopping). The M&M Yahoo! Web Store Connector (YS Connector) provides this functionality: 1) 2) 3) 4) Prepare files containing inventory items and images that can be uploaded to the web store. Prepare files containing item quantities that can be uploaded to the web store. Create Sales Orders in Retail Pro for orders from the web store. Send order status update emails to the web store when receipts for orders are updated in Retail Pro. Please bear in mind that there are a number of functions that must be performed manually at the web store itself. For example, there is no method for letting the store know that it is OK to charge the customer’s credit card. This must be done manually at the store. There is also no method upload certain images (called inset and icon images). These must be set up from the store itself. And, by the way, Yahoo! is a registered trademark of Yahoo!, Inc. 2.0 Web Store Basics A complete tutorial on setting up a Yahoo! web store is beyond the scope of this manual. However, there are some basics that are important to understand so that you can properly upload your items to the web store. 2.1 Item Tables The web store uses tables to store the product information. There is a “default” table and you can set up your own tables. These tables are composed of fields with specific names. You can add fields to and remove fields from the tables including the default table. Each row of an item table represents one “item” or thing displayed in the store. However, each item can have options that the user selects from a drop down. Options can be things like Color and/or Size. There can be more than one option for an “item”. As a result, each “item” in the web store table could actually represent more than one item in Retail Pro. 2.2 ID, Code and Options There are three important fields in the Yahoo! web store that should be well understood. They are ID, Code and Options. ID – This is a unique identifier for a row in an item table. Code – This is an identifier for the actual item in Retail Pro. It would be the UPC, ALU or Item Number. The Code is the field that is used to identify the item when generating line items on a Sales Order. Options – One or more drop downs that appear for a single ID in the Yahoo! web store. It give an example of this, let’s say we have a Leather Jacket in Retail Pro inventory. The Leather Jacket comes in sizes S, M and L. It comes in colors Black and Brown. This gives us six items in our Retail Pro style: Item# 101 Desc1 Attr (Color) Leather Jacket Black Size S Page 4 of 38 Yahoo! Store Web Connector V8 User Manual 102 103 104 105 106 Leather Leather Leather Leather Leather Jacket Jacket Jacket Jacket Jacket Black Black Brown Brown Brown Document Revision: 1 M L S M L In the Yahoo! web store, the Leather Jacket could be entered as one ID with two options: Color and Size. We would then have the following ID/Code/Option combinations: ID 1 1 1 1 1 1 Code 101 102 103 104 105 106 Desc Leather Leather Leather Leather Leather Leather Jacket Jacket Jacket Jacket Jacket Jacket Color Black Black Black Brown Brown Brown Size S M L S M L Remember that this is all one ID (or row) in an item table. This ID will appear once in the web store. Also keep in mind that prices are assigned to an ID and not a code. So all the Codes in a single ID will have the same price. 2.3 Images There are three images fields for each ID in the web store: Image, Icon and Inset. Image – This is the primary image field. Icon – Is usually displayed on a section page. Inset – Displayed on the product page with the image. Uploaded images can be in .jpg or .gif format, but not both. Images are important when you are uploading styles because it is not possible to upload an image for every option associated with an ID. 2.4 Retail Pro Styles and ID, Code, Options and Image In order to provide flexibility in handling this, the YS Connector provides four ways to select how the Attr and Size fields of a style are used as options. In one method, Attr and Size appear as options and a single ID is created for the style. In another method, an ID is created for each Attr and Size appears as an option. In the third method, an ID is created for each Size and Attr appears as an option. In the fourth method, an ID is created for each item in the style and there are no options. As an example, using the Leather Jacket above, let’s assume we have images of the jacket in black and brown. We will need one ID for the black jacket and one ID for the brown jacket. So in this case, we break the style by Attr and the Size field appears as an option. The ID, Code, Desc, Color (Attr) and Size are then: ID 1 1 1 Code 101 102 103 Desc Color Leather Jacket Black Leather Jacket Black Leather Jacket Black Size S M L 2 2 2 104 105 106 Leather Jacket Brown S Leather Jacket Brown M Leather Jacket Brown L Page 5 of 38 Yahoo! Store Web Connector V8 User Manual Document Revision: 1 In this case, the Attr (Color) field does NOT appear as an option in the web store. (So a different web store field must be assigned for color). 2.4 Path and Sections There is a Path field in the web store that applies to each item. The Path field can be set to a series of sections. This provides a method of grouping items and “drilling down” to them. For example, an item’s path might be “Furniture, Outdoor, Garden”. There could be additional paths for “Furniture, Outdoor, Deck”, “Furniture, Indoor, Bedroom” and “Accessories, Indoor, Bathroom”. The names of all of the first sections in all paths appear on the home page and are used for navigation. In our example, the home page would have Furniture And Accessories. When Furniture is selected, there are additional selections for Outdoor and Indoor. The YS Connector provides up to three levels of section nesting. In other words, something like: Mens>Jackets>Outdoor. 2.5 Extra Inventory Fields The YS Connector provides extra inventory fields for each item in Retail Pro. Some of these fields have the same name as a field in a web store table. Whether or not the Retail Pro field is used for the web store field depends on the field mapping that has been set up in the Catalog Manager. The extra fields are: Orderable – A Yes/No field. Can be used for the “Orderable” field in the web store. Include – A Yes/No field. Can be used for the “Include” field in the web store. LongDesc1 – Up to 400 characters of information. LongDesc2 – Up to 400 characters of information. ShortDesc1 – Up to 200 characters of information. ShortDesc2 – Up to 200 characters of information. WebImage – Image file. YShopping – A Yes/No field. Can be used for the “In-yshopping” field in the web store. Section1 – An item level field for the first section in the web store. Section2 – An item level field for the second (first nested) section in the web store. Section3 – An item level field for the third (second nested) section in the web store. Availability – Corresponds to the Availability field in the web store. Page 6 of 38 Yahoo! Store Web Connector V8 User Manual Document Revision: 1 3.0 Web Catalog Manager The Web Catalog Manager is used to create files containing item or item quantity information that can be uploaded to the web store. To access the Web Catalog Manager, click the Web Catalog button from the Inventory screen side menu: The Web Store Catalog Upload Manager screen will be displayed: The screen has three tab sections: Catalog File, Quantity File and Price File. Catalog File – The Catalog File tab is used to generate an item file that can be uploaded to Retail Pro. Quantity File – The Quantity file tab is used to generate a file with item quantities that can be uploaded to Retail Pro. Page 7 of 38 Yahoo! Store Web Connector V8 User Manual Document Revision: 1 Price File – The Price File tab is used to generate a price update file that can be uploaded to the web store. 3.1 Catalog File and Setup Whether or not setup information needs to be entered depends on how items have been or will be added to the web store. There are two ways to get items into the web store: You can enter each item in the web store itself or you can generate an upload file with most of the item information needed and another file with most of the item images needed. If you enter items directly into the web store, the Catalog Manager has limited functionality. In this case, it can only update an existing item file that has been downloaded from the web store. The preferred method is to generate the upload file from the Catalog Manager and use that to get your items into the web store. In both cases, set up information must be entered. This is done from the Web Store Catalog Manager Setup screen. However, YOU MUST SELECT A FILE GENERATION TYPE BEFORE ENTERING THE SETUP SCREEN. 3.2 Web Catalog Manager Setup From the Web Store Catalog Manager Upload screen click the Setup button. The setup screen will be displayed: Page 8 of 38 Yahoo! Store Web Connector V8 User Manual Document Revision: 1 Important: If the file generation type is set to “Update Exist Catalog File (Items Were Entered In Web Store)”, the Web Field Mapping tab will be displayed. Although the other tabs can be viewed, they are not active. 3.2.1 General Tab The General tab is only enabled if you are using the Catalog Manager to create the upload file. Use Retail Pro Styles – Check this if you want to use Retail pro styles in your upload. If you don’t check this, items not are combined into styles at all. Include Path field in upload for section control – Check this to use the Path variable in the upload file with sections. Retail Pro Style Definitions – Select the style definition you use from the drop down. Default Availability Setting – You can set this at the item level (if desired) but this is a default setting for the Availability field. This wording appears with your items in the store. 3.2.2 Web Field Mapping Tab The Web Field Mapping is really the heart of the catalog manager. This is where you decide which Retail Pro item fields (including the Catalog Manager extra fields) are mapped to which fields in the web store. The list of available web fields is shown on the left. The only required fields are Name, Taxable and Orderable. See the Yahoo! Web store documentation for an explanation of these fields. Page 9 of 38 Yahoo! Store Web Connector V8 User Manual Document Revision: 1 Not all web fields must be mapped. Not all web fields can be successfully uploaded. It depends on the fields in the table you are uploading to and settings in the web store. In general, if you have included a field in an upload file and it is causing an error condition, it is recommended that the field be removed from the upload file and set manually at the store. 3.2.3 Mapping a Field To map a web field to a Retail Pro field, select the web field in the list. Select a Retail Pro field from the drop down. If you select “Price Level” you must select a Price Level from the Price Level drop down. Click the Set button next to the RPro field drop down. To map a web field to a fixed value, select the web field in the list. Enter the value in the Fixed Value box. Click the Set button next to the fixed value box. The value appears in the list with quotes. It is not uploaded to the web store with quotes. If you are setting the image field, be advised that the RPro field used must contain the path to an image file and the image file must be in jpeg of gif format with the .jpd or .gif extension. Image files are zipped into a separate upload file. Jpg and gof images cannot be mixed. You can only use one or the other format. (This is set in the web store itself). Example of a mapping screen: Note: The VendComp field in the drop down means the item’s Vendor’s Company Name. Page 10 of 38 Yahoo! Store Web Connector V8 User Manual Document Revision: 1 3.2.4 Custom Web Fields Tab You can create your own web field names in tables in the web store and upload the values for those fields. The Custom Web Fields Tab is used to enter the custom field name and map it to a value. The Custom Web Fields tab is only enabled if you are using the Catalog Manager to create the upload file. To map a custom field to an RPro field, enter the Field Name and select an RPro field from the drop down. If you select Price Level you must select a Price Level from the drop down. Click the Add button next to the Field Name. To set a custom field to a fixed value, enter the field name and the Fixed Value. Click the Add button next to the Fixed Value box. 3.2.5 Path Setting Tab The Path Setting tab is only enabled if you are using the Catalog Manager to create the upload file. Note that if you have not checked “Include Path field in upload for section control” in the General tab, entries made in this section will not have any effect. Page 11 of 38 Yahoo! Store Web Connector V8 User Manual Document Revision: 1 IMPORTANT – There is a difference between the “Section 1”, “Section 2” and “Section 3” section settings shown in the Section column and the Section1, Section2 and Section3 extra inventory fields supplied by the Catalog Manager. The Section web fields can be mapped to any Retail Pro inventory field from the drop down including the item level “Section” fields. Note that the Catalog Manager only allows three “nested” sections. In other words, it is not possible to put an item in a Mens>Jackets>Outdoor>Leather section. To map a web section to an RPro field, select the section and then select the RPro field from the drop down. Click the Add button. Sections cannot be set to fixed values. 3.3 Web Catalog When the setup information has been entered, the next step is to build web catalog. The web catalog is a list of all the Retail Pro items organized by what will become the ID field in the web store. The upload file is generated from this list by (optionally) applying item filters. If you entered your items in the web store and are updating an existing file, the web catalog is built from the list of Retail Pro items. If you are using the Catalog Manager to build the upload file but are not using Retail Pro Styles, then the web catalog is also built from the list Retail Pro items. Page 12 of 38 Yahoo! Store Web Connector V8 User Manual Document Revision: 1 If you are using Retail Pro styles, the web catalog is built from the list of Retail Pro styles that has been set up to properly combine items in a style so that the Attr and Size fields are correctly used as Options in the web store. See section 2.4 on Styles and ID, Code and Options for more information on this. Remember that a Retail Pro style can consist of a single item. So using styles does not mean that single items won’t appear in your store. They will. To build the web catalog (or display the existing web catalog), click the Web Catalog button from the Catalog Manager screen. The Web Catalog screen will be displayed: Page 13 of 38 Yahoo! Store Web Connector V8 User Manual Document Revision: 1 Note: If you are not using Retail Pro Styles or you entered your items directly in the web store, the Show Styles button will be labeled “Update From RPro”. In this case, items are pulled from Retail Pro inventory and no style combination is done. If you had already built the web catalog, the web catalog items would be displayed on the screen. Note that the catalog items are displayed by the web store ID. To build a new web catalog, first click the Filter button to set the item filter. 3.3.1 Item Filter The item filter determines which items or styles are pulled from inventory into the web catalog. To set the item filter, click the Filter button. The Item Filter screen is displayed: Items can be filtered by DCS, VC and UDF or Aux field. Select the DCSes and Vendor Codes that should be included by checking the DCS or Vendor Code. To use a Misc or Aux field to select items, check the “Use” box, select the UDF or Aux from the drop down and select a setting for the UDF or Aux. (Note that UDF3, UDF4, UDF5 and UDF6 are also referred to as Misc1, Misc2, Misc3 and Misc4.) When using the filter, an item must meet all the criteria selected to be included in the catalog. In other words, it must match a selected DCS, selected VC and the Misc or Aux setting. Once the item filter is set, you can proceed to build the catalog by clicking the “Update From RPro” or “Show Styles” button. 3.3.2 Building the Web Catalog for Styles Click the Show Styles button to display the Style Assignment screen. Page 14 of 38 Yahoo! Store Web Connector V8 User Manual Document Revision: 1 The Style Assignment screen will pull all the items/styles from Retail Pro inventory that match the item filter settings. To update the screen, click the Update From RPro button. Use this button any time you add new inventory items or change the item filter. The items that match the item filter will be displayed on the screen: This screen shows the DCS, VC, Desc1, Attr and Size for each style. There is also a column for A/S/B. The A/S/B setting is the entire reason for this screen. 3.3.2.1 A/S/B A/S/B stands for Attr, Size or Both. This setting determines which of Attr and Size will appear as options when the item is added to the web catalog. When styles are added to the Style Assignment list, the A/S/B setting is set based on the Attr and Size fields of the style. If there is more than one of both, the setting is B. If there is more than one of only one, the A/S/B is set to the one with more than one value. If there are one or less of both, the setting is N. To further clarify how this setting affects items in the web store: B – Both Attr and Size appear as options for the item. With this setting, all the items in the style will appear as one item in the web store. The customer will select the Attr and Size from drop downs when adding the item to their cart. S – Only Size appears as an option. This means that if there are two or more values for the Attr field in the style, the item will appear as many times as there are Attr values. Each item will have the Size values in a drop down. A – Only Attr appears as an option. This means that if there are two or more values for the Size field in the style, the item will appear as many times as there are Size values. Each item will have the Attr values in a drop down. Page 15 of 38 Yahoo! Store Web Connector V8 User Manual Document Revision: 1 N – Neither Attr nor Size appear as options. All the items in the style appear as separate items in the web store and there are no option drop downs. To set the A/S/B for a style, select the style and then select the setting from the Attr/Size Option Setting drop down. 3.3.2.2 Why Would You Use A or S? The primary reason for using A or S for a style with two or more Attr and Size fields is to break out one of them for image purposes. For example, if the Attr field is color and you want to show an image of each color, you might want to use the Size field as the option with separate web store entires 3.3.2.3 Status Column The Status column shows which items/styles have been changed since the screen was first displayed. Status “U” means the A/S/B setting was changed. Status “N” means this is a new item/style that was just added to the list when the list when updated from Retail pro. Status “D” means that the item filter was changed and this item/style is not included in the new catalog. 3.3.2.4 Save Changes Use the Save Changes button to save any new styles that were added to the list and to save any changes to the A/S/B settings. 3.3.2.5 Exiting the Style Assignment Screen When the exit button on the Style Assignment screen is clicked, the web catalog is updated and the new item/style list is displayed on the Web Catalog screen. 3.3.2.6 A/S/B Examples Here are some examples that show how the A/S/B setting affects what goes up to the web store. Here is the Style Assignment screen from the above example: The A/S/B setting for the Jacket style is set to B. This means that both Attr and Size will appear as options in the web catalog. With this setting, the items that appear in the web catalog are: Page 16 of 38 Yahoo! Store Web Connector V8 User Manual Document Revision: 1 See that there is one Web Store ID for the Jacket. This means that the Jacket will appear once in the web store with drop downs for Attr and Size. The Attr drop down will have Black and Brown as selections and the size drop down will have M and L as selections. Now let’s go back to the Style Assignment screen and change the A/S/B for the Jacket to S. This means that only Size will appear as an Option for the style: Now when we save and return to the Web Catalog we see: The Jacket now appears twice with two web ID numbers: one for Brown and one for Black. The Jacket will now appear in the web store twice. Once with Attr Brown and once with Attr Black. Both of these will have s Size drop down with selections for M and L. 3.3.3 Building the Web Catalog for Items If you are not using styles to build the web catalog, click the Update From RPro button on the Web Catalog screen. All Retail Pro items that match the item filter will be displayed on the web catalog screen. 3.3.4 Web Catalog Form View Once the items/styles are listed on the Web Catalog screen, you can select an item and switch to the From View. The Form View is where you enter the values for the extra inventory fields and other web store fields. Page 17 of 38 Yahoo! Store Web Connector V8 User Manual Document Revision: 1 Select an item and click Form View. The Form View is displayed. The Form View has five tabs: Descriptions, Style Options, Add’ Options, Sections and Catalog Values. 3.3.4.1 Description Tab The description tab is where you enter the basic extra inventory fields for descriptions, Include, Orderable, Yshopping, Availability and image. Include – Determines if this item is included in the web store. This is a web store field. If Include is not checked, the item is still included in the upload file. Orderable – This is a web store field that indicates whether or not an item that is not available can be ordered. Yshopping – Also a web store field that determines whether or not an item is included in Yshopping. LongDesc1 and LongDesc2 – Description fields up to 400 characters. ShortDesc1 and ShortDesc2 – Description fields up to 200 characters. Availability – Select an availability setting from the drop down. Page 18 of 38 Yahoo! Store Web Connector V8 User Manual Document Revision: 1 Web Image – Enter or browse for the location of a jpg or gif file. To preview the image, click the Preview button. The preview the RPro Inventory image, click the Preview RPro Item Image button. 3.3.4.2 Style Options Tab The Style Options tab shows the Attr and Size fields as used as options. Styles with one item in the style will not have any entries in this tab. The example shown here is the Jacket with A/S/B setting set to Both. It has an Attr option with two values and a Size option with two values. Atrr Name and Size Name – These entries determine the name of the option in the web store. So, for example, in this case we would want to change the Name of the Attr field to Color. The Attr Values and Size Values boxes with the arrow buttons allow you to determine the order the options are displayed in the drop down at the web store. Select an Attr or Size and use the arrow buttons to move it up or down in the order. Page 19 of 38 Yahoo! Store Web Connector V8 User Manual Document Revision: 1 The Code Assignments section is for informational purposes only. The Code will be the UPC, ALU or Item Number of the item with the corresponding Attr and Size. In this example we see the item numbers of the four items that make up the style with the Attr and Side for each item. 3.3.4.3 Additional Options Tab It is possible to add options other than Attr and Size to an item in the web store and the Additional Options tab is where that is done. To add an option, enter the name of the option and select an RPro field from the drop down. The Option Name is what will appear in the web store. The RPro field must be an item UDF or Aux field. Click Add Field and all of the settings for the UDF or Aux field will be displayed with the option name. Delete any entries that are not needed. Use the arrow keys to adjust the order of the entries. More than one UDF or Aux field can be added. Note: When the Sales Order for an item with an additional option is generated, the UDF or Aux field will be set to the additional option setting. Page 20 of 38 Yahoo! Store Web Connector V8 User Manual Document Revision: 1 3.3.4.4 Sections Tab This is where you set the values for this item’s item-level section fields. The entries made here will only be used to determine the item’s section if you have mapped the Web Section fields to the RPro Section fields. Page 21 of 38 Yahoo! Store Web Connector V8 User Manual Document Revision: 1 3.3.4.5 Catalog Values Tab The Catalog Values tab shows all the values for the web fields that are included in upload file. This screen is for informational purposes only: The top section shows each web field with the value for this item. The Options section shows the name of each option followed by the selections. The Path section shows the section values (if Path is being used) for this item. 3.3.4.6 Catalog Exit When all item values have been entered, click the Exit button. The Catalog Manager will be displayed. Page 22 of 38 Yahoo! Store Web Connector V8 User Manual Document Revision: 1 3.4 Generating the Item Upload File When the items/styles in the web catalog have been set up, the item upload file can be created. Select the Catalog File tab from the Web Store Catalog Upload Manager: There are several ways to generate an upload file. How the upload file is generated depends on whether or not items were entered directly into the web store. 3.4.1 Items Were Entered Directly Into the Web Store If you entered your items directly into the web store, the only way to use the Catalog Upload manager is to download the items file from the web store, update the file and upload the file to the web store. In this case, “Update Existing Catalog File” should be selected and the web catalog must have been generated using Retail Pro items. The Catalog Manager Upload screen would have: Page 23 of 38 Yahoo! Store Web Connector V8 User Manual Document Revision: 1 Because the item file was not generated by the Catalog Upload Manager, it basically does not know which web store field is being used to identify Retail Pro items or what lookup scheme is being used. So you have to enter this information before the upload file can be generated. Select the Item Lookup sequence from the drop down. Select the Web Field from the drop down. This is the field in the web store that contains the item identifier (Item Number, UPC or ALU). Although ID is one of the selections, it is NOT recommended that you use ID to identify items. The Code field should really be used to identify items. Once the Item Lookup and Web Field are set, enter or browse for the location of the Existing Catalog File. (If you haven’t downloaded an item file from the web store, do that and use that file for the Existing Catalog File.) Click the Generate button. The existing file will be updated. 3.4.2 The Catalog File Is Generated by the Catalog Upload Manager This is the preferred method for generating the catalog file especially if you are using Retail Pro styles. With this method, the upload manager can control the web ID, Code and Options fields. In this case “Catalog File Is Generated By Catalog Upload Manager” is selected. The web catalog may or may not have been set up using styles. There are basically four options for generating the upload file: 1) Check “Create New Catalog File”. In this case, the Output Catalog File must be entered. A new file is created. 2) Do not check “Create New Catalog File”, check “Update Existing File” and do not check “Add New Items to Existing File”. In this case, the Existing Catalog File must be entered. The fields in the file will be updated. But if new items have been added to the web catalog, they will not be added to the file. Page 24 of 38 Yahoo! Store Web Connector V8 User Manual Document Revision: 1 3) Do not check “Create New Catalog File”, do not check “Update Existing File” but check “Add New Items to Existing File”. In this case, the Existing Catalog File must be entered. The fields in the file will not be updated and new items from the web catalog will be added to the file. 4) Do not check “Create New Catalog File”, check “Update Existing File” and also check “Add New Items to Existing File”. In this case, the Existing Catalog File must be entered. The fields in the file will be updated and new items from the web catalog will not added to the file. Once the settings are complete and the Existing Catalog File or Output Catalog File have been entered, click the Generate button. 3.4.3 Image Zip Files If you have mapped the web store Image field to a Retail Pro field and the image file exists, it will be added to a file named img.zip that will be found in the same directory as the catalog file. The img.zip file can be uploaded to the web store using the store editor. See the web store for instructions but basically you use the Store Editor, expand the menu to include the “advanced” options and select Controls. Then locate the Multiple Image upload entry. Remember that the images must be either jpg or gif but not both. And the file type has to match the Uploadedimg-default-type setting in the Store Editor>Variables section of the web store. 3.4.4 Uploading the Catalog File The catalog file is uploaded to the store from the store itself. When the file is uploaded it is possible you will get errors or warning messages. If a field is generating an error verify that the field is included in the web-side item able you are using. If the field is there and the error persists, it is recommended that you remove the field from the mapping in the Catalog Upload Manager and generate a new upload file. Warnings can be ignored. Note that not all fields can be uploaded in all circumstances. When the file is uploaded to the store, do not use the “Rebuild” option. Use the “Add Items” option. If you want to replace your entire catalog, delete all items from the store first. Then upload the Catalog File using the “Add Items” option. Page 25 of 38 Yahoo! Store Web Connector V8 User Manual Document Revision: 1 3.5 Generating the Quantity Upload File The quantity upload file contains only item quantities. It is uploaded to the web store from the web store. IMPORTANT: The quantity file uses the web store Code field to identify items. The Code field must translate to a Retail Pro item in order to generate a quantity upload file. Select the Quantity File tab in the Web Store Catalog Upload Manager: 3.5.1 Update Existing File If you already have a quantity file and want to update it, enter or browse for the file in the Existing Quantity File box. Note that this file can be a quantity file that you previously generated using the “Generate New File” function. Select “Update Existing File”. Select the stores that should be included in the quantity. If you select CMP (company) only the company total onhand is uploaded. Page 26 of 38 Yahoo! Store Web Connector V8 User Manual Document Revision: 1 Click the Generate button. 3.5.2 Generate New File You can generate a new quantity upload file using the web catalog. In this case, an entry is made for every Code (item) in the web catalog. (This includes all the items that make up a style). Select “Generate New File Based on Web Catalog”. Select the stores that should be included in the quantity. If you select CMP (company) only the company total onhand is uploaded. Click the Generate button. 3.5.3 Using the MMYSQtyGen8.exe Utility IMPORTANT: If you are going to use the MMYSQtyGen8.exe utility to generate an item quantity upload file on a scheduled basis, you MUST enter the location and name of an existing quantity upload file here in the Existing Quantity File box. The recommended procedure is: 1) Select the stores that should be included when calculating the on-hand quantity. 2) Generate a new quantity upload file. 3) Copy the name and location of the new file to the Existing Quantity File box. 4) Exit the Catalog Upload Manger. 3.6 Generating the Price Upload File The Price Upload file is an easy way to update prices without generating a new upload file. The Price Upload tab is only active if you are using the Catalog Upload Manager to generate the upload file. If you have entered items directly into the web store, this tab is not active. Select the Price File tab in the Web Store Catalog Upload Manager: Page 27 of 38 Yahoo! Store Web Connector V8 User Manual Document Revision: 1 Enter or browse for the location of the Price File and click the Generate button. The Price File contains an ID number and one or more of the web store fields Price, Sale-price and Personalization-charge. Fields that are mapped to Retail Pro fields are included in the file. The Price upload file is uploaded from the web store using the same mechanism as you use to upload the item file. But because the price file only contains the web store price fields, only those fields are updated. 3.7 Catalog Manager and Order Import Utility The Catalog Manager generates a special license file that is required by the Order Import Utility. The Catalog Manager must be started at least once prior to starting the Order Import Utility or a “License Not Found” error will occur. Page 28 of 38 Yahoo! Store Web Connector V8 User Manual Document Revision: 1 4.0 Item Quantity File Utility (MMYSQtyGen8.exe) The MMYSQtyGen8.exe utility program will generate a quantity upload file on a scheduled basis. The utility must be installed in the Retail Pro directory. If run manually, the user interface is displayed: The utility does maintain a log file for every day it is run. If the quantity upload file is not generated on schedule, check the log. Page 29 of 38 Yahoo! Store Web Connector V8 User Manual Document Revision: 1 5.0 Sales Order Import Utility The Sales Order Import Utility receives orders from the web store and generates Sales Orders in Retail Pro. The utility is designed to operate at the Retail Pro Main but could operate at a Remote. If installed at a Remote, the MMYSCatMgr.bpl plugin must also be installed on the Remote. The Sales Order Import utility can generate Sales Orders by receiving emails from the Yahoo! store or by processing an XML file downloaded from the store. Downloaded files must be processed manually. If email is used, the utility can operate in unattended mode. When run in unattended mode, the utility will process all available emails and then terminate. To run the utility in unattended mode, place a /U on the command line. If started manually and processing emails, the utility will continue to run and check for emails at a specified number of minutes until the Halt button is pressed. The utility may or may not be installed in the Retail directory. If it is installed in the Retail directory, the Retail directory is automatically displayed. Otherwise, you must enter or browse for the location of the Retail directory. Settings must be made before any orders are received from the web store. Page 30 of 38 Yahoo! Store Web Connector V8 User Manual Document Revision: 1 5.1 Customers Tab Settings on the Customers tab determine how the Bill To Customer is handled for an order: Use Customer – The utility uses the Customer you select as the Bill To Customer on all Sales Orders. Place In SO Only – The customer information from the web site is placed in the Bill To Customer fields in the Sales Order. The Retail Pro Customer file is not affected. Use Retail Pro Customer File – The Retail Pro Customer file is used. In this case, the utility attempts to match the customer from the web store by using the phone number. If a match is found, that customer is used as the Bill To Customer on the Sales Order. If there is no phone number or a match cannot be found, the utility attempts to find a Retail Pro customer using the last name and email address. If a match cannot be found that way, the utility attempts to find a match using last name, first name and zip code. If a match cannot be found using these, a new customer is created in the Customer file. If you select “Use Retail Pro Customer File”, select a Store Code from the drop down. IMPORTANT: One advantage of using the Retail Pro Customer file is that the credit card information coming from the web store can be saved in the Customer record. If you are using payment processing in Retail Pro and want to tender the web receipts using the credit card information from the web store, this is a very convenient way to do that. If you are doing payment processing in the web store, this may not matter. Page 31 of 38 Yahoo! Store Web Connector V8 User Manual Document Revision: 1 The shipping information from the web store is always placed in the Sales Order Ship To fields. The Retail Pro customer file is not used. 5.2 Order Processing Tab Settings in the Order Processing tab determine how the Sales Orders are created in Retail Pro (settings on first entry are shown): SO Sell From Store and SO Process At Store – These are the normal Sell From and Process At settings. Select a Store Code for each. “WEB” To – The utility will place the word “WEB” (without quotes) in the selected field. This is needed so that web generated Sales Orders can be identified. Web Datetime StampTo – The web store generates a datetime stamp for each order. If desired, this can be stored with the Sales Order. Select the field from the drop down. Yahoo! Order ID – Every order has an ID number assigned by Yahoo!. This order ID must be stored with the SO. Select the field from the drop down. SO Cashier – Select a cashier to be used on the Sales Orders. Tax Area – Select the Tax Area that should be used for the Sales Order. Page 32 of 38 Yahoo! Store Web Connector V8 User Manual Document Revision: 1 Zero Tax Tax Code – Select the Tax Code that has a zero tax rate. If you have not entered a tax code with a zero tax rate, you should do that and then complete the settings on this screen. Use Price Level – Enter the price level that should be used for items on the Sales Order. Discount Type – In cases where there is a discrepancy between the price from the web store the and price level used for an item, a discount will be entered and the discount type is required. Select the Discount Type from the drop down. Make SO Deposits w/Tender – If you check this box, the utility will generate an SO Deposit for each Sales Order with a credit card tender. If PayPal was used to pay at the web store, the PayPal Card Type is used as the card type for this deposit (there is no card number). Store CC Info In Customer Record – This setting is only valid if you are using the Retail Pro Customer file for the Bill To Customer. If you check this box, the credit card information from the web site is stored in the customer record. 5.2.1 Taxes Tax information is set up in the web store. The web store sends tax amounts in the order information received by the utility. The utility only has two modes for taxes: There is a tax amount or there isn’t a tax amount. In cases where there is a tax amount, the Tax Area of the Sales Order (as selected in the Order Processing screen) and the Tax Code of the item (from inventory) determine the tax rate and tax amount. The utility does not attempt to match or compare the amount from the web store with the amount on the Sales Order. In cases where there is no tax amount, the utility sets the Tax Code of the line item on the Sales Order to the Zero Tax Tax Code entered in the Order Processing screen. If there is a discrepancy between the SO total and the web store total, a message is written to the log file. 5.3 Order Email Tab If the utility is going to process orders by receiving emails from the web store, this section must be filled out. Page 33 of 38 Yahoo! Store Web Connector V8 User Manual Document Revision: 1 Enter the user ID, password and POP3 server name for the email account used for sending orders from the web store. The system the utility is installed on must have access to the Internet. This email address must also be entered in the web store. 5.3 Order Status Emails Tab In conjunction with the Web Store Catalog Upload Manager plugin, order status emails can be sent back to the web store when items are shipped. The web store then sends an email to the customer with the update information. The order status information is also available to the customer in the web store. To use this feature, check “Send Order Status Emails” and complete the settings on this tab: Outgoing Email – Enter the email address and SMTP server used for sending the status emails to the web store. If the SMTP server uses authentication, check the box and enter the user ID and password. IMPORTANT: The Web Store Catalog Manager uses the ASPEmail component to send these emails. Using SMTP authentication requires the premium version of ASPEmail. There is a fee for this license. Web Store – Obtain an Email Tracking Password from the web store and enter it here. If the Email Address of the web store has changed, enter the new one in the box. Page 34 of 38 Yahoo! Store Web Connector V8 User Manual Document Revision: 1 If you would like the status emails to be BCC’d to an address, enter it in the box. Order Status Emails are automatically sent by the Web Store Catalog Upload Manager when a receipt with web store items is updated in Retail Pro. 5.4 Order Status Settings Tab This tab has additional settings that are used for sending the Order Status Update Emails. It also has one setting for marking receipts. 5.4.1 Shipment Status Line Item Wording When the order status email is sent to the web store, it has an entry for every item in the original order. Text regarding the status of each item can be included in the email. The result is that the customer receives an email from the store with the status of each item. If all the items in the order are shipped at once and all the items are on a receipt, then all items are marked shipped and only one email is required. However, in the cases where shipments are spread across more than one receipt, the appropriate wording should be sent for each item. Page 35 of 38 Yahoo! Store Web Connector V8 User Manual Document Revision: 1 If all receipts are updated from the same Retail Pro system (Main or Remote), the Yahoo! Store Connector keeps track of the shipments for every order and can include the appropriate wording for the status for each item. Other than “Shipped”, there are four possible cases for an item. These are shown in the Shipment Status Line Item Wording section. Bear in mind that the order status update email contains ALL the items for the order. Not just the items on the receipt. Not Shipped Yet – The item has not been shipped. Total Qty Was Previously Shipped – The total quantity of this item was shipped on another receipt. Partial Quantity In This Shipment – Some of the item was shipped on this receipt but more are due to be shipped. Partial Quantity Previously Shipment – Some of the item was shipped from a previous receipt and more are due to be shipped. 5.4.2 Web Sale Receipt “WEB” Field If you would like the word “WEB” (without quotes) to be placed on a receipt from a web sales order, select the field from the drop down. This can assist with reporting on web sales. Page 36 of 38 Yahoo! Store Web Connector V8 User Manual Document Revision: 1 5.5 Generating Sales Orders To generate Sales Orders, select the Genera tab: 5.5.1 Using Email Select “Process Orders From Emails”. Enter the number of minutes for order checking. Click the Run button. The utility will check for incoming emails and process the orders. This will continue until the Halt button is pressed. 5.5.2 Using An Order File Download the orders from the web store. Select “Process Order File”. Page 37 of 38 Yahoo! Store Web Connector V8 User Manual Document Revision: 1 Enter or browse for the location of the order file. Click the run button. 5.5.3 Log The utility maintains a log file for each day it is run. Click the Log button to view log files. 5.5.4 Orders Are Saved Whether you are using emails or processing an order file, all order information is stored in a directory named YStore/WebOrders below the directory where the utility is installed. Note that all order information is in XML format. 6.0 Web Store Settings This is a guide to web store settings that are required for some of the Order Import Utility functionality. This is not a replacement for the Yahoo! Store help system. 6.1 Processing Order Emails If you are using emails to process incoming orders, this must be set up in the web store. From the Store Manager select “Email” under “Order Settings.” Enter the email address you have set up for the order emails. This email address should not be used for any other purpose. Under Send check “Immediately” and under format check “XML Format.” 6.2 Order Status Updates If you are sending Order Status emails, from the Store Manager select “Shipment & Order Status” under “Order Settings.” There are several items you can set here, but if you want emails to go to your customers when a status update email is sent to the store, check “Use Shipment Tracking Features”. Page 38 of 38