1
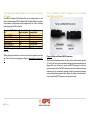
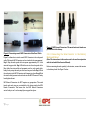
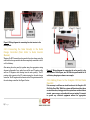
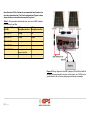
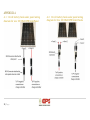
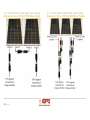
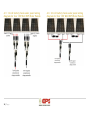
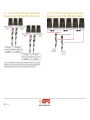
USER’S MANUAL Off-Grid Solar We provide unmatched value in terms of quality, price & service EPS considers each organization to have unique demands when it comes to Energy Management. We deal in: • Water & Waste Management • Solar & Wind Power • Energy Efficient electrical Appliances and Lighting Additionally, you can read about us & our services at our website: http://www.eroeipower.com We work from Monday to Friday and are available from 9 AM to 6 PM Solar Kits (100-2000 Watts) EPS-100W-KIT EPS-200W-KIT EPS-300W-KIT EPS-400W-KIT EPS-600W-12-KIT EPS-600W-24-KIT 1|Page CONTENTS 1 INTRODUCTION .................................................................................. 2 1.1 Limited Warranty .......................................................................... 2 1.2 Restrictions ................................................................................... 3 1.3 Warranty Claims & Return Procedures .......................................... 3 1.4 DISCLAIMER ................................................................................. 3 1.5 LIMITATION OF LIABILITY............................................................. 4 2 PRODUCT OVERVIEW......................................................................... 4 2.1 FEATURES ..................................................................................... 4 2.2 SAFETY PRECAUTIONS ................................................................. 4 3 INSTALLATION .................................................................................... 4 3.1 Parts List........................................................................................ 4 3.2 GENERAL INSTALLATION GUIDELINES......................................... 5 3.2.1 Mounting the Solar Panels ....................................................... 5 A.1 12 volt battery bank solar panel wiring diagram for one 100 Watt EPS SolarPanel ................................................................................. 12 A.2 12 volt battery bank solar panel wiring diagram for two 100 Watt EPS Solar Panels ............................................................................... 12 A.3 24 volt battery bank solar panel wiring diagram for two 100 Watt EPS Solar Panels ............................................................................... 13 A.4 12 volt battery bank solar panel wiring diagram for three 100 Watt EPS Solar Panels....................................................................... 13 A.5 12 volt battery bank solar panel wiring diagram for four 100 Watt EPS Solar Panels ............................................................................... 14 A.6 24 volt battery bank solar panel wiring diagram for four 100 Watt EPS Solar Panels ............................................................................... 14 A.7 12 volt battery bank solar panel wiring diagram for six 100 Watt EPS Solar Panels ............................................................................... 15 A.8 24 volt battery bank solar panel wiring diagram for six 100 Watt EPS Solar Panels ............................................................................... 15 3.2.2 Wiring the Solar Panels for 12 or 24 volt battery Charging ...... 6 3.2.3 Attaching the MC4 Connectors to the Solar Panel Extension Cable .............................................................................................. 6 3.2.4 Connecting the Solar Inverter to the Battery Bank and Panel ... 7 3.2.5 Connecting the Solar Panel(s) to the Solar Charge Controller (Note: Refer to Solar Inverter Manual) ............................................. 8 3.2.6 Adding Fuses to the Complete Off-Grid Solar Panel Kit........... 8 4 TROUBLESHOOTING AND SUPPORT ................................................. 10 4.1 FREQUENTLY ASKED QUESTIONS .............................................. 10 4.2 SUPPORT..................................................................................... 11 APPENDIX A......................................................................................... 12 2|Page 1 INTRODUCTION EROEI Power Solutions (“EPS”) is not assembling the Complete Solar Panel Off-Grid Kit (excepting batteries), or any other product offered by EPS. EPS, and its directors, officers, and employees disclaim, and by purchasing a EPS product you accept all liability and responsibility for damage to property, injury, or death arising out of or related to the use or misuse of any product offered by EPS. 1.1 Limited Warranty EPS warrants that Solar Panel Off-Grid Kit (the “Product”), will be free from manufacturing defects in materials and workmanship under normal authorized use consistent with product instructions for a period of one (1) year from the date the original purchaser (“Customer”) receives the Product (the “Warranty Period”). This warranty extends only to the original purchaser. The Customer’s sole and exclusive remedy and the entire liability of EPS, its suppliers and affiliates for breach of the warranty is, at EPS’s option, either (i) to replace the Product (or defective component part(s)) with a new or reconditioned Product (or component part(s)); (ii) to repair the reported problem; or (iii) to refund the purchase price of the Product. Repaired or replaced products are warranted for the remainder of the original warranty period only. No employee, agent, dealer or other person is authorized to give any warranties on behalf of EPS not expressly set forth in this limited warranty. 1.2 Restrictions No warranty will apply if the Product (i) has been altered or modified except by EPS; (ii) has not been installed, operated, repaired, or maintained in accordance with instructions supplied by EPS;(iii) has been subjected to abnormal physical, thermal or electrical stress, misuse, negligence, or accident. If EPS determines that the problem with the Product is not due to a manufacturing defect in EPS’s workmanship or materials, or otherwise does not qualify for warranty repair, then the Customer will be responsible for the costs of all necessary repairs and expenses incurred by EPS. 1.3 Warranty Claims & Return Procedures To be eligible for service under this warranty, the Customer must submit a service request within the Warranty Period by contacting EPS in writing or via telephone and obtaining a Returned Materials Authorization (“RMA”) number. This RMA must be obtained before returning any product under this warranty. Notification must include a description of the alleged defect, the manner in which the Product was used, the serial number, and the original purchase date in addition to the name, address, and telephone number of 3|Page the Customer. Within five (5) business days of the date of notification, EPS will provide the Customer with an RMA number and the location to which the Customer must return the defective Product. Any Product returned for warranty service shall be shipped at the expense and risk of the Customer. The Customer must return the entire Product kit (or, if authorized by EPS, the defective component parts), within fifteen (15) days after issuance of the RMA number. EPS will be under no obligation to accept any returned Product that does not have a valid RMA number. Customer’s failure to return the Product within fifteen (15) days of its receipt of an RMA number may result in cancellation of the RMA. All parts that EPS replaces shall become EPS’s property on the date EPS ships the repaired Product or part back to the Customer. EPS will use all reasonable efforts within thirty (30) days of receipt of the defective Product to repair or replace such Product. If a warranty claim is invalid for any reason, the Customer will be charged at EPS’s then-current rates for services performed and will be charged for all necessary repairs and expense incurred by EPS. If EPS determines that a warranty claim is valid, it will ship the repaired or replaced Product to Customer at EPS’s cost. 1.4 DISCLAIMER EXCEPT FOR THE EXPRESS LIMITED WARRANTY SET FORTH IN THE PREVIOUS PARAGRAPH, EPS DISCLAIMS ALL WARRANTIES, EXPRESS, IMPLIED AND STATUTORY INCLUDING, WITHOUT LIMITATION, THE IMPLIED WARRANTIES OF MERCHANTABILITY AND FITNESS FOR A PARTICULAR PURPOSE WITH RESPECT TO ANY PRODUCTS PROVIDED BY EPS. NO ORAL OR WRITTEN INFORMATION OR ADVICE GIVEN BY EPS, ITS DEALERS, DISTRIBUTORS, AGENTS OR EMPLOYEES SHALL IN ANY WAY INCREASE THE SCOPE OF THIS WARRANTY. EPS DOES NOT WARRANT THAT THE QUALITY OR PERFORMANCE OF THE PRODUCTS WILL MEET YOUR REQUIREMENTS OR THAT YOU WILL BE ABLE TO ACHIEVE ANY PARTICULAR RESULTS FROM USE OR MODIFICATION OF THE PRODUCTS. Some jurisdictions do not allow the limitation or exclusion of implied warranties or how long an implied warranty may last, so the above limitations may not apply to you. In any such jurisdiction, the warranty shall be limited to the minimum warranty and period required by law. EPS EXPRESSLY DISCLAIMS ALL LIABILITY FOR BODILY INJURIES OR DEATH THAT MAY OCCUR, DIRECTLY OR INDIRECTLY, BY USE OF THE PRODUCT BY ANY PERSON. 1.5 LIMITATION OF LIABILITY UNDER NO CIRCUMSTANCES WILL EPS OR ITS AFFILIATES OR SUPPLIERS BE LIABLE OR RESPONSIBLE FOR ANY LOSS OF USE, INTERRUPTION OF BUSINESS, LOST PROFITS, LOST DATA, OR INDIRECT, SPECIAL, INCIDENTAL, OR CONSEQUENTIAL DAMAGES OF ANY KIND REGARDLESS OF THE FORM OF ACTION, WHETHER IN CONTRACT, TORT (INCLUDING NEGLIGENCE), STRICT LIABILITY OR OTHERWISE, EVEN IF EPS OR ITS AFFILIATE OR SUPPLIER HAS BEEN ADVISED OF THE POSSIBILITY OF SUCH DAMAGE. Some states do not allow the exclusion or limitation of incidental or consequential damages, so these limitations may not apply to you. Neither EPS nor its affiliates or suppliers will be held liable or responsible for any damage or loss to any items or products connected to, powered by or otherwise attached to the Product. The total cumulative liability to Customer, from all causes of action and all theories of liability, will be limited to and will not exceed the purchase price of the Product paid by Customer. This warranty gives the Customer specific legal rights and the Customer may also have other legal rights that vary from state to state. 2 PRODUCT OVERVIEW Building a complete off-grid solar system has never been easier. EPS’s Solar Panel Off-Grid Kits provide up to 3000 Watt Hours of power per day and can be installed quickly and professionally using the included materials. The Solar Panel Off-Grid Kits are designed for anything from temporary back-up power to continuous power for an off-grid cabin or small house. 2.1 FEATURES Auxiliary power for RV’s and boats. Popular with commercial RV and marine retrofitters Great for camping or remote cabins. Power devices in remote back country locations Easy way to provide power for sheds, light poles and gates without the need for trenching and laying cables Two or more panels can provide back-up power for critical appliances like a refrigerator during a power outage. 2.2 SAFETY PRECAUTIONS CAUTION: Working with and installing electrical equipment is dangerous. Potential hazards include, but are not limited to, electrocution and electrical fires. Always consult a licensed electrician when installing any electrical equipment. 3 INSTALLATION 3.1 Parts List (Note: Quantity of each item varies depending on the kit size ordered) 1. 100 Watt Solar Panel 4|Page 2. Solar Panel Charge Controller 3. MC4 Connectors and MC4 Branch Connectors 4. Solar Panel Cable 5. Solar Panel Mounting Z-Brackets Figure 2: The solar panel faces South at a tilt angle equal to 20 degrees. The solar panels should be mounted on to a flat surface that is strong enough to handle the weight bearing load of the solar panels. See Figure 3 below. 3.2 GENERAL INSTALLATION GUIDELINES 3.2.1 Mounting the Solar Panels The solar panels should be mounted at angle facing South. The mounting angle should be equal to the geographical latitude of the location at which the solar panels are installed which is about 20 degrees. This will maximize the power output from the solar panels. 5|Page Figure 3: Use the Z-Brackets to mount the solar panel to a flat surface 3.2.2 Wiring the Solar Panels for 12 or 24 volt battery Charging All of EPS’s Complete Off-Grid Solar Kits can be configured for 12 volt battery bank charging. EPS’s Complete Off-Grid Solar Kits that contain an even number of solar panels can be configured for 12 or 24 volt battery bank charging. See Table I below. 3.2.3 Attaching the MC4 Connectors to the Solar Panel Extension Cable Complete Off-Grid Solar Number of Solar Battery Bank Kit Panels Included Compatibility EPS-100W-KIT One 12 volts EPS-200W-KIT Two 12 or 24 volts EPS-300W-KIT Three 12 volts EPS-400W-KIT Four 12 or 24 volts EPS-600W-KIT-12 Six 12 or 24 volts EPS-600W-KIT-24 Six 24 volts Table I: Battery bank voltage compatibility for EPS’s Complete Off-Grid Solar Kits. Wiring diagram instructions on how to wire the solar panels in each kit for 12 or 24 volt battery charging are shown in Appendix A on Pages 12 15 6|Page Figure 4: Male and Female MC4 Connectors After you have determined how the solar panels will be wired together (12 or 24 volt) and you have consulted the appropriate wiring diagram in Appendix A, you will need to attach the MC4 Connectors to the solar panel extension cable. The MC4 connectors provide a reliable and water resistant way for conveniently making electrical connections between solar panels and the extension cable. Figure 4 and Figure 5 below outline how to attach the MC4 Connectors to solar panel cable. Figure 6: MC4 Branch Connectors. The metal male and female are pre-installed at the factory. Figure 5: Connecting a male MC4 Connector to Solar Panel Cable Figure 5 outlines how to attach a male MC4 Connector to the solar panel cable (The female MC4 Connector can be attached in the same manner). Step 1: Strip the solar panel cable to expose approximately 3/8” of the stranded copper cable. Step 2: Slide the nut onto the solar panel cable. Next, slide the strain relief and grommet onto the solar panel cable. Lastly, firmly crimp the male pin onto the solar panel cable Step 3: Slide the male pin into the MC4 Connector until it snaps into place. Step 4: Slide the strain relief/grommet and nut back onto the MC4 Connector. Firmly hand-tighten the nut. MC4 Branch Connectors do NOT require any preparation. The metal female and male pins are pre-installed at the factory inside the MC4 Branch Connectors. This means that the MC4 Branch Connectors arrive“ready-to-use” and can simply be snapped into place. 7|Page 3.2.4 Connecting the Solar Inverter to the Battery Bank and Panel (Note: The instructions in this section need to be used in conjunction with the included Solar Inverter Manual) Before connecting the solar panel(s) to the inverter, connect the inverter to the battery bank. See Figure 7 below. Figure 7: Wiring diagram for connecting the solar inverter to the battery bank. 3.2.5 Connecting the Solar Panel(s) to the Solar Charge Controller (Note: Refer to Solar Inverter Manual) Warning: Do NOT connect the solar panels to the solar charge controller until the solar charge controller has been completely connected to the 12 or 24 volt battery. After wiring the solar panel(s) together using the appropriate wiring diagram in Appendix A as a guide, there will be one PV positive cable and one PV negative cable coming from the solar panel(s). The PV positive cable connects to the PV positive terminal on the solar charge controller. The PV negative cable connects to the PV negative terminal on the solar charge controller. See Figure 8 below. Figure 8: Wiring diagram for connecting the solar panel(s) to the solar Inverter. In this figure, two 100 Watt solar panels wired for 24 volt battery charging are shown as an example 3.2.6 Adding Fuses to the Complete Off-Grid Solar Panel Kit It is necessary to add fuses or circuit breakers to the Complete OffGrid Solar Panel Kits. While the systems will function without fuses or circuit breakers, fusing protects the system from accidental short circuits, power surges, and accidental incorrect wiring. It is unsafe to operate any electrical equipment without the appropriate 8|Page fuses/breakers. Table 2 shows the recommended fuse/breaker size for each system based on 12 or 24 volt configurations. Figure 9 shows where the fuses or circuit breakers need to be placed. Table 2: Recommended fuse/breaker size chart for the EPS Complete Off-Grid Solar Panel Kits. Complete Off-Grid Solar Kit 12 Volt 24 Volt Wiring/Breaker Size Wiring/Breaker Size EPS-100W-KIT 10 amps N/A EPS-200W-KIT 20 amps 10 amps EPS-300W-KIT 30 amps N/A EPS-400W-KIT 40 amps 20 amps EPS-600W-KIT-12 30 amps for each solarN/A charge controller N/A 30 amps EPS-600W-KIT-24 Figure 9: Wiring diagram for the EPS Complete Off-Grid Solar Panel Kit showing the fuse’s/breaker’s location. In this figure, two 100 Watt solar panels wired for 24 volt battery charging are shown as an example. 9|Page 4 TROUBLESHOOTING AND SUPPORT Problem There is no current or voltage produced by the solar panel(s) Possible Remedies (1) It is too dark outside for the solar panels to produce power or the solar panel(s) are in the shade. (2) Check for loose, broken or corroded connections in the solar panel cable. (3) Check fuses/breakers. The charge (1) Check for loose, broken or corroded controller is not connections in the cables between the charge working. The controller and battery bank. (2) Check charge controller is fuses/breakers. (3) Verify battery voltage is not turning “on”. sufficient to power up the charge controller. Everything is hooked up correctly. The sun is shining directly onto the solar panels but no charge is going to the batteries. Check the voltage of the battery bank. The battery bank is most likely fully charged and the solar charge controller has disconnected the solar panels from the battery. The solar charge controller will reconnect the solar panels to the battery bank when it once again requires charging. 4.1 FREQUENTLY ASKED QUESTIONS 1. WHAT SIZE BATTERY SHOULD I USE? Each 100 Watt solar panel is capable of charging up to a 125 amp hour 12 volt battery bank under normal conditions. Two 100 Watt solar panels wired for 24 volt battery charging are capable of charging up to a 125 amp hour 24 volt battery bank. 10 | P a g e Examples: Three 100 Watt solar panels wired for 12 volt battery charging: A 12 volt battery that has an amp hour capacity of up to 150 Ah is recommended. Note that a smaller amp hour battery could be used (e.g.80 Ah) if desired. Four 100 Watt solar panels wired for 24 volt battery charging: A 24 volt battery that has an amp hour capacity of up to 80 Ah is recommended. Note that a smaller amp hour battery could be used (e.g.40 Ah) if desired. 2. WHAT TYPE OF BATTERY SHOULD I USE? A deep cycle battery should be used for an alternative energy (solar) system. Automotive and marine batteries are ideally not designed to be discharged and recharged over and over. Deep cycle batteries are designed to be discharged time after time and can be discharged down to 20% capacity. Most battery manufacturers say that a deep cycle battery’s life-span can be greatly increased by not discharging it more than 50%. Deep cycle batteries do cost more money than regular automotive batteries but they are well worth the investment when used on an alternative energy system. 3. WHAT SIZE INVERTER SHOULD I USE WITH MY SOLAR PANELS? Inverter size has almost nothing to do with the power output of the solar panels. The DC to AC inverter is connected directly to the battery and, therefore, is powered by the battery bank (the solar panels charge the battery). Any size inverter can be connected to the battery bank as long as the battery bank is suitably sized for the inverter. You could have 1000 Watts of solar connected to your battery bank and only use a 100 Watt inverter. Or you could have only 100 Watts of solar connected to the battery bank and have a 1000 Watt inverter. 4.2 SUPPORT Inverter size depends on the power requirements of the loads you will run. For example, if you are only going to use a 100 Watt light bulb, then a 150 Watt inverter will easily provide the power. But, if you want to run a 1500 Watt vacuum cleaner, then you should get a 2000 Watt inverter. • Call: +91 8277 000 777 • Email: [email protected] • Write: 59/2, 2nd Main, Sampige Layout, Bangalore 4. ARE THE SOLAR PANELS INCLUDED IN MY KIT 12 VOLT, 18 VOLT, OR 24 VOLT SOLAR PANELS? Without going into detail, the Maximum Power Voltage (abbreviated Vpm) of a solar panel should be rated at about 1.5 times the nominal battery voltage. For example, a solar panel used for 12 volt battery charging needs to have a Vpm of about 18 (1.5 x 12 = 18). The EPS 100 Watt Solar Panels included in these kits have a Vpm of 18 – 21 V. Therefore, these solar panels are typically referred to in the solar industry as “12 volt solar panels” because they are designed for 12 volt battery bank charging. A solar panel designed for 24 volt battery bank charging needs to have a Vpm of about 36 (24 x 1.5 = 36). When two solar panels with a Vpm of 18 are wired in series, the two Vpm‘s of each solar panel add together. Therefore, two EPS 100 Watt Solar Panels wired in series have a Vpm of 36 – 40 V. The 24 volt wiring diagrams shown in Appendix A show how to wire two solar panels in series for 24 volt battery charging. Therefore, we can say that two EPS 100 Watt Solar Panels wired in series is a “24 volt solar panel” 11 | P a g e If you are experiencing technical problems and cannot find a solution in this manual, please contact EROEI POWER for further assistance. You may refer to our FAQ on http://www.eroeipower.com/ APPENDIX A A.1 12 volt battery bank solar panel wiring diagram for one 100 Watt EPS SolarPanel 12 | P a g e A.2 12 volt battery bank solar panel wiring diagram for two 100 Watt EPS Solar Panels A.3 24 volt battery bank solar panel wiring diagram for two 100 Watt EPS Solar Panels 13 | P a g e A.4 12 volt battery bank solar panel wiring diagram for three 100 Watt EPS Solar Panels A.5 12 volt battery bank solar panel wiring diagram for four 100 Watt EPS Solar Panels 14 | P a g e A.6 24 volt battery bank solar panel wiring diagram for four 100 Watt EPS Solar Panels A.7 12 volt battery bank solar panel wiring diagram for six 100 Watt EPS Solar Panels 15 | P a g e A.8 24 volt battery bank solar panel wiring diagram for six 100 Watt EPS Solar Panels