1
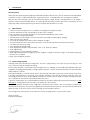
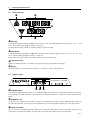
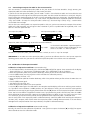
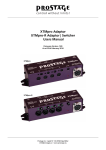
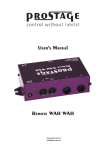
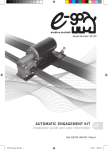
X05 MIDI Foot Controller Users Manual Firmware Version 1.71 As at 22th February 2014 Prostage S.L. • Apdo 57 • ES-07560 Cala Millor [email protected] • www.prostage.eu Table of Contents 1 Introduction 3 1.1 1.2 X05 Features The Prostage System 3 3 2 Terminology 4 2.1 2.2 2.3 2.4 MIDI StageWire Preset | Program Change Expression Pedal 4 4 4 4 3 Controls and Connectors 5 3.1 3.2 3.3 3.4 The Front Panel The Rear Panel Connecting an Expression Pedal to the Foot Controller Calibration of the Expression Pedal 5 5 6 6 4 Operating Modes & Operation 7 4.1 4.2 4.3 Foot Controller Mode Keyboard Style Mode 25 Songs with 5 Sounds 7 7 7 5 Firmware Upgrade 8 6 MIDI Implementation Chart 8 7 Warning Instructions and Warranty 9 7.1 7.2 7.3 Warnings and Safety Instructions Warranty / Support Disposal of Old Devices 9 9 9 8 Declaration of Conformity 10 NOTE => This manual uses digital bookmarks. You can show them by clicking on the "flag" icon in the top left of Acrobat Reader. A click on a topic flips directly to that chapter. Page 2 1 Introduction Dear Customer Thank you for purchasing the Prostage X05 MIDI foot controller. With the X05, you can control the Prostage looper | switchers as well as all other MIDI devices. To operate the X05, a Prostage XDS, XLS or XTMpro is required. With the X05 foot controller, you can recall different presets (stored settings / configurations) at the looper | switcher and the connected MIDI devices. The Prostage foot controllers further come with a connection for two expression pedals and the opportunity to connect multiple foot controllers in a chain. 1.1 X05 Features •Connects to the Prostage XDS | XLS | XTMpro via StageWire (microphone cable). •Phantom powered: the X05 is powered by the XDS | XLS | XTMpro. •Link-Connector: several foot controllers can be interconnected directly (daisy chain). •Connector for two expression pedals. •The connectors are positioned in a way that prevents the plugs from damage by treading. •Sends 128 presets by default. •Can recall up to 999 presets (Bank Select & Program Change). •You can freely define the used numbers of presets (so that bank steps do not lead to unused areas). •Can work with presets or songs. •Three different operating modes. •Seven high-quality buttons with noticeable "click" (0-9, bank up & down). •Three-Digit display. •Programming via System Manager software. •Up to eight different MIDI messages per preset (Program Change or Control Change) via the MIDI mapping of the XDS | XLS | XTMpro. •Delay tap and sidekick functions. 1.2 The Prostage System Prostage stands for professional live-equipment. The X05 is plug and play. This means that you can plug it in and use it, without having to configure anything. The X05 foot controller is connected to the Prostage XDS | XLS | XTMpro via one standard microphone cable. The StageWire technology developed by Prostage thereby achieves a secure connection between the foot controller and the looper | switcher. Prostage’s philosophy is “control without limits”. We want you to be able to setup your system exactly as you want it to work, while keeping it as simple to use as possible. Therefore, there are lots of things inside the system you can configure yourself. To set up the additional features of the X05, you will need the System Manager software. This is available on our website free for download ( Mac & PC). If you have any questions, or if something does not work as you expect, please do not hesitate to contact us: info@ prostage.eu. Your questions will also help us to improve this users manual. We are also looking forward to your suggestions concerning new features. We are working to improve the functionality of the system. You can easily upgrade the software of the X05 yourself. You can find more information about this topic in the users manual for the Prostage System Manager software. The Prostage team wish you lots of fun with the new X05 and big success in your musical career. Lukas Truninger Founder & Developer Page 3 2 Terminology 2.1 MIDI MIDI is Voodoo? This is wrong! Although, MIDI can do much more, what you need as a guitarist, is very simple. This is how MIDI works: A device - such as a foot controller – sends a command to another device - e.g. a looper | switcher - using a MIDI cable. The transmitting device - e.g. the foot controller - notifies the recipient - e.g. the looper | switcher - what it should do. That’s all. You can connect your Prostage devices and use the basic functions directly, without having to deal with MIDI. If you want to use the advanced functionality of the system, you can find more detailed information on MIDI in the users manual of the System Manager software. 2.2 StageWire StageWire is a further development of MIDI. The technology has been developed by Prostage specifically for the use on stage. StageWire is a connection where multiple devices communicate with each other (bidirectional) via a standard microphone cable. Using StageWire, you can interconnect up to 14 Prostage foot controllers to control the XDS | XLS | XTMpro. The foot controllers are joined together in a chain. This means, you simply run a microphone cable from the first foot controller to the second, another cable from the second to the third foot controller, and so on. The foot controller(s) are supplied with power by the XDS | XLS | XTMpro. 2.3 Preset | Program Change Presets are saved settings that can be recalled with a switch on the foot controller ( = Program Change). A preset contains all settings of the amplifier and effects belonging to a sound (e.g. Clean). You create, for example, the following presets : •Preset 1 (Clean) => Channel 1 from the amplifier & chorus switched on •Preset 2 (Lead) => Channel 2 of the amplifier & delay and booster activated If you now press button 1 on the foot controller, the amplifier switches to channel 1 and the chorus is turned on. If you press button 2, the amplifier switches to channel 2. The delay and the booster are turned on. The chorus is turned off simultaneously. So you can switch your complete guitar rig with a single button. You no longer need to perform a tap dance on different switches to adjust your sound. 2.4 Expression Pedal An expression pedal is a kind of volume pedal that is connected to the MIDI foot controller. However, the expression pedal does not control a guitar signal, but generates MIDI Continuous Controller, with which for example the volume, the effects mix or the delay time can be adjusted in an effects device. Page 4 3 Controls and Connectors 3.1 The Front Panel Bank Up In the default operating mode, the []-button switches to the next higher group of presets: e.g. 05 - 10 - 15 - and so on. You're stepping through the banks in steps of 5. If you work with songs instead, this button switches to the next song. Bank Down In the default operating mode, the [q]-button switches to the next lower group of presets: e.g. 15 - 10 - 05 - and so on. You're scrolling through the banks in steps of 5. If you work with songs instead, this button switches to the previous song. Numeric Buttons Using the [number] buttons, you choose a preset respectively a sound within the group. Display The display shows the current preset number, or - if it flashes - the pre-selected bank. 3.2 The Rear Panel StageWire™ !!! connect to Prostage PurpleLine products only !!! link expression pedal main professional foot controller StageWire Main Connect the [StageWire Main] socket via a standard microphone cable with the [StageWire] socket from the XDS | XLS | XTMpro. The foot controller is powered via the StageWire connection. It does not need a separate power supply. StageWire Link If you work with multiple foot controllers, connect the [StageWire Link] socket to the [StageWire Main] socket of the next foot controller. Like this, you can interconnect up to 14 Prostage foot controllers in a row (daisy chain). Expression Pedal You can connect a standard expression pedal to the expression pedal socket. Using a so-called Y-cable, you can also connect two expression pedals. You will find all the information about this on the next page. Page 5 3.3 Connecting an Expression Pedal to the Foot Controller You can connect a standard expression pedal to the jack socket of the foot controller. Simply connect your expression pedal to the foot controller by a short mono jack cable. If you like to use two expression pedals, you will need a Y-cable - also called insert cable. An insert cable has two mono plugs on one end. Plug one into each expression pedal. The other end of the cable has a stereo jack. Plug this into the expression pedal connector of the X05. (For the technology enthusiasts among you: the potentiometer of expression pedal # 1 is located between “tip “ and “shield“. The potentiometer of expression pedal # 2 is between “ring“ and “shield“. (The top of a stereo jack cable is called "tip", the center ring is called, “ring“ ). Custom cables are available from Prostage. You can also use a volume pedal as an expression pedal. In this case, you have to connect the output of the volume pedal to the foot controller. You will get the best resolution if you use a pedal made for keyboards, with a 10k ohm or a 20k ohm potentiometer. One expression pedal: Two expression pedals (Y-Cable): Exp. Pedal 1 Exp. Pedal 2 Exp. Pedal 1 Expression pedal with switch (e.g. to control the Remote WahWah): Switch Exp. Pedal => The switch is connected as “expression pedal 2” Hence, the Control Change assignment for the switch is set under “CC No. Exp. Pedal 2”. Instead of an expression pedal, you can also connect a switch, to use it as “Tap” for example. IMPORTANT => In order to use the expression pedal(s), you have to calibrate them first. You have to repeat the following process each time you connect a different expression pedal. Even switches must be calibrated! 3.4 Calibration of the Expression Pedal Calibration of Expression Pedal No.1 (connected to Tip): •On the foot controller, simultaneously press the buttons [] and [4|9] for approx. three seconds until the display shows a blinking "0". You are now in calibration mode. This is indicated by a dot in the display. •Move the expression pedal to the position (dead stop) where you like to have the MIDI value 0 (low). •Press the []-button (Pressing any other switch will abort the calibration process). •Now the display will flash "127". •Move the expression pedal to the other dead stop, which is the position where you like to have the MIDI value 127 (loud). •Press the []-button again. •The display will now flash "63". •Move the expression pedal to the center position. •Press the []-button again. The calibration is now complete and the display will show an arbitrary preset number. => If you don’t want to calibrate a middle position, or if you calibrate a switch, you can cancel the center position calibration (last two steps) by pressing any other button than the []-button. Then the expression pedal is calibrated linear. You can also calibrate a logarithmic motion curve if you position the pedal a little bit away from the middle when calibrating the center position. However, the middle position must differ at least 10% from 0 and 10% from 127. Otherwise, your chosen center position will be ignored and the expression pedal is calibrated linear. You can easily check if the expression pedal is calibrated correctly: Move the pedal while watching the red LED on the XDS | XLS | XTMpro, which flickers when the expression pedal is sending MIDI commands. If the LED flickers throughout the complete motion from top to bottom, the pedal is calibrated correctly. Calibration of Expression Pedal No.2 (connected to Ring): Basically, this works like the calibration of pedal No. 1. But you have to press the buttons [] and [3|8] for approx. three seconds to enter the calibration mode. Page 6 4 Operating Modes & Operation Ex-works, the X05 sends 128 different program numbers, e.g. to recall presets of multi-effect devices or of a MIDI capable guitar amp. The operating mode and additional features such as "Sidekick" or "Tap" can be set with the System Manager software. The tap function offers you the opportunity to adjust e.g. the delay time of an effect by rhythmically tapping on a switch of the foot controller. Therefore, you must tap the beat on the button at least twice. The receiver unit can thus recognize the song tempo. You will find further information about the special features of the Prostage foot controllers in the users manual of the System Manager software. => The operating modes and features listed below are set using the System Manager software. Changes must always be confirmed in the System Manager with [Update Foot Controller], so that the foot controller adopts the new settings. More information about this can be found in the manual of the System Manager software. 4.1 Foot Controller Mode The two arrow buttons [] [] work as bank up/down switches. By shortly pressing the switch, you can step up and down through the banks in steps of 5. If the scroll function is enabled, you can also scroll through the banks by holding the switch. When you step through the banks, no MIDI data will be sent. (unless the "Jiffy Bank Change" function is activated. For details, see the users manual of the System Manager software). With the [number] buttons, you can choose a number within the selected bank. As soon as you press a number button, the corresponding MIDI program number is sent. 4.2 Keyboard Style Mode The foot controller works like a keyboard. First, the single digits are entered using the [number] buttons. Values 5-9 are chosen by double clicking the number switch. The [] button is the Enter key. Once you press this button, the program number is sent. The [] button is the clear key. It deletes the entered digits. In this case, no MIDI data is sent. 4.3 25 Songs with 5 Sounds The operation mode [25 Songs with 5 Sounds] is managing songs instead of preset numbers. Use the arrow buttons [] [] to select a song. With the [number] buttons, you choose a sound within the song. The left and middle digit of the display indicate the song number. The right digit shows the sound number. The switches 0-4 send an individual program number for each combination of song and sound. Song # 1 sends program changes 0-4, Song No. 2 sends program changes 5-9, and so on. To program the loops | switching outputs of the XDS | XLS | XTMpro, you have to recall every song and every single sound contained therein one after another at the foot controller. For each combination of song and sound you can set the loops | switching outputs right at the XDS | XLS | XTMpro and store the settings. If you like to switch MIDI effect devices, you must define a MIDI mapping using the System Manager software. For each MIDI device to be controlled, you have to setup a column with the mapping mode [Program Number]. If you have selected a sound at the foot controller, the preset number that belongs to this sound is automatically selected on the left side in the MIDI mapping below [Preset Name]. To its right, in the column of the controlled MIDI device, you have to enter the preset number to be sent for this song and sound. You will find more information about this topic in chapter 7 to 7.3 in the System Manager users manual. Page 7 5 Firmware Upgrade The firmware is the operating system, the software within the X05. New firmware adds more functionality to the foot controller. You can upgrade the firmware to the latest version yourself. All information about this can be found in the manual of the System Manager software. 6 MIDI Implementation Chart The X05 foot controller is part of the coherent Prostage system. The X05 handles all MIDI data as they are configured by the System Manager software. Therefore you will find the MIDI Implementation Chart in the manual of the System Manager software. Page 8 7 Warning Instructions and Warranty 7.1 Warnings and Safety Instructions For reasons of the product liability, we are obligated to make clear certain safety aspects which must not be ignored under any circumstances. The devices must not be stored or operated in damp or wet environment. The device serves for controlling MIDI equipment and amplifiers and may be used for this purpose exclusively. This foot controller uses the Prostage StageWire technology. It may only be connected to a Prostage receiver device (XDS, XLS or XTMpro) or to the link connector of another Prostage foot controller using the StageWire technology. The foot controller is supplied with electricity by the receiver device (phantom powered). The equipment may be opened by qualified technical personnel only. There are no user serviceable parts inside the devices. In order to avoid damages, you should be careful when transporting and setting up the devices. Please avoid strong variations in temperature. Particularly the change from the cold transport vehicle to the, usually warm, stage can cause condensing humidity, which can cause leaks and thus can evoke defects. Usually, 60 minutes are sufficient to equalize the temperature. For transportation, always carry the devices in a robust packing or rack, especially if you change your place of work frequently. No containers filled with liquid may be placed on the equipment! 7.2 Warranty / Support All Prostage PurpleLine units are covered by a 2-year warranty. Prostage shall not be liable if the damage was caused by inappropriate use or if the units are not connected as described in this users manual. There are no user serviceable parts inside the unit. The detailed terms of the warranty can be downloaded on the Prostage website. If you need technical support, please contact your local dealer or email [email protected] 7.3 Disposal of Old Devices The PurpleLine products are subject to the European guideline 2002/96/EC. All old electric and electronic devices must be disposed separately from the domestic waste, using the collection points provided by the government. The devices must not be disposed with domestic or skip refuse. Information about collecting points or collection dates, can be asked from the local administration or the local waste management company. Please also carry the packing to an environmentally fair disposal. Cardboard boxes can be transferred with wastepaper collections or to the public collecting stations for recycling. Foils of the shipment are collected by the local waste management company and are forwarded to environmentally fair disposal. Page 9 8 Declaration of Conformity Company: Prostage SL Apdo 57 ES-07560 Cala Millor Type of equipment: PurpleLine System Trademarks: Prostage / StageWire Models: XDS, XLS, XTMpro, X10, X07, X05, X01, XB1 The products meet the requirements of the following standards: EMC: Safety: EN 55103-2 | EN 55103-1:2009 | EN 55103-2:2009 EN 61000-3-2 EN 61000-4-2 | EN 61000-4-3 | EN 61000-4-4 | EN 61000-4-5 | EN 61000-4-3 | EN 61000-4-11 IEC 60065:2001 | EN 60065:2002 / A1:2006 / Cor.:2007 / A11:2008 Year:2011 Cala Millor, 14. Dezember 2011 Lukas Truninger, CEO Information to the user: Class B Statement: This equipment has been tested and found to comply with the limits for a Class B digital device, pursuant to part 15 of the FCC Rules. These limits are designed to provide reasonable protection against harmful interference in a residential installation. This equipment generates, uses and can radiate radio frequency energy and, if not installed and used in accordance with the instructions, may cause harmful interference to radio communications. However, there is no guarantee that interference will not occur in a particular installation. If this equipment does cause harmful interference to radio or television reception, which can be determined by turning the equipment off and on, the user is encouraged to try to correct the interference by one or more of the following measures: - Reorient or relocate the receiving antenna. - Increase the separation between the equipment and receiver. - Connect the equipment into an outlet on a circuit different from that to which the receiver is connected. - Consult the dealer or an experienced radio/TV technician for help. © 2014 Prostage SL Page 10