1
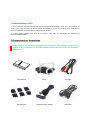
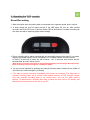
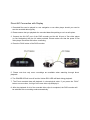
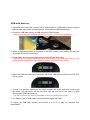
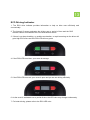
Innovative Personal Driving Recorder
DVR GPS
GPS Driving Recorder
User’s Manual
■ Warranty and Responsibilities
■ The DVR recorder may not record all events, incidents or accidents. It is not
guaranteed.
■ Any loss of data shall not be the responsibility of the manufacturer.
■ In the case of an accident, the sensor may not recognize the shock if the impact is too light and as a
result, the DVR recorder may not begin event recording automatically.
■ W hen the device is connected with a computer by the USB provided, all recording functions will not
work. Only management of recording files are available such as file move, copy, and delete, etc.
2
Contents
1. Before using the DVR recorder
3
2. Components in the package
4
3. Parts name of the DVR recorder
5
4. Main features of the DVR recorder
6
5. How to install the DVR recorder
7
6. Operating the DVR recorder
9
Event Recording
Direct AVI connection with display
USB connection
USB host back up
ECO driving indicator
How to power off the DVR recorder properly
7. How to use the DVR manager
15
Outline of the DVR manager
Button Definitions
Save, convert and open recording files
GPS mapping window
Set-up
8. Specifications
19
9. Environmental Disposal
20
3
1.Before using theDVR recorder
Please read the following carefully to use the product properly and protect the user’s
safety
1. Do not disassemble, repair, or alter the product. If malfunctions, errors, or product damage
are found to be attributable to a user, a user may not be eligible for warranty service.
2. In case of smoke or burning smells, unplug the power cable immediately.
3. Do not spray water directly on to the product. It may cause damage to the product, fire or
cause an electric shock.
4. Keep the device away from chemicals or detergents as they may change the surface and
damage the product.
5. Avoid excessive impact and do not insert any foreign object into the device. It may cause
damage to the product.
6. If a foreign material or sticker blocks the lens, the view of the lens will be obstructed and
normal operation will not be possible. Please keep the lens clean and clear. If other objects
are placed around the camera, they may be reflected on the window and included in the
video images. Please do not leave unnecessary objects around the device.
7. Please ensure the product is installed tightly and do not move the device after installation.
8. Please ensure you use the power cable provided in the package. Other power cables may
cause damage to the product, fire or cause electric shock.
9. Do not control or operate the device with wet hands - it may cause electric shock.
10. When a vehicle is parked, make sure you unplug the power cable of the device to avoid
draining the Vehicle battery.
11. Do not try to download events etc whilst driving.
12. In extreme cases e.g. when a vehicle enters or exits a tunnel with a sudden change of light,
or a light / direct sunlight is too bright or if there is no source of light at all, the recorded image
may not be satisfactory condition.
13. If the windscreen of the car was tinted, the recorded image may be poorly defined or
distorted.
14. Some accidents with a very low shock or impact may not be recorded automatically
15. If the Power supply was disconnected due to a large accident, the event may not be recorded.
4
♦ Understanding of GPS
1. GPS is used for commercial purpose and inherently has the average range error of more than 15
meters. The range of error may be more than 100 meters if you are in a built-up area, underground
or in an underpass or surrounded by a large amount of trees.
2. A GPS signal reception may take time to locate - This may vary depending on weather and
environmental conditions
2.Components in the package
Please check if the following components are included in your package. If any item is
missing or an incorrect item is included, please contact local store where you purchased
the product.
User Manual
Cord fitting kit
DVR
Cigarette power adapter
AV cable
USB cable
5
3. Parts name of DVR recorder
1. Camera lens: Make sure that any foreign material does not block the camera lens
2. Cradle: DVR can be attached on the windscreen using the cradle provided.
3. Fixing Screw: Fix DVR to the cradle with this screw
4. Power port: Connect power cable
5. USB host port: This host port is for USB flash memory stick to back-up
6. USB port: USB port is used when DVR is connected to PC directly
7. AV out: to Play the recorded video directly, DVR should be connected to external display
and speaker via AVI cable
8. Manual recording button: Record events manually
9. PLAY button: Play recorded event video
10. POW ER LED: This LED provides various information about the product
11. ECO LED: ECO driving indicator. It also provides various information about the status of the
product.
6
4. Mainfeatures of DVR recorder
■ Record Accident
When an incident occurs caused by sharp breaking, rapid acceleration, excessive cornering or
sudden impact, the DVR saves the recorded video of the 10 seconds immediately before and
20 seconds immediately after the incident.
■ Advanced video quality
It provides better video quality by using H.264 video encoding format.
■ Manual Recording
The Driver can record any event by pressing manual recording button
■ Save driving information data
It records not only incident recording but also shock and impact data from G-sensor and GPS.
(GPS data is available only in DVR-GPS model)
■ Convenient Backup
The event recording is downloaded into the DVR manager software via a Memory Stick, or USB cable,
allowing it to be analyzed in detail
■ Event analyzing software
Event recording can be analyzed in DVR manager (PC Software). It also provides useful tools
such as capturing an incident, printing and converting to AVI format.
■ Customizing
DVR manager also provides a product set-up tool. By connecting the DVR Recorder to a PC, the
user can set-up various items for his / her own preference.
■ ECO drive indicator
DVR evaluates driving and shows the efficiency of the driver by LED light color. With this
reference, you can improve your driving to increase safety and to achieve a better fuel consumption.
7
5.How to install theDVR recorder
For better performance and safety, please install DVR recorder as per the
following instructions below.
1. Connect the DVR recorder to a PC directly via the USB cable enclosed in the package.
Once you have done this, please be patient whilst the unit is recognized by your computer
– this may take 1-2 Minutes due to the size of the memory. Once the unit has been
recognized, open the file and run the DVR manager. Click “Set-up” button on the
DVR
manager and press ‘Time setting’ button to set the correct date and time. The correct time
and date will now be set.
* Time Sync Setting is necessary at least once after
purchasing.
2. Park the vehicle at a bright and flat location and ensure the engine is turned off before
installation.
3. Wipe and clean the area where the recorder will be positioned. It’s better to install the
recorder at the upper middle of the front windscreen in a position that does not interfere
with the driver’s sight.
4. The camera lens has protection cap
* Make sure the protection cap
is removed before installation
8
5. Stick the recorder bracket onto the windscreen using the sticky-pad provided on the
bracket. Adjust the camera angle horizontally with the lens facing forwards. Tighten the
adjustment screws so that camera is held firmly. Adjust if necessary after viewing a
recorded video clip after you have tried the product for the first time.
6. Connect the Power Cable to the recorder and
ensure the power cable is tidy and out of the way
using provided cable fitting kit.
7. Connect the power cable to the Cigarette power
jack in the vehicle (DC 12V, 24V)
* Please ensure you use the enclosed power
cable in the package – do not use alternative
cables.
8. Start the vehicle engine and check all the LED’s on the recorder turn on . The Recorder
sounds will beep once and all the LED’s will turn on. After a few seconds, the ECO LED
will turn-off and the power LED will remain on. The unit is now ready and will be recording
automatically.
9. After test driving and recording for the first time, please check the recorded video clips on
a PC to ensure that it has recorded properly and your happy with the angle of the camera.
It is necessary to test the unit like this at least once before using this recorder on a daily
basis.
6. Operating the DVR recorder
9
Event Recording
1. Start the engine after the power cable is connected to the cigarette power jack in vehicle.
2. A beep sound will now be heard and all of the LED lights will turn on. After several
seconds, the ECO LED turns off and the Power LED is illuminated. Constant recording will
now start and will be capturing digital video footage.
3. Event recording will be taken automatically and an audible beep will be heard if you brake
sharply, accelerate rapidly, corner excessively or if a sudden impact or shocks occurs.
A Total of 30 seconds of video clip will be taken - the 10 seconds each before and 20
seconds after an event will be stored.
*Note: Event recording time may be shortened depending on the image data especially
when recording under low light or conditions taken.
4. You can record manually by pressing the manual recording button located in the middle of
unit should you need emergency recording.
5. The main unit starts recording immediately after power is connected. The huge size of
constant recording video clip is stored in the internal memory of DVR recorder. Please
note that constant recording data is not copied when you use the USB memory
backup. To download the constant video files, connect the main unit to PC directly and
download the files direct from the unit to your PC.
Direct AVI Connection with Display
1. Recorded files can be played in a car navigation or car video player should you need to
see the recorded data urgently.
2. Please ensure that you playback the recorded data after parking a car in a safe place
3. Connect the AV OUT port of the DVR recorder and the AV IN port of Car video player
(or Car Navigation) with the AV cable provided. Please make sure that the power of car
video player should be ON before connecting.
4. Press the PLAY button of the DVR recorder.
5. Please note that only event recordings are available when watching through direct
playback
6. The POWER LED will turn-off and the Yellow ECO LED will flash during playback.
7. The Event recorded data will playback in chronological order. If you press the “PLAY”
button one more time, it will go to the next video clip and play it.
8. After the playback of all of the recorded video clips is completed, the DVR recorder will
be switched into a recording mode automatically.
11
11
USB Connection
1. Connect the DVR Recorder to PC via the USB cable provided in the package.
2. After a “beep” is heard, the Power LED will turn red and the ECO LED will at first flash
different colours and then flash yellow – after one minute the ECO LED will illuminate blue.
When the ECO LED has turned Blue the unit is recognized as a Mass Storage device by
your PC.
3. When the device is connected to a computer by the USB cable provided, the recording
function will not be available, only file management options are available via the
management software such as file move, copy and delete etc.
4. The Computer recognizes the DVR recorder as an external mass storage device.
Select the drive named as DVR and run it.
5. Recorded digital video files in the DVR will be listed
6. Select the SJA manager.exe and run it.
7. When the SJA manager is launched, by using this program the end user can view or
manage recorded files and setup the device. (Refer to page 15 regarding how to use
DVR manager)
8. To view your events of recorded footage, click on a file listed in the top right hand box.
USB host back up
1. Recorded files in the DVR recorder can be downloaded to a USB flash memory using the
USB host back up function. (Please park the vehicle before USB flash back up)
2. Connect a USB flash memory to USB host slot of DVR recorder
* USB memory must be formatted with FAT32 or FAT16 - NTFS is not supported.
3. When a USB flash memory is connected to the DVR recorder, the POWER LED will turnoff and the ECO LED will turn blue.
4. Downloading will start automatically and the ECO LED wll flicker blue.
* Only the 10 most recent recordings will be downloaded to the USB flash memory. If all
recordings are needed, the DVR recorder should be connected to PC directly.
5. When the USB host back-up is completed, the Power LED will turn-off and the ECO LED
will turn green.
6. If there is a problem backing-up, the DVR recorder will sound and beep continuously
and power LED will flicker red and the ECO LED will turn red. In this case, try again
using another USB flash memory.
* The DVR recorder may not be compatible to all kind of USB memory stick.
7. The Memory size of USB memory stick should be bigger than 1GB.
8. Unplug the USB flash memory and connect it to a PC to play the recorded files
downloaded.
13
ECO Driving Indicator
1. The ECO drive indicator provides information to help us drive more efficiently and
economically.
2. The Internal G sensor evaluates the driving over a period of time and the DVR
recorder rates it and indicates the score with different colors.
3. If there is no sharp breaking, no sudden acceleration, or rapid cornering etc the driver will
get a high ECO score and the ECO LED will turn green.
4. If the ECO LED turns blue, your score is average.
5. If the ECO LED turns red, your score is poor and you are not driving efficiently.
6. As the score is evaluated over a period of time, the LED color may change continuously.
7. For better driving, please refer to the ECO LED color.
14
Innovative Personal Driving Recorder
How to power off the product properly
1. Please unplug the power cable out of the Cigarette power jack to switch-off and to avoid
draining the car battery and avoiding a flat battery.
To avoid any data loss, please follow below instruction a) When you are recording manually, please wait for 20 seconds before power-off so that the
DVR recorder is able to complete the event recording.
b) Do not power-off the unit during USB memory back-up. Make sure you check that the
ECO LED has turned green before power-off. (This means that USB memory back-up has
been completed)
15
7. How to use SJA Manager
■
Connect the DVR recorder or
USB memory to
your PC.
Select
SJA manager.exe
file (CAM) and click on the file.
Outline of SJA Manager
■ Run SJA manager and find intro interface as below
1. Video viewer: Playing event recorded file.
2. Slide bar: Searching video
3. G sensor graph: Showing G-sensor data during driving
(X: Acceleration change between right and left. Y: Acceleration change between forward and backward.
Z: Acceleration change between up and down)
4. Tool button: Capture, Print, Backup, Setup
5. Play control buttons: This buttons control video playback
6. Eco Score: Show efficiency of driving as a score.
(A score of over 80 means ‘Good’, between 60~80 means ‘Average’, and under 60 means ‘Poor’.)
7. File list window: Shows all the video files in the selected folder.
8. Preview window: Shows a preview of the image of selected video file.
9. GPS mapping window: Displays the position of where the vehicle was on a map.
(Available only in DVR-GPS model)
16
Innovative Personal Driving Recorder
■ SJA manager operating image
Button definitions
Icon
Name
Definition
Close
Close SJA manager
Set up
Set up DVR recorder connected to PC
Capture
Save still image from video clip with JPEG
Print
Print still images from video clips
Back up
Save and convert recorded files
Speed control
Control video playback speed
Volume
Control volume
Play
Play video clip
Reverse play
Play video clip backwards
Pause
Pause playback
Stop
Stop playing video clip
Move to previous frame
Move frame backwards
Move to next frame
Move frame forwards
Open
Open video files
17
Save, convert and open recording files
■ Click the back-up button at the bottom
of the SJA manager.
Save video file as it is / Convert to AVI, then save
■ Select the file you want to back-up
from the file list – press “Back-Up”
■ Select the folder where you want to
save the file to
■ Click OK button for confirmation.
Or…
■ If you want to save the original video
file in AVI Format, click the ‘AVI Backup’ button to save and convert the
video to AVI format.
■ Select the folder where you want to
save the file to
■ Click OK button for confirmation.
■ To open a saved recorded file, click the
folder icon on the file list window of the
SJA manager
■ Select the folder where the recorded
files are saved.
■ Select the file to open.
■ You will now see the files in the file list
window of SJA manager (please note
that AVI Files will not be shown in this
file)
■ To open .AVI Files, open the file via
Windows Media Player or KM Player
(http://kmplayer.en.softonic.com/
to
download for free). NB. You may need An
MPEG4 Codec Fix to run the file through
Windows Media Player depending on
which version you have. If you do need a
Codec Fix, please search the internet or
download for free from http://www.freecodecs.com/download/ffdshow.htm
18
Innovative Personal Driving Recorder
GPS Mapping window
■ As shown in the image on the right, the
map is displayed in a small window to
indicate the location of the Vehicle when
the Digital Video footage was taken.
■ PC users should have access to the
internet to use this mapping function. In the
case where the GPS reception was poor
while recording or if the PC is not connected
with internet, this map may not be shown.
Press arrow key to move this map and press
+ or – key to zoom in or out.
Set up
Item
Option
Resolution
Image quality
FPS
640 x 480
This model has fixed resolution (VGA 640 x 480)
5 Levels
Set recording image quality. (Very Low / Low / Normal / High / Very High)
4 Levels
Set frames per second. 5 fps / 10 fps / 15 fps / 30 frames per second
Control sensitivity of G-sensor. If the value is high, the sensitivity will be low. If the value is low,
the G-sensor will be more sensitive. 0 is the most sensitive, 5 is least sensitive. Set it at a high
sensitivity rating to ensure you do not lose any incidents.
(sensitive level 0~2 is recommended)
X
Detect acceleration change between right and left.
Y
Detect acceleration change between forward and backward
Z
Detect acceleration change between up and down
On/Off
Event trigger beep sound on/off
On/Off
Voice recording on/off
NTSC/PAL Select display type of monitor to connect with device.
Date and time will be synchronized with computer’s time and date
Format internal memory of recorder. All recording files will be deleted.
Restore all options to the default setting by manufacturer.
G-Sensor
sensitivity
Event alarm
Audio
A/V Out
Time setting
Flash format
Factory setting
Description
19
8.Specifications
Technical Specification
CPU No.
Cupid ASIC chipset
Performance
133 MHz
G-Sensor
Internal 3D G-sensor
Collision, Q-Break, Q-Acceleration detection
GPS
Optional GPS module
CPU
Camera
* Only available with DVR-GPSl
Sensor
CMOS
Lens
High quality precision lens
Resolution
640 x 480
Angle
64.8°(V) x 92.8° (H) x 125.5° (D)
Sensitivity
0.8 Lux
Type
C-Microphone
Sensitivity
-38dB
Nand flash memory
2GB/4GB/8GB
USB device
USB 2.0 Device (1.1 compatible)
OS
Window98, ME, 2000, XP, Vista 32
USB host
USB Host 2.0 1 port / Format support: FAT 16/32
AV Out
Resolution 720x480 (NTSC/PAL)
Operation
0°C ~ 50°C
Rated Voltage
12-24V 200mA
USB
5V
Adapter
Cigarette power adapter
Microphone
Memory
Interface
Temperature
Power