1
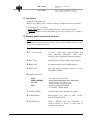
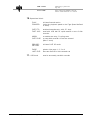
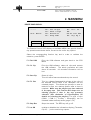
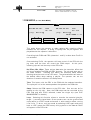
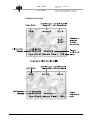
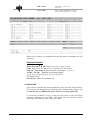
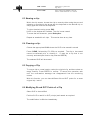
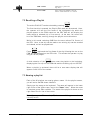
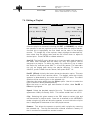
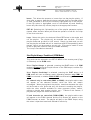
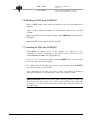
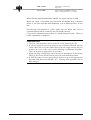
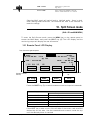
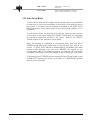
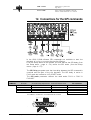
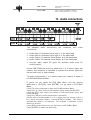
LSM 2 Cameras
Rev. 4.14 – Date: January 2000
USER’S MANUAL
0. Introduction
The EVS Live Slow-Motion system is a high quality disk recorder primarily
designed for sports applications, but the quality and flexibility of LSM
lends itself to many applications within the television industry. Many
capabilities are built into the unit, including a digital mixer/keyer,
Telestator, tracking system, audio mixer and playlist management.
The greatest advantage of LSM over tape-based systems is the ability to
record and playback at the same time! No longer do you have to wait for
the action to finish and tapes to re-cue. As soon as you know the starting
point of your replay, you can cue it. Your replay is ready before the action
has finished and recording has never stopped!
The use of CLIP & PLAYLIST MANAGEMENT allows highlights of your
event to be stored for instant replay at a later time. Individual “clips” can
be created and stored for use in a playlist allowing highlight and roll out
packages to be built quickly for use throughout a Broadcast. These
packages can be made with audio and video dissolve effects for additional
versatility.
Analysis of the sport is taken to a higher level with use of the SPLIT
SCREEN, TARGET TRACKING and PAINT features. Add the remote touch
screen Telestator to the package and you have everything you need.
EVS is a Belgian company that takes pride in making the best Products
available. Always eager to stay one step ahead of the rest, EVS strives to
constantly improve and grow. Customer feedback is a must and always
greatly appreciated.
Have fun operating the EVS Live Slow Motion system. It only gets better!
LSM 2 CAM
LSM2CAM_4.14_000118.doc
Page: 2/43
User's Guide
Author : Marianne LOTHAIRE rev B.STAS
Software : LSM2CAM4.EXE v.4.12 11/06/99
1. Remote Panel layout
The following diagram shows the REMOTE panel along with a brief
description of each area.
EVS Broadcast Equipment
Email : [email protected]
Tel : +32-4/361 7000 Fax : +32-4/361 7099
LSM 2 CAM
LSM2CAM_4.14_000118.doc
Page: 3/43
User's Guide
Author : Marianne LOTHAIRE rev B.STAS
Software : LSM2CAM4.EXE v.4.12 11/06/99
1.1 Led colors
A selected key lights red.
When a key lights green, it means a value in relation with this key exists.
For example: F1 to F0 keys
> Green light means a clip has been stored in relation with the key.
> Red light means the clip associated to the key is playing or is ready to
play.
1.2 Remote panel operational controls
Note: The operational buttons have PRIMARY and SECONDARY functions and
are divided into upper and lower sections. By pressing the SHIFT button you gain
access to the secondary functions
1. LCD DISPLAY:
provides current status of system
2. F1 - F10 buttons:
to store / recall Clips, recall Playlists and
enter timecode information, used when
modifying user adjustable software settings.
3. SHIFT key:
enables use of the secondary key functions
4. MENU key:
provides access to the LSM Main Menu
5. SOFT keys:
with LCD display, enables operator to enter
LSM MENU system
6. Operational block:
PLST
INSERT / BROWSE
IN / OUT
CUE
EVS Broadcast Equipment
: initiates active PLAYLIST
: used in playlist management to view / modify playlist
: used to enter IN / OUT points
when storing / modifying clips
: used to mark KEYFRAMES
in TARGET TRACK mode.
7. SLOMO LEVER:
initiates slow-motion and playlist replay
8. CLEAR button:
Multi-purpose key used
PLAYLISTS and CUES
9. ENTER button:
used to ENTER clips into PLAYLIST, to
confirm saving of CLIPS to disk and to
validate other options.
Email : [email protected]
to
clear
CLIPS,
Tel : +32-4/361 7000 Fax : +32-4/361 7099
LSM 2 CAM
LSM2CAM_4.14_000118.doc
Page: 4/43
User's Guide
Author : Marianne LOTHAIRE rev B.STAS
Software : LSM2CAM4.EXE v.4.12 11/06/99
10. Operational block:
11.
EVS Broadcast Equipment
PLAY:
PGM SPD:
initiates forward motion
locks the playback speed to the Pgm Speed defined
in Setup.
GOTO TC:
FAST JOG:
enables timecode entry, with «F» keys
used with JOG dial for rapid manual re-cue of disk
recorder
MARK:
GOTO CUE:
re-usable cue entry, 5 cycling cues
re-cues disk recorder to last cue entered
(Max. 5 cues)
RECORD:
RETURN:
initiates “LIVE IN” mode
PAGE:
LAST CUE:
selects clips page 1, 2, 3 or 4
Re-cues machine to last entered cue
JOG knob:
used to accurately cue disk recorder
Email : [email protected]
Tel : +32-4/361 7000 Fax : +32-4/361 7099
LSM 2 CAM
LSM2CAM_4.14_000118.doc
Page: 5/43
User's Guide
Author : Marianne LOTHAIRE rev B.STAS
Software : LSM2CAM4.EXE v.4.12 11/06/99
2. MAIN MENU
REMOTE PANEL DISPLAY:
Menu:
----Vld: Enter
2 Rmt
1 Pgm
F1:
F2:
F3:
F4:
F5:
Exit LSM
Clr Clips
Save Clips
FillPlst
Stop REC
Split
2 Pgm
Paint
F6:
F7: Inc: On
F8:
F9:Pt Dev Tbl
F0: Clp Pg 1
Setup
Target
The Remote Control LCD display at the MAIN MENU has special function
key operations as shown above, as well as the «soft» key options.
Select the corresponding function key and in order to validate the
selection, press ENTER.
EVS Broadcast Equipment
F1: Exit LSM
Exits the LSM software and goes back to the EVS
Menu.
F2: Clr. Clp
Exits the LSM software, clears all clips and restarts
the LSM software. The whole procedure will take
about 30 seconds. All recorded information will be
lost.
F3: Save Clp
Saves all clips.
This will take a few seconds and stop the record.
F4: Fill Plst
This is a «dump» feature which allows all the clips of
the selected CLIPS PAGE to be «dumped» into the
selected playlist. This allows the operator to save all
material to tape, as a backup feature after a show is
complete. Make sure the playlist you have selected
is an empty one. This function will dump over an
existing playlist if that is the one presently
selected. (See «Selection of Clips/Playlists for
details on selecting the playlist.) The type of clips
(CAM1 / CAM 2 / Primary / Secondary) can be
selected inside the Setup menu (page 3, F6)
F5: Stop Rec
Stops the record. The REC key will go off.
F7: Inc:ON
enables or disables the information display (Timecode,
Clip ID,…) on the monitoring outputs.
Email : [email protected]
Tel : +32-4/361 7000 Fax : +32-4/361 7099
LSM 2 CAM
LSM2CAM_4.14_000118.doc
Page: 6/43
User's Guide
Author : Marianne LOTHAIRE rev B.STAS
Software : LSM2CAM4.EXE v.4.12 11/06/99
F9: PtDv Tbl
Initializes the Tablet/Touch Screen. If the tablet is not
properly calibrated, use this function to re-initialize it.
F0: Clp Pg1
Toggles between Clips Page 1, Clips Page 2, Clips
Page 3 or Clips Page 4.
Important Note: Prior to using the LSM, the operator should enter the
SETUP menu and set all necessary parameters. If clips are stored with
certain parameters and the operator wishes to change them after the fact,
those clips will not change. Thus, it is important to set these parameters
first.
EVS Broadcast Equipment
Email : [email protected]
Tel : +32-4/361 7000 Fax : +32-4/361 7099
LSM 2 CAM
LSM2CAM_4.14_000118.doc
Page: 7/43
User's Guide
Author : Marianne LOTHAIRE rev B.STAS
Software : LSM2CAM4.EXE v.4.12 11/06/99
3. SET-UP MODE
(Shift + D’ from MAIN MENU)
The LSM has four menu pages once in the SET-UP mode.
To select NEXT page, press F1. To return to LAST page, press F9.
To QUIT set-up mode, press MENU and make software selection.
Adjustments are made as follows: Select MENU page, using F9
(Previous Page) / F10 (Next Page) as necessary. Choose setting to
be modified by pressing F button (see table below) & make
adjustment by rotating JOG knob. To restore the default value of a
parameter, press CLEAR and the corresponding F button.
F1
F2
F3
PAGE 1
Effect Duration: Sets the
duration of transition effect.
Used as default value in
playlist.
(0 –500 fields)
Default : 20 fields
Wipe Type: Chooses from
Vert (L>R, R>L), 45 UP
(L>R, R>L) and 45 DN
(R>L, L>R)
Default : Vert (L>R)
Pntg Cur. : (White / Black).
Selects the cursor color in
Painting mode. Default :
White
F4
Playlist Loop: Allows
playlist to loop and replay
continuously.
(ON / OFF)
Default : OFF
F5
PreRoll: (SEC:FLD) (0 to
8:10) Pre-roll for automatic
cues
Default : 00:05 (sec:fld)
Show Key Speed: Sets (2
– 100). Controls dissolve
effect for paint and target
keyer.
Default : 8 (fields)
TEST: Allows «test» of the
wipe effect chosen in F2
above.
F6
F7
PAGE 2
Fast Jog: Sets the increment
of the jump when in Fast Jog
mode.
(2 to 20 times)
Default : 20 times
PAGE 3
Cursor Color: F1, F2, and
F3 are used to set the color
for the various options.
(selected by F7)
Set H : (0 – 360)
Maj. Clip: the amount of
«guard-band» before and
after clips.
(0 –500 fields)
Default : 1 field
Prgm Spd: (1 – 100%)
during playback, selecting
SHIFT+ PLAY then rolling a
selected clip will roll that clip
at this predefined speed.
Default : 50%
Plst Insert: Selects the mode
for «INSERT» function of
playlist.
(before/after)
Default : After
Set V: (0 – 100)
Plst Speed: Default speed
used for clips entered into
playlist (1-100%).
Default : Unknown
Sec. Rmt.: Selects EVS or
SONY as second remote type
(if necessary)
Default : EVS
Set S: (0 – 100)
Default :
Brush 1 : H110-V35-S70
Brush 2 : H320-V60-S70
Border : H0-V80-S0
Genlock error messages:
(Enable / Disable) Enables
or disables the Genlock
information
on
the
monitoring output. Default :
Enable
Audio
Slow
Motion:
(Yes/No). Enables or disables
the slow motion of audio
track. Default : Yes.
Split Screen Auto Drive:
(Yes/No). Enables or disables
the tracking inside the Split
Screen effect.
Default : No
PAGE 4
Fill Plst with: (All Clips /
CAM1 Clips / CAM2 Clips /
Primary Clips / Secondary
Clips) Selects the type of
clips for the backup function
Default : All Clips7
Mode 2 PGM: Starts
Playlist (Always,
Conditional).
Default : Always
Loop Mode: (Internal /
External). Selects whether
the loop between Output 1
and Input 2 is done internally
or externally. 1
Default : Internal
GPI Delay: (Disable /
min:sec:fld). Sets the delay
between the GPI command
and the start of the
playback. Default : Disable
GPI mode: (Play / Play &
Playlist) Selects the GPI
mode. See chapter 12 for
details. Default : Play
Auto Take: (Yes / No).
Enables/Disables
the
automatic transition and
playback when recalling a
clip. Default : No
1
When "External" is selected, the border will also be looped, but this requires an optional cable inside the LSM
mainframe.
EVS Broadcast Equipment
Email : [email protected]
Tel : +32-4/361 7000 Fax : +32-4/361 7099
LSM 2 CAM
LSM2CAM_4.14_000118.doc
Page: 8/43
User's Guide
Author : Marianne LOTHAIRE rev B.STAS
Software : LSM2CAM4.EXE v.4.12 11/06/99
4. REMOTE PANEL OPERATIONS
4.1 Direct functions:
RECORD: This key lights «red» when the system is in operation; at this
time the input signal is recorded, and played back at full speed. There will
be a variable frame delay between the input and output signals; a lip-sync
error will be noticed when recording interviews, etc. This will not be
present on the playback!
MARK: Marks up to 5 cues that can be marked while recording / playing.
The cues are always marked on the LIVE program, even when playing
back other material. The 5 cues are looped, i.e. when you mark a sixth
cue, the first is overwritten.
LAST CUE: Re-cues machine to last entered cue, pressing again will recue to the previously marked cue etc. This will loop around the entered
cues (up to 5).
PLAY: Initiates forward motion. Can also be used to commence playback
of playlist; refer to PLST command.
IN: Defines the «IN» point of a clip. This key illuminates GREEN if an «in»
point exists but is not the image you see and the key lights RED if the «onair» image is at this «in» point. This point can be entered while recording.
Once you have marked an «IN», should you require to change it, the
marked «IN» should be cleared first,
i.e.
OUT: Defines the «OUT» point of a clip. This operates with the IN button.
MODIFICATION OF CLIP IN / OUT POINTS:
Select the clip that you wish to modify, use the JOG dial to position the
material at the new IN or OUT point, and re-mark the IN or OUT point(s) as
required.
Important note: when IN/OUT points are set, the system automatically write
protects a user definable length of material before and after the IN/OUT
points respectively, these are referred to as the GUARD - BANDS. This can
be set in the SETUP menu under «Maj. Clip» as required.
EVS Broadcast Equipment
Email : [email protected]
Tel : +32-4/361 7000 Fax : +32-4/361 7099
LSM 2 CAM
LSM2CAM_4.14_000118.doc
Page: 9/43
User's Guide
Author : Marianne LOTHAIRE rev B.STAS
Software : LSM2CAM4.EXE v.4.12 11/06/99
JOG KNOB: Used to accurately cue material.
FAST JOG: When selected enables FAST picture search. The actual
speed of this fast jog is adjustable in the SETUP menu.
The JOG di al i s acti ve at al l ti m es when the system i s i n PLAY & RECORD
LEVER: Used to perform slow-motion 0 - 100%, or to rev 100% (see
SHIFT FUNCTIONS).
PLST: Selects the active PLAYLIST, once a playlist has been compiled.
To play back a playlist that has been cued, press the PLAY button and it
will roll at the set speeds. (Please refer to «Making a Playlist»)
ENTER: Enters CLIP(s) into PLAYLIST, also to confirm saving of CLIPS
CUE: When in TARGET TRACK mode, after PEN is used to position circle
/ highlight, KEYFRAME can be confirmed by pressing this button.
MENU: Enables operator to gain access to LSM MAIN MENU structure
(see section on menu).
CLEAR: to clear IN / OUT/ PLST / CLIPS
REBOOTING THE SYSTEM FROM REMOTE PANEL
(“HARD REBOOT”)
In the event that the system needs to be rebooted, the process can be
accomplished from the remote panel. Keep in mind, doing this will
DELETE ANY CLIPS THAT WERE NOT SAVED.
To reboot, press the following key sequence,
After doing so, the RECORD button will flash GREEN and the LAST CUE
button will flash RED. Hitting the LAST CUE button will reboot the system.
EVS Broadcast Equipment
Email : [email protected]
Tel : +32-4/361 7000 Fax : +32-4/361 7099
LSM 2 CAM
LSM2CAM_4.14_000118.doc
Page: 10/43
User's Guide
Author : Marianne LOTHAIRE rev B.STAS
Software : LSM2CAM4.EXE v.4.12 11/06/99
«SOFT REBOOT» FROM THE KEYBOARD
It is also possible to run a «soft reboot» which will exit the software and
return the user to the EVS Menu. Here, the software can be selected and
entered again without having to reboot the entire system. When running
the following procedure, the system will automatically run a save clips
upon exit.
Hit ALT + Q on the keyboard, and confirm with ENTER or cancel with ESC.
You will exit the LSM software and go back to the EVS Menu.
TO REFRESH THE REMOTE PANEL DISPLAY
By simultaneously pressing CTRL + R on the keyboard, the remote control
unit will be refreshed (keys and LCD display). When the remote fails to
respond, use these keys and it will be re-initialized.
4.2 Shift Functions
PGM SPD (Program Speed): When selected, the PGM SPD/PLAY button
will flash red. Selecting a clip or playlist and hitting PLAY will now roll the
video at the «Program Speed» that is set in the SETUP menu. So if 33%
is your default speed here, the clip or playlist will roll at that speed.
Hitting SHIFT + PGM SPD again will disable this function.
GOTO TC: This function is used to jump to a particular time code. Use the
function keys F1 to F10 to enter the desired time code (6 digits: hh:mm:ss
are displayed on the LCD screen of the Remote). After the 6th digit is
entered, the LSM2CAM will automatically go to the required time code. If
the last digits are 0 (zeros), you do not need to enter them. Press ENTER
on the remote to validate the entry and reach the desired video.
Confirmation of correct TimeCode entry can be observed by the display on
the Remote LCD screen. This TimeCode display appears in the lower left
corner of the LCD display, just above the menu options. If a “Beep “ is
heard, the selected Timecode frame does not exist on disk any longer.
If you enter the TimeCode incorrectly, press CLEAR to exit this mode.
EVS Broadcast Equipment
Email : [email protected]
Tel : +32-4/361 7000 Fax : +32-4/361 7099
LSM 2 CAM
LSM2CAM_4.14_000118.doc
Page: 11/43
User's Guide
Author : Marianne LOTHAIRE rev B.STAS
Software : LSM2CAM4.EXE v.4.12 11/06/99
GOTO CUE: This function is used to recall, consecutively, the five cue
points previously saved with the MARK button.
If you enter the cue number incorrectly, pressing
exits this mode .
RETURN: This function allows the operator to exit from within a clip and
search on the disk at the point he was at when first selecting the clip.
Whatever timecode the operator was at when he selected the clip will be
the point where this function will return them.
USEFUL FACILITY : When in CLIP mode
This enables the operator to go to IN / OUT points of CLIPS, instantly!
4.3 Selection of Clip Banks and Playlists
SHIFT
+ F1
- F9
etc.
This allows access to clip banks 1 through 9 within the clips page
(1, 2, 3 or 4)
SHIFT SHIFT -
F1
F2
=
=
BANK 1
BANK 2, etc. (up to bank 9)
Once in the bank, selection of the F1 – F10 keys will call up the respective
clips.
The clip numbering system is as follows:
Clip 147
“1”
“4”
“7”
SHIFT
-
Denotes the CLIP PAGE numbers (either 1, 2, 3 or 4).
Selected at the MAIN MENU with F10 key.
Denotes the CLIP BANK (1 to 9)
Denotes the clip number (1 to 10) inside the bank
F10
=
PLAYLIST BANK
This allows access to the playlists. Within each CLIPS PAGE there are 10
playlists.
Selecting F1-F10 at this point calls up the respective playlists.
Playlist 21 “2”
“1”
EVS Broadcast Equipment
Denotes the CLIPS PAGE
Denotes the playlist number (1 to 10)
Email : [email protected]
Tel : +32-4/361 7000 Fax : +32-4/361 7099
LSM 2 CAM
LSM2CAM_4.14_000118.doc
Page: 12/43
User's Guide
Author : Marianne LOTHAIRE rev B.STAS
Software : LSM2CAM4.EXE v.4.12 11/06/99
4.4 Clip Numbering Hierarchy
The LSM can store up to 540 clips and 30 playlists in its libraries
This flow chart represents the hierarchy of the LSM clip numbering
system. As an example, clip number “132» is used:
As a reference, in the lower right hand portion of the remote LCD, just
above the menu options, the page number and bank are displayed as
follows:
PAGE : BANK: 1: 05
This tells the operator that he is in Page 1 and Bank 5. To change
between Page 1, Page 2, Page 3 and Page 4, press the PAGE key or go to
the Main Menu (press the MENU key on the remote panel) and then press
F10.
Important note : When a CLIP is copied, the whole CLIP, including the
GUARD - BAND is copied. The IN / OUT points of this copied CLIP will
be set at the start / end of the original front / rear guard-bands respectively.
New IN / OUT points will thus have to be marked, as required, for the
revised CLIP.
EVS Broadcast Equipment
Email : [email protected]
Tel : +32-4/361 7000 Fax : +32-4/361 7099
LSM 2 CAM
LSM2CAM_4.14_000118.doc
Page: 13/43
User's Guide
Author : Marianne LOTHAIRE rev B.STAS
Software : LSM2CAM4.EXE v.4.12 11/06/99
5. Basic operation
The LSM 2 Camera has two modes for its basic operation, 1 PGM or 2
PGM.
The 2 PGM mode is the more basic of the two, which gives the operator
independent control of the two outputs. In this mode, the two outputs can
be controlled together (such as jogging back to a certain action, with both
outputs) or they can be controlled individually (either Channel A or
Channel B). Here, clips can be stored in one location with both an «A»
and «B» clip, or just one of the two.
The 1 PGM mode is the more powerful of the two, allowing for interaction
between the two outputs. Here, a synchronized replay can be rolled
between the cameras with mix, wipe, or cut between them. Functions such
as PrvCtl give the operator control of the PRV side input while the PGM
side is rolling on air allowing for any necessary modification before rolling
the second replay.
EVS Broadcast Equipment
Email : [email protected]
Tel : +32-4/361 7000 Fax : +32-4/361 7099
2 PGM MODE
LSM 2 CAM
LSM2CAM_4.14_000118.doc
Page: 14/43
User's Guide
Author : Marianne LOTHAIRE rev B.STAS
Software : LSM2CAM4.EXE v.4.12 11/06/99
(B from M AI N M ENU)
PGM1
CH. A
HH:MM:SS:FR.
PGM
SP 100
[Cap. Record]
2 PGM
CH. B
HH:MM:SS:FR.
PGM2
PRV
SP 100
[Cap. Record]
BANK 1:01
[..]
SWAP 1
PGM 1
SWAP 2
PGM 2
SYNC 1
PGM 1+2
SYNC 2
1<>2
When first entering this mode, the operator will see that both PGM1 and
PGM2 are controlled. Here, full control is set on both channels so that the
jog knob and lever will affect both channels. If control of only one channel
is desired, the operator can simply hit the corresponding soft key and that
channel will then be fully controlled with no control of the other. To
control both again, simply choose the PGM 1 + 2 key.
When storing clips (see CLIP MANAGEMENT for details), control of both
PGM1 and 2 will result in storing both an «A» and «B» clip. If only «A» is
desired, control only PGM1 at selection of IN/OUT points and vice versa
for «B» clips.
Swap 1, 2: Allows accesses to other output on respective channel at the
same TimeCode.
Sync 1, 2: Allows synchronization of respective outputs with the other to
the same time code.
1 <> 2: Inverts, or swaps, the location of the outputs.
[ ]: The brackets located above the remote LCD menu will display the clip
numbers of the current playlist selected. This is useful for the operator to
see the clips as they are entered into the playlist. As they are entered,
the number appears across the remote screen. The selected clip in the
playlist will also be highlighted on the remote. This is also displayed in 1
PGM mode.
Comment: The presence of the Genlock signal is constantly checked. A
Genlock error message can be displayed on the monitoring output in order
to notify the user.
To display the Genlock message, enable the Genlock Error messages option
from the Setup menu (Page 3 – F4). GkA! sign will appear for Audio
Genlock problem and GkV! sign will appear for Video Genlock problem.
EVS Broadcast Equipment
Email : [email protected]
Tel : +32-4/361 7000 Fax : +32-4/361 7099
LSM 2 CAM
LSM2CAM_4.14_000118.doc
Page: 15/43
User's Guide
Author : Marianne LOTHAIRE rev B.STAS
Software : LSM2CAM4.EXE v.4.12 11/06/99
2 PGM MONITOR DISPLAYS
EVS Broadcast Equipment
Email : [email protected]
Tel : +32-4/361 7000 Fax : +32-4/361 7099
1 PGM MODE
LSM 2 CAM
LSM2CAM_4.14_000118.doc
Page: 16/43
User's Guide
Author : Marianne LOTHAIRE rev B.STAS
Software : LSM2CAM4.EXE v.4.12 11/06/99
(A from M AI N M ENU)
PGM1
CH. A
HH:MM:SS:FR.
PGM
SP 100
[Cap. Record]
1 PGM
CH. B
HH:MM:SS:FR.
PRV
PRV
SP 100
[Cap. Record]
PAGE:BANK 1:01
[..]
PrvCtl
SYNC
SWAP
NoEFF
Mix
LOOP
Take
This mode allows the operator to make replays with transition effects
between the two outputs. A string of replays can be put together and
played back at the operator’s discretion.
Controlling both PGM and PRV (channels 1 and 2) is done when PrvCtl is
not activated.
Once selecting PrvCtl, the operator will have control of the PRV with the
jog knob, and the lever will control the PGM output. At this point,
selecting clips will call them up on the PRV side.
No Effect, Mix, Wipe: These options determine the transition effect that
will occur between the PGM and PRV pictures. The mix and wipe are on
the same location. Pressing this button will alternate these effects,
showing the active one on the LCD menu. The selected effect will also be
the default effect when making a playlist. The operator can set the
duration of transition effects in the Setup menu.
Take: This button rolls the PRV to the PGM with the selected transition.
The replay will roll at the same speed as the speed on the PGM side.
Swap: Selects
making an «A»
PRV side and
MANAGEMENT
the PGM camera to the PRV side. One use can be for
clip only. Here, the PGM output can be controlled by the
with PrvCtl selected, create the single clip ( see CLIP
for details).
Loop: Selecting this function allows to recorder the material (playlist,
target,…) currently played back. So an operator can run the synchronized
replay while in «LOOP» mode and access it, with transition effect, storing
it as a clip. To do so, exit loop mode by selecting LOOP again and going
back to LIVE (press the REC button) and jog back to the material which
will appear on the PRV side.
EVS Broadcast Equipment
Email : [email protected]
Tel : +32-4/361 7000 Fax : +32-4/361 7099
LSM 2 CAM
LSM2CAM_4.14_000118.doc
Page: 17/43
User's Guide
Author : Marianne LOTHAIRE rev B.STAS
Software : LSM2CAM4.EXE v.4.12 11/06/99
1 PGM MONITOR DISPLAYS
EVS Broadcast Equipment
Email : [email protected]
Tel : +32-4/361 7000 Fax : +32-4/361 7099
LSM 2 CAM
LSM2CAM_4.14_000118.doc
Page: 18/43
User's Guide
Author : Marianne LOTHAIRE rev B.STAS
Software : LSM2CAM4.EXE v.4.12 11/06/99
6. Clip Management
The SHORT IN and SHORT OUT points define the clip. When SHORT IN
and SHORT OUT points are set, the system automatically write protects a
user definable length of material before and after the SHORT IN/OUT
points respectively, these are referred to as the GUARD-BANDS.
It is possible to trim a clip by redefining SHORT IN and SHORT OUT
points.
IN
SHORT IN
SHORT OUT
OUT
If SHORT IN and SHORT OUT
points are defined, only the fields
between those two points will be
played if the sequence is recalled
(the same applies when the
sequence is included in a play-list).
Fields between IN and SHORT IN
and fields between OUT and
SHORT OUT (GUARD BANDS) can
be reached with the command knob.
So the SHORT IN and SHORT OUT
points can be redefined.
Comments:
1. IN & OUT points of a clip cannot be replaced by new ones.
2.SHORT IN & SHORT OUT points of a clip can be replaced by new ones.
6.1 Creating a clip
At the desired IN/OUT points press IN/OUT; this can be done «on the fly»
or by accurately positioning the material with the JOG knob / PLAY button.
To clear an IN / OUT point
and
The 2 Camera LSM because of the 2 inputs allows storage of both an «A»
and «B» clip at a desired location. In either mode, it is also possible to
store only an «A» or «B» clip.
1 PGM:
A and B
PrvCtl button must not be illuminated
A only
PrvCtl button must be illuminated
Use SWAP key to bring «A» or PGM picture to the PRV side
and make desired clip
B only
EVS Broadcast Equipment
PrvCtl button must be illuminated
Email : [email protected]
Tel : +32-4/361 7000 Fax : +32-4/361 7099
2 PGM:
LSM 2 CAM
LSM2CAM_4.14_000118.doc
Page: 19/43
User's Guide
Author : Marianne LOTHAIRE rev B.STAS
Software : LSM2CAM4.EXE v.4.12 11/06/99
A and B
PGM1 and PGM2 buttons must be illuminated
A only
PGM1 button only must be illuminated
B only
PGM2 button only must be illuminated
Choose the CLIP BANK where you wish to store the CLIP
(SHIFT F1 - F9)
Press the appropriate F1 - F10 button.
The clip is now stored.
Important note : Once a clip is stored, it is safe from being overwritten. But
this does not mean that it is SAVED. If power is lost, the clips are lost. To
save ALL clips, enter the MAIN MENU and select F3, Press ENTER to
validate. ALL clips and ALL playlists will now be saved. Exiting the
software (ALT+Q) will also save the clips and playlists.
A total of 540 clips are possible, with 30 playlists as well.
6.2 Recalling a clip
6.2.1 USING THE REMOTE
Select the CLIP PAGE 1, 2, 3 or 4 ( F10 at the MAIN MENU or PAGE key).
Select the BANK in which the desired CLIP is located (SHIFT + F1 - F9).
Choose the CLIP required (F1 - F10).
If two clips are present (A and B), they will appear in their respective
locations (Ch. A or B). Hitting the Function key again will swap them.
When the operator is controlling only one channel (such as with PrvCtl),
the clip will appear at that location only. In the case of a single clip (only
an «A» or «B»), when in full control of both outputs, the clip recalled will
appear on the PGM side. When the Auto Take option is enabled, the clip
will be automatically chained to the PGM (see details below).
EVS Broadcast Equipment
Email : [email protected]
Tel : +32-4/361 7000 Fax : +32-4/361 7099
LSM 2 CAM
LSM2CAM_4.14_000118.doc
Page: 20/43
User's Guide
Author : Marianne LOTHAIRE rev B.STAS
Software : LSM2CAM4.EXE v.4.12 11/06/99
6.2.2 USING THE VGA DISPLAY CLIP SCREEN
Selecting the F10 key on the keyboard accesses the VGA clip screen. In
this mode, clips can be recalled using the pen and tablet or directly from
the keyboard.
The page is set up with 9 columns, displaying each CLIP BANK (1-9). The
operator can also select the CLIP PAGE on this screen (Pg. 1, 2, 3 or 4).
Simply use the pen to select the desired clip. If a clip is present in a
certain location, it will be highlighted in BLUE. Once selected, it will
become RED.
The keyboard can also be used to maneuver within the clip screen. The
arrow display (> <) is used as the guide to illustrate where the «cursor» is
currently located. The arrow keys on the keyboard allow movement left
and right across the screen (only 2 banks can be seen at one time) or up
and down within the bank. Once at the desired clip, hitting ENTER will call
the clip on the monitor.
You can gain immediate access to a clip by typing its ID number on the
keyboard. For example, when you type "119A", the LSM will detect that
this is the format of a clip ID and the corresponding clip is recalled
automatically.
The numbers at the bottom are used with the pen to select which 2 banks
will be displayed on the screen. Again, the current view will be designated
by the RED highlight around the number. Here it would be [1-2]. The
Clips Page can be selected here with the pen as well.
The CLEAR option on this page allows the operator to delete a clip. This
is useful for removing a clip if, for example, both an «A» and «B» were
made when only «A» was desired. Select CLEAR, and then use the pen to
select the clip you wish to delete.
EVS Broadcast Equipment
Email : [email protected]
Tel : +32-4/361 7000 Fax : +32-4/361 7099
LSM 2 CAM
LSM2CAM_4.14_000118.doc
Page: 21/43
User's Guide
Author : Marianne LOTHAIRE rev B.STAS
Software : LSM2CAM4.EXE v.4.12 11/06/99
When on this screen, the keyboard can also be used to manipulate the clip
selection:
Keyboard Functions:
Arrow keys ( ← , ↑ , ↓ , → ): Selects any clip on your screen.
Enter: Selects the clip desired (><) and call it to the monitor
Page up / Page down: Selects between Clips Page 1, 2, 3 or 4
Ctrl ← / Ctrl → : Modifies the displayed banks
([1-2], [2-3], [3-4] [4-5], [5-6], [6-7], [7-8], [8-9] )
F1: Names a clip
Del + Enter: Clears the selected clip
6.2.3 AUTO TAKE
Clips can be recalled and chained manually using the Auto Take function.
This function can be enabled in the Setup of the remote panel (page 4, F6)
and works only in 1PGM mode, when PrvCtl is on (key lights red).
In this mode, recalling a clip or a cue point will chain it with the picture
currently displayed on the PGM. The speed and the transition effect
defined for the Take function remain the same.
EVS Broadcast Equipment
Email : [email protected]
Tel : +32-4/361 7000 Fax : +32-4/361 7099
LSM 2 CAM
LSM2CAM_4.14_000118.doc
Page: 22/43
User's Guide
Author : Marianne LOTHAIRE rev B.STAS
Software : LSM2CAM4.EXE v.4.12 11/06/99
6.3 Naming a clip:
Within the clip screen, choose the clip to name by either using the pen and
selecting or positioning the arrow with the keyboard to the desired clip or
simply type the name on the keyboard.
To clear the whole string, press ESC.
Hit F1 on the keyboard to validate. The clip is now named.
To erase the last character, press Backspace.
Repeat as needed for all clips. This can be done at any time.
6.4 Clearing a clip:
Choose the appropriate BANK where the CLIP to be erased is stored.
Press CLEAR, followed by F1 - F10, as required. The clip to be erased
cannot be selected prior to clearing it. It must be a clip that is not
currently activated (the function key must be GREEN).
The selected CLIP will be erased.
6.5 Copying a Clip
To copy a clip to a new location, select the original clip, and then select an
empty location. Press ENTER to confirm. To cancel this operation wait
until the confirmation message has disappeared from the monitoring
screen.
With this function, you can have different IN and OUT points for a same
original clip / action.
6.6 Modifying IN and OUT Points of a Clip
Select CLIP to be modified.
Position CLIP to new IN or OUT point(s) and remark as required.
The modification is effective immediately.
EVS Broadcast Equipment
Email : [email protected]
Tel : +32-4/361 7000 Fax : +32-4/361 7099
LSM 2 CAM
LSM2CAM_4.14_000118.doc
Page: 23/43
User's Guide
Author : Marianne LOTHAIRE rev B.STAS
Software : LSM2CAM4.EXE v.4.12 11/06/99
7. Playlist Management
Playlist Management is a software option. If the license code for this
option is not installed on your system, the words 'No Playlist option' will
appear on the PGM monitoring output if the PLST key is hit, and the
function will not be available.
7.1 Making a Playlist
You will see that a PLAYLIST can be made very quickly. The experienced
operator can include a CLIP at the end of the PLAYLIST containing
material that happened seconds before the PLAYLIST is transmitted.
When the LSM is first switched on, the active PLAYLIST will automatically
be PLAYLIST 11.
To activate another PLAYLIST, go to PLAYLIST bank (SHIFT - F10).
Select PLAYLIST as required (press F1 - F10)
PAGE 1 contains Playlists 10 to 19, PAGE 2 contains 20 to 29, PAGE 3
contains Playlists 30 to 39 and PAGE 4 contains Playlists 40 to 49.
First choose a clip for your PLAYLIST, and press ENTER.
Repeat as necessary until last CLIP is entered.
VIEWING THE VGA PLAYLIST SCREEN
Selecting F9 on the keyboard can access the VGA playlist screen.
EVS Broadcast Equipment
Email : [email protected]
Tel : +32-4/361 7000 Fax : +32-4/361 7099
LSM 2 CAM
LSM2CAM_4.14_000118.doc
Page: 24/43
User's Guide
Author : Marianne LOTHAIRE rev B.STAS
Software : LSM2CAM4.EXE v.4.12 11/06/99
7.2 Recalling a Playlist
The active PLAYLIST can be selected by pressing
The first time this is pressed, the Playlist Edit mode will be entered. Here,
the operator will see the first frame of the highlighted clip within the
playlist appear on the PGM output but the PRV side will still display the
same output (a selected clip or live record). At the start, full control will
be of the PGM side; scrolling through the playlist can be done here.
While in this mode, selecting CLIP from the menu allows Full Control of
the PRV. Here, a new clip can be made or an existing clip can be recalled
and viewed, as well as played back.
again and the first frame of the clip following the one on the
Press
PGM will be displayed on the PRV side. This allows the operator to play
only part of the playlist.
button cues the playlist to the beginning,
A third selection of the
displaying the first clip on the PGM side and the following clip on the PRV.
When a playlist is activated, there will be a new menu display that will
appear on the LCD of the remote.
7.3 Naming a playlist
Each of the 30 playlists can now be given a name. On the playlist screen,
you will notice that F2 shows «NmPlst».
Simply type the name on the keyboard. The name will appear in the lower
right corner of the VGA screen, next to the "Name" label. When the name
is complete, press F2 to validate. The name of the playlist is shown on the
right side of the 3 r d line of the screen.
Note: If you press F1 instead of F2, the name will be given to the clip
currently on air.
EVS Broadcast Equipment
Email : [email protected]
Tel : +32-4/361 7000 Fax : +32-4/361 7099
LSM 2 CAM
LSM2CAM_4.14_000118.doc
Page: 25/43
User's Guide
Author : Marianne LOTHAIRE rev B.STAS
Software : LSM2CAM4.EXE v.4.12 11/06/99
7.4 Editing a Playlist
P.List
[TC Clip]]
CH. A
Plst. Edit
221A
SP 0
[Clip duration]
CH. B
Clip
[TC Clip]]
PRV
SP 0
[Clip duration]
BANK 1:01
[221A
AuxCLP
CLIP
]
212A
SPEED
REMOVE
DUR.Eff
INSERT
LOOP
EdtAll
Once the playlist is activated, selecting the EDIT (or BROWSE) key allows
the operator to use the jog knob to scroll up and down the playlist entries.
As each clip is highlighted, the first frame can be seen on the display
monitor. To change any of the options, simply highlight the desired clip,
then select from the above menu and use the control lever to adjust to
desired point. Press ENTER to validate selection.
AuxCLP: The AuxCLP option allows you to insert an audio track instead of
the audio track recorded with the video clip. Only one AuxCLP can be
assigned to a playlist. To define the audio clip, press the F key to select
the audio clip, and then press SHIFT + A from the remote. The new audio
clip will be played back during the playlist diffusion. To delete the
AuxCLIP, press CLEAR from the remote, then press SHIFT + A.
DurEff (Effect): Initially this button shows the duration option. This sets
the duration time of the transition effect. The default value that initially
appears is determined by the value set in the SETUP menu. The effect
duration will be occurring prior to the selected clip.
Selecting this button again gives the Effect option. Use this to select the
type of transition effect (Mix/Wipe/None)
Move the lever to set the type and duration of effect, when DurEff or
Effect is highlighted.
Speed: Select the playback speed of the clip. The default value (which
appears as «UNK») is actually 100%. This can be varied from 0 to 100 %.
Clip: Selecting this gives access to the PRV output to select clips and
edit them while in playlist mode. Once this is selected in this «BROWSE»
mode, using the jog knob will allow the operator to scroll within the clip list
that is displayed at the bottom of the VGA playlist screen.
Remove: This allows the operator to quickly edit a playlist by removing
the selected clip. The clip that has been removed remains in memory so
that it can then be inserted into another location.
EVS Broadcast Equipment
Email : [email protected]
Tel : +32-4/361 7000 Fax : +32-4/361 7099
LSM 2 CAM
LSM2CAM_4.14_000118.doc
Page: 26/43
User's Guide
Author : Marianne LOTHAIRE rev B.STAS
Software : LSM2CAM4.EXE v.4.12 11/06/99
Insert: This allows the operator to insert clips into the playlist quickly. If
done after a remove, that clip which was removed shall be inserted before
or after (selected in SETUP) the currently highlighted clip in the playlist.
If the Clip option is highlighted, scroll to the desired clip and selecting
Insert will place that clip into the playlist at the appropriate location.
EDT All: Selecting this, followed by one of the playlist parameter options
(speed, effect, duration effect) will allow the operator to edit ALL the clips
in the list at one time.
Loop: Select this option, the button will flash RED when in this mode, and
roll the playlist. The playlist will be recorded onto the disk. Exit the
playlist mode and go back to LIVE record. Simply jog back and you will
see the playlist recorded with all its transitions and at the speed they were
played. Now it can be stored as one big clip (This can be useful if some
of the 30 playlists locations need to be made available).
The Loop is recorded on channel B.
Start Playlist Always / Conditional (2PGM Mode)
This mode can be selected in the SETUP MENU of the remote panel (Page
4, F2 button) to the 2PGM mode.
When Playlist Always is selected, pressing the PLST button in 2 PGM
mode will always bring the Playlist screen on the PGM output, and the Clip
screen on the PRV output.
When Playlist Conditional is selected, pressing the PLST button in 2
PGM mode will have a different result, depending whether only PGM1 or
PGM2 is selected, or whether PGM1+PGM2 are selected together.
If 1 channel only is controlled (PGM1 or PGM2), the playlist edit screen
will appear on the selected channel, while the other will remain
unchanged. When playing back the playlist, transitions between the clips
will be forced to cuts, given that only one channel is used by the playlist,
while the other remains available for other purposes (slomo, search,
editing or playing back another playlist, etc.). Thanks to this feature, 2
playlists can play at the same time with cuts.
If both channels are controlled (PGM1+PGM2), the playlist edit screen
will appear on the PGM1 channel and the Clip screen will appear on the
PGM2 channel, as usual. The playlist will play on the PGM1 output, using
the mixes / wipes that have been defined for each clip.
EVS Broadcast Equipment
Email : [email protected]
Tel : +32-4/361 7000 Fax : +32-4/361 7099
LSM 2 CAM
LSM2CAM_4.14_000118.doc
Page: 27/43
User's Guide
Author : Marianne LOTHAIRE rev B.STAS
Software : LSM2CAM4.EXE v.4.12 11/06/99
7.4.1 THE AUXILIARY AUDIO CLIP:
In Playlist mode, the AuxCLP option allows you to add a new stereo audio
track to the original video clips. For example: sport comments, jingles,
sound ambiance,… This additional stereo audio track is available on
outputs 5/6 of the ADR. The original audio tracks are still available on
outputs 1/2 of the ADR.
The auxiliary audio clip selected is always played back with normal speed
(100%), whatever the selected playback speed for the video.
Whatever the start point of the playlist, the auxiliary audio clip will always
start playing from its IN point. If the duration of the AuxCLP is longer than
the playlist duration, the auxiliary audio clip stops together with the
playlist at the OUT point of last clip. Otherwise, the audio clip ends itself
before the end of the playlist, when the audio clip reaches its OUT point.
Note: The AuxCLP is not effective in Multiaudio mode (2 stereo audio
channels per video channel).
EVS Broadcast Equipment
Email : [email protected]
Tel : +32-4/361 7000 Fax : +32-4/361 7099
LSM 2 CAM
LSM2CAM_4.14_000118.doc
Page: 28/43
User's Guide
Author : Marianne LOTHAIRE rev B.STAS
Software : LSM2CAM4.EXE v.4.12 11/06/99
PLAYLIST EDIT MODE MONITOR DISPLAYS
EVS Broadcast Equipment
Email : [email protected]
Tel : +32-4/361 7000 Fax : +32-4/361 7099
LSM 2 CAM
LSM2CAM_4.14_000118.doc
Page: 29/43
User's Guide
Author : Marianne LOTHAIRE rev B.STAS
Software : LSM2CAM4.EXE v.4.12 11/06/99
7.5 Rolling a playlist
P.List
[TC Clip]]
CH. A
Plst. Diff
CH. A
[TC Clip]]
221A
SP 100
[Clip duration]
PRV
212A
SP 100
[Clip duration]
BANK 1:01
[221A
CLIP
]
212A
NEXT
SKIP
LOOP
EDIT
Once the playlist is cued and ready to roll, the above menu is displayed on
the remote LCD. This menu gives the operator the ability to manipulate
the playlist while it is playing.
Clip & Edit: In this mode, selecting Clip or Edit will get the operator back
to the «Edit» playlist mode.
Next: While the playlist is rolling on air, selecting this will cause the
transition of the next clip with the transition effect listed on the playlist.
This can be used if a clip is running too long and it is necessary to shorten
up the playing time.
Skip: While the playlist is rolling, the next clip in the sequence is always
displayed on the PRV screen. This function allows the operator to discard
clips before they reach the air. The clip that will be «skipped» is that
which is seen on the PRV screen (This does not remove the clip from the
playlist, it simply allows it to be skipped during playback.).
Edit: Selecting the Edit option goes back to the Playlist Editing menu.
Loop: Select this option, the button will flash RED when in this mode, and
roll the playlist. The current playlist will be recorded onto the disk. Exit
the playlist mode and go back to LIVE record. Simply jog back and you
will see the playlist recorded with all its transitions and at the speed they
were played. Now it can be stored as one big clip (This can be useful if
some of the 30 playlists locations need to be made available).
The Loop is recorded on channel B.
EVS Broadcast Equipment
Email : [email protected]
Tel : +32-4/361 7000 Fax : +32-4/361 7099
LSM 2 CAM
LSM2CAM_4.14_000118.doc
Page: 30/43
User's Guide
Author : Marianne LOTHAIRE rev B.STAS
Software : LSM2CAM4.EXE v.4.12 11/06/99
PLAYLIST DIFFUSION MODE MONITOR DISPLAYS
EVS Broadcast Equipment
Email : [email protected]
Tel : +32-4/361 7000 Fax : +32-4/361 7099
LSM 2 CAM
LSM2CAM_4.14_000118.doc
Page: 31/43
User's Guide
Author : Marianne LOTHAIRE rev B.STAS
Software : LSM2CAM4.EXE v.4.12 11/06/99
7.6 Deleting of CLIP from PLAYLIST
While in EDIT mode, scroll within the playlist to the clip that needs to be
deleted.
Again, the first frame will appear on the display as each clip is scrolled
through.
When the CLIP to be removed is located, select REMOVE from the playlist
Edit Menu.
Selected CLIP will be removed from PLAYLIST
7.7 Inserting of CLIP into PLAYLIST
Using EDIT, as above, scroll to the location for insertion of clip.
Depending on what is selected in the SETUP menu, the clip will be
inserted before or after this highlighted clip.
If prior to this a clip was removed, selecting INSERT from the edit menu
will insert that clip into the playlist.
If in CLIP mode of this edit menu, scroll to the desired clip and INSERT
will place that clip into the playlist.
Also, selecting the clip that you wish to insert into playlist by pressing
appropriate F button, or by selecting it on the clip screen is valid.
USEFUL FEATURE: When in the EDIT mode, having rotated the JOG dial
and selected the first frame of a CLIP, pressing PLAY will enable the
operator to view the selected CLIP; after which, the system will remain in
the EDIT mode
EVS Broadcast Equipment
Email : [email protected]
Tel : +32-4/361 7000 Fax : +32-4/361 7099
LSM 2 CAM
LSM2CAM_4.14_000118.doc
Page: 32/43
User's Guide
Author : Marianne LOTHAIRE rev B.STAS
Software : LSM2CAM4.EXE v.4.12 11/06/99
8. Paint Mode
(C from MAIN MENU)
The Paint Mode is a software option. If the license code for this option is
not installed on your system, the words 'No Paint option' will appear on the
PGM monitoring output when trying to enter this mode, and the function
will not be available.
The facilities within this software package can be operated using the
graphics tablet, or a touch screen. Selected in the MAIN MENU, the normal
pointing device is the tablet, selecting F9 will toggle between tablet / touch
screen (only when the touch screen is available).
The use of the LOOP function allows the operator to create a clip with the
paint feature. Rolling a clip while in the LOOP mode, in Painting, and
dissolving paint image on/off allows for a very powerful feature.
STRAIGHT LINE DRAWING:
Select L, you will be prompted to enter beginning and end points.
Place the pen at the start point followed by the finish point, pressing
lightly both times. When the pen is removed from the tablet a straight line
will appear. The system automatically defaults back to regular drawing
mode.
CIRCLE DRAWING (LARGE OR SMALL):
Select either C or c, you will be prompted to select center of circle.
Place the pen on the tablet at the point where the circle is required. The
circle will appear.
ARROW:
Select A
When you draw on the tablet and remove the pen, a «neat» arrow appears
at the end of the line. This facility remains «on», when no longer required,
select A again.
COLOR & DENSITY:
Select D. Choose the desired color from the display, then choose the
desired thickness.
This will be stored as Br1 or Br2. Thus, two types can be stored.
ERASE:
Selecting E allows the pen to be used as an eraser. This facility remains
«on», when no longer required, select E again.
EVS Broadcast Equipment
Email : [email protected]
Tel : +32-4/361 7000 Fax : +32-4/361 7099
LSM 2 CAM
LSM2CAM_4.14_000118.doc
Page: 33/43
User's Guide
Author : Marianne LOTHAIRE rev B.STAS
Software : LSM2CAM4.EXE v.4.12 11/06/99
CLEAR:
Selecting C allows for clearing of the entire drawing. Once selected, you
can choose between 3 options: Clr to clear, DfC to define customized
colors or you may ESCape this function without clearing any drawing.
If you select Define Color (DfC), a new screen will appear including a U-V
selection area, and an Y level selection area. Select first the color you
want to edit on the top of the screen, then select the U-V and Y values by
moving the pen on the right location of each selection area. When the
adjustment is made, move the pen to an empty zone of the screen.
Note: The value of the colors is stored in a file named PNTG_BR.COL. If
you want to restore the default values, you just have to delete this file. You
can also copy this file to other LSM units, in order to have the same color
settings on all systems.
KEYER:
Can be selected with pen, select K (arrows appear/disappear), or press
key <A> from remote control menu. This feature will cause the drawing to
dissolve on and off.
LOOP:
Only available with systems equipped with I/O4 boards
Loop mode is used to loop the video program output of the LSM into the
video input. This feature allows the operator to create sophisticated
effects in successive steps. Press shift + D to enable this mode
Notes:
1. Video only is looped. Original audio is not looped. This allows recording
a new audio track while playing back video material, (for ex. to add a
comment to a highlighted package)
2. When LOOP mode is enabled, the LSM does not record the live program
any more, since only 1 record channel is available. As soon as the LOOP
mode is disabled, the LSM records the live program again.
EVS Broadcast Equipment
Email : [email protected]
Tel : +32-4/361 7000 Fax : +32-4/361 7099
LSM 2 CAM
LSM2CAM_4.14_000118.doc
Page: 34/43
User's Guide
Author : Marianne LOTHAIRE rev B.STAS
Software : LSM2CAM4.EXE v.4.12 11/06/99
Paint Mode Monitor Display
C (clear)
L
C / c (circle)
A
D
Br1 / Br2
E
k / >k<
L
C
S
P
Clears screen
Enables line mode («one-shot»)
Selects large / small circle («one-shot»)
Automatic arrow at end of freehand drawing
Selects brush color and thickness
Brush 1 or Brush 2 (Set by D)
Erase unwanted portion of graphic
keyer off / on
calls the Library module where drawing, logos, …
can be saved.
marks CUE OUT point on current clip
plays back the clip at slow motion speed. The speed of
SloMo is predefined in the Prgm Speed item from the
Setup Menu (Page2 – F3)
plays back the current clip at normal speed
The clip countdown displays the field time. This means that the countdown
matches the slow motion speed.
Note: Selecting the “C” (clear) from the monitor enters the Clear menu and
the DFC menu. DFC menu allows you to select the brush color from a YUV
color palette
EVS Broadcast Equipment
Email : [email protected]
Tel : +32-4/361 7000 Fax : +32-4/361 7099
LSM 2 CAM
LSM2CAM_4.14_000118.doc
Page: 35/43
User's Guide
Author : Marianne LOTHAIRE rev B.STAS
Software : LSM2CAM4.EXE v.4.12 11/06/99
9. Target Mode
(D from MAIN MENU)
The Target Mode is a software option. If the license code for this option is
not installed on your system, the words 'No Target-track option' will
appear on the PGM monitoring output when trying to enter this mode, and
the function will not be available.
This software enables the following of an action by use of a Circle,
emphasizing a certain point. This software enables the user to choose the
size, color and thickness of the circle border as well as choosing the
darkness of the background for a highlight feature. The addition of the
LOOP function allows the operator to store this as a clip.
The facilities within this software package can be operated using the
graphics tablet, or a touch screen. Selected in the MAIN MENU, the normal
pointing device is the tablet, selecting F9 will toggle between tablet / touch
screen (only when the touch screen is available).
Creating a Target Track:
Begin by selecting all the appropriate sizes, color, etc.
(8 choices for each)
T:
E:
S:
C:
Select
Select
Select
Select
the
the
the
the
background shade
border thickness
circle size
border color
Select the material that you wish to highlight (this may be a clip, or simply
a cued replay)
Position the material at the target start point and place the pen on the
tablet.
At this point a circle will appear on the screen
When the circle is positioned correctly, mark a KEYFRAME:
either by pressing CUE button on the remote control unit.
or pressing the button of the stylus,
or by clicking on the M sign on the monitoring screen
(The K will now appear in the upper left corner indicating that a keyframe
has been marked)
Re-position the material, and mark the next keyframe, and so on...
EVS Broadcast Equipment
Email : [email protected]
Tel : +32-4/361 7000 Fax : +32-4/361 7099
LSM 2 CAM
LSM2CAM_4.14_000118.doc
Page: 36/43
User's Guide
Author : Marianne LOTHAIRE rev B.STAS
Software : LSM2CAM4.EXE v.4.12 11/06/99
When the final keyframe has been marked, the replay can be re-cued.
When the replay is animated, the illustration will appear with a dissolve
effect at the first keyframe and disappear, with a dissolve effect, at the
last.
Run through the material in LOOP mode and the effect can now be
retrieved and stored as a new clip with the target tracking.
(This can be repeated several times to include multiple circles - Refer to
LOOP explanation on page 30)
Operational notes!
1. The first / last keyframes can be at the IN / OUT points of the clip.
2. If, when a replay is viewed, the action is not accurately followed, stop the
replay where the circle has drifted away from the target and use the pen
to move the circle to the correct point, marking an additional keyframe.
This can be done as many times as necessary.
3. When checking / modifying a track, the arrows that appear at the bottom
LEFT of the screen may be used to select the next marked keyframe.
4. If ONE keyframe is to be erased, use the arrows to get to the appropriate
keyframe and then select ERASE (E). Erasing ALL keyframes can be
done using R.
EVS Broadcast Equipment
Email : [email protected]
Tel : +32-4/361 7000 Fax : +32-4/361 7099
LSM 2 CAM
LSM2CAM_4.14_000118.doc
Page: 37/43
User's Guide
Author : Marianne LOTHAIRE rev B.STAS
Software : LSM2CAM4.EXE v.4.12 11/06/99
Target Mode Monitor Display
T
S
E
C
<K>
E
R
!"
M
C
S
P
<<< >>>
Select the darkness of the background (8 choices)
Select the size of the circle (8 choices)
Select the border thickness (8 choices)
Select the border color (8 choices)
Indicates keyframe has been marked on frame viewed
Erases currently displayed keyframe
Erases all keyframes marked
Go to next keyframe (Forward or Backward)
allows you to mark a keyframe directly from the touch screen
or from the tablet. If this option is active, touching a point on
the screen automatically creates the keyframe. This option
becomes inactive after each keyframe creation.
marks CUE OUT point on current clip
starts slow-motion (preset in Prgm Spd)
plays back the current clip
searches the material (clip or live recorded). A single click
with the stylus move one frame forward or one frame back
On the remote control display, selecting A (Motif.) will cause the target
circle to be changed to the LENS function. You will now notice that the
circle will magnify the image. This is a great feature for showing, for
example, a close call like a foot on a line or a ball in/out of bounds.
EVS Broadcast Equipment
Email : [email protected]
Tel : +32-4/361 7000 Fax : +32-4/361 7099
LSM 2 CAM
LSM2CAM_4.14_000118.doc
Page: 38/43
User's Guide
Author : Marianne LOTHAIRE rev B.STAS
Software : LSM2CAM4.EXE v.4.12 11/06/99
Selecting Motif. again will switch back to highlight mode. Keep in mind,
when making these selections, the software will take a few seconds to
make the change.
10. Split Screen mode
(Shift + B’ from MAIN MENU)
To enter the Split Screen mode, press the MENU key on the remote panel to
access the Main Menu, and press the SPLIT key (B) The LCD display and the
monitoring output will display the new information.
10.1 Remote Panel LCD Display
Time Code of the right side picture
SPLIT
Left
XX:XX:XX:XX
112A
Sp 100
DUR : XX:XX:XX
[ 112 214 312
GO LIVE
LEFT
Right
114B
Sp 100
CDUR : XX:XX:XX
BANK
1:01
]
SYNC
LOOP
L & R
SHIFT
XX:XX:XX:XX
115
SWAP
RIGHT
Duration of the right side
clip
Duration of the left
side clip
GO LIVE
LF SWAP
RG SYNC
WP LOOP
SHIFT
Press the SHIFT key (D) to switch between normal and special commands
Function
LEFT
RIGHT
L&R
SHIFT
LF RG WP Brief explanation
To control the left part of the monitor
To control the right part of the monitor
To control both sides together
Access / Exit special commands
To centre the left picture
To centre the right picture
To move the separation line
Press LEFT key to take control of the left side of the screen, and recall the
desired clip for this side. Use the command knob to search inside the clip
until the desired picture is reached.
EVS Broadcast Equipment
Email : [email protected]
Tel : +32-4/361 7000 Fax : +32-4/361 7099
LSM 2 CAM
LSM2CAM_4.14_000118.doc
Page: 39/43
User's Guide
Author : Marianne LOTHAIRE rev B.STAS
Software : LSM2CAM4.EXE v.4.12 11/06/99
Press RIGHT key to take control of the right side of the screen, and repeat
the same operation with the clip you want to display on the right side.
You can also shift horizontally the clips on both sides, so that the action is
in the center of the picture. Press SHIFT key (D) to enter this mode. The
menu will change, as shown above.
Press LF key, and move the command knob to center the left side
picture. Press RG and do the same operation for the right side
picture.
Pressing WP key allows moving the border.
To exit the SHIFT mode, press the SHIFT key (D) again.
10.2 Monitoring Output Display
Note that when playing back a split screen sequence, the playback speed
is limited to the value defined by Speed Max 2 Play parameter in the
Setup menu of the remote panel. The default value is 50%. The operator
can modify this value, but this should be done carefully. If a too high
speed is used when playing back a split screen, the picture might freeze
shortly.
EVS Broadcast Equipment
Email : [email protected]
Tel : +32-4/361 7000 Fax : +32-4/361 7099
LSM 2 CAM
LSM2CAM_4.14_000118.doc
Page: 40/43
User's Guide
Author : Marianne LOTHAIRE rev B.STAS
Software : LSM2CAM4.EXE v.4.12 11/06/99
10.3 Auto Drive Mode
The Auto Drive mode allows to adjust the horizontal position of a sequence
to make sure it is as close as possible to the center of the left/right part of
the screen. This feature can be enabled or disabled by the SPLIT AUTO
DRIVE parameter in the Setup menu of the remote panel (Page 4, F1 in
this menu).
To use the Auto Drive, the first step is to track the object that must be kept
in the center of the frame. Using the TARGET TRACK mode the keyframes
are marked to determine the path of the object. Refer to the TARGET
TRACK chapter of this manual for more details.
When the tracking is completed in the desired clips, enter the SPLIT
SCREEN mode and recall these clips on the left and right side of the
screen. IF SPLIT AUTO DRIVE is enabled AND IF keyframes have been
marked inside selected clips, the word 'DRIVEN' will appear on the
corresponding side of the monitoring output. At playback, the picture will
be shifted horizontally to keep the tracked object in the center of its frame.
To disable the AUTO DRIVE without leaving the Split Screen mode, press
CLEAR+LEFT (disable Auto Drive on left side) or CLEAR+RIGHT (disable
Auto Drive on right side).
EVS Broadcast Equipment
Email : [email protected]
Tel : +32-4/361 7000 Fax : +32-4/361 7099
LSM 2 CAM
LSM2CAM_4.14_000118.doc
Page: 41/43
User's Guide
Author : Marianne LOTHAIRE rev B.STAS
Software : LSM2CAM4.EXE v.4.12 11/06/99
11. 2nd Remote Mode
(Shift + A’ from MAIN MENU)
If desired, the 2 CAM LSM can be run using 2 remotes. Here, each
operator can control one camera. This is not the recommended way to use
this machine simply because the one of the biggest advantages is the
ability to control two cameras with one operator.
Slave
Rmt 1
CH. A
Two Remotes
[TC Live or on Search]] P G M
SP 100
[Cap. record]
CH. B
Rmt 2
[TC Live or on Search]] P R V
SP 100
[Cap. record]
BANK 1:01
SWAP
Master
Rmt 1
CH. A
Two Remotes
[TC Live or on Search]] P G M
SP 100
[Cap. record]
CH. B
Rmt 2
[TC Live or on Search]] P R V
SP 100
[Cap. record]
BANK 1:01
SWAP
1<>2
When in this mode, making a clip on one remote will also make the clip on
the second remote. So if one operator stores a certain clip in location
125, that same clip will be in location 125 of the other operator.
Note: The 2nd remote control is connected to the AUX1 plug from the rear
panel of the LSM. Please refer to the Technical reference manual for more
details regarding the cabling and the connections.
EVS Broadcast Equipment
Email : [email protected]
Tel : +32-4/361 7000 Fax : +32-4/361 7099
LSM 2 CAM
LSM2CAM_4.14_000118.doc
Page: 42/43
User's Guide
Author : Marianne LOTHAIRE rev B.STAS
Software : LSM2CAM4.EXE v.4.12 11/06/99
12. Connections for the GPI commands
In the LSM 2 CAM software GPI commands are available to start the
playback of a clip or to control the playlist diffusion.
From the Setup menu on the Remote, the user defines the GPI delay (from
the Setup menu – page 4 – F4) and/or the GPI mode (from the Setup
menu – page 4 – F5)
The GPI Delay parameter sets the time delay between the GPI command is
received and the Start of the clip playback. The GPI delay is active in
PLAY mode but ineffective in PLAYLIST mode.
The GPI mode parameter defines the used mode: PLAY or PLAY &
PLAYLIST.
GPI Mode
LSM Mode
PLAY
All modes
PLAY from Remote 1
PLAY from Remote 2
PLAY from PGM/PGM1
PLAY from PRW/PGM2
PLAY & PLAYLIST
PLAY & PLAYLIST
All modes except Playlist Diffusion PLAYLIST Diffusion mode
PLAY from Remote 1
PLAY from Remote 1
PLAY from Remote 2
NEXT from Remote 1
PLAY from PGM/PGM1
SKIP from Remote 1
PLAY from PRW/PGM2
PAUSE from Remote 1
Pin connections
GPI1 between Pin 21 and Pin 22
GPI2 between Pin 20 and Pin 23
GPI3 between Pin 19 and Pin 24
GPI1 between Pin 18 and Pin 25
Pins 5, 6, 7, 8 and 13 are linked
The DB25F connector is connected as follows:
EVS Broadcast Equipment
Email : [email protected]
Tel : +32-4/361 7000 Fax : +32-4/361 7099
LSM 2 CAM
LSM2CAM_4.14_000118.doc
Page: 43/43
User's Guide
Author : Marianne LOTHAIRE rev B.STAS
Software : LSM2CAM4.EXE v.4.12 11/06/99
13. Audio connections
The standard
connections:
•
•
•
•
•
audio
connections
are
consistent
with
video
Audio Input 1/2 matches Serial Input 1 of the mainframe
Audio Input 3/4 matches Serial Input 2 of the mainframe
Audio Output 1/2 matches Serial Output A of the mainframe
Audio Output 3/4 matches Serial Output B of the mainframe
And the audio output 5/6 gives the auxiliary audio track for
AuxClip option.
As the LSM 2CAM can be set up either with 1 or 2 stereo inputs per
camera, this sequence is repeated to connect the second (optional)
stereo audio input of each camera.
To audio configuration (1 or 2 stereo inputs per camera) is made in
the EVS Maintenance Menu:
If you're not yet inside the EVS Main Menu, exit the running
application ( [ALT]+[Q], then [ENTER] ) to go back to EVS Main
Menu.
Press [F9] on the keyboard to open the EVS Maintenance Menu.
Using the [↑][↓] keys, select the Parameters option and press [ENTER].
Using the [↑][↓] keys, select the Number of Record Channel option and
press [ENTER].
Using the [TAB] key, select the nbrAudio 0 parameter.
Set the value of this parameter to 1 for 1 stereo input per camera, and to 2
for 2 stereo inputs per camera. Press [ENTER] to validate. This value is
automatically used for all channels. The nbrAudio 1 parameter is NOT
taken into account.
Press [ESC] several times until you are back to the EVS Main Menu.
Press [ENTER] to restart the application.
EVS Broadcast Equipment
Email : [email protected]
Tel : +32-4/361 7000 Fax : +32-4/361 7099
Europe, Africa & Middle East :
EVS Broadcast Equipment s.a.
Parc Scientifique du Sart Tilman - Rue Bois Saint-Jean 16 - 4102 Liege - BELGIUM
Tel : +32-4-361 7000 - Fax : +32-4-361 7099 -e-mail : [email protected]
France : EVS France s.a.
Quai Carnot 47 - 92210 Saint-Cloud - FRANCE
Tel : +33-1-5557 3625 - Fax : +33-1-4112 9783 - email : [email protected]
Italy : EVS Italia s.r.l.
Via Cipro 96 - 25124 Brescia - ITALY
Tel: +39-030 242 71 34 Fax: +39-030 2478182 - e-mail : [email protected]
North America : EVS Broadcast Equipment Inc.
9 Law Drive, Suite 200 – FAIRFIELD - NJ 07004 - USA
Tel : +1 (973) 575 7811 – Hotline: +1 (973) 575 7813 - Fax : +1 (973) 575 7812
e-mail : evsusa @ evs.tv
South America : EVS Argentina s.r.l.
Nicasio Oroño 1216 - 1416 Capital Federal - Buenos Aires Argentina
Tel: (0054) 11 4581-8465 - Fax: (0054) 11 4583-1143 - e-mail: [email protected]
Asia - Pacific : EVS Broadcast Equipment s.a.
430 DB Plaza - Discovery Bay - HONG KONG
Tel : +852-2914 2501 - Fax : +852-2914 2505 - e-mail : [email protected]