1
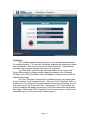
User’s Guide v3.0
Shepherd TimeClock
4465 W. Gandy Blvd.
Suite 800
Tampa, FL 33611
Phone: 813-882-8292
Fax: 813-839-7829
http://www.ShepherdTimeClock.com
The information contained in this document represents the current view of
ComputerOne of America, LLC. as of the date of publication.
This Users Guide is for informational purposes only. COMPUTERONE
AND SHEPHERD TIMECLOCK MAKE NO WARRANTIES, EXPRESS
OR IMPLIED, IN THIS DOCUMENT
Page - 1 -
Table of Contents
Table of Contents ………………………………………….
Getting Started ………………………………………….....
Authentication .……………………………………………..
2
3
3
AD Integration …………………………………………………
UserName & Password ……………………………………...
PunchID ……………………………………………………….
3
3
3
User Pages …………………………………………………
4
TimeClock …………………………………………………….
TimeSheet …………………………………………………….
4
6
Admin Pages ……………………………………………….
8
TimeCard Admin ……………………………………………..
User Admin ……………………………………………………
8
9
User Import ………………………………………………………..
User Export ………………………………………………………..
Fingerprint Registration ………………………………………….
10
10
10
Role Admin …………………………………………………….
Group Admin …………………………………………………..
JobCode Admin ………………………………………………
PayCode Admin ……………………………………………….
OverTime Admin ………………………………………………
Reports ………………………………………………………..
Exports …………………………………………………………
System Settings ………………………………………………
11
11
12
12
12
13
14
15
Company Name ………………………………………………….
Product Key ……………………………………………………….
Authentication Type ……………………………………………...
TimeZone …………………………………………………………
Groups ……………………………………………………………..
JobCodes …………………………………………………………
BioMetrics …………………………………………………………
SQL Security ……………………………………………………...
15
15
15
16
16
16
16
17
Page - 2 -
Getting Started
The Shepherd TimeClock™ is a web based time management system
written in ASP.NET (C#). This application can be installed on a local network,
with Intranet or Internet availability, or in a hosted environment (Contact Shepherd
Sales for details and pricing on our Hosting model). When installing the Shepherd
TimeClock™ be sure to read the Installation Manual thoroughly. For any
questions or problems with installation or use please contact Shepherd Support.
Authentication
The type of authentication being used by the Shepherd TimeClock™ can
be selected and changed on the System Settings administration page (*see page 8
for more details about the Admin Pages). All of the authentication types in the Shepherd
TimeClock™ can be used in conjunction with our integrated BioMetric feature
(*see page 13 for more information on BioMetric Integration).
Active Directory Integration
The Shepherd TimeClock™ can be setup to use Active Directory
integration when running on a Microsoft Windows© network. This authentication
type uses Active Directory to authenticate the current user logged into the PC
before allowing them access to the Shepherd TimeClock™ application. With this
authentication type the user is not required to logon to the Shepherd
TimeClock™ application since authentication is done through the existing
network. This authentication type requires that you provide an existing Active
Directory service account UserName and Password.
UserName & Password
This authentication type requires users to enter a UserName and
Password for validation before accessing the Shepherd TimeClock™ application.
The UserName and Passwords are setup through the application and stored in
the application’s database (*see page 9 for more information on User Administration).
PunchID
This authentication type is typically only used in an environment where
multiple users are accessing the same PC to clock in and out (Example:
warehouse, nursing station, building entrance, etc.). This authentication type
requires users to enter their unique PunchID to clock in and out (*see page 9 for
more details about the PunchID).
Page - 3 -
User Pages
TimeClock
The Timeclock page is the main\default page that users see when
accessing the Shepherd TimeClock™. This is the page where users can clock in
and out of the system. The Timeclock page consists of the “Last Activity”,
“Current Status”, “Current Time” fields, and the “Punch The Clock” button. When
using JobCodes, the “JobCode” and “Task” dropdowns appear below the
“Current Time” field.
Last Activity
When users access this page for the first time the “Last Activity” field will
display “Never” to show that they have never cocked in or out before. As users
clock in and out the “Last Activity” will change automatically and display the date
and time of the last activity for the current user.
Current Status
The “Current Status” field shows whether the user is currently “Clocked
IN” or “Clocked OUT” of the system. This field will change as users punch the
clock. The “light” to the left of the “Punch The Clock” button will also change as
the user’s current status changes. This is a quick visual reference to see your
current status.
Page - 4 -
Current Time
The “Current Time” field displays the current date and time which are
pulled from the current user’s PC. Although the “Current Time” is pulled from the
user’s PC the date and time logged on a punch are pulled from the server
running the Shepherd TimeClock™ application. This ensures that users cannot
change the date\time on their PC to falsify punches. This also means that the
date\time on PCs and the server running the Shepherd TimeClock™ need to be
synced.
Page - 5 -
TimeSheet
The TimeSheet page is where users go to view and print their timesheet
for a selected period. For users the “Employee” dropdown will display their name
and is disabled so they cannot view anyone else’s Timesheet. Administrators
are able to see everyone and can view anyone’s Timesheet.
The “Start Date” and “End Date” calendars default to the current date.
Select different dates to display a wider range of punches on the Timesheet.
Clicking on the “View Timesheet” button will display all of the punches within the
selected date range.
The “Print Timesheet” button starts out disabled and is only enabled after
a user clicks the “View Timesheet” button. When the “Print Timesheet” button is
enabled, and “Use OverTime” has been selected in the System Settings, you will
also see an option for “Show OverTime”. By selecting “Yes” for this option, the
printed Timesheet will display the amount of OverTime used within the selected
time frame. Clicking the “Print Timesheet” button will print a report, similar to the
Timesheet layout, on the current user’s default printer.
Page - 6 -
Page - 7 -
Admin Pages
TimeCard Admin
The TimeCard Admin page allows administrators to View, Add, and Edit
user’s punches for a specified date and time. Viewing the TimeCard of an
employee will validate the punches and show you if there are any missing
punches or possible problems for the selected date range. Errors will appear in
RED and possible problems will appear in GREEN.
When coupled with Groups and Roles, you can determine what users can
be seen. Supervisors or anyone with the “Time Cards – View” right, will only be
able to see those users who share a Group with them.
Follow the steps detailed below to accomplish the various functions.
View TimeCard
• Start by selecting a user from the “Employee” dropdown list.
• Next, select the “Start Date” and “End Date” for the time period you want
to view.
• Click on the “View Timecard” button.
Add Punch
• Select the date for the punch you want to add in the Timecard Details
section.
• If you are using JobCodes, select the JobCode associated with this punch.
• Next, select the Status for the punch you are adding.
o If you select a status other than Clocked In or Clocked Out, the
Time fields will change to Hours so that you can enter and track
paid or unpaid time off.
• Finally, enter the hours or time for the punch you are adding.
Edit Punch
• While viewing a Timecard, click on the “Edit” link for the punch you want to
edit.
• Edit the “Date/Time”, “JobCode”, and\or “Status” fields as appropriate.
• Finally, click on the “Update” or “Cancel” link.
o “Update” – this button will confirm and save your changes for this
punch.
o “Cancel” – this button will discard any changes you made.
Delete Punch
• Click on the “Delete” link for the punch you want to get rid of.
Page - 8 -
User Admin
The User Administration page is where administrators can View, Add,
Edit, or Delete users and set user’s roles within the Shepherd TimeClock™
application. To view a user’s information just select their name from the
“Employee” list and the fields below will auto populate. When adding a user the
First Name, Last Name, E-mail Address, UserName, Password, Role, Regular
Hourly Pay Rate, and Over-Time Hourly Pay Rate fields are required.
•
•
•
•
•
•
•
SMS Address: This field is used to store the user’s email address where
they will receive text messages on their phone (see your specific carrier
for details). When this field is filled out, messages can be sent to users
via the Status Panel.
Employee ID: This field is primarily used for synchronization with payroll
or accounting packages when using the Export feature.
Punch ID: The PunchID field is not required unless you have users that
are using the PunchID authentication type. The PunchID must be unique
for each user and can be from 4 to 9 characters long. This field accepts
alpha and numeric characters or a combination of the two.
Location: The Location field, although not required, is useful for
assigning users to a specific department. The field is alphanumeric and
limited to 10 characters.
Role: This field sets the security role that the user will be assigned to. A
user’s role defines what rights they have within the Shepherd
TimeClock™.
Active: All users must have the “Active” box checked in order to use the
application. Un-checking this box on an existing user, or leaving it unchecked on a new user, will put that user in an “Inactive” status. While
“Inactive”, the user will not be able to access the Shepherd TimeClock™
but their account will still count against the licenses being used.
Use Bio: This option only appears when the Shepherd TimeClock™ is
setup to use BioMetrics. Selecting this option will force the user to use
biometric authentication when clocking in and out.
When the Shepherd TimeClock™ is set to use the Active Directory
authentication type, a user account will be created automatically when a user
accesses the Shepherd TimeClock™ application for the first time. The initial
security Role for the user will be set based on the AD Group they are assigned
to. The security Role can be changed later within the Shepherd TimeClock™
application.
Deleted Users: Deleted users cannot access the Shepherd TimeClock™ and
their accounts do not count towards your licenses being used. To change a user
from deleted to active status simply select the user from the “Employee” list box,
check the “Active” box, and click the “Update User” button.
Page - 9 -
User Import
This page allows administrators to batch import users into the Shepherd
TimeClock™ rather than having to enter them individually. There are two
formats available for this process: Shepherd Export File and the Active Directory
Export File.
Shepherd Export File: This format is created from within the Shepherd
TimeClock™ using the “User Export” feature. This import format is used when
transferring users from one installation of the Shepherd TimeClock™ to another.
You can also manually create a file with this format for importing users (please
contact Shepherd Support for details on the appropriate format).
Active Directory Export File: This file is created by running an LDIFDE
query against an existing Active Directory. We strongly recommend that only
qualified professionals run any type of query on an existing Active Directory.
Note: When using the Active Directory authentication with Shepherd
TimeClock™, we recommend that you allow the application to add users as they
access the system rather than attempting to import them.
User Export
This page allows administrator to create a comma delimited (.csv) file of
existing users in the Shepherd TimeClock™. This feature is primarily used when
transferring users from one Shepherd TimeClock™ installation to another.
To use this feature simply select the Export Type you want, enter a name
for the export file, and click the “Submit” button. A file new export (.csv) file will
be created within the “Export” subfolder in the website.
Fingerprint Registration
This page allows administrators to register fingerprints for specific users
for use with the Biometrics. To use this page start by selecting the employee
from the dropdown list, check the box next to the finger you’re going to scan,
click the “Scan” button, follow the instructions from the scanner, and finally click
the “Register Print” button. Only Administrators are able to register prints.
Note: A biometric scanner must be attached to the PC you’re using to register
prints.
Page - 10 -
Role Admin
The Role Administration page is used to Add, Edit, and Delete security
roles used within the Shepherd TimeClock™. These roles define what a user, or
group of users, have access to within the application. There are three predefined
roles already setup within the Shepherd TimeClock™.
Administrator: This role has full access to all pages and features. This
role cannot be changed or deleted.
Supervisor: This role by default has access to the features and pages
generally required by a supervisor. This role can be changed and\or deleted.
User: This is the default role for all users added to the Shepherd
TimeClock™. This role only has access to the “Timeclock” & “TimeSheet”
pages. Like the “Administrator” role, this role cannot be changed or deleted.
Note: A user’s rights are based on the highest level role they are associated
with. (Example: Joe User is assigned to the “User” role on the User Admin page.
Joe User is also a member of the Admins Group which has been assigned the
“Administrator” role. Joe User has all the rights associated with the
“Administrator” role.)
Group Admin
The Group Admin page allows administrators to Add, Edit, and Delete
groups as well as Add and Remove members to those groups. When creating a
new group you must select the role this group will be associated with.
Enforce BioMetric Authentication & Use Bio: These options only appear
when the Shepherd TimeClock™ is setup to use biometric authentication.
Selecting this option will force all users within this group to use biometric
authentication when clocking in and out.
Page - 11 -
JobCode Admin
The JobCode Admin page is where administrators can Add, Edit, and
Delete JobCodes for the Shepherd TimeClock™ application. On all pages,
JobCodes are listed in alphanumeric order (numbers before letters, 1-10 and az). Follow the instructions detailed below to accomplish the various functions.
Add JobCode
• Enter the name of the new JobCode in the “JobCode” field.
• Click on the “Add JobCode” button.
Edit JobCode
• Click on the “Edit” link for the JobCode you want to change.
• Change the JobCode as necessary.
• Click on the “Update” or “Cancel” link.
o “Update” – will save your changes to the database.
o “Cancel” – will discard you changes.
Delete JobCode
• Click on the “Delete” link for the JobCode you want to get rid of.
JobCode Assignment: This function of the JobCode Admin page allows you to
assign JobCodes to specific groups. When this is done, users will only see the
JobCodes assigned to the groups they are members of.
Task Admin: Similar to the JobCode Admin, this tab allows you to Add, Edit,
and Delete JobCode Tasks.
Task Assignment: This function allows you to assign specific Tasks to specific
JobCodes. Users will only see the Tasks assigned to a particular JobCode.
PayCode Admin
This administration page allows you to Add, Edit, and Delete the
PayCodes available for your installation of the Shepherd TimeClock™.
PayCodes are used within the system to define time taken off from work (i.e.
Vacation) or time spent working outside normal operating hours (i.e. Holiday).
The Holidays tab allows you to define the holidays observed by your
company. This list is currently only used in conjunction with the “Comparison
Report” but will eventually be incorporated into other areas of the Shepherd
TimeClock™.
OverTime Admin
This page is where you set the parameters for calculating overtime. The
default values are “Weekly” and “40” hours. Thus overtime, by default, is
calculated based on a 40 hour work week.
Page - 12 -
Reports
The Reports page is where administrators can run the various reports built
into the Shepherd TimeClock™ application. Reports can be run on a single
employee, a specific location, or on the entire company. The various reports can
also be generated for Web View, as a Word Document, in Adobe PDF format, or
in Excel.
Generate Report
• Start by selecting the Report Type you want to run.
• Then select the Report Format you want. *NOTE: you must have the
appropriate application installed to read the Word, Excel, and Adobe
formats.
• Next select the Start Date, and End Date if necessary.
• Select the available options (1) (2).
• Finally, click on the “Generate Report” button to create your report.
(1) Convert Minutes to Decimal: By default all of the reports show total time
in the following format “HH:MM”. By selecting “Yes” on this option the
minutes will be converted to decimal format and display as “HH.MMM”.
(2) Calculate OverTime: This option will only be available when the system is
set to user overtime. Selecting “Yes” on this option will cause the report to
calculate overtime for each user based on the OverTime settings.
Complete Payroll Report
This report is formatted much like the Timesheet, showing the Clocked In
and Clocked Out times for each date with the total for each set of punches on the
right. The total hours for the selected date rage are displayed below. The hour
totals are broken into “Regular” and “Other” hours. “Other” hours are the paid or
unpaid time off codes. Each of these lines will have the associated PayCode
listed next to it.
Complete Payroll – Grouped By Location Report
This report is formatted just like the Complete Payroll report except that
the users are grouped by their location. This report is useful for when you need
to get a report on a specific department or company location.
Weekly Punch Report
The Weekly Punch Report is very similar to the Complete – Grouped By
Location report. The layout is the same and the users are grouped by location,
but the main difference is that the Weekly Punch report only shows the punches
for a seven day (1 week) period starting on the selected Start Date. This report
also calculates overtime based on a 40 hour work week.
Weekly Summary Report
This report displays the total hours worked per day for a seven day (1
week) period starting on the selected Start Date. The report is displayed in a
Page - 13 -
horizontal layout and like the other Weekly report, the users are grouped by
location.
JobCode Summary Report
This report displays the total hours spent on a JobCode during the
selected time frame. The report groups the time by JobCode and lists the hours
spent by each employee on that JobCode during the selected time period.
Punch Exception Report
The Punch Exception Report displays all of the possibly problems with
time cards (punches) during the selected time frame. The possible problems are
grouped by employee and listed in chronological order. The problems looked for
are limited to Clock In with no Clock Out, two “Clock In” in a row, etc. This report
will help you determine what corrections need to be made before running or
printing one of the other reports.
Comparison Report
This report shows a breakdown of Total Hours worked vs. the total
number of Work Hours within the selected timeframe and gives you the Total
Hours not worked. This report is based on a five day work week and takes into
account Holidays that fall within the selected timeframe.
Audit Trail Report
The Audit Trail report displays each of the punches by a user during the
selected date range and shows the IP Address and DNS Name of where each
punch came from. This report is useful for tracking whether a user has been
punching in and out from home or from someone else’s PC in the office. Keep in
mind that because of the DNS lookup this report does for each of the entries it
can be slow and take awhile to load or finish processing. It’s best to run this
report on a specific individual and\or for a short date range.
Exports
Currently the Shepherd TimeClock™ has two types of exports. The first is
a Generic Export and the second is an export designed specifically for the Gevity
accounting package. Both of these exports can be created in comma delimited
“.CSV” or “.TXT” format. The Generic Export defaults to the comma delimited
“.TXT” format and has the following layout:
• Clocked In Date
• Clocked Out Date
• PunchID
• Last Name
• First Name
• Location
• Regular Pay Rate
• OT Pay Rate
Page - 14 -
•
•
•
•
•
•
•
Pay Code
Hours Worked
Clocked In Time
Clocked Out Time
JobCode
Clocked In IP
Clocked Out IP
Create Export File
• Start by selecting the Company or Employee you want in the export.
• Next select the Start Date and End Date for your export.
• Then select the Export Type and Export Format you want.
• Next enter the Name of the export file. *NOTE: This should be the name
of the file you want to create only NOT the path of the file.
• Finally click on the “Generate Export” button. You will receive a message
stating whether the export succeeded or failed.
Viewing and Deleting Export Files
• From the Export page, click on the “Export Files & Error Report” link above
the “Employee” field.
o View – Click on the “View” link to view the Export file or Error
Report. This will open the export file in a new window.
o Delete – Click on the “Delete” button next to the Export File you
want to remove. This action will permanently delete the appropriate
file.
System Settings
The System Settings, or Operations Administration, page is where
administrators control the functionality of the Shepherd TimeClock™ application.
All of the settings on this page, and how they impact the system, are detailed
below.
Company Name
This field contains the text that is displayed on the lower left corner of ever
page in the TimeClock. This field is not required and can be left blank.
Product Key
This field contains your Shepherd TimeClock™ product key. This field is
required. Product keys are unique to each installation and can be obtained by
contacting Shepherd Support or Shepherd Sales.
Max User Count & Current User Count
These fields display the maximum user count that your Product Key
supports and the total number of licenses currently in use. If you add more users
than your key supports, you will receive a message stating that your User Count
has been exceeded and you will need to obtain a new Product Key.
Page - 15 -
Authentication Type
This setting determines how users will access the Shepherd TimeClock™
application (see the Authentication section earlier in this manual for more details on each type).
Selecting the “Active Directory” type will cause the “AD Timeclock Admin Group”,
“AD Timeclock User Group”, “Service Account UN”, and “Service Account PW”
fields to appear. These fields are used to store the names of the Active Directory
groups users are stored in and define what service account to use for LDAP
queries. The AD Group fields are case sensitive and must match the appropriate
AD Group names exactly. All of these fields are required when the Active
Directory authentication type is selected.
System TimeZone Location
This setting determines the geographical location that the Shepherd
TimeClock™ application is running in. Changing this field will change the list of
available TimeZones below. This field is required and defaults to “United States”
on installation.
System TimeZone
This setting determines the actual TimeZone that the Shepherd
TimeClock™ application is running in. This list is dependent on the selected
TimeZone Location from above. This field is required and defaults to “Eastern
Standard Time (GMT -5)” on installation.
Adjust for Daylight Savings
This setting toggles whether the Shepherd TimeClock™ will auto adjust
for Daylight Savings time. This setting defaults to “Yes” on installation.
Use Groups
This setting toggles whether or not the Shepherd TimeClock™ will use
Groups (see the Group Admin section earlier in this manual for details about setting up
Groups). This setting defaults to “No” on installation.
Use JobCodes
This setting toggles whether or not the Shepherd TimeClock™ will use
JobCodes (see the JobCode Admin section earlier in this manual for details about setting up
JobCodes). Setting this to “Yes” will cause the JobCode dropdown to appear on
the TimeClock and Punch pages. Users can then select a JobCode to log their
punches under. When JobCodes are being used, users will be forced to punch
out under their current JobCode before punching in under a new JobCode. This
setting defaults to “No” on installation.
BioMetrics Integration
This setting determines whether or not the “Use Bio” options appear on
the User and Group Admin pages. When set to “Yes” users will be forced to use
a biometric scanner device (determined below) to authenticate themselves for
Page - 16 -
each punch. Changing this setting to “Yes” will cause the BioMetric Scanner field
to become enabled. This setting defaults to “No” on installation.
BioMetric Scanner
This setting determines which biometric scanning device the Shepherd
TimeClock™ will integrate with. See the Shepherd TimeClock™ Website for
details on the various BioMetric Scanners. Changing this setting to “Vascular
Scanner” causes the Bio SQL Server, Bio SQL UserName, and Bio SQL
Password fields to appear. These fields are used to determine where the
vascular scanner’s primary database reside and how the TimeClock will connect
to it. These fields are required when the “Vascular Scanner” is selected.
SQL Security
*CAUTION: Changing these fields can cause your application to stop working.
SQL Server
This setting contains the name\instance of the SQL or MSDE
server used for the Shepherd TimeClock™ application. This field is required and
is set during installation.
SQL UserName
This setting stores the UserName for the SQL account used to
connect to the Shepherd TimeClock™ application’s database. This setting is
required and set during installation.
SQL Password
This field will always appear blank. Only enter a value in this field if
you are changing the current password or entering a new UserName and
Password combination. This setting is set during installation and should only be
changed when the SQL User Account or SQL User Account Password changes.
Page - 17 -