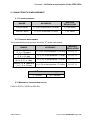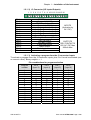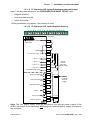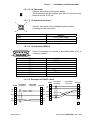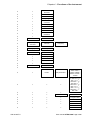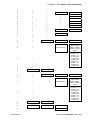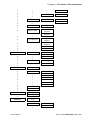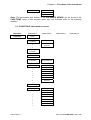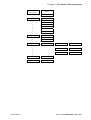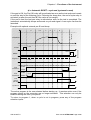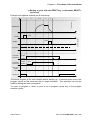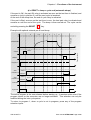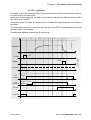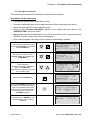
1
USER MANUAL ATEQ G520 Version 1.03 (Photo non contractual) Reference: UM-19700E-U REVISIONS OF THE ATEQ G520 USER MANUAL Reference Date week/year Chapters updated First edition UM-19700A-U 28/2002 - Second edition UM-19700B-U 04/2004 Evolution of the program from version 1.01 to 1.02 (temperature correction). Third edition UM-19700C-U 06/2005 Replace LEAK TEST text by FLOW TEST text on all displays, chapter 3. Add test output on chapter 1. Edition/Revision Fourth edition UM-19700D-U 24/2005 Up dating the measurements characteristics in the preamble. Program evolution to the 1.03 version. Differential sensor coefficient adjustable in the line production. Functioning identical to the 1.02 version. Add cut and external dump valves options in the chapter 5. Fifth edition UM-19700E-U 05/2006 Up dating the measurements characteristics in the preamble. Recommendations for leak testing instruments Precautions for the test environment • Keep the test area as clean as possible. Precautions for the operators • ATEQ recommends that the operators using the instruments should have a suitable qualification and training with respect to the work bench requirements. General precautions • Read the user manual before using the instrument, • all electrical connections to the instrument must be equipped with a safety system (fuse, circuit breaker…) appropriate to its needs and complying with the standards, • to avoid electromagnetic interference, the cable connections to the instrument should be less than two meters in length, • it is essential that the electrical main is earthed, • disconnect the electrical connections to the equipment before maintenance, • cut the air supply for any kinds of operation on the pneumatic assembly, • do not open the instrument when it is powered up, • avoid water spillage near of the instrument, • ATEQ is at your disposal for any further information concerning the use of the instrument under maximum safety conditions. We would like to bring to your attention that ATEQ will not be held responsible for any accident connected to the improper use of the instrument, to the work bench or to the lack of compliance with safety rules. ATEQ Company is free from any responsibility for any adjustment of its instrument which would not have been done by its own technicians. 0039/Ret-U ATEQ, THE ASSURANCE OF A COMPETENT AFTER SALES SERVICE THE ATEQ AFTER SALES SERVICE IS : • a team of qualified technicians, • a permanent telephone assistance, • agencies close to you for faster reaction, • a stock of spare parts available immediately, • a car fleet for rapid intervention, • a commitment to quality ... THE OVERHAUL ATEQ carries out the overhaul of your instruments at interesting prices. The overhaul corresponds to the maintenance of the instrument (checking, cleaning, replacing of used parts) as part of preventive maintenance. Preventive maintenance is the best way to guarantee reliability and efficiency. It allows the maintenance of a group of instruments in good operational order and prevent eventual break-downs. MAINTENANCE KITS The ATEQ After Sales Service proposes, two kits destined for the preventive maintenance of the pneumatic circuits of instruments. CALIBRATION This may be carried out on site or in our offices. ATEQ is attached to the COFRAC and delivers a certificate following a calibration. TRAINING COURSES In the framework of partnership with our customers, ATEQ offers two types of training in order to optimise the usage and knowledge of our instruments. They are aimed at different levels of technician: • method / control training, • maintenance / upkeep training. A TARGETED TECHNICAL DOCUMENTATION A number of technical documents are at your disposal to allow you to intervene rapidly in the event minor breakdowns: • problem sheets describing and offering solutions to the main pneumatic and electronic problems, • several maintenance manuals. A QUALITY GUARANTEE The instruments are guaranteed for parts and labour in our offices: • 2 years for leak detection equipment, • 1 year for electrical tests to norms instruments, • 1 year for the accessories. Our After Sales Service is capable of rapidly answering all your needs and queries. ATEQ recommends to made realise by its departments a revision and a calibration of the instruments every year SAV-Ub/0243 PREFACE Dear Customer, You have just purchased an ATEQ instrument, we thank you for the trust you have placed on our brand. This instrument has been designed to ensure a long and unparalleled life expectancy, and we are convinced that it will give you complete satisfaction during many long years of operation. In order to maximise the life expectancy and reliability of your ATEQ instrument, we recommend that you install this instrument on a secured workbench and advise you to consult this manual in order to familiarise yourself with the functions and capabilities of the instrument. Our ATEQ After Sales Service centre can give you recommendations based on your specific operation requirements. ATEQ 0508/PREFc-U Table of contents TABLE OF CONTENTS Preamble DEFINITION AND PRINCIPLES OF THE G520 1. DEFINITION .........................................................................................................................................5 2. CHARACTERISTICS MEASUREMENT..............................................................................................6 2.1. Flow measurement.......................................................................................................................6 2.2. Pressure measurement................................................................................................................6 2.3. Mechanical pressure regulation ...................................................................................................6 3. OPERATIONAL CHARACTERISTICS................................................................................................7 4. PRESENTATION OF THE SYMBOLS ................................................................................................8 Chapter 1 INSTALLATION OF THE INSTRUMENT 1. APPEARANCE OF THE ATEQ G520 ...............................................................................................11 1.1. Layout of connectors on the G520 rear panel............................................................................12 1.2. Connector details .......................................................................................................................12 1.2.1. Electrical connectors ...................................................................................................................... 12 1.2.2. Pneumatic connectors .................................................................................................................... 17 1.2.3. Pneumatic test output ..................................................................................................................... 17 Chapter 2 USER INTERFACES 1. ATEQ G520 FRONT PANEL APPEARANCE...................................................................................19 2. APPEARANCE OF THE KEYBOARD ..............................................................................................20 2.1. Navigation keys ..........................................................................................................................20 2.2. Cycle keys ..................................................................................................................................20 3. LOCKABLE SWITCH ........................................................................................................................21 4. INFRA-RED INTERFACE ..................................................................................................................21 5. 4 LINE LCD DISPLAY .......................................................................................................................21 6. FUNCTIONS OF THE INDICATOR LIGHTS.....................................................................................22 Chapter 3 INSTALLATION AND SETTINGS 1. POWERING UP THE ATEQ G520 ....................................................................................................23 2. CREATION OF A TEST PROGRAM.................................................................................................23 2.1. Choice of the program number ..................................................................................................24 2.2. Test type selection .....................................................................................................................24 2.2.1. Flow test ......................................................................................................................................... 24 2.2.2. Operator mode test......................................................................................................................... 24 2.3. Parameter settings .....................................................................................................................25 2.3.1. Coupling time.................................................................................................................................. 26 2.3.2. Fill time ........................................................................................................................................... 26 2.3.3. Stabilization time ............................................................................................................................ 27 2.3.4. Test time......................................................................................................................................... 27 2.3.5. Pressure units................................................................................................................................. 27 2.3.6. Set pressure ................................................................................................................................... 28 2.3.7. Maximum fill.................................................................................................................................... 28 2.3.8. Minimum fill..................................................................................................................................... 28 2.3.9. Test pressure adjustment ............................................................................................................... 28 2.3.10. Reject unit..................................................................................................................................... 28 2.3.11. Volume ......................................................................................................................................... 29 2.3.12. Test reject..................................................................................................................................... 29 2.3.13. Functions ...................................................................................................................................... 29 3. DUPLICATION OF A TEST PROGRAM ...........................................................................................30 4. DELETING A PROGRAM OR A PROGRAM NAME ........................................................................31 5. CHOICE OF THE PROGRAM TO BE RUN ......................................................................................32 6. STARTING A MEASUREMENT CYCLE...........................................................................................32 7. STOPPING A CYCLE ........................................................................................................................32 UM-19700E-U User manual ATEQ G520 Page 1/88 Table of contents Chapter 4 FUNCTIONS OF THE INSTRUMENT 1. MENU STRUCTURE..........................................................................................................................33 1.1. Main menu..................................................................................................................................33 1.2. "FUNCTIONS" menu when activated.........................................................................................37 2. CONFIGURATION MENU .................................................................................................................39 2.1. Extended menus ........................................................................................................................39 2.1.1. Activation of the additional functions .............................................................................................. 39 2.1.2. Setting the additional functions....................................................................................................... 40 2.1.3. List of additional functions .............................................................................................................. 40 2.2. Automatic save...........................................................................................................................52 2.3. Piezo auto zero ..........................................................................................................................52 2.4. Bar Graph...................................................................................................................................53 2.5. Hour............................................................................................................................................53 2.6. RS232 ........................................................................................................................................53 2.6.1. C540/580 ........................................................................................................................................ 53 2.6.2. Printer ............................................................................................................................................. 53 2.6.3. Modbus........................................................................................................................................... 57 2.7. RS485 ........................................................................................................................................58 2.7.1. C540/580 ........................................................................................................................................ 58 2.7.2. Modbus........................................................................................................................................... 58 2.8. Security ......................................................................................................................................58 2.9. Lighting the screen.....................................................................................................................58 2.10. External dump option ...............................................................................................................59 2.11. Shut off (option)........................................................................................................................60 2.12. Negative flow alarm..................................................................................................................61 2.13. I/O configuration.......................................................................................................................61 3. SPECIAL CYCLES MENU.................................................................................................................62 3.1. Special cycles available .............................................................................................................62 3.2. Volume calculation .....................................................................................................................63 3.3. Infinite fill ....................................................................................................................................64 3.4. Piezo auto zero ..........................................................................................................................65 3.5. Print ............................................................................................................................................66 3.6. Atmospherics conditions ............................................................................................................66 4. SERVICE MENU ................................................................................................................................67 4.1. Parameters service ....................................................................................................................67 4.2. Servicing of the sensors.............................................................................................................68 5. RESULTS MENU ...............................................................................................................................69 6. LANGUAGE MENU ...........................................................................................................................69 7. STAND BY MENU .............................................................................................................................69 7.1. Standby using the menu ............................................................................................................70 Chapter 5 ACCESSORIES 1. ACCESSORIES SUPPLIED WITH THE INSTRUMENT...................................................................71 1.1. Power supply..............................................................................................................................71 2. OPTIONAL ACCESSORIES..............................................................................................................72 2.1. Calibrated leak ...........................................................................................................................72 2.2. Needle valve and Leak/Flow Calibrator (CDF) ..........................................................................73 2.2.1. Needle valve................................................................................................................................... 73 2.2.2. CDF (Leak/flow Calibrator) ............................................................................................................. 73 2.3. Automatic connectors with expandable joints ............................................................................74 2.3.1. Operation........................................................................................................................................ 74 2.3.2. Standard dimensions ...................................................................................................................... 74 2.4. Filtration kit .................................................................................................................................74 2.5. Simple remote control ................................................................................................................75 2.5.1. Casing reset/start ........................................................................................................................... 75 2.5.2. S5 four-function remote control ...................................................................................................... 75 2.6. External shut off valve option .....................................................................................................76 2.7. External dump valve and shut off function .................................................................................76 UM-19700E-U User manual ATEQ G520 Page 2/88 Table of contents Chapter 6 ERROR MESSAGES ERROR MESSAGES .................................................................................................... 77 Chapter 7 OPERATIONAL PROBLEMS 1. PHENOMENON NOTED....................................................................................................................79 1.1. Condition of the machine's seals ...............................................................................................79 1.2. Damaged instrument seals ........................................................................................................79 1.3. Bumper pad................................................................................................................................79 1.4. Pneumatic air supply too low .....................................................................................................79 1.5. Pneumatic Link...........................................................................................................................79 1.6. Environment ...............................................................................................................................80 1.7. Calibration ..................................................................................................................................80 1.8. Concerns about reliability of the instrument’s circuits ................................................................80 Appendices ATEQ G520 1. TECHNICAL CHARACTERISTICS OF THE G520 ...........................................................................81 2. MECHANICAL DEFINITION DRAWINGS OF G520.........................................................................82 3. CONVERSION TABLE ......................................................................................................................83 4. PARAMETERS STORED ..................................................................................................................84 5. VALVES CODES USED IN YOUR APPLICATION ..........................................................................85 6. USER NOTES ....................................................................................................................................86 Index UM-19700E-U 87 User manual ATEQ G520 Page 3/88 Table of contents UM-19700E-U User manual ATEQ G520 Page 4/88 Preamble – Definition and principles of the ATEQ G520 Preamble DEFINITION AND PRINCIPLES OF THE G520 1. DEFINITION The ATEQ G520 is the latest air/air leak detector operating on a continuous basis (automatic test start). The instrument has been designed to test low pressure components and assemblies (less than 500 mbar) and more particularly gas applications in compliance with European standards, but it can also work with high pressure. The use of continuous testing may allow the localisation and repair of leaks. The instrument may also operate in "controlled" mode, a mode which is advantageous for certain applications, with pre-fill or rapid fill or on automatic workbenches. Absolute pressure sensor Calibrated flow tube Compressed air supply Regulator Temperature sensor ∆P Test part Internal reserve Flow Test volume lower than four times the volume of the internal reserve Differential transducer The ATEQ G520 includes: a pneumatic assembly allowing: • the pressurisation of the test part and the reserve through the use of a regulator, • the measurement of the leak flow image with a differential transducer placed on the end of a calibrated flow tube, • the monitoring of the test pressure with a piezo sensor acting as a pressure controller, • the temperature measurement of the calibrated flow tube to correct the measured flow, a programmable electronic board allowing: • the saving of all the cycle adjustments, • the calculation, display and transmission of the test results. UM-19700E-U User manual ATEQ G520 Page 5/88 Preamble – Definition and principles of the ATEQ G520 2. CHARACTERISTICS MEASUREMENT 2.1. FLOW MEASUREMENT RANGE ACCURACY Maximum RESOLUTION 100 cm3.atm/h +/- (3,5% of the flow + 0,5 ml/h) 0,1 cm3.atm/h 1000 cm3.atm/h +/- (3,5% of the flow + 5 ml/h) 1 cm3.atm/h 2.2. PRESSURE MEASUREMENT The characteristics are common for all the 5th series instruments. ACCURACY Maximum RESOLUTION +/- (1,5% of the pressure + 0,2 hPa) 0,1 % F. S. +/- (1,5% of the pressure + 1 hPa) 0,1 % F. S. +/- (1,5% of the pressure + 3 hPa) 0,1 % F. S. +/- (1,5% of the pressure + 7.5 hPa) 0,1 % F. S. RANGE F. S. = 7,5 kPa* (F. S. = 75 mbar*) F. S. < 30 kPa (F. S. < 0,3 bar) 30 ≤ F. S. ≤ 100 kPa (0,3 ≤ F. S. ≤ 1 bar) 100 ≤ F. S. ≤ 1000 kPa (1 < F. S. ≤ 10 bar) * Specific (relative) G 5th series pressure range 5 – 50 kPa 50 – 400 kPa 2.3. MECHANICAL PRESSURE REGULATION 5 kPa to 50 kPa / 50 kPa to 400 kPa UM-19700E-U User manual ATEQ G520 Page 6/88 Preamble – Definition and principles of the ATEQ G520 3. OPERATIONAL CHARACTERISTICS The ATEQ G520 carries out a pressure measurement on the ends of calibrated flow tubes connecting the test part and the internal instrument reference part (reserve) which have been previously equalised at the same pressure. The measurement is displayed in ml/minute or in ml/hour returned to atmospheric pressure. The flow measurement is dependant on a certain number of parameters: test pressure, the volume of the part to be tested, the volume of the reference. Additionally, it is necessary to optimise a number of adjustments (timings). We have strived towards the production of a user friendly instrument, that is why a few adjustments are not accessible to the operator. These are set in the factory depending on a customers’ required specifications. It's also possible to work in standard conditions mode. UM-19700E-U User manual ATEQ G520 Page 7/88 Preamble – Definition and principles of the ATEQ G520 4. PRESENTATION OF THE SYMBOLS Symbol ! UM-19700E-U Name Function Adjust leak connector Pneumatic connector for the plugging of a calibrated leak (ruby kind) or an adjustable leak. Pressure connector Pneumatic connector for the plugging of a manometer for an external checking of the pressure. Pressure supply of the air supply from the 6 bar network. Test circuit supply Pneumatic connector (according to option) for the plugging of a supplementary pneumatic supply, used in case of test pressure greater than 8 bar. Ground connector Connector for the electric plugging to the ground. Automatic connector Pneumatic connector for the driving of an external logic or pneumatic components (pneumatic sealing connector). Connector Connector for pneumatic output. Connector Connector for pneumatic input. Warning! Read and respect the instructions of the user manual, before plugging and using the instrument. Remote control Connector for a remote control. Printer Connector for printer plugging. User manual ATEQ G520 Page 8/88 Preamble – Definition and principles of the ATEQ G520 Symbol Name Bar code reader Output Input Infrared link UM-19700E-U Function Connector for bar code reader plugging. Dry contact output. Dry contact input. Infrared link, at this place there's the receiver and transmitter of the infrared link. Analogue output Analogue output. Analogue input Analogue input for the temperature sensor. User manual ATEQ G520 Page 9/88 Preamble – Definition and principles of the ATEQ G520 UM-19700E-U User manual ATEQ G520 Page 10/88 Chapter 1 – Installation of the Instrument Chapter 1 INSTALLATION OF THE INSTRUMENT 1. APPEARANCE OF THE ATEQ G520 www.ateq.com T N. G520 R C The ATEQ G520 is supplied in a moulded, painted sheet metal case and rests on rubber feet. The upper cover is attached to the main body by two screws. The size of the casing has been reduced to facilitate the insertion of the instrument in the working environment. A 24 V DC power supply unit is supplied with the instrument. UM-19700E-U User manual ATEQ G520 Page 11/88 Chapter 1 – Installation of the Instrument 1.1. LAYOUT OF CONNECTORS ON THE G520 REAR PANEL NET CE ► 01 02 03 ► 04 05 06 T1 T2 T3 T4 S1S2 S3 S4 I (Output) : 24 V === J2 100 mA 24 V === 24 V === 2A J4 I1 ► I2 ► I3 I4 I5 I6 I1 ► 01 02 03 04 05 ► I (Output) : G520 REF. 197.00 24 V=== 24 V === 200 mA OUTPUT SERVICE PIN ECHAP./ EXHAUST. J5 VID./ VAC. TEST RS485 ENTREE/IN J6 RS485 SORTIE TEST / TEST OUT SORTIE/OUT ! J7 RS232/485 MADE BY ATEQ B A J8 www.ateq.com 1.2. CONNECTOR DETAILS 1.2.1. Electrical connectors The ATEQ G520 operates on a voltage of 24V DC either: 9 Using the external power supply supplied with the instrument, 9 Or via the networking cable when the instrument is a slave. UM-19700E-U User manual ATEQ G520 Page 12/88 Chapter 1 – Installation of the Instrument 1.2.1. 1) J1 Connector (Output temperature sensors) codes / analogue outputs / 1 2 3 4 5 6 7 8 9 10 11 12 13 14 15 16 PIN 2 PIN 3 PIN 4 PIN 5 PIN 6 PIN 7 PIN 8 PIN 9 PIN 10 PIN 11 PIN 12 PIN 13 PIN 14 PIN 15 PIN 16 The analogue chosen option. COMMON (Outputs 1,2,3) Output n°1 Output n°2 OUTPUT CODES Output n°3 24V DC 100mA Max COMMON (Outputs 4,5,6) Outputs Output n°4 Output n°5 Output n°6 12V Sensor power supply TEMPERATURE 0V Sensor power supply SENSORS Sensor n°1 Input Sensor n°2 Input Analogue output n°1 COMMON (Analogue output 1) ANALOGUE OUTPUTS Analogue output n°2 COMMON (Analogue output 2) outputs are the rough signals: 4 – 20 mA or 0 – 10 V depending on the Charge / Load 24 V DC 1 2 0,1 A max 3 4 5 6 7 Obligatory diode for an inductive load. 8 UM-19700E-U User manual ATEQ G520 Page 13/88 Chapter 1 – Installation of the Instrument 1.2.1. 2) J3 Connector (I/O Inputs/Outputs) 1 2 3 4 5 6 7 8 9 10 11 12 13 14 15 16 PIN 1 PIN 2 PIN 3 PIN 4 PIN 5 PIN 6 PIN 7 PIN 8 PIN 9 PIN 10 PIN 11 PIN 12 PIN 13 PIN 14 PIN 15 PIN 16 RESET (input 1) Common (+ 24 V) START Input (input 2) Common (+ 24 V) Input 3 (program selection) Input 4 (program selection) Input 5 (program selection) Input 6 (program selection) Input 7 (program entry) Floating common outputs Part OK output Part BAD output Large leak output Alarm output End of cycle alarm 0V INPUTS (Activation by 24 V DC) OUPTUTS DRY CONTACTS 60V AC / DC Max 200mA Max 1.2.1. 3) Activating a program from the J3 connector inputs To activate a program from the J3 connector inputs, pins 5 to 8 must be selected (one or more at a time). Binary weight n + 1. Pin combinations for program selection UM-19700E-U Program number Pin 5 (Input 3) Pin 6 (Input 4) Pin 7 (Input 5) Pin 8 (Input 6) 1 2 3 4 5 6 7 8 9 10 11 12 13 14 15 16 0 1 0 1 0 1 0 1 0 1 0 1 0 1 0 1 0 0 1 1 0 0 1 1 0 0 1 1 0 0 1 1 0 0 0 0 1 1 1 1 0 0 0 0 1 1 1 1 0 0 0 0 0 0 0 0 1 1 1 1 1 1 1 1 User manual ATEQ G520 Page 14/88 Chapter 1 – Installation of the Instrument 1.2.1. 4) J3 Connector (I/O Inputs/Outputs)programmable input Input 7 can be parameterised in the CONFIGURATION/ INPUT OUPUT menu. 9 Program selection 9 Auto zero reset request, 9 Infinite fill request. Some possibilities only appear if the function is used. 1.2.1. 5) J3 Connector (I/O Inputs/Outputs) drawing 1 2 3 4 5 6 7 8 9 10 11 12 13 14 15 16 Customer 16 programs input board I1 (Reset) 1 2 I2 (Start) 24 V DC 0,3 A max 3 4 I3 (Pr 1 + 1) 5 I4 (Pr 2 + 1) 6 I5 (Pr 4 + 1) 7 I6 (Pr 8 + 1) 8 I7 (Programmable input) 9 Good part output 10 ATEQ 24 V DC 0,3 A max internal supply Com. 11 O1 0,2 A max Load Fail part output 12 Large leak output Alarm End of cycle Masse / Ground 13 O2 24 V DC Customer external supply O3 14 O4 15 O5 16 0,2 A max Load Option Note: The 24V power supply must be provided by the internal power supply of the ATEQ instrument (0,3A maximum) OR through an external power supply provided by the customer. UM-19700E-U User manual ATEQ G520 Page 15/88 Chapter 1 – Installation of the Instrument 1.2.1. 6) J4 Connector Used for connection of the power supply. The instrument can be supplied from the J3 connector relay board on the 24 V DC pin. 1.2.1. 7) J5 Connector (remote) 1 2 Used for connection of an intelligent remote control. (Lumberg female connector). 3 4 PIN 1 PIN 2 PIN 3 PIN 4 Network + 24V Power supply Network 0V 1.2.1. 8) J8 Connector (RS232) 5 1 9 6 Used for connection of a printer, a bar-code reader, a PC or a memory module. PIN 1 PIN 2 PIN 3 PIN 4 PIN 5 PIN 6 PIN 7 PIN 8 PIN 9 Not used RXD Data reception TXD Data emission Not used Earth Not used RTS request to send CTS clear to send Not used 1.2.1. 9) Examples of RS232 cables ATEQ ATEQ RX TX GND RTS CTS 9 pin SubD connector 1 2 3 4 5 6 7 8 9 UM-19700E-U 9 pin SubD connector 1 2 1 TX 3 2 RX 4 3 TX GND 5 4 6 5 GND RTS 7 CTS 8 6 9 7 RTS 8 CTS 9 Operator RX 9 pin SubD connector 25 pin SubD connector Operator 1 2 3 4 5 6 7 8 TX RX RTS CTS GND 25 User manual ATEQ G520 Page 16/88 Chapter 1 – Installation of the Instrument 1.2.2. Pneumatic connectors Pneumatic connectors are rear panel of the G520 instrument. These pneumatic outputs can carry out the following functions, depending on the configuration demanded at purchase. Output "automatic connector A" Output "automatic connector" Automatic connector A Automatic connector B Automatic connector A Stamping (output 1 code used) Automatic connector A External dump (output 2 code used) Stamping (output 1 code used) Dump (output 2 code used) Automatic connector A Shut off valve (output 2 code used) Stamping (output 1 code used) Shut off valve (output 2 code used) 1.2.2. 1) Automatic connector A Used for connection of an automatic pneumatic connector. 1.2.2. 2) Automatic connector B Used for connection of a second automatic pneumatic connector. 1.2.3. Pneumatic test output This output allows to connect the part to be tested. T : Test output. UM-19700E-U User manual ATEQ G520 Page 17/88 Chapter 1 – Installation of the Instrument 1.2.3. 1) Pneumatic supply Air supply is via the filter located on the rear panel. It is essential that the air supplied is clean and dry. Even though there is a filter, supplied with the instrument, the presence of dust, oil or impurities may cause malfunction. When the instrument is working in vacuum conditions, impurities must be prevented from being drawn into its interior. For this purpose we strongly recommend that a suitable airtight filter is installed between the test part and the instrument. This filter can be supplied by ATEQ. The presence of impurities, oil or humidity in the air may cause deterioration which will not be covered by the guarantee. In accordance with ISO standard 8573-1 concerning classes of compressed air for measurement instruments in an industrial environment : ATEQ recommends : • Grain size and concentration CLASS 1 (0.1 µm and 0.1 mg/m3) • Dew point under pressure CLASS 2 (- 40° dew) • Maximum concentration of oil CLASS 1 (0.01 mg/m3) ATEQ recommends the installation : • of an air dryer to provide dry air at less than - 40° dew point, • of a 25 micron and 1/100 micron double filter. Optimisation of operation : The supply pressure must always be between 4 and 8 bar to ensure that the pneumatic distributors operate with optimum efficiency. When a mechanical regulator is used, the supply pressure must be a minimum of 100 kPa (1 bar) greater than test pressure with a minimum of 400 kPa (4 bar). UM-19700E-U User manual ATEQ G520 Page 18/88 Chapter 2 – User interfaces Chapter 2 USER INTERFACES 1. ATEQ G520 FRONT PANEL APPEARANCE Infrared interface 4 line LCD display Results indicators Access/ locked switch www.ateq.com T N. G520 R C Pressure regulator Navigation keys Cycle keys Pressure and leak measurement quick connectors UM-19700E-U User manual ATEQ G520 Page 19/88 Chapter 2 – User interfaces 2. APPEARANCE OF THE KEYBOARD 2.1. NAVIGATION KEYS KEY FUNCTION Scroll up or increase numerical values Scroll down or decrease numerical values Not used Not used ENTER key Opening a menu Entering a parameter Confirmation of a parameter C « C » for CANCEL Return to the previous menu or function Escape without modifying a parameter 2.2. CYCLE KEYS KEY FUNCTION START key Starts a measurement cycle RESET key Stops a cycle in progress UM-19700E-U User manual ATEQ G520 Page 20/88 Chapter 2 – User interfaces 3. LOCKABLE SWITCH POSITION FUNCTION LOCKED position. Access to adjustable parameters not possible. ACCESS position. Adjustable parameters may be accessed. Note: whatever position the key is in (LOCKED or ACCESS), test cycles can be started and stopped. 4. INFRA-RED INTERFACE Not used. 5. 4 LINE LCD DISPLAY ATEQ G5 Version XX.XXi 0->500 mbar 100 ml/h UM-19700E-U Used to display measurements and adjustable parameters. In the example opposite, XX.XXi represents the program version for the instrument. User manual ATEQ G520 Page 21/88 Chapter 2 – User interfaces 6. FUNCTIONS OF THE INDICATOR LIGHTS The symbol represents an indicator which is lit. The symbol represents an indicator which is flashing. Test part OK indicator Large leak mode or fill in progress indicator (automatic start mode). Pressure default or alarm indicator Part BAD indicator Intermittent flashing stand-by or measurement between thresholds 1 and 2 of negative flow. Refer to chapter 4 paragraph 2.12. "negative flow alarm" UM-19700E-U User manual ATEQ G520 Page 22/88 Chapter 3 – Installation and settings Chapter 3 INSTALLATION AND SETTINGS 1. POWERING UP THE ATEQ G520 Supply the apparatus with 24 V DC. When powered up the instrument: - displays version and the full scale of the sensors… Carries out a RESET …then displays the main menu. ATEQ G5 Version XX.XXi 0-> 500 mbar 100 cm3/h CYCLE/Pr :001 PRESS = 400.0 mbar 0-> 500 mbar RESET CYCLE/Pr :001 PRESS = 400.0 mbar READY 2. CREATION OF A TEST PROGRAM To modify the parameters, turn the key to the ACCESS position. To access the main menu, press ENTER. In the main menu, place the cursor in front of the PARAMETERS menu. Confirm with the ENTER key. RUN/Pr:001 PRESS = 0.000 bar READY MAIN MENU RUN PROG. : --PARAMETERS SPE CYCLE :Disabled The PARAMETERS menu is used to manage test programs. )If the various programs to be created have different parameters, they must be created one by one. )If the programs have identical parameters, a base program can be created and then the Copy-Paste function can be used to duplicate the program as many times as is necessary. UM-19700E-U PARAMETERS Copy-Paste Pr :001 ---------Pr :002 ---------- User manual ATEQ G520 Page 23/88 Chapter 3 – Installation and settings 2.1. CHOICE OF THE PROGRAM NUMBER PARAMETERS Copy-Paste Pr :001 ---------Pr :002 ---------- Position the cursor in front of the chosen program number and confirm with the ENTER key. 2.2. TEST TYPE SELECTION Two test types are available. The PARAMETERS menu gives access to two possible types of test : flow test (FLOW TEST)and operator test (OPERATOR); see the following paragraph for explanations. Put the cursor in front of the required test type and confirm with the ENTER key. PARAM/TYPE FLOW TEST OPERATOR 2.2.1. Flow test The flow test allows the testing of a part for leaks by measuring a flow which is applied to it. In the event of a part having no leaks, there will be no flow, or one inferior to the reject level set. 2.2.2. Operator mode test This type of test means that the operator can carry out operations on the part whilst under test, then to confirm these operation using a "START" test is good, or "RESET" UM-19700E-U key if the operator key if the test is fail. User manual ATEQ G520 Page 24/88 Chapter 3 – Installation and settings 2.3. PARAMETER SETTINGS Once the test type is chosen, the test cycle parameters must be set. The procedure to follow for setting the test parameters is identical in each case. Example : Coupling time A. First, position the cursor in front of the chosen parameter using the navigation keys ( here, Coupl. A). PARAM/pr001 TYPE : FLOW TEST COUPL. A : 00.00 s FILL : 00.00 s Then, confirm with the ENTER key. The cursor will move to the right of the display. PARAM/pr001 TYPE : FLOW TEST COUPL. A : 00.00 s FILL : 00.00 s Modify the value using the navigation keys. PARAM/pr001 TYPE : FLOW TEST COUPL.A : 00.03 s FILL : 00.00 s Once the value is modified, confirm with the ENTER key. PARAM/pr001 TYPE : FLOW TEST COUPL.A : 03.00 s FILL : 00.00 s To move on to the next parameter, use the navigation keys. PARAM/pr001 TYPE : FLOW TEST COUPL. A : 03.00 s FILL : 00.00 s To exit from the menu, use the CANCEL key. UM-19700E-U C PARAMETERS Cut-Paste Pr:001 FLOW TEST Pr:002 FLOW TEST User manual ATEQ G520 Page 25/88 Chapter 3 – Installation and settings 2.3.1. Coupling time Coupling times A and B are start of cycle parameters. If there is no automatic connector, Coupling time A is part of the cycle. If an instrument is fitted with an automatic connector, Coupling time A delays the pressurisation of the test part by allowing the activation of a first cycle connector at the test start. Coupling time B allows the activation of a second automatic connector. These Coupling times ensure better stabilization of the seals placed on the test part. )Set this parameter using the method described in § 2.3. 2.3.2. Fill time This is the time allowed for the pressurisation of the part to be tested. It must not be too long (waste of time) or too short (the pressure in the component is at risk of not being sufficient due to drops in pressure caused by temperature changes). To determine the appropriate fill time, it is necessary to set the Fill Time in order to make it too long, then to shorten it until a drop in pressure occurs due to thermal effects. 9 Carry out a cycle. When the instrument switches to the stabilization period, the pressure must remain stable. 9 A pressure drop (since there will be no fall in pressure due to thermal effects) signifies the presence of a large leak; check the test part and the pneumatic assembly components, then start again. 9 If the pressure remains stable, the part does not contain a large leak and the fill time is too long. Shorten it progressively by carrying out cycles until a drop in pressure is noticeable. 9 As soon as a fall in pressure due to thermal effects appears, the fill time has become too short. Increase it slightly. )Set this parameter using the method described in § 2.3. UM-19700E-U User manual ATEQ G520 Page 26/88 Chapter 3 – Installation and settings 2.3.3. Stabilization time This time is used to stabilise the pressure in the test circuit. It is possible that a change in pressure occurs due to thermal exchanges between the components. If the instrument takes a measurement too early, the instrument will indicate the presence of a large leak. 9 To determine the correct stabilization time, it is necessary to set a long time so that the reading at the end of the test time is equal to zero. 9 Set the stabilization time to four times the length of the fill time. 9 Carry out a cycle. When the instrument switches to the test period, the flow must remain at zero. 9 If there is a drop in pressure, there is a small leak present. Check the test part and the pneumatic connections, then start again. 9 If the flow is close to nil, the part does not contain a small leak and the stabilization time is therefore too long. Progressively shorten and carry out cycles (wait one minute between each cycle) until you see the appearance of a drop in flow. This indicates that the stabilization time has become too short. Increase it slightly. )Set this parameter using the method described in § 2.3. 2.3.4. Test time The test time depends on the reject level as the test pressure is supplied by the reserve. The greater the leak is, the faster the pressure drops. A compromise must therefore be found between the stabilization and test times to obtain a flow measurement at a pressure as close as possible to that of the set (instruction) pressure. NB: in "Auto Start" mode, the test time parameter is removed (infinite test). )Set this parameter using the method described in § 2.3. 2.3.5. Pressure units The different units are bar, mbar, PSI, Pa, kPa, MPa. . ) Set this parameter using the method described in § 2.3. UM-19700E-U User manual ATEQ G520 Page 27/88 Chapter 3 – Installation and settings 2.3.6. Set pressure This instruction is the test pressure which must be applied to the part. This is because the flow will be constantly recalculated for this set pressure. Beyond a drop of 10 to 20 % in pressure, the error on the flow becomes significant. It is therefore important to have a real test pressure as close as possible to that of the set instruction pressure. When setting the parameters for a new test cycle (creation of a new program) the default instruction pressure displayed is the value of the calibration pressure which was set in the factory. ) Set this parameter using the method described in § 2.3. 2.3.7. Maximum fill This function is used to set a maximum limit for the fill pressure which triggers an alarm if this limit is exceeded. This threshold is automatically calculated to +20% after the validation of the instruction pressure and can be modified manually. When test time is infinite, the maximum fill pressure monitoring remains in operation. ) Set this parameter using the method described in § 2.3. 2.3.8. Minimum fill This function is used to set a minimum limit for the fill pressure which triggers an alarm if it is not reached. This function is used to set a minimum limit for the fill pressure which triggers an alarm if this limit is not reached. This threshold is automatically calculted to -20% after the validation of the instruction pressure and can be modified manually. When test time is infinite, the minimum fill pressure monitoring remains in operation. ) Set this parameter using the method described in § 2.3. 2.3.9. Test pressure adjustment The adjustment of the pressure on the regulator can be carried out when the instrument is not in a test cycle, with a good part connected to the instrument (permanent flow). 2.3.10. Reject unit The reject units are: ml/min, ml/h. ) Set this parameter using the method described in § 2.3. UM-19700E-U User manual ATEQ G520 Page 28/88 Chapter 3 – Installation and settings 2.3.11. Volume The volume parameter is imperious for the flow measurement. It's the total volume connected to the test output. It's exists a special cycle "Volume calculation" who allows to estimate the volume if is not known (see the chapter 4 paragraph 2.1.3.15) "Volume calculation"). ) Set this parameter using the method described in § 2.3. 2.3.12. Test reject This function is used to set a limit level below which the part is considered to be bad. ) Set this parameter using the method described in § 2.3. 2.3.13. Functions The FUNCTION menu gives access to additional parameters which must first be activated in the CONFIGURATION menu and then the EXTENDED MENU. If no additional parameters are confirmed in the EXTENDED MENUS, the FUNCTION menu will be empty when selected. To activate these parameters, refer to chapter 4 § 2. UM-19700E-U User manual ATEQ G520 Page 29/88 Chapter 3 – Installation and settings 3. DUPLICATION OF A TEST PROGRAM To modify the parameters, turn the key to the ACCES position. Starting from the main menu, position the cursor in front of the PARAMETERS function. Confirm with the ENTER key. The cursor will appear in front of the Copy-Paste function. Confirm the function again using the ENTER key. Next, confirm the COPY function. Display the number of the program to be copied using the navigation keys. (In this case, program no.1). Confirm using the ENTER key. Place the cursor in front of PASTE. Confirm with the ENTER key. Assign a number to this new program using the navigation keys (For example no.3). Confirm with the ENTER key, The display confirms that the program has been copied. MAIN MENU RUN PROG.: 001 PARAMETERS SPE CYCLE :Disabled PARAMETERS Copy-Paste Pr :001 ENGINE Pr :002 HEAD PARAM/Copy-Paste COPY :Pr --PASTE :Pr --- PARAM/Copy-Paste COPY :Pr 001 PASTE :Pr --- PARAM/Copy-Paste COPY :Pr 001 PASTE :Pr --- PARAM/Copy-Paste COPY :Pr 001 PASTE :Pr --- PARAM/Copy-Paste COPY :Pr 001 PASTE :Pr 003 COPY IN PROGRESS The program no.1 parameters have now been copied into program no.3 parameters. In this example program no.3 is an exact copy of program n°1. PARAM/Copy-Paste COPY :Pr 001 PASTE :Pr 003 UM-19700E-U User manual ATEQ G520 Page 30/88 Chapter 3 – Installation and settings Press the CANCEL key twice to return to the main menu. C C MAIN MENU PARAMETERS SPE CYCLE:Disabled CONFIGURATION 4. DELETING A PROGRAM OR A PROGRAM NAME To modify the parameters, turn the key to the ACCES position. Position the cursor in front of PARAMETERS function. Confirm with the ENTER key. Position the cursor in front of the program number or the program name to be deleted. Confirm once to enter the program. Confirm a second time to gain access to the delete menu. There are two possibilities : delete the program name or delete the whole program. 1°) Confirm a third time. The name of the program is deleted. 2°) Place the cursor in front of Program reset. Confirm with the ENTER key. The program is then deleted. Note: If the “Program delete” operation is carried out first, then the program name is also deleted. UM-19700E-U MAIN MENU RUN PROG.: 001 PARAMETERS SPE CYCLE :Disabled PARAMETERS Copy-Paste Pr:001 ENGINE Pr:002 HEAD PARAM/Pr001 TYPE : FLOW TEST WAIT A: 00.00 s WAIT B: 00.00 s M/Pr001/TEST TYPE Delete name Program reset PARAMETERS Copy-Paste Pr:001 ---------Pr:002 HEAD M/Pr001/TEST TYPE Delete name Program reset PARAMETERS Copy-Paste Pr:001 ---------Pr:002 HEAD User manual ATEQ G520 Page 31/88 Chapter 3 – Installation and settings 5. CHOICE OF THE PROGRAM TO BE RUN Position the key in the ACCESS position. Starting from the main menu, place the cursor in front of the RUN PROG. function. MAIN MENU RUN PROG.: 001 PARAMETERS SPE CYCLE :Disabled Confirm with the ENTER key. MAIN MENU RUN PROG.: 001 PARAMETERS SPE CYCLE :Disabled Display the number of the program required by scrolling through the numbers with the navigation keys. MAIN MENU RUN PROG. : 004 PARAMETERS SPE CYCLE :Disabled Confirm your choice with the ENTER key. MAIN MENU RUN PROG. : 004 PARAMETERS SPE CYCLE :Disabled 6. STARTING A MEASUREMENT CYCLE Press the START key to start a measurement cycle. The cycle phases appear on the display: wait, fill, stabilization, test, dump. RUN/Pr:004 PRESS =0.500 bar READY CYCLE/Pr:004 PRESS =1.00 bar STABILIZATION 7. STOPPING A CYCLE Press the RESET key to stop the measurement. The display “READY” indicates that the instrument is ready to perform a new measurement test. RUN/Pr:004 PRESS =0.500 bar UM-19700E-U User manual ATEQ G520 Page 32/88 READY Chapter 4 – Functions of the instrument Chapter 4 FUNCTIONS OF THE INSTRUMENT 1. MENU STRUCTURE 1.1. MAIN MENU MAIN MENU ACTIVE PROGRAM Under menu 1 > 1 to 16 > Copy Paste Under menu 2 Under menu 3 Under menu 4 v PARAMETERS v v v v v Programs 01 to 16 > Copy Paste > FLOW TEST > Type: flow test v v Wait A v v Fill v v Stabilization v v Test v v Pressure unit v v Set pressure v v Maximum fill v v Minimum Fill v v Reject unit v v Volume v v Test reject v v v v v OPERATOR > > Reset name Delete program > Bar > MPa > kPa > Pa > PSI > mbar > ml/min > ml/h Functions > Refer to note Type: operator > Delete name v Coupling time A v Test time v Functions Reset program > Refer to note v SPECIAL CYCLES > Disabled v Volume calculation v Infinite fill Piezo reset Print Atmospheric conditions v v CONFIGURATION > Extended menus > Name v v Correction v v Filter UM-19700E-U > Pressure correction User manual ATEQ G520 Page 33/88 Chapter 4 – Functions of the instrument v v Recoverable threshold v v Valve codes v v Automatic start v v Cycling v v Automatic connector v v Stamping v v Cycle end v v Pre-fill mode v v Fill mode v v Volume calculation v v v Automatic save v v v Automatic piezo auto zero v v v Bar graph > Yes / No > Yes / No > Test reject % > Hour v v v Hour v v v v Day v v Month v v Year v v v RS232 v v v v > Frequency Minute > C540/F580 v Printer > RS parameters > Speed: 4800 > 9600 > 19200 > 28800 > 38400 > 57600 > 115200 Serial port: 1st-7bit-="0" > 1st7bit-="1" > 1stst 7bit-even > 1 7bit-odd > 1stst 8bit-none > 1 st 8bit-="0" > 1 st 8bit-="1" > 1 8bit-even > 1st8bit-odd > v v v v v v v v v v v Print frame v v v v Program name v v v v Date & time v v v v Lines before v v v v Lines after > Pressure Inter line v UM-19700E-U v v v Form feed User manual ATEQ G520 Page 34/88 Chapter 4 – Functions of the instrument v v v v v v v Send conditions v v v v Pass v v v v Maximum part v v v v Minimum part v v v v Alarm v v v v Pressure out v v v v Re-workable v v v v v v v Export v v v v v v v Print parameters v v v v v v v Modbus v v v v RS parameters v v v RS485 v v v v v Modbus v v v Security v v v Light v v UM-19700E-U > yes / no > 255 (fixed) > Speed: 4800 > 9600 > 19200 > 28800 > 38400 > 57600 > 115200 C540/F580 > Address > 1 to 255 > Speed: 4800 > 9600 > 19200 > 28800 > 38400 > 57600 > 115200 v v v > Serial port: 1st-7bit-="0" > 1st-7bit-="1" > 1st-7bit-even > 1st-7bit-odd > 1st-8bit-none > 1st-8bit-="0" > 1st-8bit-="1" > 1st-8bit-even > 1st-8bit-odd > v v Address All results v v v > > RS parameters Serial port: 1st-7bit-="0" > 1st-7bit-="1" > 1st-7bit-even > 1st-7bit-odd > 1st-8bit-none > 1st-8bit-="0" > 1st-8bit-="1" > 1st-8bit-even > 1st-8bit-odd > > Yes / No > Mode v > Continuous Manual User manual ATEQ G520 Page 35/88 Chapter 4 – Functions of the instrument v v v v v v v Intensity > 0 % to 100 % v v v External dump Yes / No > Normally closed v v v v v Shut off v v v Negative alarm v > Automatic Normally open > Yes / No > Minimum threshold Maximum threshold v v v I/O Configuration > Program selection v Volume calculation v Infinite fill v Piezzo reset v SERVICE > PARAMETERS > Save v v Restore v v Reset v v v SENSORS > v Pressure Flow v RESULTS > Program v v v Statistics v v Total v v Good part (OK) v v Failed part v v Pressure v v Recoverable v v Alarm v Reset v Print > Program v LANGUAGE > v English French v STAND BY > Now v Power on time v > Hour Minute v UM-19700E-U User manual ATEQ G520 Page 36/88 Chapter 4 – Functions of the instrument Power off time > Hour Minute Delay Note: The parameters that feature in the EXTENDED MENUS can be found in the FUNCTIONS menu of the program when they are activated (refer to the following chapter). 1.2. "FUNCTIONS" MENU WHEN ACTIVATED MAIN MENU FUNCTION Under menu 1 > Under menu 2 Under menu 3 Under menu 4 Name v Standards conditions > Temperature Atmospheric pressure v v Pressure correction v Filter v Recoverable thresholds > Recoverable test > External 1 v Valve codes v External 2 v External 3 v External 4 v External 5 v External 6 v Internal 1 v Internal 2 v Automatic start v Cycling v > Next program Inter cycle All v Good part v Failed part v Recoverable v Alarm v Pressure fault v UM-19700E-U User manual ATEQ G520 Page 37/88 Chapter 4 – Functions of the instrument Automatic connector > v Wait A Wait B v Stamping > Maintain v All v Part OK v Part BAD v Recoverable v Alarm v Pressure fault v End of cycle > Automatic reset v Dump + Reset v Fill v Fill mode > Fill mode > Standard v v v Set v v v Ballistic > Fill instruction > Fill instruction > Fill instruction v UM-19700E-U Pre fill mode > Not operational External dumping > Yes/No User manual ATEQ G520 Page 38/88 Chapter 4 – Functions of the instrument 2. CONFIGURATION MENU 2.1. EXTENDED MENUS The extended menus offer access to additional functions If these functions are activated, they can be found in the FUNCTION menu when a program is created. If no additional functions are activated, the FUNCTION menu will be empty when a program is created. . 2.1.1. Activation of the additional functions MAIN MENU SPE CYCLE :Disabled CONFIGURATION RESULTS In the main menu, place the cursor in front of the CONFIGURATION label CONFIGURATION EXTENDED MENUS PRINTER : YES HOUR Confirm using the ENTER key. Next , confirm the EXTENDED MENUS function with the ENTER key. The list of additional functions is then displayed. CONFI/EXTEND MENUS NAME : No CYCLING : No AUTO CONNECT : No To activate a function (e.g. the NAME function), confirm it with the ENTER key. Next, choose YES with the navigation keys and confirm again with the ENTER key. Start the operation again if you need to activate other functions. CONFI/EXTEND MENUS NAME :Yes CYCLING :No AUTO CONNECT :No Once all the chosen functions are activated, press the CANCEL key twice to return to the main menu. MAIN MENU SPE CYCLE :Disabled CONFIGURATION RESULTS UM-19700E-U C C User manual ATEQ G520 Page 39/88 Chapter 4 – Functions of the instrument 2.1.2. Setting the additional functions 9 Place the key in the ACCESS position . 9 Create a new program (refer to chapter 3 §2 "Creation of a test program"). 9 In the parameters list for this new program, confirm the FUNCTIONS parameter (refer to chapter 3 § 2.3 "Parameter settings"). Only the functions which have been activated using the above method will appear in the FUNCTIONS parameter. 2.1.3. List of additional functions 2.1.3. 1) Name This function is used to customise a program, for example to name a program after the part to be tested. )Select the option and enter settings if necessary. 2.1.3. 2) Standard conditions The "Standard conditions" function allows bringing down the results measured by the instrument to define atmospherics conditions. The measurement depends of the surrounding temperature and the surrounding atmospheric pressure. When this function is activated, the instrument calculates the flow results with regards to the parameters of atmospheric conditions captured. Like this the measurement results will take no notice of the surrounding variations. To indicate the validation of this function, an asterisk is displayed after "FLOW". )Select the option and enter settings if necessary. 2.1.3. 3) Pressure correction The "pressure correction" function allows bringing down the measurement results by the instrument to a pressure condition defined in instruction. When the function is activated, the instrument calculates the flow results with regards to the instruction pressure. Like this the results will take no notice of the pressure variations. )Select the option and enter settings if necessary. 2.1.3. 4) Filtering This parameter enables the modifying of the time constant for the display of the leak value during the test time. It enables the filtering of extreme variations in flow if they exist. The parameter is set in seconds, the longer the time set is, the greater the filtering (or dampening) and the slower the display of the variations in flow will be. )Select the option and enter settings if necessary. UM-19700E-U User manual ATEQ G520 Page 40/88 Chapter 4 – Functions of the instrument 2.1.3. 5) Recovery limits This option offers the option of two reject levels: non-tolerance level (the bad part is not recoverable) and recoverable reject level (the part is bad but may be reworked to become acceptable). This option is Example particularly used in casting, when parts are intended for treatment via impregnation. REJECT LEVEL 0 PART PART GOOD PART RECOVERABLE BAD RECOVERABLE REJECT LEVEL 0 10 20 FROM 0 TO 10 THE PARTS ARE GOOD FROM 10 TO 20 THE PARTS ARE RECOVERABLE OVER 20 THE PARTS ARE BAD The associated parameter to be set is: RECUP Test. For recoverable parts, with multi-head configuration on the central unit or on the heads themselves, the Pass (PB) and Fail (PM) outputs are both activated simultaneously. On the RS232 output, there is a message (DT) in the same way as there is for a bad part. ) Select the option and enter settings if necessary. 2.1.3. 6) Valve codes The instrument has eight programmable electrical outputs (24V DC / 100 mA maximum) of which four may be reserved due to the presence of the stamping option (Valve code 1 internal and external) and external dumping (internal and external valve 2 code). These outputs (one or more) be attributed to program numbers. In general, they are used to select valves in sequence of cycles. The desired outputs may be activated for each program (Refer to chapter 1 paragraph 1.2.1.1)). Associated parameters to be adjusted: External 1, External 2, External 3, External 4, External 5, External 6, Internal 1, Internal 2. )Select the option and enter settings if necessary. UM-19700E-U User manual ATEQ G520 Page 41/88 Chapter 4 – Functions of the instrument 2.1.3. 7) Automatic start (Auto start) The automatic start function allows the launching of a test cycle as soon as the part is connected to the test measurement, it therefore negates the need for the operator to press the start key. The part is detected due to a change in the flow in the measurement circuit. The automatic start inhibits certain functions which are incompatible with the mode: automatic connector, stamping, external dump, cycle end, pre-fill, shut-off valve, chaining, double pressure and fill type. The "test time" parameter disappears from the cycle parameters when the "auto start" function is applied. ) Select the option and enter settings if necessary. First of all, check or validate in the CONFIGURATION menu the START AUTO function. CONFI/EXTENDED MENUS VALVE CODES : Yes RECUP THRESH : Yes AUTO START : Yes In the PARAMETERS /FUNCTIONS menu of the program, validate the AUTO START function. ARAM/Pr001/FUNCTIONS VALVE CODES : No AUTO START : Yes RECUP THRESH : Yes Return to the test cycle screen by pressing on the "C" several times. Press the "RESET" key to initialise the instrument. In this way, the instrument launches a reset cycle. C C CYCLE/Pr:001 PRESS = 150.0 mbar READY CYCLE/Pr:001 PRESS = 150.0 mbar AUTO ZERO Then, if no parts are connected to the measurement circuit, it will display a bar chart >>>>>>>>>>>> indicating the size of the leak. CYCLE/Pr:001 PRESS = 150.0 mbar LEAK =>>>>>>>>>>>> LARGE LEAK If a part is connected to the test circuit, the leak decreases. The bar chart diminishes in the same proportions. CYCLE/Pr:001 PRESS = 150.0 mbar LEAK =>> LARGE LEAK When the leak is virtually eliminated, the test cycle starts automatically. UM-19700E-U CYCLE/Pr:001 PRESS = 150.0 mbar FILL User manual ATEQ G520 Page 42/88 Chapter 4 – Functions of the instrument 2.1.3. 8) Chaining This function enables several tests to be carried out by the instrument one after the other. The instrument offers the option of chaining according to 6 chaining criteria. Associated parameters to be set: INTER-CYCLE (wait time between two cycles). Chaining conditions: ALL (under all conditions), PART OK (part good), TEST FAULT (test part bad), WARNING, PRESS ERROR (pressure fault), RECUPERABLE (recoverable parts). Note: this function is not available in the "Automatic start" mode (Auto start). )Select the option and enter settings if necessary. 2.1.3. 9) Automatic connector The automatic connector is a pneumatic control enabling the driving of an external logic (pneumatic sealing connector). This control is activated at the start of the cycle and is released at the end of the cycle (refer to “cycle end” diagram § 2.1.3.11) If several programs are chained, the automatic connectors are activated according to the times set as parameters in the first program and are deactivated according to the times set as parameters in the last program in the chain. They remain active throughout all cycles between the first and last program in the chain. The various waiting times A are applied in the programs in between. Associated parameters to be set: WAIT A, WAIT B. Note: this function is not valid in the "Automatic start" mode (Auto. start). )Select the option and enter settings if necessary. UM-19700E-U User manual ATEQ G520 Page 43/88 Chapter 4 – Functions of the instrument 2.1.3. 10) Stamping function This option is used to activate a pneumatic output which marks the part (for example using a pneumatic cylinder). Parameters can be set for the conditions and duration of marking. This option requires two electrical outputs: 9 an internal one for the internal cabling on the pneumatic output, 9 an external one for "customer" cabling One of the pneumatic outputs on the automatic connectors is used. The output is activated at the end of test time for the programmed hold time. Use the following procedure to use the inking function. First, in the CONFIGURATION menu, confirm the STAMPING function. In the program's PARAMETERS/FUNCTIONS menu, confirm the STAMPING function. CONFI/EXTENDED REF. VOLUME : VOLUME CALC. : STAMPING : MENUS No No Yes ARAM/Pr001/FONCTIONS STAMPING : Yes Set the inking hold value (can be set between 0 and 650 seconds). Pr001/FUNCT/STAMPING MAINTAIN : 00.5 s ALL : No OK : Yes Then select the inking conditions from those offered. Pr001/FUNCT/STAMPING MAINTAIN : 00.5 s ALL : No OK : Yes When the instrument is fitted with this option, the internal and external valve codes 1 are no longer available. Note: this function is not valid in the "Automatic start" mode (Auto start). )Select the option and enter settings if necessary. UM-19700E-U User manual ATEQ G520 Page 44/88 Chapter 4 – Functions of the instrument 2.1.3. 11) Cycle end This function allows the selection of different cycle ends depending on the configuration of the instrument (connection to a PLC…). a) Relay sequencing depending on the varying cycle ends In the aim of networking the ATEQ G520 with its environment (PLC, PC …), the following timing charts supply the sequencing of the electrical outputs (relay boards on the J3 connector) and pneumatic outputs (automatic connectors), depending on the commands entered on the front facia or the J3 connector (START, RESET). A Legend Automatic connector wait time A B Automatic connector wait time B P-F Pre-fill time F Fill time S Stabilization time Undetermined time which comes into play at the end of the # programmed test time and activation of the T Test time D Dump time START Activation of the Reset key. key on the front facia or contact between pins 2 and 3 of the J3 connector RESET Activation of the key on the front facia or contact between pins 1 and 2 of the J3 connector. Active (high level): the pneumatic output is active (air exiting) Automatic connector Inactive (low level): the pneumatic output is inactive (absence of air) PG or PB Good or Bad Part relay on the J3 connector EoC End of cycle relay on the J3 connector t mini Minimum take into account time on an input, 500 ms on the J8 connector of a central module and 50ms on the J3 connector of a measurement head. The time scale is not respected, however the indications regarding time are correct. UM-19700E-U User manual ATEQ G520 Page 45/88 Chapter 4 – Functions of the instrument b) « Automatic RESET » cycle end (systematic reset) If the part is OK, the Part OK relay will be activated as soon as the test ends and remain so until the start of the following cycle. Following the dump time, the end of cycle relay is activated (or after the wait time B if the value is not naught). If the part is bad, the bad part relay is activated as soon as the test is completed. The instrument automatically dumps and sends a cycle end signal. A new cycle can then be launched. Example with optional external pre-fill and dump: P-F F S T D Test cycle A PRESSURE t t t mini RESET t Program n° t mini Control actions t mini START t Auto connector A Auto connector B Part good or part bad Active Time B Inactive Active t Time B Inactive t t Cycle end t The active program is the one selected before starting up. It remains active even if the program inputs on the connector are no longer activated. This selection can only be modified during the inter cycle period. To return to program 1, when a cycle is not in progress, press any of the program selection inputs. UM-19700E-U User manual ATEQ G520 Page 46/88 Chapter 4 – Functions of the instrument c) Ending a cycle with the RESET key (« Automatic RESET » Cycle end) Example with optional external pre-fill and dump: P-F F D Test cycle A PRESSURE t t t mini RESET t Program n° t mini Control actions t mini START t Automatic connector A Automatic connector B Part good or part bad Active Time B Inactive Active t Time B Inactive t t Cycle end t The active program is the one selected before starting up. It remains active even if the program inputs on the connector are no longer activated. This selection can only be modified during the inter cycle period. To return to program 1, when a cycle is not in progress, press any of the program selection inputs. UM-19700E-U User manual ATEQ G520 Page 47/88 Chapter 4 – Functions of the instrument d) « RESET + dump » cycle end (automatic dump) If the part is OK, the part OK relay is activated as soon as the test time is finished, and remains so (only in position 2) until the next cycle is launched. At the end of the dump time, the end of cycle relay is activated. If the part is Bad, as soon as the test time is over, the bad part relay is activated and remains so until the end of the cycle. The dump is then carried out. The cycle can be ended by pressing the RESET key. Example with optional external pre-fill and dump: P-F F S T D Test cycle A PRESSURE t t t mini RESET t Program n° t mini Control actions t mini START t Auto connector A Auto connector B Active Time B Inactive Active t Time B Inactive t Part bad t Cycle end t The active program is the one selected before starting up. It remains active even if the program inputs on the connector are no longer activated. This selection can only be modified during the inter cycle period. To return to program 1, when a cycle is not in progress, press any of the program selection inputs. UM-19700E-U User manual ATEQ G520 Page 48/88 Chapter 4 – Functions of the instrument e) « Fill » cycle end If the part is OK, the good part relay is activated at the end of the test time and remains so till the start of the next cycle. At the end of the dump time, the end of cycle relay is activated (or after the wait time B if the value is not naught). If the part is bad, as soon as the test time is finished the relay becomes and remains activated. The instrument waits for a reset from the operator or the PLC to start the dump time and send the end of cycle signal. Example with optional external pre-fill and dump: P-F F S T # D Test cycle A PRESSURE t t mini START Control actions t t mini RESET t Program n° t mini t Auto connector A Auto connector B Active Time B Inactive Active t Time B Inactive t Part bad t Cycle end t UM-19700E-U User manual ATEQ G520 Page 49/88 Chapter 4 – Functions of the instrument 2.1.3. 12) Cycle timing chart with stamping and dumping Test Dump Dump t Auto Connector A Auto Connector B B Valve codes Stamping Cycle end In the above example it's the stamping time superior than the dumping time who initiates the end of the cycle, otherwise the dumping time initiates the end of cycle. 2.1.3. 13) Fill mode This function allows the choice of one of three possible types of fill. Note: this function is not valid in the "Automatic start" mode (Auto start). )Select the option and enter settings if necessary. a) Standard Carries out the fill time whilst monitoring the pressure thresholds.. b) Set When the instructed pressure is reached, the filling is stopped and the instrument moves on to the next stage of the cycle. c) Ballistic This type of fill allows for a fluctuation of the air pressure (filling of parts with important deformations) and notably allows the overshooting of the maximum fill threshold without stopping the cycle and delivering an error message. Never the less, to switch to stabilization, the test pressure will have to be within the thresholds once the filling is complete. UM-19700E-U User manual ATEQ G520 Page 50/88 Chapter 4 – Functions of the instrument 2.1.3. 14) Type of Pre-fill The type of pre-fill function is used to test large volume parts: to fill the part faster, allowing for a reduction in the cycle time. The regulator output is directly linked to the test output. Insertion of the pre-fill tyme in the measurement cycle. TEST RESSURE 1) 2) 3) 4) 5) 6) 1 2 3 4 5 6 7 Wait, Pre-fill, Fill, Stabilization, Test, Dump. TIME NB: this function is not valid in the "Automatic start" mode (Auto start). )Select the option and enter settings if necessary. a) Standard Carries out the pre-fill in the programmed time. b) Set Not operational. c) Ballistic Not operational. )Select the option and enter settings if necessary. 2.1.3. 15) Volume calculation If a flow type unit is used, the parameter must be set for the total test volume. The "Volume calculation" function allows its determination and setting in the parameters Preparation of the instrument 9 Connect to the instrument a part with no leak. 9 Connect a known standard leak to the rapid connector on the instrument's measurement circuit. . 9 Adjust the test pressure of the calibration leak. 9 Run a special "Calc. vol." cycle by entering the value of the leak in the "INSTRUCT." line. 9 Carry out the special "Volume calculation" cycle. At the end, by pressing on the “Enter” key, the volume value will be displayed. 9 The value of the volume is updated automatically within the active program. UM-19700E-U User manual ATEQ G520 Page 51/88 Chapter 4 – Functions of the instrument 2.2. AUTOMATIC SAVE This function has for main objective to save the test parameters from the RAM memory of the instrument to its flash memory. When this function is not validated, each time the key switch is turned from the ACCESS to the LOCKED mode, the instrument displays NO PARAMETERS SAVED IN FLASH. The save operation can be carried out manually in the SERVICE PARAMETERS menu. When the AUTOMATIC SAVE function is confirmed with a YES, the parameters are saves automatically when the key is turned from the ACCESS to the LOCKED position. This function is useful if the parameters in the RAM are accidentally erased. The instrument will then automatically read and restore the flash parameters in the RAM. 2.3. PIEZO AUTO ZERO This function enables the setting of the frequency or of the number of measurement cycles between two Piezo auto zeros. ¾ "Frequency" counter: to set a time space between two auto zeros of 1 to 999 minutes. When the dial is on zero, no auto-zero is carried out. Confirm with Yes the PIEZO AUTO AZ in the Configuration menu. Then, enter the frequency parameter and/or number of cycles. MAIN/CONFIGURATION REGUL. CTRL : Ext. PIEZO AUTO AZ: Yes /CONFI/PIEZO AUTO AZ FREQUENCY : 05 ) Select the option and enter settings if necessary. UM-19700E-U User manual ATEQ G520 Page 52/88 Chapter 4 – Functions of the instrument 2.4. BAR GRAPH This function is able only with a RC5 remote control or if the instrument possesses a 14 characters L.E.D. display. It allows having the flow value on a graphic display with a scale in regards of the captured reject thresholds. On the inferior scale is the programmable reject threshold at 30, 50 or 70 % of the display. On the superior scale is the current flow value. Measured flow value Reject threshold ) Select the option and enter settings if necessary. 2.5. HOUR This function includes a clock (hours, minutes) and an internal calendar (day, month, year). )Select the option and enter settings if necessary. 2.6. RS232 2.6.1. C540/580 This function enables the configuration of the instrument so that it may be supervised by an ATEQ central module. ) Select the option and enter settings if necessary. 2.6.1. 1) Print frame Not operational. 2.6.2. Printer This function enables the configuration of the instrument to enable the printing of the program data (parameters) as well as the test results. When the option is activated (YES), each time a cycle is started, the test results are systematically printed. ) Select the option and enter settings if necessary. 2.6.2. 1) RS parameters These parameters enable the configuration of the instrument enabling it to communicate with the printer. Associated parameters to be set: Speed, Stop byte, number of data bytes, parity. )Select the option and enter settings if necessary. UM-19700E-U User manual ATEQ G520 Page 53/88 Chapter 4 – Functions of the instrument 2.6.2. 2) Print frame This function enables the configuration of the results printout. Associated parameters to be set: PRESSURE (Display or not of the test pressure), Prog. name (Display of the program name when set), Date & Time (printing of the date and the time), Lines before (number of lines before the result), Lines after (number of lines after the result), Inter line (space between each line), Form feed (new page). a) Frame format The results frame is based on 40 columns. • Example for test OK result 1 2 3 4 5 6 7 < 0 1 > : 8 9 9 7 10 11 12 13 14 15 16 17 18 19 20 21 22 23 24 25 26 27 28 29 30 31 32 33 34 35 36 37 38 39 40 . 9 m b a r : ( O K ) : 5 . 7 c m 3 / m n Frame detail : Columns 1 2-3 4 5 6 7 – 11 12 13 – 16 17 18 19 – 20 Characters < Figure indicating program number > : space Display of the test pressure space Pressure unit : ( 2 letters indicating OK for good part TD for bad part ) : space Value of the leak measurement space 2 to 6 letters indicating the unit 21 22 23 24 – 27 28 29 > XX • Example for a test result with time and date 1 2 3 4 5 7 8 9 < 0 1 > : 3 0 / 0 5 < 0 1 > : UM-19700E-U 6 1 0 3 10 11 12 13 14 15 16 17 18 19 20 21 22 23 24 25 26 27 28 29 30 31 32 33 34 35 36 37 38 39 40 . / 1 2 0 0 2 m b a r 1 0 : 4 1 : 1 6 : ( O K ) : 3 . 2 c m 3 / m n User manual ATEQ G520 Page 54/88 Chapter 4 – Functions of the instrument • Example for a result with fault 1 2 3 4 5 6 7 8 9 10 11 12 13 14 15 16 17 18 19 20 21 22 23 24 25 26 27 28 29 30 31 32 33 34 35 36 37 38 39 40 < 0 1 > : 1 4 2 . 1 m b a r : ( T D ) : > > < 0 1 > : 1 5 0 . 4 m b a r : ( T D ) : 1 6 < 0 1 > : 1 4 2 . 1 m b a r : ( A L ) : > > < 0 1 > : 1 5 0 . 4 m b a r : ( A L ) : S E N S O R < 0 1 > : 2 0 4 . 2 m b a r : ( A L ) : H I G H < 0 1 > : 8 8 . 5 m b a r : ( A L ) : L O W < 0 1 > : 0 . 0 m b a r : ( A L ) : P R E S S . < 0 1 > : ( A L ) : F . S . p i . F . S . T E S T 1 / h c m 3 F . S . R E F P R E S S U R E P R E S S U R E Z E R O e z z o Frame detail: Columns 1 2-3 4 5 6 7 – 11 12 13 – 16 17 18 19 – 20 21 22 23 – XX Characters < Figure indicating program number > : space 5 characters for the test pressure value space 4 characters for the pressure unit : ( 2 characters indicating alarm (AL) ) : Definition of the fault 2.6.2. 3) Sending conditions With this function you can choose which data is to be printed on the results sheet. Associated parameters to be set: ALL (all test results), OK (number of good parts), T. BAD (number of bad test parts), WARN. (number of times the alarm has been triggered), PRESS DEF. (number of times pressure was incorrect), RECUPERABLE (number of recoverable parts). ) Select the option and enter settings if necessary. UM-19700E-U User manual ATEQ G520 Page 55/88 Chapter 4 – Functions of the instrument 2.6.2. 4) Exporting This function can be used to create and send a special results frame which can be processed by a PC using Microsoft Excel. This frame is of the same type as the print parameters frame except that the different character strings follow each other and are separated by a punctuation mark which enables the various boxes to be entered automatically in Microsoft Excel. This frame is operated by connecting a computer to the instrument's RS 232 link. Columns detail: 1) Customization. 6) Numeric value of pressure. 2) Program number. 7) Pressure unit. 3) Test result message. 8) Alarm message. 4) Numeric value of test. 9) Date. 5) Test unit. 10) Hour. Exportation example: Flow mode: 1 2 3 4 5 6 7 NAME 1 (OK) 0.0 cm3/h 150.0 NAME 1 (OK) 45.8 cm3/h NAME 1 (TD) NAME 1 (TD) 9 10 mbar 05/06/02 13:19:18 149.4 mbar 05/06/02 13:20:33 133.6 mbar 05/06/02 13:21:12 139.1 mbar 05/06/02 13:21:23 NAME 1 (AL) 147.6 mbar >> F.S. TEST 05/06/02 13:21:54 NAME 1 (AL) 149.8 mbar >> F.S. REF. 05/06/02 13:22:06 NAME 1 (AL) 188.6 mbar PRESS. EXCEED 05/06/02 13:25:41 NAME 1 (AL) 90.9 mbar LOW PRESSURE 05/06/02 13:26:00 NAME 1 (AL) 0.0 mbar P0 05/06/02 13:26:06 NAME 1 (AL) 152.6 mbar SENSOR 05/06/02 13:28:02 NAME 1 (AL) F.S. piezzo 05/06/02 13:30:30 8 9 10 68.9 cm3/h 8 >> F.S. TEST Operator mode: 1 2 3 4 5 6 7 NAME 5 (OK) 152.2 mbar 05/06/02 13:34:50 NAME 5 (TD) 152.2 mbar 05/06/02 13:34:53 ) Select the option and enter settings if necessary. UM-19700E-U User manual ATEQ G520 Page 56/88 Chapter 4 – Functions of the instrument 2.6.2. 5) Print parameters When this option is confirmed the test parameters are printed immediately. a) Example of parameter print frame 1 2 3 4 V e r s 3 1 / P r 5 6 7 8 i o n 0 5 / 9 10 11 12 13 14 15 16 17 18 19 20 21 22 23 24 25 26 27 28 29 30 31 32 33 34 35 36 37 38 39 40 0 1 . 0 0 j 2 0 0 2 0 1 T Y P E : F L O W W A I T A : 0 0 T E S T . 1 s F I L L . : 0 1 . 0 s S T A B . : 0 1 . 0 s T E S T : 0 2 . P r e s s . U N I T I N S T R U C T . 0 s : m b a r : 1 5 0 . M a x F I L L : 1 8 0 . 0 M i n F I L L : 1 2 0 . 0 R U N I T V O L U M E T e s t : : 0 . c m 3 / m n 0 0 7 L R E J E C T : 0 0 1 0 2.6.3. Modbus This function enables the configuration of the Modbus link when the instrument is installed in this type of network. The address of the station is fixed at 255, the frame parameters and RS parameters (speed, serial port) must be entered. See the Modbus ATEQ specific manual ) Select the option and enter settings if necessary. UM-19700E-U User manual ATEQ G520 Page 57/88 Chapter 4 – Functions of the instrument 2.7. RS485 2.7.1. C540/580 This function allows configuring the RS485 output to a C540 or F580 central when the instrument is installed in a network. ) Select the option and enter settings if necessary. 2.7.2. Modbus This function allows configuring a Modbus link when the instrument is in this kind of network. The station address, RS parameters (speed, serial port) are to be informed. See the specific ATEQ Modbus user manual. ) Select the option and enter settings if necessary. 2.8. SECURITY This function deactivates the START and RESET keys on the instrument front panel. Programs can only be started from the instrument inputs (J3 connector). ) Select the option and enter settings if necessary. 2.9. LIGHTING THE SCREEN Screen illumination can be programmed and modified. The lighting can be adjusted according to the ambient conditions or the user's choice. There are three lighting modes: 9 continuous mode, display screen permanently lit whatever the conditions, 9 manual mode, the screen remains lit for 20 minutes and if the keyboard has not been used by the end of this period the screen shuts down and only relights when the keyboard is touched again, 9 automatic mode, which is identical to manual mode, with illumination of the screen also if an action is carried out from the external inputs (rear connectors). Using these three modes, the lighting intensity of the screen can be programmed from 00 (screen off) to 07 (maximum lighting intensity). In the main menu, position the cursor by the CONFIGURATION menu then confirm by pressing ENTER. Move the cursor down until it is in front of the LIGHT menu then confirm by pressing ENTER. UM-19700E-U MAIN MENU PARAMETERS SPE CYCLE: Disabled CONFIGURATION CONFIGURATION PRINTER : No SECURITY : No LIGHT User manual ATEQ G520 Page 58/88 Chapter 4 – Functions of the instrument CONFI/LIGHT MODE :CONTINOU INTENSITY : 04 Place the cursor in front of MODE to choose the required lighting mode and confirm using ENTER. CONFI/LIGHT/MODE CONTINOUS Select the lighting mode and confirm using ENTER. To return to the previous menu, press the C button once MANUAL AUTO C CONFI/LIGHT MODE :PERMANEN INTENSITY: 07 To select the lighting intensity for the display, place the cursor in front of the INTENSITY menu and confirm using ENTER. CONFI/LIGHT MODE :CONTINOU INTENSITY : 04 Then select the lighting intensity from 00 (off) to 07 (maximum luminosity) and the new lighting intensity will be applied as soon as ENTER is pressed. CONFI/LIGHT ODE :CONTINOU INTENSITY : 06 2.10. EXTERNAL DUMP OPTION This option can be used to control a dump valve outside the instrument (for example: a remote Y valve). External dumping enables the part to be emptied before it is disconnected if the test pressure is too high. This option requires two electrical outputs: 9 an internal one for internal cabling the pneumatic output, 9 an external one for "customer" cabling. Use the following procedure to use the external dump function. First, check or confirm the EXTERNAL DUMP function in the CONFIGURATION menu. After confirming the function, select the mode for the dump valve, NORM. OPEN or NORM. CLOSED. UM-19700E-U CONFIGURATION LIGHTING STAMPING : Yes EXT.DUMP : No CONFI/EXT.DUMP NORM. CLOSED NORM. OPEN User manual ATEQ G520 Page 59/88 Chapter 4 – Functions of the instrument Then in the PARAMETERS / FUNCTIONS menu, confirm the EXT. DUMP function and at each end of cycle the external dump output will be activated. Then, set the parameter the dump time (time during which the dump valve is open) ARAM/Pr001/FUNCTIONS BLOW MODE : No STAMPING : Yes EXT. DUMP : Yes M/Pr001/FUNCT/DUMP DUMP : 03.0 s If the instrument is fitted with this option, internal and external valve codes 2 are no longer available. 2.11. SHUT OFF (OPTION) The "Cut off" option when it's installed in the instrument and validate, allows to driving an external valve. This external valve stops the air or gas flow when the instrument is out of cycle measurement. This option needs two electrical outputs: 9 one for the internal cabling of the pneumatic output, 9 one external for the "customer" cabling. For the bringing into service of the "Cut off" function follow the following procedure: Validate the function in the CONFIGURATION/CUT OFF menu. CONFIGURATION LIGHTING EXT. DUMP : No SHUT OFF : Yes When the instrument possesses this function, the valves codes 2 internal and external are not available. When this function is installed in the instrument, the "External dump" can't be installed. UM-19700E-U User manual ATEQ G520 Page 60/88 Chapter 4 – Functions of the instrument 2.12. NEGATIVE FLOW ALARM A negative flow can be bringing on by the instability of the part to be tested or by an internal leak of the instrument air chest side. More the volume to be tested is small, more the thresholds will be small and more the volumes are big and more the thresholds will be big (the measurement more difficult in this case). The advised values are: maximum threshold at 30 % for volumes smaller than 150 cm3 and maximum threshold at 100 % for volumes bigger than 150 cm3. The percentage can be eventually being reduced to the minimum just before having the fault following the instability of the part to be tested. In the event of negative flow, two reject thresholds are set (factory settings) these thresholds show the state of the negative flow on the display. Threshold 2 C zone Threshold 1 B zone Flow = 0 A zone The thresholds mark three zones: 9 A zone: 0 ml/h is displayed and the green indicator is permanently lit, 9 B zone: 0 ml/h is displayed and the green indicator flashes, 9 C zone: The "F. S. REF" alarm is displayed (the two red indicators are lit). The thresholds set in the factory are 5 % and 30 % or 30 % and 100 % of the full scale (respectively for thresholds 1 and 2). 2.13. I/O CONFIGURATION This menu is used to configure programmable input 7 on connector J3 on the 16program input/output board. See the chapter 1, paragraph 1.2.1.4) "J3 Connector (Inputs/Outputs) programmable input". UM-19700E-U User manual ATEQ G520 Page 61/88 Chapter 4 – Functions of the instrument 3. SPECIAL CYCLES MENU 3.1. SPECIAL CYCLES AVAILABLE The following list shows all the special cycles which are possible: those available will vary depending on what is checked in the extended menus or according to the optional extras requested at the time of manufacture of the instrument. Special cycle Function 9 Inactive No special cycle selected. 9 Volume calculation Cycle which enables the calculation of the volume of the test circuit. 9 Infinite fill: Cycle used to put test part under pressure for infinite time. 9 Piezo auto reset: Cycle used to carry out forced reset of the piezo transducer and the electronic regulator. 9 Print: This cycle allows to send on the RS232 link the last results measured by the instrument. 9 Atmospheric conditions: This cycle allows displaying the atmospheric conditions measured by the instrument. To run a special cycle, select it in the "special cycles" menu, then press the button. To stop it, press the UM-19700E-U button. In some cycles the stop is automatic. User manual ATEQ G520 Page 62/88 Chapter 4 – Functions of the instrument 3.2. VOLUME CALCULATION This special cycle enables the calculation of the test circuit volume. Preparation of the instrument 9 Connect the instrument to a part with no leak. 9 Connect a calibration leak on the rapid connector of the instruments test circuit. 9 Adjust the test pressure of the calibration leak. 9 Carry out the "Volume calculation" special cycle, setting the leak value in the "INSTRUCTION" line of the menu. 9 Start the special volume calculation cycle. At the end of the cycle, by pressing on the "ENTER" key the value of the volume is displayed. 9 In the active program, the value of the volume is automatically updated. In the main menu, place the cursor in front of SPE CYCLE and validate with the ENTER key. Next, place the cursor in front of Volume Calcul. and validate with the ENTER key. The display confirms that the special cycle is selected. Enter the value of the calibration leak in the INSTRUCT. line(calibration instruction), by using the navigation keys. Validate with the ENTER key. Press on the START key to launch the special cycle. At the end of the cycle, the calculated value of the volume of the part is sent directly in the active program menu to the VOLUME parameter. By pressing on the ENTER key, the calculated value of the volume is displayed. UM-19700E-U MAIN MENU ACTIVE PROG. : 001 PARAMETERS SPE CYCLE:Inactive SPE CYCLE Inactive VOLUME CALCUL. Piezo auto zero CYCLE/VOL. CALC. INSTRUCT. : 0.5 INSTRUCT.P : 150.0 R.UNIT : cm3/mn MAIN MENU ACTIVE PROG.: 001 PARAMETERS SPE CYCLE : Volume CYCLE/Pr :001 PRESS = 150.0 mbar FLOW = 0.3 cm3/h TEST VOLUME VOLUME : 0.275 L User manual ATEQ G520 Page 63/88 Chapter 4 – Functions of the instrument 3.3. INFINITE FILL In presence of "shut-off" valve or external dump valve, it is possible to carry out an infinite fill with the instrument, in other words, a permanent flow of air at the test pressure in order to locate leaks (set-up adjustment...). If the assembly allows it (risk of sudden disconnection of part under pressure) it is preferable, in the case of infinite fill, to have a dump time of zero so as not to draw in liquid if there is a leak (when looking for leaks using a soapy water based product). MAIN MENU CYCLE PROG. : 01 PARAMETERS SPE CYCLE: none In the main menu, place the cursor in front of the SPE CYCLE function and confirm using the ENTER key. SPE CYCLE Regul. 1 adjust Regul. 2 adjust Infinite fill Next, place the cursor in front of Infinite fill and confirm using the ENTER key. MAIN MENU RUN PROG. : 01 PARAMETERS SPE CYCLE:Inf fill The display confirms that the special cycle has been selected. RUN/Pr :001 PRESS = 355.5 mbar Press the START key to start a new cycle. In case of installation with a mechanical regulator, adjust the test pressure with the regulator. In case of installation with a electronic regulator, adjust the test pressure with the regulator by pressing the UP and DOWN arrows. To stop the cycle, press the RESET key. UM-19700E-U FILL _ + RUN/Pr :001 PRESS = 1000 mbar FILL RUN/Pr :001 PRESS = 1000 mbar FILL RUN/Pr :001 PRESS = 1.00 bar READY User manual ATEQ G520 Page 64/88 Chapter 4 – Functions of the instrument 3.4. PIEZO AUTO ZERO Used for compulsory reset to zero of the piezo sensor. In the main menu, place the cursor in front of SPE CYCLE and confirm using ENTER. MAIN MENU RUN PROG: 001 PARAMETERS SPE CYCLE: Inactive Next, place the cursor in front of Piezo Reset function and confirm using ENTER. SPE CYCLE Pre-regul. adjust Infinite fill Piezo reset The display confirms that the special cycle has been selected. MAIN MENU RUN PROG.: 001 PARAMETERS SPE CYCLE:Piezo R. Press the START key to start the reset. Once the reset is carried out, the cycle ends automatically. RUN/Pr :001 PRESS = 355.5 mbar RESET RUN/Pr :001 PRESS = 355.5 mbar READY Note: if the time between cycles is too long, the auto zero cycle may be programmed with a frequency in minutes, allowing the initialisation of the sensors in relation to the atmospheric pressure. Pressure is very important for the measurement of flow. For automatic devices it may be necessary to inhibit the auto zero cycle. To inhibit the automatic zero cycle, go to the CONFIGURATION menu then confirm using non. CONFIGURATION EXTENDED MENUS AZ PIEZO AUTO: No HOUR Attention: If an auto zero cycle is not carried out regularly, measurement errors may occur and result in false readings for the air tightness of parts. UM-19700E-U User manual ATEQ G520 Page 65/88 Chapter 4 – Functions of the instrument 3.5. PRINT This special cycle allows sending on the RS232 line the frame of the last measurement results. In the main menu, place the cursor in front of SPE CYCLE and confirm using ENTER. Next, place the cursor in front of Print function and confirm using ENTER. The frame is instantly send on the RS232 line. MAIN MENU RUN PROG: 001 PARAMETERS SPE CYCLE: Inactive SPE CYCLE Infinite fill Piezo reset Print 3.6. ATMOSPHERICS CONDITIONS This cycle allows displaying the atmospherics conditions measured by the instrument. These atmospherics conditions are: atmospheric pressure and ambient temperature of the tested gas. In the main menu, place the cursor in front of SPE CYCLE and confirm using ENTER. Next, place the cursor in front of Atm conditions function and confirm using ENTER. The instrument displays the atmospheric pressure and the measured temperature. To stop the cycle, press the RESET key. UM-19700E-U MAIN MENU RUN PROG: 001 PARAMETERS SPE CYCLE: Inactive CYCLE SPE Piezo reset Print Atm. Conditions ATM. CONDITION ATM PRES.: 1004 hPa TEMPERATURE : 30.0C RUN/Pr :001 PRESS = 1.00 bar READY User manual ATEQ G520 Page 66/88 Chapter 4 – Functions of the instrument 4. SERVICE MENU 4.1. PARAMETERS SERVICE This menu is used to manage the memory containing the test cycle parameters. 9 Save maintenance parameters menu: used to save the configuration of the parameters in the current test. 9 Restore maintenance parameters menu: used to restore a previously saved configuration. 9 Erase maintenance parameters menu: used to delete the current configuration. To access the menu, turn the switch to the ACCESS position. In the main menu, place the cursor in front of SERVICE and confirm using ENTER. Then place the cursor in front of PARAMETERS and confirm using ENTER. MAIN MENU CYCLE SPE: Disabled CONFIGURATION MAINTENANCE MAIN/SERVICE PARAMETERS Then place the cursor in front of the action required : SAVE: save current parameters, RESTORE: replace current parameters by those stored in the memory, IN/SERVI/PARAMETER SAVE : No RESTORE : No RESET : No ERASE: delete current parameters and return to the initial configuration. and confirm using ENTER. To activate an operation, confirm using ENTER. Then choose YES using the arrows then confirm again using ENTER. IN/SERVI/PARAMETERS SAVE : Yes RESTORE : No RESET : No Turn the switch to the LOCK position. Note: if the parameters have been modified, then current and saved parameters are therefore different, when the instrument begins to operate, the following message is displayed on the screen. UM-19700E-U User manual ATEQ G520 Page 67/88 Chapter 4 – Functions of the instrument SAVE PARAMETERS This message is not blocked and will disappear after a few seconds. It informs that a saving of the parameters may be necessary. In this case three solutions arise: 1) Restore the saved parameters (current parameters will be lost). 2) Save the current parameters in the memory (the parameters already in the memory will be lost). 3) Do nothing and work with the current parameters. 4.2. SERVICING OF THE SENSORS This menu allows the monitoring of the information that is communicated by the pressure sensors, "PRESSURE" for the absolute pressure piezo sensor and "LEAK" for the differential pressure sensor. In the main menu, place the cursor in front of the SERVICE heading and confirm with the ENTER key. Next, place the cursor in front of SENSORS and confirm with the ENTER key. The screen displays the values measured by the pressure sensors. MAIN MENU CYCLE SPE: Disabled CONFIGURATION MAINTENANCE MENU /SERVICE PARAMETERS SENSOR MENU /SERVI/SENSOR PRESSURE : 0000 FLOW : 0000 Note: without air pressure, the number of "PRESSURE" points must be less than 100, for a nil flow, the number of "FLOW" points must be less than 200. UM-19700E-U User manual ATEQ G520 Page 68/88 Chapter 4 – Functions of the instrument 5. RESULTS MENU This function is used for: 9 the detailed display of the test results: number of parts tested, number of good parts, number of bad reference parts, number of bad parts, number of recovered parts, number of times the alarm is triggered (each indicator is expressed as a % value), 9 resetting the results memory, 9 printing the results (number of good parts, number of bad parts). 6. LANGUAGE MENU This function allows the choosing of the instrument language. Several languages are available. Two are installed at the fabrication of the instrument, the English is the language by default the other is choosed by the customer. 7. STAND BY MENU This function is used to switch off the instrument without disconnecting it. Standby can be immediate or programmed with start and stop times. There are two ways to achieve immediate standby: 1) Either through the standby menu, 2) Or by pressing the RESET button for more than three seconds. Note: when the instrument is on standby, the display is off and only the yellow indicator light flashes approximately every 3 seconds. To reactivate the instrument, simply press any key on the front panel or activate any input. T R ATEQ G5 Version XX.XXi 0-> 500 mbar 100 cm3/h ) Select the option and enter settings if necessary. UM-19700E-U User manual ATEQ G520 Page 69/88 Chapter 4 – Functions of the instrument 7.1. STANDBY USING THE MENU Standby using the menu enables start and stop times for the instrument to be programmed. In the main menu, position the cursor beside STANDBY and confirm by pressing ENTER. MAIN MENU RESULTS LANGUAGE : English STAND-BY To program automatic standby at a given time, position the cursor beside STOP TIME. STAND-BY Now :No Pow-on time :No Pow-off time :No Confirm the STOP TIME parameter using YES STAND-BY Now :No Pow-on time :No Pow-off time :Yes Then set parameters for the time (hours and minutes) when the standby must take effect. "TIME DELAY" is the delay (in minutes) between the programmed time and actual standby STAND/Pow-off time HOUR : 00 MINUTE : 00 Delay : 00 To program the start-up time for the instrument, position the cursor beside START TIME STAND-BY Now :No Pow-on time :Yes Pow-off time :Yes Confirm the START TIME parameter using YES STAND-BY Now :No Pow-on time :Yes Pow-off time :Yes Then set parameters for the instrument start time (in hours and minutes). UM-19700E-U STAND/Pow-on time HOUR : 00 MINUTE : 00 User manual ATEQ G520 Page 70/88 Chapter 5 - Accessories Chapter 5 ACCESSORIES 1. ACCESSORIES SUPPLIED WITH THE INSTRUMENT 1.1. POWER SUPPLY The power supply of the G520 converts a network voltage (120 to 240 V AC) into a 24 V DC low voltage supply. It has no power switch and works as soon as it is plugged in. It is protected against surges and short circuits via a thermal fuse (Do not use any other type of fuse). UM-19700E-U User manual ATEQ G520 Page 71/88 Chapter 5 - Accessories 2. OPTIONAL ACCESSORIES 2.1. CALIBRATED LEAK Calibrated leaks are used to check the instrument's calibration. PRESSURE 2 kPa (20 mbar) 5 kPa (50 mbar) 15 kPa (150 mbar) 30 kPa (300 mbar) 50 kPa (500 mbar) 100 kPa (1 bar) 200 kPa (2 bar) 400 kPa (4 bar) 1 MPa (10 bar) A B Master leak type D 50 E 5 C 1,5 3,12 6,6 18 31,2 1,24 2,05 2,3 4 7,4 17,5 42 1,3 2,6 2,82 6,7 12 23 55 2,2 4 8,2 17 35,5 338 4,8 12 24 46,8 2,12 3,6 7,6 22,4 40 74,5 700 10 25 48 1,4 3,5 8 15,5 31 63 150 1142 23 56 1,8 3,3 8 19 37 74 149 360 2230 55 2,3 4,6 8,5 21 47 89 194 380 830 4343 2,5 6,6 12,1 23,3 56 125 220 540 1030 1500 8750 11,5 29 198 420 705 2310 3700 4450 50 95 kPa.cm3/h (bar.cm3/h) F G 1000 5000 4,2 53 5,25 11,3 132 kPa.cm3/min (bar.cm3/min) Note: the values indicated above are given for information and can vary by +/- 20%. The true rate is precisely measured before delivery with an accuracy of +/- 5% up to 1Mpa.cm3/min (10 bar.cm3/min) and +/- 3% from this value. Special master leaks can be manufactured on request, within 5% of the requested value. 9 The calibrated leaks must be used with clean dry air. 9 These leaks must not be dipped in water. It is essential that they are stored in their case after usage. 9 The leaks must be checked periodically by the company’s metrology department or by ATEQ’s metrology service. 9 Check that there is an O-ring seal and that it is in good condition. 9 The instrument zero check must be done by replacing the leak with a sealing connector and not by sealing off the leak itself. 9 To check that the leak has not been blocked, attach a piece of flexible tubing to the leak and submerge its extremity in water to watch for bubbles. Only with pressure regulation and not vacuum. UM-19700E-U User manual ATEQ G520 Page 72/88 Chapter 5 - Accessories 2.2. NEEDLE VALVE AND LEAK/FLOW CALIBRATOR (CDF) 2.2.1. Needle valve Needle valves are used to calibrate the leakage limits. These valves have an adjustable leak and depending on the model allow adjustments of between a few cm3/h to several l/min. These valves can be easily disturbed and therefore require the frequent use of some means of checking the setting (ex : ATEQ Leak/flow calibrator). Note: it is strongly recommended that you do NOT leave a needle valve permanently connected on a leak detection machine with automatic calibration every « n cycles ». 2.2.2. CDF (Leak/flow Calibrator) LEAK/FLOW CALIBRATOR The Leak/Flow calibrator is a multiple range ATEQ flow meter intended for checking leak testing equipment and particularly ATEQ instruments. It measures a loss of charge with a differential sensor, which is connected to a calibrated flow tube. C UM-19700E-U User manual ATEQ G520 Page 73/88 Chapter 5 - Accessories 2.3. AUTOMATIC CONNECTORS WITH EXPANDABLE JOINTS ATEQ automatic connectors are used so that accurate and reliable assemblies can be built to check air tightness. They simplify the work of the operator as they are selflocking thanks to the use of a pneumatic valve supplied from the mains compressed air supply. Several connectors may be controlled by the same remote, powered by an ATEQ or another logic. They adapt easily to a large number of fittings and apertures of varied dimensions. Their use ensures that non-machined walls can be guaranteed airtight. There are four basic versions of ATEQ automatic connectors : 9 SA for external connections, 9 Si for internal connections, 9 SAG and SIG for threaded and tapped connections. They are either in anodised aluminium or stainless steel as standard. Different types of joints are available depending on the elasticity required. 2.3.1. Operation The connector is positioned manually or automatically using a jack or cylinder. Compressed air is allowed through the control aperture via a three part valve. The pressure pushes the cylinder which squashes the connector. The air tightness is therefore perfect and there will be no leakage in the connector seals. 2.3.2. Standard dimensions SAG and SIG have been designed for threaded and tapped caps. For the time being, they are available in gas norm. Sizes, which are: 1/2", 3/4", 1", 11/4", 11/2", 2", BSP. The SA and SI are designed for smooth nozzles, with dimensions from 3 to 80 mm for the external diameters (SA), and from 10 to 75 mm for the internal diameters (SI). 2.4. FILTRATION KIT Clean, dry air must be used to ensure the reliability of the instruments. The filtration kit is connected to the air input on the rear panel of the instrument. It consists of a dust filtering cartridge (5µm) and another cartridge (0.01 µm) giving residual oil pollution equal to 0.01 ppm. UM-19700E-U User manual ATEQ G520 Page 74/88 Chapter 5 - Accessories 2.5. SIMPLE REMOTE CONTROL The remote control allows control and selection of various settings remotely for instruments in the ATEQ range. 2.5.1. Casing reset/start TLC Example : START / RESET. Télémécanique 2.5.2. S5 four-function remote control This remote control has four functions which can be used to control a series 5 instrument remotely. (F580 or C540 single head only). The four functions on this remote control are as follows: TLC S5 9 RESET and start cycle. 9 Increase or decrease program numbers. 9 Display the number selected. of the program 9 Display the test result, green indicator light for Pass, red indicator light for Fail or alarm. 88 Note 1: a program number can only be changed (increase or decrease) when no test cycle is running. Note 2: this remote control does not function in the “Automatic start” mode. www.ateq.com 2.5.2. 1) Connection diagram TLC S5 G520 J3 UM-19700E-U User manual ATEQ G520 Page 75/88 Chapter 5 - Accessories 2.6. EXTERNAL SHUT OFF VALVE OPTION This option allows avoiding blowing air or gas permanently on the test output. The "Automatic start" mode becomes incompatible. There's the choice between an electrical or a pneumatic order according to the option presents in the instrument: ¾ Electrical piloting 24 V DC by the output code number 2 with the "shut off" option activated in the CONFIGURATION Menu. ATEQ G5 N°2 shutt off output code TEST OUTPUT ¾ Pneumatic piloting (6 bar network) with the A and B automatic connectors option. The shut off function must be activated in the CONFIGURATION menu. A TEST PART B 2.7. EXTERNAL DUMP VALVE AND SHUT OFF FUNCTION This assembly allows dumping the test part out of test cycle and not blowing permanently air or gas. The "External dump" option must be imperiously present in the instrument. Use a 3/2 Y valve (ATEQ standard) who will be preferably close to the part to be tested. The "Automatic start" mode is being incompatible. The "External dump" function must be activated in the CONFIGURATION menu, choose the valve type, normally closed or normally opened and then activate the "External dump" function in the programs functions. There's the choice between an electrical or a pneumatic order according to the option presents in the instrument: ¾ Electrical piloting 24 V DC by the output code number 2 with the "External dump" option activated in the CONFIGURATION Menu. ¾ Pneumatic piloting (6 bar network) with the A and B automatic connectors option. The "External dump" function must be activated in the CONFIGURATION menu. UM-19700E-U ATEQ G5 N°2 external dump output code TEST OUTPUT A B TEST PART ATM User manual ATEQ G520 Page 76/88 Chapter 6 – Error messages Chapter 6 ERROR MESSAGES The ATEQ G520 can display error messages if there are operational problems. PROBLEM Test error. Flow in excess of the full scale. Action: check the test circuit. Pressure in excess of the full scale. Negative flow. Action: check the test time, the part must not change in temperature. Refer to chapter 4 paragraph 2.12 “Negative flow alarm”. Pressure in excess of the max. threshold of the pressure sensor. Action: reduce the pressure with the mechanical thumb wheel. Default on the differential sensor. Action: contact the ATEQ Aftersales service for a repair (probable presence of oil or water in the test circuit of the instrument). Pressure in excess of the max. threshold. Action: check regulator settings, and pressure limit . Pressure below the min. threshold. Action: check the network pressure, regulator settings and the pressure limits. UM-19700E-U LIT INDICATORS >> >> > > MESSAGE DISPLAYED CYCLE/Pr001 PRESS=0.942 bar FLOW=>> F.S TEST READY (NO OK) CYCLE/Pr001 PRESS= 150.0 mbar FLOW = >> F.S. REF. READY (AL) CYCLE/Pr001 PRESS = > F. SCALE >> >> >> >> > > > > RESET WAIT CYCLE/Pr001 PRESS= 150.0 mbar FLOW= SENSOR DEF. READY (AL) CYCLE/Pr001 PRESS= 140.0 mbar PRESS= > MAX READY (AL) CYCLE/Pr001 PRESS= 30.0 mbar PRESS= < MIN READY (AL) User manual ATEQ G520 Page 77/88 Chapter 6 – Error messages PROBLEM No Pressure Action: check the connection to air supply network and check the regulator adjustment. PROG error: the I/O's have selected a program with no parameters. Action: enter program parameters. Inappropriate size for the selected unit of pressure. Action: change unit or modify the minimum and maximum pressure limits if these and the test pressure can be used with this unit. UM-19700E-U LIT INDICATORS >> > MESSAGE DISPLAYED CYCLE/Pr001 PRESS= 0.0 mbar PRESS= NIL PRESSURE READY (AL) CYCLE/Pr.:009 ERROR >> >> > > PARAM/Pr001 >Press. Unity : mbar MAX Fill : PPPP MIN Fill : 0.0 User manual ATEQ G520 Page 78/88 Chapter 7 – Operational problems Chapter 7 OPERATIONAL PROBLEMS 1. PHENOMENON NOTED If a test machine begins to detect too many bad parts (statistically, more than three consecutively), it is advisable to carry out a check on the whole unit. The quality of the manufacture and operation of the leak detector should be the last things considered. 1.1. CONDITION OF THE MACHINE'S SEALS This is the no.1 defect as the seals are subject to high levels of dirt contamination (alumina, shavings). Regular cleaning of the seals is an effective remedy. 1.2. DAMAGED INSTRUMENT SEALS There is a possibility that the seals may be cut by shavings or worn by repetitive squashing. This can be prevented by regular servicing and replacement of the seals. 1.3. BUMPER PAD This is a defect which may occur after a certain amount of time as the bumper pads may be worn, or if the pressure settings in the air cylinder are inadvertently disturbed. Check the stability of the measurement and that the bumper pads are correctly installed. 1.4. PNEUMATIC AIR SUPPLY TOO LOW This anomaly can cause false measurements (large leaks or erratic measurements). The air supply to the cells must be higher than the minimum of 4 bar and it is essential that it is greater than the minimum test pressure of 1 bar. Also check that sealing connectors are being used correctly. 1.5. PNEUMATIC LINK The link and reference pipes will age and break with time. The pipes and seals must conform to the required quality. ATEQ recommends the use of RILSAN PA11 pipes and AVS type joints. UM-19700E-U User manual ATEQ G520 Page 79/88 Chapter 7 – Operational problems 1.6. ENVIRONMENT A measurement may be affected by a variation in background temperature (sun, draughts, storage of parts outdoors, handling of the test part by the operator, ...). The dampness of parts may cause errors in the readings (insufficient drying after washing, outdoor storage, condensation, presence of water in the fixture, ...). 1.7. CALIBRATION ATEQ does not accept any liability in regard to calibrations and settings to its instruments which are not carried out by its own staff. 1.8. CONCERNS ABOUT RELIABILITY OF THE INSTRUMENT’S CIRCUITS If all the other checks do not resolve the problem, the instrument’s circuit may be checked. Proceed as follows: 9 Segregate the instrument from its environment (pneumatic assembly), 9 Connect up the instrument (test output), 9 Choose an unused program, 9 Set the parameters as follows : ⇒ the regulator to the test pressure, ⇒ the pressure monitoring thresholds to +/- 20 % of the test pressure, ⇒ wait times A and B 0 seconds, ⇒ fill time 2 seconds, ⇒ stabilization time 2 seconds, ⇒ test time 2 seconds, ⇒ reject level 2, ⇒ unit cm3/h, ⇒ function all functions cancelled except "pressure correction". Run two consecutive cycles. The post test time result should not exceed 2 cm3/h. UM-19700E-U User manual ATEQ G520 Page 80/88 Appendices Appendices ATEQ G520 1. TECHNICAL CHARACTERISTICS OF THE G520 G520 Dimensions H x L x D (mm): 136 x 250 x 255 Dimensions with air filter and regulator (mm): 136 x 250 x 370 Power supply: Pneumatic connections: Weight (kg): Format: 24 VDC / 1,6 A Min 23,5 V ; Max 28 V 2,7/4, 3/5 or 4/6 about 4 ½ 19 inches Temperatures: Operational: Storage: UM-19700E-U +10°C to +45°C 0°C to +60 °C User manual ATEQ G520 Page 81/88 Appendices 2. MECHANICAL DEFINITION DRAWINGS OF G520 255 250 21 4 x M6 Tapped depth 10 C SOL 22 136 99 www.ateq.com 370 UM-19700E-U User manual ATEQ G520 Page 82/88 Appendices 3. CONVERSION TABLE TO F R O M Pa kPa bar mbar mmH2O atm Torr psi inH2O inHg Pa 1 10 -3 10 -5 10 -2 0.10197 9.8692 10 -6 7.5 10 -3 1.45 10 -4 4.01 10 -3 2.95 10 -4 kPa 10 3 1 10 -2 10 101.97 9.8692 10 -3 7.5 0.145 4.01 0.295 bar 10 5 10 2 1 10 3 10197 0.98692 750 14.5 401.46 29.53 mbar 10 2 10 -1 10 -3 1 10.197 9.8692 10 -4 0.75 1.45 10 -2 0.401 2.95 10 -2 mmH2O 9.806 9.8067 10 -3 9.8067 10 -5 9.8067 10 -2 1 9.6784 10 -5 7.3556 10-2 1.4223 103 3..937 10-2 2.895 10-3 atm 1.013 10 5 101.33 1.0133 1013.3 10332 1 760 14.695 406.78 29.921 Torr 133.32 0.13332 1.3332 10-3 1.3332 13.595 1.3158 10 -3 1 1.9337 10 -2 0.535 3.937 10 -2 psi 6897.8 6.8948 6.8948 10 -2 68.948 703.07 6.8045 10 -2 51.71 1 27.68 2.036 inH2O 249,09 0.2491 2.4909 10 -3 2.4909 25.400 2.4583 10 -3 1.8683 3.61 10 -2 1 7.35 10 -2 inHg 3386.4 3.3864 3.3864 10 -2 33.864 345.32 3.3421 10 -2 25.4 0.491 13.595 1 UM-19700E-U User manual ATEQ G520 Page 83/88 Appendices 4. PARAMETERS STORED PARAMETERS T I M E Program n° Program n° Program n° Program n° Waiting Rise Stabilization Drop R E J E C T S Test reject Reference reject Recovery test reject Recovery reference reject Rejection unit Start pressure Stabilization pressure End pressure Maximum Stabilization pressure P R E S S U R E S Minimum threshold pressure Minimum rise flow pressure Maximum drop flow pressure Minimum Stabilization flow pressure Maximum Stabilization flow pressure Minimum drop flow pressure Maximum drop flow pressure Pressure unit F L O W S Minimum rise flow Rise flow Stabilization flow Maximum drop flow UM-19700E-U User manual ATEQ G520 Page 84/88 Appendices 5. VALVES CODES USED IN YOUR APPLICATION PROGRAM GROUP: PROGRAM VALVE CODE FUNCTION 01 02 03 04 05 06 07 08 09 10 11 12 13 14 15 16 UM-19700E-U User manual ATEQ G520 Page 85/88 Appendices 6. USER NOTES _____________________________________________________________________ _____________________________________________________________________ _____________________________________________________________________ _____________________________________________________________________ _____________________________________________________________________ _____________________________________________________________________ _____________________________________________________________________ _____________________________________________________________________ _____________________________________________________________________ _____________________________________________________________________ _____________________________________________________________________ _____________________________________________________________________ _____________________________________________________________________ _____________________________________________________________________ _____________________________________________________________________ _____________________________________________________________________ _____________________________________________________________________ _____________________________________________________________________ _____________________________________________________________________ _____________________________________________________________________ _____________________________________________________________________ _____________________________________________________________________ _____________________________________________________________________ _____________________________________________________________________ _____________________________________________________________________ _____________________________________________________________________ _____________________________________________________________________ _____________________________________________________________________ _____________________________________________________________________ _____________________________________________________________________ _____________________________________________________________________ _____________________________________________________________________ _____________________________________________________________________ _____________________________________________________________________ _____________________________________________________________________ _____________________________________________________________________ _____________________________________________________________________ _____________________________________________________________________ _____________________________________________________________________ _____________________________________________________________________ _____________________________________________________________________ _____________________________________________________________________ _____________________________________________________________________ _____________________________________________________________________ _____________________________________________________________________ _____________________________________________________________________ _____________________________________________________________________ _____________________________________________________________________ _____________________________________________________________________ UM-19700E-U User manual ATEQ G520 Page 86/88 Index Index A Access position key ............................21 Additional functions ............................39 Automatic connectors ................... 43, 74 Automatic save ...................................52 Automatic start....................................42 Auto-zero frequency ...........................52 B Bar graph............................................53 C C540 / F580........................................53 Calibration leaks .................................72 Clock ..................................................53 Conversion table.................................83 Create a new program ........................23 Cycle end............................................45 Cycle keys ..........................................20 Cycle several test cycles ....................43 D Deactivating the start key ...................58 Delete a program................................31 Determine the fill time.........................26 Determine the stabilization time..........27 Dimensions.........................................82 Duplicate a program ...........................30 E Electrical connectors ..........................12 Error indicator .....................................22 Export results to MS Excel..................56 Extended menus.................................39 External dump .............................. 59, 76 F Fill instruction......................................28 Filtration kit .........................................74 Flow mode ..........................................24 Functions menu ............................ 29, 37 I I/O Configuration ................................61 Infinite fill.............................................64 Infra-red link........................................21 L Language............................................69 Large leak indicator ............................22 LCD 4 line display...............................21 Leak/Flow calibrator ...........................73 Lighting the screen .............................58 Locked position key ............................21 M Maximum fill........................................28 Measurements characteristics ..............6 Minimum fill.........................................28 UM-19700E-U Modbus.........................................57, 58 N Navigation keys ..................................20 Needle valves .....................................73 Negative flow ......................................61 O Operational characteristics ...................7 Operational problems .........................79 Operator mode....................................24 P Parameter settings..............................25 Part BAD indicator ..............................22 Part OK indicator ................................22 Part volume calculation.......................63 Pneumatic connectors ........................17 Pneumatic supply ...............................18 Power supply ......................................71 Pression (zero). ..................................78 Pressure correction.............................40 Pressure inferior to min threshold. ......77 Pressure over max threshold. .............77 Pressure too high................................77 Pressure units.....................................27 Print ....................................................66 Print frame ..........................................54 Print frame formats .............................54 Print parameters .................................53 Print the results...................................53 Printer ...........................................16, 53 Printing the results ..............................69 Program choice...................................32 Program name ....................................40 Programmable input ...........................15 R Recoverable reject level .....................41 Recoverable thresholds ......................41 Reject unit...........................................28 Remote control .............................16, 75 Remote control (S5)............................75 Reset (automatic) ...............................65 Results memory reset.........................69 RS232.................................................16 RS485.................................................58 S Security...............................................58 Sending conditions .............................55 Sensor default.....................................77 Sensor servicing .................................68 Service menu.....................................67 Service parameters.............................80 Set pressure .......................................28 User manual ATEQ G520 Page 87/88 Index Shut off ...............................................60 Shut off valve......................................76 Smoothing ..........................................40 Stabilization time ................................27 Stamping ............................................44 Stand by .............................................69 Standard conditions............................40 Stop the measurement .......................32 Symbols................................................8 T Technical characteristics ....................81 Test error ............................................77 UM-19700E-U Test output..........................................17 Test reject...........................................29 Test results display (detailed) .............69 Test time.............................................27 Type of pre-fill .....................................51 V Valve codes ........................................41 Volume ...............................................29 Volume calculation..............................51 W Wait times A and B .............................26 User manual ATEQ G520 Page 88/88 This document is the exclusive property of ATEQ. It may not be communicated, reproduced or used without prior consent.