1
bluemove
Bluemove User Manual
Semester Project
Winter 2004-2005
Cyril Jaquier - Kévin Drapel
February 14, 2005
Contents
1 Bluemove short manual
1.1 Installation . . . . . . . . . . . . . . . . . . . . . .
1.1.1 J2SE 5.0 . . . . . . . . . . . . . . . . . . . .
1.1.2 Java Bluetooth stack . . . . . . . . . . . . .
1.1.3 Bluemove . . . . . . . . . . . . . . . . . . .
1.1.4 Launching the application . . . . . . . . . .
1.2 User interface . . . . . . . . . . . . . . . . . . . . .
1.2.1 The menu . . . . . . . . . . . . . . . . . . .
1.2.2 The tool bar . . . . . . . . . . . . . . . . .
1.2.3 Timelines tab . . . . . . . . . . . . . . . . .
1.2.4 Modules Manager tab . . . . . . . . . . . .
1.2.5 Console tab . . . . . . . . . . . . . . . . . .
1.2.6 The status bar . . . . . . . . . . . . . . . .
1.3 Tutorial: a small example . . . . . . . . . . . . . .
1.3.1 Step one: add a module . . . . . . . . . . .
1.3.2 Step two: edit a module . . . . . . . . . . .
1.3.3 Step three: add an actuator . . . . . . . . .
1.3.4 Step four: add another module . . . . . . .
1.3.5 Step five: draw a module trajectory (spline)
1.3.6 Step six: draw a module trajectory (linear)
1.3.7 Step seven: save the project . . . . . . . . .
1.3.8 Step eight: play . . . . . . . . . . . . . . . .
1.3.9 Conclusion . . . . . . . . . . . . . . . . . .
1
.
.
.
.
.
.
.
.
.
.
.
.
.
.
.
.
.
.
.
.
.
.
.
.
.
.
.
.
.
.
.
.
.
.
.
.
.
.
.
.
.
.
.
.
.
.
.
.
.
.
.
.
.
.
.
.
.
.
.
.
.
.
.
.
.
.
.
.
.
.
.
.
.
.
.
.
.
.
.
.
.
.
.
.
.
.
.
.
.
.
.
.
.
.
.
.
.
.
.
.
.
.
.
.
.
.
.
.
.
.
.
.
.
.
.
.
.
.
.
.
.
.
.
.
.
.
.
.
.
.
.
.
.
.
.
.
.
.
.
.
.
.
.
.
.
.
.
.
.
.
.
.
.
.
.
.
.
.
.
.
.
.
.
.
.
.
.
.
.
.
.
.
.
.
.
.
.
.
.
.
.
.
.
.
.
.
.
.
.
.
.
.
.
.
.
.
.
.
.
.
.
.
.
.
.
.
.
.
.
.
.
.
.
.
.
.
.
.
.
.
.
.
.
.
.
.
.
.
.
.
.
.
.
.
.
.
.
.
.
.
.
.
.
.
.
.
.
.
.
.
.
.
.
.
.
.
.
.
.
.
.
.
.
.
.
.
.
.
.
.
.
.
.
.
.
.
.
.
.
.
.
.
.
.
.
.
.
.
.
.
.
.
.
.
.
.
.
.
.
.
.
.
.
.
.
.
.
.
.
.
.
.
.
.
.
.
.
.
.
.
.
.
.
.
.
.
.
.
.
.
.
.
.
.
.
.
.
.
.
.
.
.
.
.
.
.
.
.
.
.
.
.
.
.
.
.
.
.
.
.
.
.
.
.
.
.
.
.
.
.
.
.
.
.
.
.
.
.
.
.
.
.
.
.
.
.
.
.
.
.
.
.
.
.
.
.
2
2
2
2
3
3
3
3
3
4
4
4
5
5
5
5
6
6
6
6
7
7
7
Chapter 1
Bluemove short manual
This chapter quickly describes the user interface of the Bluemove application. It is divided
into three parts: the first one explains how to install the software and its requirements, the second one gives an overview of the user interface
and, finally, the third part provides a step by
step example which shows how to create a simple project with Bluemove.
$ java -version
java version "1.5.0_01"
...
You should get a string with "1.5". If not,
please reinstall the J2SE environment and follow carefully the instructions.
1.1.2
1.1
Installation
Java Bluetooth stack
In order to communicate with the module, you
need a Java Bluetooth stack . There is a lot
of different stacks available for Linux, Windows
and embedded systems. Rococo [7] offers a
free implementation of the JSR-82 [4] called
Impronto for University students. Other Java
Bluetooth stacks can be found here [2]. By default, Bluemove is compiled to run with the Rococo Impronto stack.
In order to run properly, Bluemove requires
some additional softwares and libraries. The following list summarizes the requirements for this
application:
• A Linux system on a x86 machine
• J2SE 5.0 (Java JDK 5.0 or JRE 5.0)
• Java Bluetooth stack JSR-82 compliant
Other needed libraries (log4j, xerces, ...) are Rococo Impronto
already included into the application. You do Rococo distributes its Impronto Developer
not need to care about them.
Kit for students under a license which does
not allow us to distribute it with our software.
Instead you must fill in the form
1.1.1 J2SE 5.0
available on Rococo website1 and wait for
Bluemove needs the J2SE 5.0 from Sun Mithe confirmation e-mail.
After you get
crosystems. Bluemove takes advantage of the
the impronto-1.3-1.i386.rpm, you can simlatest features of J2SE 5.0. In order to get the
ply install the Rococo Bluetooth stack with
best performance, it is important to use the latrpm -ivh impronto-1.3-1.i386.rpm.
This
est J2SE 5.0 version. You can choose to inshould install the required BlueZ libraries [1]. If
stall the J2SE Development Kit (JDK) or the
you encounter any problems, please make sure
J2SE Runtime Environment (JRE) depending
that BlueZ is correctly installed and configured
on whetever you are a developer or not. You
on your system. Further information about
can find the latest J2SE 5.0 here [5]. We will
the Impronto installation can be found in the
not present the installation of the Java Envifile impronto/user_guide.pdf of the Bluemove
ronment. Instructions are available in the downarchive.
loaded archive.
Finally, you have to read and agree the
In order to see if the J2SE 5.0 is correctly
LinuxLicense.txt file. If you agree with the
installed, open a new terminal and type the fol1 http://www.rococosoft.com/registration linux.html
lowing command.
2
Bluemove User Manual
license, you must copy it into the same direc- 1.2
User interface
tory as Bluemove.jar. The Impronto stack will
When you start Bluemove, you see the main
not work without this license file.
view of the application which contains four important parts:
1.1.3
Bluemove
• the menu bar
Bluemove is distributed as a JAR archive. Everything you need to run the application is embedded into this file. Thus, the only thing you
need to install Bluemove is to copy the JAR
archive named Bluemove.jar in a directory. We
recommend to unpack the Bluemove archive in
your home directory and run the application directly from that location.
As seen above, do not forget to copy the Impronto license file in the same directory as Bluemove.
1.1.4
• the tool bar
• the tabbed pane
• the status bar
The tabbed pane contains several tabs which are
respectively used to draw the module curves, to
manage the modules, and to view the log messages. In the next section, we will take a close
look at the different items available in the menu
bar.
Launching the application
Once the J2SE 5.0, the Java Bluetooth stack
and Bluemove are installed, you can finally
launch the application. To start with, you need
to initialise your Bluetooth device. Open a
terminal and type the following command as
”root”.
1.2.1
The menu
The menu bar is located at the top of the window. It is composed of three menus, each one
containing several menu items.
The File menu
# hciconfig hci0 up
# hciconfig hci0
hci0:
Type: USB
BD Address: 00:0C:76:48:87:7A
...
This menu allows you to do the main operations
on a project. You can create a new project,
open or save a project. You can also quit the
application. The last opened or saved project is
remembered and can thus be quickly reopened.
Your ”BD Address” should not be equal to
00:00:00:00:00:00. If so, please check your
kernel configuration and make sure that the
needed modules are loaded or compiled into the
kernel.
You can now go into the Bluemove directory
and type the following command.
The Options menu
This menu allows you to set the properties of the
application. All the settings are locally stored
on your computer.
The Help menu
$ LD_LIBRARY_PATH=/usr/lib java \
-classpath .:Bluemove.jar \
birg.bluemove.main.core.Bluemove
This menu contains a menu entry called ”Help”.
It opens your favourite browser and redirects
The path /usr/lib represents the location of it to the Bluemove help site. The menu item
the file libimpronto.so which is normally in- ”About” displays information about your system.
stalled in /usr/lib.
You should now see the Bluemove splash
screen and then the main screen. If not, please 1.2.2 The tool bar
check that all the previous steps were successfully completed.
The toolbar contains shortcuts for useful actions
You are ready to discover the power of Blue- like creating a new project, saving or opening a
move and the pleasure of modular robotic.
project.
C. Jaquier - K. Drapel
3
v1.0 - February 14, 2005
Bluemove User Manual
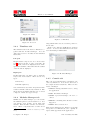
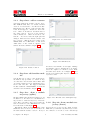
Figure 1.1: Menu
Figure 1.3: Timelines
Figure 1.2: Tool bar
1.2.3
range which will be used to send the position to
the module.
Please notice that the YaMoR servo name is
”Servo1”. You must use this name for the actuator when using a YaMoR unit.
Timelines tab
The timelines tab is the heart of Bluemove together with the modules manager. You can
draw trajectories for modules in the timelines
listed there.
Left part
Each module is composed of one or more actuators2 . Sensors can also be part of a module. At
the moment, sensors are displayed but no management is available. The name and the address
of the module is displayed.
Right part
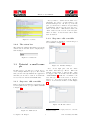
Figure 1.4: Modules Manager
In this right part, you will be able to draw the
trajectories of an actuator. There are two key
1.2.5
types:
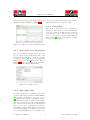
Console tab
The console tab displays the log messages generated by Bluemove. You can set the level of
the output and the refresh rate. There are five
levels of messages:
• Linear key
• Hermite spline key
You can mix these two kind of keys in the same
actuator timeline without any restriction. The
interpolation algorithm will take care of curves
composed of these two types of keys.
• DEBUG: messages useful in order to debug
the application
1.2.4
• WARN: a problem leading to an error occurred
• INFO: information messages
Modules Manager tab
Within the modules manager you can declare
• ERROR: something that should not have
the different parts of your modular robot. You
happened
can describe every module, set its name and
• FATAL: unrecoverable error
address. Each module can have several actuators. These components have a name and a Each level is displayed in a distinct colour with
2 A YaMoR module contains one actuator (a ”S-71”
its specific icon. This allows you to quickly diservo)
agnose what appended in the application.
C. Jaquier - K. Drapel
4
v1.0 - February 14, 2005
Bluemove User Manual
Now you have to describe the modular robot
physically. In order to do this, switch to the
modules manager tab. At the top of the left
part, you should see a small icon representing
a salamander followed by the text ”Project”.
Click on this label. This should enable the
”Add” button at the bottom of the left part.
Click on ”Add”. A new module called ”Module1” is inserted.
1.3.2
Figure 1.5: Console
Step two: edit a module
Click on the label ”Module1”. You should get a
screen similar to Figure 1.8.
1.2.6
The status bar
The status bar displays information about the
current action. It is also used to display important messages.
Figure 1.6: Status bar
1.3
Tutorial: a small example
Figure 1.8: Modules manager
Now, on the right part, edit the ”Module name” field and type ”Head”. Enter the
address corresponding to this module. Here
we suppose that our module has the address
”424952470001”3 . Edit the ”Comment” text
area and type ”This is the head of our modular robot.”. You can now click on the ”Apply”
button. Your window should look like Figure
1.9.
In this section, you will get to know how to
create a simple Bluemove project. We consider
that you have already installed the application
and that you are able to start it. You will also
need to have two functional YaMoR units.
1.3.1
Step one: add a module
First of all, start the Bluemove application. After the splash screen, you get a window similar
to Figure 1.7.
Figure 1.9: Module edition
3 You can also use the inquiry function to found the
available modules.
Figure 1.7: Main screen
C. Jaquier - K. Drapel
5
v1.0 - February 14, 2005
Bluemove User Manual
1.3.3
Step three: add an actuator
A module without an actuator can not move.
The YaMoR units have one actuator named
”Servo1”. Let us add it to our ”Head” module.
Expand the node ”Head” on the left part. Two
nodes should appear: ”Actuators” and ”Sensors”. Click on ”Actuators” and then click on
the ”Add” button. You get a new actuator
called ”Actuator1”. Click on the label ”Actuator1”. You notice that the right part has
changed. Edit the field ”Actuator name” and
type ”Servo1”. This is the servo name of the
YaMoR units. Set a ”Min value” of ”-90” and a
”Max value” of ”90”. Click on ”Apply”. Your
window should be similar to Figure 1.10.
Figure 1.11: Second module
Figure 1.12: Timelines tab
should see the timeline on the right. Enlarge
the timeline a bit by dragging the bottom line.
Select the ”Spline tool” in the tool bar. Draw
the same curve as the one on Figure 1.13. You
Step four: add another mod- surely noticed that spline keys are represented
by a blue round.
ule
Figure 1.10: Actuator edition
1.3.4
You should now be able to add another module without any problems. So restart at step
one and add a new module called ”Tail” with
one actuator named ”Servo1” which range is between ”-90” and ”90”. We suppose that this
module address is ”424952470002”. You should
end with a screen similar to Figure 1.11.
1.3.5
Step five: draw a module
trajectory (spline)
We have finished the physical description of our
modular robot. In order to see our animal moving, we have to draw the trajectory of its actuators. Here you will see the power of this software. Let us move to the ”Timelines tab”. Your
screen should look like Figure 1.12.
Expand the ”Head” module by clicking on the
small blue arrow located close to the label. Do
the same with the actuator ”Servo1”. Now you
C. Jaquier - K. Drapel
Figure 1.13: The first curve with spline keys
1.3.6
Step six: draw a module trajectory (linear)
Repeat the above step for the ”Tail” module.
This time you will use only linear keys. Select
the ”Linear tool” in the tool bar. Linear keys
6
v1.0 - February 14, 2005
Bluemove User Manual
are represented by a green rhombus. You should ”Console” tab and set the debug level to ”ALL”.
end with a window similiar to Figure 1.14.
Retry this step and look at the console.
1.3.9
Conclusion
We briefly looked at the basic operations of
Bluemove. There are a lot of other features that
were not described in this tutorial. However,
you should be able to discover them on your
own. Do not forget to periodically check the
help website [3]. Lots of information on Bluemove are available there.
Figure 1.14: The second curve with linear keys
1.3.7
Step seven: save the project
Before going further, it is high time to save your
project. Click on the menu named ”File” and
select the item ”Save As...”. A file chooser dialog appears. Choose the directory you want and
name your project ”first bluemove.zip” like on
Figure 1.15. You probably noticed that Bluemove projects are simply ZIP archives.
Figure 1.15: Saving a project
1.3.8
Step eight: play
We arrive at the last step of this tutorial. Power
on the modules and program the YaMoR FPGA.
This operation is described at section 7.3.3 of
[6]. Build the modular robot as shown on Figure \ref{fig:step-10}. Click on the ”Play”
button located at the bottom of the timelines
tab. After a few seconds, the modules should
start to move. If so, congratulations, you have
successfully completed this tutorial. If nothing
is moving then maybe your Bluetooth device is
not correctly initialised. You can switch to the
C. Jaquier - K. Drapel
7
v1.0 - February 14, 2005
Bibliography
[1] Bluez. http://www.bluez.org.
[2] Java
bluetooth.
javabluetooth.com.
http://www.
[3] Kévin Drapel and Cyril Jaquier. Using bluetooth to control a yamor modular robot.
http://birg.epfl.ch/page56602.html.
[4] JCP.
Jsr-82.
http://www.jcp.org/
aboutJava/communityprocess/review/
jsr082/.
[5] Sun Microsystems. J2se 5.0. http://java.
sun.com/j2se/1.5.0/download.jsp.
[6] Rico Möckel.
Getting started user
guide. http://birg.epfl.ch/page53075.
html, 2004.
[7] Rococo. http://www.rococosoft.com.
8
Index
Bluetooth
stack, 2
FPGA, 7
Java
J2SE, 2
JAR, 3
JSR-82, 2
log4j, 2
xerces, 2
Rococo, 2
Impronto, 2
license, 3
9