1
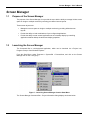
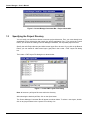
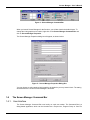
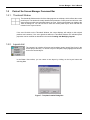
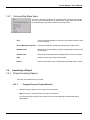
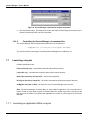
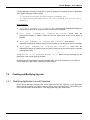
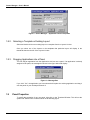
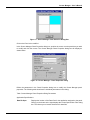
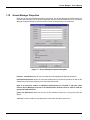
AUG / 02
VERSION 6.1
FOUNDATION
P V I E WS M G M E
smar
web: www.smar.com
Specifications and information are subject to change without notice.
For more recent updates visit the smar website above.
BRAZIL
Smar Equipamentos Ind. Ltda.
Rua Dr. Antonio Furlan Jr., 1028
Sertãozinho SP 14170-480
Tel.: +55 16 645-3599
Fax: +55 16 645-6454
e-mail: [email protected]
ARGENTINA
Smar Argentina
Soldado de La Independencia, 1259
(1429) Capital Federal – Argentina
Telefax: 00 (5411) 4776 -1300 / 3131
e-mail: [email protected]
CHINA
Smar China Corp.
3 Baishiqiao Road, Suite 30233
Beijing 100873, P.R.C.
Tel.: +86 10 6849-8643
Fax: +86-10-6894-0898
e-mail: [email protected]
FRANCE
Smar France S. A. R. L.
42, rue du Pavé des Gardes
F-92370 Chaville
Tel.: +33 1 41 15-0220
Fax: +33 1 41 15-0219
e-mail: [email protected]
GERMANY
Smar GmbH
Rheingaustrasse 9
55545 Bad Kreuznach
Germany
Tel: + 49 671-794680
Fax: + 49 671-7946829
e-mail: [email protected]
MEXICO
Smar México
Cerro de las Campanas #3 desp 119
Col. San Andrés Atenco
Tlalnepantla Edo. Del Méx - C.P. 54040
Tel.: +53 78 46 00 al 02
Fax: +53 78 46 03
e-mail: [email protected]
SINGAPORE
Smar Singapore Pte. Ltd.
315 Outram Road
#06-07, Tan Boon Liat Building
Singapore 169074
Tel.: +65 6324-0182
Fax: +65 6324-0183
e-mail: [email protected]
MIDDLE EAST
Smar Middle East
Al Sadaka Tower, Suite 204
P.O. Box 268
Abu Dhabi
Tel: 9712-6763163 / 6760500
Fax: 9712-6762923
e-mail: [email protected]
USA
Smar International Corporation
6001 Stonington Street, Suite 100
Houston, TX 77040
Tel.: +1 713 849-2021
Fax: +1 713 849-2022
e-mail: [email protected]
Smar Laboratories Corporation
10960 Millridge North, Suite 107
Houston, TX 77070
Tel.: +1 281 807-1501
Fax: +1 281 807-1506
e-mail: [email protected]
Smar Research Corporation
4250 Veterans Memorial Hwy.
Suite 156
Holbrook , NY 11741
Tel: +1-631-737-3111
Fax: +1-631-737-3892
e-mail: [email protected]
Index
Contents
Screen Manager
1.1
1.2
1.3
1.4
Purpose of the Screen Manager .........................................................1
Launching the Screen Manager..........................................................1
Specifying the Project Directory..........................................................2
The Screen Manager Command Bar ..................................................3
1.4.1. User Interface...............................................................................3
1.4.2. Functional Description..................................................................4
1.4.3. Screen Manager Command Bar ..................................................4
1.5
Parts of the Screen Manager Command Bar......................................5
1.5.1. Thumbnail Window.......................................................................5
1.5.2. Layouts List ..................................................................................5
1.5.3. History List....................................................................................6
1.5.4. Applications List ...........................................................................6
1.5.5. Save Layout button ......................................................................6
1.5.6. Logon Button ................................................................................6
1.5.7. Command Bar Menu Items ..........................................................7
1.6
Launching a Project ............................................................................7
1.6.1. Project Launching Options ...........................................................7
1.7
Launching a Layout.............................................................................8
1.7.1. Launching an Application Within a Layout ...................................8
1.8
Creating and Modifying Layouts .........................................................9
1.8.1. Modifying Application Launch Properties .....................................9
1.8.2. Selecting a Template or Existing Layout....................................10
1.8.3. Dragging Applications into a Panel ............................................10
1.9
Panel Properties................................................................................10
1.10
Screen Manager Properties ..............................................................13
III
Screen Manager - User’s Manual
IV
Screen Manager - User’s Manual
Screen Manager
1.1
Purpose of the Screen Manager
The purpose of the Screen Manager is to provide the user with the ability to manage his/her screen
space on single or multiple monitors by selecting pre-defined screen layouts.
These screen layouts can:
1.2
•
Manage the screen space on single or multiple monitors by providing defined screen
layouts.
•
Provide the ability to load combinations of pre-configured applications.
•
Provide the ability to treat several applications as one desktop display by controlling
application window desktop locations and display properties.
Launching the Screen Manager
The Command Bar is a dialog-based application, which can be launched via a Project Icon,
Program Group or from Windows Explorer.
From the Start Menu, select Programs > System302 > ProcessView, and click on the Screen
Manager icon on the Tools group.
Figure 1 - Launching Screen Manager from the Start Menu
The Screen Manager Command Bar – Project Information dialog displays as shown below:
1
Screen Manager - User’s Manual
Figure 2 - Screen Manager Command Bar - Project Information
1.3
Specifying the Project Directory
You can easily use the Browse button to traverse project directories. First, you must already have
established Project directories that contain the project application files. If you press the Cancel
button, you will abort the loading of Screen Manager. Otherwise, the requested project will load.
Specify the valid Project directory and initial screen layout file to be used. If you click on the Browse
button, you can search for valid screen layout (.pwf) files in the Locate > PWF Layout File dialog
box.
The Locate > PWF Layout File dialog box is shown below:
Figure 3 - Locate PWF Layout Files Dialog
Note: At least one .pwf layout file must exist in the directory.
After selecting the desired .pwf files, click on the Open button.
The Screen Manager Command Bar will appear as shown below. To select a new layout, doubleclick on any layout shown in the Layouts List or History List.
2
Screen Manager - User’s Manual
Figure 4 - Screen Manager Command Bar
When you launch Screen Manager for the first time, you will also launch the default layout. To
change the initial graphics to be loaded, right-click on the Screen Manager Command Bar and
click on Screen Manager Properties.
The Screen Manager Properties dialog box will appear, as shown below:
Figure 5 – Screen Manager Properties Dialog Box
You may choose to select another initial graphic to be loaded or you may leave it blank. The setting
will take effect the next time Screen Manager is launched.
1.4
The Screen Manager Command Bar
1.4.1. User Interface
The Screen Manager Command Bar runs locally on each user station. The Command Bar is a
dialog-based application, which can be launched via a Project icon, Program Group or from File
3
Screen Manager - User’s Manual
Explorer. Optionally, Screen Manager can be launched via command line by another application or
VB script.
1.4.2. Functional Description
The Screen Manager Command Bar shown in the following figure allows the user to interact with the
desktop layout. It provides the ability to treat several applications as one desktop display. The
combination of the Configuration and Runtime portions of the screen manager provides the
functional support for:
•
Controlling application window desktop location.
•
Window style properties.
•
Window launch properties.
•
Changing displays.
•
Providing automatically changing screen with slideshow feature
•
Providing access to available application.
•
Providing security for user actions.
Figure 6 - Screen Manager Command Bar
1.4.3. Screen Manager Command Bar
Only one Screen Manager Command Bar can be run on a station at a time. The conventional
command bar view uses list-control boxes to access Layouts, Applications and History files. The
command bar can either float within the primary display or can be “docked” to an edge of the
primary display.
An alternative view of Screen Manager Command Bar is called the Button View. You can open it by
selecting the Button View option on the Screen Manager Properties dialog box. The Button View
uses buttons to launch pop-up list dialog boxes.
4
Screen Manager - User’s Manual
1.5
Parts of the Screen Manager Command Bar
1.5.1. Thumbnail Window
The thumbnail Window at the left of the dialog appears as a bitmap, which reflects the current
panel layout. The thumbnail visually identifies the placement of each panel and will color code
empty panels as white and populated panels as cyan. Clicking the diskette icon displays the
Save As dialog box. You can use this to save the current panel layout, which will then be
included in the Layouts list box.
If the user left-clicks on the Thumbnail Window, the current displays will realign to their original
positions and contents. If the user right-clicks within the Thumbnail Window, the individual panel
properties can be modified as described in the section Creating and Modifying Layouts.
1.5.2. Layouts List
The Layouts List includes all layouts and template (empty layout) files found in the
current project directory. To launch a layout or template, simply highlight and doubleclick on the desired layout.
In the Button View toolbar, you can create a new layout by clicking on the Layout button and
selecting New.
Figure 7 - Template Creation Dialog Box
5
Screen Manager - User’s Manual
1.5.3. History List
The History List control box maintains a list of previously viewed layouts using the
large icon of the layout. Every time a user launches a configured layout or template, it
is added to this History List. Double-click to launch the Layouts from within this list.
1.5.4. Applications List
Every project directory defines a certain collection of available application files such
as GraphWorX, TrendWorX or Excel, which the user can drag and drop into available
panels. The Applications List control box provides the mechanism to browse the
available files.
To select a data file, double-click on the application icon. This will update the list box with all data
files associated with the application. The user can modify the Application Launch properties by rightclicking on the Application icon which will display the Application Launch Properties dialog box
described in the section Creating and Modifying Layouts.
Once in Select Panel mode (achieved by right-clicking on the Thumbnail Window on the Command
Bar), the user can modify the panel properties using the Panel Properties dialog box (displayed by a
left-click on the panel to be modified) discussed in the Creating and Modifying Layouts section of
this help file.
1.5.5. Save Layout button
The current desktop layout or template can be saved at any time as a new layout .pwf file by
clicking the diskette at the bottom of the Layouts List box. Templates should be marked read-only
so that they cannot be overwritten.
1.5.6. Logon Button
The Logon button is used to launch the ProcessView Security Server and allows the user to log in.
Upon logging in, the user’s actions are limited to those configured in the Security Server. The
Security Configurator allows for a user-specific default language and/or Screen Manager layout to
be loaded when you log in.
Select the Preferences button while configuring a Users Properties within Security Configurator or
select User – Preferences within the Security Login application.
Please refer to the “Security Configurator” documentation for further details.
6
Screen Manager - User’s Manual
1.5.7. Command Bar Menu Items
The Screen Manager Commands is accessible using a pop-up menu. Rightclicking on the Command Bar or by right-clicking on the Command Bar title
bar and selecting “Commands” launches the pop-up menu.
1.6
Exit
Forces the Screen Manager to close the current layout and then close
the current project.
Screen Manager Properties
Launches configuration dialog that maintains the ProjInfo.ini file.
Minimize View
Minimizes the Command Bar as well as all applications running in the
current layout.
Restore View
Restores the Command Bar and all applications in the current layout.
Help
Launches online help for the Command Bar.
Cancel
Returns control back to the Command Bar and closes pop-up menus.
Launching a Project
1.6.1. Project Launching Options
There are two methods that can be used:
1.6.1.1.
Program Group or Project Shortcut
1. Specify the project directory to be used in the box provided.
Note: At least one .pwf layout file must exist in the directory.
You may specify the layout file to be launched in the Screen Manager Command Bar dialog
shown below:
7
Screen Manager - User’s Manual
Figure 8 - Screen Manager Command bar Project Information
2. Click the Browse button. This displays the Locate .pwf Layout Files dialog box that allows you to
choose the initial layout file to be used as default.
1.6.1.2.
Controlling the Screen Manager via command line
The Screen Manager can be launched and controlled via a command line:
ScrMgrBar.exe [“C:\Project files\Layout One.PWF”]
This may be useful for launching or controlling Screen Manager from a VB script, etc.
1.7
Launching a Layout
Possible specifications are:
Project directory only – command bar will load with specified directory.
Layout file only – command bar will launch with previous project directory.
Both project directory and layout file – will launch as specified.
No project directory or layout file – will launch command bar with previous project directory.
ScrMgrBar.exe [/Quit or /Exit] - will close the current Screen Manager layout and exit.
Note: The Screen Manager Command Bar is a single instance application. If the command line is
used to launch a layout while a layout is already loaded the original layout will be closed and the
new layout will be loaded. This allows other applications or scripts to control layouts of the Screen
Manager.
1.7.1. Launching an Application Within a Layout
8
Screen Manager - User’s Manual
If Screen Manager is already running with a Layout or Template, it is possible to load an application
within a panel using the following syntax:
“c:\Program Files\Smar\ProcessView\bin\ScrMgrBar.exe”
“c:\application_path\application_file.ext[,command_line_switch[,Panel_
Number]]”
Some examples:
1) (full path) ScrMgrBar.exe "Display2.gdf" would load the GraphWorx32 display (in
configuration mode) into the last panel of the current layout or template.
2) (full
path)
ScrMgrBar.exe
"Display2.gdf,-runtime" would load the
GraphWorx32 display (in runtime mode) into the first empty panel of the current layout or
template.
3) (full path) ScrMgrBar.exe "Display2.gdf,-runtime,1" would load the
GraphWorx32 display (in runtime mode) into panel number one of the current layout or template.
4) (full path) ScrMgrBar.exe "Display2.gdf,-runtime,1,1" would load the
GraphWorx32 display (in runtime mode) into panel number one of the current layout or template
at the highest priority.
ScrMgrBar.exe "c:\my documents\Message.txt,,3" would load the message file into
panel three of the current layout or template.
No spaces should exist between comma separated fields. Also, if no command line is provided, a
comma separator is still require if specifying a panel number.
1.8
Creating and Modifying Layouts
1.8.1. Modifying Application Launch Properties
On the Screen Manager Command Bar, in the Applications List box, right-click on the application
whose Launch Properties you wish to modify by clicking on the commands menu. This launches you
to the command items as shown before. This displays the dialog box shown below:
9
Screen Manager - User’s Manual
Figure 9 - Screen Manager – Application Launch Properties
1.8.2. Selecting a Template or Existing Layout
Select and double-click on an existing layout or a template from the Layouts List box.
Once you select one of the layouts or the templates that particular layout will display in the
thumbnail sketch to the left of the Layouts List box.
1.8.3. Dragging Applications into a Panel
You can drag an application from the Applications List box onto a panel. If an application is already
assigned to the panel, the message box shown in the figure below will display.
Figure 10 - Message Box
If you click “Yes”, the application you have selected will replace the existing application and drag it
onto the panel on your desktop and launch it.
1.9
Panel Properties
To modify the properties of any one panel, right-click on the Thumbnail Window. This will set the
system into “Select Panel” mode as shown in the following figure:
10
Screen Manager - User’s Manual
Figure 11 - Screen Manager Panel Selection Dialog Box
Click on the Panel to be modified.
In the Screen Manager Panel Properties dialog box, position the cursor over the panel that you wish
to modify and click the mouse. The Screen Manager Panel Properties dialog box will display as
shown below:
Figure 12 - Screen Manager – Panel Properties dialog
Define the parameters in the Panel Properties dialog box to modify the Screen Manager panel
properties. The following table describes the individual parameters in this dialog:
Table: Screen Manager Panel Properties Dialog Parameters
Application Specifications
Data file Spec
Displays the location of the Data files for the application assigned to the panel.
Clicking on the button at the right displays the Locate Specification Files dialog
box. This allows you to browse directories for data files.
11
Screen Manager - User’s Manual
Command Line
Application Information being passed.
Default Directory
Displays the default directory for the application assigned to the panel. Clicking
the button at the right lets you browse several directories to set a default
directory.
Test
Pressing this button tests the newly modified panel layout before you click OK.
Window Specifications
Panel No.
Displays the Panel No. for the panel selected.
Panel Priority
Displays the Panel priority for the panel selected.
Enable Custom
Window Styles
Check this box to enable the Custom Window Styles section of the dialog box.
Title Bar
Check this box to display the Title Bar.
System Menu
Check this box to view the system menu for the application assigned to this
panel.
Minimize
Capability
Check this box to enable the minimizing feature for the application assigned to
this panel.
Maximize
Capability
Check this box to enable the maximizing feature for the application assigned to
this panel.
Sizable Window
Check this box to enable the resizing feature for the window.
Always on Top
Check this box to always display the window on top. That is, the window for
the application assigned to this panel cannot be overlaid.
Transparent if
Empty
If there is an empty panel, select whether to show placeholder application or
leave empty.
Disable User
Input
Check this box to prevent the user from entering any input.
Top
Enter a number to reposition and move the window for the application
assigned to the panel selected.
Left
Enter a number to reposition and move the window for the application
assigned to the panel selected.
Right
Enter a number to reposition and move the window for the application
assigned to the panel selected.
Bottom
Enter a number to reposition and move the window for the application
assigned to the panel selected.
When you have set all the properties for this application window, click the OK button.
12
Screen Manager - User’s Manual
1.10
Screen Manager Properties
Right-click on the Command Bar and select Commands. The Screen Manager Properties dialog box
sets the allow directory path to different application and files and sub-directories. Also, the Screen
Manager Properties dialog box determines the runtime functionality of the command bar.
Figure 13 – Screen Manager Properties Dialog Box
Include1 - Include100 allows the user to browse and add supplemental data file directories.
Include Sub Directories check box forces the subdirectories of all include directories as well as the
subdirectory of the project directory to be searched for data files.
Note: If an excessive number of additional subdirectories are included, it may take some
time for Screen Manager to launch as all subdirectories must be search in order to build the
appropriate application file.
Ignore File Extensions allows the user list all file extensions which are to be ignored from this
project.
Tool Tips is used to enable tool tip description of the button that the cursor is over.
13
Screen Manager - User’s Manual
Labels is used to enable the label under each button. This does not control display of the current
user logged into the Security Server, which is always present.
Lock Command Bar Position locks the command bar to its current “snap-to” state. This prevents
users from dragging the command bar from a docked or floating position to another position.
Button View is used to enable or disable Button View.
Auto Hide is enabled to allow a docked command bar to be hidden similar to the way that the
Windows Task Bar may be hidden.
Always On Top issues the “always on top” window style to the command bar so that nothing can
appear on top of it.
Default Layout when no one is logged in specifies the .pwf layout file to be loaded when no one
is logged into the Security Server.
Slide Show is used to enable specifies the .pwf layout file to be loaded when no one is logged into
the Security Server.
14