1
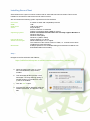
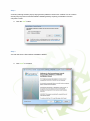
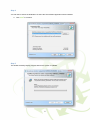
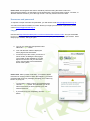
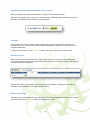
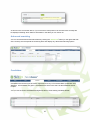
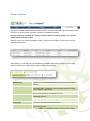
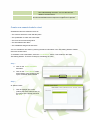
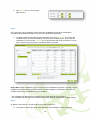
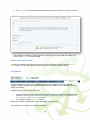
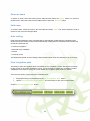
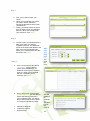
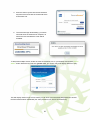
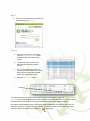
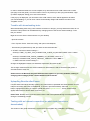
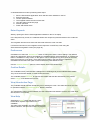
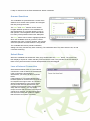
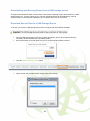
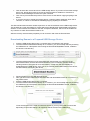
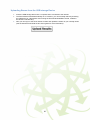
SecureAssess/Secure Client
Functional Skills User Guide for IMI Awards Centres
V9 January 14
Table of Contents
Disclaimer
2
About this Guide
3
Technical Problems
3
Installing SecureClient
4
Using SecureAssess
7
Log In
8
Log Out
9
Searching (basic and advanced)
9
Candidates
10
Exam Schedules
11
Create new exam /schedule a test
12
Invigilation
15
Set PIN/Activate without PIN
17
Pause an Exam
18
Voiding Exams
18
Print Invigilation Pack
18
Results
20
Reporting
21
Taking Exams (Using Secure Client)
22
Testing without/with an Internet Connection
22
Instructions for Candidates taking the Exams (using internet or downloaded test)
25
Downloading and Running exams from a USB storage device
28
1
Help and Support
31
Disclaimer
Whilst every effort has been made to ensure that the information and content within this user manual
is accurate, up-to-date and reliable, the information provided is on an “as is” basis. Skillsfirst shall
have neither liability nor responsibility to any person or entity with respect to any loss or damages
arising from the information contained in this manual or from the use of the software accompanying it.
The layout and functionality of the screens in this manual will be consistent with your system.
2
About this guide
This guide will give you the information you need to schedule, deliver and invigilate Skillsfirst Key and
Functional Skills exams. There are two main parts to the process; installing the SecureClient testing
software and navigating the Secure Assess system to manage the exam process.
We advise that you familiarise yourself with the information in the guide before installing the
SecureClient software.
Technical problems
Should you encounter any problems with any aspect of your installation or with using SecureAssess,
please contact Skillsfirst via [email protected] or 0121 270 5100.
3
Installing SecureClient
SecureClient is the system on which a learner sits an exam that has been scheduled. This must be
installed on all machines that will be used for learner exams.
We recommend the following system requirements for SecureClient
Processor
RAM
HDD Space
Video
Operating system
Internet Browser
Adobe Flash Player
Bandwidth
2.33GHz or faster x86-compatible processor
1GB
1GB of free space
Single display
Screen resolution of 1024x768
Graphics card with at least 128MB of memory
Please note that SecureClient does not currently support Windows 8
Windows XP (SP3)
Windows Vista (32bit)
Windows 7 (32bit or 64bit)
Internet Explorer 7 or above
Adobe Flash Player 10.1 or higher
This needs to be the ActiveX version of Flash, i.e. it needs to have been
installed from Internet Explorer.
512Kbps (based on one candidate taking an assessment of 2MB in size
downloaded within 30 seconds).
Step 1
Navigate to the SecureClient web address:
https://skillsfirst.btlsurpass.co.uk/secureassess/secureclient_installer.htm
a. When the page loads, click on: ‘Click
here to download the SecureClient
Installer’
b. This download will then present a ‘File
Download – Security Warning’ dialog. It
will ask whether you would like to ‘Run’
or ‘Save’ the installer:
c.
Click the ‘Run’ button.
d. Progress bars will be displayed whilst the
installer downloads. The file size is 20.4
MB.
4
Step 2
A security warning will then pop up saying that the publisher could not be verified. This is a routine
security step to prevent unwanted software installing itself by requiring confirmation from the
computer’s owner:
a. Click the ‘Run’ button.
Step 3
You will now see the SecureClient Installation Wizard.
a. Click ‘Next’ to continue.
5
Step 4
You will now be shown the destination of where the SecureClient application will be installed:
a. Click ‘Next’ to continue.
Step 5
The wizard will briefly display progress bars as the system is updated.
6
Step 7
A final screen confirms that the installation is completed.
a. Click ‘Finish’ to close the wizard.
Step 8
You should now see the following icon on the desktop of your PC or laptop:
Using SecureAssess
You will use SecureAssess to schedule and manage exams, print invigilation packs and access
results for onscreen Key and Functional Skills tests. This section of the guide will help you to
understand and use SecureAssess.
Essentials
This chapter introduces the aspects of the system to which all levels of user have access. Read this
chapter for information and guidance on:
• Login, user name and passwords
• Basic and advanced searching
• Scheduling tests
• Invigilation
Login requirements
SecureAssess supports the following web browsers:
•
•
•
Internet Explorer 7, 8 or 9
Mozilla Firefox 3, 4, or 6
Google Chrome
You will also need to have Flash Player - Version 10 (or above) installed on your computer. Most
computers will already have this. The system will warn you if you try to log on without the Flash
Player.
To download the Flash Player, go to:
www.adobe.com/go/getflashplayer
Follow the instructions within their website.
7
Please note: All navigation and actions should be performed using the buttons within the
SecureAssess interface, not the buttons of the web browser. Using the browser’s ‘Back’, ‘Forward’, or
‘Refresh’ buttons will return you to the login screen. This may result in the loss of data.
Username and password
To request a unique username and password, you will need to email [email protected] .
You will receive this information via e-mail. Should you forget your username or password, please
contact [email protected] .
Log in
Use this link https://skillsfirst.btlsurpass.co.uk/secureassess/SecureAssess.html and you will be able
to type in your login details. If the new window does not open, you may have pop-ups blocked. Allow
the pop-up to access, and log in again.
a. Type in your username and password and
select the ‘Login’ button.
b. Your web browser will then display the
home page for SecureAssess.
c.
Across the top of the screen you will see a
series of tabs, including the home page.
The number of tabs available to you will
depend on the user role you have been
given. Use the tabs to access different
areas of the system.
Please note: After a period of inactivity, your session will be
timed-out for security reasons. When this happens, you will be
presented with a security message prompting you to either log
back in or to log out:
•
To log back in, simply re-enter your password and
click the ‘Log In’ button. This will return you to the
same screen that you were in before your user
session timed out.
•
If you wish to log out completely, click the ‘Log Out’
button.
8
Guidance on the SecureAssess environment
Below you will find some general information on using the SecureAssess system.
When you are logged into the system, your username will be displayed with a padlock icon next to it
at the top of the SecureAssess interface, as shown below.
Log out
You should log out from the SecureAssess system when you’ve completed your activities. This
ensures that no one else can use the system without authorisation, should you need to leave your
computer unattended.
To log out of the system, click the ‘Log Out’ button next to your username, as shown above.
Screen layout
Most screens in SecureAssess follow the same format. There is a main area in the middle of the
screen that contains existing data; beneath the table of data will be a number of buttons that allow you
to perform actions on that screen.
Screens with a table of data will also have search options and filters, enabling you to control the
information that is displayed in the table, as shown below
Basic searching
The basic search is available when you first load a screen and comprises a text entry box for entering
your search terms and a ‘Submit’ button for executing the search:
9
As shown in the screenshot above, if you hover the mouse pointer over the search box a tooltip will
be displayed showing which fields of information in the table you can search on.
Advanced searching
You can access the advanced search filters by clicking the ‘Advanced’ button (on the right hand side
of the screen); this will expand the searching area and display any advanced searching options.
Candidates
Candidates are learners who have been registered for a Key or Functional Skills qualification with
Skillsfirst. All candidates are given a ‘Candidate Ref’ which is the same as their Skillsfirst learner
number.
You can use the Centre Candidate Management table to view existing candidate details..
10
Exam schedules
The ‘Exam Schedules’ table lists all the exams that are currently scheduled. It gives information about
the exam, such as its name, start date, number of candidates and status.
Use this section to schedule new exams or edit the details of existing exams. You can also
delete exams from this section.
Below is a view of the ‘Exam Schedules’ screen. The type of information you are likely to see are
explained underneath.
Alternatively, you can select to view the table by candidate, rather than by session; use the radio
buttons at the bottom of the screen to switch between the two views.
Centre
Qualification
Exam
Start Date
End Date
Number of Candidates
Date Created
Created By
Status
The centre which registered the learner for the examination
The Key or Functional Skills qualification which this examination
leads to.
The Exam which is to be sat at this scheduled time. With Key and
Functional Skills, candidates will receive different exam content
when sitting the same exam.
The first day on which the exam has been scheduled to take
place, as set during the scheduling process.
The last day on which the exam can take place, as set during the
scheduling process.
The number of candidates currently scheduled to take this exam.
The date on which the schedule was created.
The centre user who scheduled the exam.
The current status of the exam. Scheduled exams will show up
here as being either:
• Editable – Candidates’ details and times can be edited.
11
•
Invigilated
Locked – Exam cannot be edited since a candidate may
have started taking the exam. You can still view the
details of a locked exam.
This status will show that the exam is to be invigilated, as all Key
and Functional Skills exams require an invigilator to be present.
Create new exam/schedule a test
Scheduled exams are defined in terms of:
• The centre at which the exam will take place
• The qualification to which the exam leads
• The name of the exam being taken
• The associated exam dates
• The candidates assigned to that exam
You can schedule a new exam by entering the above information in the ‘Scheduling Wizard’. Details
of this are shown below.
To schedule a new examination, select the ‘Create Exam’ button. This will launch the exam
‘Scheduling Wizard’. There are six steps to scheduling an exam:
Step 1
a. Click on the ‘Exam Schedules’
tab button.
b. Click on the ‘Create Exam’ button
at the bottom of this screen to pop
up the ‘Schedule Exam Wizard’.
Step 2
At ‘Select Centre’:
a.
Click to highlight your centre
(making the ‘Next’ button active, at
the bottom of the popup) and click
on ‘Next’.
12
Step 3
At ‘Select Qualification and Exam’:
a.
b.
Click to highlight a Qualification (making the Exams list active), highlight an Exam and then click
‘Next’.
You can search for qualifications by typing directly into the ‘Select qualification’ text field. The
options will vary as you type.
Step 4
In the next step of the scheduling wizard, you can set the date and time for the examination. You can
input one date, or extend the range to give you more flexibility around test dates.
a. To schedule the date on which
you’d like the exam to be taken,
select the calendar icon next to the
‘Start Date’ field and choose the
appropriate date on the calendar.
b. If you’d like to schedule the exam so
that it can be taken across a longer
period of time, select the ‘Multiple
Day Exam’ tick box. This will reveal
an ‘end date’ field option.
For Key and Functional Skills exams
we would recommend that you set a
multiple day sitting. This will give
you more flexibility and will reduce
the likelihood of having to reschedule tests. You can schedule
tests up to 6 weeks in advance
c.
You may wish to set the times
during which the exam can be taken
in the ‘Start time’ and ‘End Time’
fields. However, we would
recommend that you do not adjust
this from the default setting, as this
allows you to test at anytime during
the day.
13
d. Click ‘Next’ once you have set the
date and time.
Step 5
In the next step of the scheduling wizard, select the candidates that will sit the examination.
The table lists candidates that have a Key and Functional Skills registration.
a. To add an individual candidate to the examination list, tick the ‘Selected’ box next to the
candidate name. The list of candidates may extend over multiple pages. To find specific
candidates, you can use the ‘Search’ box on the left hand side of the screenshot. You are
able to search by learner name or candidate reference number.
Please Note: Some candidates may be greyed-out and unavailable for selection. Hovering over the
candidate will reveal a tooltip which will explain why that candidate is unavailable. There are two
possible reasons why a candidate may be unavailable:
• The candidate has already been scheduled for the exam and has not yet taken it.
• The candidate has taken all of the available test versions (please note that this is highly unlikely).
Step 6
At ‘Delivery’ and ‘Review’ you will simply need to select ‘Finish’ as:
a. The option to ‘Deliver the same exam questions to all candidates’ will be greyed out.
14
b. The ‘online’ box should remain ticked whether testing with or without an internet connection.
The wizard will now display a review summary. Providing you are happy with the details of the
exams, select ‘Finish’ to exit the wizard.
Delete scheduled exam
To delete a scheduled exam, select the exam from ‘Exam Schedules’ screen. Select the ‘Delete
Exam’ button. You will not be able to perform this action if the exam’s status is ‘locked’.
Invigilation
Use the ‘Invigilation’ screen to give candidates access to set Invigilation PIN codes and print
invigilation packs. This screen is automatically refreshed every fifteen seconds, providing there is a
change to the data.
Invigilated exams can be activated by either:
•
•
A PIN code being set which will be entered by the invigilator to enable the candidate to start
the exam. We would recommend that you always set PIN codes when scheduling tests, as
this will save you time on the day of the test.
An invigilator using the ‘Activate’ button
Both options require the candidate to enter their unique exam Keycode.
The ‘Invigilate’ screen shows the following information:
15
Exam State
Each exam will be in one of the following
states:
• Locked:
Exam content is being prepared: the exam
cannot be started. This process should only
take a few moments.
• Locked for Invigilator:
The candidate has entered their keycode and
is waiting for the Invigilator to activate an
exam.
• Locked by PIN:
The exam cannot be started until the
invigilators four digit pin has been entered.
Note: the candidate must still first enter their
keycode.
• Ready:
The exam is ready to be taken by the
candidate.
• In Progress:
The exam is currently being taken by the
candidate.
• Paused:
The exam has been paused by the invigilator.
• Awaiting Upload:
The exam has been downloaded in advance,
sat using the SecureClient and is finished but
not yet uploaded back to SecureAssess
Central.
• Finished:
The candidate has finished taking the exam.
• Finished/voided:
The candidate has finished taking the exam
and the exam has been voided by a member
of staff.
• Voided:
The exam has been voided by a member of
staff.
• Ready for download:
The exam can be downloaded to the Local
server. A Local Administrator will be needed
for this.
• Downloaded to Local:
The exam has been downloaded to
SecureAssess Local.
• Downloaded to SecureClient:
The exam has been downloaded to the
SecureClient.
A four-digit pin number that must be entered to
enable a candidate to start the exam.
The Examination which is to be sat at this
scheduled time.
The candidate’s personal keycode. This
uniquely identifies the candidate and the exam
they are to take.
The centre which registered the learner for the
examination
The name of the qualification with which this
exam content is associated.
Earliest date on which the exam is scheduled
PIN
Exam Name
Keycode
Centre Name
Qualification
Start Date
16
End Date
Start Time
End Date
Candidate
Candidate Ref.
Invigilated
Duration
to start.
Latest date on which the exam is scheduled to
start.
Earliest time at which the exam is scheduled
to start.
Latest time at which the exam is scheduled to
start.
Name of the candidate taking the exam.
Candidate Reference Number - uniquely
identifies the candidate (this is the same as
the Skillsfirst learner number).
All Key and Functional Skills exams must be
invigilated.
This states the standard duration (in minutes)
of the exam. If the exam has been set to
‘Untimed’, this will be stated in the column
instead.
Set PIN
As previously stated, we would recommend setting a pin code for all exams. To set a PIN code, select
the exam name from the table so that it is highlighted. To set a PIN for more than one exam, hold
down the ‘Ctrl’ key whilst selecting the exams. Select the ‘Set PIN’ button at the bottom of the page. A
dialogue box will appear with an automatically generated PIN. You can then click the ‘Close’ button to
return to the Invigilation screen.
The new PIN will now appear in the ‘PIN’ column of the ‘Invigilate’ table.
Activate exam without PIN
If you forget to set a PIN, it is still possible to activate an exam after the candidate has entered their
Keycode. In the Invigilation tab within SecureAssess, select the exam from the table so that it is
highlighted and click on the ‘Activate’ button. You will then need to return to SecureClient and enter
the candidate’s Keycode again. Please note that this is only available if the candidate is sitting the
exam online.
17
Pause an exam
To pause an exam, select the exam from the table and then select the ‘Pause’ button. To resume a
paused exam, select the exam from the table and then select the ‘Resume’ button.
Void exam
To void an exam, select the exam in the main table and select ‘Void’. You will be required to enter a
reason for the void in the field provided.
Auto voiding
Exams that are started but never submitted will be automatically voided after the scheduled exam
window has closed. Exams which will be automatically voided (after the scheduled exam window has
closed) are those that are:
• Locked for invigilation
• Delivered to the candidate
• Paused
• Locked by a PIN
The default time period for auto voiding in SecureAssess (both Local and Central) is set to 12 hours.
Print invigilation pack
The facility to print an invigilation pack is available on the ‘Invigilation’ screen. Although it is possible
to also do this on the ‘Exam Schedules’ screen, you should bear in mind that if you add any further
candidates to the exam or change any other details, the invigilation pack will be out of date.
There are two options when printing an invigilation pack:
•
•
Select the exam(s) required and click the ‘Print Invigilation Pack’ button
Use the ‘Print Invigilation Pack Wizard’. The instructions for this can be found below.
Click the ‘Print Invigilation Pack’ button.
18
Step 1
a. First, you’ll need to select your
centre.
b. When you’ve selected your centre,
you’ll then need to select the
relevant qualification that the exam
contributes to.
c. Finally, you should select the exam
that you want to print an invigilation
pack for. When you’re happy with
your selections, click ‘Next’.
Step 2
a. On this screen you should select the
date of the exam you want an
invigilation pack for. The start date
shown in the wizard will default to the
date of the next scheduled exam.
When you’re satisfied with your date
and times, click ‘Next’.
Step 3
a. On the next screen of the wizard,
‘Candidate’, you’ll be able to
select which candidate(s) you
would like to print your invigilation
pack for. When you’re satisfied
with the candidates you’ve
selected, click ‘Next’.
b. On the final screen of the wizard,
‘Output Options’, you’ll be able to
select what will be produced in
your invigilation pack. You will be
able to tick/un-tick the three boxes
to configure what will be printed:
•
•
•
Attendance Register
Invigilation Reports
Keycode Slips
Atte
nda
nce
Reg
iste
r–
The
regis
ter
cont
ains the
details of
all
candidat
es
schedule
d to sit
the
exam at
19
the specified time. Use this to indicate that candidates were present and verify that all candidates
completed the exam under the proper conditions.
Supervision Report – This form allows the invigilator to confirm that the exam was carried out
according to awarding organisation regulations. It also allows the invigilator to report and detail any
disturbances that occurred during the exam.
Keycode Slip – Contains exam information and individual candidate details, including the
candidates’ unique exam Keycodes. Each candidate should be given their Keycode slip to commence
the exam.
Once you’re happy with your selections, click ‘Finish’ to print the pack.
What to do in the event of computer/system crashing
In the event of a candidate’s computer crashing or a hardware failure, the candidate can move to
another computer and enter their Keycode to resume the examination (if possible). They will resume
from the last question they were attempting and all their responses up to that point will be saved. This
includes any questions the candidate had flagged to revisit.
Please note that this functionality is only available when sitting tests online.
If an examination freezes or if you encounter problems you are unable to resolve, contact your
organisation’s support team or Skillsfirst at [email protected] or on 0121 270 5100.
Results
Use the ‘Results’ screen to view the candidates’ exam results and the percentage gained in each
exam, inspect the details of the exam and study statistical information regarding the question items.
The table shows the standard exam information: Qualification, Exam Name, Exam Version Code,
First Name, Surname and Candidate Ref.
The table also includes:
Duration
Current Result
Percentage
Centre Name
Standard time allocated for the exam plus any
additional minutes allocated to the candidate.
For example, 60 + 15 (where 60 is the standard
time allowance) – please refer to Skillsfirst
reasonable adjustments and special
considerations policies.
Result achieved by the candidate, based on the
original pass mark. Includes ‘Pass’, ‘Fail’ and
‘Close’. ‘Close’ exams are currently ‘Fails’
where the results are within a few percentage
of a Pass.
Percentage mark achieved by this candidate.
The centre which registered the learner for the
examination
20
Centre Number
Completed
The centre number of the centre which
registered the learner for the examination
Date on which the exam was completed.
The table may continue over several pages. Access the subsequent pages by using the back and
forward buttons in the bottom left-hand corner of the screen.
Search
As before, you can filter the information on the screen by using the search options. Search by a basic
mode to return exams from specific candidates, or by advanced mode to return exams of one resulttype.
Refresh
The information in the Results Release table is updated regularly. Select ‘Refresh’ to ensure that the
information you are viewing is up-to-date.
Print
Use the print button to print the details of the exams, currently on view in the table.
Candidate Reports
To print a single candidate report, select a candidate then click the ‘Candidate Report’ button. This
will open an exam reports pop-up window containing all of the information available for that exam (the
Results Summary, Results Breakdown and Result Report).
Alternatively, double clicking a candidate will open up the same exam reports pop-up.
From here you can click the ‘Print’ button to print off the three items.
Please Note: if the exam has been voided, the candidate’s percentage will be left blank on their
report.
Reports: Exam breakdown and Candidate breakdown
The ‘Exam breakdown’ and ‘Candidate breakdown’ options can be used to look at results
information for multiple exams or candidates.
To select a number of candidates, hold down the ‘ctrl’ key on your PC or laptop and select the
candidates whose results you wish to include in your report. Then select either the Candidate
Breakdown or Exam Breakdown options at the bottom of the screen.
21
Taking Exams
It is extremely important to ensure Functional Skills exams are uploaded to Skillsfirst on the
day they are taken by the learner. This ensures that the exam is flagged to be marked. If exams
are not uploaded within the window, they will be marked during the next window, causing a
significant delay to the learner receiving their results.
This section covers the process of running exams, both with and without an internet connection.
Testing without an Internet Connection
You are able to download a candidate’s exam to a local machine (or a laptop for example) in advance
of the exam being taken. This includes all question items and summary screens.
Once exams have been downloaded to a machine, you can disconnect it from the internet and have
candidates sit downloaded exams on that machine, without an internet connection. Once exams have
been completed, the invigilator can upload the exams back to SecureAssess Central once an internet
connection is present again by opening SecureClient, clicking the ‘show admin’ button, logging in and
selecting the ‘Upload Results’ button .
Please note: In order to access these features for SecureClient Advance Caching, you’ll need to
have ‘Invigilate’ and ‘SecureClient Admin Console’ permissions.
Testing with a live internet connection
When testing with a live internet connection, please be advised that exams aren’t always sent back to
the main server automatically after the exam has been completed. Ensure you have a strong Wi-Fi
connection and select the ‘show admin’ tab in SecureClient. If you see any exams in this window,
select the exam and then select the ‘upload results’ button. Please be advised that we always
recommend checking the ‘Show admin’ tab after exams have been completed, to ensure no exams
are waiting to be uploaded back to the main server.
Downloading Exams
Please note, to download exams onto your laptop you will need to have an internet connection.
To download a single exam, firstly double click the SecureClient icon on your desktop.
Step 1
22
a. Enter the exam keycode into the SecureClient
keycode screen and click the ‘Download exam
to take later’ link.
b. The exam will begin downloading; you will be
informed when the download is complete, as
well as the time and date the exam will be
available.
To download multiple exams, double click the SecureClient icon on your desktop and click the ‘Show
Admin’ button below the Keycode box (please note: your screen may look slightly different to this).
This will display another login screen where you can enter your username and password to access
the SecureClient Admin dashboard (the same password you use for SecureAssess).
23
Step 1
a. Enter your SecureAssess username and
password and click ‘Log In’.
Step 2
a. Once you’ve logged in you should
click the ‘Download Exams’ button,
located towards the bottom of the
screen.
b. You will then have access to the
SecureAssess Central Invigilate
screen.
c.
You can now select the exams you
need to download. Select one or more
exams from the table (the selected
exams are highlighted in blue).
d. Click the ‘Download’ button.
You will be shown a pop-up when the download of the exams begins. If you click ‘Close Download
Window’, the pop-up will disappear and the ‘Invigilate’ window will also close, so you can view the
download status of the exams in the SecureClient dashboard, which will be displayed.
In the table of downloading exams on the SecureClient dashboard, the status for each one will
indicate if each exam is downloading or is ready. The exams should only take a few seconds to
download. When downloaded successfully a
will appear.
24
In order to download exams to a local computer, they will need to have a PIN number set on them
(see page 18 of this guide). If no PIN number is set on any exams you are trying to download, a popup will be displayed, asking you to set a PIN number.
If this pop-up is displayed, you can either enter a PIN number, which will be applied to all exams
you’re downloading, or you can click ‘Cancel’ and manually assign PIN numbers to exams in the
‘Invigilate’ screen.
Trouble with downloading tests
When downloading tests using a wi-fi internet connection or dongle, you may find that the tests do not
download. This problem can be addressed by changing some of the Secure Assess settings. To do
this you need to:
Right-click on the Secure Client shortcut on your desktop
- Open file location
- Find Surpass Secure Client.exe.config and open it with Notepad
- Scroll down just past half-way until you find a section that looks like:
<!--START connection checks settings-->
<add key="TIME_TO_WAIT_FOR_CONNECTION_CHECK_IN_MILLISECONDS" value="15000"
/>
<add key="CONNECTION_CHECK_NUMBER_OF_RETRIES" value="1" />
<add key="CONNECTION_CHECK_DEFAULT_TIMEOUT" value="1000" />
<!--END connection checks settings-->
Change the highlighted values to 9 and 9000, respectively and save the file.
This change means that Secure Assess will allow 9 retries before it fails to download and gives it 9
seconds before it times out.
Some versions of Windows may have different menu options. If you have problems viewing or
changing these settings please contact Skillsfirst 0121 270 5100.
Uploading Results after Exams
If exams have been taken remotely (offline), they will need to be uploaded into SecureAssess once an
internet connection has been re-established. To do this, open SecureClient, select the ‘show admin’
button, highlight the exams you need to upload and select ‘upload results’. These results should
appear within Secure Assess within a minute or so.
Please note: Results which have been taken offline need to be uploaded during the exam window set
during the scheduling process.
Testing with an internet connection (or when tests have been
downloaded)
This section of the guide describes the system from the invigilator and candidate’s perspective.
25
A candidate takes an exam by following these steps:
1.
2.
3.
4.
5.
6.
7.
Run the SecureClient application which will have been installed on the PC
Enter the Keycode
Confirm personal details
The Invigilator enters the secure PIN code
View the exam introduction page
Answer questions
Finish and submit exam.
Enter Keycode
Start by opening the Secure Client application installed on the PC or laptop.
In the Keycode entry screen, the candidate enters their unique Keycode and selects ‘OK’ to start the
exam.
The Invigilator will need to be enter their PIN code before the exam can start.
If a PIN has not been set, the invigilator will be required to ‘Activate’ the exam using the
SecureAssess Invigilation screen (see page 18).
Preferences
Candidates can select the ‘Preferences’ button to change the exam’s colour settings. The different
options are designed to improve accessibility for candidates with a visual impairment. A ‘preferences’
button is available on every screen, so the options can be changed at any point, however the exam
timer will continue to count down. Each option text is shown in the style which it represents.
Candidates should select the option on the list which they find easiest to read.
Use the ‘Restore Defaults’ option to set the display back to the default style.
Confirm Details
The candidate is then presented with a dialogue box containing their personal identification details.
They must confirm their details, in order to take the exam:
The candidate selects ‘Confirm’ to approve their details and start the assessment. They should
select ‘Cancel’ if the details are incorrect.
View Introduction Page
The candidate should read the introduction prior to starting the exam. The exam timer does not start
to countdown until the ‘Start Assessment’ button is selected.
The ‘Introduction’ button can be selected once the examination has started. However, the exam timer
will continue to count down.
View Help
Selecting the ‘Help’ button will launch a short
tutorial which explains the interface to the
candidate.
This help is also available once the assessment has
started. However, the timer will continue to progress
26
if ‘Help’ is viewed once the ‘Start Assessment’ button is selected.
Answer Questions
The candidates are presented with a screen which
allows them to answer each question and navigate
their way through the exam.
The ‘Next’ and ‘Back’ buttons can be used to
navigate between questions. The candidate can
also click directly on a question button to jump to
that question. The navigation buttons will indicate
how many of the questions have been attempted.
The ‘Flag’ button can be used to highlight questions
which the candidate wants to go back to, before
submitting the exam. To flag a question, they should
select the question and then select the ‘Flag’ button.
The candidate will receive periodic notification,
stating how many minutes they have remaining. The notification will occur when there are 30, 15 and
5 minutes remaining.
Submit Exam
When the candidate has finished the exam, they should select the ‘Finish’ button. The system will
then display a request to confirm that they wish to finish the exam. They will also receive a warning if
there are any items that have not been attempted but have been flagged.
Loss of Internet Connection
SecureAssess Online relies on a live internet
connection in order to deliver the assessment.
If this connection is lost during the
assessment, you will see an error as shown
below:
If this happens, it is recommended that the
browser window is closed and the Keycode is
re-entered on the login screen. Any answers
will be remembered up to the point at which
the connection was lost and the timer will
continue from that point. Upon re-entering an
exam which is running, you may initially
receive an error that the exam is running and
cannot be re-entered. You will need to wait a
few seconds to allow the system to register
that the exam can now be re-entered.
27
Downloading and Running Exams from a USB storage device
Through the SecureClient Admin console there is the facility to package up the SecureClient to a USB
storage device (i.e. a memory stick) so you can then download exams to the USB device, travel to
another location, connecting the USB device to a computer there and run the exams.
Download SecureClient to a USB Storage Device
To do this, you’ll need a USB storage device and a computer with SecureClient installed.
•
•
Plug the USB storage device into the computer and allow it time to be recognised and any
necessary drivers installed by the operating system.
Run SecureClient as normal and then log in to the SecureClient Admin Console.
•
Click the Prepare Memory Stick button:
•
When clicked, this prompts for the memory stick drive location.
28
•
•
•
Click to select the correct drive for the USB storage device. If you wish to format the storage
device too, during this process, then tick the Format option to enable this. If the device
doesn’t need formatting then leave this option unticked.
Click ‘OK’ to proceed with the process. Click ‘Cancel’ to exit without copying anything to the
device.
If you have chosen to format the storage device, a warning will be displayed. Click ‘OK’ to
continue, or ‘Cancel’ to exit without formatting/copying anything to the device.
This SecureClient then transfers all files required to run the SecureClient to the USB storage device.
This includes any exam information for exams which have already been downloaded to be taken in
advance. It also includes the installer for the SQL Compact Framework, which must be installed on
any machine on which SecureClient needs to run.
After the memory stick has been prepared you can remove it and close the SecureClient.
Downloading Exams to a Prepared USB Storage Device
•
•
Insert the USB storage device into a computer that is connected to the internet.
The SecureClient should automatically run. If it doesn’t, you can manually start it by browsing
the USB device in a file explorer and running the SecureClientInitialRun.exe file, located in
the device’s root directory.
•
The SecureClient will then run its usual diagnostic test and then you can log in to the
SecureClient Admin Console and download exams in the normal way (see the Advance
Caching section of this guide for more information), except they will automatically be
downloaded to the USB device. Once you’ve successfully downloaded exams to the device,
exit SecureClient and unplug the device.
•
•
Running Exams from the USB Storage Device
Now you can use the USB with SecureClient files and downloaded exams to run exams in a
fully offline mode.
Insert the USB storage device into a computer.
The SecureClient should automatically run. If it doesn’t, you can manually start it by browsing
the USB device in a file explorer and running the SecureClientInitialRun.exe file, located in
the device’s root directory.
•
•
Enter the keycode for the exam as normal to access it; you may also need to enter a PIN
depending on the exam settings. All responses will be stored on the USB device.
29
Uploading Exams from the USB storage Device
•
•
•
Insert the USB storage device into a computer that is connected to the internet.
The SecureClient should automatically run. If it doesn’t, you can manually start it by browsing
the USB device in a file explorer and running the SecureClientInitialRun.exe file, located in
the device’s root directory.
Now you can log in to the Show Admin Console and upload the exams as you normally would
(see the Advance Download section of this guide for more information).
30
Help and support
Should you encounter any problems with any aspect of using SecureAssess, please contact Skillsfirst
via [email protected] or 0121 270 5100.
Published by:
Skillsfirst Awards Limited
Suite 215
Fort Dunlop
Fort Parkway
Birmingham
B24 9FD
Tel - 0121 270 5100
Fax - 0121 747 4102
Website – www.skillsfirst.co.uk
31