1
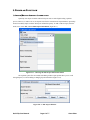
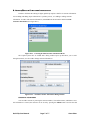
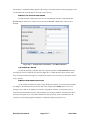
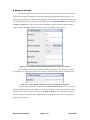
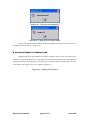
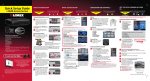
QuickTrip
User Manual
Table of Contents
I. Introduction ……………………………………………………………………… 3
II. Program Functions …………………………………………………………….. 4
A. Adding/Editing Airport Options………………………………. 4
B. Adding/Editing Customer Options……………………………. 7
C. Booking a Flight………………………………………………… 9
D. Executing a Pick-up of Tickets………………………………… 12
E. Changing Personal Preferences………………………………... 13
F. Exiting the Program…………………………………………….. 15
G. Accessing In-Program Help……………………………………. 15
III. Updates…………………………………………………………………………
16
IV. Frequently Asked Questions (FAQ)………………………………………….
16
V. Technical Information…………………………………………………………
16
Index……………………………………………………………………………….
17
QuickTrip User Manual
Page 2 of 17
Omar Khan
I. Introduction
QuickTrip is a program designed to make booking vacations for travel agencies a painless, easy
process. It features a simple, easy to use graphical user interface, and straightforward functionality.
QuickTrip is a program designed in the Java™ programming language, and can run on a variety of
different operating systems (though Microsoft™ Windows™ is recommended).
Minimum System Requirements
•
166 MHz Pentium or Pentium-compatible processor
•
32 MB RAM (48 MB Recommended)
•
Windows 98 or higher
Installation
Simply insert the QuickTrip CD into your computer, and run the file “QuickTrip.exe”.
Getting Started With QuickTrip
To start using QuickTrip after installation, a user’s first order of business would be to establish a
connection with the airline(s) that have flights on which seats can be booked. These airlines will supply a
set of files detailing flight information on a seasonal basis, allowing you to book flights up to anywhere
from 3 months to a year in advance. At this point, the user would have to go and enter the airport
information into the program (see page )
QuickTrip User Manual
Page 3 of 17
Omar Khan
II. Program Functions
1. Adding/Editing Airport Information
QuickTrip uses airport locations and IATA airport codes to make flight booking a painless
process. However, in order to do so, the airports must first be entered into the airport database. QuickTrip
makes it incredibly simple to add or edit airport information quickly. To add or edit an airport, from the
main screen, select File, and then Edit Airport Information (Figure II.1.1)
Figure II.1.1 - Choosing the Edit Airport Information Menu
The required system files are loaded, and a dialog window opens up that allows you to scroll
through airports, as well as adding or changing airport information (Figure II.1.2).
Figure II.1.2 - Edit Airport Window
QuickTrip User Manual
Page 4 of 17
Omar Khan
A. Adding Airports
You can add an airport by entering in a system number, entering the IATA airport code for that
airport, and then entering in the city and/or airport name of the airport. Once all of this information is
entered, click the Submit button (Figure II.1.3).
Figure II.1.3 – Adding an Airport
If all of the information is entered correctly, you will see a confirmation dialog (Figure II.1.4). If
there are any errors, the text of the field entered incorrectly will change to an error message (Figure II.1.5).
Figure II.1.4 – Confirmation Dialog for Successful Airport Entry
Figure II.1.5 – Incorrectly Entered Airport Number
QuickTrip User Manual
Page 5 of 17
Omar Khan
B. Scrolling Through Airports
If airports have been entered into the system previously, the user can scroll through airports by the
system number by using either the Next or Previous buttons found on the dialog window. If you are at the
first (or last) record, the Previous (or Next) buttons will be disabled (See Figure II.1.6).
Figure II.1.6 – Navigation – Next Button (Previous Button Disabled)
C.. Clearing All Fields
To make entering a new airport easier, QuickTrip also features a Clear All Fields button that will
empty all of the text fields for user input (See Figure II.1.7). While this can be quite useful to make entry of
airport information simpler, it is important to note that it is not necessary to clear all the fields to enter an
airport.
Figure II.1.7 – Clear All Fields Button
D. Editing Airport Information
To edit airport information, simply scroll to the desired airport (see section II.1.B) and make the
changes to the field where they need to be made. Then, simply hit the Submit button to save your changes.
Just as when you are adding new airports, the program will check to ensure that you have entered all of the
information correctly, and will display error messages inside the erroneous text fields if necessary (See
Figure II.1.5). If all of the information is entered correctly, the new information for the airport is saved, and
the program will display a confirmation dialog (See Figure II.1.4)
QuickTrip User Manual
Page 6 of 17
Omar Khan
2. Adding/Editing Customer Information
In order to facilitate the booking of flights, QuickTrip requires a data file of customer information.
Just as adding and editing airport information is a painless process, so is adding or editing customer
information. To add or edit customer information, select File from the main menu and choose Edit
Customer Information (See Figure II.2.1).
Figure II.2.1 – Choosing the Edit Customer Information Menu
The required system files are loaded and a dialog window opens up that allows you to scroll
through customers, as well as add or change customer information.
Figure II.2.2 – The Edit Customer Information Dialog Window
A. Adding a Customer
You can add a customer by entering the customer number, first and last names, and balance. Once
this information is entered, the customer can be saved by pressing the Submit button. Just like the add
QuickTrip User Manual
Page 7 of 17
Omar Khan
airport editor, a confirmation dialog appears if the saving is successful, and an error message appears in the
text field where the erroneous data occurs in the event of an error.
B. Scrolling Through Customers
Just like the airport editing feature, the user can scroll through customers using the Next and
Previous buttons. If the user is at the first or last record, the Previous or Next button, respectively, is
disabled.
Figure II.2.3 – Navigation (Previous Button) – Next Button Disabled
C. Clearing All Fields
To make the entering of customer data easier, QuickTrip features a Clear All Fields button that
will empty all of the text fields for user input (See Figure II.1.7). While this can be quite useful to make
entry of customer information simpler, it is important to note that it is not necessary to clear all the fields to
enter a customer.
D. Editing Customer Information
To edit customer information, simply scroll to the desired customer (see section II.2.B) and make
the changes to the field where they need to be made. Then, simply hit the Submit button to save your
changes. Just as when you are adding new customers, the program will check to ensure that you have
entered all of the information correctly, and will display error messages inside the erroneous text fields if
necessary (See Figure II.1.5). If all of the information is entered correctly, the new information for the
customer is saved, and the program will display a confirmation dialog (See Figure II.1.4)
QuickTrip User Manual
Page 8 of 17
Omar Khan
3. Booking a Flight
Now that the airports and customers are all entered into the system, QuickTrip is now functional.
The bulk of the program’s functionality is based around booking a flight. Flight bookings follow a very
logical step-by-step process. To begin booking a flight, the customer must be loaded into the system. To do
this, enter either the customer’s first name or their last name into the Enter Information frame, and press
the Enter (or Return) key. If the customer exists in the database, their record will be loaded, and their
balance (and any outstanding flights previously booked) will be displayed (Figure II.3.1)
Figure II.3.1 – The Enter Information Dialog Displaying Customer Information
If the customer has not been previously entered into the database, an error message will appear
(See Figure II.3.2), and the customer has to be entered via the Edit Customer function (See Section II.2)
Figure II.3.2 – Error Displayed When Customer is not Entered into Database
Once the customer information is displayed in the Enter Information frame, the user can select
the origin and the destination of the flight. The user can enter either the 3-letter IATA airport code, or the
airport/city name. Once the name is entered, press the Enter (or Return) key. If the airport exists in the
system, the airport name and city will be displayed. If the airport does not exist, an error message will be
displayed (See Figure II.3.3)
QuickTrip User Manual
Page 9 of 17
Omar Khan
Figure II.3.3 – Airport Found in Database and Airport Not Found in Database, Respectively
Once both the customer information and the origin/destination information is entered and
recognized by the program, you can proceed with the flight booking. From the File menu, select Book a
Flight (See Figure II.3.4).
Figure II.3.4 – Choosing the Book a Flight Feature
This loads a calendar, from which the user can select which date the flight is for (Figure II.3.5).
The month can be selected from a drop down menu, and the day can be selected by pushing the button for
that date. To select that date, press the Choose This Date! button.
QuickTrip User Manual
Page 10 of 17
Omar Khan
Figure II.3.5 – The Calendar
Once the date has been chosen by the user, a new dialog appears that displays the flight traveling
from the origin to the destination on that particular day (See Figure II.3.6).
Figure II.3.6 – The Choose Flight Dialog
From here, the user enters in the number of adult and child tickets they wish to book on this
particular flight, as well as the class on which they want to fly. Once they have entered in the number of
QuickTrip User Manual
Page 11 of 17
Omar Khan
seats they wish to book, they click the Select This Flight button. At this point, the user needs to click
Continue to finish booking tickets.
4. Executing a Pick-up of Tickets
Much like booking a ticket, in order to pick up tickets, the customer name must first be entered
into the Enter Information internal frame (See Figure II.3.1, Figure II.3.2, and accompanying
explanations)
Once tickets are booked, the customer has to come in to pick up the tickets. Thus, QuickTrip also
allows the user to execute a pick-up of tickets. To do so, simply select Pick Up Tickets! From the File
drop-down menu.
Figure II.4.1 – Choosing the ‘Pick Up Tickets!’ Option
This will load the ticket pick-up internal frame (Figure II.4.2). This frame will display both the
outstanding balance and the quick-glance travel itinerary for the customer entered, and will allow the user
to process a payment transaction.
Figure II.4.2 – Ticket Pick-up Internal Frame
QuickTrip allows for a number of payment options, including all major credit cards, as well as
debit and cash/cheque. There are two buttons on the ticket pick-up internal frame – Exact Amount and
Pick Up Tickets! The Exact Amount button will enter the exact value of the “Amount Owing” text field
into the “Amount Paid” text field (this process is shown in Figure II.4.2). The payment method can be
selected from a number of radio buttons. To complete the transaction, press the Pick Up Tickets! button.
This will then subtract the value of the “Amount Paid” text field from the customer’s balance. If the
balance for the customer is now zero, the ticket pickup will be completed, and a confirmation message
(Figure II.4.3) will be displayed. If the resulting customer balance is lower than zero (for example, if the
customer in figure II.4.2 paid $130.00 cash), a message showing how much change is owed to the customer
will be displayed (Figure II.4.4), followed by the confirmation message (Figure II.4.3)
QuickTrip User Manual
Page 12 of 17
Omar Khan
Figure II.4.3 – Ticket Pick-Up Confirmation
Figure II.4.4 – Change Owed to Customer Dialog
At this point, both the customer balance and the quick-glance trip itinerary will have been reset to
their default values (0.00 and “ ” respectively).
5. Changing Personal Preferences
In QuickTrip, there are three different user interfaces to choose from. The user can switch between
interfaces at any point during their use of the program. To switch interfaces, simply click on the View dropdown menu, and select which interface to use (Figure II.5.1). The three choices are metal view, motif view,
and windows view (Figures II.5.2, II.5.3, and II.5.4 respectively).
Figure II.5.1 – Choosing the View Menu
QuickTrip User Manual
Page 13 of 17
Omar Khan
Figure II.5.2 – Metal View
Figure II.5.3 – Motif View
QuickTrip User Manual
Page 14 of 17
Omar Khan
Figure II.5.4 – Windows View
6. Exiting the Program
To exit the program, simply choose Exit from the File menu, or click the
button in the top
right corner of the program window.
7. Accessing In-Program Help
QuickTrip makes it easy to book a flight. However, if there any problems, there are two features in
the program designed to help you. Firstly, nearly all buttons and text fields have “tool tips”, which will
appear when you hover your mouse over the component (for an example, see Figure II.3.4). In addition, an
actual help feature is also contained in the QuickTrip program. Simply select Help from the menu bar at the
top of the screen.
QuickTrip User Manual
Page 15 of 17
Omar Khan
III. Updates to QuickTrip
Periodically, updates to QuickTrip will be made available. When you bought your copy of
QuickTrip, enclosed was a registration form. If you fill out the registration form, the updates will
automatically be sent to you via e-mail. As well, in the future, look for QuickTrip’s website on the Internet.
IV. Frequently Asked Questions (FAQ)
1.
What do I do if there is an error reading from or writing to a file?
Firstly, check to see if there are files called customerDataFile.dat and airportDataFile.dat
in the folder. If these files are still there, contact our support centre for further assistance.
2.
Where can I get technical support?
For technical support, contact:
QuickTrip technical support
115 Hawksbrow Mews NW
Calgary, AB
T3G 3B6
403.619.8496
[email protected]
3.
How do I book a series of flights?
Currently, there is no feature in QuickTrip to do this. However, each individual flight can be
booked separately, and these will all be added to the customer’s record in the customer data
file. The customer can then pay (and pick up tickets) for all flights at once. Look for a feature
allowing you to link flights to be available soon!
V. Technical Information
QuickTrip is a program designed and compiled in the Java programming language, using the Java
SDK 1.5.0 version. It operates best under Microsoft® Windows™ XP or equivalent operating systems. For
further technical information, contact QuickTrip support at [email protected].
QuickTrip User Manual
Page 16 of 17
Omar Khan
Index
Airport, ……………………………………………………………………..4-7
Adding an…………………………………………………………..5
Editing an…………………………………………………………..6
Deleting an…………………………………………………………7
Customer, ………………………………………………………………….7-10
Adding a……………………………………………………………7
Editing a……………………………………………………………8
Deleting a…………………………………………………………. 9
Exiting Program……………………………………………………………15
Flights,
Viewing……………………………………………………………11
Choosing tickets on………………………………………………..12
Frequently Asked Questions………………………………………………16
Getting Started…………………………………………………………….. 3
Help, in-program…………………………………………………………..15
Installation…………………………………………………………………. 3
Personal Preferences……………………………………………………….13-15
Support……………………………………………………………………...16
System Requirements………………………………………………………3
Table of Contents…………………………………………………………...2
Tickets,
Booking…………………………………………………………….9-11
Picking up………………………………………………………….11-13
Technical Information……………………………………………………..16
Updates……………………………………………………………………...16
QuickTrip User Manual
Page 17 of 17
Omar Khan