1
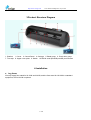
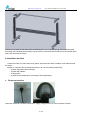
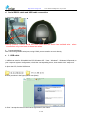
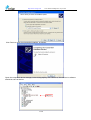
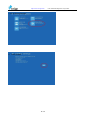
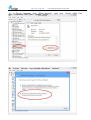
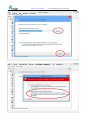
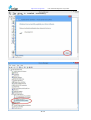
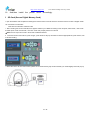
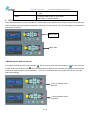
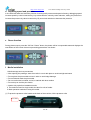
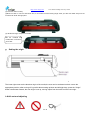
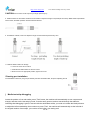
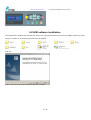
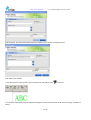
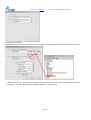
http://www.vicsign.com
User manual of HSQ series vinyl cutter
Table of Contents
1
Satety precautions...............................................................................................
1.1 Safety using methods...................................................................................
1.2 Definition of warning symbols.......................................................................
2
Standard accessories..........................................................................................
3
Product Structure Diagra....................................................................................
4
Details for frame and machine............................................................................
a. Leg frame installation..........................................................................................
b. Installation and use.............................................................................................
c. Power connection................................................................................................
d. Serial RS232 cable and USB cable connection...................................................
e. USB cable............................................................................................................
f. SD card.................................................................................................................
5.Operating instructions.............................................................................................
a. Control Panel illustration.....................................................................................
b. Off-line/On-line....................................................................................................
c. Media moves and carriage moves......................................................................
d. Speed and pressure debugging..........................................................................
e. Pause function....................................................................................................
f . Fix the media......................................................................................................
g. Set the original point.............................................................................................
h.Adjustment of cutting blades................................................................................
i.Install pen..............................................................................................................
j.Media test strip debugging.....................................................................................
6. Flexi software installation.......................................................................................
a. Flexi operation......................................................................................................
b. Auto contour cutting function.........................................................
1 / 36
http://www.vicsign.com
User manual of HSQ series vinyl cutter
1 Safety precautions
To ensure the operator can correctly use the vinyl cutter, and prevent damage of vinyl cutter, please
follow the instructions with the signs below.
a Safety using methods
WARNING
CAUTION
Any improper operation possibly results in
hazard of life or damage of equipment.
Any improper operation possibly results in
hazard of life or other objects.
b. Definition of warning symbols
WARNING
Don’t use the power source not meeting rating voltage,
otherwise fire or electronic shock may be resulted in.
If the machine gives out smoke or unpleasing smell, or noise
sounds please do not use it in such case, continuing using it
may result in fire or electronic shock.
Do not put out the plug when the power is on to avoid damage
to the machine.
Make sure electrical grounding when it is working. Otherwise it
will electric shock and machine can’t work normally.
2 / 36
http://www.vicsign.com
User manual of HSQ series vinyl cutter
Don’t detach, repair or reconstruct the machine, otherwise fire
and electric, hazard of life may be result in.
CAUTION
Don’t leak any liquid or drop metal
into the machine, such things may
result in fire.
Don’t touch the knife top with your
finger to prevent injury or
perspiration of knife head.
Do not damage or random replace
the supplied power cable, do not
excessively bend, pull, bundle the
power cable or place weight on it.
Otherwise the power source may be
damaged even fire or electric shock
is thus incurred.
To unplug the power cable from
replace, please hold the plug
instead of the cable.
Strongly pulling of the cable possibly
result in electric or fire.
When operating the machine, do not
place either of your hands on
capstan to avoid injury.
3 / 36
http://www.vicsign.com
User manual of HSQ series vinyl cutter
Place the machine on a stable
surface, otherwise the machine may
fall therefore get damaged.
To unplug the power cable from
replace, please hold the plug
instead of the cable.
Strongly pulling of the cable
possibly result in electric or fire.
Any operating is forbidden in case
of
storm or lighting to prevent damage
of the machine.
4 / 36
http://www.vicsign.com
User manual of HSQ series vinyl cutter
Place the machine on a stable
surface, otherwise the machine may
fall therefore get damaged.
To unplug the power cable from
replace, please hold the plug
instead of the cable.
Strongly pulling of the cable
possibly result in electric or fire.
Any operating is forbidden in case
of
storm or lighting to prevent damage
of the machine.
5 / 36
http://www.vicsign.com
User manual of HSQ series vinyl cutter
2. Standard accessories
Check following accessories after unpacking, please contact the seller or our company if you find
anything missing.
Item:
1
2
Parts
Power cable
USB cable
Quantit
y
1
Note
Picture
Standard
1
Standard
3
4
5
RS232 cable
Blade group
Blade
6
Pen group
7
CD disk
1
Standard
1
Standard
3
Standard
1
Standard
1
Standard
6 / 36
http://www.vicsign.com
User manual of HSQ series vinyl cutter
3.Product Structure Diagram
1. Platform
7. Trim strip
2. Cover 3. Control Panel 4. Carriage 5. Blade group 6. Pinch roller group
8. Upper cover plate 9. Switch 10.RS232 serial port/USB port/SD port interface
4.Installation
a
Leg frame
We only supply floor stand for HL1200 and HL630, and the floor stand for HL1200 is a standard
equipment, but for HL630 is optional.
7 / 36
http://www.vicsign.com
User manual of HSQ series vinyl cutter
Take out every party of the stand from the packing box, turn on the party bag, and install the stand
according to the illustrational showing. Lay the cutter on the stand after install, aim at and install spiral
shell, then lock with the screw.
b Installation and Use
1 Place the cutter in a plane and roomy place, and make sure there is 300mm room place around
the cutter.
2 Notes on Location (Do not locate the plotter in any of the places listed below)
— A place exposed to direct sunlight
— A place that vibrates
— A dusty place
— A place where temperature or humidity varies significantly
c
Power connection
Check the electrical connection and power supply voltage before you connect plotter’s power.
8 / 36
http://www.vicsign.com
d
User manual of HSQ series vinyl cutter
Serial RS232 cable and USB cable connection
1.Connection Methods
Warmly remind:RS232 serial wire and USB wire are those two isolated wire,when
connection only need one of those two wires.
2. Connected display
After connecting RS232 serial port, using COM1 port to transfer out on it directly.
e
1. USB cable
1.USB driver suits for 32 bits&64 bits CPU,Windows XP、Vista、Windows7、Windows 8.Depends on
your computer system configuration, chose the corresponding driver, then double click “setup.exe”
2.Open the CD, find the USB driver
3.Click (as show in the figure), click next (Next)
4.Click“ I accept the terms in the license agreement”,click “Next”
9 / 36
http://www.vicsign.com
User manual of HSQ series vinyl cutter
5.Choose "Complete" to install all necessary features then Click“next”; wait for a moment ,Click
“finish” ,make it completely installed.
32bit driver Manual installation method:
Connect USB cable with the PC and the machine, switch on the machine, the computer will
automatically appear dialog "Found New Hardware Wizard" as shown:
Select "from the list or specific location", click next
Into view, select “search for the best driver in these locations.” and ”Include this location in the
search:” select the USB driver file path, click Next , as follows:
10 / 36
http://www.vicsign.com
User manual of HSQ series vinyl cutter
Click Finish to close the wizard after installing, as follows:
Open the computer's device manager, below dialog displays the USB drive, the interface in software
should be same as device.
USB port
11 / 36
http://www.vicsign.com
User manual of HSQ series vinyl cutter
2. Install USB Virtual COM Port Driver in Windows 8
a. Instruction in text
1. Press [Win]+[I], the setting panel will display
2. Click “Change PC settings”
3. Click “General”
4. Go to “Advanced startup” and click “Restart now”
5. Click “Troubleshoot”
6.Click “Advanced options”
7.Click “Startup Settings”
8.Click “Restart”
9.The PC will restart, and press functions key“F7” or numbers key “7”
10. Install the USB Virtual COM port accordingly
b. Detailed steps with screen shots:
1. Press [Win]+[I], the setting panel will display
12 / 36
http://www.vicsign.com
13 / 36
User manual of HSQ series vinyl cutter
http://www.vicsign.com
User manual of HSQ series vinyl cutter
2. Click “Change PC settings”
3. Click “General”. Go to “Advanced startup” and click “Restart now
14 / 36
http://www.vicsign.com
4. PC is restarting.
5. Click “Troubleshoot”
6. Click “Advanced options”
15 / 36
User manual of HSQ series vinyl cutter
http://www.vicsign.com
7. Click “Startup Settings”
8. Click “Restart”
16 / 36
User manual of HSQ series vinyl cutter
http://www.vicsign.com
User manual of HSQ series vinyl cutter
9.Thee PC will restart, and press functions key“F7” or numbers key “7” to choose “Disable driver
signature enforcement”
10. Returning to Windows 8 and click
17 / 36
http://www.vicsign.com
User manual of HSQ series vinyl cutter
11. In Device Manager, click “Other devices”,
click “Properties”, and click “Update Driver”.
12.
Choose “Browse
my computer
for driver
18 / 36
right
software”
click “Virtual
COM Port”,
http://www.vicsign.com
13.
Input
the
14.
Click “Install this driver
User manual of HSQ series vinyl cutter
driver location
software
anyway”
19 / 36
to
continue
http://www.vicsign.com
15.
The driver is installed
successfully
20 / 36
User manual of HSQ series vinyl cutter
http://www.vicsign.com
16.
f
And then install
the
printer
User manual of HSQ series vinyl cutter
driver accordingly
SD Card (Secure Digital Memory Card)
1 open the software and complete the drawings and save as the PLT format. Note: the document name in Arabic or English words
can not exceed 12 characters.
There are two methods to create PLT file.
a.After choosing the correct model No, then appears “What is your HS630 connecting to the computer”,select “FILE”, click “finish"
b.Select report mode ”save as files”, then click ”send” and promptly save as PLT format.
*Note: File can report as PLT file in Artcut and CorelDraw software.
2 Insert SD card into the machine, press "Origin”, press the arrow keys up and down to find the appropriate file, press "Enter”, then
it will start working.
*When take off the SD from the machine, please do not extract directly, tap the SD card with your hands slightly and it will pop up.
21 / 36
http://www.vicsign.com
User manual of HSQ series vinyl cutter
5 Operating instructions
a Control Panel illustration
1. Offline
pause
4
1
5
2
6
3
1.Switch On-line state to Off-line state
2, Can be suspended when cutting.
2. Origin
1. press” ”” ” to move car and “ ” to move media,
then press” Origin” button to make old coordinates
cleared, and set up new origin.
2, Press the button at online state to read SD card file,
press” ”,” ” select file, then press “Enter” to work
3. Test
Text cutting effect
4. Reset
Reset and clear cache memory data on main-board.
22 / 36
http://www.vicsign.com
b
User manual of HSQ series vinyl cutter
5.Enter
After selecting SD file,press button,machine operates
order.
6.Mode
1,Change “blade mode” to “pen mode”
2,MPX,MPY to adjust override.
Off-line/On-line
When the cutter starts or resets, it becomes in online state. Press “Offline/Pause” button to switch to off-line state.
When computer transmits signals to the plotter, the plotter must be Online. The LCD will display the Speed/force
information as follows:
Online state
Offline state
c Media moves and car moves
The plotter is offline, press the left arrow key " " the car moves, press the right arrow key "
" the car will move
to right. Press the up arrow keys " " the media feed roller will lead to move forward, press down arrow keys, the
media feed roller will lead to move backward. LCD "XY" coordinates after moving with the numeric value will
change accordingly.
X-axis coordinate value
after shift
Y-axis coordinate value
after shift
23 / 36
http://www.vicsign.com
d
User manual of HSQ series vinyl cutter
Adjusting speed and pressure.
In line with local state and send the process of carving knife pressure and speed of testing, debugging speed
increase speed by value increment key, key to decrease the value by value reduction, testing the pressure to
increase the pressure by value increment key By numerical reduction to decrease the pressure.
e
Pause function
During plotter output, press the “Off line / Pause” button, the plotter will be in suspended state and displays the
coordinates of the current document processing parameters. As shown:
f
Media installation
1 Media storage and use precautions
— After opening the package, store the media in a cool dark place to avoid sunlight and water
— Do not place the print media to erect in order to avoid edge damage
— Do not fold and stack the print media
— Do not use bruised, wrinkled, curled, or stained with dust medium
— Do not drop or wet the print media
— Need to tidy up before installation media
2. The machine used for single media, but also for rolls of media.
3. Main operation methods of using the media
(1) To press the pressure roller handle at the back of the machine, lift the pressure roller
Press here
24 / 36
http://www.vicsign.com
User manual of HSQ series vinyl cutter
(2) Insert the media correctly.
(3)Move the roller to cover the steel shaft claw, it can ensure the best tracking length when you allow the media away from the
machine both at left and right place.
(4) Handle the stage, and press the media.
Set
the media,lift
the
handle,which controls the
pinch roller.
g.
Setting the origin
The lower right corner as the absolute origin of the media, the user can be set based on their own to the
appropriate position, after moving off a good bit about setting up/down and left/right keys, press the "Origin"
button coordinates cleared, the new origin is set up, carving output from the knife from the new origin.
h Knife set and adjusting
25 / 36
http://www.vicsign.com
User manual of HSQ series vinyl cutter
CAUTION:Don’t touch the knife top with your finger prevent injury.
a. Install the knife into the holder. Rotate the knife sheath to adjust the length of exposed part of knife tip. Blade holder exploded as
shown below, the detail operation are described as followed:
b. For different material, users can adjust the length of knife sheath exposed at any time.
c. Install the blade holder into carriage
— Loosen the screw of tool carrier
— Assemble the blade holder into the tool carrier
— When the tool is in appropriate position, tighten the screw.
i Drawing pen installation
The installation method for pen group is basically the same as blade holder, except for adjusting the nib
j
Media test strip debugging
Locate the position of car and media, press "Test" button, the machine will automatically cut out a square and
triangle, and tear-out the test strip by hand, if can be easily opened, and not carved through the adhesive,
indicating that debugging is good, if tear-out with the associated media, you need to increase the blade pressure
or adjust the knife extended tip, then continue to press "Test", the machine will automatically cut the left side of
the original location of test strips, you need to do this before you testing well.
26 / 36
http://www.vicsign.com
User manual of HSQ series vinyl cutter
6.FLEXI software installation
Put FLEIXI CD into CD ROM, open files and click “Autorun.exe” install the software.In the process of installation, please don't insert
dongle on computer, so to prevent dongle driver cannot be installed.
Click next,
Select “I agree the terms of the license agreement”then click“Next”
27 / 36
http://www.vicsign.com
User manual of HSQ series vinyl cutter
Select the installation path, click next.
Pls insert dongle on computer, and input password, it will automatically show ID number of user,as follows:
28 / 36
http://www.vicsign.com
User manual of HSQ series vinyl cutter
Select language, click “done”and software will finish installation,then it will auto fix desktop shortcut.
a.Set datasin Flexi software
1,open Flexi software,make new file or open other files,click cutting/draw button”
” to send file
2, the software automatically switches "Add Setup" dialog box, select brand name and model name accordingly, click Next,as
follows:
29 / 36
http://www.vicsign.com
User manual of HSQ series vinyl cutter
3,select connected method.
*Caution:please make sure the Flexi interface port is the same as Device Manager shown,otherwise machine can not work.
Those two ports
should be same
4. Please choose the port
the same as cut output port, the other parameter is the same as handshare agreement (above
picture)show, baud rate: 38400 hardware handshake agreement:“RTS”and“CTS”
30 / 36
http://www.vicsign.com
User manual of HSQ series vinyl cutter
5.Enter into the above cutting interface, set the overcut to 0.02cm, and then click properties.
6. Set the 0.025CM at knife effect,and the rest are same as following shown:
7.Finish setting,then click OK to save.
8.To do auto contour cutting,after importing picture into Flexi software,it should be PSD or EPS format for the picture,then connect
printer,print it as 100%.Fix correctly the material in the plotter,click Off line/Pause button,then move the blade in the middle of the first
31 / 36
http://www.vicsign.com
mark,click origin button to set red dot positioning.
User manual of HSQ series vinyl cutter
9.Click send in Flexi software,it will scan automatically.After scanning,then click the dialogue in the software,then it will make auto
contour cutting.Hereunder is the cutting result.
Noted:As picture shows,the black is the original picture,the red one is we cut.After measuring,we find it has a 5mm shift at right
side,top is 4mm.
Adjustment:Click mode button,then find system,then click origin button,then click mode button,find Laser X and Laser Y,click right
direction key to decrease 500,click bottom direction key to decrease 400,then click origin button.The proportion for the data should
be 1:100,say if it has 1mm shift,the adjusted data should be 100.
10.Click send in software again,until the two rectangles are in the same position.
b.Auto contour cutting function.
1.Open Flexi software,import picture,click the blank part of it,the software will automatically shows the following dialogue,choose
32 / 36
http://www.vicsign.com
the correct width,say if you cut in A4 material,pls use A4.
User manual of HSQ series vinyl cutter
Note:1.The width for printing and material should be same。
2.Support PSD、PNG format。
It should be same as
printing material
3. Choose the picture,click “effect”,then click “contour cutting”,depends on your requirement,adjust the contour cutting line as below。
Click here
33 / 36
http://www.vicsign.com
User manual of HSQ series vinyl cutter
4 Click “effect” then “contour cutting SA”,after it display the marks,confirm “v”.
Click here
5 Print as 100%。
6 Put the printing material in plotter。
7.Move the blade into the middle of the mark,show as the red dot in following picture,click “origin”button.
34 / 36
http://www.vicsign.com
User manual of HSQ series vinyl cutter
Click“Contour cutting”and send
8. Flexi software will show a dialogue,choose correct brand “Vicsign” and model name.
9.Click “next”if you use USB cable,please open device manager in your computer,the port is same as following shows,the other
setting is same as picture.
35 / 36
http://www.vicsign.com
They are same
10.Click send,then it will make auto contour cutting。
36 / 36
User manual of HSQ series vinyl cutter