1
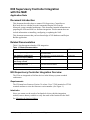
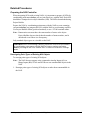
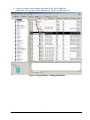
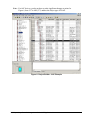
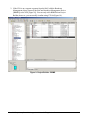
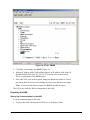
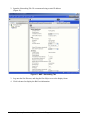
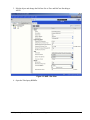
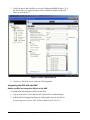
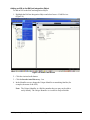
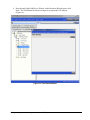
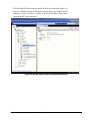
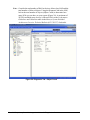
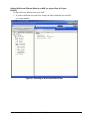
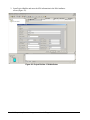
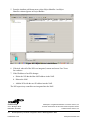
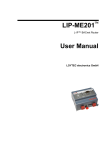
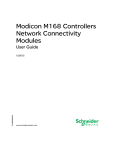
N30 Supervisory Controller Integration
with the NAE
Application Note
Code No. LIT-1201801
Release 1.2
Issued January 10, 2005
Document Introduction . . . . . . . . . . . . . . . . . . . . . . . . . . . . . . . . . . . . . . . . . . . . . . . . . 3
Related Documentation. . . . . . . . . . . . . . . . . . . . . . . . . . . . . . . . . . . . . . . . . . . . . . . . . 3
N30 Supervisory Controller Integration Overview . . . . . . . . . . . . . . . . . . . . . . . . . . . 3
Requirements . . . . . . . . . . . . . . . . . . . . . . . . . . . . . . . . . . . . . . . . . . . . . . . . . . . . . . . . . . . . 3
Interlocks . . . . . . . . . . . . . . . . . . . . . . . . . . . . . . . . . . . . . . . . . . . . . . . . . . . . . . . . . . . . . . . 3
Broadcast Management Object (BBMD) . . . . . . . . . . . . . . . . . . . . . . . . . . . . . . . . . . . . . . 4
Detailed Procedures . . . . . . . . . . . . . . . . . . . . . . . . . . . . . . . . . . . . . . . . . . . . . . . . . . . 5
Preparing the N30 Controller . . . . . . . . . . . . . . . . . . . . . . . . . . . . . . . . . . . . . . . . . . . . . . . 5
Reassigning Point Types of Existing N30 Objects . . . . . . . . . . . . . . . . . . . . . . . . . . . . . . . . . 5
Reassigning N30 Object Types in the DMO File . . . . . . . . . . . . . . . . . . . . . . . . . . . . . . . . . . 8
Changing the Interlock Object . . . . . . . . . . . . . . . . . . . . . . . . . . . . . . . . . . . . . . . . . . . . . . . 10
Setting Up Communication for the N30 . . . . . . . . . . . . . . . . . . . . . . . . . . . . . . . . . . . . . . . . 11
Preparing the NAE . . . . . . . . . . . . . . . . . . . . . . . . . . . . . . . . . . . . . . . . . . . . . . . . . . . . . . . 13
Setting Up Communication for the NAE. . . . . . . . . . . . . . . . . . . . . . . . . . . . . . . . . . . . . . . . 13
Integrating the N30 with the NAE . . . . . . . . . . . . . . . . . . . . . . . . . . . . . . . . . . . . . . . . . . . 16
Adding the BACnet Integration Object to the NAE. . . . . . . . . . . . . . . . . . . . . . . . . . . . . . . . 16
Adding an N30 to the BACnet Integration Object . . . . . . . . . . . . . . . . . . . . . . . . . . . . . . . . 17
Adding N30s from Different Sites to an NAE (or project files in Project Builder) . . . . . . . . . 24
N30 Supervisory Controller Integration with the NAE Application Note
1
2
N30 Supervisory Controller Integration with the NAE Application Note
N30 Supervisory Controller Integration
with the NAE
Application Note
Document Introduction
This document describes how to connect N30 Supervisory Controllers as
BACnet® devices with the Network Automation Engine (NAE) in the
Metasys® system extended architecture. This document contains information on
preparing the N30s and NAEs to facilitate integration. This document does not
include information on installing, configuring, or updating the NAE.
This document assumes that you have knowledge of N30 databases and Project
Builder application.
Related Documentation
Table 1 lists documents related to N30 integration.
Table 1: Related Documentation
For Information On
Refer To
LIT/Part No.
BACnet System Integration with an NAE
BACnet System Integration with NAE
Technical Bulletin
LIT-1201531
N30 databases and Broadcast
Management objects (BBMDs)
N30 Supervisory Controller Networking
Technical Bulletin
LIT-6891300
Using and Navigating the Interface of an
N30 through a VT100
N30 Supervisory Controller User’s Manual
LIT-6892010
Limitations of the Metasys System
Extended Architecture
Metasys System Extended Architecture
Overview Technical Bulletin
LIT-1201527
Project Builder
Project Builder User’s Guide
LIT-693205
N30 Supervisory Controller Integration Overview
The N30s are integrated as BACnet devices in the Metasys system extended
architecture.
Requirements
The N30 must have firmware Version 5.4 or later. Use a VT100 terminal or VT100
terminal emulator to view the firmware version number. (See Figure 1.)
Interlocks
Since you cannot see the results of an Interlock object with this integration
method, enter a dummy variable to verify the status of the Interlock in the NAE.
See Changing the Interlock Object.
N30 Supervisory Controller Integration with the NAE Application Note
3
Figure 1: VT100 Terminal - Firmware Version
Broadcast Management Object (BBMD)
Formerly called the BACnet Broadcast Management Device (BBMD) object, a
Broadcast Management object is added to N30s on different network segments to
allow communication where broadcasts cannot be sent, for example, when using
an Internet Protocol (IP) router. Always attempt to discover an N30 before adding
BBMDs. Multiple problems may occur if a BBMD is unnecessarily added.
4
N30 Supervisory Controller Integration with the NAE Application Note
Detailed Procedures
Preparing the N30 Controller
When integrating N30s with existing NAEs, it is important to prepare all N30s by
coordinating point names before you use Auto Discovery with the NAE. Each N30
should have a unique device object identifier (OID). The OID is downloaded using
Project Builder.
Prepare the N30s by coordinating point names with the NAE to create a naming
convention before you integrate the N30s with the NAE to avoid naming conflicts.
Use Project Builder offline (preferred method), or use a VT100 terminal online.
Note: Enumeration sets must have the same number of states as the object.
Project Builder does not check that the number of states matches, and it
downloads even if there is a discrepancy.
Only standard object types are viewable on the NAE.
IMPORTANT:To avoid naming conflicts, prepare the N30s in Project Builder
by coordinating point names with the NAE to create a naming convention
before you integrate the N30s with the NAE. Each device must have a unique
name.
Reassigning Point Types of Existing N30 Objects
To reassign point types of existing N30 objects:
Note: The NAE does not support write command to Analog Inputs (AIs) or
Binary Inputs (BIs) N2 AIs and N2 BIs are not commandable objects in the
NAE.
1. Reassign point types of existing N30 objects to make them commandable in
the NAE.
N30 Supervisory Controller Integration with the NAE Application Note
5
In this example, in the two highlighted rows, 35 is a set point from an ACO
ADF(1) Hmk-dx1-OATLO-SP and 38 is a DCO BD(1) Hmk-dx1-P1-LEAD, from
a DX9100 program. When integrating the N30 with the NAE, the point under
Object Type becomes the BACnet object, which is the AI for ADF(1), and BI for
BD(1) (Figure 2). These are not commandable from the NAE.
Figure 2: Project Builder - N30 Database
2. Modify the current database of the N30, and change the Object Type from AI
to Analog Output (AO) and BI to Binary Output (BO), if commands are
required.
3. Before you add the new points, write down the original object names. In this
example, the original names are ADF(1) and BD(1).
4. Delete the original points.
6
N30 Supervisory Controller Integration with the NAE Application Note
5. Create new points. In this example, the points are N2 AO(1)- Hmk-dx1OATLO-SP - N2 AO, and N2 BO - Hmk-dx1-P1-LEAD - N2 BO (Figure 3).
Figure 3: Project Builder - Creating New Points
N30 Supervisory Controller Integration with the NAE Application Note
7
6. Open each point and change the Net Point Type and Net Point Addr for all
points that you need to command from the NAE. In this example, the Net Point
type is changed to ADF and 1 (Figure 4).
Figure 4: Project Builder - Edit Attributes
7. After you update all necessary points, download to the N30.
Reassigning N30 Object Types in the DMO File
To reassign N30 object types in the DMO file:
1. If this is a new N30 database, modify the DMO file for the DX9100. In this
example, the following was changed from “DCO1”,N,N,” to “DCO1”,Y,Y,”
(Figure 5).
Note: When you import the file into the N30, the objects change from BI to
BO or AI to AO. This does not apply to Hardware points.
MODULE DCO 1
CSMODEL “DCO”,”DX9100”
ADTITLE “Analog Data”
BDTITLE “Binary Data”
CSBD “DCO1”,N,N,”OCCD-C”,”UNOCC”,”OCC”
Figure 5: DX9100 DMO File Example
8
N30 Supervisory Controller Integration with the NAE Application Note
Note: For ASC devices, you do not have to make significant changes to points. In
Figure 6, Item 217 is ADF(177) and has the Object type of N2AO.
Figure 6: Project Builder - ASC Example
N30 Supervisory Controller Integration with the NAE Application Note
9
Changing the Interlock Object
Change the Interlock object in Project Builder to identify the interlock condition in
the NAE. Refer to Working with Interlock Objects in the N30 User’s Manual.
To change the Interlock object:
1. For any interlocks in the N30, create a dummy BV object that is commanded
when the Interlock is enabled. Interlocks do not get passed to the NAE, so you
cannot see if the Interlock is enabled (Figure 7). By adding a BV, this object
maps back to the NAE, and you receive the status of the interlock (Figure 8).
Figure 7: Project Builder - Interlock (No Status)
10
N30 Supervisory Controller Integration with the NAE Application Note
Figure 8: NAE - Status from BV Object
2. Complete all description fields on each interlock you change. These fields also
import to the NAE.
Setting Up Communication for the N30
To set up communication for the N30:
1. Add the IP Address, IP Mask, and IP Router Address of the N30. (This
example contains static IPs.) You can do this online using a VT100 or offline
using Project Builder. Refer to Changing an IP Address in Chapter 3: Getting
Started in the N30 Supervisory Control User’s Manual (LIT-6892010).
Note: If the BACnet settings of the NAE are different from the setting in the
N30, you must coordinate these settings. The default UDP setting is
47808 and must match in the NAE and the N30. The standard network
address is 1001. The network addresses can be different if a BBMD is
defined for that device.
N30 Supervisory Controller Integration with the NAE Application Note
11
2. If the N30 is on a separate segment from the NAE, add the Broadcast
Management object (formerly the BACnet Broadcast Management Device
[BBMD]) to the N30 [Figure 9]). You can only add a BBMD from Project
Builder; however, you can modify it online using VT100 (Figure 10).
Figure 9: Project Builder - BBMD
12
N30 Supervisory Controller Integration with the NAE Application Note
Figure 10: VT100 - BBMD
3. Click Edit, and configure the BBMD (Figure 9).
4. Add the IP Address of the NAE in BM Address List IP Address field. In the IP
Broadcast Mask field, enter 255.255.255.255, not the current subnet mask.
This is a requirement of the BBMD object.
5. If no other N30s exist on the segment, change the Broadcast Disable to True to
prevent the BACnet device from sending out unnecessary broadcast messages.
Note: If your network does not require the BBMD, disable the object.
The N30 is now ready for BACnet Integration to the NAE.
Preparing the NAE
Setting Up Communication for the NAE
To set up communication for the NAE:
1. Log on to the NAE, and drag the NAE Device to the display frame.
N30 Supervisory Controller Integration with the NAE Application Note
13
2. Open the Networking Tab. We recommend using a static IP address
(Figure 11).
Figure 11: NAE - Networking Tab
3. Log onto the Site Director, and drag the Site Object over to the display frame.
4. Click Advanced to display the BACnet information.
14
N30 Supervisory Controller Integration with the NAE Application Note
5. Edit the object and change the BACnet Site to True and BACnet Encoding to
ASCII.
Figure 12: NAE - Site View
6. Open the Third party BBMDs.
N30 Supervisory Controller Integration with the NAE Application Note
15
7. Click Advanced, and click Edit to view the Third party BBMD (Figure 13). If
the N30 resides on a segment with no NAEs, add the IP address of the N30
online or with the SCT.
Figure 13: NAE - Advanced View
8. Click Save. The NAE is now ready for N30 integration.
Integrating the N30 with the NAE
Adding the BACnet Integration Object to the NAE
To add the BACnet Integration Object to the NAE:
1. Log on to the NAE. (Verify that the N30 and NAE are communicating.)
2. Add the BACnet Integration Object by following the steps in the BACnet
System Integration with the NAE Technical Bulletin (LIT-1201531).
16
N30 Supervisory Controller Integration with the NAE Application Note
Adding an N30 to the BACnet Integration Object
To add an N30 to the BACnet Integration Object:
1. Highlight the BACnet Integration Object and select Insert > Field Devices
(Figure 14).
Figure 14: Insert Field Device
2. Click the Assisted radio button.
3. Click the Invoke Auto Discovery... bar.
4. In the Identifier screen, change the Unique Identifier to something familiar (for
example, the name of the N30).
Note: The Unique Identifier is a BACnet number that you may not be able to
easily identify. The Unique Identifier is viewable in Project Builder.
N30 Supervisory Controller Integration with the NAE Application Note
17
5. When the N30 is found, the Wizard Auto Detect Utility screen appears
(Figure 15). The first four items are on the network and already installed. The
last row L110-N30 Device-101 is installed in this example. Write down the
Instance Number for future use. Add the Instance Number to the name as
shown.
Figure 15: Wizard Auto Detect Utility
18
N30 Supervisory Controller Integration with the NAE Application Note
6. Near the end of the Field Device Wizard, in the Extension Wizard screen, click
Done. The Field Points Wizard screen appears to import the N30 Objects
(Figure 16).
Figure 16: Field Points Wizard
N30 Supervisory Controller Integration with the NAE Application Note
19
7. Click on New>>, then click on Assisted to locate the points. The Wizard Auto
Detect Utility screen appears with all standard BACnet objects (Figure 17).
Point discovery may take several minutes.
Figure 17: Auto Detect Utility Wizard
8. Select points for the NAE using the Point Mapping Utility screen (Figure 18).
Figure 18: Point Mapping Utility
20
N30 Supervisory Controller Integration with the NAE Application Note
The following N30 device appears under the BACnet Integration (Figure 19).
Only the Schedule imports (no Interlocks import), due to the changes made in
Changing the Interlock Object. A folder is created called Binary Values that
contains the BV for the interlock.
Figure 19: Binary Values Folder with Interlock Schedule
N30 Supervisory Controller Integration with the NAE Application Note
21
Note: Consider the total number of BACnet devices allowed per NAE and the
total number of allowed objects. Using the Diagnostic tab in the NAE,
look at the total number of objects (Object Count) to determine how
many N30s you can have on your system (Figure 20). A maximum of
50 N30s and third-party devices is allowed. Refer to the Performance
Guidelines and Limitations table in the Metasys System Extended
Architecture Overview Technical Bulletin (LIT-1201527) for details.
Figure 20: Diagnostic Tab - Object Count
22
N30 Supervisory Controller Integration with the NAE Application Note
Adding N30s from Different Sites to an NAE (or project files in Project
Builder)
To add N30s from different sites to an NAE:
1. If you have different sites with N30s, change the Object Identifier for each N30
to a unique number.
Figure 21: Selecting an N30 from a Different Site
N30 Supervisory Controller Integration with the NAE Application Note
23
2. Open Project Builder and enter the N30 information in the Edit Attributes
screen (Figure 22).
Figure 22: Project Builder - Edit Attributes
24
N30 Supervisory Controller Integration with the NAE Application Note
3. Right-click inside the box and select Snapshot Config. Change the Object
Identifier (Figure 23). In this example, it is 101 for each N30 that does not
reside in the same site. This Object Identifier matches the Instance Object of
the NAE. The NAE takes this number from the N30. By default all N30s have
100 as the Object Indentifier.
Figure 23: Edit Attributes - Object Identifier
4. Select Format > Add Column to display this value in Project Builder. The Add
Column dialog box appears (Figure 24).
N30 Supervisory Controller Integration with the NAE Application Note
25
5. From the Attribute pull-down menu, select Object Identifier. An Object
Identifier column appears in Project Builder.
Figure 24: Project Builder - Add Column
6. If desired, when all of the N30s are integrated, rename and create User Views
for each user.
7. If the IP address of an N30 changes:
a. Delete the N30 that had the old IP address in the NAE.
b. Reboot the NAE.
c. Add the N30 with the new IP address into the NAE.
The N30 supervisory controllers are integrated into the NAE.
Controls Group
507 E. Michigan Street
Milwaukee, WI 53202
26
Metasys® is a registered trademark of Johnson Controls, Inc.
All other marks herein are the marks of their respective owners.
© 2005 Johnson Controls, Inc.
N30 Supervisory Controller Integration with the NAE Application Note
Published in U.S.A.
www.johnsoncontrols.com