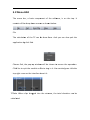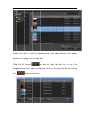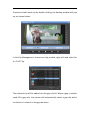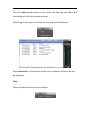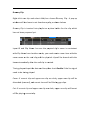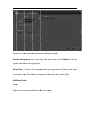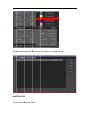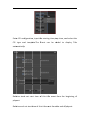
1
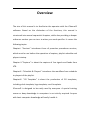
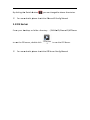
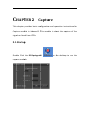
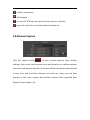
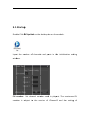
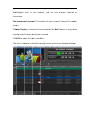
iChannel2UserManual Version 2.1 – May.2013 CopyrightNotice DAYANG Technology Development Inc.- Copyright © 2010-2012. All rights reserved. The copyright of this manual is reserved by DAYANG Technology Development Inc. This manual and any text, picture and content contained in this manual may not be reproduced or transmitted by any organization or person in any form or by any means, electronic or mechanical, for any purpose, unless approved and authorized by Beijing DAYANG Technology Development Inc. This publication may contain typographical errors or technical inaccuracies. While every precaution has been taken in the preparation of this document, DAYANG Technology Development Inc. assumes no responsibility for errors or omissions. Nor is any liability assumed for damages resulting from the use of the information contained herein. Changes are periodically made to the information herein, they will be incorporated in new versions of the manual. DAYANG Technology Development Inc. may introduce changes or improvements in the products described in this manual at any time without any special notice. DAYANG, iChannel2 are registered Trademarks or Trademarks of Beijing DAYANG Technology Development Inc. in China or other countries (areas). This manual may be involved in patents (or patents in applying), registered trademarks (or trademarks in registering) of Beijing DAYANG Technology Development Inc. This manual does not grant any licenses or agreements to use these patents (or patents in applying), registered trademarks (or trademarks in registering), copyrights or other intellectual property rights. The names of other products and companies mentioned in this manual may be trademarks of their respective owners. Disclaimer The information in this manual is furnished for informational use only and subject to change without notice. While every effort has been made to ensure that the information contained in this user manual is accurate, up-to-date and reliable, DAYANG Technology Development Inc. cannot be held responsible for inaccuracies or errors that may appear in this publication. UserManualsonDayangWebsite The latest version of the user manual, if any, and other user manuals on Dayang products can be found on the Dayang download center, on the following webpage: http://www.dayang.com Contents Introduction...............................................................................................................................5 Overview.....................................................................................................................................6 CHAPTER1 Services.........................................................................................................................8 1.1 Media Service ..................................................................................................................... 9 1.2 Clip Database Scan Service .............................................................................................. 10 1.3 CG Service ........................................................................................................................ 11 CHAPTER2 Capture........................................................................................................................12 2.1 Startup ............................................................................................................................. 12 2.2 Menu Bar ......................................................................................................................... 14 2.3 Capture Signal Window ................................................................................................... 15 2.4 Time ................................................................................................................................. 16 2.5 Clip Information ............................................................................................................... 17 2.6 Finish List .......................................................................................................................... 18 2.7 VTR Capture ..................................................................................................................... 19 2.8 Manual Capture ............................................................................................................... 20 2.9 Scheduled Ingest .............................................................................................................. 21 CHAPTER3 Scheduling&Playout.............................................................................................22 3.1 Startup ............................................................................................................................. 23 3.2 Menu BAR ........................................................................................................................ 25 3.3 Playback Window ............................................................................................................. 34 3.4 UV Meters ........................................................................................................................ 34 3.5 Playout Tool Bar ............................................................................................................... 35 3.6 Time Area ......................................................................................................................... 36 3.7 Playlist Tool Bar ............................................................................................................... 38 3.8 CG Overlay Control Area .................................................................................................. 40 3.9 Playlist .............................................................................................................................. 46 3.9.1 Components ............................................................................................................. 46 3.9.2 Editing ...................................................................................................................... 47 3.9.3 Right‐Click Menu ...................................................................................................... 52 CHAPTER 4 offline scheduling Introduction Thank you for purchasing the product of DAYANG. iChannel2 is a highly integrated and cost effective automation. Based on DAYANG video server, which is equipped with DAYANG's state‐of‐art video technology and high‐quality video I/O card. iChannel2 can complete capture and playout of HD signal in multiple channels. The applications of iChannel2 include capture, scheduling, playout, CGs, and so on. Overview The aim of this manual is to familiarize the operator with the iChannel2 software. Based on the distinction of the functions, this manual is structured into several sequential chapters, while also providing a deeper reference section you can turn to when you need specifics. It covers the following topics: ChapterI‐ “Services” introduces three of proactive procedures services, which must be run before the operation of capture, playlist schedule and playout startup. Chapter II‐”Capture” is about the capture of live signals and feeds from VTR. ChapterIII ‐“Schedule & Playout” introduces the workflow from schedule to playout of the playlist. ChapterIV‐ “CG Template” is about the production of CG templates, including clock template, logo template, scroll template. iChannel2 is designed to be easily used by everyone. A special training course or deep knowledge in computers is not strictly required. Anyone with basic computer knowledge will easily handle it. Should you have any questions during operation, please contact your dealer or contact us directly. Your comments will help us improve the quality of user documentation. We are looking forward to your feedback. CHAPTTER11 Seervicces Thiss chapter provides basic connfiguration n and ope eration innstructionss for threee servicess in ichann nel2: Meddia Service e, Clip Database Scaan Service and CG SService. V VDCP Serrvice is inn charge of the co ommunicaations am mong hardware during caapture andd playout. V VIPs Servver Settin ng ended to load varrious servvices is inte w which neeed to com mmunicatee with Posstgre database, suchh as scan clips in specifieed path m meanwhilee the clip iinformatio on of the video file e will be autom matically added a intto the clip p databasse. Moreoover, servvices w which in charge off QC, autoo file tran nsfer, auto playlist transfer also sshould bee loaded in n this moddule. C CG Server is to eedit and overlay o graphics likke clock, logo, sscroll on tthe outputt signal. 1.1 1 Media Service e From m your deesktop or ffolder patth: ...\DAYYANG\iCha annel2\Binn, double click the DYVipsU to run the e VDCP se rvice. Cho oose corresponding card and then presss Start to load cardd. If Au uto run an nd Auto lo oad card aare checke ed, VDCP service annd last cho osen card d type will be autom matically looaded at e every time e startup. 1.2 VIPs Server Setting From your desktop or folder path: ...\DAYANG\iChannel2\Bin, double click the VIPsServerSettingU to open service. To run the the all services have been added ,Click the Start Button which could be seen in the Operation section. The default directory to save clips is E:\Data, the default directory to save the database description file is ...\DAYANG\iChannel2\bin\configuration. (VipsServerDB.setting) By cclicking thee Details b buttom ,you can n change tthe abovee directories. ※ For moree details p please cheeck the iCh hannel2 Co onfig Mannual 1.3 3 CG Serrver From m your deesktop orr folder directory: ...\DAYAN NG\iChannnel2\MTSeerver to ru un the CG G server, double clic k to run n the CG SServer. ※ For moree details p please cheeck the CG G Server Co onfig Mannual CHAPTTER22 Captuure Thiss chapter provides basic connfiguration n and ope eration innstructionss for Capture mod dule in ich hannel2. TThis modu ule is abo out the caapture off live nals or feeds from V VTRs. sign 2.1 1 Startup p on th he desktoop to run the Dou uble Click the DYVipsIngestU U captture modu ule. Seleect channel coun nt and iinput the e number of chaannel in the initialization setting s wiindow. Thhe maximu um CH nu umber is ssubject to o the hannel2 an nd the settting of Re edBridgeIIII card. verssion of iCh will be NO OT shown in every ttime If Neever Display is checked, thiss window w starrtup and all values w will be reseerved. on to ente er the maiin interfacce. Clickk OK butto n sections as below.. The main inteerface is divided intoo six main 2.2 Menu Bar The menu bar, a basic component of the software, is on the top. It consists of three drop‐down menus as shown below: File Select Channel Setting to view the channel status, and select Exit to quit the module. You can as well click the top right Cross on the window to exit it. View In this menu, it can display the Status Bar. Click View and select Status Bar.At the bottom of the main interface, the status bar will be displayed. Help Click Help to view the software version. 2.3 Capture Signal Window The upper left area of the main interface is the capture signal window as shown below: On the right side of the capture signal window is the UV Meters. 2.4 4 Time Systtem Time Timecode and d Countdo own Timeccode 2.5 Clip Information ID Input the capture clip ID as the clip name or click button to generate a random ID automatically. Time Setting Input start time and duration to indicate capture start time and capture duration. End time will be calculated automatically if start time and duration are both set. In other words, when input any two values, the third one will be filled automatically. In VTR mode, Day area will present gray, users cannot set day number options. When click the Rec button , the module automatically will begin capturing. Once completed ,the record task will be added to the finish list in th he bottom m left. Afte er input thhe ID, and d any two time setttings, clickk the buttton to add the clip innto the task list. Then the meetadata off the clip will be shown in the list, including Clip p ID, Start Time, andd Clip Lenggth. 2.6 6 Finish List The recorder task which have bbeen set will w be ad dded to thhe Finish List. ore inform mation abo out schedu uled task, includingg Clip You can obtain the mo Clip Length, and Clip p Thumbnnails. ID, C 2.7 VTR Capture Click the capture button to start VTR capture after relative settings. Input start time (relative to VTR start time) and end time (relative to VTR stop time). Duration will be calculated automatically if start time and end time are both set. Users can set date number in Day area, system will perform capture after specified days (today if day number is 0). With the help of the following button, users can control the VTR playout, so that to complete the VTR Capture. Users can choose which VTR to capture in drop‐down list. : go to specified frame of VTR signal. : fast rewind : jump to previous frame. : play VTR : stop VTR : jump to next frame : fast forward : set current VTR play time point as start time or end time. : go to the start time or end time that has been set. 2.8 Manual Capture Click the capture button to start manual capture after relative settings. Input start time (system time) and duration to indicate capture start time and capture duration. End time will be calculated automatically if start time and end time duration are both set. Users can set date number in Day area, system will perform capture after specified days (today if day number is 0). 2.9 Scheduled Ingest Click the button under the Clip Info, the ingest task will be added to the task list. It is remarkable that the time interval of the two adjacent tasks must be more than 5 seconds. The module automatically will begin sequential capturing by task list when click the Rec button . With the help of the following button, users can edit and modify the capture task, so that to complete the Scheduled Ingest. :Start to capture :Stop the capture :Delete the selected task : Import the capture list (the default format of captured list is PLST) Export the capture list, and he list file will be saved with PLST format. Clear all of recorder tasks in the list. When click the buttom,a setting window, as shown below, would pop up ,where you can change the imformation of this task,including Start Time, Clip Length,and Start Date. CHAPTER3Scheduling&Playout This chapter provides basic configuration and operation instructions for the module of scheduling and playout. 3.1 1 Startup p Dou uble Click D DYVipsAirrU on the desktop to run the t module. ut the nu umber off channelss and po orts in th he initializzation settting Inpu wind dow. nnel num mber used d in playo out. The maximum m CH CH number:Set chan mber is subject s to o the version of iChannel2 and thhe settingg of num RedBridgeIII card. In this mannual, justt use one playou t channe el as instruction. nel: fill numbers of each chan nnel, plea se fill num mber The numberss of chann m 1. from If Neever Display is checked, thiss window w will be NO OT shown in every ttime starrtup and all values sshould be reserved. nter the m main interfface. Clickk OK to en The main inteerface is divided intoo eight main sections as discuussed belo ow. 3.2 2 Menu BAR The menu bar, a basic compoonent of the softw ware, is oon the top. It own menuus as show wn below: conssists of fivve drop‐do File on of the TC can bbe done here. h And you can also quitt the The calculatio application byy click Exitt. oose Exit, the pop‐u up window w will be shown to o ensure tthe operattion. Cho No to stayy in it. You u certainlyy can clickk the Clickk Yes to quit the module or N top right crosss on the interface tto exit it. TCCalee: When clips draggged into the wind dow, the total durration can n be calculaated. Set Clickk the Set w window option in thhe menu, the Frequ uently‐useed settingss are disp played in this drop‐d down winddow. C Channel Seetting: To view the status of channels a and ports that have e b been set, b but also to o modify tthe channels.(restart the proccedure to o eenable thee new valu ues) Gap p Clip: To vview and sset the gapp clip Clickk the List L buttonn in the Gap List Window, and the Clip Man nagementt Window will be poopped up ,, as shown n below: Seleect the cliips in the e Clip Mannagementt, click an nd hold thhe left mo ouse buttton on it, d drag it to the Gap LList. Clickk the All button too add all clips to o Gap Lisst in the Clip Man nagementt. Users caan removee gap clip from the gap clip llist by cliccking the Remove buttons. Preview and edit each clip by double clicking, the backup window will pop up, as shown below: In the Clip Management, choose one clip needed, right‐click and select Set As GAP Clip. The selected clip will be added into the gap clip list. When a gap in playlist need fill by gap clip, the system will automatically select a gap clip which its duration is closest to this gap duration. Set of CG event: Matrix Setting: Input the number of Port in the pop‐up window Users can add or delete external live signals, which be inputted and outputted through the matrix card. User can also name each of the signals. Set of CG event: To set the preloading time,which is used for filling the response time of CG server. Set of VTR event: Used and setting rewind time and for fillng the response time of VTR, rewind time specifies a pre‐rewind time before VTR is normally played out so that VTR playout can be started from right position of type. Auto Load: Scan frequecy is the scan time interval of the predifined playlist folder which used to save auto‐loaded playlist. The playlist will be scanned every set seconds in the user‐defined playlist directory. The system will import right playlist according to predefined auto load time of playlist. ※ For how to export a playlist as an auto‐loaded playlist, please see 3.7 Toleerance(Preeloading) is the preeloading time t range e. If the ttime betw ween now w and predefined auto load time of playlist p is in this preeloading time t rangge, this plaaylist will be autom atically im mported. By cclicking thee Details b button ,you can change tthe playlisst directorry. Syncc Play The opttions in this list a re used for controlling com mmunicattions ween maiin server and back up serverr. For morre detaileed infomattion, betw pleaase refer to "Main aand backup playout instructio on". View w Click the View window option in the menu, the Play Log and Status Bar are displayed in this drop‐down window. Select Log, in the pop‐up window the Play Log will be displayed. Select Status Bar, at the bottom of the main interface the Status Bar will be displayed. Help Help provides the version of the module. 3.3 Playback Window The upper left area of the main interface is the playback window. 3.4 UV Meters The UV Meters is on the right side of the playback window. Click the button to view and reset the status of Eight‐channel audio, any channel can be muted, as shown below: 3.5 Playout Tool Bar The Playout Tool Bar provides various functions of playout. :Clip Management :Cue (Select the clip that needs to be pre‐rolled in playlist, click this button to start pre‐roll.The clip must be pre‐rolled before the beginning of playlist) :Play :Pause/Stop :Jump(while the playlist is playing to skip the other clip) :Resume(return to the jumped frame of previous clip) :Return(return to the overlapped frame in the previous cilp ) :Next(while the playlist is playing to force immediately the transition to the next clip in the playlist.) :Reset (Reset status of current playlist) 3.6 Timer Area The upper right area of the main interface is time display .It provides the timing clock upon playout. Local Time Timecode for the playing clip Countdown Timecode for the playing clip 3.7 7 Playlistt Tool B Bar The Playlist To ool Bar prrovides funnctional b buttons of playlist. port :Click Import bu utton and select the e needed playlist. Imp In caase of theere is a existing playylist, follow wing window will bee shown, yyou can replace old playlist or add playlist at b back of original playylist. ort :Clickk Export button, sselect the e specific saving ddirectory and Expo choo ose the file type off playlist ffrom drop p‐down listt, we currrently sup pport xml,, plst and excel, the ere are tw wo types o of export, Custom aand Auto‐‐load timee playlist: Cho oose Custo om type, input any playlist naame you w want, clickk OK to exxport o specified d path. Latter, this p playlist can n be manuually impo orted this playlist to human ope eration. any time by h oose Autoload time e, then seet a time point, this playlist will be saaved Cho h name off time forrmat. and this time e point will be playylist autom matic with import time. ※ Regardinng auto loaad settingg, please see 3.2‐Sett menu CLEA AR:To cleaar all of clips from pplaylist (caannot do tthis duringg the playo out) LOC CK:To lock the functtion buttoons of playyout durin ng playoutt,as well aas to avoiid mis‐opeeration thereby to eensure higgh securityy of playo ut. 3..8 CG Ovverlay C Control The CG overrlay contrrol area provides the frequently‐useed button of phics, the following buttons aare include ed. grap Presss to o open CG set window w: Seleect All: to select all C CG instance in the llist, after cclicking OKK, corrresponding CG buttons will bee shown o on the software inteerface, like: Inveert: Invert selection. New w: create n new CG in nstance. Prress this b button to ccall CG Te mplate wind dow like b below pictture: In th his window w, you can n see CG ttemplates classified in five meenus: TitleeWord, Im mage, Dialo og, Timer and Moviie. Choose e one tem plate then n inpu ut instancee name, click OK to newly cre eate a CG instance. and this instaance will b be listed in Channe l CG Set w window, likke followinng picture e to show w: Mod dify: click on one crreated CG instance then press Modify bbutton, currrent CG instance can be re‐eddited by use of follo owing winddow, such h as stylee, color, p position, se etting scrooll text, lin nking to exxternal im mages for logo and movie an nd so on. ※ iChannel2 has built in various type of CG tem mplates tto satisfy user uirment, including ttemplate ffor logos, clocks, scrolls and aanimation n. requ Afteer editing, press Playy button tto preview w its effectt. Deleete: deletee selected d CG insta nce. Turn n on CG buttons on the main interface to add on n CG on thhe signal, like follo owing pictture to sho ow: 3..9 Playliist The Playlist area a lists the t readyy clips to playout. p The T follow wing fieldss are uded: inclu 3.9.1 Compon nents Stattus: Showss QC resullt includinng Starrt Time: This field sh hows the starting tiime of clip p. Nam me: This field showss the namee and thumbnail (first frame)) of clip. Marrk Color: U Users can set markk color forr each clip ps to labell classificaation of clips, such as green iis movie, bblue is new ws, yellow w is adverttisement. m in: Trim in point o of clips. Trim Duration: This field sho ows the tootal clip le ength (rega ardless off stored in and out‐‐points). Even nt/VTR: iff any item m event is added asssociate with one ceertain clip,, this colu umn will show acco ording signn. "T" meaans CG evvent, "M" means matrix even nt, "V" reffers to VTR event. ID: IIDs of clips, provide es the uniqque identification of clip in daatabase. 3.9.2 Editing Creaate Playlisst Clip Managem ment Clickk the buttton in Playout Tool Bar to oppen the Clip Man nagementt .The deffault clip ddirectory is E:\data a.Add new w clips to Clip Man nagementt by copyin ng clips too this folde er. At the left sid de of window is treee structure e catalog ffor clip claassification n. Righ ht‐click Cliip Root Directory tthen presss New Dirrectory to create a new subd directory. Morre deeper directorie es can be created by clicking any one ddirectory, like: Just drag‐drop clips into differennt directorries to com mplete clipp classification. It is convvenient forr sorted cllip management Clickk the button tto preview w the clip in the Clip p Manage ment. : these two butttons set the clip p’s mark‐‐in‐point and marrk‐out‐point, the sttarting and last frames for clip. c Repeeat click these two button for clearring the correspon nding marked poinnt. When n no he defaultt points a re the firsst or marrk‐in‐pointt or mark‐‐out‐pointt is set, th last frame of the clip. :go to o the deefined mark‐in‐poiint or m mark‐out‐p point resp pectively. :go to the currennt first fram me or last frame resspectivelyy. Seleect any fraame and click to capture thum mnail. Inpu ut the nam me and click the addd or inse ert button ,the clip will be ad dded or in nserted to o the playylist.Click ook to mod dify length h of clip aalong with h the mettadata of p physical cllip in dataabase. Clickk the small square aat the righht side of N Name blan nk to set m mark color of this clip. If cliick New C Clip, modiffied clip w will be save ed as a new w clip in cclip list ratther than n replacingg old clip. Add d Clip Into Playlist Seleect the clips needed in the C Clip Manaagement, click and hold the e left mou use button n on it, draag it to the playlist. Hold d Shift and click to select a ccontinuou us range, d drag it to the playlist if you want to aadd more than one clip. button to add all cclips to plaaylist. Rem move gap clip from m the Clickk the All b gap clip list byy clicking tthe icon . Check Add ass group fo or more cllips can be e added, d deleted, oor modifie ed as hole. a wh Adju ust the ite em sequen nce in playlist Seleect the iteem that needs to bbe adjuste ed in playlist, and ddrag it byy left clickk on mousse to the sspecific poosition dire ectly. Inteer‐cut Inteer‐cut, in this t case, is designned to inssert one clip c into aanother en ntire clip.. The concretee operatio ons are:(1)drag one e clip by left click on mouse e on another clip tthat need to be inseerted (2)a window, to previeew the origginal op up as aa yellow liine appeared on the original clip (3) se elect clip,, would po the mark‐in p point and m mark‐out point in th he preview w window w. (4) click ok, the t origin nal clip wiill be divided into two sectiions from the seleected inserrtion point. 3.9.3 Right‐Cllick Menu u Add d Dum mmy Clip Righ ht‐click on ne clip an nd select Add,then choose Dummy D CClip. A pop‐up wind dow will b be shown to set thee dummy cclip,as sho own below w: Dum mmy Clip is inserted into plaaylist as a a place ho older for tthe clip which w has not been prepared yet. ut ID and Clip Nam me: be sure the ph hysical clip p’s name is consisiitent Inpu with h Clip Nam me here.In n other woords, you need crea ate a new item with h the sam me name as a the reaal clip,andd the physsical clip will w be boound with h the item m automattically afte er the reall clip is cre eated. Timing playou ut:Input th he date annd time,th hen check Enable if the live siignal ming playe ed. need to be tim r one clip are clash,, upper onne clip will be Cover: if currrent clip and upper overed), an nd vacant time will be filled b by gap clipps. discarded (co e clash, up pper one cclip will be e cut Cut:: if current clip and upper onne clip are off ffor playingg current cclip. Livee Signal Righ ht‐click on ne clip an nd select Add,then n choose Live Signnal. A pop‐up wind dow will b be shown for live siggnal settin ng,as show wn below:: live signal can n equally b be used ass a item fo or playout. Inpu ut the nam me,channe el numberr and defin ned length h. Set the timin ng play: Input the date and tiime,then check Enaable if the e live nal need to o be timing played. sign Voicce Over:Overlay the originaal audio byy using loccal clip.Chheck and input the audio nam me.The de efault direectory of lo ocal clip iss E:/audio (file) Add d Item Eve ent Even nt Righ ht‐click on ne clip and d select Addd item evvent A po op‐up window will b be shown for Event,as shown n below: Add d Title (CG G) Presss Add and d select Tiitle. Enteer CG con nfiguration n ,input thhe starting time,sto op time, aand selectt the CG type an nd templaate.The EEvent can be ad dded to display Title omaticallyy. auto Relaative startt: set start time oof this titlle event from f the beginning of playyout. Relaative end: set start ttime of this title eve ent from tthe end off playout. Cho oose CG teemplate from drop ddown list tthen set a a instance name. d Matrix Add Presss Add an nd select Matrix. EEnter the Matrix co onfigurati on, inputt the starrting time or stop time, and select the e Source a and Targeet. The Matrix hed for live e signal playout auttomaticallyy. will be switch d VTR Add Presss Add an nd select VTR. Enteer the VTTR configu uration, seelect the port num mber that you want to controol and input the pla ayout posiition .The VTR will be contro olled for playout auttomatically. Channel Map pping Check Channeel Mappin ng or Channnel Mixer to set th he audio cchannel off live nal. sign Add d Independ dent Even nt The config method of Add Indeppendent EEvent is exxactly thee same as Add m Event. The large est differeence betw ween Add d Item Evvent and Add Item Indeependent Event is tthat all seetting in A Add Item Event actss on a certain singgle item while all settting in Addd Indepe endent Eve ent are jusst related to a certtain time p point. CueTone Trigger Event is uniquee for Add Independe ent Event. CueTone Triggger Eventt n detect cue tone siignals emb bedded in n original SSDI signalss, iChaannel2 can and automatiically perform "Jum mp to sub‐list" or "Re eturn to m mainlist" o once etected. cue tone signals are de ue tone is detected between time poin nt of "Jump p to sub‐liist" and time If cu poin nt of " Jum mp to sub‐‐list " + "Tiime Range e", playout progresss will jump p to follo owing sub blist. If cu ue tone is detected between time poin nt of "Retu urn to mai nlist" and timee point of " Return tto mainlisst " + "Time Range",, playout pprogress w will jump back to mainlist. If "Returnn to mainliist" is unch hecked, p layout ump back to mainlisst until sublist finish h. proggess will ju Clips can be aadded into o sublist att the lowe er part of w window. ngroup Group and Un djacent cliips can be e grouped or ungrouuped. Mulltiple clipss can be ad Loop op to causse the clipp to restarrt upon rea aching its end, in eiither Check the Loo until Stop is clicked. direection. In tthis mode,, the clip pplays conttinuously u Prop perty Check the Property to access the Clip Main Window. You can perferm following operations: View the clip: provides various functions of playout to view the clip and capture the thumbnail. Set mark color: Click the small square at the right side of Name blank to set mark color of this clip. Create new clip: input the name, mark‐in‐point, mark‐out‐point, or duration, click ok to add new item into the playlist. Note that the modify here simply add or change the metadata without changing the actual length of clip. Timing Playout: Input the date and time, check Enable if the clip need to be timing played. Cover: if current clip and upper one clip are clash, upper one clip will be discarded (covered), and vacant time will be filled by gap clips. Cut: if current clip and upper one clip are clash, upper one clip will be cut off for playing current clip.