1
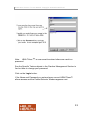
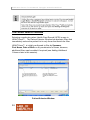
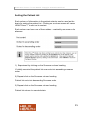
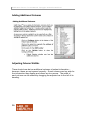
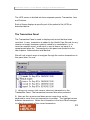
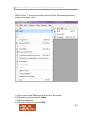
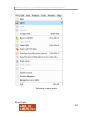
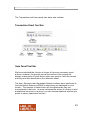
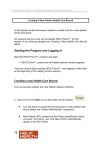
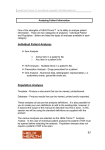
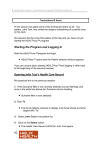
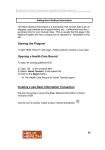
Health One Version 7.1 User Manual. Copyright 2011Helix Health Ltd Getting Around 21 Health One Version 7.1 User Manual. Copyright 2011Helix Health Ltd Session One introduced the Health Care Record and terminology used in HEALTHone™ . In this session we will introduce you to one of our patients: John Test, and learn the techniques and methods required to use HEALTHone™ and find your way around the program. Starting The Program Double click it to start HEALTHone™ – HEALTHone™has a built in security system that requires the user to identify themselves by name and password to gain access to the program. This information is entered in the LOGIN window illustrated opposite. 22 Health One Version 7.1 User Manual. Copyright 2011Helix Health Ltd Note: HEALTHone™ is case sensitive when letters are used in a password. See the Specific Tasks subjects in the Practice Management Section to find out how to change your password. Click on the Login button. If the Name and Password you entered were correct HEALTHone™ allows access and the Patient Selector Window appears next. 23 Health One Version 7.1 User Manual. Copyright 2011Helix Health Ltd The Patient Selector Window Selecting a particular patient Health Care Record (HCR) is easy in HEALTHone™ . The Patient Selector Window has dynamic filters that immediately reduce the patient list to only those that match the filter. HEALTHone™ is initially configured to filter by Surname, First Name, Date of Birth or any combination of these, however; additional filters can be added if required (see Adding Additional Columns later in this session) Patient Selector Window 24 Health One Version 7.1 User Manual. Copyright 2011Helix Health Ltd Sorting the Patient List Each column of information in the patient selector can be used as the basis for sorting the patient list. Clicking on a column name will cause HEALTHone™ to sort on its content. Each column can have one of three states – marked by an arrow or its absence. 1) Experiment by clicking on the Surname column heading If initially unsorted the patient list now sorts into ascending surname order 2) Repeat click on the Surname column heading Patient list sorts into descending Surname order 3) Repeat click on the Surname column heading Patient list returns to unsorted state. 25 Health One Version 7.1 User Manual. Copyright 2011Helix Health Ltd Adding Additional Columns Adjusting Column Widths There should now be two additional columns of patient information – however; these are not spaced correctly. Some columns are too wide for the information they display and others are too narrow. The width of each column can be altered by dragging the adjuster bar to the left of its heading. 26 Health One Version 7.1 User Manual. Copyright 2011Helix Health Ltd Selecting an Existing Patient 1) If the Surname filter is not currently selected (insert cursor flashing) click once in the white box above the column name. Surname filter is now selected 2) Type a T The list of patients reduces to display only those whose surname begins with ‘T’ 3) Type an e The list of patients further reduces to display only those whose surname begins with ‘Te’ Select John Test in the patient list. Click on the Select button. The Health Care Record (HCR) for John Test opens. 27 Health One Version 7.1 User Manual. Copyright 2011Helix Health Ltd The HEALTHone™ Screen This is the HEALTHone™ screen when a patient’s HCR is open. The three panels mentioned in session one, problem, transaction and item, can be clearly identified. Major Areas of the Screen The HEALTHone™ Screen - Screen Panels 28 Health One Version 7.1 User Manual. Copyright 2011Helix Health Ltd The HCR screen is divided into three separate panels: Transaction, Item and Problem. Each of these displays a specific part of the patient’s file (HCR) as described below. The Transaction Panel The Transaction Panel is used to display each event that has been recorded. A new transaction is added to the Health Care Record for any reason not simply because a patient visited for a consultation, i.e. to record an experts report, a lab result, a visit at home, an issue of a repeat prescription etc. Transactions in this panel are divided into the two chapters: Administrative and Medical. We will look at quick ways to navigate through the various transactions in this panel later, for now: 1) Using your mouse, click once to select any transaction in the Transaction Panel. The transaction becomes blue when selected. 2) Now use the up arrow and down arrow cursor keys on the keyboard to move from one transaction to another. The highlight moves between transactions. Notice the information in the Item Panel changes to reflect the contents of the current transaction. 29 Health One Version 7.1 User Manual. Copyright 2011Helix Health Ltd 3) Now repeat press the up arrow until the Administrative Chapter comes into view. You can now see that the Administrative Chapter has just one transaction and the Medical Chapter starts with the Basic Medical Information transaction. The Item Panel The Item Panel is used to display the contents of the selected transaction. Each transaction can contain one or more items. Remember the discussion on this in the Introduction section. Note: By default when you open a patient’s record, the last transaction displays. It is possible to set it to open automatically in either the Administrative or Basic Medical Information transaction if preferred. To do this click on the menu item « tools – options » and choose from the drop down list «Open the HCR on». The Problem Panel The Problem Panel is used to display the patient’s principal active or inactive medical problems. This feature can also extend to linking the relevant transactions to the condition they relate too. We will show you how this is done later. It is possible to hide this panel if you are not using it: Click on the View menu and select the option Problems Problem panel disappears. Click on the View menu and select the option Problems once again. Problem panel re-appears. The HEALTHone™ Screen - Using Menus 30 Health One Version 7.1 User Manual. Copyright 2011Helix Health Ltd HEALTHone™ menus act exactly like any other Windows application, simply click, point, click. 1) Click once on the File menu at the top of the screen 2) Move the mouse to point to Open Sub menu appears 3) Move the mouse to point to HCR 31 Health One Version 7.1 User Manual. Copyright 2011Helix Health Ltd 4) Search for John Test then click on a patient to select. The first transaction in John Test’s HCR is selected in the Transaction Panel and his administration information appears in the Item Panel. Menu States Menus and their various options are dynamic in that they have two states, active or inactive. A menu will become inactive, and therefore unselectable, if the task they perform is not relevant to what you are currently doing. Inactive menu options appear light grey in colour and active menu options appear black. In some instances the menu will not be present at all. The HCR menu, for example, will not be present on the menu bar unless a patient’s HCR is open. 32 Health One Version 7.1 User Manual. Copyright 2011Helix Health Ltd Selecting a menu option Short Cuts 33 Health One Version 7.1 User Manual. Copyright 2011Helix Health Ltd The HEALTHone™ Screen - Toolbars A toolbar is a strip of buttons and possibly other objects that achieve various tasks i.e. open the Patient Selector Window; create a new patient file etc. etc. The HEALTHone™ Window has two toolbars: Standard and Analysis. If an icon is greyed out it is not relevant to the area that you are currently using. The Standard Toolbar The Analysis Toolbar To find out what a particular button does you simply place the mouse cursor on it and an explanation of its function appears in the prompt area at the bottom of the HEALTHone™ Window. Wait a few seconds and its name will appear underneath your mouse cursor. 1) Point your mouse at different buttons on the toolbars and observe the prompt area at the bottom of the screen. Note:The toolbars can be locked by default – so they can’t be dragged into awkward positions. . To do this click on the menu item « tools – options » and tick «Lock the toolbars». 34 Health One Version 7.1 User Manual. Copyright 2011Helix Health Ltd The Transaction and Item panels also have own toolbars: Transaction Panel Tool Bar Item Panel Tool Bar We have indicated the function of some of the more commonly used buttons, however, the prompt area at the bottom of the screen will display a description of each button when you point to it with the mouse and they are also described on the reference sheet. The Item, Sequence and Aggregate Selector buttons were mentioned in the Introduction Session and this is where they are displayed on your screen. The function of each button will be explained as they are encountered in the book. In many instances the action of a button is also available as an option on a menu, you can choose whatever method you prefer to select a particular function. 35