1
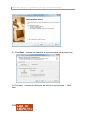
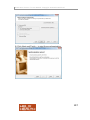
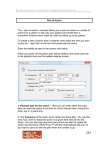
Health One Version 7.1 User Manual. Copyright 2011Helix Health Ltd Note: The Configuration tab will now remain as a feature of the logon screen. In the event of the network failing, or a laptop not connected to the network, the LOCAL configuration can be selected when required in the same manner. Synchronizing Sources Introduction A source contains a complete set of information regarding a practice, including patient files, billing information, appointment information and user information. Many practices will have secondary sources such as a laptop source, RIP Source and possibly a backup source somewhere on the network. These secondary sources need to be kept in-sync with the master source on the server. How a source is created is documented in the Installation Guide and is normally performed at installation time. There are two types of source: Master and Slave and dependent upon the type(s) being synchronised various options will/will not be available. Regardless of source type the procedure is quite straightforward. Synchronisation Technique 1) Start HEALTHone™ and login to ONE OF THE SOURCES TO BE SYNCRONISED. 2) Click on the Synchronise Sources button on the Standard Toolbar. Illustrated opposite. The Synchronisation Wizard start. There now follows a series of screens the first of which is just an opening screen and can be by-passed in the future by ticking the Do not display…box 195 Health One Version 7.1 User Manual. Copyright 2011Helix Health Ltd 3). Click Next – choose the direction of synchronization and press next. 4).Click next – choose the data you would like to synchronise. – Click next. 196 Health One Version 7.1 User Manual. Copyright 2011Helix Health Ltd 5) Click Next and Finish – to start the synchronisation. 197 Health One Version 7.1 User Manual. Copyright 2011Helix Health Ltd Typically in the case of a laptop the direction of synchronisation when leaving the practice would be Server to Laptop and when returning Laptop to Server. There is also an option to synchronise in both directions – , naturally, this would take longer to perform. Options a) Synchronise HCR’s Patient Files b) Don’t /Do synchronise deleted.. Patient’s deleted in one source can optionally be deleted in the destination source. c) Advanced (Archive..) This option is for archiving files, for example if deceased patient’s are being synchronised to an RIP source. Options control what will happen to the files in the original once synchronised to the destination. Don’t delete…Files left intact. Delete HCR…Moves patient files to the deleted patient selector screen. Delete permanently…Permanently delete the files in the original source. d) Audit trail Only applicable for Slave/Master synchronisations – synchronises the audit log. e) User information Only applicable for Slave/Master synchronisations –Changes in Master Source users – i.e. new users, password changes, rights changes etc. f) Billing Billing information. g) Appointments Appointment information. 198