1
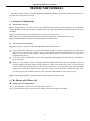
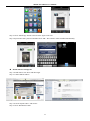
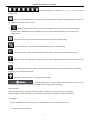
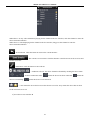
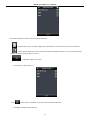
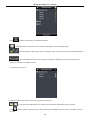
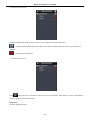
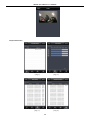
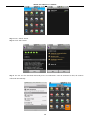
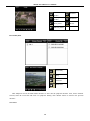
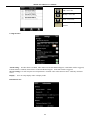
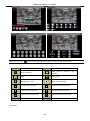
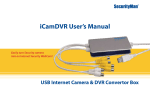
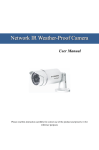
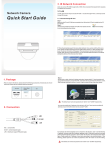
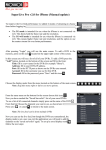
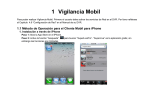
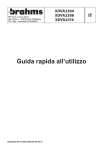
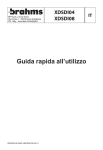
Mobile Surveillance User Manual Mobile Surveillance User Manual Contents 1.1 Network Configuration ........................................................................................................................................... 3 1.2 By Phones with iPhone OS ..................................................................................................................................... 3 1.3 By Phones with Android OS ................................................................................................................................. 13 1.4 By Phones with Blackberry OS............................................................................................................................. 18 1.5 By Phones With Windows Mobile OS .................................................................................................................. 21 2 Mobile Surveillance User Manual Mobile Surveillance This DVR supports mobile surveillance by phones with iPhone, Blackberry, Android or Windows mobile OS. At the same time, it supports 3G network. 1.1 Network Configuration Access device via LAN Step 1: Connect device via wireless router. Then checkmark DHCP both in router and device to automatically acquire IP address or enter the IP address manually. Please enter Main MenuInformationNetwork tab to see the IP address. Step 2: Use WIFI function in your mobile phone to connect the wireless router. Note: Make sure your phone network and device network are in the same network segment on LAN. Step 3: Add the IP address and port in the mobile phone surveillance client. Access device via 3G network Step 1: Set the device network. Please enter Main MenuSetupNetwork tab. If you use PPPoE to connect device, please enable PPPoE and input username and password received from you ISP in network tab. Then click “Apply”. You can enter Main MenuInformationNetwork tab to see the IP address. If you want to utilize dynamic domain name, please apply for a domain name in a DNS server supported by the device. If you have a static WAN IP address, please enter Main MenuSetupNetwork tab to input your IP address, gateway and port. If you use LAN IP address, please enter Main MenuSetupNetwork tab to input your IP address, gateway and port and then forward IP address and port number in virtual server setup of the router or virtual server(If you has enabled the UPnP function in both the device and router, you can skip this step). Port forwarding setting may be different in different routers and servers. Please refer to the router‟s manual for details. After you forward your LAN IP address and port, please check the WAN IP address in the router or server. Step 2: Add the WAN IP address or domain name in mobile phone surveillance client. 1.2 By Phones with iPhone OS Install software by iPhone/iPad Step 1: Open App Store software as shown in the figure on the left. Step 2: Search “SuperLive Pro” and click “Free” button as shown in the figure on the right. 3 Mobile Surveillance User Manual Step 4: Click “Install App” button as shown in the figure on the left. Step 5: Input iTunes Store password and then click “OK”. The software will be installed automatically. Install Software through PC Step 1: Install iTunes store in PC and then login. Step 2: Connect iPhone and PC. Step 3: Search “SuperLivePro” and select it. Step 4: Click “Download” button. 4 Mobile Surveillance User Manual Step 5: Input username and password. Step 6: Synchronously apply SuperLivePro software to iPhone/iPad. SuperLivePro Instruction Login Step 1: Choose network. There are two network connection ways: 3G/3G +WIFI, well video quality. This network supports main stream in single channel playing and sub stream. 5 Mobile Surveillance User Manual The real-time image will be displayed by using sub stream. 3G-, poor video quality contrast to the above mentioned network. Step 2: Click Login. Then click button to add device name, IP address, Port, username and password. Step 3: In the live interface, choose one channel and click to pop up the server list. Then unfold the channel and choose a channel to display the live image. Live There are many buttons in live interface, such as, screen mode, favorite channel, snap, record, open/close audio, talk, PTZ., etc. :Image view button. The pictures snapped in the live will be checked by clicking this button. You will view these pictures in this interface. :Playback button. Click this button to enter into playback interface. :Settings button. Click this button to set local configuration (Some can also support remote configuration). :Information button.Click this button to check lots of information including local information, device information, network information, etc. :Server list edition button. Click this button to add server list. :Log off button. Click this button to return to the login interface. 6 Mobile Surveillance User Manual :Screen mode button. You can choose 1,4,6,8,9,13 or 16 screen display mode. :Favorite channel display button. If you save your favorite channel in the list, clicking this button will directly play all favorite channels you have saved. :Multiple channel choice button. You can select multiple devices at the same time and let multiple channels to play simultaneously (The channels can not exceed the maximum number of the current screen display mode). :Snap button. Choose the channel and click this button to capture the channel image. :Local record button. Choose the channel and click this button to start recording. : Open/Close audio. Choose the channel and click this button to open/close the audio of this channel. :Open/Close talk. Click this button to pop up the servers which support talk function. Select the device to start talking. :Set video parameter button. Select the channel and click this button to set the video parameters including brightness, hue, saturation and contrast. :PTZ button. Click this button to pop up PTZ control panel. : Stream switch button. If “3G/3G+/WIFI” network mode is selected, you can switch between sub stream and main stream when only the single channel is playing. Other operation: When the single channel is playing, the channel can be switched by swiping your finger left and right. When the single channel is playing, you can zoom in/out the image by swiping you finger up and down Server list You can simultaneously connect 20 devices at most and there is a demo address for user test. 1)Saved Server List interface A 7 Mobile Surveillance User Manual When there is no any video information playing for the channel in the live interface, click this channel to enter the above-mentioned interface. Where there is video displaying for the channel in the live interface, long press this channel to enter the above-mentioned interface. :Return button. Click this button to return to the current interface. :The current server list name. Click this button to switch between saved server list and favorite server list. :Edit button. Click this button to enter edit list. : It indicates a device. the device channel will unfold by clicking the device name. : It shows connection status. devices is connecting. means the device has been connected. means the means the device is not connected. : Color means the device has been saved in favorite server list. Gray means the device has not been saved in favorite server list. 2)Saved Server List interface B 8 Mobile Surveillance User Manual Click edition button to enter the above-mentioned interface. :Finish button. After you finish editing, click this button to return to the saved server list interface. :Delete button. Delete the device. If this device has been added to favorite server list, deleting it here will also be deleted in the favorite server list. :Add button. Add a new device. 3)Saved Server list interface C Click button in the live interface to enter the above-mentioned interface. 4)Multiple Channel Choice Interface 9 Mobile Surveillance User Manual Click button to enter the above-mentioned interface. :Click this button to return to the live interface and play the selected channel image. :Selection button. Click the grey button to change it into color. The color button means the channel is selected to play. :The front number means you have already selected two channels to play. The number after two means you can choose 4 channels at most. 5)Favorite Server List A Click Saved Server list button to enter favorite server list interface. :Color means the channel has been selected. Gray means the channel hasn‟t been selected. Click button on the live interface to play the selected favorite channels. You can select 16 channels to play at one time. 10 Mobile Surveillance User Manual 6)Favorite Server List B Click the edition button in the favorite server list to enter the above-mentioned interface. :Click this button to delete the favorite device. The favorite channels under this server name will also be deleted. :Delete the favorite channel. 7)Favorite Server List C Click button in the live interface to enter saved server list interface. Then click saved server list button to switch to the above-mentioned interface. Image View View the snapping pictures. 11 Mobile Surveillance User Manual Playback Interface (Fig 1) (Fig 2) (Fig 3) (Fig 4) 12 Mobile Surveillance User Manual Fig 1 is local playback; Fig 2 is remote playback by time search; Fig 3 is remote playback by event search; Fig 4 is remote playback by file search. Only a part of devices have the latter 3 playback modes. Settings Interface This interface includes local configuration and remote configuration (only some devices support this function). You can configure the local software or remotely set the device. Information Interface In this interface, you can view system information, network information and online user information. 1.3 By Phones with Android OS Installation Instruction Step 1: Run Google Market program. Step 2: Search “Supercam”. 13 Mobile Surveillance User Manual Step 3: Press “Install” button. Step 4: Click “OK” button. Step 5: You can view the download and install process in notifications. Once the download is done, the software will install automatically. 14 Mobile Surveillance User Manual Login Enter into server‟s IP address (or domain name), user‟s ID and password. Click “Remember server” to save the setting; click button can quick input saved server address, user name and password. Main Menu Playback playback record file Image image view Log log record Server List device list Live live view Settings software setting Information device information view Help software help center Logoff logoff and return to login interface Live View Stop playing Single channel display Screen mode Four channels display Snap PTZ Talk Record Live audio Hide Image View 15 Mobile Surveillance User Manual The picture first Zoom in The previous picture Zoom out Next picture Delete The last picture Record Playback Pause/Play Stop Forward Backward Click Playback icon in the Main Menu interface to enter into the playback interface. First, choose channel. Second, select the record file and click it to playback. Finally, click „Return‟ button to return to the previous interface. Server list 16 Mobile Surveillance User Manual Add a server list Modify a server list Delete a server list Return Return to the previous interface Config interface Alarm setting: If Audio alarm is enabled, when Video Loss/Sensor/Motion happen,sound alarm will be triggered; If shake Alarm is enabled, when Video Loss/Sensor/Motion happen,shake alarm will be triggered. Storage setting: User can setup the relevant parameters of mobile video. This function can be valid only insert SD card. Display: User can setup display order or display mode. Information view 17 Mobile Surveillance User Manual 1.4 By Phones with Blackberry OS Step 1: Open the browser of BlackBerry phone and enter server address. Step 2: Click “Supercam” to link. Step 3: Click “Download” button on the popup interface. Step 4. After the download is done, the software will be installed automatically. If the software fails to download, please check in accordance with the following steps: 1. 2. 3. Check whether the network of mobile phone is normal or not. Check whether DVR server connect network normally or not. Modify the option of Browser Configuration. (1) Enter into Menu->Option->Browser Configuration. Refer to the following figure on the left. (2) Enter into Menu->Option->Cache Operations. Clear up browser cache. Refer to the below picture on the right. 18 Mobile Surveillance User Manual Note:When user used the Supercam software in mobile phone with touch screen, there will be compatible problem. Solution: Enter into Options Menu->Advance options->Applications->Supercam and click “Disable Compatibility” button. This problem will be solved. Login Step 1: Enter server‟s IP address (or domain name), user name and password. Step 2: Click “Login” button. Click “Remember server” to save the setting; click button can quick input saved server address, user name and password. 1. 2. Main Menu Image Image view Log Log record Server List Device list Live Live view Settings Software setting Information Device information view Help Software help center Logoff Logoff and return to login interface View Live 19 Mobile Surveillance User Manual Note: User can click Mark 1 Preset Return button on the Blackberry phone to return the previous interface. Current viewing channel Mark 2 Channel status Switch channels PTZ, click to switch to Fig 2 interface Snap Full screen Background alarm Stop rotating the PTZ Upward rotates the PTZ Downward rotates the PTZ Leftward rotates the PTZ Rightward rotates the PTZ Zoom In/Focus In/Iris Add Zoom Out/Focus Out/Iris Sub Select the preset point Group Server list 20 Set the cruise line Mobile Surveillance User Manual Software configuration Information View 1.5 By Phones With Windows Mobile OS Step 1:Activate the network access on mobile phone. Step 2: Run “Internet Explorer” and input the server‟s address. The connection is built up shown as below picture on the left. Step 3:Click on the software name. A dialog box pops up as below picture on the right. Step 4:Click “Yes” to start downloading and installing. 21 Mobile Surveillance User Manual Step 5:PCam will be opened automatically after installation. Refer to the picture on the left. Step 6:Input the server‟s address, ID and password respectively and click “Go” to log on the server. Refer to the below picture on the right: Step 7:Camera 1 is the default channel after login. Change the channel in rolling-down menu of “Channel”. Refer to the below picture on the right. Notice: User name and password here are the same with that used on the DVR. The default is admin and 123456. 22