1
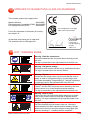
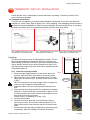
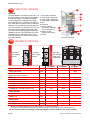
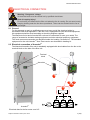
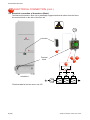
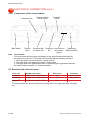
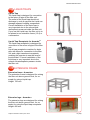
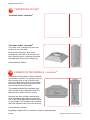
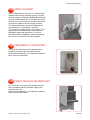
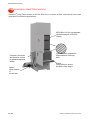
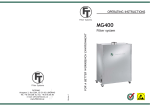
EN/A•smoke/UM-1207-1
User’s manual in original
Oil mist and Oil smoke filter
• A•smoke20
• A•smoke40
• A•smoke120
Including Heat Treat Version
A•smoke
EN
EN/A•smoke/UM-1207-1
1
BASIC INFORMATION
Read and understand the user’s manual before beginning to work in the filter
unit.
1.1 Introduction
In the following documentation you will find all essential information concerning safety, installation,
start-up and maintenance.
This product is manufactured and designed in
accordance with the EU directives that this product is embraced by.
In order to maintain this status, installation,
repair and maintenance may only be carried out
by qualified personnel and the use of original
spare parts.
For advice regarding technical service or the
need of spare parts please contact Absolent
AB or your closest accredited dealer. Contact
information can be found under the heading
“Technical Support”.
1.2 Range of Application
The filter unit A•smoke is only designed to clean
oil-contaminated* air. Other use of the filter unit
is not allowed, except where the manufacturer
guarantees the function. At the use of A•smoke
in surroundings with graphite, plumb or chrome,
more frequent service can be necessary.
*e. g. from lubricants such as emulsion, synthetic oil or/and
mineral oil.
1.3 Table of Contents:
1
1.1 1.2
1.3
2
3
4
5
5.1
5.2
5.3
5.3.1
6
2 (23)
Basic information............................2
Introduction........................................2
Range of Application..........................2
Table of Contents...............................2
Approved to CE-directives, UL and .
CSA standards.................................3
List of warning signes.....................3
Safety Precautions..........................4
Transport/Set up/Installation..........5
General..............................................5
Transport...........................................5
Mounting............................................5
Putting the filter upright......................5
Function / Design.............................6
1.3 Table of Contents, cont.
7
Technical Details................................ 6
8
Electrical connection......................... 7
8.1
General................................................ 7
8.2
Electrical connection of A•smoke20...... 7
8.3
Electrical connection of A•smoke40B..... 8
8.4
Electrical connection - A•smoke40
(standard unit) with control cabinet...... 9
8.4.1 Function of the control cabinet............. 9
8.4.2 Wiring scheme................................... 10
8.4.3 Level sensor...................................... 10
8.5
Electrical data of the fan motor.......... 10
9
To be checked before the first
start of the filter unit.........................11
10
Service/maintenance ..................... 12
10.1 General.............................................. 12
10.2 Service schedule............................... 12
11
Electronic manometer A•monitor
(A•smoke20, A•smoke40)................... 13
11.1 Function............................................. 13
11.2 Pressure settings............................... 13
12
Handling the filter cassettes........... 14
12.1 Weight of the filter cassettes.............. 14
12.2 Instruction for replacing the filter
cassettes - A•smoke20........................ 14
12.3 Instruction for replacing the filter
cassettes - A•smoke40, A•smoke120.... 15
12.4 Used filter cassettes.......................... 16
13Accessories...................................... 16
13.1 Protective Motor Switch A•smoke20... 16
13.2 Liquid Traps....................................... 17
13.3 Extension Frame................................ 17
13.4 Transition Outlet................................ 18
13.5 Carbon Filter Module........................ 18
13.6 Spray System.................................... 18
13.7 Frequency converter.......................... 19
13.8 Prefilter for severe dirt....................... 19
14
A•smoke40 Heat Treat Version......... 20
15
Fault Tracing.................................... 21
16
Absolent warranties........................ 22
17
Spare Parts....................................... 22
18
Technical support............................ 22
19
EC Declaration of conformity......... 23
Subject to alteration without prior notice.
EN/A•smoke/UM-1207-1
2
APPROVED TO CE-DIRECTIVES, UL AND CSA STANDARDS
The A•smoke product line is approved to:
Machine directive
2006/42/EG
Electromagnetic Compatibility (EMC) 2004/108/EG
Low Voltage Directive (LVD)
2006/95/EG
For the EC declaration of conformity in its entity,
see chapter 19.
The CSA approval is solely applicable to the electrical motor.
All electrical components are UL approved.
The electrical motor is CSA approved.
Tony Landh, CEO
3
Absolent AB
Kartåsgatan 1
531 40 Lidköping
Sweden
2009-12-28
LIST - WARNING SIGNS
Warning - Read the instructions
Read and understand the user guide before working on the
filter unit.
The sign is positioned on the right-hand side of the filter unit.
Warning - Dangerous voltage
All electrical work must be carried out by qualified electricians.
The sign is located next to the control cabinet.
Warning - Tip risk
The filter unit has a high centre of gravity and with that a risk of
tipping. In order to avoid personal injury, see the lifting instructions under the heading “Transport/Set up”. This sign is placed on
the packaging and on the right-hand side of the filter unit.
Warning - Rotating parts
Caution - the filter unit/ and pump can be started by the timer,
remote control or by a connected processing machine.
The sign is positioned on the right-hand side of the filter unit.
Warning - Risk of injury
Caution the filter unit can contain fluids dangerous to health.
Refer to the product sheet for the fluids in question before
handling. The sign is positioned on the right hand side of the
filter unit.
Danger - Heavy products
The filter cassettes become heavier with use. Check the
current weight of the filter cassette before handling. Weight
details can be found on the filter cassette’s rating plate and
under the heading 11 “ Handling the filter cassettes”.
Subject to alteration without prior notice.
3 (23)
EN/A•smoke/UM-1207-1
4
SAFETY PRECAUTIONS
Type of warning
Danger
Skilled
personnel
Risk of
personal injury
Warning text
Warning - Hazardous voltage!
The filter unit works with a high electrical voltage. The electrical installation
must be performed by qualified electricians. Disconnect the power supply to
the filter unit before it is opened and/or before starting work on the filter unit.
Warning - Do not connect the filter unit to explosive gases!
Do not connect the filter unit to processing machines that can bring about an
explosion risk. Furthermore, the filter unit must not be connected to media
that are highly inflammable without preventative measures being taken to stop
the spread of the explosion or fire to the filter unit.
Caution - Read and understand the user’s manual!
Read and understand the user guide before working on the filter unit.
Caution - Qualified personnel only!
All work concerning transport, installation and maintenance must be performed by qualified personnel.
Risk of trapping injury!
Do not insert your hand into the filter unit when the fan is running. Do not
wear loosely hanging clothing near the fan when operational. These can be
sucked into the fan or get caught.
Risk of tipping over!
Always check the weight of the filter unit (technical data, heading 7) before
lifting. When equipped with an integrated fan assembly the centre of gravity
of the filter unit is relatively high. When transporting the filter unit, secure well
- an alternative can be to transport the filter unit horizontally.
Heavy products!
Filter cassettes are heavy. Check the current weight of the filter cassette before handling. Weight details can be found on the filter cassette’s rating plate
and under heading 12 “Handling the filter cassettes”.
Lifting equipment or the like must be used during service and inspection
work above the ground.
Risk of slipping!
Keep the floor clean. Remove oil spill to prevent injury due to slipping.
High noise levels!
If the sound level at the control panel/workplace exceeds 75 dB(A) ear protection must be worn.
Dangerous fluids!
Use requisite personal safety equipment with all types of service work, as the
filter unit can contain liquids dangerous to health. Refer to the product sheet
for the liquids in question before handling.
Caution when recirculating air back into the building!
Note that in its standard design the filter unit does not separate gas molecules.
4 (23)
Subject to alteration without prior notice.
EN/A•smoke/UM-1207-1
5
TRANSPORT / SET UP / INSTALLATION
5.1 General
Check that the unit is undamaged on arrival and when unpacking. Contact the carrier in the
event of transport damage.
5.2 Transport and delivery
The filter unit is supplied on a wooden pallet wrapped in plastic foil. Is the filter unit delivered
standing up, it has a sign ”Risk of tipping over” on its wrapping. The packaging should remain on
the filter unit up until installation in order to prevent damage. Secure the filter firmly, or transport
the filter horizontally. One of the following methods must be used when lifting:
min 45°!
min 45°!
Fig.1: Lifting the filter unit on a wooden pallet with an overhead crane.
Fig.2: Lifting the filter unit on a woo- Fig.3: Lifting a vertical filter unit using
a forklift truck or overhead crane.
den pallet with a forklift truck.
5.3 Set up
The filter unit must be set up on a flat and firm surface. The surface must be designed to support the weight of the filter unit.
When setting up the filter unit, ducts, pipes, and electrical cables,
ensure that the service doors can be opened freely (see fig. 4)
and that internal components such as the filter cassettes can be
removed as required.
5.3.1 Lift to the vertical position
Fig.4
1. Ensure that the toggle fasteners on the service doors are
secured , before the filter unit is lifted to a vertical position.
2. When the filter is to be raised, fit the lifting device in the two
lifting eyes, as shown in fig. 5. Carefully lift the unit as shown
in fig. 6.
NB: The cords have to be long enough to form an angle of a
minimum of 45° between cord and filter unit.
3. Position the filter unit in the correct position and bolt to the
floor.
4. Open the door and check that the filter cassettes are properly
secured, i.e. that the sealing is compressed to approx. 3 mm.
If a filter cassette has become loose during transport, secure
them and close the service doors.
(How to secure, se heading 12.2 resp. 12.3.)
5. Connect the drainage.
6. Connect the suction pipe with a control damper. When a
branch pipe is used, the recommended connection is a 30°
elbow, as this gives a low pressure drop for the entire installation.
7. Connect the unit electrically (possible fan, pump and/or other
accessories). Also see heading 8 “Electrical connection”.
Subject to alteration without prior notice.
Min 1010 mm
min 45°!
Fig.5
Fig.6
5 (23)
EN/A•smoke/UM-1207-1
6
FUNCTION / DESIGN
9
A•smoke
Contaminated air is sucked into the inlet (1) in
the lower section of the filter unit and passes
through filter stage 1 (2), where the majority
of the oil particles are trapped.Filter stage 1
gets saturated and the oil drops into the bottom of the filter unit, which acts as a collection
container. From there, it is pumped (8)(accessory, not A•smoke20) or drained away. The air
passes through an additional Absolent filter
(3), where the remaining bigger particles are
filtered out and on via a HEPA filter (4) to the
integrated fan (5). Generally the air is now
free from particles and can be returned directly to the premises.
4
3
2
1
8
A•smoke40 principle
A•smoke20
with integrated fan.
"tsmoke
20
A•smoke120
TECHNICAL DETAILS
A•smoke40
A•smoke20
7
5
1. Inlet, pipe connection
2. Filter stage 1 (Absolent)
3. Filter stage 2 (Absolent)
4. Filter stage 3: HEPA filter
5. Fan
6. A•monitor
7. Control cabinet
6
(Accessory, standard
40
only for A•smoke )
7
8. Return oil tank
& pump (accessory)
9. Outlet
A•smoke40
with integrated fan.
A•smoke120
with centered
outlet and
external fan.
A•smoke20
A•smoke40
A•smoke120
Height, centred outlet
[mm]
2420
3485
3682
Height, side outlet
[mm]
-
-
3932
Width, excl. pump case
(with pump case + 80 mm)
[mm]
700
1010
3314
Depth
[mm]
780
1125
1125
Standard connection inlet
[mm]
Ø 200
Ø 315
Ø 500
Standard connection outlet
[mm]
-
-
Ø 630
Standard connection return oil
[in]
W 1 1/4”
W 3/4”
W 3/4”1)
Weight filter unit with dry filter cassettes
[kg]
300
1000
2600
Available dim. external pressure drop
[Pa]
430
1000
-
Absolent filter
[pc]
2
2
6
HEPA (H13)
[pc]
1
1
3
[m³/h]
2000
4000
12000
[dB/(A)]
60
67
2)
1)
Filter cassettes
Performance
Max. air flow
Sound level (3 m in front of filter unit)
1)
2)
All filter units without pump have a nom. pipe size W 1 1/4” return oil connection.
The level of sound emitted from the filter units with external fan is specified in the user’s m
anual for the fan.
For the electrical data, see heading 8. A wiring diagram is even included in the control cabinet.
6 (23)
Subject to alteration without prior notice.
EN/A•smoke/UM-1207-1
8
ELECTRICAL CONNECTION
Warning - Dangerous voltage
All electrical work must be carried out by qualified electricians.
Risk of trapping injury!
Do not insert your hand into the filter unit when the fan is running. Do not wear loosely
hanging clothing near the fan when operational. These can be sucked into the fan or
get caught.
8.1 General
For the warranty to apply, a qualified person must carry out all the electrical wiring in
accordance with local regulations. If the filter unit is equipped with extra electrical equipment,
this equipment shall be wired according to the wiring diagram supplied.
The Absolent oil mist and oil smoke filter unit can be customized to meet your needs. The
range of accessories includes starting equipment and other electrical periphery equipment.
The most common accessories are described under the heading ”Accessories”. The standard
equipment for the unit A•smoke40 Heat Treat version are described in heading 14.
8.2 Electrical connection of A•smoke20
The Absolent A•smoke20 filter unit is standardly equipped with wired cables from the fan to the terminal block on the side of the filter unit.
Terminal
block
A•monitor
15 VDC
460V
400V
230V
((o))
max: 230V / 1A
ΔP
ΔP
ΔP
A•smoke20
Electrical data for the fan motor: see 8.5!
Subject to alteration without prior notice.
7 (23)
EN/A•smoke/UM-1207-1
8
ELECTRICAL CONNECTION (cont.)
8.3 Electrical connection of A•smoke40B (Basic)
The Absolent A•smoke40B filter unit is standardly equipped with wired cables from the fan to the terminal block on the side of the filter unit.
A•monitor
15 VDC
Terminal
block
460V
400V
230V
((o))
max: 230V / 1A
ΔP
A•smoke
ΔP
ΔP
40B
Electrical data for the fan motor: see 8.5!
8 (23)
Subject to alteration without prior notice.
EN/A•smoke/UM-1207-1
8
ELECTRICAL CONNECTION (cont.)
8.4 Electrical connection of A•smoke40 with control cabinet (standard model)
The Absolent A•smoke40 is standardly equipped with a control cabinet for fan and oil return
pump. The wiring diagram is located inside the control cabinet.
For the warranty to apply, all electrical connections must be carried out by a qualified
electrician and in accordance with applicable directives. If the filter unit is fitted with other
electrical equipment; that equipment must be wired according to the wiring diagrams
applicable to that supply.
The transformer of the electronic manometer A•monitor is wired to the control cabinet at the
bottom of the filter unit.
A•monitor
15 VDC
Switch 1
Switch 2
Terminal
block
460V
400V
230V
((o))
Control
cabinet
max: 230V / 1A
ΔP
A•smoke
ΔP
ΔP
40B
8.4.1 Function of the control cabinet
The control unit controls the fan and the oil pump.
To start the fan, set switch 1 on the outside of the door at position 1. To start the pump,
set switch 2 on the outside of the door at position Aut. The pump is thereby controled by
the level sensor. To operate the pump manually, set switch 2 on the outside of the door at
position 1. The LEDs in switch 1 and 2 indicate that the fan resp. pump are operating.
Subject to alteration without prior notice.
9 (23)
EN/A•smoke/UM-1207-1
8
ELECTRICAL CONNECTION (cont.)
8.4.2 Components of the control cabinet
Automatic fuse
Main Switch
Terminal
block
Protective Motor
Switch, pump
Contactor,
pump
Transformer
Protective Mo- Contactor, Connectors for
fan
level sensor 400VAC/24VDC
tor Switch, fan
(pump)
8.4.3 Level sensor
The level sensor and the pump are situated on the same lid behind the blend at
the lower front of the unit. The sensor has two floats with the following functions:
1. The lower float in its lowest position = pump shut off.
2. The lower float in its uppermost position = pump starts.
3. The upper float in its uppermost position = electrical signal is generated that can
be used for alarm purposes, i.e. customer specific.
8.5 Electrical data of the fan motor
Filter unit
A•smoke20
A•smoke40B
Standard fan motor
2.2 kW; 4.6 A; 400 V; 50 Hz
7.5 kW; 14.2 A; 400 V; 50 Hz
Mains fuse
10 A
35 A
A•smoke40
7.5 kW; 14.2 A; 400 V; 50 Hz
35 A
Comment
Direct start
Direct start
The electrical data can also be read from the rating late on the right-hand side of the filter
unit.
10 (23)
Subject to alteration without prior notice.
EN/A•smoke/UM-1207-1
9
TO BE CHECKED BEFORE THE FIRST START OF THE
FILTER UNIT
Risk of trapping injury!
Do not insert your hand into the filter unit when the fan is running. Do not wear loosely
hanging clothing near the fan when operational. These can be sucked into the fan or
get caught.
1. Check that the filter cassettes are properly secured.
Open the door and check that the filter cassettes are properly secured, i.e. that the sealing is compressed to approx. 3 mm. How to secure, se headings 11.2 resp. 11.3.
2. Control cabinet (A•smoke40)
Open the lid of the control cabinet. Check that the protective motor switches for fan and pump are
activated. The black buttons have to be pressed in. Check that the fuses for the transformer are
switched on. Switch on the power supply to the control unit by turning the safety isolating switch to
position ”1”.
3. The fan’s direction of rotation
Make sure that the fan impeller rotates in the proper direction (counter-clockwise viewed from the
motor side). If you are unable to see the motor while the impeller is rotating, start the fan, read the
pressure drop across the filters from the pressure gauge, stop the fan, transpose two phase leads,
restart the fan and read the pressure drop again. The connection that gave the highest pressure
drop is the correct one.
4. Air flow
The air flow must be checked, so that the value does not exceed the design level for the installation (refer to the quote or unless otherwise stated the nominal flow under heading
“Technical data”). The air flow can be adjusted with the damper or frequency converter, if fitted. If
it is difficult to reach the required flow, check the direction of rotation of the fan motor according to
section 2 above. If the unit is run with a too high flow, there is a large risk that the life span of the
filter cassettes will be shortened.
5. Pressure drop over the filter cassettes
A•smoke20 and A•smoke40: Read the A•monitor and note down the pressure drop over the different
filter stages (heading 11). A•smoke120: Read the analogue pressure gauges (heading 10).
These values can then be used as a basic value to assess the pressure increase /life span of the
different filter cassettes.
6. Return oil pump
Check that the pump starts, preferably by lifting the floats on the level sensor (see 8.4.3).
7. Spray system (if installed)
If the filter unit is equipped with a spray system its function must be checked as this has a large effect on the life span of the filter cassettes.
The function of the spray system and fault tracing are described in the separate user guide.
8. Frequency converter (if installed)
If the filter unit is equipped with a frequency converter, you find a protocol of the different settings
and a description how to handle the frequency converter attached.
Subject to alteration without prior notice.
11 (23)
EN/A•smoke/UM-1207-1
SERVICE / MAINTENANCE
10
10.1 General
Preventive maintenance and regular service extend the life span and ensure that the filter
unit maintains its performance. Besides, you mainain a high cleaning efficiency in the industrial environment. To facilitate inspection of the filter cassette status, Absolent supplies
the A•smoke20 and A•smoke40 filter units with an electronic pressure gauge as a standard.
A•smoke120 is supplied with 3 analogue pressure gauges for the different filter stages. The
different pressure gauges are positioned on the front of the filter unit as shown below:
Filter stage 3
HEPA
Filter stage 2
Filter stage 1
A•smoke120
A•smoke
20
A•smoke
40
The pressure gauges are graduated in [Pa] and contain
green, yellow and orange sectors. The filter cassette is
to be replaced when its pressure gauge has reached
the orange sector. The yellow sector is a warning that
the filter cassette replacement is to be planned. For a
service contact, see the heading “Technical Support”.
Service shall take place when the drop has reached
the orange sector, for the latest. Note however, that
the filter unit will not be damaged when operated with
a clogged filter stage, but the required air flow will not
More information on the electronic mano- be attained. Handling during service is described under
“Changing the filter”.
meter, see heading 11.
10.2 Service schedule
Action
Monthly
Filter cassettes
Establish filter cassette
status by reading the electronic pressure gauge
X1)
Bottom section / Drainage
Check that the return oil
pipe is not blocked
X2)
Fan
Check that there is no
abnormal noise or vibration
Six monthly
Annually
X2)
X
In order to get to know your new installation, the filter cassettes should be checked once a month during the first six months the
filter unit is in use. The service interval is then adapted according to the installation in question. However, no longer than six months
between inspections. Note that when the yellow LED lights, the inspection interval must be increased as the pressure drop now increases quicklier.
2)
In order to get to know your new installation, the bottom section and drainage should be checked once a month during the first six
months the filter unit is in use. The service interval is then adapted according to the installation in question.
1)
12 (23)
Subject to alteration without prior notice.
EN/A•smoke/UM-1207-1
ELECTRONIC PRESSURE MONITOR (A•smoke20, A•smoke40)
11
11.1 Functional description
An electronic pressure gauge A•monitor is supplied as standard along with all A•smoke filter
units. The pressure monitor is delivered factory preset and contains the following features:
A
B
C
D
OPTICAL DISPLAY OVER EACH FILTER STAGE
The present pressure drop over each filter stage is monitored (See 11.2.) LED INDICATION
A green LED lamp is lit as long as the filter cassette is working within the preset
pressure range. When the yellow lamp is lit, call your service contact to replace the
filter stage. When the red LED lamp is lit, the pressure drop is too high for the filter
unit and it gives a reduced air flow.
HOUR COUNTER DEVICE
An hour-counter device is also included in our standard equipment.
It measures and monitors the operation time in hours for the filter unit.
ALARM
On the transformator card, there is an alarm output that can be used for external
alarms (maximum 1A). If any of the filter stages reaches alarm level (red LED), the
alarm output closes, see 8.5)
11.2 Pressure settings
Type
A•smoke
20
A•smoke40
A•smoke40
Heat Treat version
Filter 3 (HEPA)
Filter 2 (S3B3)
Filter 1 (S1)
Filter 3 (HEPA)
Filter 2 (S10B3)
Filter 1 (S1)
Filter 3 (HEPA)
Filter 2 (M93)
Filter 1 (D44)
Green
[Pa]
Yellow
[Pa]
Red
[Pa]
0-600
0-800
0-1000
0-800
0-2300
0-2300
0-800
0-2300
0-2300
600-800
800-1000
1000-1500
800-1000
2300-2500
2300-2500
800-1000
2300-2500
2300-2500
> 800
> 1000
> 1500
> 1000
> 2500
> 2500
> 1000
> 2500
> 2500
PLEASE NOTE!
If a filter stage is used even though the red LED-lamp is lit, the filter unit gives a reduced air volume. Note however, that the filter unit will not be damaged when operated with a clogged filter
stage. Handling during service is described under “Changing the filter”.
Subject to alteration without prior notice.
13 (23)
EN/A•smoke/UM-1207-1
12
HANDLING THE FILTER CASSETTES
Warning!
Use requisite personal protection equipment when performing service work on the
filter unit.
Lifts or the like must be used when carrying out service work above the ground.
12.1 Weight of the filter cassettes
Filter cassettes are heavy, especially when filled with fluid after a period of use. Below is a
table of weight for the different filter cassettes available. The type designation of the supplied
filter cassette can be found on the rating plate located on the front of the filter cassette.
Weight new
Weight fluid
Filter type
Filter cassette type
cassette (dry) filled cassette
Stage 3: HEPA TRSA-N 990 595x292
12 kg
16 kg
20
A•smoke
Stage 2: S3B3/650
25 kg
50 kg
Stage 1: S1/650
80 kg
120 kg
Stage 3: HEPA TRSA 1D-N 1000x914
27 kg
37 kg
Stage 2: S10B3/914 alt S10/914
155 kg
210 kg
A•smoke40 and
resp.
M93
(Heat
Treat
version)
A•smoke120
Stage 1: S1/914
155 kg
210 kg
resp. D44 (Heat Treat version)
12.2 Instruction for replacing the filter cassettes - A•smoke20
1.Read the electronic manometer A•monitor and note down the pressure drop over the different filter stages when the filter unit is in operation. The filter cassettes whose LEDs light in yellow or red have to be replaced.
2.Shut down the fan and disconnect the filter unit from electricity.
3.Open the service door.
4.Loosen the cassette by releasing the two bolts (fig. 1).
5. Lift out the filter cassettes (fig. 2) that show a pressure drop which exceeds the service
level according to “Care and maintenance”. When replacing Filter stage 1, check and
remove any dirt from the bottom of the filter unit.
6.Check that the sealing strip is undamaged before the new filter cassette is slid in (fig. 3). The sealing strip must be seated upward.
7.Secure the filter cassette (fig. 4).
8.Connect the filter unit to electricity
9.Start the fan and check the pressure drop.
Fig.1
14 (23)
Fig.2
Fig.3
Fig.4
Subject to alteration without prior notice.
EN/A•smoke/UM-1207-1
12
HANDLING THE FILTER CASSETTES cont.
12.3 Instruction for replacing the filter cassettes - A•smoke40 and A•smoke120
1. Read the electronic manometer A•monitor (A•smoke120: the analogue pressure gauges)
and note down the pressure drop over the different filter stages when the filter unit is in operation. The filter cassettes whose LEDs light in yellow or red have to be replaced. A•smoke120: The filter cassettes whose manometers have reached the yellow or orange sectors have to be replaced.
2. Shut down the fan.
3. Disconnect the filter unit from electricity.
4. Open the service door.
5. Loosen the cassette by releasing the two bolts (fig. 1).
6.1Filter stage 1 and 2
Withdraw the filter cassette with the aid of the Absolent filter sledge (accessory) or a pallet and forklift, view fig. 2. Be carefull, as the filter cassette is very heavy and possibly slippery with oil!
6.2Filter stage 3 (HEPA-filter)
Withdraw the filter cassette.
7. Lift the new filter cassette upp with the sealing strip upward and check that the sealing
strip is undamaged.
8. Push it all the way into the filter housing (view fig. 3).
9. Secure the filter cassette by tightening the two bolts (fig. 4). The filter cassette
is to be thightened until the sealing strip is compressed to a thickness of about 0.12 inches / 3 mm.
10. Connect the filter unit to electricity.
11. Start the fan and check the pressure drop reading for all three filter cassettes.
The pressure gauges should now be in the green sector / the green lights alight.
Note! If the supply air has a high content of chips or shavings, the draining plate in the bottom part
of the filter unit has to be inspected and cleaned regularly to prevent it from becoming clogged.
Fig.1
Fig.2
Fig.3
Fig.4
12.4 Worn out filter cassettes
When the filter cassette is worn out it has to be taken care of in an environmental-friendly
way. The sheet metal casing and the aluminum separators can be recycled.
Clean filtermedia can be sent to disposal facilities, but when it contains oil and particles
from the process, local regulations for disposal or incineration need to be followed.
If the oil is washed from the cassette, it can usually be sent for landfill.
Subject to alteration without prior notice.
15 (23)
EN/A•smoke/UM-1207-1
13
ACCESSORIES
A variety of accessories are available for the Absolent type A•smoke oil mist and oil smoke filter
unit. Instructions for installing these are provided on the next pages. However keep in mind that
these products must be ordered separately from us if they are to be included in the delivery.
13.1 PROTECTIVE MOTOR SWITCH - A•smoke20
Dangerous voltage
All electrical work must be carried out by qualified electricians.
Wiring diagram for the Protective Motor Switch of the A•smoke20
Fuses, max. 16A
Fan motor:
2.6 kW, 4.6 A
16 (23)
Subject to alteration without prior notice.
EN/A•smoke/UM-1207-1
13.2 LIQUID TRAPS
Liquid Trap
The liquid trap is designed for connection
to the return oil pipe of the filter unit.
The outlet of the liquid trap should not
discharge in such a way that the liquid can
damage adjacent building components.
Correct installation of the liquid trap is
very important due to the normal subatmospheric pressure inside the filter unit.
If you use the liquid trap, the filter unit is to
be placed on an extension frame (13.4) or
a mezzanine.
Liquid Trap Receptacle for A•smoke20
The liquid trap receptacle is designed for
connection to the return oil pipe of the filter
unit.
Liquid trap receptacle consists of a drain
pipe with elbow for connection to the filter
unit and a tight translucent receptacle,
enabling the operator to see the level of
liquid inside it. Correct installation of the
liquid trap is very important due to the
normal sub-atmospheric pressure inside
the filter unit.
13.3 EXTENSION FRAME
Extension frame - A•smoke40
The extension frame is designed for raising
the filter unit above ground level, for example for using a liquid trap.
Height: 700 mm.
Extension legs - A•smoke20
The extension legs are designed for raising
the filter unit above ground level, for example for using the liquid trap receptacle.
Height: 400 mm.
Subject to alteration without prior notice.
17 (23)
EN/A•smoke/UM-1207-1
13.4 TRANSITION OUTLET
Transition outlet - A•smoke20
Transition outlet - A•smoke40
The outlet cover is designed for duct connection on the outlet side.
Demount the lifting lugs, glue on the
sealing strip, place the cover on top of the
filter unit and screw it on with the enclosed
threaded bolts. Remount the lifting lugs.
Outlet diameter 400mm.
13.5 CARBON FILTER MODULE - A•smoke40
Carbon filter module with 4 carbon cassettes
for collection of gases. For mounting, remove
the mounting eyes on top of the filter unit,
glue the sealing strip onto the top and place
the carbon filter box onto the A•smoke unit.
Secure with the enclosed bolts.
The standard carbon filter cassettes (type
AFK) contain 34 kg of adsorbent (filter media) each, this makes a total of 136 kg.
Absolent can offer coal filter cassetts with
other adsorbents that might be more effective for the actual application’s specific smell
or gas problem. The cassette can be refilled
with new adsorbent when the old is used up.
Outlet diameter: 500mm.
Regarding a carbon filter for A•smoke20, please contact Absolent.
18 (23)
Subject to alteration without prior notice.
EN/A•smoke/UM-1207-1
13.6 SPRAY SYSTEM
If the contamination is ”too dry” or contains liquid
particles with too high viscosity (gooey), the selfcleaning capacity of the filter degrades and the life
cycle decreases drastically. To increase the liquid
content and / or decrease the viscosity, little drops
of liquid are added to the air through a nozzle.
The added liquid has to be able to dissolve the
contamination. For emulsions, use water.
The nozzle is mounted onto the inlet chanel. The
spray system is controlled by a time relay with
adjustable pause and spray time. For further
information about installation, safety and service,
see the user’s manual for the spray system.
13.7 FREQUENCY CONVERTER
The A•smoke filter unit can be equipped with a
frequency converter and a pressure sensor.
Please contact Absolent / your Absolent representative for more information.
13.8 PREFILTER FOR SEVERE DIRT
For severe dirt, we supply a flat prefilter which is
to be mounted under the first filter stage of the
A•smoke filter unit.
Please contact Absolent / your Absolent representative for more information.
Subject to alteration without prior notice.
19 (23)
EN/A•smoke/UM-1207-1
14
A•smoke40 Heat Treat version
A•smoke40 Heat Treat version is the first filter unit in a series of filter units which have been
optimized for different applications.
HEPA filter H13 for a guaranteed
separation degree of 99,97%
(mpps)
Frequency converter
with pressure control
for demand-adjusted
airflow
Option:
Spray system
in
the air inlet
20 (23)
Optimized filter cassette for
heat treatment: D44 resp
M93
Option:
Flat prefilter for severe
dirt before filter stage 1
Subject to alteration without prior notice.
EN/A•smoke/UM-1207-1
15
FAULT TRACING
Malfunction
Possible cause
Action
The fan rotates in the wrong direc- Check the fan’s direction of rotation
tion.
(heading 8.3) - (only skilled personnel).
Low capacity
(air flow)
With speed (rpm) regulation: The
fan speed (rpm) is set too low.
Check the fan speed (rpm) - (only skilled
personnel).
Too high pressure drop over one
or more filter cassettes.
Check the pressure drop. If the yellow
or red LED lamp is lit for one of the filter
stages, the cassette should be replaced.
High pressure drop in the duct
system.
Check and possibly change
the duct system
Adjustable damper is closed or
incorrectly adjusted.
Check and possibly adjust the damper
on the suction pipe between the machine
and filter.
The ducts are not sealed or dirty.
Check that there is no leakage from the
suction pipe between the machine and filter. Check that the ducts don’t contain dirt.
An incorrectly positioned or dam- Check that filter stages 1, 2 are fitted with
aged sealing strip can result in
the seal upward. Also check that the sealleakage past filter stages 1, 2.
ing strip is undamaged.
Resulting in unfiltered air reaching
the HEPA filter.
Abnormally short reCassettes that are not secured
placement interval for
can result in air leakage past the
the HEPA filter:
filter cassettes. Unfiltered air will
then reached the HEPA filter.
Abnormally short service interval for the
prefilter:
Check that filter stages 1, 2 are secured
against the sealing frame correctly
(heading 12).
The filter cassette in stage 1
and/or 2 are not optimised for the
application in question.
Check with Absolent that the correct filter
cassette is being used in filter stage 1, 2
for the application in question.
The filter cassette in stage 1
and/or 2 are not optimised for the
application in question.
Check with Absolent that the correct field
cassette is being used in filter stage 1
and/or 2 for the application in question.
The filter cassettes have become
clogged on account of high viscosity in the oil mist, which gives
insufficient drainage.
If emulsions are used, filter clogging may
be due to the filter running when production has stopped, which dries out the filter
cassette (water evaporates). Consequently, switch off the filter unit when not in
use. If the fluid in the process has a high
viscosity, it is necessary to apply fluid with
a spray system (heading 13).
The filter cassettes have become
clogged.
Check that chips have not been drawn
down with the air into the filter unit. The
problem with chips can be solved by
calibrating the air flow or coarse filtering
before the filter unit. Also check that sticky
particles have not clogged filter stage no.
1 (for example, in foundry applications).
Contact Absolent for appropriate measures.
Subject to alteration without prior notice.
21 (23)
EN/A•smoke/UM-1207-1
16
ABSOLENT WARRANTIES
Absolent always take full responsibility that the delivered product fulfils the function and life time
guaranteed when purchased. This warranty is however only valid if the product is in its original
configuration and only when original spare parts have been used when servicing or repairing the
filter unit.
Some examples on why orignal parts are so important are shown below:
1. FAN MOTOR
In order to cope with the special assembly configuration in an Absolent unit the original motor is
supplied with special bearings and a bearing locking device.
Using the ”wrong” type of motor will increase the risk of breakdown or failure.
2. FILTER CASSETTES
The Absolent oil mist filter depends on the multi-stage filtration technology. In order to reach
the optimum filtration efficiency and the longest possible life time, the filter cassettes have
been carefully balanced against each other. If one or several of these cassettes are replaced
by a different or third-party filter cassette, this balance is destroyed and the consequence is a
decreased collecting efficiency and shortened life time for all filter stages.
17
SPARE PARTS
Absolent has a complete range of spare parts, which ensure the operation of installations.
Please supply the filter unit’s serial number and the part number in
order to guarantee delivery of the correct spare parts. These can be
found on the machine plate, which is located on the right-hand side of
the unit. See figure 1.
When ordering filter cassettes, the above details should be supplemented with the filter cassette’s material code. This can be read on the
filter cassette’s rating plate by “type”. See figure 2.
Fig. 1
Fig. 2
18
TECHNICAL SUPPORT
Absolent has a complete range of spare parts, which give full service, and ensure the operation of
installations. In the event of questions concerning maintenance and spare parts please contact:
Head Office
Absolent AB
Kartåsgatan 1
SE-531 40 Lidköping
Sweden Tel +46 (0)510 484000
Fax +46 (0)510 484029
E-mail: [email protected]
www.absolent.com
22 (23)
Dealer:
Subject to alteration without prior notice.
EN/A•smoke/UM-1207-1
19
EC DECLARATION OF CONFORMITY
Manufacturer: Absolent AB
Kartåsgatan 1
SE-531 40 Lidköping
Sweden
Phone: +46 (0)510-48 40 00
Authorized to compile technical documentation
Jan Berntsson
Kartåsgatan 1
SE-531 40 Lidköping
Sweden
Phone: +46 (0)510-48 40 00
We, Absolent AB, declare under our sole responsibility that the products:
A•smoke20, A•smoke40 och A•smoke120
to which this declaration relates, is in conformity with the following standard(s) or other normative
document(s)
Machinery directive
2006/42/EG
Electromagnetic Compatibility (EMC)2004/108/EG
Low Voltage Directive (LVD)
2006/95/EG
Lidköping , 28th of December 2009
Tony Landh
CEO
Subject to alteration without prior notice.
23 (23)