1
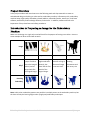
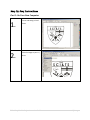
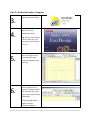
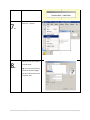
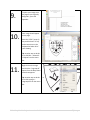
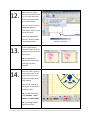
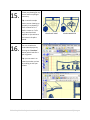
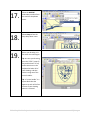
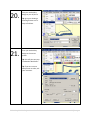
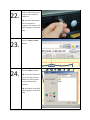
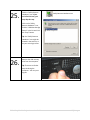
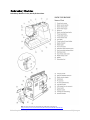
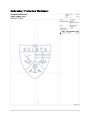
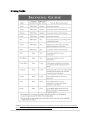
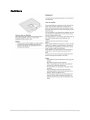
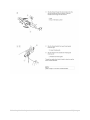
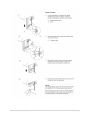
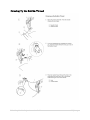
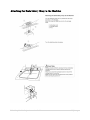
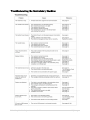
Embroidery Machine
Project Instruction Booklet
Embroidery Machine Project Instruction Booklet
1|P a ge
Project Overview ..................................................................................................................................... 3
Introduction to Preparing an Image for the Embroidery Machine ............................................................ 3
Step-By-Step Instructions ........................................................................................................................ 4
Part 1: On Your Own Computer ........................................................................................................... 4
Part 2: On the Embroidery Computer................................................................................................... 5
Part 3: Preparing the Fabric & Hoop .................................................................................................. 14
Part 4: Setting up the Embroidery Machine ....................................................................................... 19
Part 5: Embroidering Your Project on the Embroidery Machine ......................................................... 21
Embroidery Machine ............................................................................................................................. 28
Embroidery Production Worksheet........................................................................................................ 29
Features of an Iron ................................................................................................................................ 30
Ironing Guide ........................................................................................................................................ 31
Stabilizers .............................................................................................................................................. 32
Setting the Fabric in an Embroidery Hoop .............................................................................................. 33
Inserting the Bobbin .............................................................................................................................. 34
Threading the Embroidery Machine....................................................................................................... 35
Drawing Up the Bobbin Thread.............................................................................................................. 38
Attaching the Embroidery Hoop to the Machine .................................................................................... 39
Troubleshooting the Embroidery Machine ............................................................................................. 40
Embroidery Machine Project Instruction Booklet
2|P a ge
In this project students will learn how to use the following tools and shop materials to create an
embroidered design on clothing or other textiles: embroidery machine, USB memory stick, embroidery
machine hoops, high-quality embroidery thread, bobbins, embroidery backer, steam iron, Corel Draw
software, embroidery machine design software, and scissors. In addition, students will learn the
importance of shop cleanliness and safety procedures.
Make sure the design is a single colour and will work for the purpose of cutting out a sticker. Here are
some examples of what will and will not work:
Image
Will It Work? No
Photos result in
groups of stitches
where the image is
Why?
darkest, and no
longer looks like
the original image.
Maybe
Yes
Yes
Colour drawings
might embroider
decently, but
often lack the fine
details of the
original image.
Thin lines work
out well as long as
the overall image
is not too small.
Black and white
drawing
silhouettes work
well at any size.
Resulting
Embroidery
Note: multi-colour embroidery patterns are possible in multiple passes on the embroidery machine, but
the class will only be learning single-colour (single pass) embroidery techniques.
Embroidery Machine Project Instruction Booklet
3|P a ge
-
-
Part 1: On Your Own Computer
1.
2.
Create a drawing in Corel
Draw.
Save the image to your H:\
drive.
Embroidery Machine Project Instruction Booklet
4|P a ge
Part 2: On the Embroidery Computer
3.
4.
Open Janome EasyDesign.
Wait for Janome
EasyDesign to start.
Tip: the text at the bottom
of this screen says, “this
may take several minutes.”
It’s true.
5.
This is what your screen
should look like when
Janome EasyDesign finally
starts up.
6.
Click the Pencil tool to
switch to “Graphics Mode.”
This will allow you to use
your Corel Draw drawing in
EasyDesign.
A brief message should
appear that says
“Embroidery Mode ->
Embroidery Machine Project Instruction Booklet
5|P a ge
Graphics Mode.”
7.
8.
Click File -> Import.
Select the file you created
in Corel Draw.
Tip: you can see a preview
of the Corel Draw image if
you put a checkmark in the
“Preview” box.
Embroidery Machine Project Instruction Booklet
6|P a ge
9.
10.
To place your image onto
the page as you originally
designed it, press the
Spacebar.
Your image should appear
on the page.
Press the “CTRL” (control)
key and the letter “A” key
at the same time on the
keyboard to Select All of
your drawing.
Tip: another way to do this
is to click Edit -> Select All > Objects from the menu
bar.
11.
Right-click on the image
and click the “Ungroup All”
option from the drop-down
menu that appears.
Tip: another way to do this
is to click Arrange ->
Ungroup All from the menu
bar.
Embroidery Machine Project Instruction Booklet
7|P a ge
12.
Again, press the “CTRL”
(control) key and the letter
“A” key at the same time
on the keyboard to Select
All of your drawing.
Then click on the “Convert
Selected Graphics to
Embroidery” button on the
top of the screen.
A brief message appears
that says “Graphics Mode > Embroidery Mode.”
13.
If your image appears
outside the red lines of the
margins, move it inside the
red margins.
Tip: the threads only
appear pink because your
drawing is currently
selected.
14.
Press the “CTRL” (control)
key and the letter “A” key
at the same time on the
keyboard to Select All of
your drawing.
Then click on a colour at
the bottom of the screen. I
clicked on “Blue.”
Tip: to show the palette,
select Window -> Color
Palettes -> Default CMYK.
Tip: your design should
only be one colour.
Embroidery Machine Project Instruction Booklet
8|P a ge
15.
Check your drawing for any
errors and fix anything as
necessary.
Tip: I notice the maple
leaves are not showing up
properly in my drawing. I
have a chance to fix it
before I move on. To fix
this, I went back and
applied a 1.5px outline to
the leaves in Graphics
Mode.
16.
LEAVES NOT RIGHT
LEAVES CORRECTED
You can visualize the
embroidered project by
clicking the “Visualizer”
button which looks like a
pair of glasses.
Tip: you can zoom in to
view the stitches up close
by scrolling in with your
mouse.
Embroidery Machine Project Instruction Booklet
9|P a ge
17.
18.
19.
Select the MC350E
embroidery machine from
the machine drop-down
menu.
Select Hoop A from the
hoop drop-down menu.
Resize your drawing so it
fits within the red margins.
Tip: to resize your drawing,
press the “CTRL” (control)
key and the letter “A” key
at the same time on the
keyboard to Select All of
your drawing, and then
resize it using one of the
corner handles.
Tip: a “corner handle” is a
square black dot that
appears at each of the four
corners of your drawing
when it is selected.
Embroidery Machine Project Instruction Booklet
10 | P a g e
20.
21.
Save your embroidery
design to your H:\ drive.
Tip: give your drawing a
meaningful name so it is
easy to find later.
Print your embroidery
design to the correct
printer.
Tip: this will print out your
“Production Worksheet.”
Tip: if you are not sure
what printer to select, ask
your instructor.
Embroidery Machine Project Instruction Booklet
11 | P a g e
22.
Insert a USB memory stick
to one of the computer’s
USB ports.
Tip: wait 30 to 60 seconds
for the computer to
recognize the memory stick
before going on to the next
step.
23.
24.
Click the “Write To Card”
button.
Click the “Write” button.
Tip: this button looks like a
red arrow, and is located
above the “Close” button
on the left side of this
window.
Tip: Wait about 10 seconds
before going on to the next
step.
Embroidery Machine Project Instruction Booklet
12 | P a g e
25.
Find the “Safely Remove
Hardware” icon. If you
can’t find this icon, you
may skip this step.
Safely Remove Hardware icon
Click on the “Safely
Remove Hardware” icon,
find the “USB Mass Storage
Device” in the list and click
the “Stop” button.
Tip: the “Safely Remove
Hardware” icon might be
located in the task bar, or
on your main login menu.
26.
Remove the USB memory
stick from the computer.
Tip: There are no further
steps involving the
computer. You may now
log out.
Embroidery Machine Project Instruction Booklet
13 | P a g e
Part 3: Preparing the Fabric & Hoop
27.
28.
29.
30.
Lay the fabric on your
embroidery workspace
table.
With chalk, draw a
crosshair on the fabric
where the center of your
embroidery pattern will be.
Set up the tabletop ironing
board.
Tip: do not use the iron
rest.
Be sure the iron is
unplugged, and all settings
are in the OFF position
before completing this
step.
Open the water fill hole
cover on the iron, and fill
the iron with water to the
appropriate level at the
Embroidery Machine Project Instruction Booklet
14 | P a g e
sink.
Close the water fill hole
cover.
Tip: do not overfill the
water reservoir beyond the
maximum fill level.
Tip: to familiarize yourself
with the parts of an iron,
refer to “Features of an
Iron” on Page 30.
31.
Plug the iron in and set the
temperature and steam
settings to the appropriate
level for your material. This
is usually located on the
garment label.
Tip: Be sure that all settings
are in the off position
before plugging in to avoid
electric shock.
Tip: refer to the “Ironing
Guide” on Page 31.
32.
Set the iron upright on the
table while it heats up to
the correct temperature.
Tip: always point the hot
surface of the iron away
from your workspace and
away from others who
might touch it by accident.
Embroidery Machine Project Instruction Booklet
15 | P a g e
33.
Cut enough stabilizer
backing for the hoop you
will be using.
Tip: the Embroidery
Production sheet will tell
you if you need one or two
layers of stabilizer.
Tip: refer to the
“Stabilizers” sheet on Page
32.
34.
Put the stabilizer on the
back side of your fabric.
Tip: be sure to line it up
with the chalk line you
made earlier.
Tip: the stabilizer is sticky
on one side only. Ensure
the bumps (sticky side) will
be sticking to the back of
the fabric you wish to
embroider.
Embroidery Machine Project Instruction Booklet
16 | P a g e
35.
When the iron is at full
heat, apply heat to the
correct area of the material
with the stabilizer directly
beneath it.
Tip: never place the iron
directly on the
bumpy/shiny side of the
stabilizer.
Tip: press the steam button
to apply extra steam if
necessary.
36.
37.
Unplug the iron, and empty
any excess water in the
sink.
Return the iron to the
table, and allow it to cool
down in the upright
position.
Tip: the iron will still be
very hot. Face the hot
surface safely away from
your workspace and others.
Embroidery Machine Project Instruction Booklet
17 | P a g e
38.
Place the fabric, with
stabilizer attached to the
back, in the embroidery
hoop.
The large side of the hoop
goes beneath the fabric,
and the smaller side goes
above.
Tip: line up the hoop with
the chalk marks you made
on the fabric earlier.
39.
Push the two parts of the
hoop together with the
fabric between them, and
tighten the tightening
screw as necessary.
Tip: do not overtighten the
hoop.
Tip: refer to “Setting the
Fabric in an Embroidery
Hoop” on Page 33.
Embroidery Machine Project Instruction Booklet
18 | P a g e
Part 4: Setting up the Embroidery Machine
Your instructor might have already done these steps for you.
40.
41.
Take the dust cover off of
the embroidery machine.
Tip: leave the embroidery
machine power off during
these next steps.
Remove the bobbin cover
and insert the bobbin; then
replace the bobbin cover.
Tip: refer to the
instructions at the end of
this booklet for “Inserting
the Bobbin.”
42.
Thread the embroidery
machine.
Tip: refer to the
instructions at the end of
this booklet for “Threading
the Embroidery Machine.”
Tip: this embroidery
machine has a needle
threader to assist in
threading the needle.
Embroidery Machine Project Instruction Booklet
19 | P a g e
43.
44.
Draw up the bobbin thread.
Tip: refer to the
instructions at the end of
this booklet for “Drawing
Up the Bobbin Thread.”
Attach the embroidery
hoop to the embroidery
machine.
Tip: refer to the
instructions at the end of
this booklet for “Attaching
the Embroidery Hoop to
the Machine.”
Embroidery Machine Project Instruction Booklet
20 | P a g e
Part 5: Embroidering Your Project on the Embroidery Machine
45.
Open the USB cover on the
right side of embroidery
machine.
Tip: the machine should be
powered off.
46.
47.
Insert the USB memory
stick into the USB slot of
the embroidery machine.
Turn on embroidery
machine.
Embroidery Machine Project Instruction Booklet
21 | P a g e
48.
With your finger, tap the
USB symbol on the
embroidery machine
screen.
Tip: The USB symbol looks
like this:
Tip: do not remove or
insert the USB stick while
waiting for the embroidery
machine to access the USB
memory stick.
49.
Select the MyDesign folder.
Embroidery Machine Project Instruction Booklet
22 | P a g e
50.
51.
52.
53.
Select your design.
Check that you are using
the correct hoop, and then
click the “return” arrow on
the embroidery machine
touch screen.
You are now ready to sew,
and can check the details of
your design on the screen.
Lower the presser foot.
Embroidery Machine Project Instruction Booklet
23 | P a g e
54.
Click the START/STOP
button to begin
embroidering.
Tip: if something goes
wrong, press the
START/STOP button at any
time to stop the
embroidering.
55.
56.
Wait for the embroidery to
complete.
Tip: this might take
between 10 and 20
minutes.
If the machine gives an
error message or stops at
any time, tell your
instructor.
Embroidery Machine Project Instruction Booklet
24 | P a g e
57.
58.
59.
When the embroidery has
completed, raise the
presser foot by lifting the
grey presser foot lifter.
Remove the hoop from the
embroidery machine.
Remove the fabric from the
hoop.
Tip: loosen the tightening
screw to release the hoop.
Embroidery Machine Project Instruction Booklet
25 | P a g e
60.
61.
62.
Using a stitch ripper or
sharp scissors, remove the
excess threads.
Turn the embroidery
machine off.
Remove the USB memory
stick, and close the USB
door.
Embroidery Machine Project Instruction Booklet
26 | P a g e
63.
64.
Replace the embroidery
machine dust cover.
Enjoy your embroidered
design, and hand it in to
your instructor with the
appropriate accompanying
materials.
Embroidery Machine Project Instruction Booklet
27 | P a g e
Embroidery Machine: Front, Needle, & Rear Views
Note: the user manual for the Janome Memory Craft 350E can be found at:
http://content.janome.com/documents/File/ManualFile/Inst%20book%20MC350E.pdf
Embroidery Machine Project Instruction Booklet
28 | P a g e
Embroidery Machine Project Instruction Booklet
29 | P a g e
Note: Our iron is a Black & Decker IR08x Iron. The above iron is similar in style but may have slightly different features.
Embroidery Machine Project Instruction Booklet
30 | P a g e
Source: http://www.sunbeam.com/service-%26-support/product-support/instruction-manuals/garment-care/sunbeam%C2%AEsteam-master%C2%AE-iron/garment-care-steam-master-iron-manual.html
Embroidery Machine Project Instruction Booklet
31 | P a g e
Embroidery Machine Project Instruction Booklet
32 | P a g e
Embroidery Machine Project Instruction Booklet
33 | P a g e
Embroidery Machine Project Instruction Booklet
34 | P a g e
Embroidery Machine Project Instruction Booklet
35 | P a g e
Embroidery Machine Project Instruction Booklet
36 | P a g e
Embroidery Machine Project Instruction Booklet
37 | P a g e
Embroidery Machine Project Instruction Booklet
38 | P a g e
Embroidery Machine Project Instruction Booklet
39 | P a g e
Embroidery Machine Project Instruction Booklet
40 | P a g e