1
Version 4 User Manual 1 HiTrack 4 User Manual HiTrack was conceptualized and designed with invaluable assistance from a wide variety of dedicated professionals, including hospital-based newborn hearing screeners, audiologists, and Early Hearing, Detection and Intervention program coordinators. Their knowledge and experience is evident throughout the software and is acknowledged with respect and appreciation. ™ The NCHAM logo and HiTrack are trademarks of NCHAM. ®Natus ALGO 2 is a registered trademark of Natus Medical, Inc. ®Bio-logic and AuDX are registered trademarks of Bio-logic Systems Corp ™ABaer and HATS are trademarks of Bio-logic Systems Corp. All other marks belong to their respective owners. For support: Phone our Help Desk at 435.797.3584 or E-mail us at [email protected] National Center for Hearing Assessment & Management (NCHAM) Utah State University 2615 Old Main Hill -Logan, UT 84322 Tel: 435.797.3584 www.hitrack.org Revised 4/2015 2 HiTrack 4 User Manual Table of Contents User Manual .................................................................................................................................... 1 Table of Contents ........................................................................................................................ 3 Opening and Configuring HiTrack ............................................................................................. 7 User Interface Layout ................................................................................................................. 8 Settings and Administration - System Settings ........................................................................... 9 Facility Specific Settings .......................................................................................................... 17 User Specific Settings ............................................................................................................... 18 Sharing Program Information with Screening Software ........................................................... 20 Tracking Features Overview ..................................................................................................... 21 Collecting Screening Information using HiTrack ..................................................................... 29 Collecting Screening Information using Equipment Software ................................................. 37 Collecting Diagnostic Hearing Information.............................................................................. 42 Managing Screening and Tracking Data................................................................................... 45 Maintaining the HiTrack Database ........................................................................................... 78 Data Integration ........................................................................................................................ 82 Helpful Hints for Data Entry in HiTrack .................................................................................. 83 HiTrack's Web Companion ....................................................................................................... 85 Appendix A: Linking HiTrack with ............................................................................................. 91 Equipment Manufacturer Software ............................................................................................... 91 Manufacturer Software Instructions ......................................................................................... 91 Bio-logic System Corp ABaer and AOAE ............................................................................... 93 Natus ALGO 2e Color or 3 with DataBook.............................................................................. 97 Natus ALGO 2 or 2e with DataBook ........................................................................................ 99 Otodynamics EZ-Screen2 ....................................................................................................... 102 Appendix B: Report Criteria Documentation ............................................................................ 106 Classifications ......................................................................................................................... 106 Amplification Report .............................................................................................................. 110 CDC Survey Report ................................................................................................................ 111 Data Cleaning Reports ............................................................................................................ 123 Early Intervention Report ....................................................................................................... 123 Hearing Status Report ............................................................................................................. 124 3 HiTrack 4 User Manual Needing Evaluation Report ..................................................................................................... 124 Needing Outpatient Report ..................................................................................................... 125 Outpatient Screening Report ................................................................................................... 125 Physicians Report.................................................................................................................... 126 Risk Indicator Report .............................................................................................................. 126 Screener Profile Report ........................................................................................................... 127 Screening Results Report ........................................................................................................ 127 Flow Chart .............................................................................................................................. 128 Hospital Summary .................................................................................................................. 131 Quarterly Report ..................................................................................................................... 132 Technology Summary ............................................................................................................. 134 Milestone Summary Report .................................................................................................... 135 User Defined Reports .............................................................................................................. 137 Advanced Criteria ................................................................................................................... 138 Appendix C: Classification Combinations.................................................................................. 139 Appendix D: Merge Matching Criteria and Overwrite rules ..................................................... 146 Step 1: Filters are used to find a list of possible matches ...................................................... 146 Step 2: Calculating match score for possible matches ........................................................... 147 Field Overwriting .................................................................................................................... 149 Appendix E: Most Conclusive Result Calculation .................................................................... 150 Overview ................................................................................................................................. 150 Most Conclusive Result Ranking Rules ................................................................................. 150 Most Conclusive Result Window ........................................................................................... 151 Appendix F: Automatic Letter Generation Criteria ................................................................... 152 Criteria .................................................................................................................................... 152 4 HiTrack 4 User Manual Introduction One of the greatest challenges for any Early Hearing Detection and Intervention (EHDI) program is to ensure that all infants are screened for hearing loss and that those who do not pass receive appropriate and timely follow-up care. In response to hospital, regional, and national needs, NCHAM developed the HiTrack data management system which is now being used in hundreds of hospitals across the United States. Program coordinators operating or monitoring hospitalbased screening programs have discovered that a computer-based patient information system contributes significantly to program success. HiTrack can support any screening program using otoacoustic emissions (OAEs) or automated auditory brainstem responses (ABRs) to screen infants for hearing loss. Hearing Screening Protocols Most programs use either a single or two-stage protocol to conduct their hearing screening. A Two Stage screening protocol is designed to screen the baby with cheap and efficient technology (for example, OAE) while the baby is at the hospital. This stage of screening is called Inpatient screening because the mother has not left the hospital. If the baby is not screened or the outcome of the Inpatient screening is not satisfactory the hospital then makes appointments to have the mom and baby come back for Outpatient screening with a more advanced technology (Automated ABR). Single Stage screening protocols are also becoming more popular as Automated ABR screening becomes more cost effective. In this protocol, infants who do not pass Inpatient screening are referred directly for diagnostic evaluation. Data Management The HiTrack 4 Series represents the cutting-edge of EHDI Data Management. The HiTrack 4 database is built around a dynamic framework to provide the logic needed for managing the complex requirements of EHDI tracking and follow-up. The HiTrack client offers a task-oriented user interface and is designed for maximum flexibility. The Windows user interface offers all of the HiTrack functionality in a quick, responsive Windows application that requires minimal configuration. The Windows Client allows HiTrack users to run their own individual database, or connect to a remotely hosted database to access shared data. The Web Companion user interface offers virtually all of the same interface and features of the Windows user interface while providing the versatility of being able to securely access HiTrack from any computer connected to the internet. 5 HiTrack 4 User Manual State or Regional Reporting If you will be reporting your data to a central EHDI coordinator please contact them for instructions on how you will be using HiTrack: There are two common Database Layouts that can be used with HiTrack: Distributed In this layout each facility in your region or state has their own fully functional database dedicated to their own HiTrack data. A separate Central database is maintained at the state or region. The EHDI coordinator maintaining this database will populate their database by collecting Data Transfer files from each facility in their area of responsibility. They will typically set a schedule for how often (e.g. once a month) the facilities will sent their files. Statewide or regional Program Information lists, such as physicians, facilities and audiologists are often provided for import into the facility databases. This ensures that records in the Central database contain unique and synchronized Program Information entries. This is referred to as a Distributed layout because the Central database is distributed across all of the separate facility databases. Centralized In this layout a single Central database is maintained at the state or region and it is shared with each of the facilities in the area of responsibility. This sharing is typically done with HiTrack's Web Companion. HiTrack provides an advanced setting to enable data management features for a Centralized layout. Please review this setting with the HiTrack Help Desk. Some states or regions may decide to combine these layouts. For example the Central coordinator may collect Data Transfer files from each hospital and also share their database with clinic offices using the Web Companion. There are a few additional tasks required if your state or region has arranged for you and your Facility to maintain your own database in a Distributed database layout. These tasks will be noted in this manual with a "Distributed" icon. If you do not report your data to a central EHDI coordinator or if you use HiTrack's Web Companion the Data Transfer tasks can be omitted. This User Manual This hyperlinked User Manual will help you configure HiTrack and will help you to become familiar with its functions. Clicking on the blue underlined links inside this document will scroll the page down to related sections. This manual does not cover software installation. Please refer to the HiTrack 4 Installation Guide for system requirements and installation instructions. 6 HiTrack 4 User Manual Opening and Configuring HiTrack To configure HiTrack you will need to log in. During the installation process you will be asked to create a username and password to use in HiTrack. If you are starting a new database you were also asked to enter in your Facility name. If you already have an existing HiTrack 3.5 database you should contact the HiTrack Help Desk for conversion steps. When you are ready to configure HiTrack, log in using the following steps: 1. Enter the Username and Password (passwords are case sensitive) 2. Click on the Start button or press the Enter key and the following box will appear: 3. Click on the drop-down box and select a Facility or Facility Group. Names of Facility Groups are preceded by an asterisk. 4. Click on the Continue button or press the Enter key. 7 HiTrack 4 User Manual User Interface Layout After successfully logging in the HiTrack user interface opens. The user interface is made up of the following sections: File Cabinet & File Card Action Buttons Area 8 Facility Selector Tool Bar Work Area HiTrack 4 User Manual Settings and Administration - System Settings On a new installation there are specific items that need to be setup before you can begin entering baby data into the system. Click on the Settings dial icon in the toolbar in the upper right corner of the screen. This opens the first Settings screen shown below. Settings are grouped into three categories listed on the left, System-wide settings, Facility specific settings and User specific settings. Users The Users list is the first system setting and allows you to maintain a list of users, their passwords, expiration dates and facility assignments. 9 HiTrack 4 User Manual To add a new user login: 1. Click on the "Add" button below the list. The Add User screen is shown 2. Enter in a user name and password and select an expiration date in the future using the dropdown to the right of the date field. Select a User Group that provides an appropriate level of access for this person. (described in the next section) Using the checkboxes in the Facility Access list identify the Facility to be used by this person. Select more than one Facility if this person will be signing into this HiTrack system from multiple facilities. HiTrack requires strong passwords and will automatically indicate when strong password is entered. Click the “?” for information about strong password criteria. 3. Use the "Find" button to locate a person record already in HiTrack (i.e. a Screener, Doctor or Audiologist.) or enter in values for the appropriate demographic fields. Colored fields are mandatory. 4. 10 Click the "Save" button below the demographic fields to add this user. HiTrack 4 User Manual User Groups The User Groups section allows you to assign access rights to the users within a group. Access rights allow administrators to control each user’s ability to make changes to data and grant access to specific screens. The built-in Administrators group allows all access rights. A few other stock User Groups have been built-in to provide a starting point for program coordinators that are new to HiTrack 4. It is best to create your own User Groups rather than modifying stock HiTrack User Groups. Access Rights Access Right Explanation System Administrator Allows access to System-wide Settings. Facility Administrator Allows access to Facility related Settings and features. Including: User Maintenance (for Facilities already assigned to this User), Merge Sources, Letter Settings, Required Fields and other settings. This Access Right is especially useful in Centralized Layouts because it allows local Facility staff to manage everything related to their own settings, including new 11 HiTrack 4 User Manual user accounts. 12 Edit Existing Records This access right grants the ability to modify existing data in HiTrack. Add New Records This access right grants the ability to add additional data to HiTrack. Baby Allows access to view the following baby related areas: Demographics, Tracking History, Risk Indicators, Letters, Recommended Actions, Transfer History, EI Services and Record Overview. Diagnostics Allows access to Diagnostics, Hearing Disposition, and Amplification areas. Requires -Baby- Access Right. Letters Allows access to Letter features. Requires -Baby- Access Right to work with individual baby letters. Medical People Settings Allows access to Medical People from the Settings Screen. Merge Data Allows basic access to Merge tool. Users can merge new data into the system. Requires –Add New Records- Access Right. Resolve Merge Data Allows access to features used to make corrections to incoming Merge data. Clear Merge Data Allows access to features used to delete pending Merge data. Record Combination Allows advanced users to permanently combine baby records from the Baby List. Reports Allows access to Reports. Screening Allows access to view the Screening area. Requires -Baby- Access Right. Tools Allows access to basic Tools, including Key Maintenance, Change Logs, Exporting Program Information, the Database Manager and Conversion tools. State / Regional Transfer Allows access to Tools that create data transfer files for State or Regional data collection agencies. Advanced Tools Allows access to advanced features in the Tools section. External Links Allows access to external database links on the patient file folder. Lab Testing Allows access to Lab Testing data on the patient file folder. HiTrack 4 User Manual Facilities You may add or edit Facilities in HiTrack from the Facilities category. Clicking the Add button at the bottom of the Facilities tab will show the following screen. If you will be reporting your HiTrack data to a Central coordinator you must contact them and decide on a mutually agreeable way of representing your Facility name. The spelling of your Facility name must match what your Central coordinator is using. This screen also requires you to set the EHDI Protocol for your Facility. Based on the screening protocol baby records are automatically filed into folders to help you track their hearing screening and evaluation. Listed below are the available protocols and typical usage information. 13 Protocol Use if… Two-Stage Automated Pass/Manual Non-Pass Use this Protocol if you want to manually review Inpatient and Outpatient results for infants who have not Passed. Two-Stage Automated Use this Protocol if you merge completed Inpatient and Outpatient screening results from screening equipment or other HiTrack systems. Two-Stage Manual Use this Protocol if you want to manually review Inpatient and Outpatient results for all infants. Two-Stage Inpatient Automated Use this Protocol if you merge completed Inpatient screening results from screening equipment or other HiTrack systems, but want to review Outpatient screening results by hand. Two-Stage Dual Equipment Auto-Pass Only Use this Protocol if you want to require A-ABR tests for infants who did not pass OAE screening and keep an active list of infants who have not Passed. (Infants who do not Pass Outpatient must HiTrack 4 User Manual be finished by hand.) Two-Stage Dual Equipment Automated. Use this Protocol if you merge completed OAE and A-ABR Inpatient screening results from screening equipment. (Infants in Outpatient screening must be finished by hand.) Single-Stage Dual Equipment* Automated Use this Protocol if you merge completed OAE and A-ABR Inpatient screening results from third-party screening equipment. Infants who do not pass screening will be recommended for evaluation. Single-Stage Dual Equipment Auto-Pass Only* Use this Protocol if you want to require A-ABR tests for infants who did not pass OAE screening and keep an active list of infants who have not Passed. Infants who do not pass A-ABR screening will be recommended for evaluation. Merge Sources After saving changes to a facility click on the "Merge Sources" button to define the setup information needed to merge data into the HiTrack program. Merge sources included data from screening equipment software, hospital patient information system exports and data from other HiTrack databases. Each merge source is entered by selecting a type of data file, specifying a name and browsing for a folder on your computer. The folder you select here is where HiTrack will look to find the file to be merged. Because some facilities use one device in the Well Baby nursery and one device in the NICU, HiTrack allows you to enter additional merge sources for each device. Facility Contact Info The Contact Info button at the bottom of the Facilities tab is used to enter contact information for parent and physician letters. This information, including hospital Phone Number, should be entered prior to using HiTrack to generate letters. 14 HiTrack 4 User Manual Facility Groups From the Facility Group list, you may create groupings of facilities. This allows Central coordinators to easily manage and report on data from more than one place. Facility Groups also allow Central coordinators generate Letters as a state or regional entity. Contact Information should be entered for your Facility Group if you will be generating Letters as a Facility Group. The Facility Group screen also allows you to assign access rights for users who need access to more than one facility in one easy step. Nurseries & Pick Lists The Nurseries, Nursery Groups and Pick Lists settings allow you to customize the data entry screens for your facility. Under Pick Lists you can customize the following categories: Race, Insurance Type, Languages and Custom Fields. For example, if you added "Free Healthcare" as an insurance type, users could select it from a list of insurance types when entering information. The Code field allows you to synchronize data coming from screening equipment data files. The Custom Fields feature allows you to setup new pick list categories and specify allowable entries. For example a Custom field category for "Eye Color" could be added with possible entries such as Blue, Green, and Brown. After being added this user defined custom field could then be used later in baby records and on Reports as Advanced Filter Criteria. Free-form text entry Custom fields are also allowed. Advanced Settings The last category listed in the System settings is Advanced Settings. The Advanced Settings screen provides access to four setting categories. In most cases these settings will not need to be reconfigured, however experienced program coordinators may want to use these settings to customize HiTrack. Features in Advanced Settings determine how Most Conclusive Results are calculated. Please refer to Appendix E for more information about Most Conclusive Results or consult the HiTrack Help Desk. Centralized HiTrack Setting As described above, HiTrack can be used in a Centralized Database Layout. Use the Centralized Database checkbox in Advanced Settings to turn on this feature. The Centralized setting changes how records are managed when baby transfers are entered. Newborns that become sick or need special care will often be transferred to a different facility 15 HiTrack 4 User Manual better suited to handle their conditions. (Note this type of Transfer is not the same as the Data Transfer feature.) In these cases the receiving facility may need access to incoming baby records so that they can conduct hearing screening. A second Advanced Setting called “Sending Facilities retain access to Transferred out records” also determines how transferred baby records can be accessed. When enabled, sending facilities keep their access to the baby record in addition to sharing access with the receiving Facility. Although both facilities report on the record the record shows singly when accessed from a Facility Group. The following table summarizes how records are handled by the Centralized setting: Centralized Feature: Distributed (Centralized Off) In System Transfer Out of System Transfer In system and Out of System behave the same. Baby's Tracking Status "In Progress" "Transferred Out" "Transferred Out" Baby shown in Sending Facility Baby List and Reports? Yes if “Sending Facilities retain access…” is enabled. Otherwise No. Yes Yes Baby shown in Receiving Facility Baby List and Reports? Yes No (N\A) No Baby shown in Sending Facility's "Transferred Out" Folder? Yes, but with view only access, unless “Sending Facilities retain access…” is enabled. Yes Yes The Receiving Facility name is available from the baby's Transfer History. 16 HiTrack 4 User Manual Facility Specific Settings The setting categories listed below your Facility or Facility Group name allow you to customize features for your Facility or Facility Group. Access to this area in HiTrack can be granted to groups of users with the Facility Administrator Access Right. The "Save" button at the bottom of each setting screen will save your changes. Some changes, especially User access related settings, will not take effect until you leave HiTrack and log back in. Medical People The Medical People list allows you to add physicians, audiologists, screeners, and Early Intervention personnel for a specific Facility or Facility Group. Each data entry screen allows for fully detailed contact information. If you will be sending letters to Physicians and Early Intervention contacts you should enter detailed address information so it can be included on the letters. The Facility Assignment list at the bottom of the Medical Person data entry screen allows you to decide which facilities will see this person on their data entry lists. When adding a medical person to a Facility Group they are automatically assigned to all Facilities within the Group. Older non-current personnel can be suppressed from new data entry screens by using a "Show?" option checkbox. This allows you to keep your historical data intact while maintaining streamlined data entry for new records. The "Review Usage" feature (controlled by the Advanced Tools Access Right) allows you to delete unused entries or combine and replace duplicates by first selecting a Medical Person from the list. Letter Settings Under the Letter Settings tab you can select which letters should be generated for the currently selected facility and indicate if you will be using HiTrack’s built in RTF Letter formatting or Microsoft Word’s Mail Merge feature to generate Letters. Letter Templates can also be customized from this screen by clicking the Letter Templates button. After selecting the type of letter and the target language you can use the Rich Text editor or Microsoft Word to format the text, font and placement of patient data fields in the each letter. These fields contain the variable information that can be included in a letter such as a baby’s name, contact name, mailing address, screening results, and so forth. 17 HiTrack 4 User Manual When using Microsoft Word to generate letters it is strongly recommended that each template does not exceed an uncompressed file size of 900 KB. The Microsoft Word “docx” format used by HiTrack is automatically compressed so the file size of the letter template itself cannot be used to determine if it is too large. For more information and support about letter template size please call the Help Desk. Older versions of Office require Microsoft Office 2003 Compatibility Patch to process HiTrack's Letters. Please go to the Microsoft Office website and download any service packs for your Office program before installing the patch. Microsoft provides the patch at: Patch File Auto-Fills If your site manually enters baby demographics and screening data the Auto-Fill feature can simplify data entry. For example, if your hospital uses a hand-held A-ABR device you may want to use A-ABR as an auto-fill for Test Type. This feature reduces the number of fields that you and your staff need to fill in by hand. Milestones These three settings allow program coordinators to customize at what age babies should qualify for screening, loss identification and intervention enrollment milestones. Other Settings These are other settings that can be changed and customized such as Required Fields, starting date defaults, birth weight entry format and advanced feature settings. The question mark icon to the left of each setting will explain the purpose of the setting. The "Reset" button to the right of each setting value allows you to reset the setting to the default value. Commonly Configured Settings include: Show Quick Add Birth Weight Format Auto Export PI (Program Information) (Windows user interface only) Baby List Starting DOB range User Specific Settings The setting categories below your login name allow you to customize features for your login. The Auto Fills, Default Paths and Other sections listed here are similar to the settings found in the Facility specific category however, Automatic Email and Password are unique to the user specific settings. Remember to use "Save" after making changes. Automatic Email Some features in HiTrack can generate an email to be sent out to interested parties. For example, when a user does a State Data Transfer this feature can automatically send an email to a 18 HiTrack 4 User Manual predefined state contact. Users can set up their email in HiTrack by SMTP or MAPI. For SMTP configurations, please contact your email provider. If MAPI is used, the computer’s default MAPI-compliant e-mail program such as Microsoft Outlook, Outlook Express, Mozilla Thunderbird, etc… will be used. To enable Automatic E-Mail Generation for state data transfers, please check the corresponding box, and supply a valid contact email address. This address is where the automatic emails will be sent. Password This is where a user can choose to change their password. Passwords cannot be reused within 12 months. 19 HiTrack 4 User Manual Sharing Program Information with Screening Software Your lists of Doctors, Screeners, Audiologists and other pick lists are collectively called "Program Information". Your Program Information is always entered and updated in HiTrack as described in the previous section. Although it is easy to create infant records directly in HiTrack, most screening programs find it more convenient to collect demographic information and screening results using a screening software. To reduce data entry time and improve data entry accuracy, several manufacturers of screening software have designed their systems to import the Program Information from HiTrack. This Program Information is made available to screeners through pop-up prompts or drop-down menus as they create infant records and document screening results. HiTrack can often be installed on the same computer as the screening software or it can reside on another computer if that is more convenient for data management purposes. To create the necessary link between HiTrack and your screening equipment software, refer to the Linking HiTrack with Equipment Manufacturer Software section. Find the correct instructions based on the type(s) of data collection screening software you are using and whether the screening software and HiTrack are installed on the same or different computers. 20 HiTrack 4 User Manual Tracking Features Overview The Filing Cabinet HiTrack organizes your EHDI data to help you track the progress of babies needing attention in your database. This is done by categorizing babies into folders representing what they need next in the flow of follow-up. At the broadest level baby records are considered "Complete" with no further action needed or considered "In Progress" with on-going recommendations. The File Cabinet organizes babies into drawers and folders representing these categories and provides powerful "To Do List" filtering based on the protocol setting for your facility. After a drawer and folder are selected the HiTrack Baby List is updated to show babies for that folder. Action Needed Drawer The folders within this drawer represent actions for babies with tracking in progress based on your protocol. For example: The Two-Stage Automated Pass/Manual Non-Pass protocol requires manual review for all infants who do not pass screening. In other words you must "Finish" each record by hand to complete the screening step. So as baby records The counts shown in the Action Needed folders show how many babies are in each action category based on the current Baby List DOB filter. The Two-Stage Automated Pass/Manual Non-Pass protocol includes the following folders under Action Needed: Inpatient Screening (Shows all babies in Inpatient subcategories) Need Inpatient Screening Babies yet to be screened Incomplete Inpatient Screening Babies in process of being screening waiting to be finished. Outpatient Screening (Shows all babies in Outpatient subcategories) Need Outpatient Appt. Babies who have finished Inpatient screening without passing Need Outpatient Screening 21 Babies with appointments for Outpatient Screening and babies who have not passed Outpatient screening that need to be finished. HiTrack 4 User Manual Evaluation 22 (Shows all babies in Evaluation subcategories) Need Evaluation Appointment Babies needing appointments for diagnostic or other evaluation Need Evaluation Babies with appointments for evaluation Risk Monitoring Babies who've passed screening but are being monitored because of Risk Indicators Needs Intervention Babies that need Early Intervention Need to Locate Babies with invalid contact information who need follow-up HiTrack 4 User Manual No Action Drawer After screening, most babies will need no further action. Infants who do not need further action are categorized into the following folders: Complete (Shows all babies in Complete subcategories) Passed Screening Babies that passed Inpatient or Outpatient Screening Evaluation Stopped Babies that have completed evaluation and need no further follow-up. e.g. Normal Hearing records. Not Evaluated (Shows all babies in No Evaluation subcategories Contacted but Unresponsive This matches the CDC category for documenting why a baby did not receive a hearing evaluation. Unable to Contact (see above) No Eval. – Medical Reasons (see above) PCP did not Refer for Evaluation (see above) No Services (Shows all babies in No Services subcategories Contacted but Unresponsive This matches the CDC category for documenting why a baby did not receive Early Intervention services. Unable to Contact (see above) Transferred Out Babies that have been transferred out of your facility The Transferred Out folder works in one of two ways depending on your database layout. When using a Centralized database (i.e. Web Companion) the "Transferred" Baby List folder includes a read only view of babies that have transferred out of your Facility that are being listed under a different facility. (The Centralized Database setting can be changed in Advanced Settings.) In Centralized databases the total number of infants shown in this folder may be more than the number of infants at your facility If you access HiTrack using the Windows Client you typically are participating in a Distributed database layout. In this case the records marked as being transferred are included in your periodic State/Regional transfer. These babies are shown in the "Transferred" Baby List folder and are marked as "Transferred Out" because they are not being tracked in your portion of the Distributed database. 23 HiTrack 4 User Manual Refused Babies whose parents have refused screening or evaluation Discontinued Babies whose tracking has been discontinued Deceased Babies who died The File Cabinet folders are based on the Protocol selected for your facility. For example, automated Protocols, such as "Two-Stage Automated", omit the "Incomplete Inpatient" folder because this protocol anticipates completed screening data for babies merged from screening equipment software. This allows HiTrack to give you the most efficient data management support and keeps your data in convenient "To Do" lists. All Folders The "All Folders" drawer at the top left of the File Cabinet gives you ready access to a complete, unfiltered view of the Baby List. Baby List The Baby List is the heart of HiTrack and is a launching point for baby tracking. The Baby List is loaded after selecting a folder from the File Cabinet: Baby List Advanced Find Option Auto Filter Indicator 24 HiTrack 4 User Manual This list of babies is generated based on a specified range of birthdates and the current facility or facility group. Additional columns may be viewed using the scroll bar (not shown) at the bottom of the list. The list can be refreshed at any time by clicking the "Refresh" button. Sorting The baby list may be sorted by clicking on the desired column name at the top of the list. Repeated clicks to the same column header will toggle between ascending and descending order. Filters By selecting the Advanced Find box you can search using Medical ID, Last Name, First Name, Result, Birth Facility, Probable Duplicates, Notes, and even by appointments. Deselect the box to return to basic filtering. Auto-Filter provides additional flexibility for arranging your data in the Baby List by allowing column specific filtering. The "Refresh" button will blink red when filter criteria has changed to remind you to reload the list. 25 HiTrack 4 User Manual Returning to the List After reviewing a baby record or working in another part of HiTrack you can return to the last Baby List by clicking on the Return to Baby List icon at the top of the screen. Facility Group Baby List When a Facility Group is selected in the Toolbar the baby list is not automatically loaded. This allows Central coordinators, who may work with thousands of records, to first specify their Baby List filter criteria and then load the list. The Transferred folder Baby List also works in a different way when using a Facility Group. This list includes babies transferred from any facility included in the Facility Group. Combining Duplicate Records De-duplication is an important Tracking task simplified for you by HiTrack with the Combine feature. By using this feature, all related record details from the two records will be permanently combined, including contact info, screening results and notes. To combine two records from the Baby List follow these steps: 1. From the Baby List, select the baby record you would like to discard after combining. 2. Fill in the checkbox for "Combine" located at the bottom of the Baby List Screen. This will show two new fields to the right. The first field shows the first baby that was selected. 3. Select the duplicate record from the list. Note that this fills in the second field. 4. Click on the "Preview" button after both records have been selected. (Uncheck the Combine box to restart the process.) 5. HiTrack will then provide a side-by-side view of the records that are going to be combined. Use the checkboxes in the list on the left to identify the field values you want to keep in the combined record. Leaving any field unchecked will discard the value. Use the "Combine" button to confirm the record combination. This powerful feature can be granted or suppressed as a specific access right while customizing User Groups. HiTrack also provides Data Cleaning Reports to help identify records that are probable duplicates. Please refer to information on these reports in Appendix A. 26 HiTrack 4 User Manual The Baby Basket The Baby Basket is a feature that allows you to work with more than one baby at a time. It can be shown by clicking on the blue bassinet basket icon to the left of the tool bar. The Baby Basket will appear on the right side of the screen. Babies can be added to the basket by dragging the desired baby row from the Baby List onto the Baby Basket list. Multiple babies can be added by holding CTRL or Shift on the keyboard as babies are selected to drag to the Baby Basket. The arrows located beneath the Basket list also allow you to work with the list. The button with double arrows pointing to the left clears the Baby Basket. The button with double arrows pointing to the right adds all babies from the current Baby List to the Baby Basket. The buttons with single arrows will add or remove the currently selected baby. Once there are babies in the basket HiTrack provides a variety of actions that can be activated by clicking "Proceed". "Individual Diagnostic Report" will generate a summary report for each baby in the Basket. "Create Data Transfer File" will create an encrypted data file for a State/Regional transfer based on the babies in the Basket. This action is only available in the Windows version of HiTrack. “Create Unencrypted XML File” will create an unencrypted XML file based on the information of the babies in the Baby Basket. “Email Medical IDs” option will create an email using the values found in the Automatic Email link inside of settings. The body of this email will be populated with the medical IDs of the infants that are in the Baby Basket. This feature is for Windows only. For the web version of HiTrack there is the Get Baby IDs option that will populate a text box with the IDs of the Baby Basket babies. Then the user can copy and paste these values into their email client of choice. "Add Note/Custom Field" option allows a common note to be added for each baby in the Basket using just one step. “Assign Physician” assigns the specified physician to all babies in the Baby Basket. “Request Letter” requests the specified letter for all babies in the Baby Basket. “Add Recommended Action” will add the specified recommended action to all babies in the Baby Basket. “Change Tracking Folder” will move all babies in the Baby Basket to a chosen folder. In order to use this option, all babies in the Baby Basket must currently be in the same tracking folder. 27 HiTrack 4 User Manual “Delete All” will delete all babies in the Baby Basket permanently from the system. This action cannot be undone. The Baby Basket can be printed by selecting "Print" from the Right-Click menu inside the list itself. The Baby Basket is also a good way to "park" baby records that need additional data entry. Later, after their data entry is done, the baby can be removed from the Basket. 28 HiTrack 4 User Manual Collecting Screening Information using HiTrack This section describes how the Inpatient and Outpatient folders are used when your screening equipment has little or no data collection capabilities (such as handheld devices). If you use a different type of screening equipment software, please refer to the section that describes collecting screening information using screening equipment software. The steps below will cover how to enter basic demographic data on babies who need to be screened, add screening results and finish completed records. Baby records should generally remain in the Inpatient folders until screening is completed or the infant is discharged. Facility Protocol Setting When using HiTrack to enter screening results from a hand-held device you will need to use one of the following Protocols: "Two-Stage Automated Pass/Manual NonPass", "Two-Stage Manual", "Two-Stage Dual Equipment Auto-Pass Only" or "Single-Stage Dual Equipment Auto-Pass Only" See Facility set up and protocol descriptions for more information. Other Settings Quick Add should be turned on for your Facility (see other settings.) because it allows screeners to easily add screening results and finish baby records directly from the Baby List in the Windows user interface. Procedure Overview: For Inpatient Screening you will use the "Inpatient Screening List". (The name of your current list is shown above the filter criteria on the Baby List.) If you are on a different list use the File Cabinet to select "Action Needed" and then the "Inpatient Screening" folder before starting your screening procedures. Step 1: Creating baby records. The screener or data entry clerk creates a new record for each infant born or transferred into the facility by entering basic infant demographic information. Step 2: Printing a list of babies to be screened. The screener prints a list showing all babies to be screened. The screener then manually records screening results on the printed list. If screening is performed where the screening software is located, the screener does not need to print a list; results can be entered directly into HiTrack as explained in Step 3. Step 3: Entering screening results and finishing screening records. The screener adds screening results to an individual infant’s record. The screener "finishes" an infant record indicating that the screening has been completed successfully or that the infant has been discharged from the hospital by using the Tracking Options link. Infants should remain on the browse list until they pass the screening or are discharged. Step 4: Entering outpatient screening results in a Two-Stage Protocol. When an infant returns for Outpatient screening, the screener locates the baby record on the Outpatient Screening list and updates it with Outpatient results. The updated record is then "finished". Note: Screening records may be entered manually or merged in from your screening equipment. See Tracking Tasks, Step 1, for details. 29 HiTrack 4 User Manual Step 1: Creating baby records For every infant born or transferred into your program, you must create a new child record. Click on a field or press the Tab key (to move forward) or press Shift-Tab (to move backward) to select a field. To add a new baby record: 1. Click on the "Add" button at the bottom of the Baby List. A blank Demographics screen is shown. 2. Enter the baby's information in the appropriate fields. Colored fields indicate mandatory data. The data field drop-down menus offer preset options that standardize data entry. Some fields might be auto-filled. If the auto-filled information is incorrect, simply enter the information for the blank fields. 3. Enter the Primary Contact's information in the appropriate fields If the Primary Contact is someone other than the birth mother (e.g., foster or adoptive parent), uncheck the "Birth Mother" box. (To add more contacts return to "Demographics" after saving.) 4. Click the "Save" button at the bottom of the screen The Baby List is shown with your new baby highlighted. This baby's yellow File Card will be shown on the left. 30 HiTrack 4 User Manual To enter additional notes: 1. If the baby File Card is not shown on the left select the baby from the Baby List. 2. Click on "Demographics" from the File Card This baby's Demographics screen is shown. 3. Click on the "Notes" tab above the demographics screen or click on the yellow and blue Note preview box. This baby's Note history is shown. If no notes are present a "New Entry" field is selected and the cursor is set for you to type. 4. Type in your note. The date and time are automatically stored with each note entry. In HiTrack 4 each note should be entered as a separate new entry unless you are making revisions to a prior note. 5. Click the "Save" button at the bottom of the screen 31 HiTrack 4 User Manual To enter additional contacts: 1. If the baby File Card is not shown on the left select the baby from the Baby List. 2a. Click on "Demographics" from the File Card on the Windows user interface. This baby's Demographics screen is shown. Click on the "Contacts" tab above the demographics screen. 2b. Web Companion users should click on the Contacts link on the File Card. 3. A list of all contact roles is shown. Persons may be shown more than once in this list because some contacts play more than one role. For example "Birth Mother" and "Primary Contact." 4. Click on "Add" A blank Person Demographics screen is shown. 5. Enter the contacts information in the appropriate fields and select appropriate contact role types from the checkboxes below the demographics fields. Colored fields indicate mandatory data. Select "Primary Contact" (in addition to any other roles you select) if this is the person that should receive mail and contact for this baby. 6. 32 Click the "Save" button at the bottom of the screen HiTrack 4 User Manual Selecting Risk Indicators: 1. If the baby File Card is not shown on the left select the baby from the Baby List. 2. Click on "Risk Indicators" from the File Card A blank Risk Indicator list is shown. 3. Using the drop-down menus, select either Yes, No or Unknown to indicate if the specific risk criteria are present. 4. To enter a Risk Indicator not listed in the JCIH 2007 list, select the "Other Indicators" tab. 5. Click the "Save" button below. 33 HiTrack 4 User Manual Step 2: Printing a list of infants to be screened After you create infant records in Screening, you can print a list of all infants and the respective screening actions required. This list includes the infants whose records you entered today, as well as those entered previously who have not yet passed the screening. Carry this printout with you to record screening outcomes. If you have direct access to the screening software while conducting screening, you can conduct the screening and enter results directly in the screening software as explained in Step 3. To print a list of babies needing Inpatient screening: 1. Verify that you are on the "Inpatient Screening List" (shown above the baby list filter criteria.) 2. Sort the list in a way that is helpful for your screening staff by clicking on the header column for "Baby Name", "Medical ID" or "Birth Date". A second click will reverse the sort order. 3. Click on "Print List" at the bottom of the Baby List to see a preview and then "Print" when your printer is ready. To print a list of babies needing Outpatient screening: 1. Verify that you are on the "Outpatient Screening List" (shown above the baby list filter criteria.) If you are on a different list use the File Cabinet to select "Action Needed" and then the "Outpatient Screen" folder. 2. Sort the list in a way that is helpful for your screening staff by clicking on the header column for "Baby Name", "Medical ID" or "Birth Date". A second click will reverse the sort order. 3. Click on "Print List" at the bottom of the Baby List to see a preview and then "Print" when your printer is ready. 34 HiTrack 4 User Manual Step 3: Entering screening results and finishing screening records At the end of a screening session you should enter the screening results for all the infants you have screened. To enter screening results: 1. If the baby File Card is not shown on the left select the baby from the Baby List. Quick Add will be activated below the list. Note that "Inpatient" is pre-selected as the Stage for this baby. 2. Enter screening results for the selected baby in the fields on the "Results" tab. If your hand-held device provides a test ID or number you may enter it into the "ID" column. (Go directly to the "Finish" for infants who were not screened.) 3. If screening has been completed for this baby click on the "Finish" tab. (Web Companion users should click on the Tracking Options link.) Finish Options will be shown on the Windows user interface. 4. Use the Outcome drop-down list to pick the appropriate outcome for this baby. The available options in this list will change depending on what has been entered for the record. For example if no results are entered the "Missed" option will be shown. 5. If desired add a short note explaining reason of the outcome. This is optional. 6. Click on the "Save" button below. This baby will be moved out of the Inpatient Screen folder. 35 HiTrack 4 User Manual Step 4: Entering Outpatient screening results in a Two-Stage Protocol To enter in Outpatient screening results use the File Cabinet to select "Action Needed" and then the "Outpatient Screen" folder. To enter outpatient screening results: 1. If the baby File Card is not shown on the left select the baby from the Baby List. Quick Add will be activated below the list. "Outpatient" is pre-selected as the Stage for this baby. 2. Enter screening results for the selected baby in the fields on the "Results" tab. If your hand-held device provides a test ID or number you may enter it into the "ID" column. (Go directly to the "Finish" for infants who were not screened.) 3. If screening has been completed for this baby or the baby was not screened click on the "Finish" tab. (Web Companion users should click on the Tracking Options link.) Finish Options will be shown. 4. Use the Outcome drop-down list to pick the appropriate outcome for this baby. A "Finish OP with Evaluation Needed" option will be present if this baby referred. 5. If desired add a short note explaining reason of the outcome. This is optional. 6. Click on the "Save" button below. This baby will be moved out of the Outpatient Screen folder. 36 HiTrack 4 User Manual Collecting Screening Information using Equipment Software You can merge screening information into HiTrack electronically if your hearing screening program uses a screening system with its own compatible screening software. Other screening systems software changes frequently so if you have additional questions beyond what is covered here in the manual, please contact the screening manufacturer. Facility Protocol Setting If you plan to manually review non-pass babies imported from an equipment file then you should use one of the following protocols: "Two-Stage Automated Pass/Manual Non-Pass", "TwoStage Dual Equipment Auto-Pass Only" or "Single-Stage Dual Equipment Auto-Pass Only" If you merge completed screening results from an equipment file then you should use one of the following protocols: "Two-Stage Automated", "Two-Stage Inpatient Automated", "Two-Stage Dual Equipment Automated" or "Single-Stage Dual Equipment Automated" See Facility set up and protocol descriptions for more information. Facility Merge Sources While configuring HiTrack for your facility you should have added Merge Sources for the screening equipment you use. Each file imported into HiTrack is referred to as a "Batch" of screening equipment information. After merging the file will be renamed with a "Time Stamp" to indicate that this file has been imported. Matching Rules In most cases Equipment merge files contain the newly collected screening data. However, in some scenarios, such as Outpatient follow-up screening, additional screening data may be collected. To account for this HiTrack looks for matches on Medical ID, birth date and last name. If this information does not completely match an existing infant record, the information is placed in the Pending Batches list. This allows the program coordinator to decide which field needs to be corrected and then merged into an existing record or added as a new infant record, as the case may be. (See Appendix D for complete explanations of matching criteria.) Procedure Overview: Step 1: Collecting Screening Information using equipment software. The screener uses the screening equipment software to enter baby demographic information and collect screening results. An "export" or "save" feature is used in the software to create an equipment file for HiTrack. Step 2: Starting the Merge process. The screener or person in charge of tracking uses the Merge icon to open the Merge screen, selects the Merge Source and begins the merge for this batch. Step 3: Resolving any pending Merge batches. The screener or person in charge of tracking uses the Merge screen to fix invalid data or resolve questionable matches. 37 HiTrack 4 User Manual Step 1: Collecting Screening Information using Equipment Software This step varies because each screening equipment software system works differently. Some equipment software provides complete demographic and screening fields while other equipment only allows for a handful of minimum required fields. Each equipment software system also writes the equipment file at different times during the screening. Please refer to the section describing data entry into Equipment Manufacturer Software for details about specific software packages that have been tested with HiTrack. These steps are specific to HiTrack's Windows user interface. Refer to the Web Companion section for steps on how to use merge equipment files into HiTrack's Web Companion. Step 2: Starting the Merge process The Merge can start after using your screening equipment software to create an equipment file. To merge an equipment file 1. Click on the "Merge" icon from the Toolbar The Merge screen is shown. 2. Use the Merge Source drop-down to select your equipment. The Source Location for your merge source will be shown. The "Merge" button is activated if a file from the selected equipment is found. If it is not found, the “Merge” button’s text will become “Search” indicating that a search is required to find your specified file. Clicking on “Search” will automatically search the root directories of your system for the file. If it is not found, it will allow the user to search manually for the file’s location. This search feature does not allow users to search 38 HiTrack 4 User Manual for XML, ETF, or ETF4 files. If the "Merge" button is not activated after selecting your equipment, please refer to the Equipment Manufacturer Software section for instructions on creating the equipment file. 3. Click the "Merge" button. The "Merge Results" screen is shown and the batch is processed. After the merge process successfully completes a "Merge Complete" message is shown. The number of rows added and updated is also reported on this screen. 4. If the process completes but some Pending data must be resolved a different message will be shown; "Some data must be manually resolved in this batch. Use Pending Data to finish work on this batch." This batch will remain in Pending data to be resolved. See Step 3 for instructions on resolving batches. 5. Click the "Ok" button to return to the main Merge Page. Merge History will be updated with the results of this batch. 39 HiTrack 4 User Manual Step 3: Resolving any pending Merge batches When a batch needs manual resolution HiTrack keeps the batch in the Pending Data list. These batches are temporary and can be deleted by using the "Delete Batch" button. 1. Select a pending batch from the "Pending Data" grid on the Merge screen. The Browse Pending Data screen is shown. 2. Baby records shaded in purple either (a) have data entry problems or (b) are part of a questionable match. After you click on a baby the Merge Item Resolution screen is shown. (continued) 40 HiTrack 4 User Manual 3a. A single column of fields is shown when invalid entries need to be corrected. Invalid birth dates and birth weights must be resolved. Blank deceased dates also require manual resolution. Click on the field to make a correction and click on "Save" to retain the changes. 3b. Two records are presented side by side for questionable matches. The Existing infant on the left is the record already in HiTrack and the Incoming infant is the record loaded from the current batch. The Merged Record shows you the completed infant record based on the checked ‘Use Incoming’ column. There are three possible actions to take for possible matches: "Merge with this Candidate", "Add as New Record" or "Delete Imported Record". Use "Merge with this Candidate" when the records are for the same baby. Use "Add as a New Record" when the record from the current batch is not the same baby shown on the right. Use "Delete Imported Record" to discard the record from the current batch. After choosing an action the Merge will process your request and show the Merge Results screen. 4. 41 Click the "Resume Merge" button to process invalid data corrections or to continue merging this batch again. HiTrack 4 User Manual Collecting Diagnostic Hearing Information HiTrack provides a few different ways to collect diagnostic hearing evaluation information. Data can be collected and recorded within the HiTrack user interface using the Diagnostic Quick Add and Diagnostic Management links or collected by audiologists without HiTrack access using the Hearing Evaluation Submission Form. HiTrack’s Hearing Evaluation Submission Form is a web based form that allows diagnostic data to be submitted by audiologist clinics without HiTrack access in version HiTrack 4.6.0. This form submits diagnostic data to the HiTrack Pending Merge list by authenticating the audiologist’s name, state code and facility name. As the submissions are collected on HiTrack’s Pending Merge list they can be reviewed for completeness and then automatically merged with the permanent HiTrack data or discarded. Set up and IT Configuration This form is available to users that have Web Companion installed. A new Facility and associated Merge Source entry must be added to HiTrack by the state HiTrack user to collect the data. The Facility should be named “Diagnostic Submissions Data”. The new Merge Source should be given a name and use the type “Clinic Data Source”. Once these items are added to HiTrack’s system, Web Server IT staff are required to update a configuration file on the web server with the IDs of this new Facility and Merge Source. Matching Rules and Required Fields A new set of matching rules is used to compare diagnostic submissions to existing HiTrack records. See below: Field Required and Note Patient ID/Medical ID Required. A state-wide unique identifier should be used here when available. Otherwise, the audiologist’s local patient ID should be used here. Child Last and First Name Required and used to match. Child DOB Required and used to match. Contact Last and First Name Required and used to match. Contact DOB Required and used to match. Contact Phone Required and used to match. Contact Zip Required and used to match. Child’s Birth Facility Required. Must match a HiTrack Facility name. Audiologist Name and Code Required. Both must match HiTrack’s name entered in Medical People. Diagnostic Facility 42 Required. Must match a HiTrack Facility name. HiTrack 4 User Manual As with HiTrack’s other match rules, incoming records that match a majority of fields are automatically combined. Partial matches are left in the Pending List and records with no matches are added as new records in HiTrack. These new unmatched records will show in the Baby List under the new “Diagnostic Submissions Data” facility as records without screening results and can be manually matched to existing records at any time. Audiologist Onboarding Process Below is a suggested process of introducing new audiologists to the HiTrack Hearing Evaluation Submission Form. 1. Determine if the audiologist is capable and willing to submit relevant HiTrack diagnostic data. 2. Verify their related entries in HiTrack: Check that their name is spelled and entered correctly in HiTrack’s Medical Person Edit screen. Check that their clinic/facility/site name is entered correctly in HiTrack’s Facility List 3. Provide authentication details in an email and/or phone call (see suggested text below): The HiTrack Web URL (similar to) “https://yourstate.gov/HiTrack_4/ HiTrack_4/HiTrack_4_Web_PL/SubmitHearingEvaluation.aspx” Suggest that they bookmark this site after opening it the first time. Their State Audiologist Code from the Medical Person Edit screen. Create a new code for them if they do not already have one. The list of HiTrack Facilities to use to enter in for Birth Facilities and Diagnostic Facility. This can be generated by saving the Facilities list to an Excel file. 4. Arrange with them to submit a test record that can be discarded from your Pending List after successful submission. 5. Arrange for periodic follow-up with them about their data quality. 43 HiTrack 4 User Manual Suggested Audiologist Welcome Message Below is a message that could be sent to welcome new Audiologists to HiTrack’s Hearing Evaluation Submission form. Dear Audiologist, As you may know, our state uses an EDHI data management system called HiTrack to track and maintain early child hearing results and diagnosis. A new feature in HiTrack enables offsite audiologists such as yourself, to submit hearing evaluations for patients you see to the state department of health. We hope that this form will allow us to replace the FAX forms that are currently in place. Types of data collected by HiTrack’s Hearing Evaluation Submission form: Degree, Type and Configuration of hearing loss Diagnostic ABR and OAE tests Tympanometry tests Behavioral tests A short note To use this feature you will need: A State Issued HiTrack Audiologist Code The HiTrack Facility List A web browser configured to link to: https://yourstate.gov/HiTrack_4/ HiTrack_4/HiTrack_4_Web_PL/SubmitHearingEvaluation.aspx Please feel free to contact me to learn more about setting up this form for you, Thank You, State EHDI Manager Staff Configuration Please contact the Help Desk to enable this form. 44 HiTrack 4 User Manual Managing Screening and Tracking Data HiTrack provides the tools and features you need to manage your hearing screening and tracking data. This section describes common tasks that apply these tools and features effectively. Toolbar The toolbar is located at the top of every screen in HiTrack and provides easy access to all of HiTrack's features. On the left side of the toolbar is the Facility or Facility Group that is selected after logging in. This can be changed at any time while logged in. The currently selected Facility or Facility Group determines which babies you will see, which Letters will be generated and which Settings are being used. On the right side of the toolbar are several icons: Letters: HiTrack generates letters for parents and health care providers. This icon opens the list of pending letters waiting to be printed. Reports: HiTrack provides reports to monitor hearing screening and evaluation performance. This icon provides a list of reports. Merge: HiTrack can import data from screening equipment software, hospital data systems and other HiTrack databases. This icon opens the merge tools used to import data from these sources. Tools: HiTrack features powerful tools to help manage your EHDI data. This toolbox icon opens a tool screen organized into helpful tabs. Settings: This dial icon opens the Settings screen to allow customization and administration of HiTrack. Log out: The exit door Log out icon will log a user out of HiTrack and return the Login screen. 45 HiTrack 4 User Manual Tracking Tasks As discussed in the Tracking System Overview the File Cabinet and Baby List allow you to manage your baby HiTrack data. The following sections will discuss common tracking tasks in detail. Tracking tasks start at different times depending on your tracking role. State or regional users interact with HiTrack at different times than hospital users. Some common tracking roles include: Hospital users Tracking Tasks begin after screeners have collected screening information and merged or entered it into HiTrack State or regional users who collect data from multiple HiTrack databases in their state or region. Tracking Tasks begin after the hospital Data Transfer files (ETF or ETF4 files) have been merged into their state or regional HiTrack system. State or regional users who maintain data from multiple hospitals in a single, centralized database. Tracking Tasks begin after screeners have collected screening information and merged or entered it into HiTrack. Encrypted Transfer Files do not need to be merged for state/regional users providing centralized data with HiTrack's Web Companion Contact the HiTrack Help Desk for additional consultation about your tracking role. Procedure Overview: Step 1: Updating baby records. Records for babies who do not pass screening are updated with additional screening results, demographics and recommendations. All in-progress records are finished and moved to the next action folder in the File Cabinet. Step 2: Generating Letters. Letters are printed to communicate screening results to parents (or preferred contacts) and physicians so that follow-up appointments can be arranged. Step 3: Reporting Tracking Effectiveness. Reports are generated as needed to evaluate followup success, Refer rates and other tracking measurements. Step 4: Transferred Data to a Central Database (optional). This step creates an encrypted transfer file (ETF) for you to report your HiTrack data to a state or regional coordinator. This is only required for Distributed state or regional databases. 46 HiTrack 4 User Manual Tracking Tasks - Step 1: Updating baby records Updating baby records is an important daily tracking task. Babies who referred from screening that can be located by using the File Cabinet and selecting the "Need Evaluation" folder. The first subfolder "Need Evaluation Appointment" provides a quick list of babies that need appointments for diagnostic evaluation. After a baby has been selected from the Baby List their File Card is shown to the left. Baby File Card The File Card provides access to information specific to the selected baby. Relevant key information, such as contact information, risk indicator alert and pending letters notification also appear on the File Card providing you with on-demand assistance with your tasks. The File Card is separated vertically into four main areas. The top of the card shows identifying information for the current baby. The middle section provides links to different parts of the baby's record: The Recommended Actions section changes as the baby moves from folder to folder and suggests relevant tracking actions. The Messages section displays helpful information about the selected baby. Hearing Disposition, Contact information and baby specific Milestone achievements are examples of helpful information provided in the Messages section Use a single click to show the File Card for a baby from the Baby List. 47 HiTrack 4 User Manual Record Overview Record overview and Advanced Details provide a summary of data for a baby and provides links to obtain more detailed information. Note that on this screen the File Card has been minimized to the top to maximize screen usage. Clicking on the yellow icon at the top will display the baby File Card again. Click on any "More" link to see detailed information on that part of the record 48 HiTrack 4 User Manual Advanced Details Record overview also provides access to a baby's Advanced Details. Clicking on the magnifying glass icon will open a pop-up window showing Advanced Details. Advanced Details is a helpful tracking tool because it provides access to each baby's Change Log and Match History. These two historical records are important tracking tools because most hearing screening programs merge their data from other sources such as equipment software or other HiTrack systems. These features let you see changes that other users make during these processes. The following Baby fields are maintained in the Change Log: Medical ID gender birth date middle names last name alternate id first name deceased (Y/N) The following Person/Contact fields are maintained in the Change Log: last name gender first name address last name phone middle names deceased (Y/N) The Change Log entries displayed in the following format: 49 Edit: The name of the field that was changed. Prior Value: This is the previous value for this field. Empty brackets mean that the value was empty (null) prior to being edited. Prior change date: This date in parentheses is the last time this was changed before this change. New Value: This value preceded by " to " is the new value of this field. Date: This is the date the field was changed HiTrack 4 User Manual A baby's Match History is also provided on Advanced Details. A match history entry is recorded each time a record is combined or matched by HiTrack's Merge process. These entries follow the following format: Matched: Match confidence score # This will be blank for Combined records, however for merged records it is a score calculated using the number of matching fields. User Match: Yes/No This indicates whether or not HT automatically matched this record. A "Y" value will be shown if this match was done with the Combine feature or if this record was matched by hand during the merge process. User The user who combined or matched the records Incoming This shows the HT ID# from the discarded record for technical purposes only. Date: This is the date the match or combine occurred. Classifications are a third noteworthy item included in Advanced Details. Classifications are calculated for each baby at each stage and represent how they are counted on reports. They are also use as criteria for generating letters. 50 HiTrack 4 User Manual Tracking Options The Tracking Options link is directly below the Record Overview link on the baby File Card. Clicking this link will display the following screen. Tracking Actions This tab will allow you to advance a baby record from one tracking action to another. The top grid gives a list of suggested actions for a baby based on the protocol being used. (You will see these same actions when using the Quick Add "Finish" feature on the Baby List.) Some possible Inpatient actions for the Two-Stage Automated Pass/Manual Non-Pass protocol are: Finish IP without Passing The baby was screened but the results were inconclusive or incomplete. Refer for Outpatient The baby was screened but the pass criteria was not met for one or both ears; refer for further screening. Missed Inpatient Screening The baby was not screened before the mother and child were discharged from the hospital. Evaluate w/o Screening No further screening was done because the baby was referred directly for Audiologic evaluation. Refer for Intervention The baby has completed evaluation and will be monitored as enrollment activities take place. The list of suggested possible actions will automatically change as screening information is entered. The protocol being used at your facility will also determine what actions are available. You may override the choices at any time for special circumstances by deselecting this option. 51 HiTrack 4 User Manual The bottom grid provides a history of actions that have occurred for the selected baby. For record keeping purposes you may edit the explanation field by selecting a history row and then clicking the "Edit" button. Stop Tracking This tab allows you to deactivate a baby record. Possible reasons why tracking might be stopped are: Refused Parental Refusal of screening or follow-up activities Discontinued Returned Mail, Moved out of State, Multiple failed attempts to contact, Unresponsive parents Always be sure to record a note explaining the reason why tracking was stopped. 52 HiTrack 4 User Manual Demographics The Demographics link in the baby’s File Card provides specific demographic data for a baby and their primary contact. The demographics tab provides a preview of the latest note at the bottom of the baby demographics box. Clicking on this box will switch you to the Notes data entry screen. A Change Date is also shown at the bottom of the demographics screen. This shows the last time this baby's demographics were changed. Colored fields indicate mandatory data. Click on a field or press the Tab key (to move forward) or press Shift-Tab (to move backward) to select a field. To update a baby record: 1. Enter the appropriate values into the fields shown. A drop-down field marked with a pad-lock icon indicates that this record is using Program Information that is retired or not available to your facility. Click on the pad-lock to unlock the drop-down and select a current Program Information entry. 2. Click the "Save" button to retain your changes. The Change Log is automatically updated when identifying fields are modified. 53 HiTrack 4 User Manual To add additional contacts: 1. Click on the "Contacts" tab above the demographics screen. (The Web Companion provides a separate "Contacts" link on the File Card for this feature.) A list of all contact roles is shown. Persons may be shown more than once in this list because some contacts play more than one role. For example "Birth Mother" and "Primary Contact." 2. Click on "Add" A blank Person Demographics screen is shown. 3. Enter the contacts information in the appropriate fields and select appropriate contact role types from the checkboxes below the demographics fields. Colored fields indicate mandatory data. Select "Primary Contact" (in addition to any other roles you select) if this is the person that should receive mail and contact for this baby. 4. Click the "Save" button at the bottom of the screen To enter additional notes: 1. Click on the "Notes" tab above the demographics screen or click on the yellow and blue Note preview box. This baby's Note history is shown. If no notes are present a "New Entry" field is selected and the cursor is set for you to type. 2. 54 Type in your note. The date and time are automatically stored with each note entry. In HiTrack 4 each note should be entered as a separate new entry unless you are making revisions to a prior note. HiTrack 4 User Manual Custom fields are also entered on this screen. Use the "Type: " drop-down to select from your predefined list of custom fields. 3. Click the "Save" button at the bottom of the screen to retain your changes to Notes. Screening The Screening link on the File Card is where hearing screening information may be reviewed and entered for a baby. To update screening results: 1. Click on the "Screening" link from the File Card for this baby. The Screening screen is shown. This screen is separated into three areas. The top area lets you add and modify screening results. The middle area shows the screening history for this baby. The Bottom area shows the current Most Conclusive Results. 2. Add a new result by selecting from the appropriate fields in the top "New Screening Result" area. Colored fields are mandatory. To edit an existing result click on the result in the "Screening History" list. This will activate the top area and allow you to change fields for this existing entry. 3. Click on "Apply" to complete the entry for this result. The "Save" button will begin flashing to remind you to save your changes before leaving this screen. 4. 55 Click the "Save" button at the bottom of the history list. HiTrack 4 User Manual Under rare circumstances you or an audiologist may want to override HiTrack's Most Conclusive Result rules. Use the "Override MCRs" button to hand-select results to be used for head results and ear results for each stage. 56 HiTrack 4 User Manual Risk Indicators Selecting the Risk Indicators link will display a list of risk indicators for a baby. You can use the drop downs to indicate whether a baby has any of the risks shown here. A history of risk indicators may also be accessed from this screen. Diagnostics The Diagnostics link provides a quick add screen for entering Hearing Disposition, DxABR, OAE, Tympanometry and Behavioral results all in one step. Diagnostics details are for documentation purposes only. There are no reports in HiTrack that use diagnostic details as criteria. However, a filter for “Has Diagnostics” is available as an Advanced Find filter on the Baby List. To use this feature first fill in the top section that asks for Audiologist, Test Date, Facility and Test Stage. Next, fill in diagnostic details for each of the areas in the bottom. If you do not use an area use the click arrow on the left to hide that section. Diagnostics – Manage The Manage link displays histories for DxABR, OAE, Tympanometry, and Behavioral and also allows you to add new results or edit existing ones. A baby’s Individual Diagnostic Report can also be created from this screen. This report summarizes this baby's complete HiTrack record in a clean, printable format suitable for sharing with supporting organizations. Baby Letters The Letters link on the File Card shows the pending letters for selected baby and allows you to request a specific letter. This link also provides access to letter history for the selected baby. For more information on letters see Step 2: Generating Letters. 57 HiTrack 4 User Manual Recommended Actions The Recommendation system in HiTrack works together with the File Cabinet to automatically create "To Do" lists for you and your staff. For example, babies who do not pass Inpatient screening are moved to the "Need Outpatient Appointment" folder. As you enter scheduled recommendations for Outpatient Screening babies will be automatically moved to "Need Outpatient Screening" folder. When parents return with their baby for Outpatient screening their records can be easily located in the "Need Outpatient Screening" folder. This scheduling feature also applies to the Need Evaluation folders. HiTrack will automatically list suggested recommended actions on the File Card for babies in "Needing Appointment" folders. Clicking on one of these shortcuts takes you to an "Add Recommendation" screen. To enter a suggested recommendation 1. Click on a suggested recommendation link under the Recommended Actions on the File Card for this baby. Add Recommendation Screen is shown. 58 HiTrack 4 User Manual Target Date: The optimal date of completion for this action. For common recommendations the target date is prefilled for you. Confirmed Date: The date of an actual appointment for this action. Instead of Target Date and Confirmed Date, Target Age and Confirmed Age can be used. This option is chosen when a user wants to specify the optimal age of completion for an action. Status: Pick a status for this action. "Referral Made" can be used for actions that are carried out by a supporting organization. Notes: Explain briefly the reason or the details of this action. Responsible Party: This is the person or organization that is responsible for carrying out this action. The "Find Person" button opens up a pop-up window that allows you to select a person by using filter criteria. Recommended By: This is the person who requested that this action occur. Recommended On: This is the date the recommendation was made. 2. Select appropriate values for each field. 3. Click "Save" at the bottom of this screen. A message may be displayed if this recommendation affects where the baby is listed in the File Cabinet folders. To see all recommendations or make a recommendation not listed 1. Click on the "Manage" link under the Recommended Actions on the File Card for this baby. A recommendations list is shown. 59 HiTrack 4 User Manual Click on "Add", "Edit" or "Delete" to work with the recommendation list. 2. Enter the recommendation details in the appropriate fields. (See steps above.) 3. Click "Save" at the bottom of this screen. A message may be displayed if this recommendation affects where the baby is listed in the File Cabinet folders. Other Important Recommendations The "Early Intervention Referral" recommendation is important because it affects the CDC Survey report. The "Total Referred for EI" count is based on the number of babies with this recommendation. 60 HiTrack 4 User Manual Hearing Disposition There are two tabs on the Hearing Disposition screen. The first of these allows you to enter hearing disposition data and select the most conclusive outcomes. The second tab is for recording audiograms. (The Web Companion shows the Audiogram page as a separate link on the File Card instead of a tab within the Hearing Disposition screen.) The Hearing Disposition Most Conclusive Outcomes are an important tracking tool for babies receiving evaluation because they determine how this baby is seen on reports. To record hearing disposition You must have Audiologists entered in for your facility to begin entering hearing disposition. 1. Click on the "Hearing Disposition" link on the File Card for this baby. The Hearing Disposition Screen is shown. This screen is separated into two main areas. The top area lists all of the ear disposition entries for this baby. The lower area allows you to specify which entries to use as the Most Conclusive Outcomes for this baby. 61 HiTrack 4 User Manual 2. Click on "Add" to add disposition for this baby. The "Add Hearing Disposition" screen is shown with entries for Left, Right and Sound Field. 3. For each ear or sound field enter in appropriate values. HiTrack has been designed based on audiologic research to not allow incorrect combinations of Type and Degree of Loss. To record Normal Hearing use Degree: "None (Normal Hearing)". It is important to enter the date of loss Confirmation so that HiTrack can correctly report this baby on Reports. Confer with your audiologists to decide when a loss is considered confirmed. 3. Click the "Save" button at the bottom of the screen. 4. After saving HiTrack requires that you select Most Conclusive Outcomes. This is especially important for babies with multiple historical disposition entries. Pick a disposition entry for each ear and click "Save Changes" to retain your Outcome choices. If you report to the CDC please note that the CDC Survey reports both on the first and Most Conclusive Outcomes selected in Hearing Disposition. Infants that have confirmed initial entries, but unconfirmed most conclusive outcomes may adversely affect the numbers generated on HiTrack's CDC Report. Please contact the Help Desk for more information about how to check for these scenarios. 62 HiTrack 4 User Manual Amplification The Amplification link is where information may be entered regarding a baby’s hearing devices. EI Services There are three data entry screens in HiTrack that affect Early Intervention Tracking and Reporting: EI Referral data entry, EI Enrollment and Status Update, and Stop Tracking. To enter the EI Referral start by selecting "Manage" from the Recommended Actions section on the baby File Card. Next choose "Add" from the bottom of the page. Select "Early Intervention Referral" as the type of recommendation. Select an appropriate date in the future for when this should occur. Select the Person or Organization to whom the referral is being made. Select the person who is making the Referral Select the date the Referral was made. This is used to calculate the Age at Referral for the CDC Survey. 63 HiTrack 4 User Manual To enter Enrollment details, including cases of Parent Opt Out, Out of Jurisdiction or Monitoring services, use the "EI Services" link on the baby File Card. From this screen use the "Add" button at the bottom to make a new entry. Select the appropriate status. For babies that were not Enrolled choose an alternate status. Select the program and date of Enrollment or non-enrollment status. Use this checkbox to indicate Non-Part C enrollment. After saving a baby's enrollment entry you should indicate their eligibility by selecting an option from the drop down at the bottom of the EI Services screen. Yes, No and Unknown are the available choices. 64 HiTrack 4 User Manual To indicate that EI Follow-up should be discontinued on a baby, use the Tracking Options link on the File Card and then choose Stop Tracking. For this status to be counted as interventionrelated the baby must be in the "Referred for Intervention" File Cabinet folder. If the baby you are working on is not already in the "Referred for Intervention" folder, you will need to choose an Action from the "Actions" tab that will put them in this folder before stopping their tracking. For example if the record is currently in "Need Evaluation Appt" you would pick the "Refer for Intervention" Action Needed folder. For other folders you will need to first uncheck the "Suggested Actions" filter box to see more folder options. Contact the Help Desk for additional support information on this feature. Transfer The Transfer feature works in one of two ways depending on your database layout. When using a Centralized database (i.e. Web Companion) the "Transferred" Baby list folder includes a read only view of babies that have transferred out of your Facility that are being listed and reported under a different facility. The Centralized Database setting can be changed in Advanced Settings. If you access HiTrack using the Windows Client at your Facility and transmit data to a State or Regional EHDI coordinator you are typically configured with a Distributed database layout. In this case the records marked as being transferred are included in your periodic State/Regional transfer. These babies are shown in the "Transferred" Baby List folder and are marked as "Transferred Out" because they are not being tracked in your portion of the Distributed database. The transfer link can be used to transfer a baby to another facility within the system. An option is also available to transfer the baby out of the system. 65 HiTrack 4 User Manual As described earlier, the Centralized setting determines how transfer babies are handled in HiTrack, especially in regard to which facilities have access to the record after the transfer is entered. Transfer history entries can be added, edited and deleted. HiTrack also allows you to determine the Responsible Facility transferred out of your Facility. If changes to Transfer history suggest that the baby should have a different Responsible facility, HiTrack will pre-select the Responsible facility drop-down and indicate that the user to save the change. Responsible Facility from Baby records coming from HiTrack 3.5 (including merged ETF files) default to the baby Birth Facility unless there is a HiTrack 3.5 Transfer record to a different facility. Note: Responsible Facility is not used on reports or any other tracking features. 66 HiTrack 4 User Manual Tracking Tasks - Step 2: Generating Letters Letters should be generated when you have finished reviewing the screening records. All baby records that need further screening or evaluation should be finished using Quick Add or Tracking Options. Contact information should also be provided for these records. To generate letters: 1. Click on the "Letters" postage stamp icon from the Toolbar The Facility/Facility Group pending letter list tab will be shown. The baby, recipient, letter title and current screening outcomes are shown in columns on this list. Clicking on a column header will sort the list. 2. From this list you can review which letters will be generated. For Letters you do not wish to print select the "Never" print option. Use the shortcut buttons at the bottom of the screen to reset the print options for the whole list. 3. Click the "Process" button in the lower right when you are ready to continue. Your word processor will open this batch of Letters for your review. Use "File" and "Print" to send the letters to your printer. 4. After printing close your word processer and return to HiTrack. HiTrack will prompt you asking "Did the letters print successfully?" 5. If there was a paper jam or some other printing problem click "No". This leaves the letters in the list so you can reprocess them when you are ready. A Letters Reload button and date entry gives you the opportunity to override the date logic that detects new possible for letters. In most cases this feature will not be needed; new letters will automatically be shown on the list in Step 1 above. Contact the HiTrack Help Desk if you have questions about Letter criteria. The Letter History tab provides a list of all of the letters sent by HiTrack. Use the date filters at the top of the screen to help narrow down the list of letters. Use the Resend button to send an exact copy of the letters that were originally sent. To manually generate a new letter with updated content use the Letter Request feature from the Letters link on a baby's File Card. The Letter History tab will also indicate the format of historical letters. A HiTrack database may have past letters in both the original Rich Text Format and Microsoft's DOCX format for the current Facility/Facility Group. Two letter documents will be generated if letters of different formats are selected to be resent. In some cases the letter text will be missing from letters in Letter History. This scenario happens for patient records that have been merged in from older HiTrack databases or when a letter is removed from the Pending Letter list without being processed. New letter content is generated for that baby's letter if these letters are selected to be resent. 67 HiTrack 4 User Manual Pending Letters and Letter History for individual babies can also be accessed by using the Letters link on the baby File Card. 68 HiTrack 4 User Manual Tracking Tasks - Step 3: Generating Reports Program Coordinators should periodically use the HiTrack Reports to review the performance of their programs. HiTrack's Reports are designed to provide statistics for Single and Two Stage protocols. The ‘No Out Scrn ->Dx’ ("Go directly to Diagnostics without Outpatient Screening") numbers account for non-Pass babies in Single Stage protocols on the Outpatient section of reports. General Filtering Options Most reports in HiTrack can be filtered using the following criteria: Date Reports can be filtered by Birth date, Screening date or Enter Date. "Enter Date" is the date when the baby record was hand entered or merged into the HiTrack database. This date does not change and is not the same as the last change date. Open ended birth ranges can be used by un-checking the checkboxes to the left of the date entry boxes. Location Birth Facility, Inpatient Screening Site, Nursery are selectable as location filters. Facility and Nursery Groups filters can be used to combine different sets of infants for reporting. Technology Many of the reports allow filtering by the Technology used in screening. This allows program coordinators to show babies who were screened with only a specific technology or who were screened with both. This helps answer the question: "How can I report screening effectiveness by technology?" These three filter options can be used in any combination to create a targeted report. HiTrack will remember each report's latest criteria so remember to review the previously used filters when running reporting reports for different purposes. Contact information can be included on reports that provide lists of babies. Each report has its own relevant filter options in addition to the general filter options. Appendix B describes these options in detail for each report. 69 HiTrack 4 User Manual Available Reports The "Reports" icon from the Toolbar in HiTrack 4 provides access to the following reports: Click on a report link listed below for detailed report usage and criteria. 70 Amplification Report Report amplification history for babies CDC Survey Report A report providing CDC survey data Data Cleaning Reports Generate reports to help in record consolidation Duplicate Medical ID Report babies with matching Medical ID Probable Duplicate Report babies with matching DOB and last name Custom Duplicate Report babies on a variety of matching field combinations Early Intervention Report Report Early Intervention information for babies. Hearing Status Report Report babies whose hearing disposition has been evaluated. Needing Evaluation Report Report babies who need continued evaluation. Needing Outpatient Report Report babies that need Outpatient Screening. Outpatient Screening Report Report babies with Outpatient results. Physicians Report Report babies grouped by Primary Care Provider Risk Indicator Report Report babies with risk indicators. Screener Profile Report Report screener response rates Screening Results Report Report screening results for babies. Flow Chart Generates a visual flow of screening and evaluation Hospital Summary Reports screening and evaluation statistics by hospital Quarterly Report Reports screening and evaluation statistics by quarter for hospitals Technology Summary Reports screening outcomes by equipment technology Milestone Summary Reports program timeliness for the CDC 1/3/6 timelines User Defined Reports Create printable baby lists with user-specified columns and criteria HiTrack 4 User Manual To generate a program Summary report: 1. Click on the "Reports" icon from the Toolbar The available reports will be shown in a list. 2. Select the "Summary Reports" entry from the list of reports. The report selection criteria screen is shown. Select the type of Summary report using the small list in the upper left. 3. Enter your filter criteria 4. Select a grouping option. Grouping the data as a single report shows all babies for the selection criteria on one report page. When grouped by Birth facility or IP Screening Site the total list of babies are divided into different counts based on where they were born or where they were screened. Note that changing the grouping options does not change the total number of babies included; it only affects how they are shown. 5. Click the "Generate" button. A progress bar is shown until the report is generated. After generating a new window is opened containing a print preview of the report. 6. To review the report page use the left and right wedge arrows on the toolbar. 7. When you are done reviewing and printing you may close the report with the X in the top right of the window. Report windows may be left open for side by side comparison. To generate a baby listing report: 1. Click on the "Reports" icon from the Toolbar The available reports will be shown in a list. 2. Select a report from the list (excluding the "Summary Reports" entry) and click the "Select" button below. The report selection criteria screen is shown. In most cases the general criteria is listed in a column on the left and the report specific criteria is listed on the right. 3. Specify report criteria and click the "Generate" button. After generating a new window is opened containing a print preview of the report. 4. To review the report page use the left and right wedge arrows on the toolbar. 5. When you are done reviewing and printing you may close the report with the X in the top right of the window. 71 HiTrack 4 User Manual Report Advanced Criteria Most Reports in HiTrack can be filtered using the Advanced Criteria feature. Printing and Exporting Reports Once a report preview window has been opened you print the report or export it in the following formats: Crystal Reports (*.rpt) A file that is Compatible with Crystal Report Designer tools Adobe Acrobat (*.pdf) A printable format that maintains page layout. Microsoft Excel (*.xls) An Excel format that attempts to maintain similar page formatting Microsoft Excel Data Only (*.xls) An Excel format that attempts to provide the data for spreadsheet processing. Empty rows and columns are included for report white space. Microsoft Word (*.doc) A Word format that attempts to maintain similar page formatting. Most text fields are converted to "frame" objects. Rich Text Format (*.rtf) A Word compatible RTF file that attempts to maintain similar page formatting. Report fields are shown in a single vertical column when opened in WordPad. Please contact the HiTrack Help Desk if you would like help exporting a report in a different format. 72 HiTrack 4 User Manual Milestones The Milestone feature enables you to easily identify infants who are nearing or who have missed the CDC recommended dates for hearing screening (before 1 month), loss identification (before 3 months), and intervention (before 6 months). Two features in HiTrack give you Milestone information, the Milestone Baby List and the Milestone Summary report. When the Baby List Milestone feature is turned on, three new columns appear on the Baby List, Milestone, Status, and Target Date. In addition, a drop-down box appears directly to the right of the Milestones checkbox. The drop-down box allows you to select which milestone category to display. After selecting the milestone category, click the Refresh button to view the results in the baby list. Advanced Filter Criteria Milestone Categories Auto Filters Milestone Columns The Milestone Summary Report is another powerful tracking tool. Please refer to the Report Criteria section in this document for information about this report. 73 HiTrack 4 User Manual Tracking Tasks - Step 4: Transferring Data to a Central Database This step creates an Encrypted Transfer File (ETF4) file for the purpose of reporting your HiTrack data to a state or regional Central coordinator. This step is not required if you a) do not report your data to a Central coordinator or b) use the HiTrack Web Companion. This step requires you to install your state or region's Public Key. Please refer to the Tools section for instructions for this one-time installation. The Standard transfer option creates a file containing new and changed records. Standard transfers should be created and sent to your Central coordinator on a regular basis. To create a Standard transfer: 1. Select your individual facility from the Toolbar 2. Click on the "Tools" icon from the Toolbar. The Tools tabs will be shown. 3. Click on the "State/Regional Transfer" tab. The Data Transfer Options sub-tab will be shown. This tab shows the folder where the transfer file will be created and when the last transfer was made. The number of records waiting to be transferred is shown (If this is your first data transfer all of your HiTrack data will be transferred.) This number is the total number of records including babies, medical persons and other Program Information lists. If your Hospital uses a “Two-Stage Manual” or “Two-Stage Automated Pass/Manual Non-Pass” protocol, some infants may be listed under “Not sending”. To include these infants in your Transfer, go to the Action Needed – Inpatient Screening folder and update the infants Tracking History. For assistance, go to Tracking Options page 21. 74 HiTrack 4 User Manual 4. Click on the "Transfer" button. A success message will be shown after the ETF4 file is created. 5. Use your Email program to create a new message to your Central coordinator with this ETF4 file as an attachment. Alternatively, you could use the HiTrack Automatic Email found in User Settings to generate this email for you. You can open the folder where transfers are being made by double clicking in the box under "Transfer File to:" (This works with any folder field in HiTrack.) Types of Data Transfers As mentioned above Standard transfers are the routine way of sending data to your Central coordinator. Periodic Standard data transfers keep your Central coordinators database up to date. The Maintenance Transfer feature should generally be used at the direction of your Central coordinator or the HiTrack Help Desk. Maintenance transfers are needed to resend missing data, most often due to human error. There are four types of HITACK data transfers; one routine and three are for maintenance: Standard Transfer – A transfer file is created that includes new and changed baby records. (described above in Tracking Task 4) Standard transfers should be created and sent to your Central coordinator on a regular basis. Transfer by Birth Date – A transfer file is created that includes baby records with birth dates between two dates. All of the data fields in each baby's record are included in the transfer. Use this transfer when you know which babies you want to resend to your Central coordinator. Transfer by Change Date – A transfer file is created that includes baby records that have changed between two dates. Only parts of the record that changed between these two dates are included in the transfer. (Demographics are always included.) Use this transfer to resend a lost period of changes independent of how old the babies are. Transfer entire current facility– A transfer file containing all of your Facility records is created. Every part of each baby's record is included in the transfer. Baby Basket Transfer– A transfer file containing all of your babies’ records in your Baby Basket is created. 75 HiTrack 4 User Manual The following example explains the differences between the Birth Date and Change Date transfers: Three babies were born at your hospital during the month. Baby "A" was born on the 6th, Baby "B" was born on the 15th and Baby "C" was born on the 17th. Three baby records will be created in HiTrack as their information is manually entered on their birth date. A Birth Date transfer with a date range from the 6th to the 15th would include Baby "A" and Baby "B" but not Baby "C". As explained above all of the data fields for Baby "A" and Baby "B" will be included in the transfer file. After entering these babies into HiTrack updates were made to their records. These changes began on the 21st and were finished on the 28th. A Change Date transfer with a date range from the 20th to the 24th would include data fields that changed for Baby "A" and Baby "B" in the transfer. Baby "C" is not included because their last change occurred on the 28th. 76 HiTrack 4 User Manual Note that a Change Date transfer using the prior date range of the 6th to the 15th would not include any records because no records were changed during that period of time. The biggest difference between the Birth Date and Change Date transfers is that Change Date transfers include records based on the when the edits and updates were made in HiTrack and Birth Date transfers include records based on the date of birth of the baby. Remake/View Transfer History The best way to re-create a lost transfer file is to use the "Remake/View Transfer history" feature. After clicking on this button a historical list of data transfers will be shown. To remake a transfer click on the row that you would like to remake. The Data Transfer options screen will be returned and the date range criteria for a maintenance transfer will be preselected for you. Transfer File Name ETF4 transfer files use the following naming format: The first 10 Letters of your Facility name (underlines for spaces) & ... 4 Characters of the HiTrack ID for that Facility (This is part of an internal unique identifier and is not the same as HiTrack 3.5 "State Transfer ID") & ... Date of Transfer: Day, Month (Three letter abbreviation), Year (Two Digit) & ... A Three or Two letter "Type of Transfer" description: --"STD" is Standard Transfer, (New and changed records) --"DB" is Date of Birth Range Maintenance Transfer --"CD" is Change Date Range Maintenance Transfer --"EN" is Entire Facility Maintenance Transfer --"EP" is Program Information export Be aware that subsequent transfer files will be named identically if you create more than one transfer of a specific type on a single day. If you use email to send a maintenance transfer to your Central coordinator be sure to explain the type of transfer and the date range used. Otherwise, they may skip your file because it is named the same as a previous maintenance transfer. 77 HiTrack 4 User Manual Maintaining the HiTrack Database HiTrack provides several tools to help you maintain your database. The Tool box icon opens the Tools screen with several tabs along the top. A brief description of each tab is given below. Program Information – HiTrack program information can be exported to a specified file to be imported by screening equipment software. Change Logs and Audits -- Allows users to view changes made to baby data after a selected start date. State/Regional Transfer – Provides an encrypted data transfer file for use in another HiTrack system at a State or Regional office. Back-ups/Conversion – Backup or restore a HiTrack database. Convert existing data from HiTrack 3.5 Desktop or Enterprise editions. Key Maintenance – Install encryption keys for State/Regional transfer data and other encryption key Tools. Advanced Tools – Other tools for maintaining your database. Program Information This tool is used to export your Facility's lists of birth locations, physicians, audiologists and screeners for use in screening equipment software when HiTrack is not installed on the screening equipment computer. (If HiTrack's Windows user interface is installed on the same computer as your screening software you will not need this tool.) To export your lists specify a folder or drive and then click the "Export Program Info" button. This creates a series of .TXT and .DBF files used by screening equipment software. An XML formatted version of your Program Information is also exported. Change Log and Audits This feature allows you to view the changes made to baby and person records at your Facility. Use the checkbox and date selector to filter what changes are shown. The Change Log can be browsed on-screen or exported to a file for future analysis. Read Tracking Tasks – Step 1 for more about the fields maintained in the Change Log. State/Regional Transfer This tool is outlined in the Tracking Tasks - Step 4. 78 HiTrack 4 User Manual Back-ups and Conversion Backing up data is one of the most important elements of good data management. Although the HiTrack Back-up feature is not a substitute for a permanent back-up system, this utility does provide a quick and convenient way for you to copy infant records and critical program information to a diskette or zip drive. If you do not have another back-up system, take advantage of this feature to back up your data on at least a weekly basis. Backups can only be made using HiTrack if you are using the computer that is serving the database. Backup features are disabled if your computer is only installed with the application component of HiTrack. To make a backup of your HiTrack database: 1. Click on the "Launch Database Manager" button from the "Backups/Conversion" tab. The Database Manager will be launched. Three buttons will be shown: "Backup Database", "Restore Database" and "Update database". 2. Click on the "Backup Database" button. A Browse for Folder window will be shown. Choose a folder where the backup should go and then click "OK". 3. You will then be asked for an optional password. This allows you to protect your database file. If you do not want to put a password on the backup you may simply click Proceed. Forgotten passwords on back up files cannot be retrieved. After processing a "Database Backup Completed Successfully" message will appear. The name of the backup file created will start with "HT4Backup_" and then be followed by the date and time the backup was created. It will have a .zip extension because it was compressed to save file space. HiTrack also offers an automated backup feature. This will back up your HiTrack database at a specified time or event. To use this feature, open up the Database Manger and click on the “Add Auto Backup” button. Now select a folder where your HiTrack backups will be placed and then complete the rest of the backup wizard. Upon completion of the wizard, the “Add Auto Backup” button reads “Edit Auto Backup”. If you click on this button, you can change the settings for your automated backup of HiTrack. If at any time you want to stop doing automated backups, click on the “Delete Auto Backup” button and your HiTrack database will no longer be automatically backed up. To restore an existing HiTrack 4 backup: THESE STEPS WILL OVERWRITE YOUR CURRENT HiTrack DATABASE 1. Click on the "Launch Database Manager" button from the "Backups/Conversion" tab. The Database Manager will be launched. Three buttons will be shown: "Backup Database", "Restore Database" and "Update database". 2. Click on the "Restore Database" button. A small Restore Database window will be shown. 79 HiTrack 4 User Manual Use the small folder icon to the right to locate a HiTrack 4 backup file. 3. Click on the "Proceed" button to restore the data and overwrite your current HiTrack database. The Database Manager can also be access by clicking on the "plug-in" icon from HiTrack's opening page. Please contact the HiTrack Help Desk for Conversion support. Key Maintenance This tool helps you maintain your public and private keys used for data encryption in HiTrack. If you report your HiTrack data to a state or regional coordinator you will need to install their Public Key. In most cases this is provided to you as an email attachment called "PublicKey.pbk". Use your email program to save this attachment to your computers hard drive and then use this screen in HiTrack to install it. Use the "Browse" button on the left side of the screen to locate the PublicKey.pbk file. (Refer to Tracking Tasks - Step 4 for steps on creating a Standard data transfer.) If you are a state or regional Central HiTrack user you will need to create a Decryption Key Set and then export your Public Key for the users who transfer data to you. Use the buttons on the right side of this screen to perform these tasks. After exporting the Public Key it can be safely emailed to all of your users. Public Keys can be shared over non-secure networks because they can only be used to encrypt data files. Private keys are required to decrypt data files and should not be shared over non-secure networks. Advanced Tools Use Advanced Tools under the direction of the HiTrack Help Desk. Classification Browser Tool The Classification Browser tool in HiTrack allows program coordinators to browse baby records by creating combinations of Classifications. This tool is available by clicking on the Tools link in the tool bar and then clicking on the Classification Browser button at the bottom of the Advanced Tools tab. The pick lists on the left allow for filtering by stage specific classifications. The "NOT" checkboxes provide the ability to exclude the selected classification instead of including it. Any combinations of classifications can be used across the four stages. A birth date filter is also provided to narrow down the results. The Refresh button queries the database and reloads the list according to the selected classification filters. After the list loads the number of baby records is reported and highlighted in a box to the right. The Classification browser helps answer the following questions: "How do I see a list of infants show on the Flow Chart or other Summary report?" and "How can I improve my program by accounting for infants with atypical diagnosis?" 80 HiTrack 4 User Manual The Classification Browser grid includes a row for each baby's classification in the list. This shows how the baby is being reported across all four stages. This list can be sorted and exported for use outside of HiTrack. The baby's internal HiTrack ID number is also provided in this list. 81 HiTrack 4 User Manual Data Integration HiTrack is designed to integrate with other database systems in several ways. Incoming data is imported through HiTrack's advanced Merge system so that it can be checked for completeness and existing records can be are matched based on rule-based algorithms. It also means that questionable matches are left for manual review. The following methods are available for populating and querying HiTrack: File Exchange (XML, TXT, CSV) – HiTrack can import data from XML and Comma Separated Value formatted files. HiTrack data can also be exported in these formats. Stored Procedures (SQL) –- This method allows batches of data to come into HiTrack using HiTrack's Merge Database Stored procedures. HiTrack also provides stored procedures for other systems to query. Web Services (SOAP) – HiTrack provides several industry standard Web Services that can be used to add or query data using web protocols. Electronic Messaging (HL7) – HiTrack provides HL7 V2 compatibility using integration software called Mirth Connect. Both incoming and outgoing data channels are available to use with HiTrack data. Please contact the HiTrack Help Desk to discuss data integration installation and configuration. 82 HiTrack 4 User Manual Helpful Hints for Data Entry in HiTrack This section contains data entry shortcuts to make entering data quick and easy. Navigating screens and fields Keyboard shortcuts for buttons are shown on the Windows user interface with an underline under the shortcut letter. For example if a button reads "Cancel" you can press Alt+C on the keyboard to cancel the screen. To move through the data entry fields, click the field, press Tab to move forward or press Shift+Tab to move backward. HiTrack Windows now supports additional standard Keyboard shortcuts, including: ESC ..... Leave the screen you are on ENTER .. Save the changes you have made on this screen F1 ......... Shows support options F2 .......... Opens the Action Needed Cabinet F3 .......... Activates Advanced Find feature F4 .......... Shows/Hides the File Card F5 ......... Reloads the Baby List F6 ......... Shows/Hides the Baby Basket F7 ......... Highlights the Facility pick list on the Tool bar F8 ......... Opens the Letters Screen F9 ......... Opens the Reports Screen F10 ....... Opens the Merge Screen F11 ....... Opens the Tools Screen F12 ....... Opens the Settings Screen HiTrack Web now supports access keys. Depending on the browser, they can be used by holding down Alt and pressing the access key, or by holding down Alt+Shift and pressing the access key. The supported access keys are: 83 1 ........... Shows support options 2 ............. Opens the Action Needed Cabinet 3 ............ Activates Advanced Find feature 4 ............ Shows/Hides the File Card 5 ........... Reloads the Baby List 6 ........... Shows/Hides the Baby Basket 7 ........... Shows a list of the appointments happening today 8 ........... Opens the Letters Screen 9 ........... Opens the Reports Screen 0 ........... Opens the Merge Screen - ........... Opens the Tools Screen HiTrack 4 User Manual = ........... Opens the Settings Screen B ........... Navigates back to the Baby List Opening Records In many case you can open a record for review and editing by double-clicking the mouse on the row of information you are interested in. Entering Dates Each date entry control allows you to enter the month, day and years using the keyboard or a pop-up calendar. Clicking on the icon to the side of the date field will open the pop-up calendar. In some cases dates are optional on several screens, including report filters. Optional dates will have a check box to the left of the date. Uncheck the box to exclude a date or leave it blank. Using drop-down menus Drop-down menus offer preset options that save time and standardize data entry. You can also use the keyboard to help you select items from drop-down menus. When a drop-down is selected you can jump to existing presets by typing the first letter of the entry. Entering File Locations Each Windows user interface screen that requires you to fill in a computer file location includes a folder icon. Clicking this folder icon will help you select a location from your computer or local network. It also allows you to create a new folder and select it in one step. The folder shown in any file location box can also be automatically opened by double-clicking in white area of box. Data Grids The contents of most data grids in the Windows user interface may be printed or exported by right-clicking in the grey area of a grid. After right-clicking you will have these options: Copy Selected Row – Copies the selected row into the Windows clipboard. You can then "Paste" this entry as text into another program. Print – Opens a Print Preview screen for the grid you have selected. Save as XML – Allows you to save this grid as an "XML" file with accurate database structure representation. Save as CSV – Allows you to save this grid as a "Comma Separated Values" file that is compatible with Microsoft Excel. 84 HiTrack 4 User Manual HiTrack's Web Companion This section describes HiTrack's Web Companion. The Web Companion is a web-based user interface designed to operate within the modern versions of Internet Explorer or Firefox web browsers. As described above your HiTrack database may be configured with a Distributed or Centralized layout. In most cases the Web Companion provides access to a Centralized state or regional database. Please contact the HiTrack Help Desk with Web Companion usage questions or for instructions on how to install the Web Companion IIS Server application (IT required). To use the Web Companion you will need to open your web browser to a predetermined web site provided by your Central coordinator (i.e., "https://hitrack.state.gov/".) This page will open the HiTrack login page. You should see a yellow security padlock in your web browser when this pages loads. (If you do not see a yellow security padlock please contact your Central coordinator before using HiTrack.) Web Browser Settings To use the Web Companion the following settings must be configured in your web browser: Internet Explorer 7 or newer (recommended), Firefox 2 or newer. Other web browsers (i.e. Opera, Netscape) are NOT supported. Trusted Sites – The HITRACK web application site must be added to the Internet Explorer "Trusted Sites" list and "Automatic prompting for file downloads" must be enabled for Trusted Sites. To do this in Internet Explorer go to the HiTrack Web site and select Tools and then Internet Options. From here select the Trusted Site icon from the Security tab. After selecting the icon click the Sites button to open the Trusted Sites list that allows you to add the HiTrack site. To allow prompting for downloads click on the Custom Level… button for the Trusted Sites zone. Enable automatic prompting by filling in the radio button under the Downloads section. JavaScript must be enabled for the HITRACK web application site. Popup windows must be allowed for the HITRACK web application site. Most browsers provide feedback if a pop-up is blocked. The option to "Always allow for this site" should be used. A PDF viewer (i.e. Adobe Reader) if using the Reports feature. Microsoft Office Word 2003 (or later) is required for Letters Microsoft .Net Framework 2.0 is required on client computers where users choose to use the Merge Companion upload tool. The Merge Companion provides automated upload features and renames screening equipment merge files as they are processed. 85 HiTrack 4 User Manual Differences in Web Companion A few main differences between HiTrack's Windows user interface and the Web Companion are: Automatic Session Timeout –Web Companion is a web application that can be used by hundreds of users. To conserve computing resources the system provides a built-in session timeout feature. This feature (provided by the web server system) will end your session if it is unattended for a certain amount of elapsed time. Typically this time period is set to 20 minutes of inactivity. Software Installation and Maintenance – The Web Companion server software can only be installed and maintained with IT support. Letter Templates – Letter Templates for your Facility or Facility Group cannot be edited using the Web Companion. If you need to customize the templates for your facility you can submit your suggested letter text to your Central coordinator or install the Windows user interface on one computer at your site to access the template editor. Please call the HiTrack Help Desk for letter template support. Other functional differences between the Windows user interface and the Web Companion user interface include how data is imported and exported. Collecting Screening Information from Screening Equipment Software – Web browser software applications such as the HiTrack Web Companion are not allowed to access files on your computer, including merge equipment files. To account for this constraint the Web Companion provides both a manual and an automatic upload method for merging equipment files. These two options are described in the next section. Program Information – Instead of exporting separate program information files to a given folder the Web Companion provides a download link for a single ZIP file that contains all of the Program Information files for your facility. After downloading, the contents of this Compressed Zipped file can be extracted for your screening equipment. Processing Letters – After clicking "Process" on the pending Letter list an RTF word processing file containing your letters will be downloaded from the Web Companion site. In some cases your web browser will automatically show this file, in other cases you will need to download the file and open it manually for printing. 86 HiTrack 4 User Manual Manually Uploading Equipment Files to the Web Companion One advantage to the manual upload method is that it does not require any additional tools or downloads. The main disadvantage is that you must manually rename or move the equipment file on your computer after the merge completes. To manually upload and merge an equipment file: 1. Click on the Merge icon from the toolbar. The Merge screen is shown with the Manual Upload tab selected by default. Select your equipment Merge Source from the drop down in Step #1. 2a. Click the "Choose File" button. A "Choose File" pop-up window will be shown. Locate the equipment file on your computer and then click Open. The equipment file path will be shown in the small field to the left of the Browse button. 2b. Click the "Upload File" button to send a copy of this file to the server computer where the Web Companion site runs. This screen will be updated showing the date that file was uploaded. 3. Click the "Merge Data" button to begin the merge process after uploading. 4. After the merge completes you will be reminded to rename or move your equipment file. If you use the Manual Upload feature is it important that you rename or move your equipment file after each merge. Failure to do so may cause your screening equipment software to append the next export to the information you previously merged. Remerging the same baby records requires more staff effort and duplicates screening test outcomes unnecessarily. 87 HiTrack 4 User Manual Automatic Uploading Equipment Files using the Merge Companion The HiTrack Merge Companion is a small tool (100KB) that can be downloaded onto your computer to automate screening equipment file merges. The Merge Companion uses a technology called "Web Services" to upload and merge equipment files. To use this tool you must have Microsoft's .Net Framework 2.0 installed on the computer you use to access HiTrack. (Please contact the HiTrack Help Desk for more information about this requirement.) Merge Companion must downloaded and configured the first time you use it. To download and configure the Merge Companion (one time only): 1. Click on the Merge icon from the toolbar. The Merge screen is shown with the Manual Upload tab selected by default. Select the Automated Upload tab. From this page you can download the Merge companion by clicking on the Merge Companion link with the Right mouse button and selecting "Save Target/Link as...". Download the exe file to your Desktop (or any other easy to remember folder location). 2. After downloading the Merge Companion exe locate the file from the Desktop and run it by double clicking on the icon. The Merge Companion screen will be shown and the following message will appear. (continued) 88 HiTrack 4 User Manual 3. Click on the "Configuration Options" link. The Configuration options will be shown. Fill in the HiTrack User name, Facility and Web Service URL fields. The URL is typically the same as your Web Companion site address followed by: "/HiTrack_4/HiTrack_4_WS/WSMergeCompanion.asmx". 4. Click on the "Save" button. The Configuration Options will close and the Merge Companion will load your Facility's Merge Sources. The Merge Companion will save your configuration for next time and does not need to be downloaded or configured again. 89 HiTrack 4 User Manual To merge an equipment file using the Merge Companion: 1. Double click on the Merge Companion icon from the Desktop (or wherever you saved it after downloading). The Merge Companion screen will be shown. 2. Select your equipment Merge Source from the drop down in and then type in your HiTrack password. The "Start" button is activated if a file from the selected equipment is found. If it is not found, the “Start” button’s text will become “Search” indicating that a search is required to find your specified file. Clicking on “Search” will automatically search the root directories of your system for the file. If it is not found, it will allow the user to search manually for the file’s location. This search feature does not allow users to search for XML, ETF, or ETF4 files. 3. Click on "Start". The equipment file will be uploaded and the merge process will begin. After merging, the equipment file on your computer will be automatically renamed to indicate that the file has been processed. For more information refer to the File Location details in Appendix A. 4. 90 Any pending merge batches should be resolved by logging into the Web Companion and clicking on the Merge icon from the toolbar. HiTrack 4 User Manual Appendix A: Linking HiTrack with Equipment Manufacturer Software Manufacturer Software Instructions This section discusses linking HiTrack with a few specific screening systems. Screening systems software changes frequently so please contact the screening manufacturer if there are any questions beyond what is covered here in this manual. The instructions below refer to the HiTrack Windows user interface. For information about how to Merge into HiTrack's Web Companion see the documentation earlier in this document. Four commonly used screening software packages are detailed in this section, Bio-logic ABaer and AOAE, ALGO 2e Color, ALGO 3 and Otodynamics EZScreen2. About File Locations For any screening software link you need to establish a file location that is entered into both HiTrack and the screening software. This location will be used by the screening software to write the file and used by HiTrack when merging the file. Any file path on the computer may be used when HiTrack and the screening software are installed on the same computer as long as your Windows User account has read and write access to it. In most cases a new folder such as "C:\merge files\" can be created as used as an export location. When HiTrack and the screening software are not on the same computer, removable media may be used. In the following directions, note that any removable media such as USB Flash Memory drives may be used in cases where terms "A:" and "diskette" are used. File paths on network drives can also be used for equipment data files when HiTrack is on a different computer. Please call the HiTrack Help Desk for additional file location support. File Processing After HiTrack is able to successfully read in records from a merge, the file is renamed with a date and time "stamp". This prevents future screening activity from writing over the completed file and also prevents unnecessary re-merging of completed files. The date and time stamp is added to the end of the file name. For example if you merge an "ALGO.TXT" file on March 21st 2006 at 11:02 it will be renamed to "ALGO_TXT_2006-03-2111-02-52.old" after merging. Program Information Sharing HiTrack's Program Information can be exported automatically when the HiTrack Windows user interface is installed on the same computer as the screening equipment software. To enable this setting turn on the "Auto Export PI" (Program Information) feature listed under Other Settings for your Facility. When this setting is enabled changes made to Medical People or Pick lists are automatically exported to HiTrack's "ProgInfo" folder (the default path is "C:\Program Files\NCHAM\HiTrack 4 for Windows\ProgInfo"). Some screening equipment software can then be configured to use this folder to import the lists. 91 HiTrack 4 User Manual When HiTrack is not installed on the same computer the Program Information tab in Tools can be used to export the lists to a removable storage device. Free Text Program Information Support Instead of importing HiTrack's Program Information to use in drop-downs some equipment manufacturers allow "Free Text" entries collected from their software. Although this method of exporting data is not recommended by the HiTrack Help Desk it is a way to obtain patient related entries from rudimentary software. "Placeholder Created" warnings are shown during the Merge process when HiTrack encounters a Free Text entry it does not recognize. The Fix Unknown Code Placeholders tool in HiTrack Advanced Tools should be used regularly to keep your lists of Program Information clear of duplicate entries. Automating the HiTrack Merge With the help of IT or Data support staff the HiTrack Merge can be automated to run on a recurring schedule without user interaction. As with other merges, any records that have questionable matches or need manual attention are left in the Pending Data merge screens. A Windows "bat" file should be created with the following data fields in sequence (separated by spaces): 1. The location of the HiTrack 4 executable. 2. The action to perform (MERGE) 3. The Merge Source ID to merge as (found on the Facility Merge Sources screen) 4. The HiTrack username to merge with 5. The password for the HiTrack 4 username 6. The Facility ID (GUID) to Merge for (can be found in SettingsSelect the hospital Edit Advanced) 7. The Facility or Facility Group ID to use to obtain Letter settings. Sample "bat" file contents: "C:\Program Files\NCHAM\HiTrack 4 For Windows\HiTrack_4_Win_PL.exe" MERGE 10 usern passw 56045B2B-DB17-42DE-BBDC-735F8EA3B5C9 56045B2B-DB17-42DE-BBDC-735F8EA3B5C9 The IT or Data support staff should contact the HiTrack Help Desk to complete the setup for automated merges. Please review the Data Integration section for more information about automating data merges. 92 HiTrack 4 User Manual Bio-logic System Corp ABaer and AOAE (Version 3.17.0.i.020) Demographic data for babies to be screened can be entered into the HATS™ (Hearing Assessment Tracking System) that comes with the Bio-logic equipment. To set the exporting file path click Setup on the main screen of the Bio-logic® Hearing Screening module (shown below), select Export Path and then click HiTrack. If the Bio-logic software and HiTrack are on the same computer, enter C:\Program Files\Bio-logic Systems Corp\ABaer. If they are on different computers, enter A:\. Before starting verify that Biologic AudX/ABaer was added to your Facility Merge Sources and that the file location (i.e., the location from which the data will be coming) is set to c:\Program Files\Bio-logic Systems Corp\ABaer if Biologic is installed on the same computer as HiTrack or to A:\ if Biologic is installed on a different computer. Link Setup Use the following steps to set your file location and program information in the Biologic software: 1. Click the Biologic Hearing Screening icon from the Desktop 2. From the menu bar select Setup > Export Path > HiTrack (If Export Path does not show in your menu use the Switch Profile to change to the Administrator user.) A pop-up with an “Export to” path is shown. 3. Use the “…” button or type in the file location path and then click the "Ok" button. 4a. To import Program Information (in later versions of HATS) when HiTrack is installed on the same computer: Use Setup > HiTrack List Import. Browse for "C:\Proram Files\NCHAM\HiTrack 4 For Windows\ProgInfo". Also fill in the "Hitrack 4" checkbox. 4b. To import Program Information (in later versions of HATS) when HiTrack is installed on a different computer you will need to first export the Program Information from HiTrack onto a floppy disk or removable flash drive. Next, use Setup > HiTrack List Import, browse for "A:\" (or the drive letter of the flash drive) and fill in the "Hitrack 4" checkbox. 93 HiTrack 4 User Manual Data Entry Data can be entered into the HATS system in one of two places. The first option is when the screening tests are actually conducted on the front screen. A limited amount of data can be entered in the Patient Information form shown below. The second option is to click the HATS Access button in the bottom left hand corner of the above screen and use the somewhat more comprehensive data collection form shown below. Any data entered on the above form is automatically copied into the Hearing Screening form when screening is done. Regardless of which form is used, when a hearing screening test is completed, the demographics and test results for each ear are stored in a database from which it can be exported to a file for merging into HiTrack. Some additional information fields can be added to HATS using instructions found in the HATS manual. The following table lists the HATS data that can be transferred from Bio-logic equipment and the HiTrack field to which it is imported: 94 Data enter into HATS as: Is imported into HiTrack as ID number* Child’s Medical ID Last Name* Child’s Name-Last HiTrack 4 User Manual 95 First Name Child’s First Birth Date* Child’s Birth-Date Sex Child’s Gender TOB Time Birth Hospital Birth Facility Doctor Physician Alternate ID# Alt Rec # Multi-Code Order Nursery Type Nursery Inpatient/Outpatient Level Weight (in grams) Child’s Birth-Weight Notes Notes Risk Factors -AP Risk Indicators Apgar scores of 0-4 at 1 minutes or 0-6 at 5 minutes Risk Factors -BW Risk Indicators Birth Weight Risk Factors -CF Risk Indicators Cranio Facial Anomalies Risk Factors -CI Risk Indicators Congenital (in utero) infection Risk Factors -FX Risk Indicators Family History Risk Factors -HL Risk Indicators Stigmata Risk Factors -HY Risk Indicators Hyperbilirubinemia Risk Factors -ME Risk Indicators Bacterial Meningitis Risk Factors -MV Risk Indicators Mechanical Ventilation Risk Factors -OD Risk Indicators Ototoxic Medication Mother Last Name Mother's Name-Last Mother First Name Mother's First Mother DOB Mother’s BirthDate Mother ID # Mother’s Contact ID Mother Language Mother’s Language Street Address Mother's Address line 1 Apartment Number Mother's Address line 2 City City HiTrack 4 User Manual State State Postal Code ZIP Telephone Phone *Indicates fields which must be added to the basic HATS screen. The following screening information is imported into HiTrack: Screening type (OAE or ABR), Left & Right Results, Test Date. Test ID, Technician-Screener. Screening Site, Level Inpatient/Outpatient Currently, the Bio-logic system does not transfer some data entered into HATS (e.g., Patient Outcome at Discharge, Status, History, Testers' Notes) to HiTrack. Also, only one Risk Factor may be selected, if more than one is selected none transfer over to HiTrack. These may change in the future. To import data that has been collected in HATS into HiTrack: 1. Enter the child's demographic data and collect screening data using the Bio-logic Hearing Screening module or the HATS module 2. From the Bio-logic Hearing Screening module, select Patients >Export>HI*TRACK. 3. Minimize or Exit from the Bio-logic Hearing Screening module. 4. On the HiTrack main screen, click the Merge button. 5. From the Merge Type drop-down menu, select Biologic AuDX/ ABaer. 6. Click the Merge button. All of the data collected using the ABaer and AOAE equipment for the date range specified will be imported to HiTrack. When the merge is completed, a message appears telling you how many records were merged successfully. Export tips You probably want to export (download) infant records from HATS and merge them into HiTrack on at least a weekly basis in order to generate timely letters and up-to-date reports. During the export process, a copy of the data is sent to HiTrack. The original data is retained in the HATS database. Exporting data from HATS and merging it into HiTrack is always a twostep process: 1. Records from HATS are automatically stored at the specified location as data for each child are collected. These records remain at that location and new records are added to the database as infants are screened. When an Export is done, the information is copied to the file location specified. Caution: Any data exported but not merged into HiTrack will be OVERWRITTEN. 2. The data from the exported file is merged into the HiTrack database by clicking the Merge icon from the Toolbar and clicking the "Merge" button. Refer to the Merging process documentation in this manual for more information. After a completed merge the export file will be renamed with a date and time stamp. 96 HiTrack 4 User Manual Natus ALGO 2e Color or 3 with DataBook Because the ALGO equipment cannot be used for purposes other than screening, HiTrack must be installed on a different computer. DataBook is not designed to import your Program Information from HiTrack or to make that available to screeners during data entry. Therefore, screeners must take great care to follow the data entry conventions described below. Before starting verify that Natus ALGO 2e Color/3 was added to your Facility Merge Sources and that the file location (i.e., the location from which the data will be coming) is set to a folder on the local hard drive if is HiTrack installed on the same computer as or to A:\ if HiTrack is installed on a different computer. Link Setup To set up your DataBook and HiTrack system: 1. Open HiTrack. 2. Click the Settings button and choose the Medical Persons category on the left. 3. Fill in the "Only List People marked as Show" option and click the "Refresh" button. 4. Using the right side button on the mouse right-click and select Print Grid. (Repeat these steps for other Physicians and Audiologists.) This step print lists of the HiTrack screener and physician codes that must be used during data entry. See “Data entry and export tips” below for detailed information. 5. Open the ALGO 2e Color or 3 Databook 6. On the User Preferences screen, the following fields should be checked and the date format set as follows: Medical Record No. required Date of Birth required Last Name required Gender required Date format: mm/dd/ccyy (Setting the date format may not be sufficient to ensure proper data entry—it is recommended that you post the data entry format for screeners directly on the screening equipment to avoid merge errors.) 97 HiTrack 4 User Manual Data entry and export tips Programs using DataBook software for infant hearing screening must follow the data entry guidelines provided below to ensure smooth transfer of information into HiTrack. Screening data that has not been entered in this specific format is not recognized by HiTrack. Use the following conventions during data entry into DataBook: 1. Medical Record No: Enter up to 10 digits or characters. 2. Name, Last: Enter infant's last name. Name, First: Enter infant's first name or BB or BG (upper or lower case) to designate baby boy or baby girl. 3. Gender: Check Male or Female 4. Pediatrician: Enter Physician code as designated on the HiTrack code list. 5. Date of Birth: Enter as mm/dd/ccyy 6. Birth Location: Enter I, II, or III as Nursery level in the initial spaces. HiTrack ignores additional information. 7. Other: Enter O for Outpatient screening; enter I for Inpatient screening; HiTrack will ignore additional information. 8. Comment: Field not read by HiTrack. 9. User ID: Enter Screener code as designated on the HiTrack code list. 10. Risk Indicators: Leave as U if unknown; enter Y if present; enter N if certain it is not present. (Note: Severe asphyxia appears in HiTrack's Other Risk Indicator field.) You probably want to export (download) infant records from DataBook and merge them into HiTrack on at least a weekly basis in order to generate timely letters and up-to-date reports. During the export process, a copy of the data is sent to HiTrack. The original data is retained in the DataBook system. Exporting data from DataBook and importing (merging) it into HiTrack is always a two step process: 1. From the Databook module, infant records are exported to a diskette by date range (refer to DataBook documentation for more explicit instructions). Always name the download file ALGO (DataBook automatically adds an extension so the file on the diskette is named ALGO.TXT). Do not download subsequent ALGO data onto the same diskette until you have completed the merge process, if you do, the first data file is OVERWRITTEN. 2. The data from the exported file is merged into the HiTrack database by clicking the Merge icon from the Toolbar and clicking the "Merge" button. Refer to the Merging process documentation in this manual for more information. After a completed merge the export file will be renamed with a date and time stamp. 98 HiTrack 4 User Manual Natus ALGO 2 or 2e with DataBook Because the ALGO equipment cannot be used for purposes other than screening, HiTrack must be installed on a different computer. DataBook is not designed to import your Program Information from HiTrack or to make information available to screeners during data entry. Therefore, screeners must take great care to follow the data entry conventions described in this section. Before starting verify that Natus ALGO 2/2e was added to your Facility Merge Sources and that the file location (i.e., the location from which the data will be coming) is set to a folder on the local hard drive if is HiTrack installed on the same computer as or to A:\ if HiTrack is installed on a different computer. Link Setup To set up your DataBook and HiTrack system: 1. Open HiTrack. 2. Click the Settings button and choose the Medical Persons category on the left. 3. Fill in the "Only List People marked as Show" option and click the "Refresh" button. 4. Using the right side button on the mouse right-click and select Print Grid. (Repeat these steps for other Physicians and Audiologists.) HiTrack prints a lists of the screener and physician codes that must be used during data entry Data entry and export tips Programs using DataBook software for infant hearing screening must follow the data entry guidelines provided below to ensure smooth transfer of information into HiTrack. Screening data that has not been entered in this specific format is not recognized by HiTrack. Because DataBook software does not provide separate data entry fields for vital information such as infant birth date, or inpatient screening vs. outpatient rescreening, screeners must modify the way that data is entered into available fields. An example of correct data entry on the DataBook screen is shown and explained below. Also note that DataBook does not have a function to automatically recall infant information entered during a previous screening session so screeners must enter all information, following this specific format, every time a screening session is conducted even when successive screening attempts are made on the same infant. 99 HiTrack 4 User Manual Table 3: Example of Data Entry on the ALGO 2 DataBook Screen Screen Prompt What screener enters Type first name, then press Enter: 07/01/97 bb1 (Birth date, sex,1 = inpatient; 2 = outpatient) There must be 6 digits entered in the date field. If the month or day is a single digit, add a zero as shown above. There must be a space between the year and the sex of the infant. Type last name, then press Enter: Smith Type patient ID number, then press Enter: 1254324 Type operator initials, then press Enter: MDL (Designated screener codes/initials) Screeners should use the code list created in the setup steps as they enter information into the Algo. 1 In the first name field, do not enter a first name; instead, enter the infant's birth date, as shown above, with the month/day/year separated by either slashes or hyphens, followed by a space. Then enter the letters bg (baby girl) or bb (baby boy), in either upper (BB) or lower case (bb) letters. 2 In the last name field, enter the infant's last name in either upper or lower case letters. 3 In the patient ID number field, enter the infant's medical record or patient ID number. (Most hospitals assign unique medical identification numbers to each twin, triplet, etc. If your hospital does not, you should add a multiple birth code to the infant's patient ID number, for example: 1254324A, 1254324B, etc.) 4. In the operator initials field, enter the three character or three digit code for the screener as shown on the HiTrack code list. These codes will be matched in HiTrack when the DataBook records are merged into HiTrack You probably want to export (download) infant records from DataBook and merge them into HiTrack on at least a weekly basis in order to generate timely letters and up-to-date reports. During the export process, a copy of the data is sent to HiTrack. The original data is retained in the DataBook system. Exporting data from DataBook and importing (merging) it into HiTrack is always a two step process: 1. From the Databook software, infant records are exported to a diskette by date range. (Refer to DataBook documentation for more explicit instructions.) Always name the download file ALGO.DAT because HiTrack looks for that file name when attempting to merge new data into your tracking database. Do not download subsequent ALGO data onto the same diskette until you have completed the merge process, if you do, the first data file is OVERWRITTEN. 2. The data from the exported file is merged into the HiTrack database by clicking the Merge icon from the Toolbar and clicking the "Merge" button. Refer to the Merging process 100 HiTrack 4 User Manual documentation in this manual for more information. After a completed merge the export file will be renamed with a date and time stamp. 101 HiTrack 4 User Manual Otodynamics EZ-Screen2 (Version 6.25.0.0) The EZ-Screen2 software can be used with any of the Otodynamics equipment that has a keyboard for entering demographic data (e.g., ILO 88, Echoport plus, ILO 288, etc.). Before starting verify that Otodynamics EZ-Screen was added to your Facility Merge Sources and that the file location (i.e., the location from which the data will be coming) is set to a folder on the local hard drive if is HiTrack installed on the same computer as or to A:\ if HiTrack is installed on a different computer. Link Setup To link EZ-Screen2 with HiTrack, specify the following settings in EZ-Screen2: 1. On the EZ-Screen2 main screen, select the File menu, then Options. Select the Exports/Imports tab. The following screen appears. 2. In the Screening data transfer area, field enter the merge file location that was entered in HiTrack for your EZScreen Merge Source. (The default is C:\Program Files\Otodynamics\ILO4win\Transfer.) 3. From the Export data to: drop-down menu, select NCHAM, HI*TRACK. 4. Click the OK button to retain these changes. 102 HiTrack 4 User Manual If HiTrack and EZScreen2 are on the same computer, the user can configure the shared Program Information before merging into HiTrack. To configure Program information: 1 Open EZScreen2 and make sure to be log in as an ILO Administrator. 2 Select Data Management > User Password > Configure. Listed here will be all the users for EZScreen2 and screeners and hospitals for HiTrack. 3 Use the arrows to assign HiTrack codes to their EZScreen2 equivalents. If the user changes the hospital affiliation, then all babies at this point and on will have the new hospital information. This does not change the hospital information for existing babies in HiTrack. 4. Click the OK button to retain these changes. Data Entry Refer to the EZ-Screen documentation to select mandatory fields for data entry. Most, but not all, of the demographic data collected by EZ-Screen2 can be imported or merged with HiTrack. The EZ-Screen2 data entry screen is shown below: When demographic data is entered into EZ-Screen2 and a test is completed, a copy of the data and test results for each ear are stored in the location specified in the EZ-Screen2 configuration. The default location is C:\program files\Otodynamics\ILO4win\Transfer and the file name is EZScreen.txt. The following table lists what EZ-Screen2 data can be transferred and the HiTrack field to which it is imported: Data entered in EZ-Screen2 as: Imported in HiTrack as: Family Name Child's Name-Last First name Child's First 103 HiTrack 4 User Manual ID number Child’s Medical ID Mother's Name Mother's Name-Last Weight (kg) Child's Birth-weight Date of birth Child's Birth-Date Time of birth Time Male/Female Gender Status Nursery Multiple births Order Notes Notes Secondary ID Alt. Rec. # Mother’s Forename Mother’s First Mother’s Maiden Name Mother’s Maiden Mother’s ID Number Mother’s Contact ID Mother’s Address (house/street) Mother’s Address line 1 Mother’s Address (town) Mother’s Address line 2 Mother’s Address (city) Mother’s City Mother’s Address (state/province) Mother’s State Mother’s Address (postcode/zip) Mother’s Zip Mother’s Phone number Mother’s Phone Mother’s Date of Birth Mother’s Birthdate Guardian’s Family Name Mother’s Alt Name-Last Guardian’s Forename Mother’s Alt First Guardian’s Address (house/street) Mother’s Alt Address line 1 Guardian’s Address (town) Mother’s Alt Address line 2 Guardian’s Address (city) Mother’s Alt City Guardian’s Address (state/province) Mother’s Alt State Guardian’s Address (postcode/zip) Mother’s Alt Zip Guardian’s Phone number Mother’s Alt Phone Risk Factors Family History Risk Indicators Family History Risk Factors Low Birth Weight Risk Indicators Birth Weight Risk Factors Bacterial Meningitis Risk Indicators Bacterial Meningitis 104 HiTrack 4 User Manual Risk Factors Ototoxic Medication Risk Indicators Ototoxic Medication Risk Factors Syndrome Risk Indicators Stigmata Risk Factors Hyperbilirubinemia Risk Indicators Hyperbilirubinemia Risk Factors Congenital Infection Risk Indicators Congenital (in utero) infection Risk Factors Cranio Facial Anomalies Risk Indicators Cranio Facial Anomalies Risk Factors Mechanical Ventilation Risk Indicators Mechanical Ventilation Risk Factors Abnormal Apgar Scores Risk Indicators Apgar scores of 0-4 at 1 minute or 0-6 at 5 minutes Risk Factors Other Risk Factors Risk Indicators -Other tab (brings over a ‘Y’ if selected in EZScreen) The following screening information is imported into HiTrack: Screening type (OAE or ABR) , Left & Right Results, Test date, Test ID ,Screener ID (if pick lists are set up). Even though data for other fields can be entered into EZ-Screen2 (e.g., Middlename, Alternate Contact ID # etc.), they are not presently transferred to HiTrack. All of the data collected during screening since the last time you merged will be imported to HiTrack. When the merge is completed, a message appears telling you how many records were merged successfully. Export tips You probably want to export (download) infant records from EZScreen2 and merge them into HiTrack on at least a weekly basis in order to generate timely letters and up-to-date reports. During the export process, a copy of the data is sent to HiTrack -the original data is retained in EZ-Screen2. Exporting data from EZ-Screen2 and importing (merging) it into HiTrack is always a two-step process: 1. Records from EZ-Screen2 are automatically stored at the specified file location as data for each child are collected. This data remains at that location and new data is appended to it until a merge is done. 2. The data from the data file is merged into the HiTrack database by clicking the Merge icon from the Toolbar and clicking the "Merge" button. Refer to the Merging process documentation in this manual for more information. After a completed merge the export file will be renamed with a date and time stamp. 105 HiTrack 4 User Manual Appendix B: Report Criteria Documentation Classifications Classifications are used to categorize babies on reports including the Flow Chart and other summary reports. Each baby may be classified for each EHDI Stage: Inpatient, Outpatient, Evaluation and Intervention. A baby may have at most four classifications, one for each stage. Classifications are based on Most Conclusive Results and other parts of the baby record. Most Conclusive Results are computed for each ear at Inpatient and Outpatient stages. Most Conclusive Outcomes are also defined for Hearing Disposition but must be manually selected for each infant after any type and degree of hearing loss is entered or changed. The criteria lists below are presented in the order of consideration. Once a qualifying classification is found for each stage no other criteria is considered. Updated 5/19/2008. Inpatient Classifications Last updated: 10/9/2007 Classification Criteria 1 Deceased before/during Inpatient Screening Infant is marked as deceased and no screening results exist 2 Inpatient Pass Both Inpatient Most Conclusive Results are Pass 3 Inpatient Referred Both or one Inpatient Most Conclusive Result is Refer 4 Inconclusive Inpatient Results Other Inpatient screening results exist that are not Refer 5 Missed Inpatient Screening Infant's most recent Tracking Action for Inpatient Screening is "Missed" and the baby has no Transfer entries. 6 Refused Inpatient Screening Infant's most recent Tracking Status for Inpatient Screening is "Refused". 7 Transferred Out before/during Inpatient Screening Infant's most recent Tracking Status for Inpatient Screening is "Transferred Out" or a Transfer entry exists. 8 No Inpatient Information (default Classification) 106 HiTrack 4 User Manual Outpatient Classifications Last updated: 10/9/2007 Classification Criteria 1 Deceased before/during Outpatient Screening Infant is marked as deceased, Inpatient screening results exist and no Outpatient screening results or Hearing Disposition is entered. 2 Outpatient Pass Both Outpatient Most Conclusive Results are Pass. 3 Outpatient Refer Both or one Outpatient Most Conclusive Result is Refer. 4 Outpatient Inconclusive Results Other Outpatient screening results exist that are not Refer. 5 Refused Outpatient Screening Infant's most recent Tracking Status for Outpatient Screening is "Refused". 6 Scheduled for Outpatient Screening Infant's folder is "Need Outpatient Screening" and no Outpatient results exist. 7 Follow-Up Discontinued before/during Outpatient Screening Infant marked Discontinued while in "Need Outpatient Appt.", "Need Outpatient Screening" or "Need to Locate" folders. (Excludes the infant if they need to be located for Evaluation.) 8 Need to Locate for Outpatient Screening Infant does not have Outpatient screening results and their folder is "Need Outpatient Appt." or "Need to Locate". 9 Go directly to Evaluation without Outpatient Screening Infant does not have Outpatient screening results and any of the following: a. folder is "Need Evaluation Appt.", "Need Evaluation", or "Completed Evaluation". b. "Evaluate w/o Outpatient" Action exists in Tracking History. c. Hearing Disposition has been entered. 10 107 No Outpatient Information Infant does not have Outpatient screening results HiTrack 4 User Manual Evaluation Classifications Last updated: 4/28/2008 Classification Criteria 1 Deceased before/during Eval Infant is marked as deceased, Outpatient screening results or Hearing Disposition is entered and no EI Services are entered. (Single Stage Protocols check for Inpatient Screening.) 2 Confirmed Loss after Evaluation Infant has Most Conclusive Hearing Disposition where any ear is entered with a confirmed type of Loss or Sound Field is entered and confirmed. 3 Normal Hearing after Evaluation Infant has Most Conclusive Hearing Disposition where a. both ears are confirmed Normal ("N/A (No Loss)" or "None" (for HT3.5 converted data)) d. one ear is entered and confirmed normal c. sound field is entered and confirmed normal 4 Refused Evaluation Infant's most recent Tracking Status for Evaluation is "Refused". 5 Follow-Up Discontinued before/during Evaluation Infant's most recent Tracking Status for Evaluation is "Discontinued". 6 Out of Jurisdiction – No Evaluation Infant with a "Transfer Out of System" History record entered while the record is in "Need Evaluation Appt" or "Need Evaluation" and no Hearing Disposition entries exist. (Transfer date must be after DOB) 7 Evaluation in Process Infant has any of the following a. Most Conclusive Hearing Disposition with unconfirmed type and degree of Loss entered b. An "Evaluate without Screening" Tracking Option has been used.. c. Outpatient Most Conclusive Result of Refer, Invalid or Could not Test. 8 108 Need to Locate for Evaluation Infant's folder is "Need Evaluation Appt." or "Need to Locate" and a Tracking Action of "Need to Locate" during Evaluation exists. HiTrack 4 User Manual Intervention Classifications Last updated: 10/26/2012 Classification Criteria 1 Deceased before/during Intervention Infant is marked as deceased and an EI Service enrollment has been entered. 2 Refused Intervention All EI Service entries are marked as "Parent Opt Out" or the infants most recent Tracking Status for "Referred for Intervention" is "Refused". 3 Follow-Up Discontinued before/during Intervention Infant's most recent Tracking Status for "Referred for Intervention" is "Discontinued". 4 No Intervention Info Infant has no EI Service enrollments entered that are "Pending", "Enrolled", or "Monitoring" 5 Enrolled in Intervention Infant has at least one EI Service enrollment entered that is "Pending", "Enrolled", or "Monitoring" 109 HiTrack 4 User Manual Amplification Report This report lists babies who have Amplification entries and provides calculations for the JCIH 2007 Benchmark for Amplification. Deceased babies are not included in this report. Report Specific Filtering Options This report uses the general filtering options. JCIH 2007 Benchmark This report includes the JCIH Benchmark for amplification: “For families who elect amplification, the percentage of infants with confirmed bilateral hearing loss who receive amplification devices within 1 month of confirmation of hearing loss; the recommended benchmark is 95%.” Although the benchmark applies only to infants with bilateral hearing loss, information has also been provided on infants who have unilateral hearing losses or where laterality is unknown. In order to determine whether a baby meets the benchmark or not, two pieces of information are required: 1) the fitted date for the amplification device, and 2) a hearing disposition entry. Babies who do not have these two pieces of information will not be counted on the JCIH 2007 Benchmark report, but they will be counted on the Amplification report as long as they have an amplification entry. A count of babies without a fitted date is included on the JCIH 2007 Benchmark report to show how many babies are not included on the report because the fitted date is missing. The Total Babies count includes babies without fitted dates, babies without hearing disposition entries, and babies with bilateral, unilateral, and laterality unknown hearing losses. 110 HiTrack 4 User Manual CDC Survey Report The HiTrack 4.6.0 CDC Summary Report follows the guidelines given in the "CDC-EHDI Hearing Screening and Follow-up Survey (HSFS): 2013 Explanations." This report also contains quality assurance feedback statistics not included by the CDC explanations. These additional numbers help program coordinators check the quality of their data. Report Specific Filtering Options Birth date range Specifics the Birth Date Range for the report. Only include Baby Basket babies Allows the CDC Survey report to be run for a small subset of records. Report Only Confirmed Hearing Disposition In prior versions of HiTrack only Confirmed Disposition entries were used when calculating the Identified No Loss/Loss counts for the CDC Summary Report. This option allows Any Disposition entries to be counted or Only Confirmed Disposition entries to be counted. State data managers may want to evaluate the report output with both settings. State Abbreviation for Non-resident calculation The entry in this option is used to calculate non-resident totals. Record Browse List Feature When generated in Browse List format HiTrack’s CDC Summary Report allows users to see lists of babies that make up the counts for most of the survey categories. The records from these filtered lists can then be added to the Baby Basket for later review. Lost to Follow-Up % and Number (Diagnosis) This statistic is now included at the end of section 1 of the CDC Report. Age Calculations and Types of Loss Considered The CDC defines the date ranges as follows: 0 to 1 month = 0 to 30 days 0 to 6 months = 0 to 180 days 6 to 12 months = 181 to 360 days 12+ months = 361+ days As prescribed by the CDC, ears Fluctuating Conductive losses are counted as Normal hearing ears. 111 HiTrack 4 User Manual Non-Resident CDC Counts Starting with the 2012 instructions the CDC has added a new count to each section of Part 1 that allows users to account for No Info/Unknown babies by categorizing them as Non-Resident. To determine if a baby is Non-Resident HT uses the following rules: If a state is specified it must be a valid abbreviation or fully spelled out state name. If it is not a valid spelled out name or two letter abbreviation it is considered Non-Resident. Blank entries are counted as Residents. Only records without screening or diagnosis (depending on which count) qualify for the Non-Resident count. A count of invalid Address entries is included in the Warnings List (see below). NICU >30 Days Counts HiTrack uses the ICU Days field (from Demographics) to calculate the number of babies with more than 30 days in the NICU. A count of how many records have ICU Days filled in is included in the Warnings List. Hearing Loss Type and Severity Summary This section of the survey report summarizes types and degrees of loss for the report selection criteria. As required by the CDC, the hearing loss summary grid reports statistics based on the most complete diagnosis. To meet this requirement HiTrack uses selections based on the Most Conclusive Outcomes selected on the Hearing Disposition screen. Each Type and Degree of loss category reports the number of ears recorded in HiTrack with that disposition. When ranged Degrees of Loss are used in records they are included in the counts with the most severe end of that range. (For example, Mild-Moderate is counted as Moderate and Severe-Profound is counted as Profound.) Babies with a type of loss that did not follow a normal screening protocol are not counted in this section, including babies for whom tracking was discontinued and babies that passed their screening results. This summary also includes other statistics to help program coordinators understand their data, especially numbers of babies being excluded by the CDC survey reporting instructions. There may be a difference in the number of babies with hearing loss on the summary grid when compared to counts on other parts of the survey. Parts 1 and 3 report statistics based on the initial diagnosis. The report includes two numbers that help account for this difference. "Total Cases Resolved" counts babies who initially had a type of loss that resolved to Normal hearing. These babes do not show on the type of loss grids. The second number, "Initial Normal Cases to Identified later as a Loss" counts babies who initially had confirmed Normal hearing, but developed a confirmed loss. This second number is provided for the Comments section of the survey. Not Pass Babies with Type of Hearing Loss This number provides the number of babies represented by the ear counts in the Type and Degree grid. Types of loss for Late Onset/Atypical babies are excluded from this grid. Total Number of Babies with Hearing Disposition Data This number provides the number of babies with any entries in Hearing Disposition. This can be used as a quality assurance feedback especially if it differs greatly from the number of babies 112 HiTrack 4 User Manual reported on the grid. Differences in the number could be due to Sound Field entries or losses entered as "Undetermined" type of loss. Total Ears with Undetermined Type of Hearing Loss This number provides the number of ears entered with Undetermined as a quality assurance feedback. Quality Assurance Tools HiTrack provides several quality assurance tools to assist you in preparing your CDC Survey. User Defined Report Columns CDC Screening Outcome, Type of Loss (Initial), Degree of Loss (Initial) User Defined Report Auto Filters The output grid of all User Defined Reports can be dynamically filtered further depending on the values obtained from the report. Report Advanced Filter Criteria "CDC Initial Dx is Different" Yes/No Baby Advanced Details CDC Screening Outcome Baby Basket The baby basket can be used to keep an intermediate list of CDC qualifying babies to use for other Reports. "In Baby Basket" Yes/No Please contact Help Desk to brainstorm additional quality assurance checks. Other Notes Note that the table arrangement on the HiTrack report provides types of loss as columns although the 2011 CDC report shows types of loss as rows. This alternate arrangement does not affect the data provided in the table. The "Profound" degree under Conductive loss is shaded grey to indicate that this is not a valid category. The number of ear losses for this category is provided as a quality assurance feedback. When laterality is unknown the ear with a specified type of loss will be represented in the Laterality Unknown count. Unknown Ear counts are not provided on this section because HiTrack requires left/right ear identification on audiometric data entry. Overall Hearing Status for CDC Reporting The Most Conclusive Outcome hearing disposition entries for the left ear and the right ear are used in this report. In bilateral cases where the type of loss is different in each ear the following rules are used: 113 Ear 1 Type Ear 2 Type "Head" Type of Loss Sensorineural Conductive, Mixed, Neural, Fluctuating* Sensorineural HiTrack 4 User Manual Neural Anything except Sensorineural. Neural Conductive Mixed Conductive Conductive Fluctuating Conductive Fluctuating Mixed Mixed Missed ears CDC and JCIH have recently recommended that both ears should always be rescreened at outpatient screening appointments. From the JCIH "Year 2007 Position Statement" Statement: "For rescreening, a complete screening on both ears is recommended, even if only 1 ear failed the initial screening." The following table summarizes how the HiTrack 4 CDC Survey reports babies with only one ear screened. Inpatient Outpatient CDC Report Outcome Single ear Pass, Refer, Invalid or Could Not Test. [blank] Missed Inconclusive (both ears screened or single Pass ear) Single ear Pass, Refer, Invalid or Could Not Test Not Passed (reflects Inpatient result) Refer (both ears screened) Single ear Pass, Refer, Invalid or Could Not Test Refer (reflects Inpatient result) Warning List Feature After generating the CDC Report, HiTrack provides a list of babies and issues that may be of interest for data entry completion purposes. The following categories are reported: Names of babies who have an Initial Loss reported on Part 1, but not on Part 2 Names of babies who have Unknown Diagnosis Names of babies who were Not Referred to EI Names of babies with have Unknown EI Services # invalid address State Fields # of NICU Days entries Babies from the Warnings List can be added to the baby basket with using the baby basket button on the warning list screen. Once in the baby basket, this list can be used as a to-do list for data entry completion or deeper reporting purposes. 114 HiTrack 4 User Manual User Defined Report Columns Several are available in User Defined Reports to help locate and verify data to be submitted: Evaluation Head Result – Hearing Disposition EI Services Outcome – EI Services Primary Contact State – Contacts Primary Contact Zip – Contacts 115 HiTrack 4 User Manual CDC Survey Report Counts The following sections of this document explain how babies are counted in each survey question. Based on CDC reporting instructions, Inpatient and Outpatient hearing screening result outcomes have been combined into overall outcomes of Pass, Not Pass/Inconclusive, Refer, Refused, Missed, and Deceased. For more information about these combinations see the Appendix. Although Birth date, Screening date and Confirmed Hearing Disposition are all required fields within HiTrack, infants with only one ear screened may be counted as "Age Unknown" if they came from a Merge Source that does not require entries both ears. Survey Counts Total Occurrent Births This reports all baby records residing in HiTrack for the filter criteria. Total Screened Calculated: Total Passed + Total Not Pass Total Not Screened Calculated: Not Screened + Missed Hearing Screening + Unknown Screening Not Screened – Infant Died/Parents Declined Services This reports babies with Deceased or Refused as their combined Screening outcome. Missed Hearing Screening This reports babies with Missed as their combined Screening outcome. Babies who had only one ear screened and Passed are also included in this count. This includes babies that missed inpatient and have only one ear Passed for Outpatient. CDC's rule is that both ears must be screened at the same time. If only one ear is screened and the other is blank are counted as missed. If that missed ear is during outpatient, where the Inpatient is Refer, it will be counted as Not Passed baby to account for the Inpatient results. Unknown Hearing Screening This reports babies with No Information as their combined Screening outcome. Total Passed This reports babies with Pass as their combined Screening outcome. Total Not Pass This reports the number of babies with Refer or Not Pass/Inconclusive as their combined Screening outcome. Babies who did not Pass Inpatient and were screened in only one ear and passed are also included in this count. 116 HiTrack 4 User Manual Two Stage (Inpatient & Outpatient) Lost to Follow-up This reports babies with Not Passed that also have one of the following Outpatient outcomes: Broken Appointment, Follow-up Discontinued for Outpatient, No Outpatient Information or Scheduled for Outpatient Screening. Total Normal Hearing This reports the number of Not Pass babies with confirmed normal hearing. This includes babies with fluctuating loss in on ear and confirmed normal hearing in the other ear. The computed age subcategories are based on the date of the Most Conclusive Outcomes listed on the Hearing Disposition screen. Total Hearing Loss This reports the number of Not Pass babies with confirmed hearing loss as a subset of Total Not Pass. The computed age subcategories are based on the date of the Most Conclusive Outcomes listed on the Hearing Disposition screen. Non-permanent Fluctuating losses (both bilateral and unilateral) are excluded from this count and all other "Loss" counts on the CDC Survey Report. Total with No Diagnosis Calculated: Audiologic Diagnosis in Process (Awaiting Dx) + All No Diagnosis counts Audiologic Diagnosis in Process (Awaiting Dx) This reports the number of babies with all of the following criteria: Classified as Evaluation In Process (Outpatient Refer or Evaluate without Screening) One ear-specific Hearing Disposition entry One diagnostic Recommended Action six months since the last Hearing Disposition entry One currently scheduled diagnostic Recommended Action. No Diagnosis – Infant Died/Parent Declined Services This reports the number of babies who are classified as "Deceased during/before Evaluation" or "Refused evaluation" No Diagnosis – Non-resident or Moved Out of Jurisdiction This reports the number of babies who are entered as Transferred Out of System while in an Needing Evaluation folder. No Diagnosis – Unresponsive/Unable to Contact/Unknown This reports the number of babies who are classified as "Follow-up Discontinued during Evaluation" and the number of Not Pass babies without diagnostic information. No Diagnosis - Parent/Family Contacted but Unresponsive 117 Discontinued babies that did not pass and have at least one recorded recommendation. HiTrack 4 User Manual No Diagnosis – Unable to Contact Discontinued babies that did not pass and have no recorded recommendations. No Diagnosis - Unknown Babies without diagnostic information that did not pass. Babies with Evaluation In Process (no upcoming appointments) or Need to Locate for Evaluation are included here until their hearing disposition is confirmed or Tracking is Discontinued for Evaluation. Inpatient Not Pass babies without Outpatient screening will also be included in this count unless Tracking is Discontinued for Outpatient. Cases of non-permanent, transient hearing loss This reports the number of babies with Fluctuating Conductive hearing losses. Total Hearing Loss not included in "Total Not Pass" This reports the number of babies with a confirmed hearing loss that also have Pass, Missed, Refused or No Info as their combined Screening outcome. The computed age subcategories are based on the date of the Most Conclusive Outcomes listed on the Hearing Disposition screen. Early Intervention Counts The Early Intervention counts are based on several data entry criteria. A baby must qualify for each of the items listed as criteria for the EI counts. Total Referrals to Part C EI Refer or not pass the hearing screening results Must have a confirmed hearing loss. Must have a Recommended Action entry for Early Intervention Referral. Referred and Eligible For Part C EI Refer or not pass the hearing screening results Must have a confirmed hearing loss. Must have a Recommended Action entry for Early Intervention Referral. On the EI Services screen, the drop down box at the bottom of the form reads: “Baby considered eligible to receive Part C (Federal) services.” This box must have “Yes” selected. 118 HiTrack 4 User Manual Referred and Not Eligible For Part C EI Refer or not pass the hearing screening results Must have a confirmed hearing loss. Must have a Recommended Action entry for Early Intervention Referral. On the EI Services screen, the drop down box at the bottom of the form reads: “Baby considered eligible to receive Part C (Federal) services.” This box must have “No” selected. Referred but Eligibility Unknown Refer or not pass the hearing screening results Must have a confirmed hearing loss. Must have a Recommended Action entry for Early Intervention Referral. On the EI Services screen, the drop down box at the bottom of the form reads: “Baby considered eligible to receive Part C (Federal) services.” This box must have “Unknown” selected. Total Not Referred to Part C EI and Unknown Refer or not pass the hearing screening results Must have a confirmed hearing loss. Must not have a Recommended Action entry for Early Intervention Referral. Total Enrolled in Part C EI Refer or not pass the hearing screening results Must have a confirmed hearing loss. On the EI Services screen, there must be a record entered where the status is not "Parent Opt-out", “Not eligible/closed" or "Out of Jurisdiction." The checkbox must not be checked for “Private Enrollment (Non-Part C).” If there are multiple enrollments for a baby and some of them are Non-Part C enrollments while others are Part C, then the baby will still be counted in this section. Each baby enrolled in EI Services must also have a separate IFSP EI Service recorded to meet the CDC’s “signed IFPS” requirement Enrolled in Part C Before 6 Months of Age, Enrolled in Part C After 6 Months but Before 12 Months of Age, Enrolled in Part C After 12 Months of Age, Enrolled in Part C Age Unknown Refer or not pass the hearing screening results Must have a confirmed hearing loss. On the EI Services screen, there must be a record entered where the status is not "Parent 119 HiTrack 4 User Manual Opt-out", “Not eligible/closed" or "Out of Jurisdiction." The checkbox must not be checked for “Private Enrollment (Non-Part C).” If there are multiple enrollments for a baby and some of them are Non-Part C enrollments while others are Part C, then the baby will still be counted in these sections. A baby’s age is determined by the difference between the birth date and the enrollment date. If there are multiple enrollments for a single baby, the earliest enrollment date is used in determining the age. If the birth date or the enrollment date is blank, then the baby will be counted in the “Enrolled in Part C Age Unknown” category. The date ranges for the CDC report categories are calculated by the number of days, but displayed on the report as months. Total Receiving Only Monitoring This reports the number of enrolled babies that only have Monitoring EI Service entries. Total Services from Non-Part C EI Services Refer or not pass the hearing screening results Must have a confirmed hearing loss. On the EI Services screen, there must be a record entered where the status is not "Parent Opt-out", “Not eligible/closed" or "Out of Jurisdiction." The checkbox must be checked for “Private Enrollment (Non-Part C).” If a baby has multiple enrollments, they must all be non-part C enrollments in order to be counted in this section. Non-Part C EI Services Before 6 Months of Age, Non-Part C EI Services After 6 Months but Before 12 Months of Age, Non-Part C EI Services After 12 Months of Age, Non-Part C EI Services Age Unknown Refer or not pass the hearing screening results Must have a confirmed hearing loss. On the EI Services screen, there must be a record entered where the status is not "Parent Opt-out", “Not eligible/closed" or "Out of Jurisdiction." The checkbox must be checked for “Private Enrollment (Non-Part C).” If a baby has multiple enrollments, they must all be non-part C enrollments in order to be counted in this section. A baby’s age is determined by the difference between the birth date and the enrollment date. If there are multiple enrollments for a single baby, the earliest enrollment date is used in determining the age. If the birth date or the enrollment date is blank, then the baby will be counted in the “Enrolled in Part C Age Unknown” category. The date ranges for the CDC report categories are calculated by the number of days, but displayed on the report as months. No EI Services Infant Died/No EI Services Parents Declined Services Refer or not pass the hearing screening results Must have a confirmed hearing loss. 120 HiTrack 4 User Manual If a baby has a tracking status of Receiving Intervention prior to stopping tracking (from the Tracking Status screen) because of parent refusal, the baby will be counted in this category. If a baby has one or more enrollment entries from the EI Services screen where the Status is “Parent Opt-out,” then that baby will be counted in this category. However if that baby also has enrollment entries where the status is not “Parent Opt-out,” then that baby will not be counted in this section of the report but will be counted in one of the “Enrolled” sections. If a baby has a tracking status of Receiving Intervention and an enrollment entry from the EI Services screen prior to marking the baby as Deceased, that baby will be counted as Deceased in this category. No EI Services Non-resident or Moved Out of Jurisdiction This reports the number of hearing loss infants whose latest EI entry is marked as Out of Jurisdiction. No EI Services Unresponsive/No EI Services Unable to Contact/No EI Services Unknown Refer or not pass the hearing screening results Must have a confirmed hearing loss If a baby has a tracking status of Receiving Intervention prior to stopping tracking by changing the status to “Follow-Up Discontinued,” the baby will be counted in this category. If a baby has a tracking status of Receiving Intervention and no enrollment entries on the EI Services screen, the baby will be counted in this category. If a baby has one or more enrollment entries from the EI Services screen where status is “Not eligible/Closed,” then that baby will be counted in this category. If that baby also has enrollment entries from the EI Services screen where the status is “Parent Opt-out,” then that baby will still be counted in this category. Records who have had their Tracking Option changed to No Services - Parent/Family Unresponsive or No Services - Unable to Contact will count in these respective folders. Otherwise they will be counted as Unknown. EI Services for Late Onset Hearing Losses These counts match the logic used for Not Pass hearing losses, except they account for babies that passed or missed screening. Demographics Report This final report section uses the same criteria as above categorized by CDC defined demographic sub categories. Note that for each category, missing entries in HiTrack will be included in the Unknown count, except for Mother’s Education which filters by the mother’s age. 121 HiTrack 4 User Manual Persons with no race entries or multiple race entries are counted as "Other" 122 HiTrack 4 User Manual Data Cleaning Reports These three reports help program coordinators to find duplicate records for the purpose of combining records in HiTrack. These reports help answer the following questions: "How can I identify duplicate records?" and "How can I locate duplicate records sent from different hospitals when babies are transferred?" Duplicate Medical ID This report includes babies with duplicate Medical ID numbers in the system. Duplicate Medical IDs are allowed across birthing facilities but not within a facility. This report should be used to see if a baby has been entered under more than one facility with the same Medical ID. Probable Duplicates This report includes babies who share the same last name and date of birth and includes birth order to help distinguish records for twins and multiple births. This report should be used to look for baby records that have been entered by more than one facility, especially transferred babies. Custom Duplicates This report allows users to build a duplicate list based on a variety of field combinations. Report Specific Filtering Options This report uses the general filtering options. Combining Duplicates After duplicate records have been identified with these reports they can be combined using the Record Combine feature on the Baby List. Early Intervention Report This report lists babies who have Early Intervention entries filtered by either status or service type. Deceased babies are not included in this report Report Specific Filtering Options In addition to the general filtering options users may filter by Enrollment Status and Type of Service. 123 HiTrack 4 User Manual Hearing Status Report This report may include babies with a Confirmed Loss, Confirmed Normal Hearing or Suspected Loss, depending on the selection criteria options. This report also includes the Milestone ages and Early Intervention enrollment if it is entered. Milestone ages are the baby's age in months for Screening, Identification of Loss, and Enrollment. These ages are delimited by slashes (/) with exclamation marks (!) noting for ages that have exceeded the target milestone. Report Specific Filtering Options In addition to the general filter options this report allows to filter by hearing disposition confirmation: Confirmed Losses, Suspected Losses, Confirmed Normal Hearing Any combination of these loss filters may be used to help answer the following questions: "Which infants have not had their suspected loss confirmed yet?" and "What services are being given to infants with hearing loss?" Needing Evaluation Report This report lists babies needing evaluation grouped by their Recommended Actions. By default the baby must meet the following criteria to be included: 1 Not Deceased 2 "In Progress" Status 3 Classified as "Evaluation in Process", "Confirmed Loss after Evaluation" or "Risk Monitoring" Completed Actions are not included for babies on this report. If the baby has Outpatient Refer or No OPDx then the baby will show up under No Recommendation/None. This report helps program coordinators answer the following questions: "Which infants are scheduled for follow-up within the next (x) days?" and "Which infants need to be scheduled for follow-up?" (The latter question can be answered by referring the "No Recommendation/None" category.) Report Specific Filtering Options In addition to the general filter options this report can be filtered by a specific type of recommendation or the date when the recommendation is due. The date boxes at the top of the filter page allow for appointment date filtering. Disabling the Incomplete Records filter allows HiTrack to include actions for any babies, not only ones meeting the three criteria above. This may be useful for reporting actions recorded for babies that passed their hearing screening. 124 HiTrack 4 User Manual Needing Outpatient Report This report includes babies with any of the following classifications: Inpatient Inpatient Referred Missed Inpatient Screening Inconclusive Inpatient Results Refused Inpatient Screening Transferred Out before/during Inpatient Screening Outpatient Outpatient Inconclusive Results, Need to Locate for Outpatient Screening' Scheduled for Outpatient Screening' No Outpatient Information'. Report Specific Filtering Options This report uses the general filtering options. Outpatient Screening Report This report lists babies known to the current Facility or Facility Group with Outpatient screening results. The final pages of the report provide summary outcome counts and nursery level counts for babies listed on the report. This report may help answer the question: "I need to report Outpatient screening differently for billing purposes; how do I get a list of patients who came back for Outpatient screening?" Report Specific Filtering Options This report uses the general filtering options and also allows for filtering by screening outcome classifications. 125 HiTrack 4 User Manual Physicians Report This report lists babies by their Primary Care Provider and provides an alternative to printing individual letters to inform physicians of screening results. The report can be generated for all physicians or for only those who wish to receive information in this format. If no patients of a particular physician were screened during the selected date range, no report is generated for that physician. The list of babies for each Physician starts on a new page. This report helps answer the questions: "How can I communicate patient hearing screening outcomes to doctors?" and "Which baby records do not have their doctor specified?" Report Specific Filtering Options In addition to the general filter options this allows for filtering by screening classification and by specific doctor. Risk Indicator Report On this report the JCIH risk indicators are listed as columns across the top of the report with baby records showing as rows. The risk indicators abbreviation explanations and indicator statistics are included at the end of the report. A diagnostic and Hearing status evaluation summary is also provided at the end of the report. This report includes babies that are marked as 'Yes' for any Risk Indicator. Starting in HiTrack version 4.4.7 several indicators have been retired to conform to the JCIH 2007 Position Statement. These indicators are provided on this report for historical reporting purposes. The new JCIH 2007 indicators are: "Chemotherapy" [CHEM]. "Neonatal intensive care of more than 5 days or any of the following regardless of length of stay: ECMO, assisted ventilation, exposure to ototoxic medications (gentimycin and tobramycin) or loop diuretics (furo-semide/Lasix), and hyperbilirubinemia that requires exchange transfusion" [NN5L] These indicators were added because there was not enough justifiable overlap with any existing JCIH 1994 or JCIH 2000 indicator. Report Specific Filtering Options This report uses the general filtering options and also allows for filtering by each indicator. 126 HiTrack 4 User Manual Screener Profile Report This report shows screening outcome rates broken down by screening Facility, Screener and then the stage of screening. Audiologists are included as Screeners on this report as well as other screens in HiTrack. All Most Conclusive Ear results are counted unless filtered by technology type. This report helps hospital program coordinators answer the following question: "Which screeners at my hospital need additional training and monitoring?" Report Specific Filtering Options In addition the general filtering options this report provides the ability to filter by screening technology. Screening Results Report This report lists babies within the specified Selection Criteria range and infant screening outcomes. You can create a concise listing of babies including only name, medical record number, date of birth and screening results or a more comprehensive report including contact information. The final pages of the report provide summary outcome counts and nursery level counts for babies listed on the report. Report Specific Filtering Options This report uses the general filtering options and also allows for filtering by screening outcome classifications. 127 HiTrack 4 User Manual Flow Chart The Flow Chart lets screening program coordinators see the 'flow' of babies through their program. It provides a concise one-page summary of the total number of births, the numbers and percentages of babies who passed, were referred, were not screened, the number of children undergoing specific types of diagnostic assessment, and the number found to have confirmed hearing loss. Periodic review of the HiTrack Flow Chart allows coordinators assess the quality of their program. There are three main vertical sections on this report: Inpatient, Outpatient and Hearing Status (Evaluation). The total # of babies at the top of the chart indicates how many babies at this facility. The Flow Chart is also clickable. Clicking on a category such as “Screened” will bring up a list of all the babies that are included in the category. These babies can then be added to the Baby Basket for further inspection or revision. Inpatient Section The top section shows the number of babies for each IP screening outcome. A special "NICU" category is included in the Not Screening box to account for babies without screening results (Missed or No Information) because they are still in an intensive care unit. Babies with a nursery level other than "Well Baby Nursery" are counted here if they have no IP results. Outpatient Section The OP section accounts for all babies who 'Referred' after being screened during IP, whose IP results were 'Inconclusive' or who were 'Not Screened' during IP. The OP section is divided vertically into two sections; OP outcomes for babies who were not screened during IP are shown on the right and OP outcomes for babies whose IP results were Referred or Inconclusive are on the left. The divided OP section lets program coordinators assess OP screening efficiency. It answers the questions: "How effective are my programs' follow-up policies for babies who come back for additional screening? Are these policies working to screen babies who were missed at birth?" Hearing Status The Hearing Status section includes a count for the Total Recommended for Evaluation. This count includes babies who were referred from OP screening, who referred directly to diagnostic evaluation (‘No Out. Scrn ->Dx’) and babies who received some diagnostic evaluation without being referred in a typical way. These atypical babies are reported in 'Atypical - > Dx' box in the 128 HiTrack 4 User Manual center of the chart. These are babies whose records indicate evaluation in process or a confirmed hearing status although they passed or were not screened during IP or OP. Most Conclusive Outcomes for Hearing Disposition are used to categorize babies in the Hearing Status section and must be manually set for each baby. The Total Recommended for Evaluation is divided into four sub-sections: Normal Hearing Babies who have ‘Confirmed Normal’ Hearing. Not Evaluated Babies for whom Tracking has been stopped because they have be marked as Discontinued, Lost/Locate, Refused or Deceased. Evaluation in process Babies who do not yet have a confirmed hearing status divided by their current Diagnostic Recommendation. (‘In Process’). The last category in this box shows babies who have yet not received a diagnostic recommendation. Confirmed Loss Babies with a Confirmed Loss. Unspecified Type of Loss shows the number of babies with only Sound Field Hearing Status or whose type of loss is not yet specified. HiTrack's Flow Chart also accommodates Single Stage protocols where babies are referred directly for evaluation when they do not pass Inpatient screening. In this case, babies who do not pass Inpatient screening will be counted under the ‘No Out. Scrn ->Dx’ counts in the Outpatient section chart and then represented in the Hearing Status section below. Confirmed Loss - Other Category This count includes babies with a confirmed loss where one or both of the selected Hearing Disposition ear entries are Neural or Undetermined Loss. Evaluation in Process This count reports babies who did not Pass Inpatient or Outpatient that have no other diagnostic Recommendations. Unmonitored Infants with Risk Indicators This supplemental count reports babies with positive ("Yes") Risk Indicators that don't have an active Risk Monitoring Recommended Action and that are not being evaluated for hearing loss. Pass Infants monitored for Risk Indicators This supplemental count reports babies that have an active Risk Monitoring Recommended Action that have Passed Inpatient/Outpatient Screening. 129 HiTrack 4 User Manual Report Specific Filtering Options This report uses the general filtering options. Grouping Options This report can be grouped in three different ways. Grouping the data as a single report shows all babies for the selection criteria on one Flow Chart. When grouped by Birth facility or IP Screening Site the total list of babies are divided into different Flow Chart pages based on where they were born or where they were screened. Note that changing the grouping options does not change the total number of babies included; it only affects how they are shown. 130 HiTrack 4 User Manual Hospital Summary The Hospital Summary report allows state and regional screening program coordinators see the 'flow' of babies through facilities in their program. It provides concise facility-oriented summaries of the total number of babies, the numbers and percentages of babies who passed, were referred, were not screened, the number of children undergoing specific types of diagnostic assessment, and the number found to have confirmed hearing loss. The numbers on this report are based on the same criteria as the HiTrack Flow Chart, except for that the OP section counts are simplified. On this report each row of numbers and percentages represents a facility grouped as either a Birthing or Screening location followed by an 'All Facilities' total at the end of the report. This report allows state and regional coordinators to answer the following question: "How can I compare and report each facility in my state or region in one step?" This report can also be used as a "score card" for facility coordinator training meetings! Report Specific Filtering Options This report uses the general filtering options. Grouping Options This report can be grouped in three different ways. Grouping the data as a single report shows all babies for the selection criteria as one row with total counts. When grouped by Birth facility or IP Screening Site the total list of babies are divided into different Facility rows based on where they were born or where they were screened. Note that changing the grouping options does not change the total number of babies included; it only affects how they are shown. 131 HiTrack 4 User Manual Quarterly Report This 12-month report is composed of four main categories: Percent Screened as Inpatients, Percent Passing Inpatient Screening, Percent Completing Outpatient Screening and Hearing Status. The first two categories are shown together in the first half of the report and the latter two categories are also shown together in the second half of the report. Each facility is shown as a row and a "Quarter Totals" summary count is included at the end of each section. This report is helpful because it allows a state or regional coordinator to evaluate screening statistics over time. It helps answer the following questions: "I have just started a new protocol in my state/region how can I tell if overall performance has improved?" and "How can I report percents of screening completion for all facilities in my state/region?" Percent Screened as Inpatient Actual: IP Pass + IP Refer + IP Inconclusive Expected: Total Babies - IP Refused - IP Deceased Percent Passing Inpatient Screening Actual: IP Pass Expected: IP Pass + IP Refer + IP Inconclusive (Same as Actual 'Screened') No Info Totals grouped by facility are shown for babies who have no information. Deceased Totals grouped by facility are shown for babies who are marked as Deceased during the IP stage. Percent Completing Outpatient Screening Actual: OP Refer + OP Pass + 'No Scrn ->Dx' + OP Inconclusive Expected: IP Referred + IP Inconclusive + Missed + IP No-Info - OP Deceased. This does not include IP Transferred, allowing individual hospitals to possibly show more than 100%. 'No Scrn -> Dx' is included to account for babies with atypical evaluation. Any sites using a Single Stage protocol will see most of their non-pass babies counted in this category. Referred For Diagnostics Actual: Total Recommended for Evaluation (Includes Atypical Dx), Expected: Total Babies - IP Deceased - OP Deceased 132 HiTrack 4 User Manual Other Dx These numbers equal totals for each respective Hearing Status section based on the Flow Chart categories. No Follow-Up This number includes babies from the following categories: Need to Locate, Refused, Deceased, and Follow-up Discontinued. Report Specific Filtering Options This report uses the general filtering options and may be grouped by facility. Grouping Options This report can be grouped in three different ways. Grouping the data as a single report shows all babies for the selection criteria as one row with total counts. When grouped by Birth facility or IP Screening Site the total list of babies are divided into different Facility rows based on where they were born or where they were screened. Note that changing the grouping options does not change the total number of babies included; it only affects how they are shown. 133 HiTrack 4 User Manual Technology Summary This report shows summary information for OAE and A-ABR screening technologies. This helps answer the questions: "How can I report screening effectiveness by technology?", "Is my first stage screening technology providing a cost effective waypoint?", and "Do I need to consider changing screening technology at my facility?" Each count represents an overall "head" screening outcome at a given stage of screening. (For example, if the Most Conclusive Ear results are both OAE then the baby is counted in the OAE column. If the Most Conclusive Ear results are both A-ABR then the baby is counted in the AABR column.) The first column indicates the facility name for which these babies are reported. Inpatient and Outpatient counts are provided for each facility as separate rows of information. The total number of infants screened at the stage is given. The number of infants not screened for that stage is included in curled brackets. "{x}". The third and fourth columns show baby counts whose head screening outcomes were either OAE or A-ABR. The last column on the right counts babies who have a Most Conclusive Ear result with one technology for one ear and a different technology for the other ear. A noteworthy count on this report is the {Non-Pass OAE} count under the A-ABR column. This number shows the number of babies with A-ABR Most Conclusive Results that also did not pass screening with OAE. Report Specific Filtering Options This report uses the general filtering options. Grouping Options When grouping the report by Birth Facility each row counts represent babies born at each facility. If grouped by IP screening site then the counts represent babies screened at each facility. 134 HiTrack 4 User Manual Milestone Summary Report The Milestone Summary Report (and the Milestone mode on the Baby List) use the following criteria for each milestone. Hearing Loss dates are based on the hearing entry specified as a Most Conclusive outcome on the Hearing Disposition screen. Deceased babies are excluded from these counts. This report helps answer the questions: "How closely is my program meeting the recommended CDC milestones?" and "What is my programs average age of loss identification and EI enrollment?" "Screened by" Milestone: This count uses the screening Most Conclusive Result date of Inpatient screening or Outpatient screening if it exists. Babies without Most Conclusive Results are considered Late or Overdue for this Milestone. "Loss Identified by" Milestone: This count uses the most recent date of hearing loss for babies in the following categories: Inpatient Referred Inconclusive Inpatient Results Outpatient Refer Outpatient Inconclusive Results Go directly to Evaluation without Outpatient Screening Not: Outpatient Pass Not: Follow-Up Discontinued before/during Outpatient Screening Babies in these categories without a hearing loss specified are considered Late or Overdue for this Milestone. "Enrolled by" Milestone: This count uses the date enrolled entered from the EI Services screen or the Confirmed Appt. Date/Target date on the "Early Intervention Referral" recommendation for babies with: Hearing Loss specified Not: Refused Evaluation Not: Parental Opt-Out of EI service Not: Deceased before/during Eval Babies with a hearing loss specified without EI Services or EI Referrals specified are considered Late or Overdue for this Milestone. EI referrals are included for users with databases converted from HiTrack 3.5 because 135 HiTrack 4 User Manual Enrollment details were not available in this older version. Report Specific Filtering Options This report uses the general filtering options. Grouping Options When grouping the report by Birth Facility each page represent births at each facility. If grouped by IP screening site then each page represent babies screened at each facility. 136 HiTrack 4 User Manual User Defined Reports Selecting this report option will open up an "Available User Defined Reports" list. This list lets you, select an existing saved report to run, create a new report or delete an existing report. Clicking the New button shows the main User Defined report screen that consists of three tabs: The Column definitions tab allows you to select up to 8 columns to include on the report. Filling in the check box and using the ">" button will add the selected column to the "Selected Elements" list. Use "<" to remove a selected element. The top of the Selection Criteria tab provides the general report filtering options. Advanced Selection Criteria can be created using the same steps as used in Advanced Criteria for other reports. The Sorting tab provides three layers of sorting options. Uncheck the "Ascending" check box to sort the rows in descending (Z to A, Newest to Oldest) order. Overall report options are provided at the bottom of the screen. You can name the report, save the report, Generate the report or return to the Available User Defined Reports list. When a report is generated the results of the report, including the selected columns, are shown in a grid that can be printed or exported using buttons below the list. When report results are saved as a CSV (comma separated values) file HiTrack creates a file that can be opened in Microsoft Excel 2003 automatically for further reporting flexibility. 137 HiTrack 4 User Manual Advanced Criteria Advanced criteria can be added to most reports in HiTrack allowing for more targeted reporting and data quality investigation. Adding criteria The "Add" button below the grid shows the Advanced Selection Criteria screen. The Name field is used to describe complex criteria, such as "Low weight boys". The list of drop down boxes on the left allows you to select and combine multiple criteria elements. After an element is selected the drop down to the right provides relevant options such as "Equals", "Not Equals", "Is Blank" and other options for date and number ranges. The filter criteria for this element becomes more narrow as additional elements are selected on this screen because a Boolean "AND" action is applied. For example if two elements are selected: "Gender Equals Male" "AND..." "Birth Weight (gram) Less Than # 1200" A baby must qualify for both elements to be included with this filter. After selecting the desired elements for this criterion the "Add" button can be used to include this in the advanced criteria grid. Modifying criteria Criteria rows may be edited or removed by using the "Edit" and "Delete" buttons shown below the grid. The Edit button will return you to the Advanced Selection Criteria screen to make changes to criteria elements. Boolean "OR" Operation Each criteria row added to the Advanced criteria grid filters with a Boolean "OR" action. For example if you added the criteria from the example above "Low weight boys" and then added a second criteria "Girls in NICU" the following rows would be shown: Low weight boys Gender Equals Male AND Birth weight (gram) Less than 1200 Girls in NICU Gender Equals Female AND Nursery Equals NICU OR With these criteria the possible list of infants has been expanded to include babies with both criteria. 138 HiTrack 4 User Manual Appendix C: Classification Combinations This table lists the overall combined screening outcome used on some reports. Inpatient Inpatient Ears Outpatient Outpatient Ears CDC Outcome Passed 1 Deceased 0 Deceased Passed 1 Scheduled 0 Missed Passed 1 Referred 1 Missed Passed 1 Passed 1 Missed Passed 1 No Out. Scrn>Eval 0 Missed Passed 1 No Info. 0 Missed Passed 1 Inconclusive 0 Missed Passed 1 Inconclusive 1 Missed Passed 1 Discontinued 0 Missed Passed 1 Broken Appt. 0 Missed Passed 1 Inconclusive 2 Not Passed Passed 2 Inconclusive 1 Not Passed Passed 2 Inconclusive 2 Not Passed Passed 2 Scheduled 0 Passed Passed 2 Refused 0 Passed Passed 1 Passed 2 Passed Passed 2 Passed 1 Passed Passed 2 Passed 2 Passed Passed 2 No Out. Scrn>Eval 0 Passed Passed 2 No Info. 0 Passed Passed 2 Inconclusive 0 Passed Passed 2 Discontinued 0 Passed Passed 2 Deceased 0 Passed Passed 2 Broken Appt. 0 Passed Passed 1 Referred 2 Referred Passed 2 Referred 1 Referred 139 HiTrack 4 User Manual Passed 2 Referred 2 Referred Passed 1 Refused 0 Refused Referred 1 Deceased 0 Deceased Referred 1 Scheduled 0 Missed Referred 1 Referred 1 Missed Referred 1 Passed 1 Missed Referred 1 No Out. Scrn>Eval 0 Missed Referred 1 No Info. 0 Missed Referred 1 Inconclusive 0 Missed Referred 1 Inconclusive 1 Missed Referred 1 Discontinued 0 Missed Referred 1 Broken Appt. 0 Missed Referred 1 Inconclusive 2 Not Passed Referred 2 Inconclusive 1 Not Passed Referred 2 Inconclusive 2 Not Passed Referred 1 Passed 2 Passed Referred 2 Passed 2 Passed Referred 2 Scheduled 0 Referred Referred 2 Refused 0 Referred Referred 1 Referred 2 Referred Referred 2 Referred 1 Referred Referred 2 Referred 2 Referred Referred 2 Passed 1 Referred Referred 2 No Out. Scrn>Eval 0 Referred Referred 2 No Info. 0 Referred Referred 2 Inconclusive 0 Referred Referred 2 Discontinued 0 Referred Referred 2 Deceased 0 Referred Referred 2 Broken Appt. 0 Referred Referred 1 Refused 0 Refused 140 HiTrack 4 User Manual Missed 0 Deceased 0 Deceased Missed 0 Scheduled 0 Missed Missed 0 Referred 1 Missed Missed 0 Passed 1 Missed Missed 0 No Out. Scrn>Eval 0 Missed Missed 0 No Info. 0 Missed Missed 0 Inconclusive 0 Missed Missed 0 Inconclusive 1 Missed Missed 0 Discontinued 0 Missed Missed 0 Broken Appt. 0 Missed Missed 0 Inconclusive 2 Not Passed Missed 0 Passed 2 Passed Missed 0 Referred 2 Referred Missed 0 Refused 0 Refused Inconclusive 0 Scheduled 0 Unknown Inconclusive 0 No Out. Scrn>Eval 0 Unknown Inconclusive 0 No Info. 0 Unknown Inconclusive 0 Inconclusive 0 Unknown Inconclusive 0 Discontinued 0 Unknown Inconclusive 0 Broken Appt. 0 Unknown Inconclusive 0 Deceased 0 Deceased Inconclusive 1 Deceased 0 Deceased Inconclusive 1 Scheduled 0 Missed Inconclusive 0 Referred 1 Missed Inconclusive 0 Passed 1 Missed Inconclusive 1 No Out. Scrn>Eval 0 Missed Inconclusive 1 No Info. 0 Missed Inconclusive 0 Inconclusive 1 Missed Inconclusive 1 Inconclusive 0 Missed 141 HiTrack 4 User Manual Inconclusive 1 Inconclusive 1 Missed Inconclusive 1 Discontinued 0 Missed Inconclusive 1 Broken Appt. 0 Missed Inconclusive 2 Scheduled 0 Not Passed Inconclusive 2 Refused 0 Not Passed Inconclusive 1 Referred 1 Not Passed Inconclusive 2 Referred 1 Not Passed Inconclusive 1 Passed 1 Not Passed Inconclusive 2 Passed 1 Not Passed Inconclusive 2 No Out. Scrn>Eval 0 Not Passed Inconclusive 2 No Info. 0 Not Passed Inconclusive 0 Inconclusive 2 Not Passed Inconclusive 1 Inconclusive 2 Not Passed Inconclusive 2 Inconclusive 0 Not Passed Inconclusive 2 Inconclusive 1 Not Passed Inconclusive 2 Inconclusive 2 Not Passed Inconclusive 2 Discontinued 0 Not Passed Inconclusive 2 Deceased 0 Not Passed Inconclusive 2 Broken Appt. 0 Not Passed Inconclusive 0 Passed 2 Passed Inconclusive 1 Passed 2 Passed Inconclusive 2 Passed 2 Passed Inconclusive 0 Referred 2 Referred Inconclusive 1 Referred 2 Referred Inconclusive 2 Referred 2 Referred Inconclusive 0 Refused 0 Refused Inconclusive 1 Refused 0 Refused Refused 0 Deceased 0 Deceased Refused 0 Referred 1 Missed Refused 0 Passed 1 Missed Refused 0 Inconclusive 1 Missed 142 HiTrack 4 User Manual Refused 0 Inconclusive 2 Not Passed Refused 0 Passed 2 Passed Refused 0 Referred 2 Referred Refused 0 Scheduled 0 Refused Refused 0 Refused 0 Refused Refused 0 No Out. Scrn>Eval 0 Refused Refused 0 No Info. 0 Refused Refused 0 Inconclusive 0 Refused Refused 0 Discontinued 0 Refused Refused 0 Broken Appt. 0 Refused Transferred Out 0 Scheduled 0 Unknown Transferred Out 0 No Out. Scrn>Eval 0 Unknown Transferred Out 0 No Info. 0 Unknown Transferred Out 0 Inconclusive 0 Unknown Transferred Out 0 Discontinued 0 Unknown Transferred Out 0 Broken Appt. 0 Unknown Transferred Out 0 Deceased 0 Deceased Transferred Out 0 Referred 1 Missed Transferred Out 0 Passed 1 Missed Transferred Out 0 Inconclusive 1 Missed Transferred Out 0 Inconclusive 2 Not Passed Transferred Out 0 Passed 2 Passed Transferred 0 Referred 2 Referred 143 HiTrack 4 User Manual Out Transferred Out 0 Refused 0 Refused No Info. 0 Scheduled 0 Unknown No Info. 0 No Out. Scrn>Eval 0 Unknown No Info. 0 No Info. 0 Unknown No Info. 0 Inconclusive 0 Unknown No Info. 0 Discontinued 0 Unknown No Info. 0 Broken Appt. 0 Unknown No Info. 0 Deceased 0 Deceased No Info. 0 Referred 1 Missed No Info. 0 Passed 1 Missed No Info. 0 Inconclusive 1 Missed No Info. 0 Inconclusive 2 Not Passed No Info. 0 Passed 2 Passed No Info. 0 Referred 2 Referred No Info. 0 Refused 0 Refused Deceased 0 Scheduled 0 Deceased Deceased 0 Refused 0 Deceased Deceased 0 Referred 1 Deceased Deceased 0 Referred 2 Deceased Deceased 0 Passed 1 Deceased Deceased 0 Passed 2 Deceased Deceased 0 No Out. Scrn>Eval 0 Deceased Deceased 0 No Info. 0 Deceased Deceased 0 Inconclusive 0 Deceased Deceased 0 Inconclusive 1 Deceased Deceased 0 Inconclusive 2 Deceased Deceased 0 Discontinued 0 Deceased Deceased 0 Deceased 0 Deceased 144 HiTrack 4 User Manual Deceased 145 0 Broken Appt. 0 Deceased HiTrack 4 User Manual Appendix D: Merge Matching Criteria and Overwrite rules HiTrack checks for existing records when merging from equipment data files or data transfer files. Existing records are found in two steps. First, the database is filtered down to a short list of possible matches. During the second step a matching “score” is determined for each record in this short list. Depending on the score the records will be merged together, added as a new record or left for user resolution. Step 1: Filters are used to find a list of possible matches Based on the type of merge, HiTrack filters down the number of infants to examine for matches by performing the following filters (in order) until matching records are found. The purpose of the filters is to narrow down a potentially huge database into a small subset that can be checked row by row. If no records are found after checking all filters the incoming record is added new. Equipment Merges Search for... Facility 1. Babies born on the same day (excludes time of day) with an exact match on Medical ID All 2. Babies born within 1 day with matching birth weight Birthing Facility 3. Babies born within 1 day with matching birth weight Merging Facility HiTrack 3.5 ETF Merges Search for... (across all Facilities) 1. Babies with an exact match on HT35 Unique ID and Medical ID 2. Babies with an exact match on HT35 Unique ID and Birth Date 3. Babies born the same day (excludes time of day) with an exact match on Medical ID 4. Babies with an exact match on HT35 Unique ID and birth weight 5. Babies born within 1 day with matching birth weight and with similar last name (4 letters) HiTrack 4 ETF4 Merges Search for... (across all Facilities) 1. Babies with an exact match on HT4 "ID" (globally unique identifier) 2.. Uses same filters as HiTrack 3.5 ETF Merges 146 HiTrack 4 User Manual Step 2: Calculating match score for possible matches A score is calculated for each baby found with filters and HiTrack decides what to do with the record based on the following ranges of scores: 0-54 Not a match 55 - 69 This is a possible match but needs user resolution. This baby is left in Pending Data as "Needing Attention". 70+ These records will be Automatically merged together. This is a "High Confidence" match. A score lower than the "unsure match" score will result in a new record after all the babies found by filters have been checked for matches. Some filters from Step 1 will result in subsets of babies whose records have already been prematched on a given field. Baby Field Matching Scores Scores are assigned for matches on the following fields: HiTrack 4 "ID" 100 HiTrack 3.5 Unique ID 46 Baby DOB 40 Medical ID 25 Birth Weight 10 Baby lastname 5 Score can be inferred as "trust" of the field used in matching. Matches on Globally Unique IDs (GUIDS) from HiTrack 4 ETF4 files ("ID") will always result in an automatic match. (Score 100> Score 70) Other Scores Demographic merges, alldata.txt and demgraph.txt have slightly different scores because they give higher score value (trust) to Medical IDs. Merges from XML files use the same filters and scores as HiTrack 4 ETF4 rules. 147 HiTrack 4 User Manual Match Score Examples Same lastname, weight and medical ID, all else different (or blank) 148 Score: 25+10+5=35 Not a Match Same DOB and lastname, all else different (or blank) Score: 40+5=45 Not a match Same HT35 Unique ID, all else different (or blank) Score: 46 Not a match Same HT35 Unique ID and Medical ID, all else different (or blank) Score: 46+25=71 High Confidence Match, Automatically merged Same DOB, weight and last name, all else different (or blank) Score: 40+10+5=55 Unsure match, "Needs Attention". HiTrack 4 User Manual Field Overwriting HiTrack uses rules when baby records are automatically merged from a High Confidence match to determine which fields to overwrite. HiTrack updates and overwrites existing baby records by splitting each baby record into three areas: Baby Identifying Fields: Medical ID, Last name, first name and Birth date. Other Baby demographic fields Screening History, Diagnostics, Contacts and other historical lists of information for the baby Depending on the source of data the following rules are used: Source Data Transfer from another HiTrack 4 database. Identifying Fields Identifying fields, such as last name and birth date, are handled individually. Whichever value was changed most recently is retained. Data Transfer from a HiTrack 3.5 database Other Fields Historical Lists If any of the incoming values for this area have changed more recently then all of the existing fields in this area are overwritten to the incoming values. All fields for exact* entries are overwritten with incoming values if they have changed more recently. If any of the incoming values have changed more recently then all of the existing fields are overwritten to the incoming values. New records are appended All fields for exact* entries are overwritten with incoming values if they have changed more recently. New records are appended Equipment Files No fields are overwritten. New values for blank fields are inserted. Existing contacts are updated based on matching last and first names. All other records are always appended. Overwriting Notes *Existing historical entries are matched on HiTrack's internal Primary Keys. This allows HiTrack to confidently match existing historical rows. HiTrack's Change Log keeps logs changes to identifying fields during merge overwrites. In prior versions of HiTrack Baby "Notes" were considered part of the Baby demographic fields. In HiTrack 4 Notes are maintained as their own separate historical list. Customized field overwriting is allowed for baby and person matches that require user attention. HiTrack 4 Data Transfer overwrite rules are used when merging from data in XML sources. 149 HiTrack 4 User Manual Appendix E: Most Conclusive Result Calculation Overview HiTrack not only allows users to save multiple screening results for an infant, it also saves data management time by automatically determining which results best reflect the child’s overall screening status and need for follow-up. HiTrack uses ranking rules to: 1) select a Most Conclusive set of Left and Right ear results at each screening level (Inpatient/Outpatient), and 2) combine Left and Right ear results to produce a Most Conclusive Head result at each screening level. The Most Conclusive Head results determine how a child will be counted in reports, what follow-up is needed, and which letter will automatically be generated for the child’s parent and health care provider. Most Conclusive Result Ranking Rules HiTrack’s ranking rules have been carefully thought through and periodically reviewed to correctly determine the Most Conclusive Head results for children in the most common screening scenarios. In the small number of cases where unique circumstances would suggest that a different decision rule should be applied, a user can override HiTrack’s selection and manually designate the Most Conclusive results for an infant. HiTrack offers two ranking rules: "Results ranked independent of technology" (default) "Results ranked with precedence given to Automated ABR" At the broadest level both rules use the following algorithm: MCRs... Rule for Individual Ears Best Test Result is selected. ("Pass beats Refer") for Head Result Worst Test Result (from Left and Right MCR) is selected. 150 HiTrack 4 User Manual Most Conclusive Result Window HITRCK calculates Most Conclusive Results (MCRs) using a ranking rule for test results but first filters the results by a “window of time” since the latest result was obtained. (Inpatient and Outpatient results are calculated separately.) By default this window is defined as beginning 5 days prior to the newest test and ending on the date of the newest test. The following two examples illustrate how the Most Conclusive Result Window works. Example #1 Inpatient 1 (DOB) 2 3 5 6 7 8 Day MCR Window Excluded results MCR Outcome Right Ear Pass Refer Refer Left Ear Pass Refer Refer The shaded area above shows results that will be excluded in the query for seeking Most Conclusive Results, based on this modification to HT V4. In this case, the baby’s result would be calculated as an overall “Refer” instead of an overall “Pass” Example #2 Inpatient 1 (DOB) 2 3 5 6 7 8 Day Excluded results MCR Window MCR Outcome Right Ear Pass Pass Refer Pass Left Ear Invalid Pass Refer Pass In this example the overall results would be a “Pass” because both ear passes are within the ranking filter window. In general, the MCR Window affects only infants in Inpatient for more than five days with developing hearing loss that results from, for example, Head Trauma, high doses of Ototoxic Medications or Meningitis. As always, clinical judgment should be used in cases where the circumstances and conditions require manual overriding. 151 HiTrack 4 User Manual Appendix F: Automatic Letter Generation Criteria Criteria The following table explains what automatic letters will be generated based on possible combinations of Inpatient and Outpatient Screening results. Letter Title Inpatient Head Result Outpatient Head Result Diagnostic Referral (PC) Inconclusive Inconclusive Diagnostic Referral (PC) Inconclusive No Out. Scrn->Eval Diagnostic Referral (PC) Inconclusive Referred Diagnostic Referral (PC) Missed Inconclusive Diagnostic Referral (PC) Missed No Out. Scrn->Eval Diagnostic Referral (PC) Missed Referred Diagnostic Referral (PC) No Info. Inconclusive Diagnostic Referral (PC) No Info. No Out. Scrn->Eval Diagnostic Referral (PC) No Info. Referred Diagnostic Referral (PC) Passed Inconclusive Diagnostic Referral (PC) Passed No Out. Scrn->Eval Diagnostic Referral (PC) Passed Referred Diagnostic Referral (PC) Referred Inconclusive Diagnostic Referral (PC) Referred No Out. Scrn->Eval Diagnostic Referral (PC) Referred Referred Diagnostic Referral (PC) Refused Inconclusive Diagnostic Referral (PC) Refused No Out. Scrn->Eval Diagnostic Referral (PC) Refused Referred Diagnostic Referral (PC) Transferred Out Inconclusive Diagnostic Referral (PC) Transferred Out No Out. Scrn->Eval Diagnostic Referral (PC) Transferred Out Referred Diagnostic Referral (Physician) Inconclusive Inconclusive Diagnostic Referral (Physician) Inconclusive No Out. Scrn->Eval Diagnostic Referral (Physician) Inconclusive Referred Diagnostic Referral (Physician) Missed Inconclusive 152 HiTrack 4 User Manual Diagnostic Referral (Physician) Missed No Out. Scrn->Eval Diagnostic Referral (Physician) Missed Referred Diagnostic Referral (Physician) No Info. Inconclusive Diagnostic Referral (Physician) No Info. No Out. Scrn->Eval Diagnostic Referral (Physician) No Info. Referred Diagnostic Referral (Physician) Passed Inconclusive Diagnostic Referral (Physician) Passed No Out. Scrn->Eval Diagnostic Referral (Physician) Passed Referred Diagnostic Referral (Physician) Referred Inconclusive Diagnostic Referral (Physician) Referred No Out. Scrn->Eval Diagnostic Referral (Physician) Referred Referred Diagnostic Referral (Physician) Refused Inconclusive Diagnostic Referral (Physician) Refused No Out. Scrn->Eval Diagnostic Referral (Physician) Refused Referred Diagnostic Referral (Physician) Transferred Out Inconclusive Diagnostic Referral (Physician) Transferred Out No Out. Scrn->Eval Diagnostic Referral (Physician) Transferred Out Referred Inpatient Inconclusive/Missed (PC) Inconclusive No Info. Inpatient Inconclusive/Missed (PC) Missed No Info. Inpatient Inconclusive/Missed (Phys.) Inconclusive No Info. Inpatient Inconclusive/Missed (Phys.) Missed No Info. Inpatient Pass (PC) Passed No Info. Inpatient Pass (Physician) Passed No Info. Inpatient Refer for Outp. (Physician) Referred No Info. Inpatient Refer for Outp. Scn (PC) Referred No Info. Inpatient Refusal (PC) Refused No Info. Inpatient Refusal (Physician) Refused No Info. Outpatient Broken Appt. (PC) Inconclusive Broken Appt. Outpatient Broken Appt. (PC) Missed Broken Appt. Outpatient Broken Appt. (PC) No Info. Broken Appt. Outpatient Broken Appt. (PC) Passed Broken Appt. 153 HiTrack 4 User Manual Outpatient Broken Appt. (PC) Referred Broken Appt. Outpatient Broken Appt. (PC) Refused Broken Appt. Outpatient Broken Appt. (PC) Transferred Out Broken Appt. Outpatient Broken Appt. (Physician) Inconclusive Broken Appt. Outpatient Broken Appt. (Physician) Missed Broken Appt. Outpatient Broken Appt. (Physician) No Info. Broken Appt. Outpatient Broken Appt. (Physician) Passed Broken Appt. Outpatient Broken Appt. (Physician) Referred Broken Appt. Outpatient Broken Appt. (Physician) Refused Broken Appt. Outpatient Broken Appt. (Physician) Transferred Out Broken Appt. Outpatient Pass (PC) Inconclusive Passed Outpatient Pass (PC) Missed Passed Outpatient Pass (PC) No Info. Passed Outpatient Pass (PC) Passed Passed Outpatient Pass (PC) Referred Passed Outpatient Pass (PC) Refused Passed Outpatient Pass (PC) Transferred Out Passed Outpatient Pass (Physician) Inconclusive Passed Outpatient Pass (Physician) Missed Passed Outpatient Pass (Physician) No Info. Passed Outpatient Pass (Physician) Passed Passed Outpatient Pass (Physician) Referred Passed Outpatient Pass (Physician) Refused Passed Outpatient Pass (Physician) Transferred Out Passed Outpatient Refusal (PC) Inconclusive Refused Outpatient Refusal (PC) Missed Refused Outpatient Refusal (PC) No Info. Refused Outpatient Refusal (PC) Passed Refused Outpatient Refusal (PC) Referred Refused Outpatient Refusal (PC) Refused Refused Outpatient Refusal (PC) Transferred Out Refused 154 HiTrack 4 User Manual Outpatient Refusal (Physician) Inconclusive Refused Outpatient Refusal (Physician) Missed Refused Outpatient Refusal (Physician) No Info. Refused Outpatient Refusal (Physician) Passed Refused Outpatient Refusal (Physician) Referred Refused Outpatient Refusal (Physician) Refused Refused Outpatient Refusal (Physician) Transferred Out Refused 155 HiTrack 4 User Manual


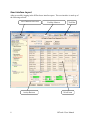


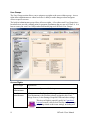
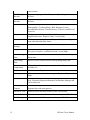


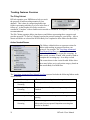


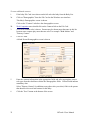
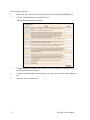


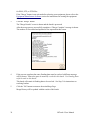
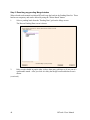


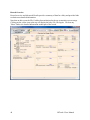

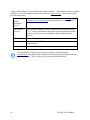
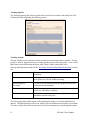


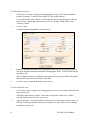


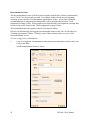
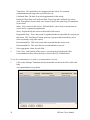
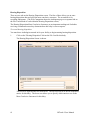
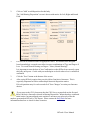
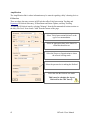
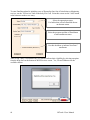

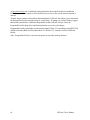


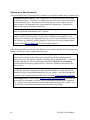

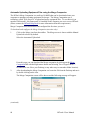


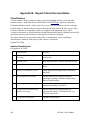
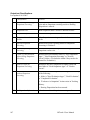

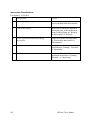


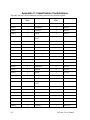
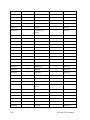

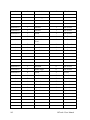


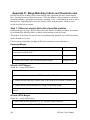
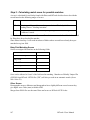
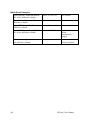


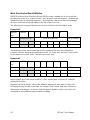

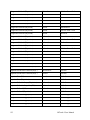
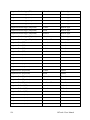
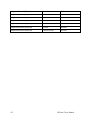


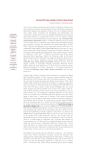

![[U4.33.02] Opérateur CREA_TABLE](http://vs1.manualzilla.com/store/data/006357647_1-7f0aad9363cefa6b77d0a3853941dfcb-150x150.png)


![[U4.33.02] Opérateur CREA_TABLE](http://vs1.manualzilla.com/store/data/006353909_1-f49d20b27ff9b36b714bfa6f0e72afc8-150x150.png)