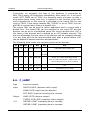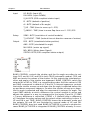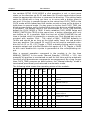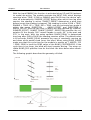
1
OSCAT Building: LIBRARY Documentation In English Version 1.00 Chapter Table of Contents 1. Legal...................................................................................... 5 1.1. 1.2. 1.3. 1.4. 1.5. Disclaimer................................................................................................................... 5 License Terms............................................................................................................. 5 Registered trademarks................................................................................................ 5 Intended Use............................................................................................................... 6 Other.......................................................................................................................... 6 2. Introduction............................................................................ 7 2.1. 2.2. 2.3. 2.4. 2.5. Objectives................................................................................................................... 7 Conventions................................................................................................................ 8 Test environment........................................................................................................ 9 Releases................................................................................................................... 10 Support..................................................................................................................... 10 3. Others.................................................................................. 11 3.1. BUILDING_VERSION................................................................................................... 11 4. Actuators.............................................................................. 12 4.1. 4.2. 4.3. 4.4. 4.5. 4.6. 4.7. ACTUATOR_2P........................................................................................................... 12 ACTUATOR_3P........................................................................................................... 13 ACTUATOR_A............................................................................................................. 15 ACTUATOR_COIL........................................................................................................ 16 ACTUATOR_PUMP...................................................................................................... 16 ACTUATOR_UD.......................................................................................................... 17 AUTORUN.................................................................................................................. 19 5. Heating, Ventilation, Air Condition.........................................22 5.1. AIR_DENSITY............................................................................................................. 22 5.2. AIR_ENTHALPY.......................................................................................................... 22 5.3. BOILER...................................................................................................................... 23 5.4. BURNER.................................................................................................................... 25 5.5. DEW_CON................................................................................................................. 29 5.6. DEW_RH.................................................................................................................... 29 5.7. DEW_TEMP................................................................................................................ 31 5.8. HEAT_INDEX.............................................................................................................. 32 5.9. HEAT_METER............................................................................................................. 32 5.10. HEAT _TEMP............................................................................................................ 33 2 Version 1.00 Chapter 5.11. 5.12. 5.13. 5.14. 5.15. 5.16. 5.17. 5.18. 5.19. 5.20. 5.21. 5.22. 5.23. LEGIONELLA............................................................................................................ 35 SDD......................................................................................................................... 38 SDD_NH3................................................................................................................ 39 SDT_NH3................................................................................................................. 39 T_AVG24................................................................................................................. 39 TANK_LEVEL............................................................................................................ 41 TANK_VOL1............................................................................................................. 42 TANK_VOL2............................................................................................................. 42 TEMP_EXT............................................................................................................... 43 WATER_CP............................................................................................................... 45 WATER_DENSITY..................................................................................................... 45 WATER_ENTHALPY................................................................................................... 46 WCT........................................................................................................................ 46 6. Electrical Engineering............................................................ 47 6.1. CLICK........................................................................................................................ 47 6.2. CLICK_MODE............................................................................................................. 49 6.3. DEBOUNCE................................................................................................................ 49 6.4. DIMM_2..................................................................................................................... 50 6.5. DIMM_I...................................................................................................................... 52 6.6. F_LAMP..................................................................................................................... 54 6.7. PULSE_LENGTH......................................................................................................... 56 6.8. PULSE_T.................................................................................................................... 56 6.9. SW_RECONFIG.......................................................................................................... 57 6.10. SWITCH_I................................................................................................................. 58 6.11. SWITCH_X............................................................................................................... 59 6.12. TIMER _ 1................................................................................................................ 60 6.13. TIMER_2.................................................................................................................. 60 6.14. TIMER_EVENT_DECODE........................................................................................... 62 6.15. TIMER_EXT.............................................................................................................. 63 6.16. TIMER_P4................................................................................................................ 65 7. Blind Modules.......................................................................72 7.1. Introduction.............................................................................................................. 72 7.2. BLIND_ACTUATOR..................................................................................................... 74 7.3. BLIND_CONTROL....................................................................................................... 75 7.4. BLIND_CONTROL_S................................................................................................... 78 7.5. BLIND_INPUT............................................................................................................. 80 7.6. BLIND_NIGHT............................................................................................................ 84 7.7. BLIND_SCENE............................................................................................................ 87 7.8. BLIND_SECURITY....................................................................................................... 89 7.9. BLIND_SET................................................................................................................ 91 7.10. BLIND_SHADE......................................................................................................... 93 7.11. BLIND_SHADE_S...................................................................................................... 96 3 Version 1.00 Chapter 4 Version 1.00 Chapter 1. Legal 1. Legal 1.1. Disclaimer The software modules included in the OSCAT library are offered with the intent to serve as a template and guideline for software development for PLC according to IEC61131-3. A functional guarantee is not offered by the programmers and is excluded explicitly. As the software modules included in the library are provided free of charge, no warranty is provided to the extent permitted by law. As far as it is not explicitly arranged in written form, the copyright owners and/ or third parties provide the software modules “as is”, without any warranty, explicit or implicit, including, but not limited to; market maturity or usability for a particular purpose. The full risk and full responsibility concerning quality, absence of errors and performance of the software module lie with the user. Should the library, or parts of it, turn out to contain errors, the costs for service, repair and/or correction must be assumed by the user. Should the entire library, or parts of it, be used to create user software, or be applied in software projects, the user is liable for the absence of errors, performance and quality of the application. Liability of OSCAT is explicitly ruled out. The OSCAT library user has to take care, through suitable tests, releases and quality assurance measures, that possible errors in the OSCAT library cannot cause damage. The present license agreements and disclaimers are equally valid for the software library, and the descriptions and explanations given in this manual, even when this is not mentioned explicitly. 1.2. License Terms The use of the OSCAT library is free of charge and it can be utilized for private or business purposes. Distribution of the library is expressly encouraged; however, this has to be free of charge and contain a reference to our webpage WWW.OSCAT.DE. If the library is offered in electronic form for download or distributed on data carriers, it has to be ensured that a clearly visible reference to OSCAT and a link to WWW.OSCAT.DE are included accordingly. 1.3. Registered trademarks All the trademarks used in this description are applied without reference to their registration or owner. The existence of such rights can therefore not be ruled out. The used trademarks are the property of their respective owners. Therefore, commercial use of the description, or excerpts of it, is not permitted. 5 Version 1.00 Chapter 1. Legal 1.4. Intended Use The software modules included in the OSCAT library and described in this documentation were exclusively developed for professionals who have had training in PLC. The users are responsible for complying with all applicable standards and regulations which come into effect with the use of the software modules. OSCAT does not refer to these standards or regulations in either the manual or the software itself. 1.5. Other All legally binding regulations can be found solely in chapter 1 of the user manual. Deduction or acquisition of legal claims based on the content of the manual, apart from the provisions stipulated in chapter 1, is completely ruled out. 6 Version 1.00 Chapter 2. Introduction 2. Introduction 2.1. Objectives OSCAT is for " Open Source Community for Automation Technology ". OSCAT created a Open Source Library referenced to the IEC61131-3 standard, which can be dispensed with vendor-specifc functions and therefore ported to all IEC61131-3-compatible programmable logic controllers. Although trends for PLC in the use of vendor-specifc libraries are usually solved efciently and these libraries are also provided in part free of charge, there are still major disadvantages of using it: 1. The libraries of almost all manufacturers are being protected and the Source Code is not freely accessible, which is in case of a error and correction of the error extremely difcult, often impossible. 2. The graphic development of programs with vendor-specifc libraries can quickly become confusing, inefcient and error-prone, because existing functions can not be adjusted and expanded to the actual needs. The Source codes are not available. 3. A change of hardware, especially the move to another manufacturer, is prevented by the proprietary libraries and the benefts that a standard such as IEC61131 ofer would be so restricted. A replacement of a proprietary library of a competitor is excluded, because the libraries of the manufacturers difer greatly in scope and content. 4. The understanding of complex modules without an insight into the source code is often very difcult. Therefore the programs are inefcient and error prone. OSCAT will create with the open OSCAT Library a powerful and comprehensive standard for the programming of PLC, which is available in the Source Code and verifed and tested by a variety of applications in detail. Extensive knowledge and suggestions will continue to fow through a variety of applications to the library. Thus, the library can be described as very practical. OSCAT understands his library as a development template and not as a mature product. The user is solely responsible for the tests in its application modules with the appropriate procedures and to verify the necessary accuracy, quality and functionality. At this point we reference to the license and the disclaimer mentioned in this documentation. 7 Version 1.00 Chapter 2. Introduction 2.2. Conventions 1. Direct modifcation in memory: Functions, which modify input values with pointer like _Array_Sort, starts with an underscore "_". _Array_Sort sorts an array directly in memory, which has the signifcant advantage that a very large array may not be passed to the function and therefore memory of the size of the array and the time is saved for copying. However, it is only recommended for experienced users to use these functions, as a misuse may lead to serious errors and crashes! In the application of functions that begin with "_", special care is appropriate and in particular to ensure that the call parameters never accept undefned values. 2. Naming of functions: Function modules with timing manner, such as the function PT1 are described by naming FT_<modulname> (ie. FT_PT1). Functions without a time reference are indicated with F_<modulename>. 3. Logical equations: Within this guide, the logical links are used & for AND , + for OR, /A for negated A and # for a XOR (exclusive OR). 4. Setup values for modules: To achieve that the application and programming remains clear and that complex functions can be represented simply, many of the modules of the library OSCAT have adjustable parameters that can be edited in application by double-clicking on the graphic symbol of the module. Double-clicking on the icon opens a dialog box that allows you to edit the Setup values. If a function is used multiple times, so the setup values are set individually for each module. The processing by double-clicking works on CoDeSys exclusively in CFC. In ST, all parameters, including the setup parameters may passed in the function call. The setup parameters are simply added to the normal inputs. The parameters are in the graphical interface entered by double click and then processed as constants under IEC61131. It should be noted that time values has to be written with syntax "T#200ms" and TRUE and FALSE in capital letters. 5. Error and status Reporting (ESR): More complex components are largely contributed a Error or status output. A Error Output is 0 if no error occurs during the execution. If, 8 Version 1.00 Chapter 2. Introduction however, in a module a error occurs, this output takes a value in the range 1 ..99 and reports a error with a error number. A status or Error Collection module may collect these messages and time-stamped, store them in a database or array, or by TCP/IP forward it to higher level systems. An output of the type Status is compatible with a Error starting with identical function. However, a status output reports not only errors but also leads on activities of the module log. Values between 1..99 are still error messages. Between 100..199 are located the reports of state changes. The range from 200..255 is reserved for Debug Messages. With this, within the library OSCAT standard functionality, a simple and comprehensive option is ofered to integrate operational messages and error messages in a simple manner, without afecting the function of a system. Modules that support this procedure, as of revision 1.4 are marked "ESRready." For more information on ESR modules, see the section "Other functions". 2.3. Test environment The OSCAT library is designed with CoDeSys and tested on diferent systems. The test environment consists of the following systems: 1. Beckhof BX 9000 with TwinCAT PLC Control Version 2.10.0 2. Beckhof CX 9001-1001 with TwinCAT PLC Control Version 2.10.0 3. Wago 750-841 with CoDeSys Version 2.3.9.31 4. Möller EC4P222 with CoDeSys Version 2.3.9.31 5. CoDeSys Simulation on I386 CoDeSys 2.3.9.31 6. CoDeSys Simulation on I386 CoDeSys 3.4 7. S7 and STEP 7: The OSCAT library is compiled and verifed on STEP7 since version 1.5. 8. PCWORX / MULTIPROG: The OSCAT library since version 2.6 compiled on MULTIPROG and verifed. 9. Bosch Rexroth IndraLogic XLC L25/L45/L65 with Indraworks 12VRS 10.Bosch Rexroth IndraMotion MLC L25/L45/L65 with Indraworks 12VRS 11.Bosch Rexroth IndraMotion MTX L45/L65/L85 with Indraworks 12VRS 9 Version 1.00 Chapter 2. Introduction We are constantly striving OSCAT the library to also test in other test environments. 2.4. Releases This manual is updated by OSCAT continuously. It is recommended to download the latest version of the OSCAT manual under www.OSCAT.DE . Here the most current Manual is available for download. In addition to the Manual OSCAT prepared a detailed revision history. The OSCAT revisionhistory lists all revisions of individual modules, with amendments and at what release the library of this component is included. 2.5. Support Support is given by the users in the forum WWW.OSCAT.DE. A claim for support does not exists, even if the library or parts of the library are faulty. The support in the forum under the OSCAT is provided for users voluntarily and with each other. Updates to the library and documentation are usually made available once a month on the home page of OSCAT under WWW.OSCAT.DE. A claim for maintenance, troubleshooting and software maintenance of any kind is generally not existing from OSCAT. Please do not send support requests by email to OSCAT. Requests can be processed faster and more efectively when the inquiries are made in our forum. 10 Version 1.00 Chapter 3. Others 3. Others 3.1. BUILDING_VERSION Type Function: DWORD Input IN : BOOL (if TRUE the module provides the release date) Output (Version of the library) BUILDING_VERSION provides if IN = FALSE the current version number as DWORD. If IN is set to TRUE then the release date of the current version as a DWORD is returned. Example: BUILDING_VERSION(FALSE) = 100 for Version 1.00 DWORD_TO_DATE(OSCAT_VERSION(TRUE)) = 2011-1-30 11 Version 1.00 Chapter 4. Actuators 4. Actuators 4.1. ACTUATOR_2P Type Function module Input IN: BYTE (control input 0 - 255) TEST: BOOL (starts autorun when TRUE) ARE: BOOL (enable for Autorun) I/O ARX: BOOL (autorun signal bus) Output OUT: BOOL (switching signal for valve) ARO: BOOL (TRUE if autorun is active) Setup CYCLE_TIME: TIME (clock speed of the valve) SENS: BYTE (Minimum and maximum input values) SELF_ACT_TIME: TIME (self act time) SELF_ACT_PULSE: TIME (switching time with autorun) SELF_ACT_CYCLES: INT (number of cycles with autorun) ACTUATOR_2P is an interface for 2-point actuators such as solenoid valves. The 2-point actuator can only be on / of switching and therefore, the input value IN is canged in a pulse / pause signal at the output OUT. The cycle time (CYCLE_TIME) determines the switching times of the output. The sticking of the valve because of a long rest period is prevented by using the self act time (SELF_ACT_TIME) and the count of self act cycles (SELF_ACT_CYCLES) and the pulse duration (SELF_ACT_PULSE). The cycles runs automatically and a stick of the valve can be avoided. After the interval, the module checks whether SELF_ACT_TIME ARE = TRUE and = ARX is FALSE, then switches ARO for the duration of self-activation to TRUE. At the same time ARX set to TRUE to prevent that other modules which are connected to the same ARX go to the Autorun. The input IN value can be varied from 0..255 If the input signal IN < SENS, the valve remains permanently closed (OUT = FALSE) and IN > 255 - SENS means the valve is permanently open (OUT = TRUE). 12 Version 1.00 Chapter 4. Actuators 4.2. ACTUATOR_3P Type Function module Input IN: BYTE (input control signal 0 - 255) TEST: BOOL (module processes diagnostics if TRUE) ARE: BOOL (automatic diagnosis is allowed if TRUE) END_POS: BOOL (input for limit switch) Output OUT1: BOOL (control signal for fap in the OPEN direction) OUT2: BOOL (control signal for fap toward close) POS: BYTE (simulated fap position) ERROR: BOOL (TRUE if diagnostic errors) STATUS: BYTE (ESR compliant status output) I/O ARX: BOOL (Auto-Communications) Setup T_RUN: TIME (run-time to full movement 0 - 255) T_EXT: TIME (duration extension at diagnosis) T_CAL: TIME (faps up period for calibration) T_DIAG: TIME (time for automatic diagnostics) SWITCH_AVAIL : BOOL (TRUE, when limit switch is connected) ACTUATOR_3P is a 3-point actuator interface for controlling actuators with up / down input. The signal at the input IN is converted into pulses at the outputs OUT1 and OUT2 which drives the motor accordingly. The input signal IN is processed and the two control outputs (OUT1 and OUT2) are controlled so that an input value of 0 closes the fap, 255 opens the fap, and 127 half-open the fap. The module can also process a limit switch. The limit switches must be connected so that no matter whether upper or lower end have been reached, the input END_POS gets TRUE, and thus indicating that the fap has reached one of the two end positions. To set the limit switch into operation, the setup variable SWITCH_AVAIL has to be 13 Version 1.00 Chapter 4. Actuators TRUE, otherwise the limit switch is ignored. The diagnostic input TEST can start at any time a fap and engine diagnostics. The module then goes through a diagnostic cycle and report any errors at the output ERROR. A diagnostic cycle drives back the fap to 0%, then measures the running time from 0% - 100% and drives back to 0%. It also checks if the limit switches work properly (if it is activated by the setup variable SWITCH_AVAIL ). After the diagnostic cycle, the valve moves back to its position defned by the input IN. The measured runtimes during the diagnostic are used in the operation to drive the fap very closely to each required position. With the setup variable T_DIAG is specifed after which time a diagnosis independently is activated without going through the input Test. After power on automatically a diagnosis cycle runs. If the value T_DIAG = T#0s, an automatic diagnosis is not performed. A fap is usually moved up and down to set diferent volume fows. The more a fap moves, the more it deviates from the ideal absolute position, because with every move a small position error and is added up over many movements. To prevent this error with the setup variables T_CAL after a defned period (The accumulated time of all fap movements), a calibration can be performed automatically. With this calibration the motor moves in the zero position and the fap is then returned to the value specifed by IN. A value of T#0s for CAL_RUNTIME means that no automatic calibration is carried out. When calibration and diagnostics without limit for adding a full motion, the time T_EXT runtime T_RUN to ensure that reached its fnal position without the fap limit switch safely. At the output POS of the module, the current fap position is simulated by set the time T_RUN. At this output can also be determined, when the fap has reached the position requested the input. If the input TEST = TRUE, the device performs a diagnostic cycle. With the external variable ARX any modules communicate with each other and ensure for the self-diagnostic cycles (after power on) to do not run parallel. The user thereby determines how many and which modules are connected to the same variable and thus can be tuned. If a module is connected to an own variable ARX, no coordination of the diagnostic cycles is done. More information about the inputs TEST, ARE and ARX can be read at module Autorun. Status messages the module: STATUS 14 ARE ARX 100 Normal operation - - 101 Calibration - - 103 Diagnostic UP TRUE TRUE 104 Diagnostic UP TRUE TRUE Version 1.00 Chapter 4. Actuators 4.3. ACTUATOR_A Type Function module Input I1: BYTE (control signal 1) IS: BOOL (input selection) I2: BYTE (control signal 2) RV: BOOL (reversal of direction for output Y) DX: BOOL (self-activation) Setup RUNTIME: TIME (runtime of the servo motor) SELF_ACT_TIME: TIME (time for automatic movement) OUT_MIN: DWORD (output value at I = 0) OUT_MAX: DWORD (output value at I = 255) Output Y: WORD (control signal for the servo motor) ACTUATOR_A is used to control actuators with analog input. The module has two inputs (I1 and I2) that cover the range 0..255 the entire output range of Y. The output Y is of type WORD, and its operating range is predetermined by the setup values OUT_MIN and OUT_MAX. An input value of 0 produces the output value OUT_MIN and an input value of 255 creates the value OUT_MAX, diferent input values produce corresponding output values between OUT_MIN and OUT_MAX. The module can be directly used to control DA converters with 16 bit input. The input IS selects between two inputs I1 and I2, thus can, for example, switch between manual and automatic operation. Another input DX switches when a rising edge immediately to self-activation. If SELF_ACT_TIME > t # 0s then the self-activation after the time SELF_ACT_TIME is repeated automatically, while the output Y is switched for the time RUNTIME to OUT_MIN, then for the same time on OUT_MAX and then returns back to the normal control value. The input RV can invert the output, Y = OUT_MAX if I = 0 and Y = OUT_MIN when I = 255. In this way, simply the direction of the servo motor to be reversed. 15 IS IS IS Y 0 0 0 Y = (OUT_MAX-OUT_MIN) * I1 / 255 +OUT_MIN 1 0 0 Y = (OUT_MAX-OUT_MIN) * I2 / Version 1.00 Chapter 4. Actuators 255 +OUT_MIN 0 1 0 Y = OUT_MAX OUT_MIN) * I1 /255 (OUT_MAX- 1 1 0 Y = OUT_MAX OUT_MIN) * I2 /255 (OUT_MAX- - - starts a self activation cycle 4.4. ACTUATOR_COIL Type Function module Input IN: BOOL (control signal) Setup SELF_ACT_CYCLE: TIME (automatic activation time) SELF_ACT_TIME: TIME (switch on with auto activation) Output OUT: BOOL (control signal for the pump) STATUS: BYTE (ESR compliant status output) ACTUATOR_COIL is used to control simple valves. The output OUT follows the input signal IN. If the setup variable SELF_ACT_CYCLE set to a value greater than 0, the valve is automatically activated for the duration of SELF_ACT_TIME if it was of for the time SELF_ACT_CYCLE. An ESR compliant status output indicates state changes of the valve for further processing or Data Logging. The status messages are defned as follows: STATUS = 100, Standby. STATUS = 101, valve was activated by TRUE at the input IN. STATUS = 102, valve was activated automatically. 4.5. ACTUATOR_PUMP Type 16 Function module Version 1.00 Chapter 4. Input Actuators IN: BOOL (Control signal for pump) MANUAL: BOOL (Manual control signal) RST: BOOL (reset signal) Output PUMP: BOOL (control signal for the pump) RUNTIME: REAL (engine running time in hours) CYCLES: REAL (number of on / of cycles of the pump) Setup MIN_ONTIME: TIME (minimum runtime for motor) MIN_OFFTIME: TIME (minimum stoptime for motor) ly) RUN_EVERY: TIME (time after that the pump runs automatical- ACTUATOR_PUMP is a pump interface with operating hours counter. The pump can be turned on with both IN or Manual. The setup variables MIN_ONTIME and MIN_OFFTIME set a minimum ON time and minimum OFF time. If the input IN reaches TRUE quicker than MIN_ONTIME, then the pump continues to run until the minimum run time is reached. If the input IN is set longer than MIN_ONTIME to TRUE, the pump runs until IN is FALSE again. If the pump is turned on in quick succession, the pump waits until the elapsed time MIN_OFFTIME, until they turn on the pump. With the setup variables RUN_EVERY the time is defned after that the pump runs automatically when it is standing still for more than RUN_EVERY time, so a stuck of the pump can be avoided. The pump turns itself on in this case, and runs for MIN_ONTIME. By RUN_EVERY = T # 0s, the automatic activation can be switched of. An internal counter counts the pump operating hours and the number of switching cycles. Both values can be reset to zero with TRUE at input RST. The hour meter is permanently and gets not lost neither at power failure or reset. RUNTIME and CYCLES are both REAL values, so not the usual Overfow happens, as happened with TIME values after 50 days. 4.6. ACTUATOR_UD Type 17 Function module Version 1.00 Chapter 4. Input Actuators UD: BOOL (direction input in Auto Mode UP = TRUE) ON: BOOL (TRUE, when in Auto Mode) MANUAL: BOOL (TRUE, if Manual Mode) UP: BOOL (UP enable in Manual Mode) DN: BOOL (DN enable in Manual Mode) OFF: BOOL (safety switch TRUE = outputs FALSE) YUP_IN: BOOL (return input UP relay) YDN_IN: BOOL (return input DN relay) Output YUP: BOOL (output for direction UP) YDN: BOOL (output direction for DN) STATUS: Byte (ESR compliant status and error output) Confg SOUND: TIME (minimum on-time) TOFF: TIME (minimum of time) YDN_in) OUT_RETURN: BOOL (switches and the return input YUP_In and ACTUATOR_UD is a reversing contactor interface with locking and confgurable timing. With additional return inputs a activation was prevented as long as a relais stuck. The module has an automatic and a manual mode. In automatic mode (ON = TRUE and Manual = FALSE), the input of the UD decides about the direction and ON/OFF. As soon as the manual input is TRUE starts the Manual mode and outputs will follow only the inputs UP and DN. UP and DN may never be both TRUE, if happens both outputs gets FALSE. With a safety-switch-of input OFF the outputs are switched of in both the manual and in automatic mode at any time . Two return inputs YUP_IN and YDN_IN serve as separate inputs for the state of the relays due to the avoid activating the output of a other relais in case of a failure of one relay module. This error is reported through error messages at the output STATUS. The feedback function is only available if the confg variable OUT_RETURN is set to TRUE. Status reports all activities of the module in order to provide them for a data record. The status output is ESR compatible and combinable with other ESR modules 18 Version 1.00 Chapter 4. Actuators from our The output status reports two errors: library . 1: YUP can not be set because YDN_IN TRUE. 2: YDN can not be set because YUP_IN TRUE. The Confg variables TON and TOFF defne a minimum ontime and a dead time between two output impulses and therefore large motors or transmissions can be switched, even if they needs a start and stop time. Manual UP DN ON UD OFF YUP YDN Status 1 0 0 - - 0 0 0 102 1 1 0 - - 0 1 0 103 1 0 1 - - 0 0 1 104 1 1 1 - - 0 0 0 102 0 - - 1 1 0 1 0 111 0 - - 1 0 0 0 1 112 - - - - - 1 0 0 101 1 0 0 0 - 0 0 0 110 0 - - 0 - - 0 0 110 4.7. AUTORUN Type Function module Input IN: BOOL (switch input) TEST: BOOL (enables the Autorun cycle) ARE: BOOL ( Enable Autorun) Setup TRUN: TIME (minimum duration of the load) TOFF: TIME (Maximum lifetime of the load) I/O ARX: BOOL (Autorun Enable Signal) Output OUT: BOOL (output to load) ARO: BOOL (TRUE if Autorun active) 19 Version 1.00 Chapter 4. Actuators AUTORUN monitors the duration of a load and ensures that the load at OUT is on, after the time TOFF at least for the time TRUN. AUTORUN stores the run time and switches the output only on, if a minimum TRUN within the period TOFF is not reached. The input IN is the switching input for the output OUT. The output ARO indicates that just Autorun is activ. The input ARE must be TRUE to enable autorun, at ARE a Timer can be connected to start autorun at certain times. The I/O ARX prevents if TRUE an autorun, autorun can only be active if ARI = FALSE. If ARI = FALSE and the internal Timer have expired, the module switches ARO and OUT to TRUE and at the same time ARI to TRUE. This mechanism can be used in several ways: a) A TRUE on the I/O ARX can prevent an autorun, it can, for example be controlled by an external Timer and allow the autorun only during a certain period of time. b) The ARI ports of multiple modules can be connected together and thus prevents that several modules simultaneously switch in the autorun mode. The modules wait until the frst module is fnished with Autorun and then the next module will begin. This is very useful to prevent that a larger number of loads perform simultaneously the autorun and therefore create unnecessarily high current load. The operating states of AUTORUN: IN T E S T A R E A R X A R O O U T X 0 - - - X Normal operation - 1 - 1 1 1 TEST starts the Autorun cycle - 0 1 1 0 > > 1 1 Autorun cycle is active A simple application of Autorun with input and output: 20 Version 1.00 Chapter 4. Actuators In the next example, the inputs ARE (Autorun Enable ) will be released by a Timer so that autorun will run only at certain times. The autorun of the modules X1 and X2 will start at the same time. The following example shows three autorun modules that are locked on ARI each other, so that only one device can go into the autorun and the other has to wait. 21 Version 1.00 Chapter 5. Heating, Ventilation, Air Condition 5. Heating, Ventilation, Air Condition 5.1. AIR_DENSITY Type Input Function : REAL T: REAL (air temperature in ° C) P: REAL (air pressure in Pascal) RH: REAL (humidity in %) Output (Density of air in kg / m³) AIR_DENSITY calculates the density of air in kg / m³ depending on pressure, humidity and temperature. The temperature is given in ° C, pressure in Pascal and the humidity in % (50 = 50%). 5.2. AIR_ENTHALPY Type Input Function : REAL T: REAL (air temperature) RH: REAL (Relative humidity of the air) Output (Enthalpy of air in J/g) AIR_ENTHALPY calculates the enthalpy of moist air from the statements T for temperature in degrees Celsius and relative humidity RH in % (50 = 50%). The enthalpy is calculated in joules/gram. 22 Version 1.00 Chapter 5. Heating, Ventilation, Air Condition 5.3. BOILER Type Function module Input T_UPPER: REAL (input upper temperature sensor) T_LOWER: REAL (lower input temperature sensor) PRESSURE: REAL (input pressure sensor) ENABLE: BOOL (hot water requirement) 1) 2) REQ_1: BOOL (input requirements for predefned Temperature REQ_2: BOOL (input requirements for predefned Temperature BOOST: BOOL (input requirement for immediate Deployment) Output HEAT: BOOL (output loading circuit) ERROR: BOOL (error signal) STATUS: Byte (ESR compliant status output) Setup T_UPPER_MIN: REAL (minimum temperature at top) Default = 50 T_UPPER_MAX: REAL (maximum temperature at top) Default = 60 T_LOWER_ENABLE : BOOL (FALSE, if lower Temperature Sensor does not exist) T_LOWER_MAX: REAL (maximum temperature of bottom) Default = 60 T_REQUEST_1: REAL (temperature requirement 1) Default = 70 T_REQUEST_2: REAL (temperature requirement 2) Default = 50 T_REQUEST_HYS: REAL (hysteresis control) Default = 5 T_PROTECT_HIGH: REAL (upper limit temperature, Default = 80) T_PROTECT_LOW: REAL (lower limit temperature, Default = 10) 23 Version 1.00 Chapter 5. Heating, Ventilation, Air Condition BOILER is a Controllerfor bufers such as warm water bufer. With two separate temperature sensor inputs also storage layers can be controlled. With the setup variable T_LOWER_ENABLE the lower temperature sensor can be switched on and of. When the input ENABLE = TRUE, the boiler is heated (HEAT = TRUE) until the preset temperature T_LOWER_MAX reaches the lower area of the bufer and then turn of the heater, until the lower limit temperature of the upper region (T_UPPER_MIN) is reached. If T_LOWER_ENABLE is set to FALSE, the lower sensor is not evaluated and it control the temperature between T_UPPER_MIN and T_UPPER_MAX at the top. A PRESSURE-input protects the boiler and prevents the heating, if not enough water pressure in the boiler is present. If a pressure sensor is not present, the input is unconnected. As further protection are the default values T_PROTECT_LOW (antifreeze) and T_PROTECT_HIGH are available and prevent the temperature in the bufer to not exceed an upper limit and also a lower limit. If an error occurs, the output ERROR is set to TRUE, while a status byte is reported at output STATUS, which can be further evaluated by modules such as ESR_COLLECT. By a rising edge at input BOOST the bufer temperature is directly heated to T_UPPER_MAX (T_LOWER_ENABLE = FALSE) or T_LOWER_MAX (T_LOWER_ENABLE = TRUE). BOOST can be used to impairment heating up the boiler when ENABLE is set to FALSE. The heating by BOOST is edge-triggered and leads during each rising edge at BOOST to exactly one heating process. Due to a rising edge on BOOST while ENABLE = TRUE the heating is started immediately until the maximum temperature is reached. The boiler will be loaded to provide maximum heat capacity. The inputs REQ_1 and REQ_2 serve any time to provide a preset temperature (or T_REQUEST_1 T_REQUEST_2). REQ can be used for example to provide a higher temperature for legionella disinfection or for other purposes. The provision of the request temperatures is made by measuring at the upper temperature sensor and with a 2-point control whose hysteresis is set by T_REQUEST_HYS. Status 24 1 upper temperature sensor has exceeded the upper limit temperature 2 upper temperature sensor has fallen below the lower limit temperature 3 lower temperature sensor has exceeded the upper limit temperature 4 lower temperature sensor has fallen below the lower limit temperature Version 1.00 Chapter 5. Heating, Ventilation, Air Condition 5 Water pressure in the bufer is too small 100 Standby 101 BOOST recharge 102 Standard recharge 103 Recharge on Request Temperature 1 104 Recharge on Request Temperature 2 The following Example shows the application of a BOILER with a TIMER and a public holiday mode: 5.4. BURNER Type Function module Input IN: BOOL (control input) Stage2: BOOL (control input level 2) OVER_TEMP: BOOL (temperature limit of the boiler) OIL_TEMP: BOOL (thermostat of fuel oil warming) FLAME: BOOL (fame sensor) RST: BOOL (reset input for failure reset) RST_TIMER: BOOL (reset for the service counter) Output MOTOR: BOOL (control signal for the motor) COIL1: BOOL (control signal for valve oil Level 1) COIL2: BOOL (control input for oil valve stage 2) 25 Version 1.00 Chapter 5. Heating, Ventilation, Air Condition PRE_HEAT: BOOL (fuel oil warming) IGNITE: BOOL (ignition) KWH: REAL (kilo watt hour meter) STATUS: BYTE (ESR compliant status output) FAIL: BOOL (fault: TRUE if error appearance) I/O RUNTIME1: UDINT (operating time level 1) Runtime2: UDINT (operating time level 2) CYCLES: UDINT (number of burner starts) Setup PRE_HEAT_TIME: TIME (maximum time for fuel oil warming) PRE_VENT_TIME: TIME (prepurge) PRE_IGNITE_TIME: TIME (pre ignition time) POST_IGNITE_TIME: TIME (post ignition time) STAGE2_DELAY: TIME (delay level 2) SAFETY_TIME: TIME () LOCKOUT_TIME: TIME (time must elapse before with a RST a interference can be deleted) MULTIPLE_IGNITION: BOOL () KW1: REAL (burner output at level 1 in KW) KW2: REAL (burner output at level 2 in KW) BURNER is a control interface for oil or gas burner operating at kilowatt hour meter and counter. The module controls a two-stage burner with optional fuel oil warming. The input IN is the control input that starts the burner only when the input OVER_TEMP is FALSE. OVER_TEMP is the boiler thermostat protection, which gets TRUE, if the boiler temperature has reached the maximum temperature. A burner start begins with the fuel oil 26 Version 1.00 Chapter 5. Heating, Ventilation, Air Condition warming, by PRE_HEAT gets TRUE. Then it waits for a signal at the input OIL_TEMP. If the signal OIL_TEMP is within the PRE_HEAT_TIME not TRUE and the oil temperature is not reached, the start sequence is interrupted and the output FAIL is set to TRUE. At the same time the error is spent at the Output STATUS. After fuel oil warming the motor gets on and sets the fan in operation. Then after a defned time the ignition is switched and the oil valve is opened. If no response of the fame sensor after specifed time (SAFETY_TIME), the module shows a failure. A fault is signaled even if the fame sensor responds before the ignition. If after a successful ignition, the fame breaks of and the set-variable MULTIPLE_IGNITION = TRUE, immediately a ignition is started. A second stage is activated automatically after the time STAGE2_DELAY when the input STAGE2 is TRUE. If a fault occurs, then the module is locked for a fxed time LOCKOUT_TIME and only after this time a RST can start the operation again. During the LOCKOUT_TIME, the RST Input must be FALSE. A TRUE at input OVER_TEMP stops immediately every action and reports the error 9. The status output indicates the current state of the module: 110 = Wait for Start signal ( Standby ) 111 = startup sequence is executed 112 = burner runs on stage 1 113 = burner runs at stage 2 A number of error conditions are provided at the output STATUS, if an error is present: 1 = fuel oil warming has not responded within the PRE_HEAT_TIME 2 = fame sensor is active during fuel oil warming (PRE_HEAT_TIME) 3 = fame sensor is active during the aeration period (PRE_VENTILATION_TIME) 4 = safety time ( Safety_Time) was passed without a fame 5 = fame stops in operation 9 = boiler overheating contact has tripped Trace recording of a normal boot sequence: 27 Version 1.00 Chapter 5. Heating, Ventilation, Air Condition The signal IN starts the sequence with the output PRE_HEAT. After reaching the oil temperature (OIL_TEMP = TRUE), the engine started and the PRE_VENTILATION_TIME (time from engine start until oil valve is open) awaited. After an adjustable time (PPR_IGNITION_TIME) before opening the oil valve, the ignition is turned on. The ignition is then on until the POST_IGNITION_TIME has expired. The operating time per stage is measured independently in seconds. IN over Oil 0 tem tem p p 0 - Flam e Rst motor Oil - 0 0 0 coil Pre ignite hea t 0 0 Status fail 110 0 Wait mode 1 0 0 0 0 0 0 1 0 111 0 fuel oil warming period 1 0 1 0 0 1 0 1 0 111 0 aeration period 1 0 1 0 0 1 0 1 1 111 0 pre ignition period 1 0 1 0 0 1 1 1 1 111 0 Open valve stage 1 1 0 1 1 0 1 1 1 1 112 0 Flame burns post ignition period 1 0 1 1 0 1 1 1 0 112 0 Burner is running 1 0 1 0 0 1 1 1 1 111 0 Post-ignition after fame stops - 1 - - - - - - - 9 1 Boiler overheating 1 0 1 1 0 1 0 1 0 3 1 foreign light failure The following time diagram explains the various setup times and the sequence: The timing diagram refects the exact time line: t1 = pre-heating (PRE_HEAT_TIME) t2 = prepurge (PRE_VENT_Time) t3 = pre ignition time (PRE_IGNITE_TIME) 28 Version 1.00 Chapter 5. Heating, Ventilation, Air Condition t4 = safety time (SAFETY_TIME) t5 = post ignition time (POST_IGNITE_TIME) t6 = delay for stage 2 (STAGE2_DELAY) 5.5. DEW_CON Type Input Function : REAL RH: REAL (Relative Humidity) T: REAL (temperature in °C) Output REAL (water vapor concentration in g/m³) The module DEW_CON calculates from the relative humidity (RH) and temperature (T in °C) water vapor concentration in the air. The result is calculated in grams/m³. RH is shown in % (50 = 50%) and indicates the temperature in °C. The module is suitable for temperatures from -40°C to +90°C. 5.6. DEW_RH Type Input Function : REAL VC: REAL (water vapor concentration in air, in grams / m³) T: REAL (temperature in °C) Output 29 REAL (Relative humidity in %) Version 1.00 Chapter 5. 30 Heating, Ventilation, Air Condition Version 1.00 Chapter 5. Heating, Ventilation, Air Condition The module DEW_RH calculates the relative humidity in % (50 = 50%) from the water vapor concentration (VC) and temperature (T in ° C) . The water vapor concentration is measured in grams / m³. DEW_CON can be used for calculations in both directions (heat up and cool down). If cooled too much, then the maximum relative humidity limited to 100%. For calculation of the dew point of the module DEW_TEMP is recommended. In the following example, the case will be calculated when air is cooled from 30°C and relative humidity of 50% by 6 degrees. The module DEW_CON provides the moisture concentration in the outlet air of 30° and DEW_RH calculates the resulting relative humidity RH of 69.7%. These calculations are important when air is cooled or heated. In air conditioning systems a resulting relative humidity of 100% hast to be avoided due to condensation and the resulting problems. See also the modules DEW_CON and DEW_TEMP. 5.7. DEW_TEMP Type Input Function : REAL RH: REAL (Relative Humidity) T: REAL (temperature in °C) Output REAL (dew point) The module DEW_TEMP calculate the dew point temperature from the relative humidity (RH) and temperature (T in ° C). The relative humidity is given in % (50 = 50%). 31 Version 1.00 Chapter 5. Heating, Ventilation, Air Condition 5.8. HEAT_INDEX Type Input Function : REAL T: REAL (temperature in °C) RH: REAL (Relative Humidity) Output REAL ( Heat Temperature Index) HEAT_INDEX calculates at high temperatures and high humidity wind chill. The function is defned for temperatures above 20 ° C and relative humidity > 10%. For values outside the defned range, the input temperature is passed out. 5.9. HEAT_METER Type Input Function : REAL TF: REAL (fow temperature in °C) TR: REAL (back fow temperature in °C) LPH: REAL (Flow in L/h or L/pulse) E: BOOL ( Enable Signal) RST: BOOL (asynchronous reset input) Setup CP: REAL (Specifc heat capacity 2nd component) DENSITY: REAL (density of the 2nd component) CONTENT: REAL (share, 1 = 100%) PULSE_MODE: BOOL (pulse counter if TRUE) RETURN_METER: BOOL (fow meter in the return if TRUE) AVG_TIME: TIME (time interval for current consumption) 32 Output C: REAL (current consumption in joules/hour) I/O Y: REAL (amount of heat in joules) Version 1.00 Chapter 5. Heating, Ventilation, Air Condition HEAT_METER is a calorimeter. The amount of heat Y is measured in joules. The inputs of TF and TR are the forward and return temperature of the medium. At the input LPH the fow rate in liters/hour, resp. the fow rate per pulse of E is specifed. The property of E is determined by the Setup Variable PULSE_MODE. PULSE_MODE = FALSE means the amount of heat is added continuously as long as E is set to TRUE. PULSE_MODE = TRUE means the amount of heat with each rising edge of E is added up. The PULSE_MODE is turned on the use of heat meters, while indicating the fow rate in liters per pulse at the input LPH and the heat meter is connected at the input E. If no fow meter is present, the the pump signal is connected at input E and at the input LPH given the pump capacity in liters per hour. When using a fow meter with analog output is the output to be converted to liters per hour and sent to the input LPH, the input E will be set to TRUE. With the setup variables CP, DENSITY and CONTENT the 2nd component of the medium is specifed. For operation with pure water no details of CP, DENSITY and CONTENT are necessary. [fzy] If a mixture of water and a 2nd media is present, with CP the specifc heat capacity in J/KgK, with DENSITY the density in KG/l and with CONTENT the portion of the 2nd component is specifed. A proportion of 0.5 means 50% and 1 would be equivalent to 100%. The setup variables RETURN_METER is specifed whether the fow meter sits in forward or reverse. RETRUN_METER = TRUE for return measurement and FALSE for fow measurement. The output C of the module represents the current consumption. The current consumption is measured in joules/hour, and is determined at the intervals of AVG_TIME. The module has the following default values that are active when the corresponding values are not set by the user: PULSE_MODE = FALSE RETURN_METER = FALSE AVG_TIME = T#5s 5.10. HEAT _TEMP 33 Type Function module Input T_EXT: REAL (TAT) Version 1.00 Chapter 5. Heating, Ventilation, Air Condition T_INT: REAL (nominal room temperature) OFFSET: REAL (lowering or raising the Room temperature) T_REQ: REAL (temperature requirement) Output TY: REAL (heating circuit fow temperature) HEAT: BOOL (heating requirement) Setup TY_MAX: REAL (maximum heating circuit temperature, 70°C) TY_MIN: REAL (minimum heating circuit temperature, 25°C) TY_C: REAL (design temperature, 70°C) T_INT_C: REAL (room design temperature, 20°C) T_EXT_C: REAL (T_EXT at design temperature -15°C) T_DIFF_C: REAL (forward / reverse diferential 10°C) C: REAL (constant of the heating system, DEFAULT = 1.33) H: REAL (threshold requirement for heating 3°C) HEAT_TEMP calculates the fow temperature of the outside temperature by the following formula: TY = TR + T_DIFF / 2 * TX + (TY_Setup - T_DIFF / 2 - TR) * TX ^ (1 / C) with: TR = T_INT + OFFSET TX := (TR - T_EXT) / (T_INT_Setup - T_EXT_Setup); The parameters of the heating curve are given by the setup variables TY_C (design fow temperature), T_INT_C (room temperature at the design point), T_EXT_C (outside temperature at the design point) and T_DIFF_C (diference between forward / reverse at the design point). With the input ofset, the heating curve of room reduction (negative ofset) or room boost (positive ofset) can be adjusted. With the setup variables TY_MIN and TY_MAX the fow temperature can be kept to a minimum and maximum value. The input T_REQ is used to support requirements such as external temperature from the boiler. If T_REQ is larger than the calculated value of the heating curve for TY so TY is set to T_REQ. The limit of TY_MAX does not apply to the request by T_REQ. The setup variable H defne at what outside temperature the heating curve is calculated, as long as T_EXT + H >= T_INT +OFFSET the TY stays at 0 and HEAT is FALSE. If T_EXT + H < T_INT + OFFSET the HEAT is TRUE and TY outputs the calcu34 Version 1.00 Chapter 5. Heating, Ventilation, Air Condition lated fow temperature. The setup variable C determines the curvature of the heating curve. The curvature is dependent on the heating system. Convectors: C = 1.25 – 1.45 Panel radiators: Radiators: C = 1.20 – 1.30 C = 1.30 Pipes: C = 1.25 Floor heating: C = 1.1 The larger the value of C, the stronger the heating curve is curved. A value of 1.0 gives a straight line as the heating curve. Typical heating systems are between 1.0 and 1.5. The graph shows Heating curves for the design temperatures of 30 - 80°C fow temperature at -20 ° C outside temperature and at a C of 1.33: 5.11. LEGIONELLA Type 35 Function module Version 1.00 Chapter 5. Input Heating, Ventilation, Air Condition MANUAL: BOOL (Manual Start Input) TEMP_BOILER: REAL (boiler temperature) TEMP_RETURN: REAL (temperature of the circulation pipe) DT_IN: DATE_TIME (Current time of day and date) RST: BOOL (Asynchronous Reset) Output HEAT: BOOL (control signal for hot water heating) PUMP: BOOL (control signal for circulation pump) STATUS: Byte (ESR compliant status output) Valve0..7: BOOL (control outputs for valves of circulation) RUN: bool (true if sequence is running) Setup T_START: TOD (time of day at which the disinfection starts) DAY: INT (weekday on which the disinfection starts) TEMP_SET : REAL (temperature of the boiler) TEMP_OFFSET: REAL () TEMP_HYS: REAL () T_MAX_HEAT: TIME (maximum time to heat up the boiler) T_MAX_RETURN: TIME (maximum time until the input TEMP_RETURN to be active after VALVE) TP_0 .. 7: TIME (disinfection time for circles 0..7). LEGIONELLA has an integrated timer, which starts on a certain day (DAY) to a specifc time of day (T_START) the desinfection. For this purpose, the external interface of the local time is needed (DT_IN). Each time can be started the desinfection by hand with a rising edge at MANUAL. 36 Version 1.00 Chapter 5. Heating, Ventilation, Air Condition The process of a disinfection cycle is started with an internal start due to DT_IN, DAY and T_START, or by a rising edge at MANUAL. The output HEAT is TRUE and controls the heating of the boiler. Within the heating time T_MAX_HEAT the input signal TEMP_BOILER must go then to TRUE. If the temperature is not reported within T_MAX_HEAT, the output STATUS passes fault. The disinfection then continues anyway. After the heating, the heater temperature is measured and reheated if necessary by TRUE at the output HEAT. When the boiler temperature is reached, PUMP gets TRUE and the circulation pump is turned on. Then the individual valves are opened one after the other and measured, whether within the time T_MAX_RETURN the temperature war reached at the return of the circulation line. If a return fow thermometer is not present, the input T_MAX_RETURN remains open. The output STATE is compatible with ESR, and may give the following messages: 110 111 On Sequence run hold 1 Boiler temperature was not reached 2 Return temperature at Ventil0 was not reached 3..8 Return temperature at valve1..7 was not reached Schematic internal structure of Legionella: The following example shows a simulation for 2 disinfection circuits with trace recording. In this structure, VALVE2 connected to the input RST and thus disrupts the sequence after of two circles: 37 Version 1.00 Chapter 5. Heating, Ventilation, Air Condition 5.12. SDD Type Input Function : REAL T: REAL (air temperature in ° C) ICE: BOOL (TRUE for air over ice and FALSE for air over water) Output REAL (saturation vapor pressure in Pa) SDD calculates the saturation vapor pressure for water vapor in air. The temperature T is given in Celsius. The result can be calculated for air over ice (ICE = TRUE) and for air to water (ICE = FALSE). The scope of the func - 38 Version 1.00 Chapter 5. Heating, Ventilation, Air Condition tion is -30°C to 70°C over water and at -60°C to 0°C on ice. The calculation is performed according to the Magnus formula. 5.13. SDD_NH3 Type Function : REAL Input T: REAL (temperature in °C) Output REAL (saturation vapor pressure in Pa) SDD_NH3 calculates the saturation vapor pressure for ammonia (NH3). The temperature T is given in Celsius. The scope of the function is located at -109°C to 98°C. 5.14. SDT_NH3 Type Function : REAL Input T: REAL (temperature in °C) Output REAL (saturation vapor pressure in Pa) SDT_NH3 calculates the saturation temperature for ammonia (NH3). The pressure P is given in Celsius. The scope of the function is 0.001 bar to 60 bar. 5.15. T_AVG24 39 Type Function module Input TS: INT (external temperature sensor) Version 1.00 Chapter 5. Heating, Ventilation, Air Condition DTI: DT (Date and time of day) RST: BOOL (Reset) Setup T_FILTER: TIME (T of the input flter) SCALE: REAL:= 1.0 (scaling factor) SFO: REAL (zero balance) Output TA: REAL (Current outside temperature) TP: BOOL (TRUE if T24 is renewed) I/O T24: REAL (daily average temperature) T24_MAX: REAL (Maximaltemp. in the last 24 hours) T24_MIN: REAL (minimum temperature in the last 24 hours) T_AVG24 determines the daily average temperature T24. The sensor input TS is of type INT and is the temperature * 10 (a value of 234 means 23.4 °C). The data of flter run for noise suppression on a low-pass flter with time T_FILTER. By scale and SFO a zero error, and the scale of the sensor can be adjusted. At output TA shows the current outside temperature, which is measured every hour and half hour. The module writes every 30 minutes the last, over the 48 values calculated daily average in the I / O variable T24. This needs to be defned externally and thereby can be defnded remanent or persistent. If the frst start a value of -1000 found in T24, then the module initializes at the frst call with the current sensor value, so that every 30 minutes a valid average may be passed. If T24 has any value other than -1000, then the module is initialized with this value and calculates the average based on this value. This allows a power failure and remanent storage of T24 an immediate working after restart. A reset input can always force a restart of the module, which depending on the value in T24, the module is initializes with either TS or the old value of T24. If the module should be set on a particular average, the desired value is written into T24 and then a reset generated. T24_MAX and T24_MIN passes the maximum and minimum values of the last 24 hours. To determine the maximum and minimum value, the temperatures of each half hour are considered. A temperature value that occurs between 2 measurements is not considered. 40 Version 1.00 Chapter 5. Heating, Ventilation, Air Condition 5.16. TANK_LEVEL Type Function module Input LEVEL : BOOL (input for level sensor) LEAK: BOOL (input for leak sensors) ACLR: BOOL (input to reset the alarm) Setup MAX_VALVE_TIME (Maximum make-up time for valve) LEVEL_DELAY_TIME: TIME (response time for input LEVEL) Output VALVE: BOOL (output signal to valve) ALARM: BOOL (alarm output) STATUS: BYTE (ESR compliant status output) TANK_LEVEL used to keep the level of liquid in a tank constant. At the input LEVEL a niveau sensor is connected and at the output VALVE, the after feed valve is connected. To debounce at the troubled fll niveau the level sensor, its response time can be adjusted using the Setup variable LEVEL_DELAY_TIME. At the input LEVEL with TRUE is displayed, that the liquid level is too low. After the input was through for the time LEVEL_DELAY_TIME to TRUE, the output VALVE set to TRUE to replenish fuid. During the replenishment process MAX_VALVE_TIME is monitored, and if VALVE stay longer than this time to TRUE, an alarm is generated in the case of sensor failures or leaks to prevent a permanent refll. The module also monitors the input LEAK which for normal operation must always be FALSE. Once LEAK goes to TRUE the refll immediately stops and a alarm is generated. LEAK is used to connect leak sensors and or additional niveau sensors above the normal levels. If f an alarm occurs in the operation the module will stop any refll until the error has been fxed and the input ACLR is set to TRUE shortly. At the ESR status output all operating conditions are passed with ESR messages. STATUS = 1, leak sensor (LEAK) is enabled. STATUS = 2, refll time (MAX_VALVE_TIME) was exceeded. STATUS = 100, level is reached, feeding of. STATUS = 101, ACLR was pressed. STATUS = 102, level below, make-up runs. 41 Version 1.00 Chapter 5. Heating, Ventilation, Air Condition 5.17. TANK_VOL1 Type Input Output Function: REAL TR : REAL (Radius of the tank) TL: REAL (Length of the tank) H: REAL (Filling height of the tank) Real (Contents of the tank to the fll level) TANK_VOL1 calculates the contents of a tube-shaped tanks flled to the height H. 5.18. TANK_VOL2 Type Input Output Function: REAL TR : REAL (Radius of the tank) H: REAL (Filling height of the tank) Real (Contents of the tank to the fll level) TANK_VOL2 calculates the contents of a spherical tanks flled to the height H. 42 Version 1.00 Chapter 5. Heating, Ventilation, Air Condition 5.19. TEMP_EXT Type Function module Input T_EXT1: REAL (external temperature sensor 1) T_EXT2: REAL (external temperature sensor 2) T_EXT3: REAL (external temperature sensor 3) T_EXT_Setup: BYTE (query mode) DT_IN: DATE_TIME (daytime) Output T_EXT: REAL (output outside temperature) HEAT: BOOL (heating signal) COOL: BOOL (cooling signal) Setup T_EXT_MIN: REAL (minimum outdoor temperature) T_EXT_MAX: REAL (maximum outside temperature) T_EXT_DEFAULT: REAL (default external temperature) HEAT_PERIOD_START: DATE (start of heating season) HEAT_PERIOD_STOP: DATE (end of heating season) COOL_PERIOD_START: DATE (start of cooling period) COOL_PERIOD_STOP: DATE (end of cooling period) HEAT_START_TEAMP_DAY (heating trigger temperature day) HEAT_START_TEAMP_NIGHT (heating trigger temperature night) HEAT_STOP_TEMP: REAL (heating stop temperature) COOL_START_TEAMP_DAY (cooling start temperature day) COOL_START_TEMP_NIGHT (cooling start temperature night) COOL_STOP_TEMP: REAL (cooling stop temperature) START_DAY: TOD (start of the day) START_NIGHT: TOD (early night) CYCLE_TIME: TIME (query time for outside temperature) 43 Version 1.00 Chapter 5. Heating, Ventilation, Air Condition TEMP_EXT processes up to 3 remote temperature sensor and provides by mode a selected external temperature to the heating control. It calculates signals for heating and cooling depending on outdoor temperature, date and time. With the input T_EXT_Setup is defned how the output value T_EXT is determined. If T_EXT_Setup is not connected, then the default value 0. The setup values T_EXT_MIN and T_EXT_Max set the minimum and maximum value of the external temperature inputs. If these limits are exceeded or not reached, a fault in the sensor or broken wire is assumed and instead of measured valued the default value T_EXT_DEFAULT is used. T_EXT_Setup T_EXT 0 Average of T_EXT1, T_ext2 and T_ext3 1 T_EXT1 2 T_EXT2 3 T_EXT3 4 T_EXT_DEFAULT 5 Lowest value of the 3 inputs 6 Highest value of 3 inputs 7 Average value of 3 inputs With the setup variables HEAT_PERIOD and COOL_PERIOD is defnes when heating and when cooling is allowed. The decision, whether the output HEAT or COOL gets TRUE, still depends on the setup values HEAT_START HEAT_STOP and COOL_START and COOL_STOP. These values can be defned separately for day and night. The start of a day and night period can be determined by the setup variables START_DAY and START_NIGHT. A variable CYCLE_TIME specifes how often the outside temperature to be queried. 44 Version 1.00 Chapter 5. Heating, Ventilation, Air Condition 5.20. WATER_CP Type Function : REAL Input T: REAL (water temperature in °C) Output REAL (Specifc heat capacity at temperature T) WATER_CP calculates the specifc heat capacity of liquid water as a function of temperature at atmospheric pressure. The calculation is valid in the temperature range from 0 to 100 degrees Celsius and is calculated in joules / (gram * kelvin). The temperature T is given in Celsius. 5.21. WATER_DENSITY Type Input Function : REAL T: REAL (temperature of the water) SAT: BOOL (TRUE, if the water is saturated with air) Output REAL (water density in grams / liter) WATER_DENSITIY calculates the density of liquid water as a function of temperature at atmospheric pressure. The temperature T is given in Celsius. The highest density reached water at 3.983 °C with 999.974950 grams per liter. WATER_DENSITY calculates the density of liquid water, not frozen or evaporated water. WATER_DENSITY calculates the density of air-free water when SAT = FALSE, and air-saturated water when SAT = TRUE. The calculated values are calculated using an approximate formula and results values with an accuracy greater than 0.01% in the temperature range of 0 - 100°C at a constant pressure of 1013 mBar. The deviation of the density of air saturated with water is corrected according to the formula of Bignell. The dependence of the density of water pressure is relatively low at about 0.046 kg/m³ per 1 bar pressure increase, in the range up to 50 bar. The low pressure dependence has practical applications, no signifcant infuence. 45 Version 1.00 Chapter 5. Heating, Ventilation, Air Condition 5.22. WATER_ENTHALPY Type Function : REAL Input T: REAL (temperature of the water) Output REAL (enthalpy of water in J/g at temperature T) WATER_ENTHALPY calculates the Enthalpy (Heat content) of liquid water as a function of temperature at atmospheric pressure. The temperature T is given in Celsius. The calculation is valid for a temperature of 0 to 100 ° C and the result is the amount of heat needed to head the water from 0 ° C to a temperature of T. The result is expressed in joules / gram J / g and passed as KJ/Kg. It is calculated by linear interpolation in steps of 10 ° and thus reach a sufcient accuracy for non-scientifc applications. A possible Application of WATER_ENTHALPY is to calculate the amount of energy needed, for example, to head a bufer tank at X (T2 - T1) degree. From the energy required then the runtime of a boiler can be calculated exactly and the required energy can be provided. Since there temperature readings are signifcantly delays, with this method a better heating is possible in practice. 5.23. WCT Type Input Function : REAL T: REAL (outdoor temperature in ° C) V: REAL (Wind speed in km/h) Output REAL (wind chill temperature) WCT calculates the wind chill temperature depending on the wind speed in km/h and the outside temperature °C. The wind chill temperature is defned only for wind speeds greater than 5 km/h and temperatures below 10 °C. For values outside the defned range, the input temperature is output. 46 Version 1.00 Chapter 6. Electrical Engineering 6. Electrical Engineering 6.1. CLICK Type Function module Input IN: BOOL (control input for buttons) Output Q: BOOL (output) SINGLE: BOOL (output for simple key press) DOUBLE: BOOL (output for double key press) TRIPLE: BOOL (output for tripple key press) STATUS: BYTE (ESR compliant status output) Setup T_DEBOUNCE: TIME (debounce time for buttons) T_SHORT: TIME (Maximum time for short pulse) T_PAUSE: TIME (maximum interval between two pulses) T_RESetup: TIME (reconfguration time) CLICK is a button interface which automatically adjusts to the connected switch. If a switch is connected, CLICK recognize themselves whether it is an opener or closer, and then evaluates each case only the frst fank. With the setup variable T_DEBOUNCE the debounce of the buttons is set. It is set by default to 10 ms. The time T_RESetup is used to decide whether a make or break is connected to the input IN. If the input is for more than this time in a state, it is assumed as rest mode. The default value is 1 minute for T_RESetup. With short successive pulses a single, double or triple pulse evaluated and switches according to the output SINGLE, DOUBLE or TRIPLE. If the pulse is longer than the setup time T_SHORT or a pause between two pulses is longer than T_PAUSE, then the pulse sequence is interrupted and the corresponding output is set, until the contrary input pulse is inactive. The output Q corresponds to the input pulse. However, it is always High- active. An ESR compliant status output indicates state changes to subsequent ESR compliant evaluation modules. With short pulses, the output SINGLE (one pulse), DOUBLE (2 pulses) or TRIPLE (3 pulses) is 47 Version 1.00 Chapter 6. Electrical Engineering selected. The corresponding output remains at least one cycle active and as a maximum of as long as the input IN remains active. Status 110 Inactive input 111 Output SINGLE activated 112 Output DOUBLE activated 113 TRIPLE output enabled Example 1 shows an application of CLICK with three subsequent dimming modules. Analog can also be used up to 3 switch or a mixture of dimmers or switches. Example 2 shows CLICK with a dimmer, and behaves like a dimmer without CLICK, however, a short double-click sets the output of the dimmer at 100% and a triple-click is as an additional switching output available. 48 Version 1.00 Chapter 6. Electrical Engineering 6.2. CLICK_MODE Type Function module Input IN: BOOL (control input for buttons) Output SINGLE: BOOL (output for simple key press) DOUBLE: BOOL (output for double key press) LONG: BOOL (output for a long key press) TP_LONG: BOOL (pulse when long key press starts) Setup T_LONG: TIME (decoding time for long key press) CLICK_MODE is a push button interface which decodes both simple click, double click or long keystrokes. With short pulses a single or double-click is decoded switches the according outputs SINGLE or DOUBLE, each for a one cycle. If the pulse is longer than the T_LONG, then the output TP_OUT is set for one cycle to TRUE and the output LONG remains TRUE until the input IN goes back to FALSE. 6.3. DEBOUNCE Type Function module Input IN: BOOL (input signal from the switch or push button) TD: TIME (debounce) PM: BOOL (operation mode TRUE = pulse mode operation) Output Q: BOOL (output) DEBOUNCE can debounce the signal from a switch or button and pass it debounced to the output Q . If PM = FALSE, the output Q follows the input signal IN debounced, if PM = TRUE at the input IN a leading edge is detec49 Version 1.00 Chapter 6. Electrical Engineering ted and the output Q remains only for one cycle to TRUE. The debounce time for the input IN is set by the time TD. 6.4. DIMM_2 Type Function module Input SET: BOOL (input for switching the output to VAL) VAL BYTE (value for the SET operation) I1: BOOL (tax receipt for Taster1, On) I2: BOOL (tax receipt for switch2, down) RST: BOOL (entrance to switch of the output) Output Q: BOOL (output) D1: BOOL (output for doubleclick at l1) D2: BOOL (output for doubleclick at l2) I/O OUT: Byte ( Dimmer Output) Setup T_DEBOUNCE: TIME (debounce time for buttons) T_ON_MAX: TIME (start limitation) T_DIMM_START: TIME (reaction time to dim) T_DIMM: TIME (time for a dimming ramp) MIN_ON: BYTE (minimum value of OUT at startup) MAX_ON: BYTE (maximum value of OUT at startup) RST_OUT: BOOL (if Reset is true, OUT is set to 0) SOFT_DIMM: BOOL (Soft start at power-up) DBL1_TOG: BOOL ( Enable Toggle for D1) DBL2_TOG: BOOL ( Enable Toggle for D2) DBL1_SET: BOOL ( Enable Value for doubleclick I1) DBL2_SET: BOOL ( Enable Value for doubleclick I2) DBL1_POS: BYTE (value for doubleclick at I1) DBL2_POS: BYTE (value for double at I2) 50 Version 1.00 Chapter 6. Electrical Engineering DIMM_2 is an intelligent Dimmer for 2-button operation. The Dimmer can be set via the setup variables. The time T_DEBOUNCE is used to debounce the switch and is set by default to 10ms. A start limitation T_ON_MAX switches the output of when it is exceeded. The times T_DIMM_Start and T_DIMM set the timing cycle of the Dimmers . With the inputs of SET and RST, the output Q can be switched on or of at any time. SET sets the output OUT to the predetermined value VAL, RST sets OUT to 0 if the setup variable RST_OUT is set to TRUE. RST switches D1 and D2 in addition to FALSE. SET and RST may be used for connection of Fire alarm systems or Alarm systems. In case of fre or burglary all the lights can be set to On with SET or switched to of with RST when exit of the building. While switch on and of the last output value of the dimmer remains at the output OUT, only a FALSE at output Q switches the light of and a TRUE at Q switch the lamp on again. While switching on by a short press the mpodule limits the output OUT for a minimum MIN_ON and a maximum of at least MAX_ON. If, for example, the dimmer set to 0 then the module is automatically set the output OUT to 50 and vice versa, the output OUT if it is higher than MAX_ON is limited to MAX_ON. These parameters are to prevent that after switching-on a very small value at the output OUT occures and despite active Q no light is switched on. By the parameter MIN_ON a minimum value of light is defned when switched on. Conversely, for example: the light in the bedroom is prevented to apply full brightness immediately. If the parameter SOFT_DIMM set to TRUE, the DIM starts at power on with a long button press every time at 0. In addition to the function of the dimmer, at the inputs I1 and I2 a doubleclick is decoded and puts the outputs of D1 resp. D2 for one cycle to TRUE. If the setup variable D?_TOGGLE is set to TRUE then the output D? is inverted by double-clicking. The outputs D1 and D2 can be used to to switch additional consumer or events with a double-click. An output of D? may be attributed to the SET input and the dimmer also be set to a predefned value defnded by VAL using a double-click. If the setup variable DBL?_SET set to TRUE, so a corresponding double-click does not modify the associated output D? but the value of the variable DBL?_POS is passed through to the output OUT and the output Q is switched on if necessary. OUT is the value of the dimmer and is defned as an I/O variable external. This has the advantage that the value of the dimmer can be infuenced externally at any time and can be reconstructed even after a power failure. OUT can be defned if desired retentive and persistent. The following table shows the operating status of the dimmer: 51 Version 1.00 Chapter 6. Electrical Engineering I1 I2 SET RST single - - single double - 0 0 0 Q D1 D2 OUT 1 - - LIMIT(MIN_ON,OUT,MAX_ON) 0 - - 0 TOG PULSE - double 0 0 TOG PULSE long - 0 0 1 - dimm up start from 1 if SOFT_DIMM = TRUE - long 1 dimm down and turn of at 0 - - 1 0 ON - VAL - - 0 1 OFF OFF 0 wenn RST_OUT = TRUE 6.5. DIMM_I Type Function module Input SET: BOOL (input for switching the output to VAL) VAL BYTE (value for the SET operation) IN: BOOL (control input for buttons) RST: BOOL (entrance to switch of the output) Output Q: BOOL (output) DBL: BOOL (double-click output) I/O OUT: Byte ( Dimmer Output) Setup T_DEBOUNCE: TIME (debounce time for buttons) T_RESETUP: TIME (reconfguration time) T_ON_MAX: TIME (start limitation) T_DIMM_START: TIME (reaction time to dim) T_DIMM: TIME (time for a dimming ramp) MIN_ON: BYTE: = 50 (minimum value of OUT at startup) MAX_ON: BYTE:= 255 (maximum value of OUT at startup) SOFT_DIMM: BOOL (if TRUE dimming begins after 52 Version 1.00 Chapter 6. Electrical Engineering switch on at 0) DBL_TOGGLE: BOOL (if TRUE the output DBL is inverted at each double-click) RST_OUT: BOOL (if Reset is true, OUT is set to 0) DIMM_I is an intelligent Dimmer which automatically adjusts itself to opening or closing switches without reconfgure. The Dimmer can be set via the setup variables. Over time T_DEBOUNCE the button is debounced. It is set by default to 10ms. The time variable T_RECONFIG decide whether a open or close switch is connected at the Input IN. If the input is longer than that defned T_RECONFIG defned time in a state, this is assumed to rest position. If the start limitation T_ON_MAX is exceeded, it switches the output automatically of. The times and T_DIMM_Start T_DIMM sets the timing of the Dimmers fxed. With the inputs of SET and RST, the output Q can be switched on or of at any time. SET relies on the output OUT through the by VAL predetermined value , RST sets OUT to 0 if the setup RST_OUT variable is set to TRUE. RST also switch DBL to FALSE. SET and RST may be used to connect fre alarm systems or alarm systems. WIth SET all the lights in an emergency case can be centrally enabled or disabled with RST when leaving the building. While switch on and of the last output value of the dimmer remains at the output OUT, only a FALSE at output Q switches the light of, and a TRUE at Q switch the lamp on again. When switching from a short press limits the module the output OUT to at least MIN_ON and maximal MAX_ON. If, for example, the dimmer to 0, the device automatically sets the output OUT to 50 and vice versa, the output OUT gets, if it is higher than MAX_ON, is limited to MAX_ON. These parameters are intended to prevent present after turning a very small value at the output OUT and Q active terms despite no light. By the parameter MIN_ON a minimum value of light is defned when switched on. 53 Version 1.00 Chapter 6. Electrical Engineering Conversely, for example: the light in the bedroom is prevented by MAX_ON to apply full brightness immediately after switch on. If the parameter SOFT_DIMM set to TRUE, the dimming starts at power on with a long button press every time at 0. In addition to the function of the dimmer a double-click on the input IN is decoded to the output DBL for one cycle to TRUE. If the setup variable DBL_TOGGLE is set to TRUE, the output DBL is inverted each time at a double click. The output DBL can be used to switch additional load or events with a double-click. The output DBL can be switched to the input SET and the dimmer can be set to a predefned value VAL using a double-click. OUT is the value of the dimmer and is defned as an I/O variable external. This has the advantage that the value of the dimmer can be changed externally at any time and can be reconstructed even after a power failure. OUT can be defned if desired retentive and persistent. The following table shows the operating status of the dimmer: IN SET RST single 0 0 double 0 0 Q DIR NOT Q OUT<127 - - DBL OUT - LIMIT(MIN_ON,OUT,MAX_ON) TOG PULSE long 0 0 ON NOT DIR - Ramp up or down depending on DIR start at 0 when soft_dimm = TRUE and Q = 0 reverse direction if 0 or 255 is reached - 1 0 ON OUT<127 - VAL - 0 1 OFF UP OFF 0 wenn RST_OUT = TRUE 6.6. F_LAMP Type Function module Input SWITCH: BOOL (dimmer switch input) DIMM: BYTE (input from the dimmer) RST: BOOL (input for resetting the counter) Output LAMP: BYTE (dimmer output) STATUS: BYTE (ESR compliant status output) I/O ONTIME: UDINT (operating time in seconds) ONTIME: UDINT (operating time in seconds) 54 Version 1.00 Chapter 6. Electrical Engineering Setup T_NO_DIMM: UINT (cut of time dimmer in hours) T_Maintenance : UINT (reporting time for lamp replacement in Hours) F_LAMP is an interface for fuorescent lamp. The output LAMP follows the input DIMM and SWITCH. If DIMM is not connected, the default is of 255 is used and the output LAMP passes 0-255 depending on SWITCH. The outputs ONTIME and CYCLES count the operating time of the light bulb in seconds and the switching cycles. Both values are externally stored and can be saved permanent or persistent , more info, see the module ONTIME. A TRUE at the input RST resets both values to 0. The setup variables T_NO_DIMM determines after which length of time a new lamp the dimming may be done. This value, when not otherwise set by the user, defaults to 100 hours. Fluorescent lamps may not use reduced levels of brightness, during the frst 100 hours , otherwise your life is shortened dramatically. By a RST at replace of the lamp module it prevents the dimming in the initial phase. The output state is ESR compatible, and can report operating conditions, but also pass a message to change the bulb. The default time T_MAINTENANCE is, if not modifed by the user, 15000 hours. If T_Maintenance set to 0 so no message is generated for lamp replacement. Status 110 Lamp of 111 Lamp on, no dimming allowed 112 Lamp on, dim allowed 120 Call for lamp replacement The following example shows the use of the module F_LAMP in conjunction with DIMM_I: 55 Version 1.00 Chapter 6. Electrical Engineering 6.7. PULSE_LENGTH Type Function module Input IN: BOOL (input pulse) Output SHORT: BOOL(pulse if IN < T_SHORT) MIDDLE: BOOL (pulse if IN =< T_LONG and IN >= T_SHORT) LONG: BOOL (TRUE if IN > T_SHORT) Setup T_SHORT: TIME (Maximum length for short pulse) T_ LONG : TIME (minimum length for a long pulse) PULSE_LENGTH sets on an input pulse at IN one of the 3 outputs. The output SHORT is for one cycle TRUE if the input pulse is less than T_SHORT. The output MIDDLE will TRUE for one cycle when the input pulse length is between T_SHORT and T_LONG. The output of LONG is set when the input pulse has exceeded T_LONG and remains to TRUE, as the input pulse is set to TRUE. 6.8. PULSE_T Type Function module Input IN: BOOL (input pulse) T1: TIME (minimum time) T2: TIME (maximum time) Output 56 Q: BOOL (output pulse) Version 1.00 Chapter 6. Electrical Engineering PULSE_T generates an output pulse length of T2 when the input IN is less than T1 to TRUE. If the input IN for longer than T1 to TRUE, the output Q follows the input IN and is at the same time with IN set to FALSE. If IN is longer than the time T2 to TRUE, the output is after the time T2 automatically reset to FALSE. A further impulse at IN while the output is TRUE sets the output with the falling edge of IN to FALSE. Is input IN longer than the time T2 set to TRUE, the output Q automatically defaults to FALSE after the time T2 . The following chart shows the input pulse that applies to T1 longer and the output Q follows the input. Then, at input IN a short pulse (less than T1) is generated and the output remains active until a further pulse to IN resets it again. Another short pulse at the input IN sets the output to TRUE, until it will be deleted automatically after the expiry of the time T2. 6.9. SW_RECONFIG Type Function module Input IN: BOOL (push button input) TD: TIME (debounce time for input) TR: TIME (reconfguration) Output Q: BOOL (output) SW_RESetup is an intelligent push button interface, it can debounce the input and automatically detects whether a break contact element or closing contact is connected to the input IN. If at input IN a break contact element is detected, so the output Q is inverted. If a closing contact is connected to the input IN, the module creates for each change of state of 57 Version 1.00 Chapter 6. Electrical Engineering the switch with a pulse with length TR. TD is the bounce time and TR the reconfguration time. If the input IN remains longer than the reconfguration time is, in a state, the output is FALSE, and will thus pass the next pulse at the input to an active high pulse. In the practical installation techniques this may be a great advantage if some switches are somtimes are break contact elements and sometimes connected as closing contact. The following chart illustrates the operation of the module: 6.10. SWITCH_I Type Function module Input SET: BOOL (input for switching the output to 100%) IN: BOOL (control input for buttons) RST: BOOL (entrance to switch of the output) Output Q: BOOL (output) Setup T_DEBOUNCE: TIME (debounce time for buttons) T_RESetup: TIME (reconfguration time) T_ON_MAX: TIME (start limitation) SWITCH_I is an intelligent switch which automatically adjusts to the connected switch or push-button switches. If a switch is connected, the output follows each switching edge of the switch. However, if a push-button switch is connected, SWITCH_I detects whether there is an opener or closer, and then evaluates only the frst edge. The setup variable T_ON_MAX determines after which time the output is switched of automa58 Version 1.00 Chapter 6. Electrical Engineering tically. With the SET and RST inputs the output can be switched at any time to 100% or of. Applications are the message of smoke detectors or alarm systems. The time T_DEBOUNCE serves to debounce the switch and is by default set to 10ms. The time T_RESetup is used to decide whether a close switch or break switch is connected to the input IN. If the input is for more than this time in a state, it is assumed as rest mode. 6.11. SWITCH_X Type Function module Input IN1..6: BOOL (push button inputs) Output Qx: BOOL (switch outputs) Setup T_DEBOUNCE: TIME (debounce time for buttons) SWITCH_X is an interface for up to 6 push-buttons. The individual buttons are debounced with T_DEBOUNCE and switch the respective outputs Q1 to Q6. IN3 to IN6 are directly connected to the outputs when they be operated alone. IN1 and IN2 generate a pulse for one cycle after they are pressed. If one of the inputs IN3 up to N6 is pressed during input IN1 or IN2 is operated , then no output pulse passed to Q1 to Q6, but the corresponding output Q31 to Q62 is activated. Q42, for example, is activated if IN4 is operated while IN2 is operated. Q2 and Q4 are then inactive. SWITCH_X thus allows the inputs IN3 to IN6 to realize a triple occupancy and select it by pressing IN1 or IN2 and a further input. 59 Version 1.00 Chapter 6. Electrical Engineering 6.12. TIMER _ 1 Type Input Function module E: BOOL ( Enable Input) DTI: DATE_TIME (date time input) START: TOD(time of day) DURATION: TIME (duration of the output signal) DAY: BYTE (Selection of the week days) Output Q: BOOL ( switch output) TIMER_1 generates at selectable days a week, an output event Q with a programmable duration (DURATION) and a fxed starting time START. DTI provides the module the local time. START and DURATION sets the time of day and duration of the event. The input DAY determines on which days of week the event is generated. IF DAY is set to 0, thus no event is produced. A DURATION = 0 indicates that the output is only set for one cycle. The resulted output signal can also run past midnight, or it may be longer than a day. The maximum pulse duration, however is 49 days (T#49d). The input DAY is of type BYTE and the bits 0..7 defne the days of the event. Bit 0 corresponds to Sunday, bit 1 Saturday .. Bit 6 corresponds to Monday. If the bits 0..6 in DAY are set, so every day an event is generated, otherwise only for those days for which the corresponding bit is set. The input Default is, if it is not connected, set to 2#0111_1111, and thus is the module is active every day. An additional Enable Input E can unlock the module. This input is TRUE if it is not connected. 6.13. TIMER_2 Type Input function module DT_IN: DATE_TIME (date time input) START_TIME: TOD (start time) DURATION: TIME (duration of the output signal) MODE: BYTE (daily selection) 60 Version 1.00 Chapter 6. Electrical Engineering HOLIDAY: BOOL (holiday signal) Output Q: BOOL (Output) TIMER_2 generates an output event with a programmable duration. DT_IN provides the building block the local time. START_TIME and DURATION specifes the time of day and the duration of the event. The input mode determines how often and on which days the event are produced. HOLIDAY is an input signal indicating whether the current day is a holiday. This signal can be generated by the module HOLIDAY. MODE 61 Q 0 no output is created 1 only on Monday 2 only on Tuesday 3 only on Wednesday 4 only on Thursday 5 only on Friday 6 only on Saturday 7 Only on Sunday 11 every day 12 every 2 days 13 every 3 days 14 every 4 days 15 every 5 days 16 every 6 days 20 Weekdays (Monday to Friday) 21 Saturday and Sunday 22 Working days (weekdays excluding public holidays) 23 Holidays and weekends 24 Only on holidays 25 First day of the month 26 Last day of the month 27 Last day of the year (December 31) Version 1.00 Chapter 6. Electrical Engineering 28 First day of the year (January 1) Example of the use of TIMER_2: The example shows the system routine (in this case for a Wago controller), which reads the internal clock and provides for DATE_TIME for TIMER_2 and HOLIDAY. HOLIDAY provides holiday information on the TIMER_2. TIMER_2 supplies in this example at weekends (Saturday and Sunday) and holidays (mode = 22) an output signal at 12:00 noon for a period of 30 minutes. TIMER_2 produces, limited by the cycle time, the exact DURATION at the output. TIMER_2 notes on which day it produced the last output pulse, thus ensuring that generates only one pulse per day. 6.14. TIMER_EVENT_DECODE Type Input Function EVENT: STRING ( Event string) LANG: INT (language) OUTPUT TIMER_BOOK TIMER_EVENT_DECODE allows the programming of Timer Events using string instead of loading the structure TIMER_EVENT. The events are specifed as follows: <Typ;Kanal; Day , Start, duration, country, Lor> Element Description <> Start and stop characters of the record. Type Type of event (as described in '123', 2#0101, 8#33, 16#FF TIMER_P4) Channel to be programmed channel 62 Formats '123', 2#0101, 8#33, 16#FF Version 1.00 Chapter 6. Day Electrical Engineering Selection number eg Day '123', 2#0101, 8#33, 16#FF, 'Mo' 'MO, DI, DO' Start Start time (daytime) 'TOD#12:00' Duration Duration of the event 'T#1h3m22s' Country And logical link '123', 2#0101, 8#33, 16#FF Lor logical or link '123', 2#0101, 8#33, 16#FF Field Day has, depending on the type of event diferent meanings and can also be specifed with week as a text or a list of the week. The input LANG specifes the used language, 0 = the default language set in the setup , 1 = english, .... more info about languages, see the section data types. 6.15. TIMER_EXT Type Input Function module ENA: BOOL (module enable ) ON: BOOL ( forces the output Q to TRUE) OFF: BOOL (forces the output Q to FALSE) MAN: BOOL (control input when ON = OFF = TRUE) SWITCH: BOOL (push button input) DT_IN: DATETIME (input for date and time of day) SUN_SET: TOD (time of sunset) SUN_RISE: TOD (time of sunrise) HOLIDAY: BOOL (input for holiday module) Setup HOLIDAY: BOOL (input for holiday module) T_SET_START: TIME (Start-before sunset) T_SET_STOP: TIME (of time after sunset) T_DAY_STOP: TOD (of time after daytime) T_RISE_START: TIME (ON time before sunrise) T_DAY_START: TOD (turn-on time of day) T_RISE_STOP: TIME (OFF time after sunrise) ENABLE_SATURDAY: BOOL (active on Saturdays if TRUE) 63 Version 1.00 Chapter 6. Electrical Engineering ENABLE_SUNDAY: BOOL (active on Sundays if TRUE) ENABLE_HOLIDAY: BOOL (active on Holiday if TRUE) Output Q: BOOL (switch output) Status: BYTE (ESR compliant status output) TIMER_EXT is a Timer specifcally for outdoor lighting or other loads are to be turned on at twilight. The output Q is at fxed times of the day ON and OFF, in addition, the output can before twilight turned ON and after twilight turned of automatically. An additional input SWITCH can switch the output, regardless of the respective time of day, on and of. The inputs ENA, ON, OFF and MAN provide a detailed automatic and manual control of the output. If ENA is not connected, the module is still Enabled because its internal Default is TRUE. The following table provides detailed information about the operating conditions of the block. 64 ENA ON OFF MAN SWITCH Timer Q STATUS L - - - - - L 104 H H L - - - H 101 H L H - - - L 102 H H H X - - MAN 103 H L L - - NOT Q 110 H L L - - TOD = T_DAY_START H 111 H L L - - TOD = T_DAY_STOP L 112 H L L - - TOD = SUN_RISE - T_RISE_START H 113 H L L - - TOD = SUN_RISE + T_RISE_STOP L 114 H L L - - TOD = SUN_SET - T_SET_START H 115 H L L - - TOD = SUN_SET + T_SET_STOP L 116 Version 1.00 Chapter 6. Electrical Engineering The setup variables ENABLE_SUNDAY, SATURDAY and HOLIDAY defne whether the block is active on Saturdays, Sundays and public holidays. If the module should not be ON at public holidays, at the input HOLIDAY to the module HOLIDAY must be connected from the library, this module indicates a TRUE if today is a public holiday. The setup variables T_SET_START, T_SET_STOP, T_RISE_START, T_RISE_STOP, T_DAY_START and T_DAY_STOP set the switching times. if one of those variables is T#0s or TOD#00:00 then the switch time is inactive. This means that ie. T_SET_START (switch before sunset) only turns on when it is set to at least 1 second. the module gets ON the output Q, at a time T_DAY_START, and in reach of T_DAY_STOP OFF again when one of the two times ( T_DAY_START or T_DAY_STOP) TOD#0:00 is and the corresponding switch process is not executed. The module switch ON at the time T_RISE_START before sunrise (SUN_RISE), and OFF reaching of T_RISE_STOP after sunrise again. The same is for the times at sunset. 6.16. TIMER_P4 Type Input 65 function module DTIME: DATE_TIME (date time input) Version 1.00 Chapter 6. Electrical Engineering TREF_0: TOD (reference time 0) TREF_1: TOD (reference 1) HOLY: BOOL (holiday input) L0..L3: BOOL (Logic Inputs) OFS: INT (channel ofset) ENQ: BOOL (If ENQ = FALSE all outputs remain FALSE) MAN: BOOL (switch for manual operation) MI: BYTE (channel selection for manual operation) RST: BOOL (Asynchronous Reset) I/O PROG: ARRAY [0..63] OF TIMER_EVENT (program data) Output Q0..Q3: BOOL (switch outputs) STATUS: BYTE ( ESR compliant status output) TIMER_P4 is a universal programmable Timer which has a lot of opportunities. In addition to events at fxed times, also events depending on external hours like sunrise or sunset can be programmed. In addition to the timing programm, all outputs can be linked fexible with logic inputs. Up to 63 independently programmable events are possible, and the user has virtually unlimited possibilities. The programming of the Timers are done via an ARRAY [0..63] OF TIMER_EVENT. It can thereby any number of events per channel and overlapping events can be generated. The data structure TIMER_EVENT contains the following felds: 66 Data field Data Type Description CHANNEL BYTE Channel number Version 1.00 Chapter 6. Electrical Engineering TYPE BYTE Event Type DAY BYTE Day or another number START TOD Start time DURATION TIME Duration of the event LAND BYTE Mask to be logical and LOR BYTE Mask for Logical OR LAST DWORD Internal use The data feld is the CHANNEL specifed for the relevant event channel, if multiple channels are to be switched simultaneously per channel must be programmed in separate events. The TYPE of event determines what type of event is to be programmed, see the overview in the following table. DAY defnes either a bitmask days of the week (Bit7 = MO, bit0 = SO), or the day of the month/year or a defned another number or count depending on the event type. START is the start time (TIMEOFDAY) of the event, with events as a function of an external time START can also defne a time difference. The duration defnes independent of the type of event, how long the event lasts. Was an event is started the timer remembers in the data structure each day, so that each event is run at maximum once per day. If several events per day and channel are to be defned, they can be programmed independently by multiple events. LAND and LOR defne logical masks for additional logical links, a detailed description of the possible state of links is provided below in the text. The Timer has an additional manual input which allows to override outputs manually. If MAN = TRUE is the 4 lowest bits of the input MI are passed to the outputs Q. The input is an enable input and must be set to TRUE for normal operation, if ENQ is set to FALSE, all outputs remain at FALSE. The Module can always be reset by means of the asynchronous input RST, here all running events are deleted. The input OFS is used only when more of the TIMER modules are cascaded, the value of OFS then determines which channel number the frst output of the module has. If OFS is set to 4 for example, so the modules does not response to the corresponding channel number 0..3 but to the channels 4..7. Thus, multiple devices are cascaded in a simple way. The STATUS output is an ESR compliant status output which reports the operating states of the module. STATUS = 100 (The module is disabled , ENQ = FALSE) STATUS = 101 (manual operation, MAN = TRUE) STATUS = 102 (automatic operation) The following example shows two cascaded timers : 67 Version 1.00 Chapter 6. Electrical Engineering Block diagram of the timers : If a programmed event occurs then the corresponding timer of the selected channel is started with the pre-defned time period. The channel output can be linked by logical AND with up to 4 inputs L0..L3, only the inputs are associated, which are defnded in the event mask LAND with a 1 . contains the mask LAND not a 1 (2#00000000) then no input is connected to the output. If the mask LAND contains, for example 2#00001001) then the output signal of the Timer is linked with the logic inputs L0 and L3 by AND. The output in this case is only true if both an event the Timer has started and at the same time L0 and L3 are TRUE. After the AND link the output can be additionally connected to any logic inputs in the same manner using the mask LOR OR. The following events can be programmed: 68 TYP Description E DAY Start Duration 1 daily event - Start time Duration 2 Event on selected days of the week B0..6 Start time Duration 3 Event every N days N Start time Duration 10 Weekly Event Day the Start time Duration of Version 1.00 Chapter 6. Electrical Engineering week 20 monthly event Day of month the Start time Duration 21 last day of the month - Start time Duration 30 annual event Day year the Start time Duration 31 last day of the year - Start time Duration 40 Event to leap days - Start time Duration 41 Event on holidays - Start time Duration 42 on holidays and weekends - Start time Duration 43 Event during the week - Start time Duration 50 External event after time 0,1 Ofset Duration 51 Event before external time 0,1 -Ofset Duration 52 Output to time+set ofset 0,1,2 Ofset 53 Output to time + ofset delete 0,1,2 Ofset 54 output to time - set ofset 0,1,2 Ofset 55 output to time - ofset delete 0,1,2 Ofset of Event Types: 1. daily event at a daily event, only channel number, start time and duration of the event is programmed. The feld DAY has no meaning. 2. Event on selected days of the week at this event the timer is started at selectable day of the week. In feld DAY is here defned by a bit mask at which days during the week days the event has to be started. Monday = bit 6,.... Sunday = bit 0. The event will start only on weekdays when the corresponding bit in feld DAY is TRUE. 3. Event every N days this after a period of N days, the defned event starts. In feld DAY is specifed, after how many days the event starts. N = 3 means that the event will be started every 3 days. N can take this value of 1..255. 10. Weekly Event 69 Version 1.00 Chapter 6. Electrical Engineering here, a event is started on a particular day in the week, the corresponding day is defned in the feld DAY: 1 = Monday ..... 7 = Sunday. 20. monthly event At monthly events in the feld DAY the corresponding day of the month is defned in which the event will take place. DAY = 24 means that the event respectively at 24th of a month starts. 21. End of the month As months have no fxed length, it is also useful to generate an event on the last day of a month. In this mode the DAY has no meaning. 30. annual event At annual events, in the feld DAY the corresponding day of the year is defned, in which the event starts. DAY = 33 means that each event at the 33rd day of the year starts, which corresponds to the 2nd of February. 31. End of the year As years have no fxed length, it is also useful to generate an event on the last day of the year . In this mode the DAY has no meaning. The event is produced on 31. December. 40. Event to leap days This event is only generated on 29. February, which is only in a leap year. DAY here has no meaning. 41. Event on holidays This event is only generated when the input HOLY = TRUE. At this input must be connected the module HOLIDAY from the library. If this mode is not used, the input HOLY remains open. The Field Day has no meaning here. 42. Event on holidays and weekends This event is generated when the input HOLY = TRUE, or a Saturday or Sunday is present. At this input JHOLY must be connected for this purpose the module HOLIDAY from the library. If this mode is not used, the input HOLY remains open. The Field Day has no meaning here. 43. Event during the week This event is generated only during the week days from Monday to Friday. The Field Day has no meaning here. 50. External event after time Here is generated a daily event that depends on an external time. IN feld START here is not the start time itself, but rather set the ofset of the external time. In feld DAY is indicated the external time that is used as a reference. DAY = 0 means TREF_0, and DAY = 1 corresponds TREF_1. An event after external time, for example, is an event 1 hour after sunset. In this case, TREF_1 (DAY must be on 1) passes the time of sunset, and in 70 Version 1.00 Chapter 6. Electrical Engineering the feld Start the time 01:00 (one hour ofset) is specifed. The times for sunrise and sunset can be fed from the module SUN_TIME from the library. 51. Event before external time Here is generated a daily event that depends on an external time. IN feld START here is not the start time itself, but rather set the ofset of the external time. In feld DAY is indicated the external time that is used as a reference. DAY = 0 means TREF_0, and DAY = 1 corresponds TREF_1. An event before external time, for example, is an event 1 before after sunset. In this case, TREF_1 (DAY must be on 1) passes the time of sunset, and in the feld Start the time 01:00 (one hour ofset before TREF_1) is specifed. The times for sunrise and sunset can be fed from the module SUN_TIME from the library. 52 Set output after external time An event of type 52 switches the output on at reaching an external time + START. The external time is TREF1 when DAY = 1 or TREF_0 if DAY = 0. If DAY > 1 the external time is 0. The output remains then to TRUE until it is overwritten with a new event or is deleted by a separate event. 53 Delete output with external ofset An event of type 53 switches the output of at reaching an external time + START. The external time is TREF1 when DAY = 1 or TREF_0 if DAY = 0. Is DAY > 1 is the external time is 0. 54 Set output with negative ofset An event of type 54 switches the output on at reaching an external time START. The external time is TREF1 when DAY = 1 or TREF_0 if DAY = 0. If DAY >1 the external time is 0. The output is then held to TRUE until it is overwritten with a new event or deleted by a separate event. 55 Output with negative ofset An event of type 55 switches the output of when reaching the external time - START. The external time is TREF1 when DAY = 1 or TREF_0 if DAY = 0. Is DAY > 1 is the external time is 0. 71 Version 1.00 Chapter 7. Blind Modules 7. Blind Modules 7.1. Introduction The following modules are designed and harmonized to each other that a modular structure of a shutter controller can be reached. This modular system allows quick and easy setup from simple to complex blind controllers which are aligned to the application. The system can also be expanded at any later time, allowing any expansion of the functions. Applications include all types of blinds, shutters, and all types of shading devices. The modules are designed so they can be easily connected in series and the order of the wiring at the same time determines the priority of the functions. The signals UP and DN for manual operation, and the guidelines for angle and position in the automatic mode (PI and AI) are passed from module to this module, which ensures a simple signal path and a clear structure. A special feature is that the signals UP and DN if both are true simultaneously switch to automatic mode. All modules have the inputs UP and DN with which the manual upd and down command is received and by QU and QD is passed on to the next module. If both inputs UP and DN set to TRUE then the relevant modules switch to automatic mode and evaluate the inputs PI and AI (position and angle) for input from the blind. If both inputs UP and DN set to TRUE then the relevant modules switch to automatic mode and evaluate the inputs AI and PI (position and angle for input from the blind. By order of the modules also the priority of the individual functions are determined and can easily changed by users . Future or custom features can be turned on in this way quickly and easily into the existing modules without having to modify the existing programming. The STATUS output passes ESR compliant messages about the state of the module. When there are no messages available each module passes the input adjacent S_IN status messages on to the STATUS output. Summary of the Blind status messages: 72 STATUS Module Description 111 SECURITY Safe position in case of fre 112 SECURITY Security position at wind 113 SECURITY Safety position at ALARM 114 SECURITY Door contact safety position 115 SECURITY Security position in the rain Version 1.00 Chapter 7. 73 Blind Modules 1 ACTUATOR Error UP and DOWN simultaneously 120 ACTUATOR Up motion 121 ACTUATOR down motion 121 CONTROL Up moving position 122 CONTROL Down moving position 123 CONTROL UP moving angle 124 CONTROL Down moving angle 121 CONTROL_S Up motion 122 CONTROL_S down motion 123 CONTROL_S Auto positioning 127 CONTROL_S Lockout Time 128 CONTROL_S Calibration 129 CONTROL_S Extend mode 130 INPUT Standby 131 INPUT Manual Timeout 132 INPUT Manual Up 133 INPUT Manual Down 134 INPUT SingleClick up 135 INPUT SingleClick Down 136 INPUT Forced position 137 INPUT Double click 1 138 INPUT Double click 2 141 NIGHT Night position active 151 SHADE Active shading 160-175 SCENE active scene 178 SET Set operation 179 SET Restore operation Version 1.00 Chapter 7. Blind Modules 7.2. BLIND_ACTUATOR Type Function module Input UP: BOOL (Input UP) DN: BOOL (input DOWN) S_IN: BYTE (ESR compliant status input) T_UD: TIME (run time up / down) T_ANGLE: TIME (duration of the slat adjustment) Setup T_LOCKOUT: TIME (delay time between change of direction) Output POS: BYTE (position of the shutter, 0 = bottom, 255 = top) ANG: BYTE (angle of the fn, 0 = vertical, 255 = horiz.) QU: BOOL (motor up signal) QD: BOOL (motor down signal) STATUS: BYTE (ESR compliant status output) BLIND_ACTUATOR is a blind / shutter actuator to simulate the position and the angle of the slats. The inputs UP and DN are mutually interlocked, so that QU and QD can never be active at the same time. With time T_LOCKOUT the minimum pause is set between a change of direction. Additionally BLIND_ACTUATOR provides two outputs with the type Byte which simulate the position of fn and the position of the shutter. For accurate simulation, adjust the setup times and T_UD T_ANGLE accordingly. T_UD sets the time to drive from "closed" needed to "open" (up position). T_ANGLE specifes the time for adjusting the fn from "vertical" to horizontal. The actuator ensures that frst the fn be placed horizontally and then starting the "open" action of the shutter. Conversely, when "close" the shutter the fn set vertically before the down movement begins. POS = 0 means blinds shut down, and POS means = 255 blind is up. Intermediate positions are in accordance with intermediate values 0 ..255 The angle of the blades is issued by the output ANG, with mean ANG = 0 is invertical position and ANG = 255 is the horizontal position, values 0-255 indicate the appropriate an74 Version 1.00 Chapter 7. Blind Modules gle. By outputs POS and ANG the information on the position of the shutter control is provided. ANG and POS may only provide useful results if the times T_UD and T_ANGLE are precisely adapted to the corresponding blind. The actuator may, if T_ANGLE is set to T#0s, be used for all types of roller shutters. The inputs T_UD, T_ANGLE T_LOCKOUT and have the following default values: T_UD = T#10S T_ANGLE = T#3S T_LOCKOUT = T#100MS The input and output S_IN STATUS are ESR compliant outputs and inputs. In Input S_IN the upstream functions report their status to the module, this status will be forwarded to the output of STATUS, and own status messages also issued on STATUS. If a status message is present at the input it will overwrite the own status messages, an error will be put out with highest priority. STATUS Meaning 0 no message 1 Error, UP and DN active simultaneously 101 Manual UP 102 Manual DN NNN forwarded message The following graphic shows the internal structure and function of the module: 7.3. BLIND_CONTROL Type 75 Function module Version 1.00 Chapter 7. Input Blind Modules UP: BOOL (Input UP) DN: BOOL (input DOWN) S_IN: BYTE (ESR compliant status input) PI : BYTE (default of position) AI : BYTE (default of fn angle) T_UD : TIME (time to move up 0 ..255) T_ANGLE : TIME (time to move fap from von 0 ..255) 255 Setup SENS : BYTE (resolution of controll module) T_LOCKOUT : TIME (lockout time at direction reverse of motors) Output POS : BYTE (simulated shutter position) ANG : BYTE (simulated fn angle) MU: BOOL (motor up signal) MD: BOOL (Motor down Signal) STATUS: BYTE (ESR compliant status output) BLIND_CONTROL controls the shutter and the fn angle according to settings in PI and AI if UP and DN is both TRUE (automatik modue). POS und ANG are herein the values of the shutter. At this outputs the simulated position and angle of the shutter are bypassed. BLIND_CONTROL switch the outputs MU or MD to TRUE in a corresponding order until the values in POS and ANG correspond to default of PI and AI. A internal sequencer controls that while shutter moves up and down the fn angle is adjusted before the up and down movement happens. So when the shutter moves up or down, the fn angle is adjusted and after the movement it restores it's angle. The input SNES defnes at which diference the control module is active and adjusts the output in a way to correspond to the inputs PI and AI. IF SENS = 0 every diference is controlled, if SENS = 5 (default) after a diference of 5 between the setup values and the actual values controlling is done. If UP and DN is not TRUE, BLIND_CONTROL leaves the automatic mode and the outputs QU and QD are controled by manual mode of UP and DN. BLIND_CONTROL does not need BLIND_ACTUATOR to control a shutter because BLIND_ACTUATOR is integrated in BLIND_CONTROL already. If no au76 Version 1.00 Chapter 7. Blind Modules tomatic mode for a shutter is needed, BLIND_ACTUATOR only is recommended. Use of BLIND_CONTROL must be carefully and must set the cycle time for the module smaller than T_ANGLE / 512 * SENS. With a doubleclick to the SENS symbol the setup values can be adjusted (default 5). If the cycle time is to long, the shutter moves up and down in a not periodically manner. If a smaller cycle time is not possible, the SENS value can be increased. The graph shows the shutter geometry. The table shows the working states of the module. UP DN PI AI MU MD L L - - L L no action H L - - H L shutter moves up L H - - L H shutter moves down H H P A X X Position P and angle A are driven automatically. The input and output S_IN STATUS are ESR compliant outputs and inputs. In Input S_IN the upstream functions report their status to the module, this status will be forwarded to the output of STATUS, and own status messages also issued on STATUS. 77 Version 1.00 Chapter 7. Blind Modules STATUS Meaning 0 no message 101 manually up 102 manually down 121 position up 122 position down 123 fn setting horizontally 124 fn setting vertically NNN forwarded messages 7.4. BLIND_CONTROL_S Type Function module Input UP: BOOL (Input UP) DN: BOOL (input DOWN) S_IN: BYTE (ESR compliant status input) PI : BYTE (default of position) T_UP: TIME (duration of the blinds upwards) T_DN: TIME (Duration of the blinds downwards) RU: BOOL (release up) RD: BOOL (release down) Setup T_LOCKOUT : TIME (lockout time at direction reverse of motors) T_EXT: TIME (extension time to stop) EXT_TRIG: BYTE ( Trigger for extension time) R_POS_TOP: BYTE (Maximum position when RD = TRUE) R_POS_BOT: BYTE (minimum position if RU = TRUE) Output POS: BYTE (Simulated position) MU: BOOL (motor up signal) MD: BOOL (Motor down Signal) STATUS: BYTE (ESR compliant status output) 78 Version 1.00 Chapter 7. Blind Modules BLIND_CONTROL_S manages and controls the position of blinds. The outputs MU and MD control the up and down direction of the motors. The time T_LOCKOUT is the waiting time for a change of direction between MU and MD and the times T_UP and T_DN determine how long the engine need for a full movement downwards or upwards. As the run time of the engine can vary, on reaching a fnal position (Above or below) the corresponding motor is in addition to the time T_EXT controlled to ensure that the fnal position is attained, which provides a continuous calibration of the system. For the frst start and after a power failure, a calibration run is done automatically upwards. The variable EXT_TRIG indicates from what distance from the fnal value the run time will be extended. In automatic mode the set ting R_POS_TOP limits the maximum position of the blinds if RD = TRUE. For example the blind remain at 240 if RD = TRUE and R_POS_TOP = 240, which may prevent freezing in winter in the up position. Similarly, R_POS_BOT and RU = TRUE are for the lowest possible position in charge, which can place during the summer for forced ventilation. The output of POS is the simulated position of the blinds, 0 = down and 255 = up. S_IN and STATUS are the ESR compatible status inputs and outputs. MU MD POS is regulated to PI auto aut o 102 Manual operation down L H L 101 Manual mode up H L L L - Manual Timeout L L - - 107 Lockout Time L L - - 108 Auto calibration H L - - 109 Time extension X X UP DN STATUS H H 103 L H H The module is interconnected with other components of the shutter control: 79 Version 1.00 Chapter 7. Blind Modules BLIND_CONTROL_S is specially designed for the control of blinds and has in contrast to shutters no angle, so the device also has no input AI and no output ANG. BLIND_CONTROL_S can be connected of course with the other BLIND components of the library. The module supports automatic calibration, which can cause, after a power failure, to move up all blinds, which is undesired some times in your absence. Therefore, in case of your absence the desired position of the blinds should be given to the input PI. The blinds move to up position for calibration, and then automatically move into the desired position. The automatic calibration however can be prevented if both inputs UP and DN are FALSE. 7.5. BLIND_INPUT Type Function module Input POS: BYTE (return of the blind position) ANG: BYTE (return of the slat angle) S1: BOOL (Input UP) S2: BOOL (input DOWN) IN: BOOL (Controlled operations if TRUE) PI: BYTE (position if IN = TRUE) AI: BYTE (angle if IN = TRUE) Setup SINGLE_SWITCH: BOOL (TRUE for single button operation) CLICK_EN: BOOL ( TRUE for single-click mode ) CLICK_TIME: TIME ( Timeout for K lick Detection) MAX_RUNTIME: TIME ( Timeout for one movement) MANUAL_TIMEOUT: TIME ( Timeout of manual operation) DEBOUNCE_TIME: TIME (debounce time for the inputs S) DBL_CLK1: BOOL (move to double click position if TRUE) DBL_POS1: BYTE (position at S1 double-click) 80 Version 1.00 Chapter 7. Blind Modules DBL_ANG1: BYTE (angle at S1 double-click) DBL_CLK2 away: BOOL (move to double click position if TRUE) DBL_POS2: BYTE: = 255 (position at S2 double click) DBL_ANG2: BYTE: = 255 (angle at S2 double click) D1_TOGGLE: BOOL: = TRUE (Toggle mode for D1) D2_TOGGLE: BOOL: = TRUE (Toggle mode for D2) MASTER_MODE: BOOL (enable the master mode if TRUE) Output QU: BOOL (motor up signal) QD: BOOL (motor down signal) STATUS: BYTE (ESR compliant status output) PO: BYTE (output position) AO: BYTE (output angular position) D1: BOOL (command output for double click function 1) D2: BOOL (command output for double click function 2) BLIND_INPUT serves as a key interface for operating blinds. The module supports three modes, manual, automatic and controlled operation. if IN = FALSE (manual mode), the inputs S1 and S2 are used to control the out puts of QU and QD. If the Setup Variable SINGLE_SWITCH = TRUE, then the input S2 is ignored and the entire control is on the S1 switch. S1 will switch alternately QU and QD so as followed by pressing the button S1 change between up and down motion in succession. The internal default is FALSE (2 button confguration). The setup variable MANUAL_TIMEOUT defned rest period after which (time with no signal at S1 or S2), the device automatically switches to automatic mode. If this value is not specifed then the internal default value of 1 hour used. When the input IN = TRUE, the outputs of QU and QD goes to automatic (both are set TRUE), and switched the inputs PI and AI to the outputs PO and AO. IN can be pulsed to take on the values in short, the module controls these values for the time MAX_RUNTIME and then switches back to automatic mode. As long as IN = TRUE the automatic mode is pushed to the values of AI and PI. The inputs POS and ANG are the return receipts for the current position of the shutter. These values are provided by the module BLIND_CONTROL. With 81 Version 1.00 Chapter 7. Blind Modules the variable SETUP CLICK_MODE a click operation is set, a short press starts on the direction up for S1 and down for S2 and a second short press stops the appropriate direction or reverses the direction. This setting make sense for blinds with a long run time, or to move with a button press to one end. if the key is pressed longer as the setup time CLICK_TIME so the CLICK mode will be leaved and the shutter moves as long as the button is held down in manual mode. If a key press is shorter than CLICK_TIME, the blinds moves further until a further click stops the drive or a fnal position is achieved. The default value is 500 milliseconds for CLICK_TIME and the default for CLICK_MODE is TRUE. If both variables CLICK_MODE Setup and SINGLE_SWITCH are TRUE at the same time, a button operation with only one button on S1 is possible. With the time set of MAX_RUNTIME the run time is limited, which ist started by a simple one Click started but not terminated with another Click . The value of MAX_ RUNTIME defaults to T#60s and should be as long as the blind safely reach the end position from any position. Two outputs D1 and D2 can be used to evaluate a double-click on S1 or S2, if D?_Toggle = TRUE a double-clicking switch an appropriate output and a further double-click again of, if D?_Toggle = FALSE so with each double-click a pulse is generated at the corresponding output. After a manual operation command is the module is for the time MANUAL_TIMEOUT in the mode "Manual Standby" (STATUS = 131), the manually hit position is maintained so well for this time and the automatic functions of all downstream components are suppressed. By a long (longer than CLICK_TIME) pressure on both buttons, the "Manual standby" mode is terminated prematurely and returned to automatic mode. The following table shows the operating states of the module: POS S1 S2 IN ANG 82 PI QU QD AI PO D1 D2 AO X L L L - H H X*5 - - Standy / automatic operation - - - H Y H H Y - - controlled operation, PI and AI are served X H L L - H L X - - Manual mode up X L H L - L H X - - Manual operation down X H H L - H H X - - Manual Mode Exit prematurely X L L L - L L X - - Manual operation standby until timeout expires X *4 L L - H L X - - CLICK_EN = TRUE X L *4 L - L H X - - CLICK_EN = TRUE - *2 L L - H H - / D1 - D1_TOGGLE = TRUE - *2 L L - H H - *3 - D1_TOGGLE = FALSE Version 1.00 Chapter 7. Blind Modules - L *2 L - H H - - / D2 D2_TOGGLE = TRUE - L *2 L - H H - - *3 D2_TOGGLE = FALSE *1 in transition in the automatic mode, the outputs PO and AO are set to the last value of POS and AN. *2 Double click *3 Output pulse for one cycle *4 Single click, is blind moves in one direction for MAX_RUNTIME *5 angle and position are not transferred if the variable MASTER_MODE = TRUE. The output of STATUS is compatible and ESR are status messages about state changes. STATUS Meaning 130 Standby mode 131 Manual Standby 132 manually up 133 manually down 134 Single-clicking up 135 single-click down 136 IN = TRUE forces values 137 Double-clicking position 1 is hit 138 Double-click position 2 is hit 139 Force Automatic Mode The following example shows the structure of a blind controller with the module BLIND_INPUT and BLIND_CONTROL: 83 Version 1.00 Chapter 7. Blind Modules The use of other BLIND modules is optional and is used to extend the func tionality. BLIND_INPUT and BLIND_CONTROL gives a full blind control. BLIND_INPUT can decode a double click at the two inputs S1 and S2 and turn the two outputs D1 and D2. These outputs can be used downstream function blocks or to control any other event. Master Mode: With the variable MASTER_MODE = TRUE, the master mode is turned on. The master mode prevents that the angle ANG and position POS will be transfered to the outputs AO and PO in Standby Mode 130. Blind modules which are between the input and Control modules can switch the position of the shutter and the shutter remains after the change in the new position (if MASTER_MODE = FALSE). However, if the variable MASTER_MODE = TRUE ensures that after an automatic stop by downstream modules the Blind Input resets again to the old position. If MASTER_MODE = FALSE in the state 130 the POS and ANG is transmitted in on the outputs of PO and AO. Is MASTER_MODE = TRUE the last valid value remains at the STATUS 130 on the outputs PO and AO and the inputs of POS and ANG are not transferred. The module BLIND_INPUT thus retains the last valid BLIND_INPUT position. 7.6. BLIND_NIGHT Type Function module Input UP: BOOL (Input UP) DN: BOOL (input DOWN) S_IN: BYTE (ESR compliant status input) PI: BYTE (input value of the blind position in automatic mode) AI: BYTE (input value of the blade angle in automatic mode) 84 Version 1.00 Chapter 7. Blind Modules E_NIGHT: BOOL (Automatic night service on) E_DAY: BOOL (automatic day service onπ) Setup SUNRISE_OFFSET: INT (ofset from sunrise in minutes) SUNSET_OFFSET: INT (ofset by the sunset in minutes) T1: TOD (earliest point in time for night-shade) T2: TOD (the latest point in time for night-shade) T3: TOD (earliest point in time for day position) T4: TOD (latest point in time for day position) NIGHT_POSITION: BYTE (position for night service) NIGHT_ANGLE: BYTE (angle for night service) DAY_POSITION: BYTE (position for day position) DAY_ANGLE: BYTE (angle for day position) RESTORE_TIME: TIME (time to hit the day position) IN/OUT CX: CALENDAR (data structure for local time) Output QU: BOOL (motor up signal) QD: BOOL (motor down signal) STATUS: BYTE (ESR compliant status output) PO: BYTE (output value of the blind in automatic mode) AO: BYTE (output value of the blade angle in automatic mode) NIGHT: BOOL (TRUE between sunset and sunrise) BLIND_NIGHT serves to close the shutters or blinds at night. The module automatically closes the blind after sunset with a delay of SUNSET_OFFSET and the blind goes up after sunrise with a delay of SUNRISE_OFFSET again. 85 Version 1.00 Chapter 7. Blind Modules The opening and closing can be unlocked separately with E_NIGHT for close and E_DAY for open. If, for example E_NIGHT set to TRUE and E_DAY not, so in the evening at dusk the blinds shuts down, but it must be opened the next morning manually. If E_NIGHT and E_DAY are not connected so both set internally to TRUE. To identify the corresponding periods, the module requires an external data structure of type CALENDAR. UP, DN and S_IN the inputs from other BLIND modules and are passed in the day mode to the outputs QU, QD and STATUS. The signals PI, AI and PO, AO pass the values for the position and angle of the blind to the following modules. In the night mode at the outputs of PO and AO the values for night mode are passed, any manual operation deletes the automatic night mode. If E_DAY = TRUE, at the end of the night the defned day mode with DAY_POSITION and DAY_ANGLE is restored. The time RESTORE_TIME is the maximum time to reach the day position. The input and output S_IN STATUS are ESR compliant outputs and inputs. In Input S_IN the upstream functions report their status to the module, this status will be forwarded to the output of STATUS, and own status messages also issued on STATUS. STATUS Meaning 0 no message 141 Night mode 142 day position will be reached NNN forwarded messages The following graphic shows the interconnection with other modules of BLIND_NIGHT for blind control: BLIND_NIGHT Timing Diagram 86 Version 1.00 Chapter 7. Blind Modules The timing diagram shows a course of a day. The times T1 and T2 defne the allowed range for the beginning of the night shade, T3 and T4 defne the appropriate area for the restoration of the day position. The day and night position is predetermined by the setup values DAY_POSITION, DAY_ANGLE, NIGHT_POSITION and NIGHT_ANGLE. Using two release inputs E_DAY and E_NIGHT, the night shade and the days position are unlocked separately. Thus, for example if E_NIGHT = FALSE and TRUE = E_DAY the module can be used in the morning to bring the blinds in the specifed days position. 7.7. BLIND_SCENE Type Function module Input UP: BOOL (Input UP) DN: BOOL (input DOWN) S_IN: BYTE (ESR compliant status input) PI: BYTE (input value of the blind position in automatic mode) AI: BYTE (input value of the blade angle in automatic mode) ENABLE: BOOL (enable input for scenes) SWRITE: BOOL (write input scenes) SCENE: BYTE (number of the scene) Output QU: BOOL (motor up signal) QD: BOOL (motor down signal) STATUS: BYTE (ESR compliant status output) PO: BYTE (output value of the blind in automatic mode) 87 Version 1.00 Chapter 7. Blind Modules [fuzzy] AO: BYTE (output value of the blade angle in automatic mode) BLIND_SCENE stores up to 16 scenes consisting of relevant current blind position and angle, and can restore these scenes during retrieval. Every scene can be active or inactive, depending on whether saving the scene the input ENABLE was TRUE or not (ENABLE = TRUE means active). A scene is retrieved by the number of the scene (0 .. 15) is applied at the input SCENE and simultaneously ENABLE is set to TRUE. A scene can only be accessed if both the inputs UP and DN are the same TRUE (automatic mode). This ensures that an active scene always overridden by the manual mode of operation is. The following table illustrates the operation of BLIND_SCENE: UP DN ENABLE SWRITE SCENE QU QD PO AO 1 1 0 0 - 1 1 PI AI no scene - - 1 1 y - - - - write scene number y - - 0 1 y - - - - disable scene number y 1 1 1 0 y 1 1 - - recall scene number y The input S_IN and output STATUS are ESR compliant inputs and outputs, through input S_IN upstream modules report their status to the module, this status will be forwarded to the output of STATUS, and own status messages issued also on STATUS. 88 STATUS Meaning 160 .. 175 scenes 0..15 active 176 Scene written Version 1.00 Chapter 7. Blind Modules NNN forwarded messages The following graphic shows the application of BLIND_SCENE with other modules to control a blind: 7.8. BLIND_SECURITY Type Function module Input UP: BOOL (Input UP) DN: BOOL (input DOWN) S_IN: BYTE (ESR compliant status input) PI: BYTE (blind position in automatic mode) AI: BYTE (slat angle in automatic mode) FIRE: BOOL (input for fre alarm) WIND: BOOL (input for wind alarm) ALARM: BOOL (input for intrusion detection) DOOR: BOOL (input for door contact) RAIN: BOOL (input for rain sensor) Setup ALARM_UP: BOOL (default direction at ALARM Default = Up) WIND_UP: BOOL (default direction at wind, Default = Up) RAIN_UP: BOOL (default direction at rain, Default = Down) Output QU: BOOL (motor up signal) QD: BOOL (motor down signal) STATUS: BYTE (ESR compliant status output) 89 Version 1.00 Chapter 7. Blind Modules PO: BYTE (output value of the blind in automatic mode) AO: BYTE (output value of the blade angle in automatic mode) BLIND_SECURITY makes sure the blinds drive either up or down when certain events occur. The inputs UP and DN control a downstream module BLIND_ACTUATOR over the outputs of QU and QD. With the inputs FIRE, WIND, RAIN ALARM the inputs UP and DN are overwritten and the blinds drive either completely up or completely down. This FIRE has the highest priority followed by WIND, Alarm and with the lowest priority RAIN. Rain can be overridden as the only one by manual inputs UP and DN. Therefore, if the user should decide to remain open the blind despite the rain, he must interrupt the rain mode only by a short press of the UP or DN. FIRE drives the shutter to the top while RAIN, Wind and Alarm are confgurable for up or down. ALARM is confgured using the setup variables ALARM_UP for both high and down drive, the setup variable WIND_UP specifes whether to run in Wind up or down. The variable RAIN_UP determine what position will be approached at Rain. The default values are UPfor Alarm, UP for Wind and DNfor Rain. The setup variables can be changed by double-clicking the icon at any time. The input and output S_IN STATUS are ESR compliant outputs and inputs. In Input S_IN the upstream functions report their status to the module, this status will be forwarded to the output of STATUS, and own status messages also issued on STATUS. 90 STATUS Meaning 0 no message 111 Fire 112 Wind 113 Burglar alarm 114 Door alarm Version 1.00 Chapter 7. Blind Modules 115 Rain NNN forwarded messages The following graphic shows the application of BLIND_SECURITY with BLIND_ACTUATOR for controlling a blind: BLIND_SECURITY must necessarily used directly on BLIND_CONTROL. If other modules are installed between BLIND_SECURITY and BLIND_CONTROL the security functions can not be guaranteed. 7.9. BLIND_SET Type Function module Input UP: BOOL (Input UP) DN: BOOL (input DOWN) S_IN: BYTE (ESR compliant status input) PI: BYTE (blind position in automatic mode) AI: BYTE (slat angle in automatic mode) IN: BOOL (input for fre alarm) PX: BYTE (input for wind alarm) AX: BYTE (input for intrusion detection) Setup OVERRIDE_MANUAL: TRUE) BOOL (allows manual Override if RESTORE_POSITION: BOOL (IF TRUE restore old position) RESTORE_TIME: TIME (duration for the restore of last position) Default = T#60s) 91 Version 1.00 Chapter 7. Blind Modules Output QU: BOOL (motor up signal) QD: BOOL (motor down signal) STATUS: BYTE (ESR compliant status output) PO: BYTE (start value of the blind) AO: BYTE (start value of the slat angle) BLIND_SET can be used anywhere in a BLIND application to accelerate a defned position (PX, AX). Using the setup variable OVERRIDE_MANUAL defnes if the module may override a manual operation. If the variable RESTORE_POSITION is set to TRUE, the module remembers the last position and drive to this position automatically after a forced operation. The variable RESTORE_TIME determines how long the module remains active to restore the last Position again. If not set RESTORE_POSITION the forced state remains when switch back in the automatic mode. State table of BLIND_SET: UP DN PI IN QU QD STATUS AX AI 92 AX PO MANUAL_ AO OVERRIDE 1 1 X 0 - 1 1 S_IN X - Standby 1 1 - 1 Y 1 1 178 Y - Forced position - - - 1 Y 1 1 178 Y 1 Forced position - - - - - 1 1 179 Z - Restoreoldposition 0 1 X - - 0 1 S_IN X - Manual operation 1 0 X - - 1 0 S_IN X - Manual operation 0 0 X - - 0 0 S_IN X - Manual operation Version 1.00 Chapter 7. Blind Modules 7.10. BLIND_SHADE Type Function module Input UP: BOOL (Input UP) DN: BOOL (input DOWN) S_IN: BYTE (ESR compliant status input) PI: BYTE (blind position in automatic mode) AI: BYTE (slat angle in automatic mode) SUN: BOOL (input signal from the solar sensor) I/O CX: CALENDAR (current time and calendar data) Setup SUNRISE_OFFSET: TIME (delay at sunrise) SUNSET_PRESET: TIME (delay at sunset) DIRECTION: REAL (facade orientation, 180 ° = south facade) ANGLE_OFFSET: REAL (Horizontal Aperture Shading) SLAT_WIDTH: REAL (width of the slats in mm) SLAT_SPACING: REAL (distance of the slats in mm) SHADE_DELAY: TIME (delay time of shading) SHADE_POS: BYTE (position for shading) Output QU: BOOL (motor up signal) QD: BOOL (motor down signal) STATUS: BYTE (ESR compliant status output) PO: BYTE (blind position in automatic mode) AO: BYTE (slat angle in automatic mode) BLIND_SHADE calculate the appropriate angle of the slats from the current position of the sun to guarantee an optimum shading. The slats are tracked to the sun, th ensure over the course of the day always shading. 93 Version 1.00 Chapter 7. Blind Modules With the input ENABLE the function is activated when UP and DN (automatic mode) are active. The module evaluate the INPUT SUN, which displays sunshine when TRUE. If SUN or ENABLE gets FALSE then the device switches of automatically. SUNRISE_OFFSET defne after which time lag after sunrise, the shading is active. SUNSET_PRESET determines a what time before sunset the shading is stopped. The shading is active if SUN = TRUE, ENABLE = TRUE, UP = TRUE, DN = TRUE, and the horizontal sun angle is within the range DIRECTION ANGLE_OFFSET and DIRECTION + ANGLE_OFFSET, and the day time is within the area defned by SUNRISE, SUNRISE_OFFSET, SUNSET SUNSET_PRESET. DIRECTION specifes the orientation of the facade, 180° means façade is south, 90° in the east and 270° in the west. With the setup variable SHADE_DELAY is determined how long after SUN is FALSE the shading remains active. The default value is 60 seconds. SHADE_DELAY prevents the case of constantly running up and down while partial cloud cover the blind. When using BLIND_SHADE make sure that the cycle time for the module is smaller as T_ANGLE / 512 * SENS. SENS is here the SENS value of the BLIND_CONTROLLERS. If the cycle time is too large, the blind will start irregular driving. The setup variable BLIND_POS specifes how far the blind can drive down when shadowing. The following graphic describes the geometry of blind: 94 Version 1.00 Chapter 7. Blind Modules The following chart shows an east to south-facing facade with DIRECTION = 135° and ANGLE_OFFSET = 65°: The shading function calculates the angle of slats so that the slats only close as far as the sun is shaded, but still as much light as possible enters the room. With the values DIRECTION and ANGLE_OFFSET the horizontal angle of the sun which requires a shading is calculated. Depending on the thickness of the wall and the width of the window the ANGLE_OFFSET can be set so that unnecessary shading is avoided. By DIRECTION of the direction of the facade is specifed. Using the dimensions of the slats, width and distance in millimeters (SLAT_WIDTH and SLAT_SPACING) the module calcuates how far the slats should be tilted to avoid the sun. The target is to tilt the slats as far as absolutely necessary in order to guarantee optimal lighting conditions. To not infuence the mood and light conditions at sunrise and sunset, an OFFSET of the sunrise and a PRESET before the sunset can be adjusted. With an ofset of 30 minutes and a preset of 60 minutes, for example, the shading started 30 minutes after sunrise and already fnished 60 minutes before sunset. The input SUN of the module is to connect a solar intensity sensor or any suitable sensor which interrupts the function if there is no solar radiation. The following graphic illustrates the shading: The input and output S_IN STATUS are ESR compliant outputs and inputs. In Input S_IN the upstream functions report their status to the module, this status will be forwarded to the output of STATUS, and own status messages also issued on STATUS. BLIND_SHADE report on the output STATUS the STATUS 151 when the shade is active. The following example shows the application of BLIND_SHADE within a blind control: 95 Version 1.00 Chapter 7. Blind Modules 7.11. BLIND_SHADE_S Type Function module Input UP: BOOL (Input UP) DN: BOOL (input DOWN) S_IN: BYTE (ESR compliant status input) PI : BYTE (default of position) ENABLE: BOOL (shading enabled) SUN: BOOL (input signal from the solar sensor) HORZ1: REAL (horizontal sun angle Shading start) [100.0] HORZ2: REAL (horizontal sun angle Shading end) [260.0] VERT: REAL (vertical shading angle) [90.0] ALERT: BOOL (forced opening of the blinds) [FALSE] I/O CX: CALENDAR (current time and calendar data) Setup SUNRISE_OFFSET: TIME (Delay at sunrise) [T#1h] SUNSET_PRESET: TIME (Delay at sunset) [T#1h] SHADE_DELAY: TIME (Delay of shading) [T#60s] SHADE_POS: BYTE (maximum position for shading) Output QU: BOOL (motor up signal) QD: BOOL (motor down signal) STATUS: BYTE (ESR compliant status output) PO: BYTE (blind position in automatic mode) 96 Version 1.00 Chapter 7. Blind Modules BLIND_SHADE_S is a much simpler function of BLIND_SHADE specifcally for use with roller blind. Here no slat angle for shading must be calculated, but simply ensure that when the sun shines the blind closes far enough. In the inactive state of the module the inputs UP, DN, and PI S_IN passed unchanged through to the outputs QU, QD, PO and STATUS. The module is activated, if UP = TRUE, DN = TRUE, ENABLE = TRUE and SUN (for at least SHADE_DELAY) = TRUE. If these conditions are met, the module checks whether the current horizontal sun angle is in the range between HORZ1 and HORZ2 and the vertical sun angle is lower than VERT. Is now also the current time between sunrise + SUNRISE_OFFSET and sunset - SUNSET_PRESET, then the module moves in the STATUS 151 (shading) and is ensuring that the value issued at output PO, not greater value than SHADE_POS (PO is then the minimum of PI and SHADE_POS). For the angle HORZ1 and HORZ2 is valid: 90° = East, 180° = South, 270° = West. SHADE_DELAY prevents a permanent up and down move when partly cloud cover the blinds. With the input ALERT for example, can be achieved (in a simple manner) that the roller blind goes up when the door opens. The ALERT input has the highest priority in the module, forces STATUS = 152 independent of the inputs and sets QU = TRUE, FALSE = QD, drives therefore manually UP. Within a blind control the BLIND_SHADE are used as follows: 97 Version 1.00 Chapter 7. Blind Modules index of modules ACTUATOR_2P............................................ 12 ACTUATOR_3P............................................ 13 ACTUATOR_A.............................................. 15 ACTUATOR_COIL.........................................16 ACTUATOR_PUMP.......................................16 ACTUATOR_UD...........................................17 AIR_DENSITY.............................................. 22 AIR_ENTHALPY...........................................22 AUTORUN................................................... 19 BLIND_ACTUATOR......................................74 BLIND_CONTROL........................................ 75 BLIND_CONTROL_S....................................78 BLIND_INPUT.............................................. 80 BLIND_NIGHT.............................................84 BLIND_SCENE............................................. 87 BLIND_SECURITY........................................ 89 BLIND_SET.................................................91 BLIND_SHADE............................................93 BLIND_SHADE_S......................................... 96 BOILER....................................................... 23 BUILDING_VERSION....................................11 BURNER.....................................................25 CLICK......................................................... 47 CLICK_MODE..............................................49 DEBOUNCE................................................. 49 DEW_CON..................................................29 DEW_RH..................................................... 29 DEW_TEMP................................................. 31 DIMM_2...................................................... 50 98 DIMM_I....................................................... 52 F_LAMP.......................................................54 HEAT _TEMP...............................................33 HEAT_INDEX............................................... 32 HEAT_METER.............................................. 32 LEGIONELLA............................................... 35 PULSE_LENGTH..........................................56 PULSE_T..................................................... 56 SDD............................................................ 38 SDD_NH3...................................................39 SDT_NH3.................................................... 39 SW_RECONFIG............................................57 SWITCH_I.................................................... 58 SWITCH_X..................................................59 T_AVG24....................................................39 TANK_LEVEL............................................... 41 TANK_VOL1................................................42 TANK_VOL2................................................42 TEMP_EXT..................................................43 TIMER _ 1................................................... 60 TIMER_2..................................................... 60 TIMER_EVENT_DECODE.............................. 62 TIMER_EXT................................................. 63 TIMER_P4...................................................65 WATER_CP.................................................. 45 WATER_DENSITY.........................................45 WATER_ENTHALPY...................................... 46 WCT........................................................... 46 Version 1.00