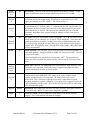
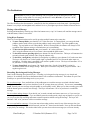
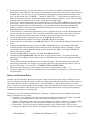
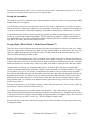
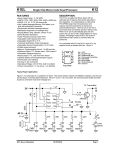
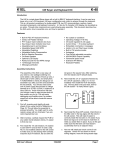
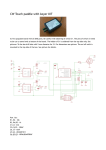
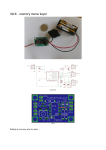
1
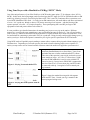
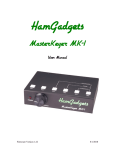
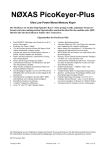
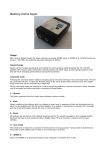
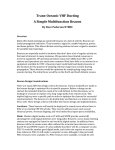
PicoKeyer Setup Menu Commands Long Version Short Version SPEED (Default: 13 WPM) S QSO NUM (Default: 1) Q RANGE L (Default: 5 WPM) RL RANGE H (Default: 30 WPM) RH CUT NUM X QSO Number: The keyer will send the current QSO number. You can use the ▲ and ▼ buttons to set the QSO number anywhere from 1 to 65535. To reset the QSO number to 1, simply press both buttons at the same time. Range High: This sets the high end of the speed control pot range. It is set the same way as the stored speed and low range setting. Cut numbers: “Cut” numbers are often used in contests to send contact serial numbers and signal reports. The most commonly used cut numbers are 0 and 9. For this item, button 2 will toggle the zero setting, and button 3 will toggle the nine setting. You can select no cut numbers (Ø 9); cut zeros (T 9); cut nines (Ø N); or both (T N). Note that this only affects the way QSO numbers are sent. Other numbers in stored messages, or numbers sent by hand, are not affected. The default setting is no cut numbers. L Auto letter spacing: The keyer will announce the current setting. Automatic letter spacing takes effect for messages sent from memory as well as code sent manually with the paddle. 0 turns automatic letter spacing off. In this mode you control the spacing between letters. This is the default setting; it is the same way most keyers operate and most operators are accustomed to. 1 turns on automatic letter spacing. A letter space is automatically inserted if the keyer detects no input from either paddle at the end of the space after a dot or dash. Settings from 2 to 9 will turn on automatic letter spacing with longer delays. For example, selecting 2 will insert one extra “dot” length spacing between characters. Selecting 3 will insert an extra 2 “dot” lengths, and so on. Note that auto letter spacing is ignored while in setup mode. Z Leading Zeros: As with several other menu settings, either button may be used to switch between two settings. Select “Y” to send numbers in stored messages with up to two leading zeros (1 is sent as 001, 99 is sent as 099, 123 is sent as 123, 1000 is sent as 1000). “N” will send numbers without leading zeros. Like the CUT NUM setting, this affects only QSO numbers and not other numbers stored in messages or sent manually. The default setting is N. (Default: 0) LDG Ø Speed: The keyer will announce the stored speed in WPM. Use buttons 2 & 3 as Down/Up or -/+ buttons to adjust the speed, as described above. Range Low: This sets the low end of the speed control pot range. The setting is adjusted the same way you would set the stored speed. (Default: 0/9) LTR SPC Menu item description (Default: N) Ultra PicoKeyer 23 October 2014 (Firmware V1.1) Page 10 of 19 BCN (Default: 15 s) B WEIGHT (Default: 5) W Weight: The keyer announces the current weight. The buttons may be used to decrease or increase the weight setting. Weight can be set anywhere from 1 (50% "light") to 5 (normal) to 9 (50% "heavy"). The default setting is 5. SIDE TN T Sidetone: The keyer announces the current sidetone setting. You can use the buttons to switch between “N” (sidetone OFF), “Y” (sidetone ON) and “M” (MCW mode). In MCW mode, the keying output is active any time code is being sent and for two word spaces after the key is released. This can be used to control the PTT line of an FM transmitter. Regardless of the sidetone setting, the sidetone is always used while in setup mode. K Key Mode: The keyer will send the current keying mode: "A" or "B" for iambic A or B timing modes, “U” for Ultimatic, “G” for bug or “S” for straight key. You can use the buttons to switch between modes. In “Bug” mode, dots are made automatically with the correct spacing and length with one paddle input, while dashes are made manually with the other. If straight key mode is selected while using a paddle, either paddle input will key the transmitter. P Paddle Selection: This will allow you to reverse the paddles for mis-wired paddles or left handed operators. Simply hit whichever paddle you want to use for DITs. No need to rewire your paddle! (Default: Y) KEY (Default: Mode A) PADL Beacon delay: The keyer sends the current default beacon delay in seconds. Use the buttons to set the delay between beacon transmissions from 0 to 255 seconds. After selecting this menu item the keyer will announce “DIT”. Tap the paddle you wish to use as the dot paddle; this setting will take effect as soon as you exit the setup menu. AUDIO (Default: Around 2 kHz) A DELAY D Transmit delay compensation: Some transmitters tend to shorten Morse code elements when used in QSK mode. This setting can be used to lengthen Morse elements and shorten spaces to compensate. The setting can be from 0 to 50 milliseconds. This is similar to weighting, except that it is independent of speed. Weighting shortens or lengthens elements by a percentage; delay lengthens elements by a specified number of milliseconds. Be aware that this can cause problems when using large delays and fast speeds. MENU MENU Menu mode: Long mode sends words for each menu selection. Short mode sends one or two letters only. MENU is always sent in long mode regardless. VERS V (Default: 0) Ultra PicoKeyer Audio Tone: The keyer will send a dash at the selected sidetone audio frequency each time button 2 or 3 is pressed. The default setting is approximately 2000 Hz, which gives the loudest audio from the on-board speaker. Firmware version: The keyer sends the version number of its internal firmware program. This is informational and cannot be changed. 23 October 2014 (Firmware V1.1) Page 11 of 19 Operating the Ultra PicoKeyer Once your Ultra PicoKeyer is assembled, mounted in the cabinet and has the battery installed, it’s time to connect your paddles and transmitter or transceiver and take a little time to read this manual to learn how to use your PicoKeyer’s features. This is the connections end of your PicoKeyer. The center jack is for your paddles (input); the right hand jack is the on/off output for keying your transmitter or transceiver (output). The left hand jack is a low power audio output that can be used for ear buds or headphones. This is the controls end of your PicoKeyer. The speed control knob is on the right, the memory/setup pushbuttons are on the left. The triangle symbols ◄, ▼, ▲ and ► are used with the setup menu system. The buttons are not marked with numbers, but are numbered from 1 through 4 from left to right for message memories. The Speed Control This is the control you will probably use the most often. The code speed can be adjusted from 5 words per minute (WPM) to 30 WPM by simply turning the speed control knob. The high and low limits can be set using the setup function described later in this manual. The default high and low range settings are 5 WPM and 30 WPM, but you can set these anywhere between 5 WPM and 60 WPM. You may notice that the speed will decrease to 5 WPM as you rotate the knob counter-clockwise, then suddenly jump to 13 WPM. This is a special feature known as “Dual-Set Speed”. Two Morse code speed settings are available for your use. The current speed is the speed at which the keyer is operating, regardless of whether that speed is derived from the speed pot or the menu. The stored speed is saved in the chip’s internal non-volatile memory, and is used when the speed pot is turned to its minimum position. At any time you may use the speed adjustment to set any speed between the low and the high range setting. Setting the speed with the pot does not affect the stored speed, which will always be available by simply turning the pot to its full counter-clockwise position. This feature can be very useful; for example, you can keep your speed set at a constant, favorite speed, but have the option of rapid QRS/QRQ to answer faster or slower stations. Or, you can simply ignore the stored speed and always use the pot for speed control – it’s up to you. Two things to note: First, you can set the stored speed anywhere from 5 WPM to 60 WPM – and it doesn’t have to be within your speed control range. You can also set the range of the speed control to whatever is best for you. Second, if you set the stored speed and low range the same, it effectively disables the dual-set speed feature – you’ll have a constant range of speed adjustment. See the Range (RL & RH) commands in the “Setup Menu Commands” section. Ultra PicoKeyer 23 October 2014 (Firmware V1.1) Page 2 of 19 The Pushbuttons Special Note: If you try to send something with your paddle and get an unexpected result, you may still be in setup mode. To exit setup, push buttons 3 and 4 (▲and ►). If you hear “dit dit” you’re back in normal operating mode. The Ultra PicoKeyer has four memories, controlled by the four pushbuttons on the front panel. Operating these buttons is very simple and straightforward, and their use is as you might expect from a modern electronic device. Playing a Stored Message Pressing and immediately releasing any of the four buttons once (a “tap” of a button) will send the message stored with that button, if there is one stored. Using Keyer Features There are several functions that can be used by pressing multiple buttons at the same time. To enter Tuneup Mode, press buttons 1 & 3 at the same time. In Tuneup Mode, you can tap the dash paddle to send a steady carrier or tap the dot paddle to send a string of dits. Tap either paddle to stop sending. Tap any button to exit Tuneup Mode. While in Tuneup mode, the sidetone will always be ON regardless of the sidetone setting as a reminder that you’re transmitting. To decrease the QSO counter by one, press buttons 1 & 2 at the same time. The keyer will send two “dits” using the sidetone only to let you know it decremented the QSO counter. To check the current operating speed, press buttons 2 & 4 at the same time. The keyer will announce the currently selected speed in Morse code, using the sidetone only. To check for a straight key and adjust for straight key or paddle use, press buttons 2 & 3 at the same time. The keyer will check to see if either paddle input is grounded, and if so it will treat the other input as a straight key. If neither input is grounded it will assume a paddle is in use. The keyer will announce “K” to let you know it’s ready for normal operation. To enter Setup Mode, press buttons 3 & 4 at the same time. See the “Setup Mode” section for information about how to change settings. When you’re finished in setup mode, just press buttons 3 & 4 together again to exit. Recording, Reviewing and Saving Messages Don’t let the following description fool you – recording, reviewing and saving messages is very simple and intuitive! It would take less time to demonstrate than it will to read these instructions. The buttons on your Ultra PicoKeyer are powerful little things and very easy to use. To record a message: Press and hold one of the pushbuttons to record the message associated with that button. Simply hold the button until you hear the Morse code “K” prompt (about two seconds). You are now in recording mode. Record your new message using the paddle as you normally would. When you’re done recording, press and hold the button again to save the new message. The keyer will announce “R” to let you know it recorded the message. To exit without making changes: If you decide you’ve made a mistake and want to start over, or if you were just reviewing an existing message, or if you accidentally entered recording mode, simply tap any button except the one you just pressed to stop recording and return to normal operation without saving the message. The keyer will announce “NR” to let you know it did not record the message. To review and add to a message: If you just want to hear what you have stored in any of the message slots, just enter recording mode (hold the button down until you hear “K”, then release the button. Now tap the same button to play back your message. This works either before you start to record a new message (to review one already Ultra PicoKeyer 23 October 2014 (Firmware V1.1) Page 3 of 19 stored), or after you record a message to make sure you’ve recorded what you want before saving. Once you review the message, the “pointer” in memory is not set to zero – in other words, if you review the message and start recording, what you send will be appended to the end of the message. To erase an existing message: If you want to erase a message you have stored in one of the memory locations, it’s easy. Enter recording mode (hold down the button until you hear “K”), then release. Now press and hold the button down again until you hear “R”. This will erase anything stored in that message location. Let’s walk through a couple of typical uses of the memory buttons. First, let’s assume you want to record a new message in memory location #1. 1. Hold down button 1 until you hear “K”, then release the button. 2. Send your message using the paddle. You can pause as long as you want between words. 3. If you want to review what you’ve sent so far, tap button #1. 4. Once you’re satisfied with the message, press and hold button #1 again until you hear “R”. Now let’s say you think you have a message stored in M1, but you’re not sure what it is. You want to review the message and possibly change it, but you don’t want to key the transmitter. Here’s what you would do: 1. Hold down button 1 until you hear “K”, then release the button. 2. Tap button 1. The keyer will play the stored message (if there is one) without keying the transmitter. 3. If you want to append something to the existing message, you can do it just by sending with the paddles before you exit. 4. If you want to leave that message as it is, just tap button 2, 3 or 4. The keyer will respond with “NR” (think: “Not Recorded”). If you changed the message and want to save it, hold the button until you hear “R”. Now let’s say you want to replace this message with a new one: 1. Press and hold button 1 as before until you hear “K”. 2. If you want to record a new message, just use the paddle to send the new message. 3. To review what you’ve just sent, tap button 1 again. If you want to add to it, you can. 4. Once you’re satisfied with the message, press and hold button 1 until you hear “R”. Now you’re done and out of recording mode. So let’s say you want to just delete message #1. 1. Press and hold button 1 as before until you hear “K”. 2. Press and hold the button again until you hear “R”. The message is now erased; in other words, you just recorded an empty message. Special Message Commands Several special embedded commands may be used in messages. All commands start with a slash followed by one or two characters. When playing back a message in setup mode you will hear the command itself, not its effect – message chaining, QSO numbers, pause and beacon mode are inactive while in setup mode. For example, you will hear /R instead of the word to be repeated. To store a slash character in a message, save it as //. For example, if I want the message to send N0XAS/B I’d store it in memory as N0XAS//B. /R will repeat the last word, including the word space after it. This can save a lot of memory space, since each /R takes up only two character positions in memory. For example, to send a 3x3 CQ, you can simply store “CQ /R/RDE (call sign) /R/RK”. This can save a lot of memory space. /1, /2, /3 and /4 can be used to “call”, or insert another stored message as part of the one you’re recording. The indicated message will be played immediately when one of these commands is encountered, then the current message will resume. Ultra PicoKeyer 23 October 2014 (Firmware V1.1) Page 4 of 19 /P will pause the message. This will cause the keyer to wait while you manually send information such as a signal report or other comment. The message will automatically resume after a full word space has passed with no paddle input. Hint: If you use /P, store it immediately following the preceding characters without a word space. In other words, store “UR RST/P …” instead of “UR RST /P …”. This prevents you starting to send before the word space completes, which will terminate memory playback completely. If you want to terminate a message while it’s paused so it won’t resume, simply tap any message button. To have your message automatically repeat at timed intervals, insert the command /B (BEACON) at the end of your message. This will cause the keyer to delay for the number of seconds set with the B parameter (see the setup menu instructions) and re-send the message. You can terminate beacon operation by tapping either paddle or any button. This can be especially useful for calling CQ, or to use your PicoKeyer to control a propagation beacon or “fox” transmitter. To have Message #1 automatically start whenever power is applied to the keyer, store the /A command as the first two characters in message #1. This is useful for automatically starting a keyer used as part of a beacon station. Remember that you will still need to use /B at the end of the message if you want it to repeat. To send the QSO number and increment it by one, send /QI (QSO & Increment). To send the QSO number and NOT increment it, send /QN (QSO & No increment). To the last (previous) QSO number, send /QR (QSO Repeat). This is useful during contests if you need to send a “fill”. To temporarily increase the keyer speed by one WPM, send /SU (Speed Up). Note that this and the /SD command will take effect immediately and will remain in effect only until the message is finished. You can store multiple /SU or /SD commands to change speed by more than one WPM – for example, /SU/SU will increase your speed by 2 WPM. To temporarily decrease keyer speed by one WPM, send /SD (Speed Down). To temporarily set a specific speed, send /Snn where nn is the speed you want. /S or /S0 will resume the normal speed. For example, to send a signal report at 30 WPM and return to the normal speed you would use /S30 599/S0. To alter the letter spacing, send /Fn where n is one digit, 0 through 9. This will act the same as setting the letter spacing in the menu. For example, say you want to add a little extra space between letters in your call sign in a CW message. You could store, “CQ /R/R DE /F2N0XAS /R/R K /F0/B”. To insert an extra word space in your message, use the special prosign character “1M” (.------). To insert a steady carrier, use the /Cn command, where n is the number of seconds (from 1 to 9) that you wish to send the carrier. Battery and External Power Note that your Ultra PicoKeyer does not have a power switch! The microprocessor “brain” of the keyer will go into a low-current sleep mode after about a second or so with no inputs from either paddle or any of the buttons. In sleep mode, the keyer chip draws so little current – a few microamperes -- that the internal battery can last for years. As soon as you touch a paddle, the chip instantly “wakes up” and continues its normal operation. You won’t be able to tell the difference when the keyer goes to sleep; the transition from power-saving sleep to operating is instantaneous and requires no action from you. The battery in your Ultra PicoKeyer should last for a long time – anywhere from several months to several years. Battery life depends on a few factors: Frequency of use. Obviously, the more you use the keyer, the shorter the battery life will be. Even with regular use, you shouldn’t have to replace the battery more than once a year or so. Sidetone. The sidetone speaker draws more power than the rest of the keyer functions. Using the sidetone speaker will reduce battery life – but you should still only have to replace it once in a great while. Beacon mode. The keyer does not sleep between messages while in beacon mode. If you use your PicoKeyer to control a beacon full time, you should use an external power source. This can be as simple as Ultra PicoKeyer 23 October 2014 (Firmware V1.1) Page 5 of 19 a pair of series AA or AAA alkaline cells. Remember to remove the coin cell before connecting an external power source, and never allow the external source to exceed 3.3 V – and of course, double-check the polarity before applying power! Battery replacement is straightforward – just remove the two screws from the cabinet bottom, remove the keyer circuit board from the cabinet, slide the coin cell battery out of its holder and install the new battery. All of your settings and messages will be retained even with no battery power. If you should need to replace the battery in your keyer, you will need a CR2032 or equivalent lithium cell. These are very common and are used in many devices from garage door openers to car remotes to thermometers and medical monitors. You can order high quality CR2032 cells from www.HamGadgets.com. Don’t use any battery or power source that exceeds 3.3 volts. Straight Key Mode The Ultra PicoKeyer can automatically detect and use a properly wired straight key. During its power-on program, the PicoKeyer checks to see if either paddle input is grounded. If one input is shorted, the other input is assumed to be a straight key. This way you can plug in a straight key wired to a mono plug and use it without any changes or adjustments. Be aware that while the setup menu will still function and you can send messages, you will not be able to record messages while using a straight key. Of course it’s not always convenient to pull out the battery when you switch between a paddle and a straight key. To detect paddles or a straight key, just press buttons 2 and 3 (the middle two) at the same time. It will automatically re-scan the paddle inputs and determine whether or not a straight key is plugged in. If you use a straight key with a stereo plug, you may find it more convenient to switch between paddles and a straight key using the K menu setting. Sidetone The PicoKeyer’s sidetone is a square wave audio signal generated by the microprocessor. Sidetone can be turned on or off, and the audio frequency can be changed from the setup menu. There is a very noticeable peak in the response of the on-board speaker at roughly 2 kHz; if your PicoKeyer is installed in the plastic cabinet you’ll probably want to find this peak so you can hear it with the case assembled. The default setting should be at this audio peak. Using headphones for sidetone If you prefer, you can use a 3.5 mm stereo plug to connect an external device for sidetone. This will disconnect the on-board speaker. The PIC processor chip used in the Ultra PicoKeyer can drive small ear buds or headphones with 32 ohms or greater impedance. Low impedance phones will result in very low or no sidetone volume. For larger speakers or lower impedance headphones, you’ll need to use and external amplifier. An inexpensive amplified PC speaker may work well, or you can use this as an opportunity to build a low power audio amplifier. An LM386 amplifier chip will work well for this, as well as many other types. You will need to use a stereo plug for an external audio device. If you need to use a mono plug, you can cut the PCB trace on the bottom of the board under the PHONES jack. It’s the trace that runs between the two outer-most pads of the jack. This will work fine with mono headphones, and will give you sidetone in one ear with stereo ‘phones. USE CAUTION when trying ear buds or headphones! Some ear buds or headphones may be uncomfortably loud, or even loud enough to damage your hearing. NEVER use a headset or earbuds directly on or in your ears until you Ultra PicoKeyer 23 October 2014 (Firmware V1.1) Page 6 of 19 know how loud the sidetone will be. If it’s too loud, you can try a smaller value capacitor in place of C3. You can also connect an external variable resistor to use as a volume control. Keying the transmitter The PicoKeyer will key any solid state, tube or hybrid transmitter or transceivers that uses a keying voltage of 60 V or less, either positive or negative. Your transmitter or transceiver may need either a mono or stereo cable. It depends on the rig; check your owner’s manual for details for connecting a straight key to your transmitter. The PicoKeyer’s output acts like a straight key, so you’ll use the method for connecting a straight key. Remember to disable the rig’s internal keyer, if it has one. If you intend to use the PicoKeyer with a rig requiring grid-block or cathode keying voltages over 60 V, you will need to use a separate high voltage keying adapter. The Universal Keying Adapter 3 available from NØXAS at www.hamgadgets.com is optically isolated and will handle solid-state, grid-block or cathode keyed transmitters at up to 400 V. Of course, you can always build your own! Keying Modes (What’s Mode A, Mode B and Ultimatic??) There have been a couple of different operating modes for iambic keying that have evolved over the years. Modes A & B are simply a matter of when the keyer checks for input from the paddles. In iambic mode A, the keyer only checks for paddle inputs after the end of each dot or dash. In iambic mode B, on the other hand, the keyer will check for paddle input during each dot or dash. In practice, this can mean that you get “extra” or “dropped” dots or dashes at the end of a character, depending on how you send. If you find that the keyer often drops the last dot or dash in a character, or you often get an extra dot or dash at the end of a character, try switching between modes A & B and see which one best suits you. I find that Mode B worked best for me when using a single-lever paddle, while Mode A works best with a dual-lever paddle. Ultimatic mode is a different way of handling iambic keying. In modes A & B, if the keyer sees both paddles closed it will alternate sending dots and dashes. Ultimatic, on the other hand, will send dots or dashes according to the last paddle to be pressed. For example, to send the letter P in mode A or B, you would close the dot paddle, then close the dash paddle and release the dot paddle for the two dashes, then release the dash paddle and close the dot paddle for the last dot. In Ultimatic mode, you would close the dot paddle and hold it closed, close the dash paddle for the two dashes, then release it for the last dot. Some letters are easier to send and require less effort using Ultimatic mode. It’s a little bit of an adjustment from regular iambic keying; it took me a couple of hours of practice to get used to it. Selecting a keying mode (A, B or Ultimatic) is largely a matter of personal preference. There is no one “right” way that works for everyone; find which works best for you. Two additional keying modes are available with the Ultra PicoKeyer. “Bug” mode (mode G in the setup menu) offers automatic dots and manual dashes, emulating a mechanical semi-automatic key. Straight key mode (mode S in the setup menu) allows completely manual sending, treating each paddle as a straight key input. This can also be used in the same way you would a “cootie” key – like two straight keys back to back. Keep in mind that you can always send stored messages, but you will not be able to record messages while in bug or straight key modes. Ultra PicoKeyer 23 October 2014 (Firmware V1.1) Page 7 of 19 Using Your Keyer with a Handheld or FM Rig (“MCW” Mode) One of the unique features of your Ultra PicoKeyer is MCW mode (menu option “T” for sidetone, select “M” for MCW). In this mode, the keying output can be used to trigger the PTT input of a VHF or UHF handie-talkie or FM mobile rig, allowing you to use your FM rig for Morse code. This is not CW (Continuous Wave) operation, nor is it true MCW (Modulated CW) mode – it’s really just an FM transmission, with audio Morse code tones sent instead of voice. It is a good way, though, to have a CW practice net using a local repeater – with the blessing of the repeater operator, of course – or a simplex frequency. Those participating don’t need HF privileges or HF equipment to learn and practice Morse code on the air. It is not possible to give detailed instructions for attaching your keyer to every rig on the market. Different transceivers, even from the same manufacturer, may require different setups to work well. You will need to take a look at your rig’s manual to determine how the audio and PTT signals from the keyer need to be connected. Look for instructions for connecting a packet radio TNC for a good start. Doing it wrong could possibly damage your rig and/or your keyer! Refer to the operator’s manual for your rig for specific requirements for PTT and audio. Using MCW mode will probably require making a custom cable to connect the keying and sidetone outputs to your FM transceiver. Depending on your radio you may also need to install a shorting jumper across capacitor C3, and/or you may need to use an external variable resistor to control the audio level supplied to your transceiver. Figure 1 - Keying Yaesu and similar HTs In Figure 1, we see the most common method that will work with many handheld transceivers from Alinco, Yaesu, Icom and others that use a similar combined audio/PTT scheme. This value of the capacitor is not critical, and can be several times smaller or larger. A 2.2 K or 2.7 kΩ resistor (3.9 kΩ for some ICOM handhelds) is used in series with the PTT line to key the rig. In most cases, GROUND is connected to the sleeve (barrel) of a 2.5 mm stereo plug, and PTT/Audio is connected to the tip – but again, be sure to consult your rig’s manual. Figure 2 shows the method for using with with separate audio and PTT lines. Consult your rig’s manual for the correct plug and wiring to use. Figure 2 - Keying HTs with separate audio & PTT Ultra PicoKeyer 23 October 2014 (Firmware V1.1) Page 8 of 19 About Setup Mode Just remember: Enter and exit setup mode with ▲ and ►. Use the ◄ and ► buttons to navigate through the menu; use the ▼and ▲ buttons to change settings. “?” means you’re in setup mode, and “did dit” means you’re back in normal operating mode. Using the Ultra PicoKeyer’s setup mode is very simple and intuitive, with only a few very simple things to remember. To enter or exit setup mode, press the ▲ and ► buttons (3 & 4) at the same time. The keyer will send “?” to let you know you’re in setup mode, or “dit dit” to let you know you’ve exited setup mode. The ◄ and ► buttons (1 and 4) will move forward and backward through the menu items. The menu “wraps around”, meaning you can navigate through the menu in either direction. The order of menu items is shown in the table below. You can move through the menu choices in either direction using the left and right buttons. The ▲ and ▼ buttons (2 and 3) will change the selected item’s settings. The selections also wrap around, with a couple of exceptions as noted below. Tap any button to go to the next item or selection and stop. Hold any button to scroll through items until you release the button. Holding ◄ or ► will announce each menu item in turn; holding button ▼ or ▲ will send a dot or dash for each decrement or increment of the selected item’s setting. To reset the item to its original “factory default” setting, press and release the middle two buttons (▼ and ▲) at the same time. Many operators will find the default settings of the Ultra PicoKeyer satisfactory for normal operation. However, some people like things set up a little differently. There are numerous settings you can change to suit your operating speed, style or equipment. Probably the most common changes are the speed control range settings and the default speed. Most people won’t use setup mode often, and it can be a chore to try to remember all of the commands. Others change settings often, and may want the menu operation to be quick and efficient. For that reason, you have a choice between two menu modes – we’ll call them “Long” and “Short”. In “Long” mode, each menu selection is spelled out with a short word like SPEED, WEIGHT or CUT NUM. In “Short” mode, the menu selections are sent as one or two letters only – such as S, W or X. To quickly change between the two modes, you can use the ◄ button to quickly select MENU (► will get you there just as easily, but not as quickly). The MENU selection will always be spelled out regardless of the menu mode selected, just in case you’ve selected short mode but have not used the menu for a while. Once you have MENU selected, tap ▼ or ▲ to switch between “L” (long” and “S” (short) modes. As an example, let’s look at the S menu item (SPEED setting). Once in setup mode, tap button 4 to advance to the “SPEED” menu item. The keyer will announce the currently set speed. You can now tap button 2 to decrease the speed by one WPM, or button 3 to increase it. Holding either button will continuously increase or decrease the speed, with a dot or dash sent at the new speed for each step. When the button is released, the keyer will again announce the current speed setting. Speed may be set from 5 WPM to 60 WPM. If you want to return to the default 13 WPM setting, simply press and release buttons 2 and 3 at the same time. Ultra PicoKeyer 23 October 2014 (Firmware V1.1) Page 9 of 19