1
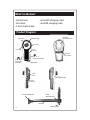
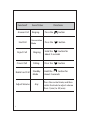
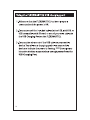
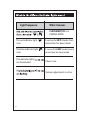
TM
Thank you for purchasing the GoGroove FLEXSMART X2.
Utilizing the latest technology in both the FM Transmitting
and Bluetooth industry, this device allows you to make
hands-free calls and listen to music over your car speakers
while driving. It’s easy to setup with any smartphone or other
Bluetooth enabled device. It even has a USB charging port in
case you need power on-the-go.
DO IT ALL WITH THE FLEXSMART X2!
Table of Contents
Whats in the box? ................................................ 3
Product Diagram ................................................. 3
Quick Start.............................................................. 4
Installing FLEXSMART X2 ................................. 5
Pairing mode ........................................................ 5
Playing Music........................................................ 6
Hands-free calling .............................................. 8
diagram AUX input............................................................... 8
USB charging ....................................................... 10
Indicator lights chart ......................................... 11
Troubleshooting ................................................. 12
Care & Maintenance .......................................... 14
2
Product Specs ...................................................... 15
What’s in the box?
-Control Hub
-Flex-Neck
-3.5mm Audio Cable
-microUSB charging cable
-miniUSB charging cable
Product Diagram
PLAY/PAUSE
FLEX-NECK
CONNECTING SLOT
CONTROL KNOB
NEXT SONG
LED
DISPLAY
LAST SONG
FLEX-NECK
RELEASE TAB
CALL BUTTON
& BLUE LIGHT
INDICATOR
END CALL &
RED LIGHT INDICATOR
MICROPHONE
3.5MM
LINE-IN
USB
CHARGING PORT
3.5MM
LINE-OUT
FLEX-NECK CONNECTOR
POWER
INDICATOR LIGHT
FLEX-NECK
3
POWER BUTTON
FLEX NECK
CONTROL HUB
4
Operating Instructions:
Installing FLEXSMART X2 in your vehicle
Setup is easy! Your FLEXSMART X2 comes packaged as two
separate pieces. There is a Flex-Neck and a Control Hub. Please
assemble the two pieces as shown on page 4. Once
assembled, the FLEXSMART X2 is now ready to be connected
to the 12V DC outlet in your vehicle. Simply insert the DC
barrel of the FLEXSMART X2 into your vehicle’s DC outlet. You
can switch the power ON and OFF with the convenient Power
Button.
5
6
7
8
FunctionP
hone Status
Answer Call
Ringing
Directions
Press the
button
Press the
button
End Call
Conversation
Mode
Reject Call
Ringing
Hold the
button for
about 2 seconds
Cancel Call
Calling
Press the
Redial Last Call
Standby
Mode
Hold the
button for
about 3 seconds
Adjust Volume
Any
9
button
Press the control knob, and then
rotate the knob to adjust volume
from 1 (min) to 30 (max)
10
Light Sequence
What it means
FLEXSMART X2 is in
PAIRING MODE
The red indicator light
is on
A successful HFP (Hands-Free)
connection has been made
The blue indicator light
is on
A successful A2DP (audio/music)
connection has been made
The indicator lights
are illuminated
、 、
、 、
11
Power is on
Volume adjustment is active
12
13
Care and maintenance
- Do not expose the unit to dust, water, or extreme
temperatures.
- Do not attempt to disassemble the product.
- If the product is giving you problems, please contact the
manufacturer or retailer.
14
15