1
NX-200/ NX-300
NX-200S/ NX-300S
VHF DIGITAL TRANSCEIVER/
UHF DIGITAL TRANSCEIVER
INSTRUCTION MANUAL
ÉMETTEUR-RÉCEPTEUR NUMÉRIQUE VHF/
ÉMETTEUR-RÉCEPTEUR NUMÉRIQUE UHF
SPECIALIST
RADIO
MODE D’EMPLOI
TRANSCEPTOR DIGITAL VHF/
TRANSCEPTOR DIGITAL UHF
MANUAL DE INSTRUCCIONES
RICETRASMETTITORE DIGITALE VHF/
RICETRASMETTITORE DIGITALE UHF
MANUALE DI ISTRUZIONI
© B62-2252-00 (E, E2, E3)
09 08 07 06 05 04 03 02 01 00
ENGLISH
VHF DIGITAL TRANSCEIVER/
UHF DIGITAL TRANSCEIVER
NX-200/ NX-300
NX-200S/ NX-300S
INSTRUCTION MANUAL
SPECIALIST
RADIO
NOTIFICATION
This equipment complies with the essential requirements of
Directive 1999/5/EC.
The use of the warning symbol means the equipment is
subject to restrictions of use in certain countries.
This equipment requires a licence and is intended for use in
the countries as below.
AT
BE
DK
FI
FR
DE
GR
IS
IE
IT
LI
LU
NL
NO
PT
ES
SE
CH
GB
CY
CZ
EE
HU
LV
LT
MT
PL
SK
SI
BG
RO
ISO3166
Firmware Copyrights
7KHWLWOHWRDQGRZQHUVKLSRIFRS\ULJKWVIRUÀUPZDUH
HPEHGGHGLQ.HQZRRGSURGXFWPHPRULHVDUH
reserved for Kenwood Corporation.
Information on Disposal of Old Electrical and Electronic Equipment and Batteries
(applicable for EU countries that have adopted separate waste collection systems)
Products and batteries with the symbol (crossed-out wheeled bin) cannot be
disposed as household waste.
Old electrical and electronic equipment and batteries should be recycled at a
facility capable of handling these items and their waste byproducts.
Contact your local authority for details in locating a recycle facility nearest
to you.
Proper recycling and waste disposal will help conserve resources whilst
preventing detrimental effects on our health and the environment.
SPECIALIST
RADIO
Notice: The sign "Pb" below the symbol for batteries indicates that this battery
contains lead.
THANK YOU
We are grateful you have chosen Kenwood for your land
mobile radio applications.
This instruction manual covers only the basic operations of your
NEXEDGE portable radio. Ask your dealer for information on any
customized features they may have added to your radio.
NXDN™
NOTICES TO THE USER
SPECIALIST
RADIO
NXDN™ is a protocol name for a new digital communications
system using 4-level FSK technology which has been
co-developed by Kenwood and Icom.
X Government law prohibits the operation of unlicensed radio
transmitters within the territories under government control.
X ,OOHJDORSHUDWLRQLVSXQLVKDEOHE\ÀQHDQGRULPSULVRQPHQW
X 5HIHUVHUYLFHWRTXDOLÀHGWHFKQLFLDQVRQO\
Safety: It is important that the operator is aware of and
understands hazards common to the operation of any
transceiver.
The AMBE+2TM voice coding Technology embodied in this product
is protected by intellectual property rights including patent rights,
copyrights and trade secrets of Digital Voice Systems, Inc. This
voice coding Technology is licensed solely for use within this
Communications Equipment. The user of this Technology is
explicitly prohibited from attempting to extract, remove, decompile,
reverse engineer, or disassemble the Object Code, or in any other
way convert the Object Code into a human-readable form. U.S.
Patent Nos. #5,870,405, #5,826,222, #5,754,974, #5,701,390,
#5,715,365, #5,649,050, #5,630,011, #5,581,656, #5,517,511,
#5,491,772, #5,247,579, #5,226,084 and #5,195,166.
i
PRECAUTIONS
•
•
•
•
•
•
•
•
Do not charge the transceiver and battery pack when they are wet.
Ensure that there are no metallic items located between the
transceiver and the battery pack.
'RQRWXVHRSWLRQVQRWVSHFLÀHGE\Kenwood.
If the die-cast chassis or other transceiver part is damaged, do not
touch the damaged parts.
If a headset or headphone is connected to the transceiver, reduce
the transceiver volume. Pay attention to the volume level when
turning the squelch off.
Do not place the microphone cable around your neck while near
machinery that may catch the cable.
Do not place the transceiver on unstable surfaces.
Ensure that the end of the antenna does not touch your eyes.
When the transceiver is used for transmission for many hours, the
radiator and chassis will become hot. Do not touch these locations
when replacing the battery pack.
Always switch the transceiver power off before installing optional
accessories.
The charger is the device that disconnects the unit from the AC
mains line. The AC plug should be readily accessible.
SPECIALIST
RADIO
•
•
ii
•
•
SPECIALIST
RADIO
Turn the transceiver power off in the following locations:
• Near explosives or blasting sites.
• In aircrafts. (Any use of the transceiver must follow the
instructions and regulations provided by the airline crew.)
• Where restrictions or warnings are posted regarding the use of
radio devices, including but not limited to medical facilities.
• Near persons wearing pacemakers.
Turn the transceiver power off in the following locations,
unless the model is specifically qualified for such use
(Intrinsically Safe such as approved by Factory Mutual, CSA):
,QH[SORVLYHDWPRVSKHUHVLQÁDPPDEOHJDVGXVWSDUWLFOHV
metallic powders, grain powders, etc.).
• While taking on fuel or while parked at gasoline service stations.
Do not remove the black sheet from the reverse side of the
transceiver (refer to the illustration below). Removal of this
VKHHWGHFUHDVHVWKHZDWHUSURRIHIÀFLHQF\RIWKHWUDQVFHLYHUDQG
may cause malfunctions if water seeps into the transceiver.
The orange seal on the reverse side of the transceiver is
LPSRUWDQWZLWKUHVSHFWWRWKHZDWHUSURRIHIÀFLHQF\RIWKH
transceiver. Do not place stickers or other materials on or
DURXQGWKHVHDOVKRZQLQWKHÀJXUHRURQWKHUHYHUVHVLGHRI
WKHEDWWHU\SDFN'RLQJVRZLOOLPSDLUWKHZDWHUSURRIHIÀFLHQF\
of the transceiver and may cause it to break down. Additionally,
in order to prevent damage to the seal, do not allow it to come
in contact with foreign materials.
iii
•
•
•
•
•
•
Do not disassemble or modify the transceiver for any reason.
Do not place the transceiver on or near airbag equipment while
WKHYHKLFOHLVUXQQLQJ:KHQWKHDLUEDJLQÁDWHVWKHWUDQVFHLYHU
may be ejected and strike the driver or passengers.
Do not transmit while touching the antenna terminal or if
any metallic parts are exposed from the antenna covering.
Transmitting at such a time may result in a high-frequency burn.
If an abnormal odor or smoke is detected coming from the
transceiver, switch the transceiver power off immediately,
remove the battery pack from the transceiver, and contact your
Kenwood dealer.
Use of the transceiver while you are driving may be against
WUDIÀFODZV3OHDVHFKHFNDQGREVHUYHWKHYHKLFOHUHJXODWLRQV
in your area.
Do not expose the transceiver to extremely hot or cold
conditions.
Do not carry the battery pack (or battery case) with metal
objects, as they may short the battery terminals.
Danger of explosion if the battery is incorrectly replaced;
replace only with the same type.
SPECIALIST
RADIO
•
•
iv
NOTIFICATION OF WATER-RESISTANT MODEL
Water Resistance and Maintenance (NX-200/ NX-300 Only)
This transceiver conforms to the following standards:
IP67:7KH,3VWDQGDUGLVWKHSURWHFWLRQOHYHOVSHFLÀHGE\WKH
LQWHUQDWLRQDOVWDQGDUG,(&7KHÀUVWQXPHUDOLQGLFDWHVWKH
“dust-resistant” level and the second numeral indicates the “waterresistant” level.
SPECIALIST
RADIO
PRECAUTIONS
• The applicable standards listed above do not assure that the
transceiver can be used in water. The transceiver may be
damaged in a situation in which the maximum depth is over
1 meter or the maximum submersion time exceeds 30 minutes.
• Observe the following precautions to maintain the transceiver’s
water-resistant performance:
a) Do not drop or apply strong physical shocks to the transceiver.
b) When you disassemble the transceiver or open the cover
of the option board, IP67 will no longer be maintained. After
disassembling the transceiver or opening the cover of the
option board, if you want to continue maintaining IP67, contact
your dealer or Authorized Service Center.
c) Do not soak the transceiver in water that contains a solvent or
surfactant, such as detergent or alcohol.
• If it is soaked in muddy water or salt water (including sea water),
LWPD\EHFRPHFRUURGHG,PPHGLDWHO\ÁXVKZLWKIUHVKZDWHUDQG
then wipe dry with a soft cloth.
• If water is splashed onto the microphone, the battery, or the
antenna terminal, clean and dry them with a soft cloth before
reconnecting to the transceiver.
• When water gets into the microphone opening or the speaker
grill, the voice level may become low or distorted. Lightly shake
WKHWUDQVFHLYHUWRUHPRYHWKHZDWHUIURPWKHVSHDNHUDQGRU
microphone before operating the transceiver.
8VHRIDQ\RSWLRQRQWKHWUDQVFHLYHUQRWVSHFLÀHGE\Kenwood,
may reduce or void the water resistant and dust resistant
performance.
• When using an option with the transceiver, ensure that it
corresponds with the IP67 standard.
v
INFORMATION CONCERNING THE LI-ION BATTERY PACK
7KHEDWWHU\SDFNLQFOXGHVÁDPPDEOHREMHFWVVXFKDVRUJDQLFVROYHQW
0LVKDQGOLQJPD\FDXVHWKHEDWWHU\WRUXSWXUHSURGXFLQJÁDPHVRU
extreme heat, deteriorate, or cause other forms of damage to the
battery. Please observe the following prohibitive matters.
•
•
•
•
Do not disassemble or reconstruct battery!
The battery pack has a safety function and protection circuit to
avoid danger. If they suffer serious damage, the battery may
JHQHUDWHKHDWRUVPRNHUXSWXUHRUEXUVWLQWRÁDPH
Do not short-circuit the battery!
Do not join the + and – terminals using any form of metal (such
as a paper clip or wire). Do not carry or store the battery pack
in containers holding metal objects (such as wires, chainnecklace or hairpins). If the battery pack is short-circuited,
H[FHVVLYHFXUUHQWZLOOÁRZDQGWKHEDWWHU\PD\JHQHUDWHKHDW
RUVPRNHUXSWXUHRUEXUVWLQWRÁDPH,WZLOODOVRFDXVHPHWDO
objects to heat up.
Do not incinerate or apply heat to the battery!
If the insulator is melted, the gas release vent or safety function
is damaged, or the electrolyte is ignited, the battery may
JHQHUDWHKHDWRUVPRNHUXSWXUHRUEXUVWLQWRÁDPH
Do not use or leave the battery near fires, stoves, or other
heat generators (areas reaching over 80°C/ 176°F)!
If the polymer separator is melted due to high temperature,
an internal short-circuit may occur in the individual cells and
the battery may generate heat or smoke, rupture, or burst into
ÁDPH
Avoid immersing the battery in water or getting it wet by
other means!
If the battery becomes wet, wipe it off with a dry towel before
use. If the battery’s protection circuit is damaged, the battery
may charge at extreme current (or voltage) and an abnormal
chemical reaction may occur. The battery may generate heat or
VPRNHUXSWXUHRUEXUVWLQWRÁDPH
SPECIALIST
RADIO
•
vi
•
•
•
•
•
•
Do not charge the battery near fires or under direct
sunlight!
If the battery’s protection circuit is damaged, the battery may
charge at extreme current (or voltage) and an abnormal
chemical reaction may occur. The battery may generate heat or
VPRNHUXSWXUHRUEXUVWLQWRÁDPH
Use only the specified charger and observe charging
requirements!
,IWKHEDWWHU\LVFKDUJHGLQXQVSHFLÀHGFRQGLWLRQVXQGHUKLJK
temperature over the regulated value, excessive high voltage
or current over regulated value, or with a remodelled charger),
it may overcharge or an abnormal chemical reaction may occur.
The battery may generate heat or smoke, rupture, or burst into
ÁDPH
Do not pierce the battery with any object, strike it with an
instrument, or step on it!
This may break or deform the battery, causing a short-circuit.
The battery may generate heat or smoke, rupture, or burst into
ÁDPH
Do not jar or throw the battery!
An impact may cause the battery to leak, generate heat
RUVPRNHUXSWXUHDQGRUEXUVWLQWRÁDPH,IWKHEDWWHU\ҋV
protection circuit is damaged, the battery may charge at an
abnormal current (or voltage), and an abnormal chemical
reaction may occur.
Do not use the battery pack if it is damaged in any way!
The battery may generate heat or smoke, rupture, or burst into
ÁDPH
Do not solder directly onto the battery!
If the insulator is melted or the gas release vent or safety
function is damaged, the battery may generate heat or smoke,
UXSWXUHRUEXUVWLQWRÁDPH
Do not reverse the battery polarity (and terminals)!
When charging a reversed battery, an abnormal chemical
reaction may occur. In some cases, an unexpected large
DPRXQWRIFXUUHQWPD\ÁRZXSRQGLVFKDUJLQJ7KHEDWWHU\PD\
JHQHUDWHKHDWRUVPRNHUXSWXUHRUEXUVWLQWRÁDPH
SPECIALIST
RADIO
•
vii
•
•
•
•
•
Do not reverse-charge or reverse-connect the battery!
The battery pack has positive and negative poles. If the battery
pack does not smoothly connect with a charger or operating
equipment, do not force it; check the polarity of the battery. If
the battery pack is reverse-connected to the charger, it will be
reverse-charged and an abnormal chemical reaction may occur.
The battery may generate heat or smoke, rupture, or burst into
ÁDPH
Do not touch a ruptured and leaking battery!
If the electrolyte liquid from the battery gets into your eyes,
wash your eyes out with fresh water as soon as possible,
without rubbing your eyes. Go to the hospital immediately. If
left untreated, it may cause eye-problems.
SPECIALIST
RADIO
•
Do not charge the battery for longer than the specified
time!
,IWKHEDWWHU\SDFNKDVQRWÀQLVKHGFKDUJLQJHYHQDIWHUWKH
regulated time has passed, stop it. The battery may generate
KHDWRUVPRNHUXSWXUHRUEXUVWLQWRÁDPH
Do not place the battery pack into a microwave or high
pressure container!
The battery may generate heat or smoke, rupture, or burst into
ÁDPH
Keep ruptured and leaking battery packs away from fire!
If the battery pack is leaking (or the battery emits a bad odor),
LPPHGLDWHO\UHPRYHLWIURPÁDPPDEOHDUHDV(OHFWURO\WH
OHDNLQJIURPEDWWHU\FDQHDVLO\FDWFKRQÀUHDQGPD\FDXVHWKH
EDWWHU\WRJHQHUDWHVPRNHRUEXUVWLQWRÁDPH
Do not use an abnormal battery!
If the battery pack emits a bad odor, appears to have different
coloring, is deformed, or seems abnormal for any other reason,
remove it from the charger or operating equipment and do not
use it. The battery may generate heat or smoke, rupture, or
EXUVWLQWRÁDPH
viii
&217(176
SPECIALIST
RADIO
UNPACKING AND CHECKING EQUIPMENT ......................... 1
PREPARATION ......................................................... 2
GETTING ACQUAINTED ............................................... 4
PROGRAMMABLE FUNCTIONS....................................... 8
BASIC OPERATIONS ..................................................12
MENU MODE (NX-200/ NX-300 ONLY) .............................15
SCAN....................................................................18
FleetSync: ALPHANUMERIC 2-WAY PAGING FUNCTION .......20
5-TONE SIGNALING (NX-200/ NX-300 ONLY) .....................23
ADVANCED OPERATIONS ............................................25
BACKGROUND OPERATIONS ........................................30
VGS-1 OPTIONAL VOICE GUIDE & STORAGE UNIT ..............33
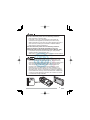
UNPACKING AND CHECKING EQUIPMENT
Carefully unpack the transceiver. If any items are missing or
GDPDJHGÀOHDFODLPZLWKWKHFDUULHULPPHGLDWHO\
Note: These unpacking instructions are for use by your Kenwood
dealer, an authorized Kenwood service facility, or the factory.
SUPPLIED ACCESSORIES
Belt clip........................................................................................ 1
6FUHZVIRUEHOWFOLS[PP ............................................... 2
Universal connector cap.............................................................. 1
'UHVVLQJVFUHZSUHDVVHPEOHG ............................................. 1
3DFNLQJSUHDVVHPEOHG .............................................................. 1
Instruction manual............................................................................. 2
1
PREPARATION
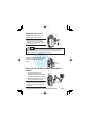
INSTALLING/ REMOVING THE (OPTIONAL) BATTERY PACK
2
3
Match the guides of the
EDWWHU\SDFNZLWKWKHJURRYHV
on the upper rear of the
WUDQVFHLYHUWKHQÀUPO\SUHVV
the battery pack in place.
Lock the safety catch to
prevent accidentally releasing
the battery pack.
To remove the battery pack,
lift the safety catch, press the
release latch, then pull the
EDWWHU\SDFNDZD\IURPWKH
transceiver.
1
2
SPECIALIST
RADIO
1
Note:
X For battery pack charging procedures and useage, refer to the
battery charger Instruction Manual.
X Before charging a battery pack that is attached to the
WUDQVFHLYHUHQVXUHWKDWWKHVDIHW\FDWFKLVÀUPO\FORVHG
X While operating the transceiver using a Li-ion battery pack in
DUHDVZLWKDQDPELHQWWHPSHUDWXUHRI²&)DQGORZHU
operating time may be shortened.
INSTALLING THE (OPTIONAL) ANTENNA
6FUHZWKHDQWHQQDLQWRWKH
connector on the top of the
transceiver by holding the
antenna at its base and turning
LWFORFNZLVHXQWLOVHFXUH
2
Optional
antenna
3
INSTALLING THE BELT CLIP
Belt clip
Attach the belt clip using the
VXSSOLHG[PPVFUHZV
Note: If the belt clip is not
installed, its mounting location
may get hot during continuous
WUDQVPLVVLRQRUZKHQOHIWVLWWLQJLQ
a hot environment.
3 x 8 mm screws
SPECIALIST
RADIO
'RQRWXVHJOXHZKLFKLVGHVLJQHGWRSUHYHQWVFUHZORRVHQLQJZKHQ
LQVWDOOLQJWKHEHOWFOLS$FU\OLFHVWHUZKLFKLVFRQWDLQHGLQWKHVH
glues, may crack the transceiver’s back panel.
INSTALLING THE CAP OVER THE UNIVERSAL CONNECTOR
Insert the cap into place over the
universal connector and secure
it in place using the attached
VFUHZ
Universal
connector cap
M
IC
INSTALLING THE (OPTIONAL) SPEAKER/ MICROPHONE OR
HEADSET
1
2
Insert the guide of the
VSHDNHUPLFURSKRQHRU
headset connector into place
over the universal connector.
Secure the connector in place
XVLQJWKHDWWDFKHGVFUHZ
M
IC
Note: When not using an optional
VSHDNHUPLFURSKRQHRUKHDGVHW
install the cap over the universal
connector.
Optional
speaker/ microphone
1
4
GH
I
7
PQ
RS
2 ABC
5JKL
8 TUV
0
3 DEF
6 MNO
9 WXYZ
#
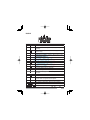
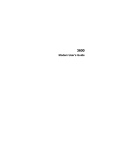
GETTING ACQUAINTED
SPECIALIST
RADIO
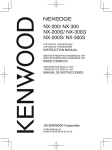
NX-200S/ NX-300S
① Selector knob
5RWDWHWRVHOHFWD]RQHRUFKDQQHOJURXS,'GHIDXOW
② Power switch/ Volume control
5RWDWHWRWXUQWKHWUDQVFHLYHU212))DQGWRDGMXVWWKH
volume.
③ Auxiliary key
3UHVVWRDFWLYDWHLWVSURJUDPPDEOHIXQFWLRQ^SDJH`
④ Transmit/ Receive/ Battery low indicator
,IHQDEOHGE\\RXUGHDOHUOLJKWVUHGZKLOHWUDQVPLWWLQJ
JUHHQZKLOHUHFHLYLQJDFDOO&RQYHQWLRQDOFKDQQHOVRQO\
DQGRUDQJHZKHQUHFHLYLQJDQRSWLRQDOVLJQDOLQJFDOO%OLQNV
UHGZKHQWKHEDWWHU\SRZHULVORZZKLOHWUDQVPLWWLQJ
⑤ PTT (Push-To-Talk) switch
3UHVVDQGKROGWKLVVZLWFKWKHQVSHDNLQWRWKHPLFURSKRQH
to call a station.
⑥ Side 1 key
3UHVVWRDFWLYDWHLWVSURJUDPPDEOHIXQFWLRQ^SDJH`7KH
default is Squelch Off Momentary.
⑦ Side 2 key
3UHVVWRDFWLYDWHLWVSURJUDPPDEOHIXQFWLRQ^SDJH`
⑧ Universal connector
&RQQHFWDVSHDNHUPLFURSKRQHRUKHDGVHWKHUH^SDJH`
2WKHUZLVHNHHSWKHVXSSOLHGFDSLQSODFH
MIC
1
4
3
2
DEF
ABC
O
GHI
7 PQ
6 MN
5
JKL
8
TUV
YZ
9 WX
RS
#
0
SPECIALIST
RADIO
NX-200/ NX-300
① Selector knob
5RWDWHWRVHOHFWD]RQHRUFKDQQHOJURXS,'GHIDXOW
② Power switch/ Volume control
5RWDWHWRWXUQWKHWUDQVFHLYHU212))DQGWRDGMXVWWKH
volume.
③ Auxiliary key
3UHVVWRDFWLYDWHLWVSURJUDPPDEOHIXQFWLRQ^SDJH`
④ Transmit/ Receive/ Battery low indicator
,IHQDEOHGE\\RXUGHDOHUOLJKWVUHGZKLOHWUDQVPLWWLQJ
JUHHQZKLOHUHFHLYLQJDFDOO&RQYHQWLRQDOFKDQQHOVRQO\
DQGRUDQJHZKHQUHFHLYLQJDQRSWLRQDOVLJQDOLQJFDOO%OLQNV
UHGZKHQWKHEDWWHU\SRZHULVORZZKLOHWUDQVPLWWLQJ
5
SPECIALIST
RADIO
⑤ PTT (Push-To-Talk) switch
3UHVVDQGKROGWKLVVZLWFKWKHQVSHDNLQWRWKHPLFURSKRQH
to call a station.
⑥ Side 1 key
3UHVVWRDFWLYDWHLWVSURJUDPPDEOHIXQFWLRQ^SDJH`
The default is Squelch Off Momentary.
⑦ Side 2 key
3UHVVWRDFWLYDWHLWVSURJUDPPDEOHIXQFWLRQ^SDJH`
The default is Backlight.
⑧ Keypad (keypad models only)
Press these keys to send DTMF tones. These keys can
DOVREHSURJUDPPHGZLWKVHFRQGDU\IXQFWLRQV^SDJH`LI
a programmable function key is programmed as “Function”.
⑨
key
3UHVVWRDFWLYDWHLWVSURJUDPPDEOHIXQFWLRQ^SDJH`
The default is Menu.
⑩
key
3UHVVWRDFWLYDWHLWVSURJUDPPDEOHIXQFWLRQ^SDJH`
The default is Zone Up.
⑪
key
3UHVVWRDFWLYDWHLWVSURJUDPPDEOHIXQFWLRQ^SDJH`
⑫
key
3UHVVWRDFWLYDWHLWVSURJUDPPDEOHIXQFWLRQ^SDJH`
⑬
key
3UHVVWRDFWLYDWHLWVSURJUDPPDEOHIXQFWLRQ^SDJH`
7KHGHIDXOWLV=RQH'RZQ
⑭
key
3UHVVWRDFWLYDWHLWVSURJUDPPDEOHIXQFWLRQ^SDJH`
⑮ Universal connector
&RQQHFWDVSHDNHUPLFURSKRQHRUKHDGVHWKHUH^SDJH`
2WKHUZLVHNHHSWKHVXSSOLHGFDSLQSODFH
6
DISPLAY
Description
Monitor or Squelch Off is activated.
%OLQNVZKHQDQLQFRPLQJFDOOPDWFKHV\RXU2SWLRQDO
Signaling.
7KHFXUUHQW]RQHOHIWLFRQRU&+*,'ULJKWLFRQLV
added to scan.
6FDQLVLQSURJUHVV%OLQNVZKLOHVFDQLVSDXVHG
$PHVVDJHLVVWRUHGLQPHPRU\%OLQNVZKHQDQHZ
message has arrived.
The current channel is a Priority channel.
SPECIALIST
RADIO
Indicator
2SHUDWRU6HOHFWDEOH7RQH267LVDFWLYDWHG
6LJQDOVWUHQJWKLQGLFDWRU^SDJH`
%DWWHU\SRZHULQGLFDWRU^SDJH`
Talk Around is activated.
Site Lock is activated.
6FUDPEOHU(QFU\SWLRQLVDFWLYDWHG
$XWR5HFRUGLQJRQWKH9*6RSWLRQLVDFWLYDWHG
$XWR5HSO\0HVVDJHRQWKH9*6RSWLRQLV
activated.
7KHDX[LOLDU\IXQFWLRQLVDFWLYDWHG
Lone Worker is activated.
7KHFKDQQHOLVXVLQJKLJKWUDQVPLWSRZHU´/µ
DSSHDUVZKHQXVLQJORZWUDQVPLWSRZHU
VOX is activated.
7KHYLEUDWRULVDFWLYDWHG%OLQNVZKHQLQKLELWHG
Displays the time.
Displays the key functions for
,
, and
.
7
PROGRAMMABLE FUNCTIONS
)ROORZLQJLVDOLVWRIDYDLODEOHSURJUDPPDEOHIXQFWLRQV3OHDVH
FRQWDFW\RXUGHDOHUIRUIXUWKHUGHWDLOVRQWKRVHIXQFWLRQVZKLFK
have been programmed on your transceiver.
Q PROGRAMMABLE FUNCTIONS FOR NX-200S/ NX-300S
Auto Telephone 2
AUX
Battery Indicator
Broadcast Call 1 ~ 6
&+*,''RZQ
&+*,'6HOHFW
&+*,'5HFDOO
&+*,'8S
CW Message 5
'LUHFW&+*,'a
'LUHFW&+*,'6HOHFWa
(PHUJHQF\6
)L[HG9ROXPH
Forced Search Function
+RPH&+*,'
+RPH&+*,'6HOHFW
Key Lock
Lone Worker
/RZ7UDQVPLW3RZHU
Monitor 7
Monitor Momentary 7
•
•
•
•
•
•
•
•
•
•
•
•
•
Scan
6FDQ'HOHWH$GG
6FUDPEOHU(QFU\SWLRQ 6HQGWKH*36GDWD
6LWH'RZQ
Site Lock Site Select Site Up 6LWH8S'RZQ
Speaker Attenuation 9
Squelch Off 1
Squelch Off Momentary 1
Talk Around 7
Telephone Disconnect 2
Vibrator
VOX =RQH'HOHWH$GG
=RQH'RZQ
Zone Select Zone Up
SPECIALIST
RADIO
•
•
•
•
•
•
•
•
•
•
•
•
1
Available only for Analog Conventional operation.
Available only for Analog Trunking operation.
Available only for NXDN Trunking operation.
Can be programmed only on the Selector knob.
5
Available only for NXDN Conventional operation.
6
&DQEHSURJUDPPHGRQO\RQWKH$X[LOLDU\NH\DQGWKHRSWLRQDO
VSHDNHUPLFURSKRQH3)RUDQJHNH\
7
Available only for Analog Conventional, Analog Trunking, and NXDN
Conventional operation.
Available only for Analog Conventional and NXDN Conventional
operation.
9
Can be programmed only on the microphone programmable function
keys.
$YDLODEOHRQO\IRU212))RSHUDWLRQ
11
$YDLODEOHRQO\ZKHQ)RUFHG6HDUFKLV21
SPECIALIST
RADIO
2
9
Q PROGRAMMABLE FUNCTIONS FOR NX-200/ NX-300
Auto Reply Message 2
Autodial Autodial Programming AUX
Backlight
Broadcast Call 1 ~ 6
&+*,''RZQ
&KDQQHO(QWU\
&+*,'6HOHFW5
&+*,'5HFDOO
&+*,'8S
Clock
&ORFN$GMXVWPHQW
CW Message 6
Digit 1 × 'RZQ12
'LJLWð 'RZQ12
Digit 1 × Up 12
'LJLWð Up 12
'LUHFW&+*,'a
'LUHFW&+*,'6HOHFWa
Display Format
(PHUJHQF\7
)L[HG9ROXPH
Forced Search Function
*363RVLWLRQ'LVSOD\
*URXS1;'16
*URXS6'01;'1
*URXS6WDWXV1;'1
+RPH&+*,'
+RPH&+*,'6HOHFW
,QGLYLGXDO1;'1
,QGLYLGXDO6'01;'1
,QGLYLGXDO6WDWXV1;'1
•
•
•
•
•
•
•
•
•
•
•
•
•
•
•
•
•
•
•
•
•
Key Lock
Lone Worker
/RZ7UDQVPLW3RZHU
Maintenance
Menu
Monitor 9
Monitor Momentary 9
OST 1
Playback 2
Priority-channel Select 5HFHLYH(QWU\12
Scan
6FDQ'HOHWH$GG
6FUDPEOHU(QFU\SWLRQ
6FUDPEHU(QFU\SWLRQ&RGH
6'0$QDORJ1;'1
6HOFDOO$QDORJ
6HOFDOO6'0$QDORJ
6HOFDOO6WDWXV$QDORJ
6HQGWKH*36GDWD
6LWH'RZQ
Site Lock Site Select 5
Site Up 6LWH8S'RZQ5
Speaker Attenuation 11
Squelch Level 1
Squelch Off 1
Squelch Off Momentary 1
Stack
6WDWXV$QDORJ1;'1
Talk Around 9
7UDQVFHLYHU3DVVZRUG
Vibrator
Voice Memo 2
SPECIALIST
RADIO
•
•
•
•
•
•
•
•
•
•
•
•
•
•
•
VOX =RQH'HOHWH$GG
=RQH'RZQ
•
•
Zone Select 5
Zone Up
1
Available only for Analog Conventional operation.
$YDLODEOHRQO\LIWKH9*6RSWLRQDOERDUGKDVEHHQLQVWDOOHG
Available only for Analog Conventional and Analog Trunking
operation.
Available only for NXDN Trunking operation.
5
Can be programmed only on the Selector knob.
6
Available only for NXDN Conventional operation.
7
&DQEHSURJUDPPHGRQO\RQWKH$X[LOLDU\NH\DQGWKHRSWLRQDO
VSHDNHUPLFURSKRQH3)RUDQJHNH\
Available only for NXDN Conventional and NXDN Trunking operation.
9
Available only for Analog Conventional, Analog Trunking, and NXDN
Conventional operation.
Available only for Analog Conventional and NXDN Conventional
operation.
11
Can be programmed only on the microphone programmable function
keys.
12
Available only for 5-tone calls.
SPECIALIST
RADIO
2
11
BASIC OPERATIONS
SWITCHING POWER ON/OFF
Turn the PowerVZLWFKVolumeFRQWUROFORFNZLVHWRVZLWFKWKH
transceiver ON.
Turn the PowerVZLWFKVolumeFRQWUROFRXQWHUFORFNZLVHIXOO\
WRVZLWFKWKHWUDQVFHLYHU2))
2
2QNH\SDGPRGHOV\RXFDQHQWHUWKHSDVVZRUGGLUHFWO\
Press
SPECIALIST
RADIO
Q Transceiver Password (NX-200/ NX-300 Only)
,IWKHWUDQVFHLYHULVSDVVZRUGSURWHFWHG´3$66:25'µZLOO
DSSHDURQWKHGLVSOD\ZKHQWKHSRZHULVWXUQHG217R
XQORFNWKHWUDQVFHLYHUHQWHUWKHSDVVZRUG
1 Select a character using .
to enter the selected character.
7KLVVWHSLVXQQHFHVVDU\ZKHQXVLQJWKHNH\SDG
3 5HSHDWVWHSVDQGWRHQWHUWKHHQWLUHSDVVZRUG
•
4
Press
or # to delete a character. Press and hold
# to delete all characters.
Press
or
or WRFRQÀUPWKHHQWU\
,I\RXHQWHUDQLQFRUUHFWSDVVZRUGDQHUURUWRQHVRXQGV
and the transceiver remains locked.
7KHSDVVZRUGFDQFRQWDLQDPD[LPXPRIGLJLWV
ADJUSTING THE VOLUME
Rotate the PowerVZLWFKVolumeFRQWUROWRDGMXVWWKHYROXPH
&ORFNZLVHLQFUHDVHVWKHYROXPHDQGFRXQWHUFORFNZLVH
decreases it.
12
SELECTING A ZONE AND CHANNEL/GROUP ID
Select the desired zone using the key programmed as Zone
Select or Zone Up/Down(DFK]RQHFRQWDLQVDJURXSRI
channels.
6HOHFWWKHGHVLUHGFKDQQHOJURXS,'XVLQJWKH6HOHFWRUNQRE
GHIDXOW(DFKFKDQQHOJURXS,'LVSURJUDPPHGZLWKVHWWLQJV
for transmitting and receiving.
<RXFDQWRJJOHWKHGLVSOD\EHWZHHQWKH]RQHDQGFKDQQHOJURXS
ID names and number by pressing the key programmed as Display
)RUPDWRUE\DFFHVVLQJWKH0HQX1;1;2QO\^SDJH`
TRANSMITTING
SPECIALIST
RADIO
Note: If the default settings for
1;1;2QO\
and the Selector knob have been changed, use the appropriate
NH\VWRVHOHFWWKH]RQHDQGFKDQQHOJURXS,'
1 6HOHFWWKHGHVLUHG]RQHDQGFKDQQHOJURXS,'
2 Press the key programmed as Monitor or Squelch Off to
FKHFNZKHWKHURUQRWWKHFKDQQHOLVIUHH
3
,IWKHFKDQQHOLVEXV\ZDLWXQWLOLWEHFRPHVIUHH
Press the PTTVZLWFKDQGVSHDNLQWRWKHPLFURSKRQH
Release the PTTVZLWFKWRUHFHLYH
)RUEHVWVRXQGTXDOLW\KROGWKHWUDQVFHLYHUDSSUR[LPDWHO\
LQFKHVaFPIURP\RXUPRXWK
Q Making Group Calls (Digital) (NX-200/ NX-300 Only)
,IDNH\KDVEHHQSURJUDPPHGZLWKGroup or Group +
Status, you can select a group ID from the list to make a
call to those parties on a Conventional channel.
To select a group ID:
1 Press the key programmed as Group or Group + Status.
2 Press
WRVHOHFWDJURXS,'QDPHIURPWKHOLVW
3 Press and hold the PTTVZLWFKWRPDNHWKHFDOO
6SHDNLQWRWKHWUDQVFHLYHUDV\RXZRXOGGXULQJDQRUPDO
transmission.
Q Making Individual Calls (Digital) (NX-200/ NX-300 Only)
,IDNH\KDVEHHQSURJUDPPHGZLWKIndividual or
Individual + Status\RXFDQPDNHFDOOVWRVSHFLÀF
persons.
1 Press the key programmed as Individual or
Individual + Status.
2 Press
to select a unit ID from the list.
•
On keypad models, you can enter a unit ID directly.
Press and hold the PTT VZLWFKWRPDNHWKHFDOO
•
6SHDNLQWRWKHWUDQVFHLYHUDV\RXZRXOGGXULQJDQRUPDO
transmission.
RECEIVING
SPECIALIST
RADIO
3
Select the desired zone and channel. If signaling has been
SURJUDPPHGRQWKHVHOHFWHGFKDQQHO\RXZLOOKHDUDFDOORQO\
if the received signal matches your transceiver settings.
Note: 6LJQDOLQJDOORZV\RXUWUDQVFHLYHUWRFRGH\RXUFDOOV
7KLVZLOOSUHYHQW\RXIURPOLVWHQLQJWRXQZDQWHGFDOOV5HIHUWR
“6,*1$/,1*” on page 27 for details.
Q Receiving Group Calls (Digital)
When you receive a group call on a Conventional channel
and the received group ID matches the ID set up on your
transceiver, you can hear the caller’s voice.
When you receive a group call on a Trunking channel, the
WUDQVFHLYHUDXWRPDWLFDOO\VZLWFKHVWRWKHFRPPXQLFDWLRQV
channel to receive the call.
Q Receiving Individual Calls (Digital)
:KHQ\RXUHFHLYHDQLQGLYLGXDOFDOODULQJLQJWRQHZLOO
VRXQGDQGWKHFDOOHUҋV,'ZLOODSSHDURQWKHGLVSOD\1;
1;2QO\7RUHVSRQGWRWKHFDOOSUHVVDQGKROG
the PTT VZLWFKDQGVSHDNLQWRWKHWUDQVFHLYHUDV\RXZRXOG
during a normal transmission.
MENU MODE (NX-200/ NX-300 ONLY)
0DQ\IXQFWLRQVRQWKLVWUDQVFHLYHUDUHVHOHFWHGRUFRQÀJXUHG
through the Menu instead of physical controls. Once you
EHFRPHIDPLOLDUZLWKWKH0HQXV\VWHP\RXZLOODSSUHFLDWHWKH
versatility it offers.
MENU ACCESS
1
Press the key programmed as Menu.
2
7KHFDWHJRU\OLVWLVVKRZQ
:KHQWKHUHLVRQO\FDWHJRU\WKHIXQFWLRQOLVWLVVKRZQ SURFHHGWRVWHS
Press
to select a category item.
3
4
On keypad models, you can enter a category number directly.
Press
or WRYLHZWKHIXQFWLRQOLVW
Press
SPECIALIST
RADIO
•
to select a function item.
•
5
On keypad models, you can enter a function number directly.
Press
or
to set up the selected function item.
• Press
or # to return to the category list.
6
Press
to select your desired setting.
7
)RUVHWWLQJVZLWKPRUHWKDQOHYHOUHSHDWVWHSVDQG
Press
or
WRVHWWKHVHOHFWHGVHWWLQJDQGH[LW0HQXPRGH
• Press
or # at any time to return to the previous display.
• Press
DWDQ\WLPHWRH[LW0HQXPRGH
MENU CONFIGURATION
6RPHWUDQVFHLYHUNH\VPD\DOUHDG\EHSURJUDPPHGZLWK
functions listed in the Menu. Those functions can be accessed
directly by pressing the key. All other functions can still be
DFFHVVHGXVLQJWKHWUDQVFHLYHU0HQX7KHIROORZLQJWDEOHOLVWV
the available Menu items.
Display
$8725(3/<06*
AUTO DIAL
$872',$/352*
AUX
BROADCAST
Description
$XWR5HSO\0HVVDJH212))
Autodial Mode
Autodial Programming Mode
$8;212))
%URDGFDVW212))
15
16
Description
&ORFN212))
&ORFN$GMXVWPHQWPRGH
'LUHFW&+*,'a6HOHFW
'LVSOD\)RUPDW212))
)L[HG9ROXPH
Forced Search
*363RVLWLRQ'LVSOD\PRGH
*URXSPRGH
*URXS6WDWXVPRGH
*URXS6'0PRGH
+RPH&+*,'6HOHFW
Individual mode
,QGLYLGXDO6WDWXVPRGH
,QGLYLGXDO6'0PRGH
/RQH:RUNHU212))
/RZ7UDQVPLVVLRQ3RZHU212))
Maintenance Display mode
0RQLWRU212))
267212))
OST mode
Playback mode
Priority Channel Select mode
5HFHLYH(QWU\PRGH
6FDQ212))
6FDQ'HOHWH$GG
6FUDPEOHU(QFU\SWLRQ212))
6FUDPEOHU(QFU\SWLRQ&RGHPRGH
Selcall mode
6HOFDOO6WDWXVPRGH
6HOFDOO6'0PRGH
7UDQVPLW\RXU*36GDWD
6LWH/RFN212))
Display Site Number
Site Select Mode
Squelch Level mode
6TXHOFK2II212))
SPECIALIST
RADIO
Display
CLOCK
CLOCK ADJUST
',5(&7&+6(/
DISP FORMAT
),;('92/80(
)25&('6($5&+
*36326',63
*5283
*528367$786
*52836'0
+20(&+6(/
INDIVIDUAL
,1',967$786
,1',96'0
/21(:25.(5
/2:7;32:(5
0$,17(1$1&(
MONITOR
OST
OST LIST
PLAYBACK
35,&+6(/
5(&(,9((175<
SCAN
6&$1'(/$''
6&5$0(1&5<3
6&5$0&2'(
6(/&$//
6(/&$//67$786
6(/&$//6'0
6(1'*36'$7$
6,7(/2&.
6,7(1R
6,7(
648(/&+/(9(/
648(/&+2))
Display
Description
STACK
STATUS
6+2570(66$*(
TALK AROUND
PASSWORD
VIBRATOR
92,&(0(02
92;/(9(/
VOX
=21('(/$''
Stack mode
Status mode
Short Mesage mode
7DON$URXQG212))
7UDQVFHLYHU3DVVZRUGPRGH
9LEUDWRU212))
Voice Memo mode
VOX Level mode
92;212))
=RQH'HOHWH$GG
CHARACTER ENTRY
SPECIALIST
RADIO
There are 2 methods available for entering characters:
3UHVVLQJWKH
keys
WRF\FOHWKHFKDUDFWHUVIURP$a=a
Press
DQGDVSDFHGHIDXOWVHWWLQJV
You can also assign a character to an optional key and later
press that key to recall the assigned character: A ~ Z, a ~ z,
aRUDVSDFHDQGFKDUDFWHUV
8VLQJWKH'70)NH\SDG
3UHVVWKHNH\SDGNH\VWRHQWHUFKDUDFWHUVDVVKRZQLQWKH
WDEOHEHORZ
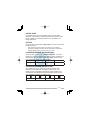
DTMF Key
Character Cycle
1
1
2
A B C 2
'()
*+,
5
J K L 5
6
M N O 6
7
P Q R S 7
789
9
W X Y Z 9
>VSDFH@
17
SCAN
Scan monitors for signals on the transceiver channels. While
scanning, the transceiver checks for a signal on each channel
and only stops if a signal is present.
To begin scanning, press the key programmed as Scan.
•
•
The LFRQDSSHDUVRQWKHGLVSOD\1;1;2QO\
7KH/('EOLQNVJUHHQ1;61;62QO\
When a signal is detected on a channel, Scan pauses at that
FKDQQHO7KHWUDQVFHLYHUZLOOUHPDLQRQWKHEXV\FKDQQHOXQWLOWKH
VLJQDOLVQRORQJHUSUHVHQWDWZKLFKWLPH6FDQUHVXPHV
SPECIALIST
RADIO
To stop scanning, press the Scan key again.
Note: To use Scan, there must be at least 2 channels in the scan
sequence.
TEMPORARY CHANNEL LOCKOUT
'XULQJVFDQ\RXFDQWHPSRUDULO\UHPRYHVSHFLÀFFKDQQHOV
from the scanning sequence by selecting them and pressing
the key programmed as Scan Delete/Add.
7KHFKDQQHOLVQRORQJHUVFDQQHG+RZHYHUZKHQVFDQQLQJLV
ended and restarted, the channels are reset and deleted channels
ZLOODJDLQEHLQWKHVFDQQLQJVHTXHQFH
PRIORITY SCAN
Note: To use Priority Scan, a Priority channel must be programmed.
:KHQXVLQJDVLQJOH3ULRULW\FKDQQHOWKHWUDQVFHLYHUZLOO
DXWRPDWLFDOO\FKDQJHWRWKH3ULRULW\FKDQQHOZKHQDFDOOLV
received on that channel, even if a call is being received on a
normal channel.
When using dual Priority channels, Priority channel 1 is given
precedence over Priority channel 2. So, if a call is received on
3ULRULW\FKDQQHOZKLOHDFDOOLVDOUHDG\RQ3ULRULW\FKDQQHO
WKHWUDQVFHLYHUZLOOFKDQJHWR3ULRULW\FKDQQHO
SCAN REVERT
SCAN DELETE/ADD
SPECIALIST
RADIO
7KH6FDQ5HYHUWFKDQQHOLVWKHFKDQQHOVHOHFWHGZKHQ\RX
press the PTT VZLWFKWRWUDQVPLWGXULQJVFDQ<RXUGHDOHUFDQ
SURJUDPRQHRIWKHIROORZLQJW\SHVRI6FDQ5HYHUWFKDQQHOV
• Selected: The last channel selected before scan.
• Selected + Talkback: Same as “Selected”, plus you can
UHVSRQGWRFDOOVRQWKHFKDQQHODWZKLFKVFDQLVSDXVHG
• Priority 1/ Priority 2:7KH3ULRULW\FKDQQHOHLWKHU3ULRULW\
RU3ULRULW\
• Priority 1 + Talkback/ Priority2 + Talkback: Same as
´3ULRULW\3ULRULW\µSOXV\RXFDQUHVSRQGWRFDOOVRQWKH
FKDQQHODWZKLFKVFDQLVSDXVHG
• Last Called + Selected:7KHODVWFKDQQHORQZKLFK\RX
receive a call.
<RXFDQDGGDQGUHPRYH]RQHVDQGRUFKDQQHOVJURXS,'VWR
and from your scan list.
1 6HOHFW\RXUGHVLUHG]RQHDQGRUFKDQQHOJURXS,'
2 Press the key programmed as Zone Delete/AddWR
DGGUHPRYH]RQHV or Scan Delete/AddWRDGGUHPRYH
FKDQQHOVJURXS,'V1;1;2QO\
•
You can also press and hold the key programmed as Scan
Delete/AddWRDGGUHPRYH]RQHV
PRIORITY-CHANNEL SELECT (NX-200/ NX-300 ONLY)
If the Priority channel has been set as Operator Selectable by
your dealer, you can reprogram the Priority channels.
1 6HOHFW\RXUGHVLUHG]RQHDQGFKDQQHOJURXS,'
2 Press the key programmed as Priority-channel Select.
3 Press
WRVHOHFW´1250$/µ´35,25,7<µ ´35,25,7<µ RU´35,25,7<µ 4 Press
WRVDYHWKHVHWWLQJDQGH[LW
19
FleetSync: ALPHANUMERIC 2-WAY PAGING FUNCTION
)OHHW6\QFLVDQ$OSKDQXPHULFZD\3DJLQJ)XQFWLRQDQGLVD
SURWRFRORZQHGE\Kenwood Corporation.
Note:
X This function is available only in analog operation.
X Ask your dealer for further information regarding the
NX-200S/ NX-300S.
SELCALL (SELECTIVE CALLING)
A Selcall is a voice call to a station or group of stations.
•
4
SPECIALIST
RADIO
Q Transmitting (NX-200/ NX-300 Only)
1 Select your desired zone and channel.
2 Press the key programmed as Selcall or Selcall +
Status to enter Selcall mode.
3 Press
WRVHOHFWWKHVWDWLRQ\RXZDQWWRFDOO
On keypad models, if Manual Dialing is enabled, you can
directly enter the station ID.
Press the PTTVZLWFKDQGEHJLQ\RXUFRQYHUVDWLRQ
Q Receiving
$QDOHUWWRQHZLOOVRXQGDQGWKHWUDQVFHLYHUZLOOHQWHU
6HOFDOOPRGH7KHFDOOLQJVWDWLRQҋV,'ZLOODSSHDUZKHQ
D6HOFDOOLVUHFHLYHG1;1;2QO\<RXFDQ
respond to the call by pressing the PTTVZLWFKDQG
speaking into the microphone.
Q Identification Codes
$Q,'FRGHLVDFRPELQDWLRQRIDGLJLW)OHHWQXPEHUDQGD
GLJLW,'QXPEHU(DFKWUDQVFHLYHUKDVLWVRZQ,'
(QWHUD)OHHWQXPEHUaWRPDNHDJURXSFDOO
(QWHUDQ,'QXPEHUaWRPDNHDQLQGLYLGXDOFDOOLQ
\RXUÁHHW
•
(QWHUD)OHHWQXPEHUWRPDNHDFDOOWRDOOXQLWVLQWKHVHOHFWHG
ÁHHW)OHHWFDOO
(QWHUDQ,'QXPEHUWRPDNHDFDOOWRWKHVHOHFWHG,'LQDOO
ÁHHWV6XSHUYLVRUFDOO
Select “ALL” Fleet and “ALL” ID to make a call to all units
%URDGFDVWFDOO
STATUS MESSAGE
SPECIALIST
RADIO
<RXFDQVHQGDQGUHFHLYHGLJLW6WDWXVPHVVDJHVZKLFKPD\
be decided in your talk group. Messages can contain up to 16
DOSKDQXPHULFFKDUDFWHUV6WDWXVPHVVDJHVUDQJHIURPWR
aDUHUHVHUYHGIRUVSHFLDOPHVVDJHV
$PD[LPXPRIUHFHLYHGPHVVDJHVFRPELQHGVWDWXV
PHVVDJHVDQGVKRUWPHVVDJHVFDQEHVWRUHGLQWKHVWDFN
memory of your transceiver.
Q Transmitting
1 Select your desired zone and channel.
2 Press the key programmed as Status to enter Status
PRGHSURFHHGWRVWHSRUSelcall + Status to enter
6HOFDOOPRGHSURFHHGWRVWHS
3 Press
WRVHOHFWWKHVWDWLRQ\RXZDQWWRFDOO
•
4
5
Press
Press
•
6
If Manual Dialing is enabled, you can enter a station ID
by using the DTMF keypad, or by using
. When
using
, cycle through the digits to select a digit,
then press
to set the digit and move the cursor to the
right. Repeat this process until the entire ID is entered.
to enter Status mode.
WRVHOHFWWKHVWDWXV\RXZDQWWRWUDQVPLW
If Manual Dialing is enabled, you can enter a status ID by
using the DTMF keypad, or by using
UHIHUWR
VWHSDERYH
Press the PTTVZLWFKRUSide 2 key to initiate the call.
´&203/(7(!µDSSHDUVRQWKHGLVSOD\ZKHQWKHVWDWXV
has been successfully transmitted.
21
Q Receiving
$FDOOLQJ,'RUWH[WPHVVDJHZLOODSSHDUZKHQD6WDWXVFDOO
is received. Press any key to return to normal operation.
Q Reviewing Messages in the Stack Memory (NX-200/ NX-300 Only)
1 Press the key programmed as Stack, or press and hold
the key programmed as Selcall, Status, or Selcall +
Status to enter Stack mode.
2
The last received message is displayed.
Press
•
3 Press
•
•
to select the desired message.
0HVVDJHW\SHVDUHLGHQWLÀHGDVIROORZV
I: Caller ID, S: Status Message, M: Short Message
Press and hold
for 1 second or press
to cycle the
GLVSOD\LQIRUPDWLRQDVIROORZV
,'1DPH!6WDWXV6KRUW0HVVDJH!&+*,'!7LPH6WDPS
SPECIALIST
RADIO
•
to return to normal operation.
To delete the selected message, press
or #7RFRQÀUP
the deletion, press
or .
To delete all messages, press and hold
or # for
VHFRQG7RFRQÀUPWKHGHOHWLRQSUHVV
or .
SHORT/LONG MESSAGES
Received short messages are displayed the same as Status
PHVVDJHVDQGDUHVWRUHGLQWKHVDPHVWDFNPHPRU\1;
1;2QO\
To send short messages, and to send and receive long
messages, you must connect the transceiver to a PC. Ask
your dealer for details.
GPS REPORT
7RVHQG\RXUORFDWLRQGDWD\RXPXVWÀUVWFRQQHFWD*36XQLW
WRWKHWUDQVFHLYHU*36GDWDFDQEHPDQXDOO\WUDQVPLWWHGE\
pressing the key programmed as Send the GPS data, or by
DFFHVVLQJWKH0HQX^SDJH`,IVHWXSE\\RXUGHDOHU*36
data may be automatically transmitted at a preset time interval.
22
5-TONE SIGNALING (NX-200/ NX-300 ONLY)
5-tone Signaling is enabled or disabled by your dealer. This
IXQFWLRQRSHQVWKHVTXHOFKRQO\ZKHQWKHWUDQVFHLYHUUHFHLYHV
the 5 tones programmed in your transceiver. Transceivers that
GRQRWWUDQVPLWWKHFRUUHFWWRQHVZLOOQRWEHKHDUG
SELCALL (SELECTIVE CALLING)
A Selcall is a voice call to a station or group of stations.
•
4
SPECIALIST
RADIO
Q Transmitting
1 Select your desired zone and channel.
2 Press the key programmed as Selcall, Selcall + Status
or Selcall + SDM to enter Selcall mode.
3 Press
WRVHOHFWWKHVWDWLRQ\RXZDQWWRFDOO
On keypad models, you can directly enter the station ID.
Press the key programmed as Call 1 to Call 6 and
begin your conversation.
Note: Additionally, you can also use the keys programmed as Digit
1x Down, Digit 1x Up, Digit 10x Down, and Digit 10x Up keys to
DGMXVWWKH6HOFDOOQXPEHUDigit 1x Up/DownLQFUHDVHVGHFUHDVHV
the Selcall number by 1 each time the key is pressed. Digit 10x
Up/DownLQFUHDVHVGHFUHDVHVWKH6HOFDOOQXPEHUE\HDFKWLPH
the key is pressed.
Q Receiving
When you receive a call containing the correct tones, the
WUDQVFHLYHUZLOOHQWHU6HOFDOOPRGH$QDOHUWWRQHZLOOVRXQG
and the calling station’s ID appear on the display. Press any
key to return to normal operation.
STATUS MESSAGE
<RXFDQVHQGDQGUHFHLYH6WDWXVPHVVDJHVZKLFKPD\EH
decided in your talk group. Messages can contain up to 16
alphanumeric characters.
$PD[LPXPRIUHFHLYHGPHVVDJHVFDQEHVWRUHGLQWKH
stack memory of your transceiver.
•
4
5
6
You can enter a station ID by using the DTMF keypad, or
by using
.
Press
Press
•
SPECIALIST
RADIO
Q Transmitting
1 Select your desired zone and channel.
2 Press the key programmed as Status to enter Status
PRGHSURFHHGWRVWHSRUSelcall + Status to enter
6HOFDOOPRGHSURFHHGWRVWHS
3 Press
WRVHOHFWWKHVWDWLRQ\RXZDQWWRFDOO
to enter Status mode.
WRVHOHFWWKHVWDWXV\RXZDQWWRWUDQVPLW
You can enter a status ID by using the DTMF keypad, or by
using
UHIHUWRVWHSDERYH
Press the key programmed as Call 1 to Call 6 to initiate
the call.
Q Receiving
$FDOOLQJ,'RUWH[WPHVVDJHZLOODSSHDUZKHQD6WDWXVFDOO
is received. Press any key to return to normal operation.
Q Reviewing Messages in the Stack Memory
1 Press the key programmed as Stack to enter Stack mode.
•
2
The last received message is displayed.
Press
•
to select the desired message.
Press and hold
for 1 second or press
to cycle the
GLVSOD\LQIRUPDWLRQDVIROORZV
6HOFDOO1DPH!6WDWXV1DPH!&+*,'!7LPH6WDPS
3 Press
•
•
to return to normal operation.
To delete the selected message, press
or #7RFRQÀUP
the deletion, press
or .
To delete all messages, press and hold
or # for
VHFRQG7RFRQÀUPWKHGHOHWLRQSUHVV
or .
ADVANCED OPERATIONS
DTMF (DUAL TONE MULTI FREQUENCY) CALLS
•
•
SPECIALIST
RADIO
Q Making a DTMF Call (NX-200/ MX-300 Only)
Manual Dialing (Keypad Models Only)
1 Press and hold the PTTVZLWFK
2 (QWHUWKHGHVLUHGGLJLWVXVLQJWKH'70)NH\SDG
If you release the PTTVZLWFKWUDQVPLWPRGHZLOOHQGHYHQ
if the complete number has not been sent.
If the Keypad Auto PTT function has been enabled by your
dealer, you do not need to press the PTTVZLFKWRWUDQVPLW
you can make the call simply pressing the DTMF keys.
Store & Send
1 Press the key programmed as Autodial.
2 (QWHUXSWRGLJLWVXVLQJWKH'70)NH\SDG
•
3
Alternatively, you can enter digits by using
.
Press the PTTVZLWFKWRPDNHWKHFDOO
Q Autodial (NX-200/ MX-300 Only)
$XWRGLDODOORZV\RXWRTXLFNO\FDOO'70)QXPEHUVWKDWKDYH
been programmed onto your transceiver.
1 Press the key programmed as Autodial, or access the
0HQX^SDJH`
7KHÀUVWHQWU\LQWKH$XWRGLDOOLVWDSSHDUVRQWKHGLVSOD\
25
2
Press
to select your desired Autodial list
QXPEHURUHQWHUWKHOLVWQXPEHUGLUHFWO\a
•
3
The stored entry appears on the display.
Press the PTT VZLWFKWRPDNHWKHFDOO
EMERGENCY CALLS
SPECIALIST
RADIO
Q Stun Code
7KLVIXQFWLRQLVXVHGZKHQDWUDQVFHLYHULVVWROHQRUORVW
When the transceiver receives a call containing a stun
code, the transceiver becomes disabled. The stun code is
FDQFHOOHGZKHQWKHWUDQVFHLYHUUHFHLYHVDFDOOZLWKDUHYLYH
code.
,I\RXUWUDQVFHLYHUKDVEHHQSURJUDPPHGZLWKWKH(PHUJHQF\
function, you can make emergency calls.
1 Press and hold the key programmed as Emergency.
•
Ask your dealer for the length of time necessary to hold this
NH\EHIRUHWKHWUDQVFHLYHUHQWHUV(PHUJHQF\PRGH
:KHQWKHWUDQVFHLYHUHQWHUV(PHUJHQF\PRGHLWZLOOFKDQJH
WRWKH(PHUJHQF\FKDQQHODQGEHJLQWUDQVPLWWLQJEDVHGRQ
KRZLWLVVHWXSE\\RXUGHDOHU
2 7RH[LW(PHUJHQF\PRGHSUHVVWKHEmergency key again.
,IWKH(PHUJHQF\PRGHFRPSOHWHVDSUHVHWQXPEHURIF\FOHV
(PHUJHQF\PRGHZLOODXWRPDWLFDOO\HQGDQGWKHWUDQVFHLYHU
ZLOOUHWXUQWRWKH]RQHDQGFKDQQHOWKDWZDVLQXVHEHIRUH
(PHUJHQF\PRGHZDVHQWHUHG
Note:
X <RXUGHDOHUFDQVHWWKHWUDQVFHLYHUWRHPLWDWRQHZKHQ
WUDQVPLWWLQJLQ(PHUJHQF\PRGH
X Your dealer can set the transceiver to emit tones and received
VLJQDOVDVQRUPDORUPXWHWKHVSHDNHUGXULQJ(PHUJHQF\
operation.
26
SCRAMBLER
Press the key programmed as ScramblerEncryption, or
DFFHVVWKH0HQX^SDJH`WRVZLWFKWKHWUDQVFHLYHUWRVHFXUH
HQFU\SWHGWUDQVPLVVLRQ
•
Pressing the PTT VZLWFKDIWHUWKH6FUDPEOHUIXQFWLRQKDVEHHQ
turned ON encrypts the transmitted signal.
SIGNALING
SPECIALIST
RADIO
Q Quiet Talk (QT)/ Digital Quiet Talk (DQT)
Your dealer may have programmed QT or DQT signaling on
\RXUWUDQVFHLYHUFKDQQHOV$47WRQH'47FRGHLVD
VXEDXGLEOHWRQHFRGHZKLFKDOORZV\RXWRLJQRUHQRWKHDU
FDOOVIURPRWKHUSDUWLHVZKRDUHXVLQJWKHVDPHFKDQQHO
Operator Selectable Tone (OST) (NX-200/ NX-300 Only)
,IDNH\KDVEHHQSURJUDPPHGZLWKOST, you can
UHSURJUDPWKH47'47VHWWLQJVRQHDFKRI\RXUFKDQQHOV
1 Select your desired channel.
2 Press and hold the key programmed as OST for
1 second.
to select your desired tone or code.
3 Press
<RXUGHDOHUFDQVHWXSWRWRQHVFRGHV
4 Press
WRVDYH\RXUQHZVHWWLQJ
5 :KHQ\RXKDYHÀQLVKHGRSHUDWLQJXVLQJ267SUHVVWKH
OST key again to turn the OST function OFF.
Q Radio Access Number (RAN)
5$1LVDQHZVLJQDOLQJV\VWHPGHVLJQHGIRUGLJLWDOUDGLR
communications.
:KHQDFKDQQHOLVVHWXSZLWKD5$1VTXHOFKZLOORQO\
RSHQZKHQDFDOOFRQWDLQLQJDPDWFKLQJ5$1LVUHFHLYHG
27
If a call containing a different RAN is made on the same
FKDQQHO\RXDUHXVLQJ\RXZLOOQRWKHDUWKHFDOO7KLV
DOORZV\RXWRLJQRUHQRWKHDUFDOOVIURPRWKHUSDUWLHVZKR
are using the same channel.
SPECIALIST
RADIO
Q Optional Signaling
Your dealer may also program several types of optional
signaling for your transceiver channels.
5-tone Signaling (NX-200/ NX-300 Only): Refer to
“6(/&$//6(/(&7,9(&$//,1*µRQSDJH.
DTMF Signaling : DTMF Signaling opens the squelch only
ZKHQWKHWUDQVFHLYHUUHFHLYHVDFDOOFRQWDLQLQJDPDWFKLQJ
DTMF code.
FleetSync Signaling : Refer to “6(/&$//6(/(&7,9(
&$//,1*µRQSDJH
NXDN ID Signaling: NXDN ID is an optional signaling
system available only for digital communications.
VOICE OPERATED TRANSMISSION (VOX)
VOX can be activated or deactivated by your dealer. VOX
RSHUDWLRQDOORZV\RXWRWUDQVPLWKDQGVIUHH
Note:7RRSHUDWH92;\RXPXVWXVHDQRSWLRQDO.+6.+6
.+6%+RU.+62+KHDGVHW
Q VOX Gain Level (NX-200/ NX-300 Only)
1 Connect the headset to the transceiver.
2 Press the key programmed as VOX.
3
7KHFXUUHQW92;*DLQOHYHODSSHDUVRQWKHGLVSOD\
Press
level.
WRLQFUHDVHRUGHFUHDVHWKH92;*DLQ
7KH92;*DLQFDQEHDGMXVWHGIURPOHYHOVWR
4 :KLOHDGMXVWLQJWKHOHYHOVSHDNLQWRWKHKHDGVHW
PLFURSKRQHWRWHVWWKHVHQVLWLYLW\OHYHO<RXUYRLFHLV
QRWWUDVPLWWHGGXULQJWKLVWHVWSURFHGXUH
5
:KHQVRXQGLVUHFRJQL]HGWKH/('OLJKWVRUDQJH
Press
to save the setting.
•
SPECIALIST
RADIO
Q VOX Operation
1 Connect the headset to the transceiver.
2 Press and hold the key programmed as VOX for
2 seconds.
3 To transmit, simply speak into the microphone.
The transceiver recognizes sound levels depending on
WKH92;*DLQOHYHO,ILWLVWRRVHQVLWLYHLWZLOOWUDQVPLW
ZKHQWKHUHLVQRLVHLQWKHEDFNJURXQG,ILWLVQRWVHQVLWLYH
HQRXJKLWZLOOQRWSLFNXS\RXUYRLFHZKHQ\RXEHJLQ
speaking.
4 :KHQ\RXÀQLVKVSHDNLQJWUDQVPLVVLRQHQGV
5 To turn the VOX function OFF, press and hold the VOX
key again, for 2 seconds.
Note:,IDVSHDNHUPLFURSKRQHLVFRQQHFWHGWRWKHWUDQVFHLYHU
ZKLOH92;LV21DQGWKH92;*DLQ/HYHOLVVHWWRDVHQVLWLYH
level, louder received signals may cause the transceiver to
transmit.
29
BACKGROUND OPERATIONS
Your dealer can activate a variety of transceiver functions to
SHUIRUPZLWKRXWDQ\DGGLWLRQDORSHUDWLRQRQ\RXUSDUW
CLOCK (NX-200/ NX-300 ONLY)
,IDFWLYDWHGE\\RXUGHDOHU\RXFDQYLHZWKHFORFNE\SUHVVLQJ
the key programmed as Clock.
Note: Removing or leaving the battery pack uncharged for
H[WHQGHGSHULRGVZLOOFOHDUWKHFORFNWLPH
•
2
3
4
5
The current time setting appears.
SPECIALIST
RADIO
To set the clock:
1 Press the key programmed as Clock Adjustment.
Press
to increase or decrease the year setting.
Press
to set the year and cycle to the month setting.
5HSHDWVWHSVDQGWRVHWWKHPRQWKGD\KRXUDQGPLQXWH
Press
WRH[LW&ORFN$GMXVWPHQWPRGH
•
You can press
DWDQ\WLPHWRH[LW&ORFN$GMXVWPHQWPRGH
VIBRATOR
:KHQDQRSWLRQDOYLEUDWRULVLQVWDOOHGWKHYLEUDWRUIXQFWLRQZLOO
DOHUW\RXZKHQDQRSWLRQDOVLJQDOLQJFDOOLVUHFHLYHG3UHVVWKH
key programmed as VibratorRUDFFHVVWKH0HQX^SDJH`
to turn the Vibrator function ON and OFF.
TIME-OUT TIMER (TOT)
The Time-out Timer is used to prevent you from using a
FKDQQHOIRUDQH[WHQGHGGXUDWLRQ,I\RXFRQWLQXRXVO\WUDQVPLW
IRUDSUHVHWWLPHWKHWUDQVFHLYHUZLOOVWRSWUDQVPLWWLQJDQGDQ
DOHUWWRQHZLOOVRXQG5HOHDVHWKHPTTVZLWFK
BATTERY SAVER
The Battery Saver can be activated only on Conventional
FKDQQHOV7KLVIXQFWLRQGHFUHDVHVWKHDPRXQWRISRZHUXVHG
ZKHQDVLJQDOLVQRWEHLQJUHFHLYHGDQGQRRSHUDWLRQVDUH
being performed.
KEY LOCK
Press the key programmed as Key Lock to lock and unlock the
transceiver keys.
7KHIROORZLQJNH\VVWLOOIXQFWLRQZKHQ.H\/RFNLVDFWLYDWHG
(PHUJHQF\%DFNOLJKW0RQLWRU0RQLWRU0RPHQWDU\6TXHOFK2II
Squelch Off Momentary, Function, Key Lock, PTT
SPECIALIST
RADIO
LOW BATTERY WARNING (NX-200S/ NX-300S)
Press the key programmed as Battery Indicator7KH/('
OLJKWVIRUVHFRQGVGLVSOD\LQJWKHEDWWHU\SRZHUUHPDLQLQJDV
GHVFULEHGLQWKHWDEOHEHORZ :KHQWKHEDWWHU\SRZHULVYHU\
ORZUHFKDUJHRUUHSODFHWKHEDWWHU\SDFN /LJKWV*UHHQ
Lights Orange
Lights Red
Blinks Red
+LJK
6XIÀFLHQW
/RZ
9HU\ORZ
LOW BATTERY WARNING (NX-200/ NX-300)
<RXUGHDOHUFDQVHWDQDOHUWWRQHWRVRXQGDQGWKH/('
LQGLFDWRUWREOLQNUHGZKHQWKHEDWWHU\SRZHULVORZ7KH
EDWWHU\SRZHULFRQGLVSOD\VWKHEDWWHU\SRZHUUHPDLQLQJDV
GHVFULEHGLQWKHWDEOHEHORZ :KHQWKHEDWWHU\SRZHULVYHU\
ORZUHFKDUJHRUUHSODFHWKHEDWWHU\SDFN
+LJK
6XIÀFLHQW
/RZ
9HU\ORZ
SIGNAL STRENGTH INDICATOR (NX-200/ NX-300 ONLY)
The signal strength indicator displays the strength of received
FDOOV1RLFRQDSSHDUVZKHQQRVLJQDOLVDYDLODEOH
Strong
6XIÀFLHQW
Weak
9HU\ZHDN
ÁDVKHVZKHQRXWRIUDQJH1;'17UXQNLQJRQO\
COMPANDER
SPECIALIST
RADIO
If programmed by your dealer for a channel, the compander
ZLOOUHPRYHH[FHVVLYHQRLVHIURPWUDQVPLWWHGVLJQDOVWR
provide higher clarity of signals.
Note:7KH&203$1'(5LVXVHGRQO\LQDQDORJRSHUDWLRQ
BUSY CHANNEL LOCKOUT (BCL)
On Conventional channels, if BCL is set up by your dealer, you
ZLOOEHXQDEOHWRWUDQVPLWLIWKHFKDQQHOLVDOUHDG\LQXVH8VH
DGLIIHUHQWFKDQQHORUZDLWXQWLOWKHFKDQQHOEHFRPHVIUHH
If BCL Override has been programmed, you can transmit over
the current signal:
1 Press and hold the PTT VZLWFK
,IWKHFKDQQHOLVDOUHDG\LQXVHDZDUQLQJWRQHZLOOVRXQG
2 Quickly release and then press the PTT VZLWFKDJDLQ
3 6SHDNLQWRWKHWUDQVFHLYHUDV\RXZRXOGGXULQJDQRUPDO
call.
CONTROL CHANNEL HUNT
On digital Trunking channels, the transceiver automatically
searches for a control channel.
:KLOHVHDUFKLQJIRUDFRQWUROFKDQQHOWKHDQWHQQDLFRQZLOOÁDVK
1;1;2QO\DQGQRVLJQDOVFDQEHUHFHLYHG
PTT ID
377,'LVWKHWUDQVFHLYHUXQLTXH,'FRGHZKLFKLVVHQWHDFK
time the PTTVZLWFKLVSUHVVHGDQGRUUHOHDVHG
Note: PTT ID can be made only in analog operation.
VGS-1 OPTIONAL VOICE GUIDE & STORAGE UNIT
VOICE RECORDER
SPECIALIST
RADIO
7KHYRLFHUHFRUGHUDOORZV\RXWRUHFRUGFRQYHUVDWLRQVDQG
create voice memos.
Q Auto Recording (NX-200/ NX-300 Only)
,IDFWLYDWHGWKHDXWRUHFRUGHUZLOOFRQWLQXRXVO\UHFRUGDOO
transmitted and received signals. The recording storage
DUHDUHWDLQVRQO\WKHODVWVHFRQGVRIUHFRUGLQJ
Q Voice Memos (NX-200/ NX-300 Only)
To record a voice memo for later playback:
1 Press the key programmed as Voice Memo, press and
hold the key programmed as Playback, or access the
0HQX^SDJH`
2
3
7KHGXUDWLRQRIUHFRUGLQJPHPRU\ZLOODSSHDURQWKH
GLVSOD\DQGEHJLQFRXQWLQJGRZQ
Speak into the microphone to record your memo.
Press
to end the recording and store it in memory.
,IWKHPHPRU\EHFRPHVIXOOUHFRUGLQJZLOOVWRSDQGWKH
YRLFHPHPRZLOOEHVWRUHGLQPHPRU\
Q Auto Reply Message (NX-200/ NX-300 Only)
You can set the transceiver to automatically respond to
,QGLYLGXDO&DOOVZKLOHXVLQJ)OHHW6\QF1;'1
1 Press the key programmed as Auto Reply Message to
enter Auto Reply Message mode.
2 :KHQ\RXUHFHLYHDQ,QGLYLGXDO&DOOWKHWUDQVFHLYHUZLOO
send an automatic response to the caller after
VHFRQGVDQG´*5((7,1*µDSSHDUVRQWKHGLVSOD\
•
•
If you are available to receive the call, press any key to
cancel the auto response.
If there is memory available on your transceiver, “I am not
DYDLODEOH/HDYH\RXU0HVVDJHµZLOOEHVHQWWRWKHFDOOHU
and they can leave you a recorded message. When a
PHVVDJHLVVWRUHGRQ\RXUWUDQVFHLYHU´1(:0(66$*(µ
appears on the display.
If no memory is available on your transceiver, “I am not
DYDLODEOHµZLOOEHVHQWWRWKHFDOOHUDQG´0(025<)8//µ
appears on the display.
SPECIALIST
RADIO
•
Q Playback (NX-200/ NX-300 Only)
To play back a recorded conversation, memo, or message:
1 Press the key programmed as Playback or access the
0HQX^SDJH`
2
,IWKHODVWDFWLRQRQ\RXUWUDQVFHLYHUZDVWRDXWRUHFRUG
\RXUFRQYHUVDWLRQ´6725("µZLOODSSHDURQWKHGLVSOD\
RWKHUZLVHDUHFRUGLQJFKDQQHOZLWKWKHWLPHRIWKH
UHFRUGLQJZLOODSSHDU
Press
•
WRVHOHFWWKHFKDQQHO\RXZDQWWRSOD\
“AR” represents auto recorded conversations, “RM”
represents auto reply messages, and “VM” represents
voice memos.
3 7KHWUDQVFHLYHUZLOODQQRXQFHWKHWLPHDQGFKDQQHO
WKHQWKHUHFRUGLQJZLOOSOD\EDFN
•
:KHQWKHHQWLUHUHFRUGLQJKDVEHHQSOD\HG´(1'2)
0(66$*(µLVGLVSOD\HG<RXFDQDOVRHQGWKHUHFRUGLQJ
at any time by pressing
.
To delete the selected recording, press
. To clear all the
recorded data, press and hold
.
VOICE GUIDE
:KHQFKDQJLQJWKH]RQHDQGRUFKDQQHODQDXGLRYRLFHZLOO
DQQRXQFHWKHQHZ]RQHDQGFKDQQHO$GGLWLRQDOO\ZKHQ
FKDQJLQJDIXQFWLRQVHWWLQJWKHQHZVHWWLQJZLOOEHDQQRXQFHG
SPECIALIST
RADIO
Note: Voice announcements vary by dealer setting.
SPECIALIST
RADIO