1
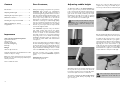
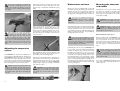
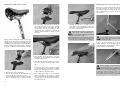
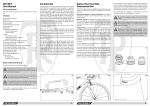
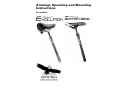
Airwings Operating and Mounting
Instructions
For models
1
Content
Dear Customer,
Introduction ...........................................................2
thank you for buying a suspension seat post from
AIRWINGS. Our products are manufactured
in Germany with the high quality demanded of
mechanical engineering products and in accordance
with the relevant industrial standards. Please read
these instructions carefully before performing any
work on your seat post. Be sure to observe the
instructions on maintenance and care, bearing in
mind that a certain degree of skill and high-quality
tools are essential for any kind of work done on
your bike. Don’t overestimate your own abilities
and turn to your bicycle dealer for help if should
ever have the slightest doubt.
Adjusting saddle height .......................................3
Adjusting the suspension system ..................... 4
Maintenance and care .........................................5
Mounting the seat post and saddle .................. 5
Warranty (liability for defects)
and guarantee .......................................................8
Impressum
Text, concept and product photos:
Ingenieurbüro Zedler
www.zedler.de
Teinacher Straße 34
D-71634 Ludwigsburg
Germany
Design:
www.ott-dtp-service.de
Technical details in the text and illustrations of this
manual are subject to change.
© No part of these instructions may be reprinted,
translated or reproduced in any way without prior
written permission.
Adjusting saddle height
Release one of the two Allen screws by 2 to 3
complete turns using a 5 mm Allen key. It is not
necessary to take the whole mechanism apart.
To adjust the saddle to the desired height you
need to open the seat post binder and then shift
it up or down inside the seat tube. Instructions on
how to open and close the seat post binder will be
given in the user manual provided by the bicycle
manufacturer, especially if your bike is equipped
with a quick-release. There you will also find tips
on how to find the correct saddle height.
Do not ride your bike with the seat post
drawn out to a length where you can see
the max-mark. This could cause damage to the
seat post or frame.
!
Your AIRWINGS suspension seat post enhances
your riding comfort and protects you against
bumps from the ground. The seat post is designed
for use on tarred or other hard-surface roads
and paths, as well as for cross-country, marathon
and cycling tours. It is not suitable for freeriding,
downhilling, dual slalom, jumps etc. Improper use
can result in sudden failure, with unforeseeable
consequences.
Give the saddle a light blow if it doesn’t move easily
at first and then bring it into the desired position.
To adjust the tilt you first need to release both
screws. The saddle will tilt as you tighten them
again depending on which screw you tighten more.
You may find it necessary to repeat releasing and
tightening the screws several times to get the
saddle into the desired position. Finally tighten the
screws again with a torque of no more than 6 Nm.
Normal hand force applied to a standard Allen key
is quite sufficient to clamp the saddle tight.
For your own safety, please note that the weight of
the rider including any baggage he may be carrying
on his back must not exceed 140 kg. At the same
time, observe the maximum weight specified by the
bicycle manufacturer. Mounting a carrier or a child
seat to the AIRWINGS seat post is not permitted.
We wish you many years of riding enjoyment
and fun on your patented AIRWINGS suspension
system.
AIRWINGS Hillreiner GmbH
www.airwings-systems.de
State as of October 2003
With frames where the seat tube extends beyond
the top tube the seat post must reach below the
level of the top tube! In some cases this will require
an insertion depth of at least 10 centimeters.
The method of adjusting the fore-to-aft position
and tilt of the saddle will vary depending on the
type of seat post.
2
Use a torque key or ask your bicycle dealer
to tighten the screws with the correct
torque.
i
3
If you use too much force or tighten the
screw with a long-handled tool or a pair
of pliers there will be a risk that the screws, the
seat clamp pin or the mounting itself fail. Danger
of accident!
If the seat post felt too soft, turn the screw a few
turns clockwise (as when looking at the seat post
from its end), i.e. inward. This will make the spring
stiffer.
stiffer
Maintenance and care
Clean your seat post regularly with a soft cloth
and water, removing any adhering dirt and salt. For
obstinate dirt you can use warm water with a few
squirts of commercial washing-up liquid. Do not
use aggressive cleaning agents such as solvents etc.
A steam jet is not suitable for cleaning your
AIRWINGS seat post, since a powerful
water jet can penetrate it and spoil the
lubrication.
!
After adjusting the saddle check whether
everything is securely fastened. Take
hold of the saddle front and rear and try
to twist it against the frame of the bike.
Also try to tilt the saddle by bringing your weight to
bear on it once at its front and once at its rear end.
If the saddle or the seat post yields to force,
tighten the screws a little more, e.g. half a full
turn.
If the seat post felt too hard, turn the screw
counterclockwise (as when looking at the seat
post from its end), i.e. outward. An important note:
At the very most, turn the adjusting screw out to
a point where it is flush with the end of the seat
post tube. Turning it out further could cause the
seat post to fail!
If your seat post is mounted in a steel
frame you should dismount it once a year.
Clean the seat post and seat tube with a cloth
and grease both surfaces before mounting the
seat post again. This will help to prevent the seat
post from rusting onto the frame.
Mark the position of your seat post in the
frame by drawing a line with a felt pen along
the upper edge of the seat tube and another line
perpendicular to the first.Then you will easily find
the original position again when remounting the
seat post.
i
4
After adjusting the seat post, check whether it still
yields a little, i.e. by about 10 mm, when you sit on
the saddle in your usual riding position.
If the seat post should still yield too much after its
preload has been increased or if it should still not
yield noticeably after it has been set to its softest
adjustment, you will need a different AIRWINGS
spring package to improve your riding comfort. Ask
your dealer for advice.
Mounting the seat post and saddle requires a
fair degree of experience and skill and should
therefore best be left to your bicycle dealer. If you
want to give it a try yourself, be sure to follow the
instructions carefully.
AIRWINGS seat posts come in many
different diameters. Make sure that your
seat post matches the diameter of your frame!
!
AIRWINGS holds a series of sleeves
available for adapting seat posts to frames
with unusual tube diameters. Ask your dealer
about adapters if you need one.
i
Dismounting the old seat post
i
Adjusting the suspension
system
Your AIRWINGS seat post has been adjusted to an
average rider’s weight. Adjusting the springiness of
your AIRWINGS seat post to give you maximum
riding comfort is easy. For this purpose you need to
remove the seat post from the frame. Read through
the manual provided by the bicycle manufacturer
before removing the seat post from the frame.
After allowing the seat post to dry well it is advisable
to rub its metal surfaces in with commercial hard
wax. This should be done in any case at least twice
a year. When the wax has aired sufficiently give the
surface a polish. In this way your seat post will keep
its shiny appearance for years.
Mounting the seat post
and saddle
Lubricating the interior of your AIRWINGS seat
post is easy to do from the outside and will keep it
working smoothly for many years. We recommend
lubrication every 5000 km or once a year. If you
use your bike in rougher conditions (frequent rides
in the rain or in very dusty terrain) your seat post
will want lubrication more often. Apply a grease
gun containing commercial (high viscosity) bearing
grease to the lubricating nipple and pump two to
three shots of grease into the seat post. Small shots
are quite sufficient. Please don’t fill you seat post up
to the top with grease!
Before mounting your new AIRWINGS seat post
you will need to remove your old seat post. Release
the seat post binder on the frame (observing the
instructions of the bicycle manufacturer!) and pull
the old seat post out. Remove any old grease and
dirt that may have accumulated inside the seat
tube.
If your old seat post is stuck hard we
recommend applying a little thin oil to the
edge of the seat tube. Let the thin oil seep in, if
possible overnight, before trying again to twist
the seat post out. If this doesn’t work either, ask
your dealer for help.
i
If you have a patented seat post, release the
screw connection completely and take the saddle
off the seat post.
AIRWINGS seat posts fitted with original
springs can be adapted to riders of less
than 40 kg up to more than 130 kg. Exchanging
the springs is a job best left to your bicycle
dealer!
i
5
Mounting the saddle on the seat post
Mounting the new seat post onto the frame
Grease the seat post and the inside of the frame’s
seat tube and insert the seat post. The seat post
should slip in easily but without any play! Don’t on
any account use brute force! If in doubt, ask you
bicycle dealer.
2. Place the saddle on (B) with the rails resting on
the rail supports; next place the upper assembly
(C) together with the seat clamp pins (D)
on the saddle rails. Check whether you have
mounted the tilting assembly correctly. The rail
clamping surfaces should be exactly opposite
each other.
Place the tilting assembly (B) on the seat post head
(A); (B) receives the seat post rails and provides an
engaging surface for the upper assembly (C), thus
permitting you to adjust the tilt of the saddle. Note
that the position of the tilting assembly is as shown
in the picture. Otherwise the mechanism could fail!
– Applying excessive force, e.g. with a pair of
pliers, poses a risk of damaging the screws, seat
clamp pins or upper assembly.The ideal solution
is to use a torque wrench!
Tighten all these screws to a torque of no
more than 6 Nm (medium force /
hand-tight), especially the adjusting screws that
determine the tilt of the saddle.
Overtightening screws won’t make the saddle any
more secure whereas it can cause damage to the
saddle rails and seat post. Danger of breakage!
If your frame is made out of carbon you
are not supposed to use grease1 Please
read the manual of the bike.
!
If you are use a shim apply grease on the in- and
outside. Align the slot of the shim with the slot
of the frame. Close the clamping according to the
manual of the frame manufacturer.
3. Turn the Allen screws (E) into the seat clamp
pins (D) in the upper assembly (C) and tighten
them hand-tight at first.
4. Now adjust the tilt of the saddle as you want it.
You can do this by adjusting the Allen screws
(E).
Your bicycle dealer will be pleased to inform
you what saddle tilt is normally most suitable,
healthy and comfortable for you. As a rule the
saddle should be horizontal, however.
1. Preparing the upper assembly (C)
(C) has two recesses for the threaded seat
clamp pins (D) at its front and rear end.
The seat clamp pins must be oriented such that
they can afterwards receive the Allen screws (E).
6
5. After adjusting the saddle to the desired tilt
tighten both Allen screws equally to a torque
of no more than 6 Nm. This should normally be
possible using a proper-sized Allen key without
any additional tools.
After mounting the seat post check whether
everything is tight and secure.Grip the saddle
front and rear and try to twist it against the frame.
Also try to tilt the saddle by bringing your weight
to bear once on its front and once on its rear end.
If the saddle or seat post yields to force, tighten
the screws a little as necessary, e.g. by half a turn.
7
Warranty
(liability for defects)
and guarantee
Your AIRWINGS seat post was manufactured with
care and left the factory in good working order.
You have full warranty rights during the first two
years after purchase or delivery of the seat post.
Your contracting partner and contact person in the
event of defects is the bicycle dealer from whom
you bought the bicycle or seat post.
Please bring you customer’s receipt with you so
that your complaint can be processed smoothly.
Always keep your receipt in a safe place in case you
should need it.
To prolong the service life and durability of your
seat post only use your bicycle for its intended
purpose (see p. 1 and the user manual provided by
the bicycle manufacturer) Be sure also to observe
the maximum load specifications. Furthermore,
it is essential that you follow these mounting
instructions (especially the torque specifications)
and the specified maintenance intervals accurately.
It can happen that a little grease oozes out
i of your suspension seat post on first use.
A slight abrasion of paint from the black shaft
during use is normal and will impair neither the
functioning nor the durability of your seat post.
Guarantee
In addition to the statutory warranty (liability for
defects) AIRWINGS Hillreiner GmbH gives you
a three-year guarantee (as of the date of sale)
against material and manufacturing defects of your
AIRWINGS seat post. In a guarantee-activating
event the AIRWINGS company reserves the right
to repair the defective seat post or to replace it
with the current successor model. Further claims
(assembly costs, transport etc.) are excluded.
The guarantee presupposes that,
– you returned the guarantee card to AIRWINGS
immediately after purchase,
– the seat post was properly mounted and
adjusted by a bicycle dealer,
– you have used and maintained the seat post in
accordance with the information provided in
these instructions.
In a guarantee-activating event please turn directly
to
AIRWINGS Hillreiner GmbH
phone: 0049 / 8136 / 998435
Email: [email protected]
If we have agreed to take the seat post back, send
it to
Notes on wear
Some components of your seat post are subject
to wear due to their function. The rate of wear
will depend on care and maintenance and the way
you use your bicycle (mileage, rides in the rain,
dirt, salt etc.). Bicycles that are often left standing
in the open may also be subject to increased wear
through weathering.
These components require regular care and
maintenance. Nevertheless, sooner or later they
will reach the end of their service, depending on
conditions and intensity of use. These components
must be replaced when they have reached their
limit of wear.
8
AIRWINGS Hillreiner GmbH
Hofer Straße 37
D-85229 Hirtlbach
Germany