1
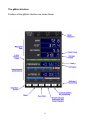
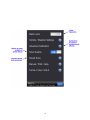
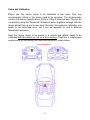
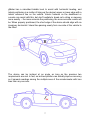
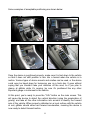
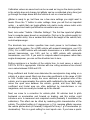
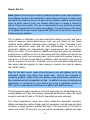
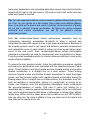
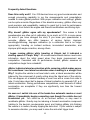
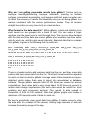
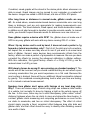
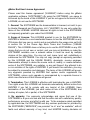
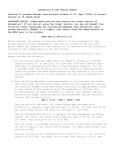
User Manual – Version 2.0 - August 2011
Copyright 2008-2011
Hunter Research and Technology, LLC
If you have an issue or question that has not been addressed in this manual,
contact [email protected]. Feedback and suggestions are welcome.
1
The gMeter Interface
Features of the gMeter interface are shown below:
2
3
4
5
Setup and Calibration
Before use, the device needs to be calibrated in two ways. First, any
accelerometer offsets in the device need to be corrected. The accelerometer
used in iOS devices typically has ± 0.04g to 0.06g of offset per axis. This can be
corrected by using the "Advanced Calibration" option in gMeter settings, with the
device placed face up and screen level. Normally, this particular calibration only
needs to be performed once, but it can be repeated for use in different
temperature extremes.
Next, the device needs to be placed in a vehicle and gMeter needs to be
calibrated with the vehicle at rest on a level surface. There are a couple basic
requirements for positioning and mounting the device, shown below:
6
gMeter has a simulated bubble level to assist with horizontal leveling, and
lateral positioning is a matter of lining up the device's upper or lower edge with a
lateral reference line on the vehicle. Interior features on the dashboard or
console can assist with this, but don't hesitate to break out a string or measure
more exactly -- the more accurate the positioning, the more accurate results will
be. When properly positioned, the short edge of the device should align with an
imaginary horizontal / lateral line passing evenly from one side of the vehicle to
the other:
The device can be inclined at an angle as long as the previous two
requirements are met. In fact, an inclined position can actually improve accuracy,
as it spreads readings among the multiple axes of the accelerometer with less
bias from any one axis.
7
Some examples of acceptable positioning are shown below:
Once the device is positioned properly, make sure it is tied down to the vehicle
so that it does not shift position or turn into a hazard when the vehicle is in
motion. Various types of device mounts and cradles can be used, or the device
could even be taped down for temporary use on a track day. It goes without
saying that you shouldn't take your attention off the road, so if you plan to
glance at gMeter while it's running, be sure it's positioned like any other
important gauge or instrument in the vehicle.
At this point, you're ready to press the "CAL" button on the main screen. This
will cause the device to detect the vertical direction (using the acceleration of
gravity) and take all the other information into account to identify the forward
axis of the vehicle. When properly calibrated on a level surface with the vehicle
at rest, gMeter should show zero forward acceleration, meaning the device is
now ready to detect forward motion.
8
Calibration values are saved and can be re-used as long as the device position
in the vehicle does not change, but gMeter can be re-calibrated at any time (just
go through the steps above with the vehicle at rest on a level surface).
gMeter is ready to go, but there are a few more settings you might want to
tweak. Press the "i" button to enter settings. Here you will find an important
option -- a switch that can toggle gMeter into metric mode, where metric units
are displayed and metric performance conventions are used.
Next, look under "Vehicle / Weather Settings". The first few inputs tell gMeter
how to compute power based on acceleration. First up is the vehicle weight (or
mass in metric units). Use a number that reflects the weight of the vehicle, fuel,
and driver/passenger.
The drivetrain loss number specifies how much power is lost between the
wheels and the engine. For a 2WD vehicle with manual transmission, use 0.15
(15%). For a 2WD vehicle with automatic transmission or a 4WD vehicle with
manual transmission, use 0.20, and for a 4WD vehicle with automatic
transmission, use 0.25. If you want to compute wheel horsepower rather than
engine horsepower, you can set the drivetrain loss to zero.
Rolling resistance is a function of the vehicle tires. In most cases, a value of
0.010 to 0.015 is appropriate. Vehicles with low rolling resistance tires should
use a value between 0.006 and 0.01.
Drag coefficient and frontal area determine the aerodynamic drag acting on a
vehicle at a given speed. Most cars have drag coefficients in the range of 0.28
to 0.35. Frontal area is simply the cross sectional or projected area of the
vehicle, and is approximately the vehicle width multiplied by the vehicle height,
minus the open area between the vehicle, ground, and tires. Both drag
coefficient and frontal area are often published by manufacturers or car
magazines, and can usually be looked up on the internet.
Next, we come to a correction for vehicle pitch. All vehicles tend to pitch
backward on acceleration and forward on braking, and this motion could
introduce error in measured and computed results (basically it invalidates the
calibration). This effect can be offset by modeling pitch characteristics of the
vehicle. The default setting is 2 degrees per g (°/g), meaning gMeter assumes
the vehicle pitches back (or forward) 2 degrees for every 1 g of acceleration (or
deceleration). This is a good setting for most sports cars. If you have a sports
9
car with a very stiff suspension, values between 1 and 2 °/g may be better.
Vehicles with a softer suspension should use a pitch correction between 2 and
4 °/g. Through trial and error, the pitch angle correction can be tweaked as
needed to improve results.
The roll angle correction works like the pitch correction, but affects the lateral
force measurement in gMeter. Values of 1 to 2 °/g are typical for race cars, 2 to
3 °/g for sports cars, 3 to 4 °/g for cars with firm suspensions or unloaded trucks,
4 to 5 °/g for typical passenger vehicles, and 5 to 6 °/g for soft riding vehicles
and car-based SUVs.
The trigger level determines what g-level of forward acceleration trips the auto
start trigger in hands-free mode. Most vehicles should use a value of 0.05 to
0.07g. Vehicles with excessive vibration can increase the trigger level to
prevent false starts.
Finally, gMeter has inputs for ambient temperature and pressure. These
quantities are used to calculate air density required for the aerodynamic drag
computation. If you don't have access to the ambient weather conditions,
standard day sea level values of 29.92 in. Hg and 70F (US units) or 101.31 kPa
and 21.1C (metric) can be used. However, note that specifying the wrong
pressure and temperature can throw aerodynamic drag off by 5-10% or more,
which can have a significant effect on computed power at higher speeds.
Note: settings for weight/mass, drivetrain loss, rolling resistance, drag
coefficient, frontal area, and weather are only used to compute power. These
inputs do not affect time, speed, or distance computations.
The pitch correction affects all forward data, including speed, distance, and
power, and is a very important parameter. This input will affect gMeter results
across the entire speed range. If unknown, you can vary the pitch correction
until gMeterʼs computed speed matches that of a calibration reference (a
speedometer or 5th wheel, for instance) across a speed range.
10
Ready, Set, Go
Note: gMeter should only be used by qualified operators under safe conditions.
The software should not be operated by a driver whose vehicle is in motion (use
the hands-free modes or have a co-pilot run the software). gMeter should not be
used on public roads if such use violates traffic laws or causes a hazard to
others. Please drive safely. The user is responsible for any accidents, property
damage, or injuries that occur while using gMeter. You must agree to the terms
of the gMeter End User License Agreement (EULA) at the end of this document
before using the software.
OK, so gMeter is calibrated, you have entered the settings you want, and you're
ready to measure vehicle performance. Let's say you select 1/4 mile timed
distance mode. gMeter's start/stop button changes to "Auto", indicating it has
gone into hands-free mode and will start automatically. As soon as you
accelerate, gMeter will automatically begin measurement and computation.
When you reach 1/4 mile distance, gMeter will beep and show the computed
performance. In addition to the 1/4 mile speed and time, gMeter also shows the
instantaneous, peak, and average power, and the peak and average forward g
during the run (it also shows lateral g statistics, which should be very close to
zero for a proper 1/4 mile run). If desired, you can save this data (along with raw
time series data and graphs) for later viewing or transfer via e-mail by tapping
the “SAVE” button.
Tip: For the best results, make all performance runs with gMeter set to the
instrument display view rather than graph view. Due to the overhead of
rendering graphics, graph mode can impose some performance penalties on
the measurement and computation of data. In addition, be sure no background
applications or processes on your device are using a significant amount of
CPU, as this could hamper performance in gMeter and affect accuracy.
The timed speed modes operate in much the same way as a timed distance run,
except gMeter will beep and display computed performance when the target
speed is reached (60 mph or 100 km/h, depending on units selected).
The timed deceleration mode also offers hands-free automatic operation.
gMeter automatically starts off when you first accelerate, and will beep and flash
red when a trigger speed is reached (64 mph in US unit mode or 104 km/h in
metric unit mode). At this point, you can initiate deceleration. gMeter will begin
11
measuring deceleration and computing data when speed drops back below the
target limit (60 mph in US unit mode or 100 km/h in metric unit mode) and stop
when zero speed is reached.
Tip: You can experiment with the various modes in gMeter without getting in the
car. First, lay your device on a flat surface (like a desk) and calibrate gMeter.
Now, if you pick up the device and orient it vertically, the acceleration of gravity
will act like a vehicle's forward acceleration. By tipping the device between
horizontal and vertical orientations, you can try out gMeter's various
performance modes.
Note that accelerometer-based vehicle performance computers work by
continuously measuring acceleration (hundreds of times a second) and
integrating this data with respect to time to get speed and distance. Because of
the ongoing process used to get speed and distance, potential measurement
and computation errors in each instant of motion can stack up and cause larger
errors in the end result. Thus, accelerometer-based vehicle performance
computers are typically not used for measurement over long distances or times.
They do provide acceptable results for shorter distances and times, such as the
modes offered in gMeter.
To ensure the best possible results, follow the calibration procedures carefully
and make your performance runs consistent with the intended purpose of each
mode. Timed distance and timed speed assume forward motion and positive
forward acceleration in a straight line on a level surface. Timed braking
assumes forward motion and positive forward acceleration to reach the trigger
speed, and then forward motion with negative forward acceleration during the
braking phase (all in a straight line on a level surface). Any deviations from this,
such as hesitation in acceleration, driving in a curved path, or driving on an
incline, can introduce error into performance calculations and/or compromise
the accuracy/relevance of results. That said, if you're just looking for a
repeatable way to measure general performance or gauge run to run increments
(say, due to engine/chassis modifications or differences in driving style), gMeter
results may still be useful in cases where test conditions are not 100% perfect.
Like any other tool, the value of gMeter is how you make use of the results and
how relevant the results are to you.
12
Frequently Asked Questions
Does this really work? Yes. iOS devices have very good accelerometers and
enough processing capability to run the measurements and computations
needed to make gMeter practical. With proper calibration and settings, gMeter
can be quite accurate. Regardless of the absolute accuracy, gMeter offers very
good precision and repeatability, making it a great tool to look for performance
increments from factors like engine and chassis modifications and driving style.
Why doesn't gMeter agree with my speedometer? One reason is that
speedometers are often out of calibration, by as much as 5-10% in some cases
(or more if you have changed tire size). If you know your speedometer is
accurate, gMeter can differ because of various factors: improper
mounting/positioning, improper calibration (or a calibration that is no longer
appropriate), traveling on inclined surfaces, inconsistent acceleration, and
improper pitch angle correction, among others.
I began running gMeter while traveling at 55mph, but it indicated a
starting speed of 0 mph. Why? All accelerometer-based devices need some
information about the initial speed when they begin measurement and
computation. Consistent with its performance modes, gMeter assumes all
computations begin from a standstill.
gMeter indicates lateral acceleration while cornering, which makes sense,
but sometimes I see lateral acceleration when traveling in a straight line.
Why? Anytime the vehicle is not level side to side, a lateral acceleration will be
induced by the component of gravity acting along the lateral axis of the vehicle.
This can happen on a banked roadway or even one with a crown from side to
side. It only takes about half a degree of lateral inclination to generate 0.01 g of
lateral acceleration. During performance computations, small amounts of lateral
acceleration are acceptable if they are significantly less than the forward
acceleration.
As soon as I switch into one of the hands-free automatic modes or reset
gMeter, it immediately begins computing even though the vehicle has not
accelerated yet. You could be on an inclined surface, or may need to
recalibrate gMeter. Gravity may be inducing a forward acceleration component
(relative to the device's accelerometer axes) and tricking gMeter into thinking
the vehicle is in motion, thereby tripping the auto-start. If your vehicle is subject
to excessive vibration, you may need to raise the auto-start trigger level.
13
Why am I not getting reasonable results from gMeter? Factors such as
improper mounting/positioning, improper calibration, traveling on inclined
surfaces, inconsistent acceleration, and improper pitch/roll angle correction can
all affect the accuracy of results. Be absolutely sure you are using gMeter in a
manner consistent with the various performance modes. They all assume
straight line motion (or very close to it) on a level surface.
What format is the data saved in? Within gMeter, results and statistics from
each saved run are grouped into a block of text. You can swipe a finger
up/down over the saved runs to scroll through them. The runs are time-stamped
with the date and time data was saved. gMeter also maintains raw time series
data for each run, and this gets saved internally. Exported data that is e-mailed
from gMeter is given in the following form for each run:
date timestamp mode time_s distance_m speed_kmh
lat_g_peak lat_g_avg peak_power_kw avg_power_kw
fwd_g_peak
fwd_g_avg
10/09/08 23:12:27 400m 11.4 400.6 267.5 0.85 0.66 0.25 -0.04 1017.3 432.7
time_s distance_m speed_kmh fwd_g lat_g power_kw
0.00 0.0 0.0 0.00
0.02 0.0 0.1 0.30
0.05 0.0 0.5 0.30
0.10 0.0 0.9 0.30
etc . . . . .
0.00
0.10
0.10
0.10
0.0
0.0
0.1
0.2
There is a header section with summary data from the run, and then a raw data
section with time series data from the run. This block format would be repeated
for each run that is saved to gMeter's storage cache. Data elements are spacedelimited, which makes them easy to import into spreadsheet or database
software. Though gMeter samples data 50-100 times per second for internal
computations, time series data is only saved about 15-25 times per second to
reduce data storage requirements (the extra data would be overkill for most
graphing and post processing anyhow). This results in data spaced in
increments of 0.04 to 0.06 seconds. Note that gMeter graphs and caches a
maximum of 30 seconds worth of data for each run.
Be sure to periodically clear saved data from gMeter (it makes sense to clear
the data after it's e-mailed off the device). Storing large amounts of data will
increase the memory usage of the app.
14
If enabled, saved graphs will be stored in the device photo album whenever run
data is saved. Graph images can be synced to your computer or e-mailed off
the device. Images are saved in JPEG format, at a size of 320 x 372 pixels.
After long times or distances in manual mode, gMeter results are way
off. As noted above, accelerometer-based devices accumulate error over long
times or distances, and are only appropriate for making measurements over
short intervals. The timed distance, timed speed, and timed deceleration modes
in gMeter are all short enough in duration to provide accurate results. In manual
mode, you shouldn't expect accurate results for distances over one mile or so.
Does gMeter require a device with GPS? No, gMeter does not make use of
GPS in any way. gMeter will work with any device running iOS 4.1 or later.
When I tip my device end to end by hand, it does not read a perfect ± 1g
forward or lateral acceleration, why? First of all, the pitch and roll corrections
will impact this, so make sure they are set to zero if you want to do some hand
tests of gMeter. Second, some devices have accelerometer offsets from the
factory, which can make a perfect ±1g impossible to measure. Be sure you have
corrected the offsets by running the advanced calibration in gMeter settings.
With this calibration, the typical factory offsets of ± 0.04g to 0.06 g can be
reduced down to ±0.01g or less.
Will lateral g forces be wrong if I am cornering on a banked roadway? The
results will not be incorrect, but you should realize that they do not reflect a pure
cornering acceleration like you would experience on a flat road. Because the
road surface is banked, there will be an additional lateral acceleration induced
by gravity. This combined cornering/banking load is what your tires are feeling,
so it is indeed a relevant measurement.
Numbers from gMeter don't agree with timings at my local drag strip.
Why? There are various ways in which drag strips can measure initial motion
of a vehicle, but normally it's done by tripping a light as the vehicle moves off
the line. In this case, there may be a small discrepancy (often called "rollout"
distance) between where the car starts to move and where the timer begins. In
contrast, gMeter starts measuring and computing performance as soon as the
car starts to accelerate, and has no rollout discrepancy. The effect of rollout
should simply provide a fixed, consistent offset between drag strip data and
gMeter data, and that offset should be easy to identify after obtaining several
runs worth of data.
15
gMeter End User License Agreement
Please read this license agreement (“LICENSE”) before using the gMeter
application software (“SOFTWARE”). By using the SOFTWARE, you agree to
be bound by the terms of this LICENSE. If you do not agree to the terms of this
LICENSE, do not use the SOFTWARE.
1. General. The SOFTWARE and its documentation is licensed, not sold, to you
by Hunter Research and Technology, LLC (“HUNTER”) for use only under the
terms of this LICENSE. HUNTER reserves all rights in and to the SOFTWARE
not expressly granted to you under this LICENSE.
2. Scope of License. This LICENSE granted to you for the SOFTWARE by
HUNTER is limited to a non-transferable license to use the SOFTWARE on any
iOS device that you own or control and as permitted by the usage rules set forth
in section 9.b. of the iTunes App Store Terms and Conditions (“USAGE
RULES”). This LICENSE does not allow you to use the SOFTWARE on any iOS
device that you do not own or control, and you may not distribute or make the
SOFTWARE available over a network where it could be used by multiple
devices at the same time. You may not rent, lease, lend, sell, redistribute or
sublicense the SOFTWARE. You may not copy (except as expressly permitted
by this LICENSE and the USAGE RULES), decompile, reverse engineer,
disassemble, attempt to derive the source code of, modify, or create derivative
works of the SOFTWARE, any updates, or any part thereof. Any attempt to do
so is a violation of the rights of HUNTER. If you breach this restriction, you may
be subject to prosecution and damages. The terms of this LICENSE will govern
any upgrades provided by HUNTER that replace and/or supplement the
SOFTWARE, unless such upgrade is accompanied by a separate license in
which case the terms of that license will govern.
3. Termination. This LICENSE is effective until terminated by you or HUNTER.
Your rights under this LICENSE will terminate automatically without notice from
HUNTER if you fail to comply with any term(s) of this LICENSE. Upon
termination of the LICENSE, you shall cease all use of the SOFTWARE, and
destroy all copies, full or partial, of the SOFTWARE.
4. No warranty. You expressly acknowledge and agree that use of the
SOFTWARE is at your sole risk and that the entire risk as to satisfactory quality,
performance, accuracy and effort is with you. To the maximum extent permitted
by applicable law, the SOFTWARE and any services performed or provided by
the SOFTWARE ("SERVICES") are provided "as is" and “as available”, with all
faults and without warranty of any kind, and HUNTER hereby disclaims all
16
warranties and conditions with respect to the SOFTWARE and any SERVICES,
either express, implied or statutory, including, but not limited to, the implied
warranties and/or conditions of merchantability, of satisfactory quality, of fitness
for a particular purpose, of accuracy, of quiet enjoyment, and non-infringement
of third party rights. HUNTER does not warrant against interference with your
enjoyment of the SOFTWARE, that the functions contained in, or SERVICES
performed or provided by, the SOFTWARE will meet your requirements, that the
operation of the SOFTWARE or SERVICES will be uninterrupted or error-free,
or that defects in the SOFTWARE or SERVICES will be corrected. You
acknowledge that the SOFTWARE and SERVICES are not intended or suitable
for use in situations or environments where the misuse of, failure of, or errors or
inaccuracies in the content, data, or information provided by, the SOFTWARE or
SERVICES could lead to death, personal injury, or severe physical, property, or
environmental damage. No oral or written information or advice given by
HUNTER shall create a warranty. Should the SOFTWARE or SERVICES prove
defective, you assume the entire burden of all necessary expenses, servicing,
repair, or correction. Some jurisdictions do not allow the exclusion of implied
warranties or limitations on applicable statutory rights of a consumer, so the
above exclusion and limitations may not apply to you.
5. Limitation of liability. To the extent not prohibited by law, in no event shall
HUNTER be liable for accidents, property damage, personal injury, death, or
any incidental, special, indirect or consequential damages whatsoever, including,
without limitation, damages for loss of work, loss of profits, loss of data,
business interruption or any other personal or commercial damages or losses,
arising out of or related to your use or inability to use the SOFTWARE, however
caused, regardless of the theory of liability (contract, tort or otherwise) and even
if HUNTER has been advised of the possibility of such damages. Some
jurisdictions do not allow the limitation of liability for personal injury, or of
incidental or consequential damages, so this limitation may not apply to you. In
no event shall HUNTERʼs total liability to you for all damages (other than as may
be required by applicable law in cases involving personal injury) exceed the
amount of ten dollars ($10.00). The foregoing limitations will apply even if the
above stated remedy fails of its essential purpose.
6. Controlling law. The laws of the state of Virginia, excluding its conflicts of
law rules, govern this LICENSE and your use of the SOFTWARE. Your use of
the SOFTWARE may also be subject to other local, state, national, or
international laws.
17