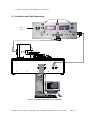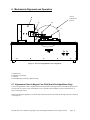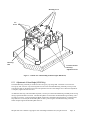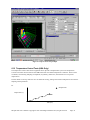
1
INTEGRAL SOLUTIONS INT’L QST-2001 HGA/HSA/HDA QUASI-STATIC TESTER USER'S MANUAL (QUASI 97) Rev. 1.9.3.1 Copyright 1995-1999 Integral Solutions Int’l All rights reserved Integral Solutions Int’l 2192 Bering Drive San Jose, CA 95131 Phone: (408) 941-8300 Fax: (408) 941-8309 E-mail: [email protected] Web: www.isiguys.com While every effort has been made to verify the accuracy of the information contained in this publication, this publication may contain technical and/or typographical errors. Please contact Integral Solutions Int’l to report any errors in this publication TABLE OF CONTENTS: 1. Quick Start __________________________________________________________ 6 2. Introduction _________________________________________________________ 6 3. Features ____________________________________________________________ 9 3.1 Software __________________________________________________________ 9 3.2 Mechanics ________________________________________________________ 9 3.3 Electronics _______________________________________________________ 9 4. Specifications: _______________________________________________________ 9 4.1 Applied Currents and Fields _________________________________________ 9 4.2 Measurements ____________________________________________________ 9 4.3 Test Time ________________________________________________________ 9 4.4 Calculations ______________________________________________________ 10 4.5 Tests ___________________________________________________________ 10 4.5.1 4.5.2 Static Tests _____________________________________________________________10 Quasi-Static Tests ________________________________________________________10 4.6 Computer _______________________________________________________ 10 4.7 Power Supply_____________________________________________________ 10 4.8 Physical _________________________________________________________ 11 4.9 Options _________________________________________________________ 11 5. Installation _________________________________________________________ 11 5.1 System Requirements______________________________________________ 11 5.2 Components of the QST-2001 _______________________________________ 11 Installation and Cable Connections ________________________________________ 12 5.3.1 5.3.2 5.3.3 External Power Supply Configuration __________________________________________13 Cable Connections________________________________________________________13 Software Installation ______________________________________________________13 6. Mechanical Alignment and Operation ___________________________________ 14 6.1 6.1.1 Alignment of Head in Magnet Core Field (Guzik Cartridge Mount Only) _____ 14 Adjustment of Head Angle (HGA Only) ________________________________________15 6.2 Adjustment of Locked/Unlocked Position Hardstops _____________________ 16 6.3 Conversion Between Mounting Assemblies ____________________________ 16 6.4 Changing Orientation of the Magnet Core Field (Hard vs. Easy Axis) _______ 16 6.5 Conversion of the HGA Head Mounting Assembly between HGA Mount and Cartridge Mount (QST-2000 only) _________________________________________ 16 7. Software Startup and System Menus _____________________________________ 17 7.1 System Startup and Head Installation/Removal Procedure _________________ 17 7.2 Configuration Selection Menu _______________________________________ 17 7.3 QST-2001 Main Menu _____________________________________________ 17 7.4 System Configuration Menu_________________________________________ 18 7.5 Tools Menu______________________________________________________ 20 7.5.1 7.5.2 7.5.3 7.5.4 7.6 Data Logging Menu_______________________________________________________20 Options menu ___________________________________________________________21 Grading Menu ___________________________________________________________23 Bar Code Definitions Menu _________________________________________________24 Calibration Menu _________________________________________________ 25 7.6.1 When To Recalibrate ______________________________________________________25 8. Software Tests_______________________________________________________ 26 8.1 Software Test Graphical Interface ____________________________________ 26 8.2 Stress Options ___________________________________________________ 27 8.3 Longitudinal and Transverse Transfer Curves __________________________ 27 8.3.1 8.3.2 8.4 Setup Parameters _________________________________________________________28 Example of Result _________________________________________________________28 Bias Angle _______________________________________________________ 30 8.4.1 8.4.2 8.4.3 8.5 Setup Parameters _________________________________________________________30 Results ________________________________________________________________30 Example of Result and Printout _______________________________________________30 Resistance Delta__________________________________________________ 31 8.5.1 8.5.2 8.6 Setup Parameters _________________________________________________________31 Example of Result and Printout _______________________________________________32 Asymmetry ______________________________________________________ 32 8.6.1 8.6.2 8.6.3 8.7 Setup Parameters _________________________________________________________32 Results ________________________________________________________________33 Example of Result and Printout _______________________________________________33 Electromigration__________________________________________________ 34 8.7.1 8.7.2 8.7.3 8.8 Setup Parameters _________________________________________________________34 Results ________________________________________________________________34 Example of Result and Printout _______________________________________________35 Stability _________________________________________________________ 35 8.8.1 8.8.2 8.9 Setup Parameters _________________________________________________________35 Example of Result and Printout _______________________________________________36 Quasi-Static Measurements _________________________________________ 36 8.9.1 8.9.2 Setup Parameters _________________________________________________________37 Example of Result and Printout _______________________________________________37 8.10 Static Tests ______________________________________________________ 38 8.10.1 8.10.2 Setup Parameters _________________________________________________________38 Example of Result and Printout _______________________________________________38 8.11 Popcorn Tests ____________________________________________________ 39 8.11.1 8.11.2 Setup Parameters _________________________________________________________39 Example of Result and Printout _______________________________________________40 8.12 Temperature Control Tests (HGA Only)_______________________________ 41 8.12.1 8.12.2 Setup Parameters _________________________________________________________42 Example of Result and Printout _______________________________________________44 8.13 ESD Stress Test __________________________________________________ 45 8.13.1 8.13.2 Setup Parameters _________________________________________________________45 Example of Result and Printout _______________________________________________46 8.14 Production Tests__________________________________________________ 47 8.14.1 8.14.2 Setup Parameters _________________________________________________________47 Example of Result and Printout _______________________________________________48 9. Data Log File _______________________________________________________ 49 9.1 Microsoft Access Log File Format ___________________________________ 49 9.2 Description of Log File Tables_______________________________________ 49 9.3 Description of Log File Queries______________________________________ 49 9.4 Microsoft Excel Log File Format _____________________________________ 50 9.5 Microsoft Excel Log File Example ___________________________________ 50 10. Software Interface for Remote Operation _______________________________ 51 11. Diagnostics and Scope Points ________________________________________ 51 12. Upgrading Preamps_________________________________________________ 51 Appendix A: Integrating HGAs, HSAs, and HDAs with the QST-2001 ____________ 52 Appendix B: Temperature Controller (Optional) ______________________________ 53 Temperature Controller Description_______________________________________ 53 B.1 Overview _________________________________________________________ 53 B.2 Temperature Controller Setup Menu ___________________________________ 53 B.3 Installation and Cable Connections for the Temperature Controller System ____ 55 B.4 Temperature Controller Calibration ____________________________________ 56 Appendix C: Integral Solutions Int’l HBM ESD Tester (Optional) _______________ 57 C.1 Features _________________________________________________________ 57 Appendix D: Setup of Computer System for QST-2000/2001 _____________________ 58 1. Limited Warranty. ___________________________________________________ 60 2. Other Limits.________________________________________________________ 60 3. Exclusive Obligation._________________________________________________ 60 4. Other Statements. ____________________________________________________ 60 5. Entire Obligation. ___________________________________________________ 61 TABLE OF FIGURES: Figure 1 – Connection of Quasistatic Tester Components ____________________________________ Figure 2 – Overview of Quasistatic Tester Components ______________________________________ Figure 3 – Isolated view of head loading mechanism (QST-2000 shown) _________________________ Figure 4 – QST-2001 Main Menu_______________________________________________________ Figure 5 – System Configuration Menu __________________________________________________ Figure 6 – Data Logging Menu ________________________________________________________ Figure 7 – Options Configuration Menu _________________________________________________ Figure 8 – Operator Mode ____________________________________________________________ Figure 9 – Grading Configuration Menu _________________________________________________ Figure 10 –Bar Code Definitions Menu __________________________________________________ Figure 11 – System Calibration Menu ___________________________________________________ Figure 12 – Software Test Graphical Interface _____________________________________________ Figure 13 – Transverse Transfer Function Menu ___________________________________________ Figure 14 – Longitudinal Transfer Function Tests __________________________________________ Figure 15 – Bias Angle Test (AMR head) _________________________________________________ Figure 16 – Resistance Delta Test ______________________________________________________ Figure 17 – Asymmetry Test ___________________________________________________________ Figure 18 – Electromigration Test ______________________________________________________ Figure 19 – Stability Test _____________________________________________________________ Figure 20 – Quasi-Static Tests _________________________________________________________ Figure 21 –Static Tests_______________________________________________________________ Figure 22 –Popcorn Test Digitizer ______________________________________________________ Figure 23 – Temperature Control (Sweep Mode) ___________________________________________ Figure 24 – Temperature Control Transfer Curves (Sweep Mode) ______________________________ Figure 25 – ESD Control _____________________________________________________________ Figure 26 – ESD Control Transfer Curve _________________________________________________ Figure 27 – Production Tests __________________________________________________________ Figure 28 – Log File ________________________________________________________________ Figure 29 – Excel File Type ___________________________________________________________ Figure 30 – Excel Log File Example_____________________________________________________ Figure 31 – Temperature Controller Setup Menu___________________________________________ 12 14 15 18 18 21 22 23 23 24 25 26 29 30 31 32 33 35 36 37 38 40 44 45 46 47 48 49 50 51 54 1. Quick Start For those already familiar with Quasistatic testing, a quick start feature is available. To quickly setup the QST-2001, follow the instructions in chapters 5, 6, and 7. Also, if the QST system includes the Temperature Controller or ESD Stress System option, read Appendix B or C respectively. 2. Introduction The Quasi-Static Tester is an engineering and production test system for characterizing the performance of Giant MR and MR Heads. Unique mechanical configuration allows Hard and Easy transfer curves with a single magnet. The transverse (Hard) and longitudinal (Easy) transfer curves are acquired at constant bias current by measuring Amplitude across the MR element while sweeping an applied magnetic field. The precision low-noise calibration circuitry allows maximum dynamic range for every measured point. From the transfer curve statistical results such as Min, Max, Asymmetry, Hysteresis, and Barkhausen Noise are automatically calculated along with Resistance, Bias Current, and Ambient Temperature measurements during the test. The Hard transfer curve can be used to quickly characterize the linearity of the MR head response to transverse magnetic field. The Easy axis transfer curve can be used to evaluate MR element shields breakdown. Also, high longitudinal field can be applied to reset magnetic domains in the MR element. For engineering analysis the tester can perform the following tests while applying thermal, bias current, and write element excitation stresses to MR head. • • • • • Bias Angle Test - Magnetic moment angle inside the MR element is measured while sweeping Bias Current. Resistance Delta Test - Temperature of MR element is calculated by measuring the change in resistance while sweeping Bias Current. Asymmetry Test - Amplitude Asymmetry is calculated by measuring amplitude at symmetrical constant magnetic fields while sweeping Bias Current. Electro-migration Test - Samples resistance at specified intervals for a specified duration. When resistance changes beyond specified threshold, bias current is shut off to allow failure analysis of MR element. Stability Test - Samples amplitude for specified iterations and calculates Amplitude Stability. For production testing, a high throughput of 360 heads per hour can be achieved. This throughput can be accomplished by mounting MR heads off-line on 2xHGA style cartridges and fast transfer curve test times of less then 1 second per curve. Open architecture software control under Windows /Windows 95 provides user with the reliability and speed of the turnkey software as well as the flexibility to write custom modules. The processed results can be exported directly to Excel. Ideal for HGA sampling, failure analysis, and production level evaluation. The high magnetic field strength supports MR Head domain polarization prior to testing. ISI QST-2001 User’s Manual Copyright 1996-1999 Integral Solutions Int’l, all rights reserved Page: 6 ISI QST-2001 User’s Manual Copyright 1996-1999 Integral Solutions Int’l, all rights reserved Page: 7 Magnet Transfer Function Fwd Rev 10000 8000 Amplitude (µV) 6000 4000 2000 0 -2000 -4000 -6000 -8000 -10000 -1500 -1000 -500 0 500 1000 1500 Field Strength (oe) ISI QST-2001 User’s Manual Copyright 1996-1999 Integral Solutions Int’l, all rights reserved Page: 8 3. Features 3.1 Software • • • • Windows 98tm Open architecture allowing custom module design Engineering/Production modes Direct output to Accesstm ,Exceltm ,Comma Delimited 3.2 Mechanics • • • • Compact, table top Unique magnet assembly allowing 360 degree field rotation with 1 degree accuracy Support for Guzik top and bottom head cartridges Simple and quick adjustment for Magnet and Head position 3.3 Electronics • • • • • • Noise level less then 20 µV Pk-Pk All measurements done with 14 bit accuracy Precision low noise calibration circuitry allowing maximum dynamic range on every measurement 10 MHz Write signal generator Dual read channel supports either dual stripe heads or two head testing simultaneously MR element protection circuitry against current transients 4. Specifications: 4.1 Applied Currents and Fields • • • Bias Current (HGA Only, HSA dependent upon preamp chip) Range: +/- 20 mA Hardware Limit: User configurable, factory preset 1000 mV Resolution: . 01 mA Accuracy: . 01 mA Write Current (HGA Only, HSA dependent upon preamp chip) Range: 10 - 63.1 mA Resolution: < 3mA Magnetic Field Hard/Soft-Field Intensity: +/- 750 Oe Resolution: .1 Oe 4.2 Measurements • • • • • All measurements have 14-bit accuracy. Bias Current (HGA Only) +/- .01 mA Amplitude +/- 10 µV Resistance +/- .02 Ω Ambient Temperature +/- 1° C 4.3 Test Time • Hard/Soft Transfer Curve Per 1200 point Curve: Throughput: < 1 second up to 360 heads/hr ISI QST-2001 User’s Manual Copyright 1996-1999 Integral Solutions Int’l, all rights reserved Page: 9 4.4 Calculations • • • • • • • • • • Resistance ∆R/R Hysteresis Jump Hysteresis Area Bias Point Sensitivity Barkhausen Noise Amplitude (Positive, Negative, P-P) Amplitude Asymmetry ∆Temperature 4.5 Tests 4.5.1 Static Tests • • • • • MR Element: Head Select, Short / Open, Polarity Write Element: Short / Open Flex • Point to Point Tests • Point to Ground Tests • Passive Component Tests • RDX/RDY tests Preamp Chip: Chip Modes functionality, Fault Line, Power Margins, Power Consumption Voice Coil: Open / Short Coil Resistance, Winding Polarity, Coil Inductance 4.5.2 Quasi-Static Tests • • • • • • • • • Hard and Easy Transfer Curves Popcorn Bias Angle Temperature and Resistance vs. Bias Current Amplitude and Amplitude Asymmetry vs. Bias Current Electromigration (with real time ∆R monitoring and immediate failure abort) Stability of Amplitude and Amplitude Asymmetry (during Bias Current, Field, or Write Bursts) Thermal Stability ESD Stability 4.6 Computer Type: Operating system: Pentium IIItm PC, 15” Flat Panel Monitor, 6GB Drive, and 128MB Windows 98tm 4.7 Power Supply • • • • Kepco: DC Output Range: Closed Loop Gain: Output Impedance: BOP 20-5D +/- 5A . 5 GI (A/V) Shunt R 40kΩ Shunt C3 .05µF ISI QST-2001 User’s Manual Copyright 1996-1999 Integral Solutions Int’l, all rights reserved Page: 10 4.8 Physical • • • Size (HxWxD): Weight: Power: 12” x 10” x 20” 50 lb 120 VAC, 50/60 Hz, 15A 4.9 Options • • • • • • • 2xHGA High throughput cartridge Support for Guzik style cartridges Custom test modules Custom HSA Toolings National Instruments GPIB Board for External Device Control Temperature Controller Integration for testing up to 8 heads simultaneously ESD Stress System Integration 5. Installation 5.1 System Requirements The following describes the requirements of the PC in order to operate the QST-2001: • • • • • • • • PC computer class 486 or greater CD ROM Windows 95/98 Operating System 16 Mb of RAM. VGA or Super VGA graphics adapter. Bus or serial mouse. 20 Mb of free hard drive space available. Microsoft Excel 97 or later Note: The system described above can be supplied from Integral Solutions Int’l if a turnkey system is desired. 5.2 Components of the QST-2001 The following describes the components of the QST-2001: • • • • • • • QST-2001 Unit External Power Supply Host PC system (can be supplied by Integral Solutions Int’l if a turn-key system is desired) Data Acquisition Board and 68-pin cable AC Power Cable (Q=2) BNC to Banana Plug Cable Banana Plug to DC Power Cable Optional components of the QST-2001: • 2xHGA High throughput toolings • Custom HSA toolings • Guzik Cartridge Mounting Fixture, with 6-pin Pogo Pin Interface Board and Cable (does not include Guzik Cartridge) • Guzik HGA Mounting Blocks for various suspension types • Custom HGA Mounting Blocks • Spare Quasi Preamplifier Boards • National Instruments GPIB Board for external device control ISI QST-2001 User’s Manual Copyright 1996-1999 Integral Solutions Int’l, all rights reserved Page: 11 • 8xHGA toolings for 8 head simultaneous measurement 5.3 Installation and Cable Connections All Switches switched to Right. Power Switch GND GND Figure 1 – Connection of Quasistatic Tester Components ISI QST-2001 User’s Manual Copyright 1996-1999 Integral Solutions Int’l, all rights reserved Page: 12 5.3.1 External Power Supply Configuration Before operating the QST-2001, the following configuration must be done on the External Power Supply. Failure to do this properly may result in damaging the QST-2001 Unit. 1. 2. 3. 4. Connect the AC Power Cable from the rear of the External Power Supply to a grounded AC outlet. Switch the Mode switch on the front panel to Current position. Switch the Current Control switch on the front panel to Off position. Turn the Power switch on the front panel to On position 5.3.2 Cable Connections • • • • • • Connect the BNC to Banana Plug Cable from the QST-2001 (connection FIELD-X) to the External Power Supply (connection Current Programming Input), located on the lower right corner of the External Power Supply front panel. Verify that the side labeled GND on the Banana Plug end is connected to the black connector on the External Power Supply. Connect the Banana Plug to 2-Pin Magnet Power Cable from the QST-2001 (connection Magnet Current Input 2-Pin Connector) to the External Power Supply (connection Common and Output), located in the lower center of the External Power Supply front panel. Verify that the side labeled GND on the Banana Plug end is connected to the black connector on the External Power Supply. Connect the 68-pin Cable from the Computer to the QST-2001. Verify that the selected tooling is installed. Connect the AC Power Cable from the QST-2001 to a grounded AC outlet. For Diagnostics only, a BNC to BNC Cable can be connected to either connection SCOPE-1 or CH-2 for signal monitoring on an external device (see section DIAGNOSTICS). 5.3.3 Software Installation 1. In Windows 95/98 select the Start button and choose Run. 2. Select the drive that the software is located on and run SETUP. A similar menu should appear: 3. 4. The SETUP program will prompt for all necessary information. After setup is complete a message will appear to install Preamps. Preamps should be installed to the same directory as Quasi97. ISI QST-2001 User’s Manual Copyright 1996-1999 Integral Solutions Int’l, all rights reserved Page: 13 6. Mechanical Alignment and Operation Area of Isolation for Figure 3 B A D C Figure 2 – Overview of Quasistatic Tester Components A: Magnet Core B: Magnet Core Housing C: Carriage D: Head Mounting Assembly (HSA Pictured) 6.1 Alignment of Head in Magnet Core Field (Guzik Cartridge Mount Only) To achieve optimal test results, the MR element must be parallel to the magnet face and the Head R/W Gap must be located as close to the center of the Magnet Core as possible when the Head is in the Locked Position, as shown in the figure below. When performing this alignment, a mechanically functional head must be installed, although electrical connection is not required. ISI QST-2001 User’s Manual Copyright 1996-1999 Integral Solutions Int’l, all rights reserved Page: 14 Mounting Screws Set Screws Hard Stop Bolt Locked /Unlocked Hard Stop Adjustment Screws Figure 3 – Isolated view of head loading mechanism (QST-2000 shown) 6.1.1 Adjustment of Head Angle (HGA Only) The Head Mounting Assembly is mounted to the Carriage by a pivoting shaft. This shaft is secured to the Carriage by four setscrews. By loosening these four setscrews the Head Mounting Assembly can be pivoted, such that the slider on the head can be positioned parallel to the face of the Magnet Core. When the adjustment is complete, tighten the four setscrews. An additional hard stop, called the Hard Stop Bolt, is used to prevent the Head Mounting Assembly from moving during repeated installation of heads. The Hard Stop Bolt is located under the Head Mounting Assembly, and is secured by a setscrew. After performing the Head Angle/Center Adjustment described above, loosen the Hard Stop Bolt setscrew and adjust the Hard Stop Bolt so that is presses against the Head Mounting Assembly. When complete tighten the Hard Stop Bolt setscrew. ISI QST-2001 User’s Manual Copyright 1996-1999 Integral Solutions Int’l, all rights reserved Page: 15 6.2 Adjustment of Locked/Unlocked Position Hardstops The Locked and Unlocked Position Hardstops can be adjusted by moving the hardstop along the channel in the baseplate. There are fixed limits at each end of the channel preventing the user from accidentally moving the Carriage off of the slide assembly. The Unlocked Position Hardstop does not require fine adjustment. Proper adjustment is performed if the tooling clears the Magnet Core assembly when in the Unlocked Position. Factory adjustment provides about ½” of clearance for easy removal of the head assembly. The Locked Position Hardstop must be adjusted such that the head gap is centered within the Magnetic Core field, as seen from the side. 6.3 Conversion Between Mounting Assemblies Conversion between HSA and HGA mounting assemblies can be done in a very simple process. 1. Move the Carriage to the Unlocked Position and remove the HGA/HSA. 2. Disconnect any cables from the Mounting Assembly to the Quasi Preamp Board. 3. Remove the four Mounting Screws from the assembly. 4. Replace Carriage with desired type. 5. Replace four Mounting Screws. 6. Reattach any cables from the Mounting Assembly to the Quasi Preamp Board. 7. Place HGA/HSA on Mounting Assembly and check Locked Position Hardstop (see section 6.2 Adjustment of Locked/Unlocked Position Hardstops). 6.4 Changing Orientation of the Magnet Core Field (Hard vs. Easy Axis) The Magnet Core can easily be changed between Transverse (Hard Axis) and Longitudinal (Easy Axis) orientations. This is done by loosening the thumb screws on the back of the Magnet Core Housing, rotating the Magnet Core Housing to the desired angle, and tightening the thumbscrews. In HSA mode it is important that the HSA be outside of the magnet while rotating to limit the risk of damage to the HSA. 6.5 Conversion of the HGA Head Mounting Assembly between HGA Mount and Cartridge Mount (QST-2000 only) Two different fixtures are available for mounting HGAs on the QST-2000, called the HGA Mount and Cartridge Mount. The HGA Mount accommodates the standard Guzik HGA Mounting Blocks, available for a variety of HGA suspensions. Custom HGA Mounting Blocks can also be developed. Optionally, the HGA Mount can be replaced with the Cartridge Mount. The Cartridge Mount accommodates the standard Guzik Universal Preamp 6 Cartridge, with 6-pin pogo pin interface. This allows the user to install HGAs on Guzik Cartridges for testing on both the QST-2000 and on the Guzik system, without additional handling of the HGA. This is ideal for both engineering and production applications where both static and dynamic testing of HGAs is required. Different Hard Stop Bolts are used for the HGA Mount and Cartridge Mount assemblies. These must be changed when converting between assemblies. The procedure for converting between these Mount Assemblies is as follows: • • Move the Carriage to the Unlocked Position and remove the HGA. Disconnect the 6-pin cable from the Quasi Preamp Board. ISI QST-2001 User’s Manual Copyright 1996-1999 Integral Solutions Int’l, all rights reserved Page: 16 • • • • • Remove the two screws that secure the Head Mount Assembly to the Pivot Shaft. Loosen the four setscrews that lock the Pivot Shaft to the Carriage. Two of these setscrews can be seen from the top of the Carriage, and the other two from the front of the Carriage. Slide the Pivot Shaft out of the Carriage by pushing the shaft out of the opposite side of the Locked/Unlocked Position Hardstops. Remove the Pivot Shaft and Head Mount Assembly. Loosen the setscrew that locks the Hard Stop Bolt and remove the Hard Stop Bolt. Installation is performed in exactly the reverse order. After installation it may be necessary to readjust the Head Angle (see section 6.1.1 Adjustment of Head Angle). 7. Software Startup and System Menus 7.1 System Startup and Head Installation/Removal Procedure The following procedure for Power ON is required in order not to damage heads: 1. 2. 3. 4. 5. 6. Power ON the PC Power ON the QST-2001 Start the Quasi Software (Normally under START | PROGRAMS | QUASI 97 | QUASI 97) Connect the HGA/HSA/HDA to the Quasistatic Tester. Move the HGA/HSA/HDA forward into the magnetic field. Toggle the BIAS ON/OFF software switch until the Bias is ON. All measurements can now be performed. To change heads to the following: 1. Move the HGA/HSA/HDA backward out of the magnetic field. The Bias Current will automatically switch OFF. 2. Remove the HGA/HSA/HDA. It is not recommended to change heads while the Bias Current is ON. This may cause transient conditions that can damage the head. To power OFF the Quasistatic Tester perform these steps in the reverse order. NOTE: In the event of a power failure or system crash, the Quasistatic Tester may be in an unpredictable state. It is strongly recommended to disconnect the head and repeat the above sequence. 7.2 Configuration Selection Menu Once the user has entered the QST-2001 software, the user must select a configuration for the user’s product. Select the File menu option, and the select Open. From here, choose the product the user is currently testing. If the user wishes to make a new product, select New from the File menu and enter the desired product name. If the user has defined setups in the Bar Code Definitions table (Section 7.5.4) the user can enter a string instead of a file name at this point (by hand or using a barcode reader). If the string matches any definition in the Bar Code Definitions list, the corresponding Setup file will be opened. 7.3 QST-2001 Main Menu The QST-2001 Main Menu allows the user to configure the tester, as well as giving convenient access to all tests via toolbar buttons. ISI QST-2001 User’s Manual Copyright 1996-1999 Integral Solutions Int’l, all rights reserved Page: 17 Figure 4 – QST-2001 Main Menu 7.4 System Configuration Menu The System Parameters Menu allows the user to enter default values for all tests, and to enter limits for all of the tests to prevent damage to the heads (such as maximum bias current and field strength). If a particular test includes one of these parameters then the test’s value will be temporarily used during the test, then the system value will be restored at the completion of the test. Furthermore, if any test attempts to exceed the parameter limits entered in this menu then an error message will appear and the value will not be set. Figure 5 – System Configuration Menu ISI QST-2001 User’s Manual Copyright 1996-1999 Integral Solutions Int’l, all rights reserved Page: 18 Tester Configuration: HSA/HDA, 2 HGA, 8xHGA or HGA. Selects which mode the QST-2001 will perform in. (HGA not available on QST-2001 Plus.) MR Head Channel (HGA Only): Selects which channel to perform measurement on. Single Channel (HD-0) – Measurement will be performed on channel 1. Single Channel (HD-1) – Measurement will be performed on channel 2. Dual Channel (HD-0 & HD-1) – Measurement will be performed on both channel 1 and channel 2 simultaneously (not currently implemented). Field Channel: Select which channel will control the Magnetic Field (QST 2000 Only) Field-1 – Magnetic Field will be controlled using Field 1 connection. Field-2 – Magnetic Field will be controlled using Field 2 connection. Preamp Chip Preamp Chip in the user’s HSA/HDA. HGA mode always utilizes the TLS25B006 preamp chip. Field Polarity: Selects Facing UP or Facing DOWN field polarity. In HSA mode, the user can select which heads, odd or even, face which direction. In HGA mode only the even head facing is utilized. In 2xHGA mode this item changes field polarity based on which cartridge is currently being used (Near or Far). Note: This item is useful when correlating up and down facing heads. By changing this item the user can maintain same field polarity the head sees whether it is mounted up facing or down facing. When Field Polarity is set to Facing Up and Magnet is rotated to 0 Degrees and Field is set to positive value, the field direction is From Upper Face of the magnet to Lower Face of the magnet. Total # of Heads Total heads in HSA. HGA mode defaults to one head. MR Head Type Type of MR head that is being tested. AMR or GMR (Spin Valve) Wire Resistance (Ohm): HGA/HSA wire resistance in Ohms. Used in calculating MR element temperature. Lead Resistance (Ohm): HGA/HSA lead resistance in Ohms. Used in calculating MR element temperature. K Beta: Temperature constant of the MR material. Used in calculating MR element temperature. Head Preheat Time (Sec) Specifies how long to preheat the head in seconds after Bias has been turned on. Note: Some heads take some time to warm up and running tests during this warm up condition will produce erroneous results. HGA Preamp Gain Formula Formula used in HGA, 2 HGA and 8xHGA modes for calculating the result ‘Preamp Amp’ in Transfer Curve and Quasi- Static Tests. Formula can use up to two variables: I and R. HSA Preamp Gain Formula Formula used in HSA/HDA mode for calculating the result ‘Preamp Amp’ in Transfer Curve and Quasi- Static Tests. Formula can use up to two variables: I and R. Part ID: Specifies identification for the part being tested. ISI QST-2001 User’s Manual Copyright 1996-1999 Integral Solutions Int’l, all rights reserved Page: 19 Operator ID: Identifies operator. Tester ID: Identifies tester. Bias Mode: Mode for Bias. Ibias sets bias in mA, VBias sets 1 mA, measures resistance, calculates IBias to achieve desired voltage and then sets this bias current. The voltage is then fine-tuned. VBias Res mode sets the IBias in the text box next to the mode selection list box, measures resistance, calculates IBias to achieve desired voltage and sets the bias. No fine-tuning is done in this mode. Read Bias Hd 0: Specifies default Read Bias for Hd 0 (Even heads in 8xHGA mode). Read Bias Hd 1: Specifies default Read Bias for Hd 1 (Odd heads in 8xHGA mode). Default Field (Oe): Specifies default Magnetic Field. Note: It is recommended to keep Default Field at 0. Once this item is changed the field on the Magnet is available immediately. Prolonged settings of high default field will eventually heat and damage the Magnet. Default Write Current (mA): Specifies default Write Current. Write Frequency (MHz): Specifies default Write Frequency (12.5 to 400). Only available on 2001 Plus machines with the Synthesizer Board installed in the system. Write Stop: Defines the polarity of the final write pulse when writing. Maximum Field (Oe): Maximum Field allowed during any test. Maximum Bias : Maximum Bias allowed during any test. 7.5 Tools Menu The tools menu allows the user to set data logging, user options, and grading. 7.5.1 Data Logging Menu ISI QST-2001 User’s Manual Copyright 1996-1999 Integral Solutions Int’l, all rights reserved Page: 20 The Data Logging Menu allows user to configure data logging. Figure 6 – Data Logging Menu Log Statistics: If enabled test statistics will be logged to the user defined log file. These are the only results that will be logged in text file mode. Log Raw Results If enabled individual test results will be logged to the user defined log file. Log Raw Data: If enabled raw results data for non-Transfer Curve Tests will be logged to the user defined log file. Log Transfer Raw Data If enabled raw results data for Transfer Curve Tests will be logged to the user defined log file. Note: Enabling of raw results is not recommended, as it will significantly slow down the tests. Log Plots If enabled Plots will be saved into the log file (Excel Only). File: User can specify the name of the log file. User has a choice of either Microsoft Access, Comma Delimited Text, or Microsoft Excel file formats. Note: This file is automatically saved with the current setup and will be started the next time this setup is selected. 7.5.2 Options menu The Options Menu allows user to configure various system options. ISI QST-2001 User’s Manual Copyright 1996-1999 Integral Solutions Int’l, all rights reserved Page: 21 Figure 7 – Options Configuration Menu Auto Clear Results: If enabled the results table and plot will be cleared every time test is run. Grading: If enabled grading will be checked for each test run. Prompt for Login: If enabled user will be prompted to enter a password every time the software is started. If the user fails to enter the password correctly the system will be placed in Operator Mode. In Operator Mode, no changes will be allowed to the setups and only the Production test will be enabled. Password: Password used during login. If the password is entered incorrectly the user will enter operator mode. Statistics: Statistics to be displayed during each run. Heads: Which heads will be run during production (HSA/HDA, 2 HGA and 8xHGA Only). The label column also allows the user to set the name that appears for this head in the info grid. 2x Cartridge labels: Allows the user to set the name that appears for each cartridge in 2x mode. The grid also shows which cartridge is currently detected if the bias is on. ISI QST-2001 User’s Manual Copyright 1996-1999 Integral Solutions Int’l, all rights reserved Page: 22 Prompt user for Part ID: If enabled user will be prompted to enter Part ID every time test is run. Keep Part ID Window Visible: If enabled the Part ID window stays visible so that user can enter next Part’s ID while testing a Part Part ID Verification: String Comparison for Part ID. Comparison string is case sensitive and supports the following wildcards: # allows any character in this position of the part ID string; ? Ends Part ID Verification for the rest of the string. Figure 8 – Operator Mode 7.5.3 Grading Menu The grading menu allows the user to enter grades for all of the tests in the Quasi97 software. Grading is formatted such that if the grade is true the part fails and if the grade is false the part passes. To set up a grade follow these steps: ISI QST-2001 User’s Manual Copyright 1996-1999 Integral Solutions Int’l, all rights reserved Page: 23 Figure 9 – Grading Configuration Menu 1. 2. 3. 4. Select the test the user wishes to grade from the drop down list in the Test column. Select which Result from that Test the user wishes to grade for in the Result column. Select which Statistic of that Result the user wishes to grade for in the Stat column. Select which operator with which to grade and the value grading will be based on. Remember that if the grade is true the part will fail. To add a new grade, press Add Grade; to remove a grade, position the cursor onto the grade and then press Remove Grade. 7.5.4 Bar Code Definitions Menu The Bar Code Definitions menu allows the user to define setups in terms of string constants. Whenever the user selects to open a setup file, the string entered is checked against the list of bar code verification strings on this menu. If the name entered matches one of these strings, the file defined by that string is opened. The setup name on the menu must include the full path of the file. The Bar Code Verification String can use the following wildcard characters: # Ignore this character. ? End verification for this string. Example: ISI QST-2001 User’s Manual Copyright 1996-1999 Integral Solutions Int’l, all rights reserved Page: 24 Figure 10 –Bar Code Definitions Menu In this table we have two setups defined. If the user were to press File | Open and enter a string which had an A as the third character the first file would be opened. If the user entered a string where the third through fifth characters were 895 the second file would be opened. The user may enter these strings by hand or by using a bar code reader. 7.6 Calibration Menu System Calibration parameters are saved into EEPROMs inside the system and interface boards. Therefore Calibration is specific to each product configuration. These parameters have been calibrated at the factory and generally do not require recalibration, although this option does exist. System Calibration parameters include the following items: • • Resistance/Bias (saved for individual heads in 2 HGA and 8xHGA configurations) Ambient Temperature The Resistance calibration requires the user to mount a precise resistor of known value instead of the head. A 25Ohm, 0.1% tolerance resistor is used at the factory for this procedure. The proper head is selected on the head selection table and the known resistance is entered. Then press either Calibrate All Channels Resistance or Calibrate Selected Channel Resistance. (Only press Calibrate All if you have a resistor on each channel.) The Ambient Temperature calibration requires the user to precisely measure the Ambient Temperature and enter this value into the menu. Then press Calibrate Ambient Temperature. Units are in degrees C. When finished calibrating press Save to EEPROM. 7.6.1 When To Recalibrate In general, unless termination boards, Quasi Preamp boards, or the system is converted between HGA and Cartridge Mount (which requires change in termination boards), this calibration is not necessary. ISI QST-2001 User’s Manual Copyright 1996-1999 Integral Solutions Int’l, all rights reserved Page: 25 Figure 11 – System Calibration Menu 8. Software Tests 8.1 Software Test Graphical Interface All Software Tests share the same GUI design, which is a single menu allowing the user to configure test parameters, view results, and view any resulting plot (as applicable). Most tests with plots allow multiple data sets to be shown. Other plots, such as those in the Electromigration and Stability Tests, dynamically plot the data real-time. The result grid is typically separated into four or more tabs, showing Raw Data, Raw Results, Statistics and Grades. The Statistics tab is brought to foreground by default at the completion of the test, although the user may switch tabs to view the other data. To print out the results of any test, select File|Print or File|Print Preview on the main menu. ISI QST-2001 User’s Manual Copyright 1996-1999 Integral Solutions Int’l, all rights reserved Page: 26 Test Selection Toolbar Test Parameters Info Grid Results Plot Results Grid Clear Results Button Head Selection Abort Test Button Reset Plot Scales Button Bias On/Off Button Show All Curves Button Run Test Figure 12 – Software Test Graphical Interface Test Selection Toolbar: The Test Selection Toolbar allows the user convenient access to all QST2001 tests. The button for the currently selected test will appear depressed. Info Grid: The info grid shows all of the test runs currently in memory for this test. Selecting a row will bring up the results and plot for that test run. The most recent test run is always on top of the Info Grid. Results Plot: The results plot shows a graphical representation of the test results. Left clicking and dragging over an area zooms into that area of the plot. Right clicking on the plot brings up a customization dialog. Clear Results Button: When Auto Clear Results is not selected in the Options menu (see 7.5.2) multiple test runs are saved in memory and shown in the Info Grid. Pressing this button clears all runs of this test from memory. Abort Test Button: If the test is in progress, pressing this will end the test. Reset Plot Scales Button: After zooming in, pressing this button will reset the plot scales to their original position. Bias On/Off Button: Toggling this button turns bias on and off. Show All Curves Button: Pressing this button will show the plots for all test runs in memory. Run Test Button: Pressing this button will run the test currently selected. Head Selection: There are two ways to change heads in the QST-2001 software. First, the user may enter the desired head into this textbox and press enter. Second, the user may use the up and down arrows next to the text box to cycle through the heads. Attempting to select a head that is not enabled in the Options menu (see 7.5.2) results in an error. ISI QST-2001 User’s Manual Copyright 1996-1999 Integral Solutions Int’l, all rights reserved Page: 27 Results Grid: The results grid shows all of the results and statistics for the currently selected test run. There are tabs for viewing Statistics, Raw Data, Parameters and Grades. Test Parameters: All test specific parameters are entered here. 8.2 Stress Options Several tests, including Longitudinal and Transverse Transfer Curves and Stability Tests, enable the user to enter Stress Options. Stress Options are executed before each cycle of the test. The Stress Options are executed in the order that the user enters them. The following are the possible stress conditions: Bias Current: Sets the entered Read Bias value. Bias Switch: Setting to 0 will turn bias off, setting 1 will turn bias on. Delay (mS): Delays for the entered amount of time. Field (Oe): Sets the entered field. Write AC (mS): Writes with data for the entered duration. Data frequency is defined in the system menu. Write Current (mA): Sets the Write Current value. Write DC (mS): Writes without data for the entered duration. 8.3 Longitudinal and Transverse Transfer Curves The Longitudinal and Transverse Transfer Curves allow the user to sweep the Magnet Core Field while sampling the change in HGA/HSA voltage output. Evaluations of amplitude, amplitude asymmetry, and hysteresis are made automatically. The user can specify two types of sweeps, either range (From-To-Inc) or symmetrical (FromInc). In the range mode the field will be swept from FROM to TO, then back to FROM field values. In the symmetrical mode the field will be swept from 0 to +FROM, then back to –FROM then back to 0 field values. In both cases the field will be reset to 0 at the end of the measurement. The Forward direction is defined as the direction in which the Field is increasing. 8.3.1 Setup Parameters The setup parameters for the Longitudinal and Transverse Transfer Curve Tests are as follows: Cycles: Number of times the transfer curve will be run for statistical calculation. In multi-cycle mode the plot style is selected by the Multiple Curves Per Test item. Averages: Number of averages per each point measured. Sweep From (Oe): Starting Field for the transfer curve. Sweep To (Oe): Stopping Field for the transfer curve. Sweep Inc (Oe): Increment Field for the transfer curve. Measure At (Oe): Specifies +/- Field location to measure Amplitude and Asymmetry. Symmetrical: If enabled, Sweep To item will be disabled and Transfer Curve will be ISI QST-2001 User’s Manual Copyright 1996-1999 Integral Solutions Int’l, all rights reserved Page: 28 performed symmetrically with respect to Sweep From starting from 0. Multiple Curves Per Test: Used only if multiple cycles are run. If enabled, each cycle will be represented by a separate transfer curve. If disabled, the transfer curve will be the average of all the cycles run. Stress Options: This brings up a form where the user may set up a variety of stress conditions under which the Transfer Curve will be run. Stress Options are described in section 8.2. 8.3.2 Example of Result Figure 13 – Transverse Transfer Function Menu ISI QST-2001 User’s Manual Copyright 1996-1999 Integral Solutions Int’l, all rights reserved Page: 29 Figure 14 – Longitudinal Transfer Function Tests 8.4 Bias Angle By running transfer curves with maximum field in order to saturate MR element the Bias Angle can be calculated. 8.4.1 Setup Parameters The setup parameters for the Bias Angle Test are as follows: Cycles: Number of cycles entire test will be run. Averages: Number of averages per each point measured. Sweep From (mA): Starting bias current in mAmps. Sweep To(mA): Ending bias current in mAmps. Sweep Increment (mA): Amount to increment bias current in mAmps. 8.4.2 Results Optimal Bias Bias calculated to be optimal for this head. Optimization is calculated based on head type (AMR or GMR). 8.4.3 Example of Result and Printout ISI QST-2001 User’s Manual Copyright 1996-1999 Integral Solutions Int’l, all rights reserved Page: 30 Figure 15 – Bias Angle Test (AMR head) 8.5 Resistance Delta By measuring HGA/HSA resistance delta, MR Temperature can be calculated from a set of user defined parameters. These parameters include the wire/lead resistance of the HGA/HSA and the temperature Constant of the MR material. The Resistance Delta Measurement then sweeps Bias Current while measuring Resistance and calculating MR Temperature. 8.5.1 Setup Parameters The setup parameters for the Resistance Delta Test are as follows: Cycles: Number of cycles entire test will be run. Averages: Number of averages per each point measured. Sweep From (mA): Starting bias current in mAmps. Sweep To (mA): Ending bias current in mAmps. Sweep Inc (mA): Amount to increment bias current in mAmps. Magnetic Field (Oe): Strength of magnetic field in Oersteds. ISI QST-2001 User’s Manual Copyright 1996-1999 Integral Solutions Int’l, all rights reserved Page: 31 8.5.2 Example of Result and Printout Figure 16 – Resistance Delta Test 8.6 Asymmetry The Asymmetry Measurements sweeps Bias Current while measuring Amplitude and Amplitude Asymmetry. The field strength during this measurement is user selectable. 8.6.1 Setup Parameters The setup parameters for the Asymmetry Test are as follows: Cycles: Number of cycles entire test will be run. Averages: Number of averages per each point measured. Sweep From (mA): Starting bias current in mAmps. Sweep To (mA): Ending bias current in mAmps. Sweep Inc(mA): Amount to increment bias current in mAmps. Magnetic Field (Oe): Strength of magnetic field in Oersteds ISI QST-2001 User’s Manual Copyright 1996-1999 Integral Solutions Int’l, all rights reserved Page: 32 8.6.2 Results Bias Current (mA) Resistance (Ohms) Measured bias current before the test Measured resistance before the test 8.6.3 Example of Result and Printout Figure 17 – Asymmetry Test ISI QST-2001 User’s Manual Copyright 1996-1999 Integral Solutions Int’l, all rights reserved Page: 33 8.7 Electromigration Electromigration is a time stress measurement, where resistance will be measured as a function of time. For HGA/HSA stressing a separate Bias Current can be used vs. the default value configured for other measurements. For failure analysis, if resistance exceeds a user-defined value during the measurement, or changes greatly between time samples, or changes greatly with respect to initial measurement the Bias Current will be shut off and the test will abort early. During this measurement, Ambient Temperature will also be measured, supporting measurements performed in temperature controlled environments. All results are dynamically plotted real-time on the graph. 8.7.1 Setup Parameters The setup parameters for the Electromigration Test are as follows: Averages: Number of averages per each point measured. Bias Current (mA): Bias current to be used during the test in mAmps Test Duration (Hrs): Length of test in Hours. Max Res. (Ohm): Maximum resistance threshold for the head in Ohms. Test will abort if this threshold is achieved. Min Res. (Ohm): Minimum resistance threshold for the head in Ohms. Test will abort if this threshold is achieved. Delta Res. (Ohm): Maximum resistance change per individual sample for the head in Ohms. Test will abort if this threshold is achieved. Delta Res. Interval (S) Interval between time samples in Seconds. Max Res. Change (Ohm): Maximum amount the resistance can change from the initial resistance for the head in Ohms. Test will abort if this threshold is achieved. 8.7.2 Results Res (Ohm) Statistics of Resistance calculated from Raw Data MR Temp (C) Statistics of MR Calculated Temperature calculated from Raw Data Amb. Temp (C) Statistics of Ambient Temperature calculated from Raw Data Bias Current (mA) Measured Bias Current used during the test. Initial Resistance (Ohm) Measured Initial Resistance before the start of the test. Max Resistance Delta (Ohm) Maximum Resistance Delta from one sample to another. Final Resistance (Ohm) Final Resistance at the end of the test. Total Resistance Change (Ohm) Total Resistance change between Initial Resistance and Final Resistance Test Result Test completion code: 0 – Test completed normally ISI QST-2001 User’s Manual Copyright 1996-1999 Integral Solutions Int’l, all rights reserved Page: 34 1234- Resistance Delta was exceeded Maximum Resistance change was exceeded Minimum Resistance was exceeded Maximum Resistance was exceeded 8.7.3 Example of Result and Printout Figure 18 – Electromigration Test 8.8 Stability Stability is a time stress measurement, where either Amplitude and/or Amplitude Asymmetry can be measured as a function of time. During the stability measurement the ‘stress’ parameter will be toggled for a user defined duration of time, then returned to its original value. After a fixed channel settling time, Amplitude and/or Amplitude Asymmetry will be measured. Simultaneously Ambient Temperature will be measured to support measurements performed in temperature controlled environments. All results are dynamically plotted real-time on the graph. 8.8.1 Setup Parameters The setup parameters for the Stability Test are as follows: ISI QST-2001 User’s Manual Copyright 1996-1999 Integral Solutions Int’l, all rights reserved Page: 35 Averages: Number of averages per each point measured. Bias Current (mA): Bias current to be used during the test in mAmps. Test Duration: Number of iterations the test will run. Field (Oe): Strength of magnetic field to be used in Oersteds Stress Options: Type of stress condition to be used. Stress Options are defined in section 8.2. 8.8.2 Example of Result and Printout Figure 19 – Stability Test 8.9 Quasi-Static Measurements The Quasi-Static Measurements allow the user to perform single measurements of Amplitude, Resistance, Amplitude Asymmetry, and Ambient Temperature at any field strength and Bias Current. The result of these measurements does not include a graph, so the GUI interface for this menu is different from the others. ISI QST-2001 User’s Manual Copyright 1996-1999 Integral Solutions Int’l, all rights reserved Page: 36 8.9.1 Setup Parameters Each test in the Quasi-Static tests allows the user to individually control @Bias, @Oe and Iterations. Setting either @Bias or @Oe to 0 will set the system default value. The Quasi-Static Tests will give the user single shot results for any or all of the following tests: Amp @ Oe: Measures amplitude at the specified field for the specified number of iterations. Ideal for running high number of iterations. Amp @ Pk-Pk Oe: Measures amplitude at +/- the specified field. Results include: Pk-Pk amp; Positive Amp; Negative Amp; Asymmetry; Bias Point; Delta R/R; and Preamp Pk-Pk Amp (Pk-Pk amp scaled by the preamp gain). Ambient Temperature: Measures the Ambient Temperature. Read Bias: Measures the current Read Bias. Resistance: Measures the Resistance at the current settings. 8.9.2 Example of Result and Printout Figure 20 – Quasi-Static Tests ISI QST-2001 User’s Manual Copyright 1996-1999 Integral Solutions Int’l, all rights reserved Page: 37 8.10 Static Tests Static tests are chip dependant tests used to test the HGA/HSA. Standard Static tests include Voice Coil Polarity, Head Open/Short, and Writer Open/Short. When the HSA is integrated into the QST-2001 system, all Static tests provided for in the preamp chip are presented here. In HGA mode, only write fault is supported. At the end of the Static Test run, there are two items added to the info grid. Head -1 corresponds to results that are not head dependent; the other results appear in the grid after the number for the current head. The 2001 Plus also adds the ability to check for Point to Point shorts, Point to Ground shorts, and any Passive Components available on the flex. All of these tests are defined specifically for each individual preamp, allowing for the exclusion of pins that are intentionally grounded or connected together. Point to Point tests work by sensing current travelling between pins, the Point to Ground test measures resistance to ground and reports a failure if less then 200 Ohms. 8.10.1 Setup Parameters The setup parameters for the Static Tests are as follows: Cycles: Number of cycles entire test will be run. Averages: Number of averages per each point measured. 8.10.2 Example of Result and Printout Figure 21 –Static Tests ISI QST-2001 User’s Manual Copyright 1996-1999 Integral Solutions Int’l, all rights reserved Page: 38 8.11 Popcorn Tests Popcorn tests utilize boards that are optional to the QST-2001 Plus system. These options are not available to earlier QST models. The Popcorn Tests work by exciting the writer at a defined current and frequency, waiting a defined delay period and then measuring Popcorn pulses using either the Threshold or Rate Qualification method. The Popcorn Tests also allow the user to sweep either or both frequency and write current. 8.11.1 Setup Parameters Cycles: How many Cycles to measure. Each Cycle consists of a Write a Delay and a Read. Amp Qualify: If enabled, the user can define a threshold in uV that will be considered a Popcorn pulse. This detection only occurs during the Read period. Rate Qualify: If enabled, the user can define a slope in uV/nS that will be considered a Popcorn Pulse. This detection only occurs during the Delay period. Filter: Which Filter to use (F0 or F1). These filters are user defined as placed on the Universal Interface Board of the QST 2001Plus. Preamp Gain: The gain programmed for the read channel preamp. This value is read only. Channel Gain: Off, Low, or High. This selects which hardware gain channel to use. Generally this value should be set to High Gain unless the channel is saturated. Test Mode: Style of test to run. Popcorn (Single Frequency, Single Current), Frequency Sweep, Current Sweep, and Frequency and Current Sweep. Write Current (mV): Write Current for Non Write Current Sweep modes. Threshold (uV): Threshold that will be used if Threshold Qualification is enabled. Slope (uV/nS): Slope that will be considered a Popcorn pulse if Slope Qualification is enabled. Frequency (MHz): Frequency used in Non Frequency Sweep modes. Write Current (mA) From: Starting Write Current in Write Current Sweep modes. Write Current To: Ending Write Current in Write Current Sweep modes. Write Current Inc: Write Current increment in Write Current Sweep modes. Frequency (MHz) From: Starting Frequency in Frequency Sweep modes. Frequency To: Ending Frequency in Frequency Sweep modes. Frequency Inc: Frequency increment in Frequency Sweep modes. Write (uS): Duration of write. Delay (uS): Duration of Delay. During this time only Slope Qualification will detect Popcorn pulses. Read (uS): Length of Read for each cycle. During this time only Threshold Qualification will detect Popcorn pulses. Multi Events Per If enabled then each qualifying pulse is counted as popcorn. If not enabled then each cycle will count as 1 popcorn if there are one or more qualifying ISI QST-2001 User’s Manual Copyright 1996-1999 Integral Solutions Int’l, all rights reserved Page: 39 Cycle pulses. Digitize Pulse If enabled then each cycle with a qualifying pulse is digitized and shown on the Digitizer graph. 8.11.2 Example of Result and Printout Figure 22 –Popcorn Test Digitizer ISI QST-2001 User’s Manual Copyright 1996-1999 Integral Solutions Int’l, all rights reserved Page: 40 Figure 23 –Popcorn Tests Sweep Sample 8.12 Temperature Control Tests (HGA Only) The Temperature Control Tests utilize equipment that is optional to the QST-2001 system. The Temperature Control Tests allow characterization of the MR heads under user defined temperature conditions. There are four test modes, each allowing sampling of Amplitude, Asymmetry, Resistance, and Transfer Curves at specific temperatures. The first mode is a Sweep, where the user can define the starting, ending and increment temperatures at which the sampling will be performed. Ex. Sample Point Temperature (C) Time (hrs) ISI QST-2001 User’s Manual Copyright 1996-1999 Integral Solutions Int’l, all rights reserved Page: 41 The second mode is a Ramping mode. Ramping mode sweeps bias currents at each individual point of a temperature sweep. The third mode is a Thermal Stability mode. The test will perform a single sampling at a base temperature, then perform samplings at a peak temperature. The user can define the base temperature, the peak temperature, how long to sample at the peak temperature, and the interval between sampling. After the completion of the test time, one final measurement will be taken at the base temperature. Ex. Sample Point Temperature (C) Time (hrs) The fourth mode is a Pulsed mode, where the user can define the starting, ending and increment temperature as well as the pulse duration. The test takes a sample at the base temperature after soaking the head at an increasing peak temperature for a defined duration. This is repeated for the user-defined range of peak temperatures. Ex. Sample Point Time (hrs) 8.12.1 Setup Parameters The setup parameters for the Temperature Control Test are as follows: Averages: Number of averages per each sample point measured. Run All Selected Heads: If enabled in 8xHGA mode, the tester will run for all heads selected in the Options menu. Temp From (C) In Sweep and Ramping modes this item defines the starting temperature. In Constant and Pulsed modes this item defines the base temperature. Temp To (C) In Sweep and Ramping modes this item defines the ending temperature. In Constant mode this item defines the peak temperature. In Pulsed mode this item defines the soaking temperature. Temp Inc (C) Increment temperature used only in Sweep, Ramping and Pulsed modes. ISI QST-2001 User’s Manual Copyright 1996-1999 Integral Solutions Int’l, all rights reserved Page: 42 Bias From (mA): Specifies bias current used during the test. In Ramping mode specifies the Bias to sweep from. Bias To (mA): Only used in Ramping mode. Specifies bias current to sweep to during the test. Bias Inc (mA): Only used in Ramping mode. Specifies bias current increment during the test. Test Time (Hrs): In Constant mode defines the total duration of the test. In all other modes this item is ignored. Sample Time (Hrs): In Constant mode defines how often a transfer curve is run. In Pulsed mode defines soaking duration. In Sweep and Ramping modes this item is ignored. Mode: Defines test mode as described above. Bias Delay (Min): Length of time in minutes to wait after setting bias before taking the measurement. Keep Bias On: If enabled, Bias will remain on for the duration of the test. ISI QST-2001 User’s Manual Copyright 1996-1999 Integral Solutions Int’l, all rights reserved Page: 43 8.12.2 Example of Result and Printout Figure 23 – Temperature Control (Sweep Mode) ISI QST-2001 User’s Manual Copyright 1996-1999 Integral Solutions Int’l, all rights reserved Page: 44 Figure 24 – Temperature Control Transfer Curves (Sweep Mode) 8.13 ESD Stress Test The ESD Control Test utilizes equipment that is optional to the QST-2001 system. The ESD Control Test allows characterization of the MR heads vs. defined ESD Stress. The test is setup to run a transfer curve after stressing the head with ESD. Several fail on parameters are defined by the user to abort the test under various conditions. The ESD Control Test can also work with certain HSA’s with reset pulse. In these cases, all ESD voltages are in terms of the DAC values programmed for controlling Reset Pulse amplitude. 8.13.1 Setup Parameters The setup parameters for the ESD Control Test are as follows: Module: Type of waveform that is being used. This is read from the EEPROM in the ESD device. Coarse Sweep From (V): This defines the first ESD pulse fired from the ESD System. (A transfer curve is run before this first pulse is run.) Coarse Sweep To (V): This defines the final ESD Pulse fired. Coarse Sweep Inc (V): Voltage increment used from Coarse Sweep From to Fine Sweep From Voltage. Fine Sweep From (V): This defines the voltage at which the Fine Inc starts being used. ISI QST-2001 User’s Manual Copyright 1996-1999 Integral Solutions Int’l, all rights reserved Page: 45 Fine Inc (V): Voltage increment used from Fine Sweep From to Coarse Sweep To. Pulse Polarity: POSITIVE, NEGATIVE, or POS-NEG and NEG-POS. Type of pulse to be fired for each voltage increment. In POS-NEG and NEG-POS modes both a positive and a negative pulse are fired at each increment with separate measurement taken after each firing. Pulses Per Voltage: Number of pulses fired at each voltage increment. Delay Before Pulse (S): Time in seconds to wait before firing a pulse. Delay After Pulse (S): Time in seconds to wait after firing a pulse. Fail On Parameters: Parameters that can be utilized to abort the test in mid run. To use a parameter, enable it and then set the values to be used for that parameter. Delta is defined as the percentage change from the initial reading (before the first ESD pulse.) All values are signed to indicate any change in polarity. MFR Amp (%) Specifies percentage difference in Amplitude at which HBM voltage will be used for MFR calculation. Default: 10% MFR Res (%) Specifies percentage difference in Resistance at which HBM voltage will be used for MFR calculation. Default: 1% 8.13.2 Example of Result and Printout Figure 25 – ESD Control ISI QST-2001 User’s Manual Copyright 1996-1999 Integral Solutions Int’l, all rights reserved Page: 46 Figure 26 – ESD Control Transfer Curve 8.14 Production Tests The Production Test menu allows the user to run any of the Quasi97 tests in a sequence. This also allows the user to setup a production sequence that will be run in Operator Mode. (See 7.5.2 Options Menu.) After running a Production Test, the user can see any individual test plots and raw data by selecting the individual test from the test toolbar. 8.14.1 Setup Parameters The setup parameters for the Production Test are as follows: Grading Setup: This calls up the Grade Setup menu allowing the user to grade the test results. (See 7.5.3 Grading Menu) ISI QST-2001 User’s Manual Copyright 1996-1999 Integral Solutions Int’l, all rights reserved Page: 47 8.14.2 Example of Result and Printout Figure 27 – Production Tests ISI QST-2001 User’s Manual Copyright 1996-1999 Integral Solutions Int’l, all rights reserved Page: 48 9. Data Log File 9.1 Microsoft Access Log File Format The Quasi97 log file is designed for convenient easy to use access to a history of test data. The file will be saved as a *.MDL file and can be opened using Access. Upon opening, the user will see a set of tables similar to this: Figure 28 – Log File 9.2 Description of Log File Tables Each log file table has a field ‘ID’. This field is a built in relationship field, which connects all of the tables for cross-tab queries. The data from the tests is separated into these tables as follows. Data: This is the raw data collected for each test run. Grades: These are the grade results collected for each test run. Info: This is miscellaneous info gathered for each test run. Items in this table include test time, Part ID, Tester ID, Operator ID and Miscellaneous notes. Parameters: Here all of the parameters for each test run are stored. Results: These are the raw results calculated for each test. Multiple cycles of tests produce statistics. Statistics: These are the statistics calculated for all the tests. System: This table includes all information about the system, including Tester SN and global parameters set in the System menu. 9.3 Description of Log File Queries Several queries have been prewritten for the log file to make the data more accessible as well as to present the user with examples for any queries he/she might need to write in order to format the data for export. Upon running a query, the user will be prompted for a test name. Enter the name of the test for which the user wishes to see ISI QST-2001 User’s Manual Copyright 1996-1999 Integral Solutions Int’l, all rights reserved Page: 49 results or statistics. If unsure of the name of the test, all tests in the log file have their names in the test column of the info table. 9.4 Microsoft Excel Log File Format In order to log data directly in Microsoft Excel File format, the user must select “Microsoft Excel (*.xls)” file type when opening log file in the Options|Data Logging menu. Figure 29 – Excel File Type An Excel file of the specified name will automatically be created. The new excel file will contain three separate sheets for every test available in Quasi 97. The first sheet displays Statistical Results, second sheet displays Raw Results, and the third sheet displays Raw Data. 9.5 Microsoft Excel Log File Example ISI QST-2001 User’s Manual Copyright 1996-1999 Integral Solutions Int’l, all rights reserved Page: 50 Figure 30 – Excel Log File Example 10. Software Interface for Remote Operation The QST-2001 supports a software interface for remote control of all operations. This allows the user to develop custom programs using the QST-2001 measurements as tools. Both single-shot and integrated tests are available, as well as control of all parameters. Results of all measurements will be returned to the user executing the remote operation. This interface is performed using Windows ActiveX controls. A source code example of this interface is provided with the QST-2001 software. 11. Diagnostics and Scope Points Two scope points are available for monitoring of the Head Voltage signal, connected to the Channel 1 and Channel 2 outputs of the QST-2001. The scope points, however, are taken after a fixed signal gain (1000:1) and automatic dc zero level adjustment (which is dynamically adjusted during measurements). 12. Upgrading Preamps When a new preamp is integrated into the Quasi97 software, a new release of Preamps is made available. If the user wishes to upgrade Preamps without upgrading the entire Quasi97 software, simply run the PreampsSetup.exe provided by Integral Solutions. Preamps should be installed to the current Quasi97 directory. Guzik is a trademark of Guzik Technical Enterprises ISI QST-2001 User’s Manual Copyright 1996-1999 Integral Solutions Int’l, all rights reserved Page: 51 Appendix A: Integrating HGAs, HSAs, and HDAs with the QST2001 The following is a list of requirements to integrate an HGA with the QST-2001 system: • • • Flex cable (FOS) drawings, with pad pinout configuration (Up and Down) HGA Drawings (Up and Down) Sample HGAs (Up and Down) The following is a list of requirements to integrate an HSA with the QST-2001 system: • • • • • • • • • • • Preamp Chip specifications Sample HSAs, including shipping comb HSA flex circuit mechanical layout diagram HSA flex circuit schematic Sample(s) of flex connector used on drive PCB (or detailed specifications and drawings) Drawings of pivot hard stop reference surface Drawings (top and side views) of assembled HSA (with pivot bearing, if installed during test) Detailed dimensions of HSA mounting surface or pivot bearing (including bore size and tolerances) 3-D model of assembled HSA importable to ACAD 14 (recommended, but not required) Direction of rotation of Spindle Drawings of shipping comb The following is a list of requirements to integrate an HDA with the QST-2001 system (note that many of these items are duplicated from the HSA integration requirements): • • • • • • • Preamp Chip specifications Sample HDAs HSA flex circuit mechanical layout diagram HSA flex circuit schematic HDA drawings, showing flex circuit connector location and installation height, and HSA park position Sample(s) of flex connector used on drive PCB (or detailed specifications and drawings) Direction of rotation of Spindle ISI QST-2001 User’s Manual Copyright 1996-1999 Integral Solutions Int’l, all rights reserved Page: 52 Appendix B: Temperature Controller (Optional) Temperature Controller Description B.1 Overview The QST-2001 Temperature Controller is an optional attachment to the QST-2000 system. The Temperature Controller attachment allows the user to perform quasistatic tests on MR heads at a controlled temperature of your choosing. With the ability to heat the head up to 250° C at an accuracy of 0.001° C, the Temperature Controller is ideal for testing the temperature stability of your heads. The Qst-2001 Temperature Controller features a LakeShore Model 340 temperature controller, an ISI Hotfinger attachment, and an easy to use temperature controller software module. The module includes three new tests for testing MR heads, allowing testing at a fixed stress temperature for a defined length of time, testing while sweeping temperature, and testing at a fixed temperature after an incrementing stress factor. ISI Hotfinger Attachment The ISI Hotfinger attachment is a highly heat conductive plate upon which the MR head is placed. Inside the Hotfinger is a heating cartridge and a temperature sensor, completing a closed loop system with the LakeShore temperature controller. This closed loop system utilizes standard PID methods to control the temperature of the MR head. Temperature Controller Features • 0.001 Degree C accuracy • • Compact. Can be placed under your monitor. • • Test MR Heads at controlled temperatures up to 250 Degree C. Easy user interface. Allows testing while sweeping temperature, at a constant temperature, or after an incrementing temperature stress. B.2 Temperature Controller Setup Menu The Temperature Controller Setup menu can either be accessed directly through the Start | Program Files | LS340 setup item, or can be selected by pressing the LS340 Setup button on the TempCont test screen. ISI QST-2001 User’s Manual Copyright 1996-1999 Integral Solutions Int’l, all rights reserved Page: 53 Figure 31 – Temperature Controller Setup Menu Device Name: Name given to the device in the National Instruments GPIB setup menu. Connect: Initializes the GPIB device, giving the device a GPIB Device ID. Refresh Device: Whenever the user make a change in the setup of the device, the user must press refresh device for the new setup to take effect. Set Point (C): Used to test the LS340. Set the point the user wishes the LS340 to heat up to. Heater ON: Used to test the LS340. Pressing this will heat the Hotfinger to the Set Point. Heater OFF: Stop the process of heating to the set point Loop: Control loop to use. 1 or 2. See page 6-1 in the LS340 User’s Manual for help in determining which loop to use. Mode: Mode determines how temperature will be controlled by the LS340. See pages 6-3 through 6-7 of the LS340 User’s Manual for help in choosing which method is best for the user. Manual PID - Uses the entered PID values to control temperature. See the LS340 User’s Manual Pages 2-9 through 2-12 for help on tuning PID. Zone – User can define up to ten zones for manual PID control. Open Loop – There is no temperature control in open loop mode, the user simply set the power the user wish to be applied Autotune PID – Automatically tunes temperature control using PID. Autotune PI – Automatically tunes temperature control using PI. Autotune P – Automatically tunes temperature control using P. ISI QST-2001 User’s Manual Copyright 1996-1999 Integral Solutions Int’l, all rights reserved Page: 54 Range: Select the heater range to be used. Available ranges are 10 mW, 100mW, 1 W, 10 W, and 100 W. Input: A or B. Select which input the user are using. Units: Units the user wishes the LS340 to report temperature in. P Value: Proportional to be used for heating. 0.1 to 1000.0. Used only in manual PID and Zone modes I Value: Integral to be used for heating. 0.0 to 1000.0. Used only in manual PID and Zone modes. Setting to zero turns this feature off. D Value: Derivative to be used for heating. 1 to 1000 (in Seconds). Used only in manual PID and Zone modes. Setting to zero turns this feature of. Positive Slope: Maximum rising slope to be used. Slope is the rate changes come from the control output program. Negative Slope: Maximum falling slope to be used. Max Set Point (K): Maximum set point allowed (in Kelvin). Max Current: Maximum Current allowed. Max Range: Maximum heater range to be used. Temperature Difference (C): This parameter is used with Settle Time to determine if the LS340 is in a settled state. The LS340 is considered to be in a settled state when the temperature changes no more than the temperature difference during a period of time equal to the settle time. Settle Time (SEC): Settle time used for seeing if the LS340 has settled. See Temperature Difference. Calibrate Temp. (C): Temperature to be used during the calibration procedure. Calibrate: Starts the calibration procedure. Apply: Applies the calibration factor. Defaults: Restores factory set LS340 defaults to the system. B.3 Installation and Cable Connections for the Temperature Controller System Included in the temperature controller are the following items: • RJ11 to RJ11 cable • RJ11 to Serial adapter • Temperature Controller to Hot Plate cable • Hot Plate • Temperature Control (LS340) To connect the Temperature Controller, connect the RJ45 cable to the back of the LS340 at connection Serial I/O. Connect other end of RJ11 cable to RJ45-Serial adapter. Connect the assembly to the serial port on the computer. Connect the Temperature Controller to Hot Plate cable 8 Pin side to the hot plate 10 Pin connection. The opposing end of the Temperature Controller to Hot Plat cable has three connectors. Connect the dual Banana Plug connector to the LS340 at connection Heater Output. Connect the single banana plug to LS340 connection ground and the 6 Pin DIN connector to LS340 connection Input A. The Temperature Control System is now ready to use. ISI QST-2001 User’s Manual Copyright 1996-1999 Integral Solutions Int’l, all rights reserved Page: 55 B.4 Temperature Controller Calibration In order to Calibrate the temperature controller, the user will need a temperature sensor, preferably one that is sensitive to 0.01° C. From the LS340 setup screen, under the Temperature Calibration heading the user can enter the temperature the user wishes to calibrate at. Next, press Calibrate. When the software prompt appears, measure the temperature of the ISI Hotfinger attachment at the location where the head will be placed, and enter this value in the box provided. Remember that the LS340 is accurate to 0.01° C, if the user temperature probe is less sensitive than this the user will be lessening the sensitivity of the LS340. ISI QST-2001 User’s Manual Copyright 1996-1999 Integral Solutions Int’l, all rights reserved Page: 56 Appendix C: Integral Solutions Int’l HBM ESD Tester (Optional) C.1 Features - Bipolar Voltage Range up to +/- 500 Volts Voltage Step Resolution better than 1V Direct integration with QST-2000/1 Tests Stand-alone unit can integrate with other systems Fully software controlled (drivers included) The ISI Human Body Model (HBM) ESD Tester option allows users to perform integrated ESD / Quasi static testing of MR heads. This unit integrates directly into the QST 2000/1 HGA setup with seamless Quasi97 software control of all ESD functions. ESD voltage control is selectable between single pulse and sweep mode. Between ESD pulses, user specified testing can be performed to plot MR characteristics as a function of ESD voltage. Competitive pricing makes the ISI Quasi-static tester with ESD the best system on the market for the user’s MR testing requirements. Voltage = +650 mV RL = 25 Ohms ISI QST-2001 User’s Manual Copyright 1996-1999 Integral Solutions Int’l, all rights reserved Page: 57 Appendix D: Setup of Computer System for QST-2000/2001 If the user wishes to utilize the QST on a computer other than that provided by ISI the computer must be configured in the following manner. First, please check section 5.1 System Requirements in this manual to ensure that the computer the user wishes to run on is equipped with all of the products necessary to run the Quasi97 software. Next, the NiDaq 6.1 software provided with the system must be installed onto the computer. It is important to use version 6.1 of the NiDaq software, other versions have shown incompatibility with the QST system. During the installation of the NiDaq software, the user must select Third Party Compilers as shown. After this, the default settings are acceptable, although the user should verify that Microsoft Visual Basic is selected. ISI QST-2001 User’s Manual Copyright 1996-1999 Integral Solutions Int’l, all rights reserved Page: 58 After the software installation, the user should power off the computer and install the NiDaq card provided with the QST into an available computer slot. The NiDaq card for the 2000 fits into an ISA slot while the card for the 2001/2001Plus fits into a PCI slot. If the system also intends to run the ISI ESD Stress System, install the NiDaq card for this into an available ISA slot as well. Now power on the computer and the cards should all be found by the Operating System. Next, the user must run the NiDaq Configuration Utility, usually located in the Start menu, under National Instruments DAQ. The Configuration Utility should locate and configure all cards the user has added to the system. If asked for any information, the user should accept the default settings for each card. Now the system is ready for installation of the Quasi97 software and connecting the QST system. See section 5.3 Installation and Cable Connections for details on this process. ISI QST-2001 User’s Manual Copyright 1996-1999 Integral Solutions Int’l, all rights reserved Page: 59 LIMITED WARRANTY Integral Solutions Int'l, a California Corporation, having its principal place of business at 2192 Bering Drive, San Jose, CA 95131 ("Manufacturer") warrants its Quasi-Static Tester model QST-2001 products (the "Products") as follows: 1. Limited Warranty. Manufacturer warrants that the Products sold hereunder will be free from defects in material and workmanship for a period of six (6) months from the date of purchase. If the Products do not conform to this Limited Warranty during the warranty period (as herein above specified), Buyer shall notify Manufacturer in writing of the claimed defects and demonstrate to Manufacturer satisfaction that said defects are covered by this Limited Warranty. If the defects are properly reported to Manufacturer within the warranty period, and the defects are of such type and nature as to be covered by this warranty, Manufacturer shall, at its own expense, furnish, replacement Products or, at Manufacturer's option, replacement parts for the defective Products. Shipping and installation of the replacement Products or replacement parts shall be at Buyer's expense. 2. Other Limits. THE FOREGOING IS IN LIEU OF ALL OTHER WARRANTIES, EXPRESS OR IMPLIED, INCLUDING BUT NOT LIMITED TO THE IMPLIED WARRANTIES OF MERCHANTABILITY AND FITNESS FOR A PARTICULAR PURPOSE. Manufacturer does not warrant against damages or defects arising out of improper or abnormal use of handling of the Products; against defects or damages arising from improper installation (where installation is by persons other than Manufacturer), against defects in products or components not manufactured by Manufacturer, or against damages resulting from such non-Manufacturer made products or components. Manufacturer passes on to Buyer the warranty it received (if any) from the maker thereof of such non-Manufacturer made products or components. This warranty also does not apply to Products upon which repairs have been effected or attempted by persons other than pursuant to written authorization by Manufacturer. 3. Exclusive Obligation. THIS WARRANTY IS EXCLUSIVE. The sole and exclusive obligation of Manufacturer shall be to repair or replace the defective Products in the manner and for the period provided above. Manufacturer shall not have any other obligation with respect to the Products or any part thereof, whether based on contract, tort, strict liability or otherwise. Under no circumstances, whether based on this Limited Warranty or otherwise, shall Manufacturer be liable for incidental, special, or consequential damages. 4. Other Statements. Manufacturer's employees or representatives' ORAL OR OTHER WRITTEN STATEMENTS DO NOT CONSTITUTE WARRANTIES, shall not be relied upon by Buyer, and are not a part of the contract for sale or this limited warranty. ISI QST-2001 User’s Manual Copyright 1996-1999 Integral Solutions Int’l, all rights reserved Page: 60 5. Entire Obligation. This Limited Warranty states the entire obligation of Manufacturer with respect to the Products. If any part of this Limited Warranty is determined to be void or illegal, the remainder shall remain in full force and effect. ISI QST-2001 User’s Manual Copyright 1996-1999 Integral Solutions Int’l, all rights reserved Page: 61