1
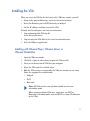
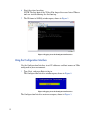
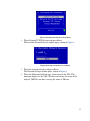
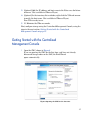
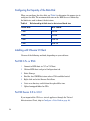
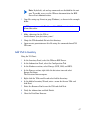
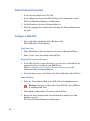
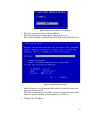
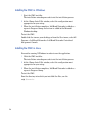
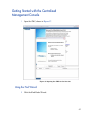
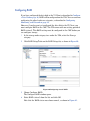
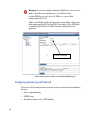
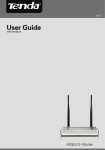
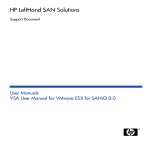
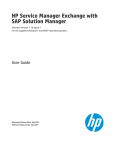
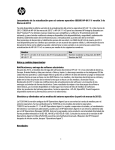
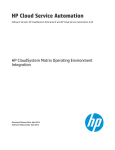
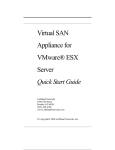
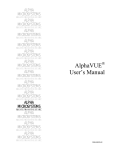
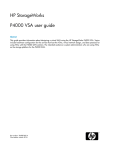
HP LeftHand SAN Solutions
Support Document
Installation Manuals
VSA Quick Start Guide for SANiQ 8.0
Legal Notices
Warranty
The only warranties for HP products and services are set forth in the express warranty
statements accompanying such products and services. Nothing herein should be construed as
constituting an additional warranty. HP shall not be liable for technical or editorial errors or
omissions contained herein.
The information contained herein is subject to change without notice.
Restricted Rights Legend
Confidential computer software. Valid license from HP required for possession, use or copying.
Consistent with FAR 12.211 and 12.212, Commercial Computer Software, Computer Software
Documentation, and Technical Data for Commercial Items are licensed to the U.S.
Government under vendor's standard commercial license.
Copyright Notices
© Copyright 2009 Hewlett-Packard Development Company, L.P.
2
Documentation Updates
The title page of this document contains the following identifying information:
•
Software Version number, which indicates the software version.
•
Document Release Date, which changes each time the document is updated.
•
Software Release Date, which indicates the release date of this version of the software.
To check for recent updates or to verify that you are using the most recent edition of a
document, go to:
http://h20230.www2.hp.com/selfsolve/manuals
This site requires that you register for an HP Passport and sign in. To register for an HP
Passport ID, go to:
http://h20229.www2.hp.com/passport-registration.html
Or click the New users - please register link on the HP Passport login page.
You will also receive updated or new editions if you subscribe to the appropriate product
support service. Contact your HP sales representative for details.
The following table indicates changes made to this document since the last released edition.
Document Changes
Chapter
Version
Changes
3
Support
Visit the HP Software Support web site at:
www.hp.com/go/hpsoftwaresupport
This web site provides contact information and details about the products, services, and
support that HP Software offers.
HP Software online support provides customer self-solve capabilities. It provides a fast and
efficient way to access interactive technical support tools needed to manage your business. As
a valued support customer, you can benefit by using the support web site to:
•
Search for knowledge documents of interest
•
Submit and track support cases and enhancement requests
•
Download software patches
•
Manage support contracts
•
Look up HP support contacts
•
Review information about available services
•
Enter into discussions with other software customers
•
Research and register for software training
Most of the support areas require that you register as an HP Passport user and sign in. Many
also require a support contract. To register for an HP Passport ID, go to:
http://h20229.www2.hp.com/passport-registration.html
To find more information about access levels, go to:
http://h20230.www2.hp.com/new_access_levels.jsp
4
Contents
1 Chapter: Using the VSA Laptop Demo. . . . . . . . . . . . . . . . . . . . . . . . . . . . . . . . . . . . . . 7
Introduction . . . . . . . . . . . . . . . . . . . . . . . . . . . . . . . . . . . . . . . . . . . . . . . . . . . . . . . . . . . . . . 7
Overview. . . . . . . . . . . . . . . . . . . . . . . . . . . . . . . . . . . . . . . . . . . . . . . . . . . . . . . . . . . . . . . . . 8
Planning the Demo Installation . . . . . . . . . . . . . . . . . . . . . . . . . . . . . . . . . . . . . . . . . . . . . . 9
Installing the CMC . . . . . . . . . . . . . . . . . . . . . . . . . . . . . . . . . . . . . . . . . . . . . . . . . . . . . . . 10
Installing the VSA . . . . . . . . . . . . . . . . . . . . . . . . . . . . . . . . . . . . . . . . . . . . . . . . . . . . . . . . 11
Getting Started with the Centralized Management Console . . . . . . . . . . . . . . . . . . . . . . 15
Next Steps . . . . . . . . . . . . . . . . . . . . . . . . . . . . . . . . . . . . . . . . . . . . . . . . . . . . . . . . . . . . . . 18
Installing Another VSA . . . . . . . . . . . . . . . . . . . . . . . . . . . . . . . . . . . . . . . . . . . . . . . . . . . . 18
Troubleshooting . . . . . . . . . . . . . . . . . . . . . . . . . . . . . . . . . . . . . . . . . . . . . . . . . . . . . . . . . . 19
Documentation Available . . . . . . . . . . . . . . . . . . . . . . . . . . . . . . . . . . . . . . . . . . . . . . . . . . 20
Documentation Available . . . . . . . . . . . . . . . . . . . . . . . . . . . . . . . . . . . . . . . . . . . . . . . . . . 21
2 Chapter: Getting Started with the VSA for ESX Server . . . . . . . . . . . . . . . . . . . . . . . 23
Introduction . . . . . . . . . . . . . . . . . . . . . . . . . . . . . . . . . . . . . . . . . . . . . . . . . . . . . . . . . . . . . 23
Planning for the VSA . . . . . . . . . . . . . . . . . . . . . . . . . . . . . . . . . . . . . . . . . . . . . . . . . . . . . . 24
Installing the VSA . . . . . . . . . . . . . . . . . . . . . . . . . . . . . . . . . . . . . . . . . . . . . . . . . . . . . . . . 25
Installing the Centralized Management Console. . . . . . . . . . . . . . . . . . . . . . . . . . . . . . . . 33
Getting Started with the Centralized Management Console . . . . . . . . . . . . . . . . . . . . . . 35
Creating the iSCSI SAN . . . . . . . . . . . . . . . . . . . . . . . . . . . . . . . . . . . . . . . . . . . . . . . . . . . 39
Troubleshooting . . . . . . . . . . . . . . . . . . . . . . . . . . . . . . . . . . . . . . . . . . . . . . . . . . . . . . . . . . 39
Documentation Available . . . . . . . . . . . . . . . . . . . . . . . . . . . . . . . . . . . . . . . . . . . . . . . . . . 41
5
6
Th
is
pa
ge
is
in
te
nt
io
na
l
ly
le
ft
bl
an
k
1 Chapter: Using the VSA Laptop Demo
Introduction
The VSA™ laptop demo is LeftHand’s smallest and most portable version. Use
this demo version to see the SAN/iQ® software in action. Create a LeftHand
SAN, complete with storage clusters and evaluate all LeftHand SAN storage
management features.
The VSA runs a full-featured version of the SAN/iQ software, and provides the
following benefits:
•
Experience the SAN/iQ software without investing in physical
storage devices
•
A 30 day evaluation period for advanced SAN/iQ software features such as
Clustering and Virtualization, Managed Snapshots, Remote Copy and
Multi-Site SAN.
•
Can be used indefinitely as a stand-alone iSCSI target.
•
Is a VMware® certified virtual appliance
•
Is available at www.hp.com
Requirements for the Demo
•
Minimum of 224 MB of RAM
•
5 GB to 950 GB SCSI of disk space
•
VMware Player version 1.x (1.0.4 or higher) and 2.x
•
VMware Workstation version 5.5.x (5.5.3 or higher) and 6.x
7
•
VMware Server version 1.x (1.0.2 or higher)
•
Have a reserved or static IP address, subnet mask, and gateway for the
virtual machine
Overview
When using the demo version, the full suite of features in the SAN/iQ software
is enabled for 30 days. After 30 days, volumes become unavailable if any
licensed features are in use. Licensed features include:
•
Clustering
•
Snapshots
•
Remote Copy
•
Multi-site SANs
The VSA can be used for free indefinitely as a single node iSCSI target with
snapshots or Remote Copy. If a configuration is deleted and recreated, the
30-day trial period of licensed features starts again.
If you want to use the VSA fully featured on an ESX Server, simply purchase a
license and follow the instructions in Chapter 2, Chapter: Getting Started
with the VSA for ESX Server to set up a virtual LeftHand SAN in your
environment.
Using the VSA demo comprises the following steps:
8
•
Install a VMware application on a host system.
•
Download the VSA to the host system.
•
Unzip the downloaded package to a directory on the host system.
•
Using VMware, browse to directory containing the virtual machine
and start it.
•
Configure the IP address and hostname of the VSA using the
VMware console.
•
Install the Centralized Management Console (CMC) on a machine from
which you will administer the SAN.
•
Use the CMC to create clusters and storage volumes and try out the
features of the LeftHand SAN.
Download the VSA
The VSA for Laptop Demos is available from the LeftHand website:
•
www.hp.com
Planning the Demo Installation
Before you install the VSA, plan the virtual network configuration. Then,
when you install the Centralized Management Console, plan and configure
the hardware features before configuring the virtual storage node for
data storage.
Configuration planning includes
•
Virtual appliance directories, host names, IP addresses
•
Network configuration, including subnet and virtual IP address
•
Storage configuration
Plan the Network Configuration
Plan the subnet and IP address for the virtual machines as well as for the
VIPs required for SAN/iQ clusters.
Plan for the VSA
Create a directory for your virtual machines on the hard drive that will act as
the storage node. Create a separate directory for each virtual machine.
9
Plan the CMC Installation
Install the CMC on a Linux or Microsoft Windows OS. Then, use the CMC to
find virtual storage appliances, create storage, and connect to
application servers.
Installing the CMC
Install the CMC on the computer that you will use to administer the LeftHand
SAN. You administer the entire network of VSAs from the CMC.
Installing the CMC in Windows
1
Click the CMC installer.
The installation wizard opens and starts the installation process.
2
At the Choose Install Set window, select the configuration most
appropriate for your setup.
3
When the installation completes, LeftHand is added as a separate
Program Group and an icon is added to the Microsoft Windows desktop.
Installing the CMC in Linux
You must be running X Windows in order to run the application.
1
Click the CMC installer.
The installation wizard opens and starts the installation process.
2
At the Choose Install Set window, select the configuration most
appropriate for your setup.
3
When the installation completes, LeftHand is added as a separate
Program Group.
To start the CMC:
1
10
From the directory into which you installed the files, run the
script ./Console.
Installing the VSA
When you start the VSA for the first time with a VMware console, you will:
•
Unzip to the prepared directory and start the virtual machine.
•
Direct the Ethernet port to NAT, Host-only, or bridged.
•
Set the IP address and host name of the VSA.
You only need to configure each virtual machine once.
1
Copy or download the VSA zip file.
Leave this zip file intact.
2
Copy or unzip the VSA files to the virtual machine directory.
3
Start the VMware application.
Installing with VMware Player, VMware Server, or
VMware Workstation
1
Open the VMware console.
2
Click File > Open or other choice to open the VSA.vmx file.
3
Navigate to the location of VSA files you unzipped.
4
Select the VSA.vmx file and click Open.
5
Edit the VSA settings as required by the VMware console you are using.
Select the appropriate network mode:
•
Bridged
•
NAT
•
Host-only
Note: All VSAs on the same platform should use the same
networking mode.
When running multiple VSAs on a single host, use NAT or
Host-only networking mode, and use DHCP to assign IP addresses
to the VSAs.
11
6
Start the virtual machine.
NOTE: The first boot of the VSA will be longer than usual since VMware
tools are installed during the first boot up.
7
The Welcome to SAN/iQ window opens, shown in Figure 1
Figure 1Logging in to the Configuration Interface
Using the Configuration Interface
Use the Configuration Interface to set IP addresses and host names on VSAs
configured in your environment.
1
Type Start, and press Enter to log in.
The Configuration Interface window opens, shown in Figure 2
Figure 2Logging in to the Configuration Interface
The Configuration Interface main menu opens, shown in Figure 3
12
Figure 3Configuration Interface main menu
2
Tab to Network TCP/IP Settings and press Enter.
The Available Network Devices window opens, shown in Figure 4
Figure 4Selecting an interface to configure
3
Tab to the network interface and press Enter.
The Network Settings window opens, shown in Figure 5
4
Tab to the Hostname field and type a host name for the VSA. This
hostname displays in the CMC. This does not change the name of the
original .VMX file, nor does it change the name in VMware.
13
Figure 5Setting the hostname
5
Tab to the method for setting the IP address.
If typing in a static IP address, note that Gateway is a required field. If
you do not have a gateway, enter 0.0.0.0.
6
Tab to OK and press Enter.
A confirmation message opens.
7
Press Enter.
A confirmation message opens.
8
Press Enter to confirm the change to the network settings.
The network interface will be configured (wait a few seconds), and a
message opens confirming the IP address change.
9
Press Enter to leave that message.
10 On the Available Network Devices window, tab to Back and press Enter.
The Configuration Interface menu opens.
11
Tab to Log Out and press Enter.
The Configuration Interface entry window is displayed again.
12 Switch from the console view to the Summary view. (Not available in
VMware Player.)
14
13 [Optional] Add the IP address and host name to the Notes area for future
reference. (Not available in VMware Player.)
14 [Optional] In the inventory list or sidebar, right-click the VSA and rename
to match the host name. (Not available in VMware Player.)
Your VSA is ready to use.
15 15. Minimize the VMware console.
Next, configure storage using the Centralized Management Console, using the
steps in the next section, Getting Started with the Centralized
Management Console on page 15.
Getting Started with the Centralized
Management Console
1
Open the CMC, shown in Figure 6
If you are opening the CMC for the first time, and have not already
discovered storage nodes on the SAN, the Find Wizard
opens automatically.
Figure 6Opening the CMC for the first time
15
2
Click Next and proceed through the Find Nodes Wizard.
The wizard guides you through the steps for finding a VSA on your
network. After finishing the wizard, your virtual storage node appears in
the navigation window in the Available pool, as shown in Figure 7
Figure 7Newly found VSA in CMC
Configuring the Hardware with the SAN/iQ Software
1
Select the VSA in the navigation window and expand the tree underneath.
Verifying RAID
Your virtual storage appliance has virtual RAID as the RAID type. You only
need to turn it on.
16
1
In the tree under the VSA select Storage.
The Tab view opens with the RAID Setup tab displayed.
2
Click the RAID Setup tasks list and choose Configure RAID.
The Configure RAID window opens, as shown in Figure 8
Figure 8Choosing to configure virtual RAID
3
Select RAID (virtual) and click OK.
After RAID is turned on, the RAID status shows normal, as shown
in Figure 9
17
RAID is Normal
Figure 9Navigation window and the RAID Setup tab with RAID on
Next Steps
The VSA is on the network and operating properly. Next, use the CMC to
continue configuring the VSA and the clustered iSCSI SAN.
Configuring Clustered Storage
Configure management groups, clusters and volumes with the Getting Started
wizard. See Chapter 1, “Getting Started,” section “Creating Storage by Using
the Getting Started Launch Pad” in the LeftHand SAN User Manual. This
section helps you work through the wizards.
Installing Another VSA
You may install more than one VSA to fully evaluate the SAN/iQ software. To
install a second VSA, create a second directory at the same level as the first
VSA. Follow the instructions in these sections:
18
•
“Installing the VSA”
•
“Getting Started with the Centralized Management Console”
•
“Next Steps”
Troubleshooting
Try these tips if you are having trouble.
Table 1
Troubleshooting Installation
Trouble
Solution
You want to reinstall
the VSA.
1
Close your CMC session.
2
In VMware, power off the VSA.
3
Click File>Remove from inventory.
4
In a file manager, go to the folder that
holds the VSA.vmx file and delete all files.
5
Copy fresh files into the VSA folder from
the downloaded zip file.
6
Open VMware and begin again.
You cannot find the VSA with
the CMC, and cannot recall
its IP address.
Open a VMware console session and display
the console window for the VSA. Wait for the
SAN/iQ Welcome window and the prompt to
type START and press Enter. In the
Configuration Interface navigate to the
Network TCP/IP settings and select eth0 to
open the Network Settings window. Note the
IP address in that window.
Type the IP address in the NOTES area on
the VMware summary window.
In Windows
19
Table 1
Troubleshooting Installation
Trouble
Solution
If the wizard freezes, reset
the Hardware Acceleration in
Windows.
1
Go to Windows Properties > Settings >
Advanced > Troubleshooting.
2
Move the Hardware Acceleration slider to
one notch above None.
3
Click OK, and then OK again to leave the
Properties dialog.
4
Restart the installation wizard.
In Linux
If the installer does not start
automatically
Run CMC_Installer.bin again
In VMware
You don’t have your cursor
available, or you don’t have
your keyboard available.
• If your cursor is missing, you are in
console mode. Press Ctrl-Alt.
You want to see your VSA,
but the window is black.
• You are in the console view of the guest
window. Change to the Summary view.
• If your keyboard is missing, move the
mouse to the console window and click
once.
• Your console window has timed out. Click
in the window with the mouse and then
press the Backspace key.
Documentation Available
For detailed instructions about using the Centralized Management Console
and the VSA, see the following resources.
20
VSA Frequently Asked Questions
Check out www.hp.com for the LeftHand VSA Forum. Once in the Forum, go
to VSA Basics > Getting Started > FAQ.
Documentation Available
For detailed instructions about using the Centralized Management Console
and the VSA, see the following resources. The User Manuals are available in
PDF format and are installed in the Documentation subdirectory with the
Centralized Management Console program files.
Online Help
All User Manual content is contained in the Online Help,
available from the menu bar under Help > Help Topics. Context
sensitive help is available by clicking the question mark on
any window.
VSA User Manual
The VSA User Manual provides important information about configuring the
VSA virtual network environment, hardware configuration, and using the
VSA with physical platforms and the SAN/iQ software.
LeftHand SAN User Manual
The LeftHand SAN User Manual provides detailed instructions for using the
SAN/iQ software to create, access and manage the SAN data storage.
Remote Copy User Manual
The Remote Copy User Manual provides instructions for using the Remote
Copy capabilities of the SAN/iQ software.
21
Multi-Site SAN User Manual
The Multi-Site SAN User Manual provides instructions for configuring and
using the SAN/iQ® Multi-Site HA/DR Solution Pack, which must be
purchased separately.
22
2 Chapter: Getting Started with the VSA
for ESX Server
Introduction
This Quick Start Guide describes the procedures and best practices that guide
you to successfully install and configure your Virtual SAN Appliance for
VMware® ESX (VSA™). You will also install and configure data storage with
the SAN/iQ® software Centralized Management Console (CMC).
Using the Evaluation Version
Use these procedures and best practices to use the full evaluation version of
the Virtual SAN Appliance for VMware® ESX. The free 30-day, fully
functional evaluation edition is pre-formatted for the VMware ESX Server.
To continue using the full version of the software after your 30- day trial
period has ended, you must purchase a license key. After you apply the license
key, your configuration can be used as is in a production environment, or
reconfigured if necessary.
Prerequisites
•
Have available drive space of up to 2 TB for ESX Server. LeftHand
Networks recommends installing ESX Server on top of a redundant RAID
configuration. Do not use RAID 0.
•
1 GB of memory reserved.
•
A single virtual CPU with at least 2000 MHz reserved.
•
Have a Gigabit Ethernet or internal network environment
— Designate a host name for the VSA™
23
— Plan the network configuration, including an IP address, subnet
mask, and gateway for the VSA, or use DHCP
Use the VSA with the following versions of VMware ESX Server:
•
VMware ESX Server version 3.x
Planning for the VSA
Careful planning of the virtual network configuration, the VSA configuration
and the configuration of the clusters and volumes for data storage ensures
that you can take full advantage of the features and benefits of the
LeftHand SAN.
Planning the Virtual Network Configuration
Before you install the VSA on the network, plan the virtual network
configuration, including the following areas:
•
Design and configuration of the virtual switches and network adapters.
•
VSA directories, host names and IP addresses.
•
Virtual network configuration, including the subnet and the virtual IP
addresses (VIPs) for iSCSI access.
For more detailed information, see the VSA User Manual, which is installed
as a PDF in the directory into which you unzipped the VSA files. Or you can
download it from the LeftHand Networks website. Click the link, or search by
name for User Manual VSA 7.0 SP1 for VMware ESX.
Planning the SAN/iQ Software Storage Configuration
When you install the Centralized Management Console, you should plan and
configure the storage node features, such as email alert notification, before
you configure the data storage.
For information about configuring storage node features, see “Getting Started;
Configuring Storage Nodes” in the Online Help or in the LeftHand SAN User
Manual. The LeftHand SAN User Manual is installed as a PDF in the
24
LeftHand Networks \UI\Documentation directory. The Online Help is
available from the Help menu or the Help button found on the task windows
and dialogs in the CMC.
Installing the VSA
There are two ways you can obtain the VSA.
•
•
As a zip package downloaded from the LeftHand Networks web site.
When you install the packaged VSA for the first time, you will need to
•
Unzip to the prepared directory and start the VMware Infrastructure
Client (VI Client).
•
Transfer the virtual machine to the ESX Server.
•
Add the VSA to inventory.
•
Select the network.
•
Configure the data disk.
•
Reserve the CPU and memory.
•
Power on the VSA.
•
Set the IP address and host name of the VSA.
As a OVF package imported through the VI Client Import Virtual
Appliance wizard.
When you import the VSA as an virtual appliance through the VI Client
you will need to
•
Configure the data disk.
•
Reserve the CPU and memory.
•
Power on the VSA.
•
Set the IP address and host name of the VSA.
25
Configuring the Capacity of the Data Disk
When you configure the data disk, use Table 2 to determine the proper size to
configure the disk. The maximum disk size on the ESX Server is limited by
the block size used to format the datastore.
Table 2
Relationship of disk size to datastore block size
Block Size
Max VMDK
1 MB
256 GB
2 MB
512 GB
4 MB
1024 GB
8 MB
2048 GB
Installing with VMware VI Client
Use one of the following methods, depending on your software.
For ESX 3.5+ or ESXi
1
Connect to ESXi host via VC or VI Client.
2
Click on ESXi host and go to Configuration tab.
3
Select Storage.
4
Find the local VMFS datastore where VSA would be hosted.
5
Right-click and select Browse DataStore.
6
Ceate new directory and click on the upload files icon.
7
Upload unzipped folder for VSA.
For ESX Server 3.0 to 3.0.2
If you imported the VSA as a virtual appliance through the Virtual
Infrastructure Client, skip to Configure a Data Disk on page 28.
26
Note: By default, ssh and scp commands are disabled for the root
user. To enable access, see the VMware documentation for ESX
Server Basic Administration.
1
Copy files using scp (Linux) or pscp (Windows), as shown in the example
below.
scp VSA_esx.zip <user>@<IP address of the ESX Server>:/vmfs/
volumes/datastore
2
Make a directory for the VSA at
/vmfs/volumes/”your_datastore_name”.
3
Unzip the VSA download file into that directory.
4
Open execute permissions on this file using the command chmod 755
VSA.vmx.
Add VSA to Inventory
Using the VI Client:
1
In the Inventory Panel, select the VMware ESX Server.
2
In the Information Panel, select the Configuration Tab.
3
In the Hardware section, select Storage (SCSI, SAN, and NFS).
4
In the Storage section, right-click the datastore icon and select
Browse Datastore.
The Datastore Browser opens.
5
Right-click the VSA.vmx file and select Add to Inventory.
6
In the Add to Inventory Wizard, enter a name for the new VSA and
click Next.
7
Select the Resource Pool to run the VSA and click Next.
8
Verify the information and click Finish.
9
Close the DataStore Browser.
27
Select A Network Connection
1
In the Inventory Panel select the VSA.
2
In the Information Panel select Edit Settings in the Commands section.
The Virtual Machine Properties window opens.
3
On the Hardware tab, select Network Adapter 1.
4
Select the appropriate network connection from the Network label list on
the right.
Configure a Data Disk
1
Next, click Add at the bottom of the Hardware tab.
The Add Hardware Wizard opens.
Select Device Type
2
Select Hard Disk as the type of device you want to add and click Next.
3
Select Create a new virtual disk and click Next.
Designate Disk Capacity and Location
4
In the Disk Capacity section, designate a capacity that is suitable for the
amount of storage available on your ESX Server.
Refer to Configuring the Capacity of the Data Disk on page 26 for
information about maximum disk size.
5
In the Location section, select Store with Virtual Machine, and click Next.
Advanced Options
6
Select the Virtual Device Node to be SCSI (1:0) in the dropdown menu.
Warning: Selecting anything other than SCSI 1:0 causes RAID to
be unconfigurable later.
28
7
Select Mode > Independent > Persistent and click Next.
8
Review the device configuration and click Finish to complete the Add
Hardware wizard.
The Virtual Machine Properties window opens.
9
Click the Resources tab.
10 Select CPU and reserve at least 2000 MHz.
11
Select Memory and reserve 1024 MB.
12 Click OK to close the Virtual Machine Properties window.
Verify Settings
13 Select the ESX Server in the inventory panel.
14 Click the Resource Allocation tab.
15 Verify the CPU and Memory reservations you just set.
Power On the VSA and Configure IP Address and Host Name
1
In the inventory panel, select the new VSA and power it on using the
Power On command on the information panel.
Note: The first boot of the VSA is longer than normal, since
VMware tools are installed during the first boot up.
2
Click the Console Tab and wait for the VSA to boot.
3
When the VSA has finished booting, a log in prompt opens, shown in
Figure 10
Figure 10Logging in to the SAN/iQ Configuration Interface
29
4
Log in and use the SAN/iQ Configuration Interface to configure an IP
address and host name for the VSA.
Setting the IP Address
Use the Configuration Interface to set IP addresses and host names for all
the VSAs in your environment. You can return to the Configuration
Interface to find or change an IP address or host name.
1
Type Start and press Enter.
The Configuration Interface window opens, shown in Figure 11.
Figure 11Logging in to the Configuration Interface
2
Press Enter to log in.
The Configuration Interface main menu opens, shown in Figure 12.
Figure 12 Configuration Interface main menu
3
30
Tab to Network TCP/IP Settings and press Enter.
The Available Network Devices window opens, shown in Figure 13.
Figure 13 Selecting an interface to configure
4
Tab to the network interface and press Enter.
The Network Settings window opens, shown in Figure 14.
The cursor should be in the Hostname field. Tab to the field if necessary.
Figure 14 Setting the host name
5
Press Backspace in the Hostname field to delete the default name and
type your own host name.
This host name displays in the CMC. It does not change the name of the
original .vmx file, nor does it change the name in VMware.
6
Configure the IP Address
31
Using DHCP
a
Tab to the choice Obtain IP address automatically using DHCP and
press Enter to select it.
b
Tab to OK and press Enter.
A message opens, asking you to verify the request.
c
Tab to OK and press Enter.
After a short pause, another message opens that displays the new IP
address. Record this IP address for later use.
Configure IP Address Manually
a
Tab to the choice Use the Following IP Address and press Enter.
The IP Address, Netmask, and Gateway list opens for editing.
b
Tab to each field and enter the appropriate information.
Gateway is a required field. If you do not have a gateway, enter 0.0.0.0.
7
Tab to OK and press Enter.
A confirmation message opens.
8
Press Enter.
The network interface is now configured (wait a few seconds). The
Available Network Devices window opens.
9
On the Available Network Devices window, tab to Back and press Enter to
return to the Configuration Interface menu, shown in Figure 15.
Figure 15Logging out of Configuration Interface menu
10 Tab to Log Out and press Enter.
The Configuration Interface entry window is displayed again.
32
Figure 16 Configuration Interface window
11
Press Ctrl+Alt to get the cursor back from the Console.
Finishing Up with VI Client
1
In the VI Client Information Panel, click the Summary tab.
2
In the General section on the Summary tab, verify that the IP address and
host name are correct, and that VMware Tools are running.
Note: If VMware Tools show “out of date” then they are running correctly.
The “out of date” status is not a problem. VMware tools are updated with
each SAN/iQ software upgrade.
3
In the inventory panel, right-click the VSA and select Rename.
4
Change the name of the VSA to match the host name, if desired.
Your VSA is ready to use.
5
Minimize your VI Client session.
Next, install the Centralized Management Console (CMC).
Then follow the steps in Getting Started with the Centralized
Management Console on page 35.
Installing the Centralized Management Console
Install the CMC on the computer or virtual machine that you use to
administer the VSA. You administer the entire network of VSAs from this
CMC.
To obtain the latest CMC for the VSA, go to www.hp.com
33
Installing the CMC in Windows
1
Start the CMC installer.
The installation wizard opens and starts the installation process.
2
At the Choose Install Set window, select the configuration most
appropriate for your setup.
3
When the installation completes, LeftHand Networks is added as a
separate Program Group and an icon is added to the Microsoft
Windows desktop.
To start the CMC:
Double-click the icon on your desktop, or from the Start menu, select All
Programs > LeftHand Networks > LeftHand Networks Centralized
Management Console.
Installing the CMC in Linux
You must be running X Windows in order to run the application.
1
Click the CMC installer.
The installation wizard opens and starts the installation process.
2
At the Choose Install Set window, select the configuration most
appropriate for your setup.
3
When the installation completes, LeftHand Networks is added as a
separate Program Group.
To start the CMC:
From the directory into which you installed the files, run the
script ./Console.
34
Getting Started with the Centralized
Management Console
1
Open the CMC, shown in Figure 17.
Figure 17 Opening the CMC for the first time
Using the Find Wizard
2
Click the Find Nodes Wizard.
35
3
Click Next on the Find Nodes Wizard and proceed through its steps.
The wizard guides you through the steps for finding a VSA on your
network. After finishing the wizard, the VSA appears in the navigation
window in the Available pool, shown in Figure 18.
Figure 18 Newly found VSA in CMC
Configuring the Hardware
Configure hardware settings before you add the VSA to a management group.
Select the VSA in the navigation window to expand the hardware
configuration categories. Use these categories to configure RAID (if
necessary), monitoring, and the network, shown in Figure 19.
Configure
monitoring, RAID,
and network from
these categories
Figure 19Configuring the hardware
36
Configuring RAID
If you have configured the data disk in the VI Client as described in Configure
a Data Disk on page 28, RAID will be configured on the VSA. You can continue
configuring the other hardware categories, as described in Configuring
Monitoring and Network on page 38.
However, if you have not yet configured the data disk in the VI Client, you
must configure RAID in the CMC. The VSA comes with one setting provided:
RAID (virtual). This RAID setting must be configured in the CMC before you
can configure storage.
1
In the storage node category tree under the VSA, select the Storage
category.
2
Click RAID Setup Tasks on the RAID Setup tab, as shown inFigure 20.
Figure 20Configuring virtual RAID
3
Choose Configure RAID.
The Configure RAID window opens.
4
Select RAID (virtual) from the list and click OK.
Note that the RAID status now shows normal, as shown in Figure 21.
37
Warning: If you have trouble configuring RAID now, you may have
made a mistake when configuring a virtual disk earlier.
On the ESX Server, verify that the VSA has a virtual disk
configured on SCSI 1:0.
VSAs use SCSI 0:0 and 0:1 for operating system disks, and use the
disk configured for SCSI 1:0 for SAN data storage. If no SCSI disk
is configured for SCSI 1:0, RAID cannot be configured on the
appliance.
RAID is Normal
Figure 21Navigation window and the VSA RAID Setup tab
Configuring Monitoring and Network
Use the rest of the configuration categories to change settings for the following
features:
38
•
Alerts and monitoring
•
SNMP traps
•
Network settings such as NIC bonding.
Click the Help button available on any window for further information.
Creating the iSCSI SAN
The VSAs are on the network and operating properly. Next, use the
Centralized Management Console to create the clustered iSCSI SAN with the
VSAs.
Warning: You cannot clone a VSA after it is in a management
group. You must clone a VSA while it is in the Available Nodes pool.
Use the Management Groups, Clusters, and Volumes wizard to create your
storage pool. For information about using the wizards, see Chapter 1, “Getting
Started,” the section “Creating Storage by Using the Getting Started Launch
Pad” in the LeftHand SAN User Manual or in the Online Help.
Troubleshooting
Try these tips if you are having trouble.
39
Table 3
Troubleshooting Installation
Trouble
Solution
You want to reinstall
the VSA
1
Close your CMC session.
2
In the VI Client, power off the VSA.
3
Right-click and select Delete from Disk.
4
Copy fresh files into the virtual machine
folder from the downloaded zip file or
distribution media.
5
Open VMware and begin again.
You cannot find the VSA
with the Centralized
Management Console,
and cannot recall its IP
address.
CMC windows display the IP address of a
machine if the machine can be found.
You can’t
configure RAID.
Verify that the VSA has a virtual disk configured
on SCSI 1:0. VSAs use SCSI 0:0 and 0:1 for
operating system disks. They use the disk
configured for SCSI 1:0 for SAN data storage. If
no SCSI disk is configured for SCSI 1:0 then
RAID cannot be configured on the appliance.
Open a VI Client session and select the Summary
tab for the machine you want. The IP address
and DNS name are displayed in the General
information section.
In Windows
If the Installation wizard
freezes, reset the
Hardware Acceleration
in Windows.
1
Open the Windows Display Properties >
Settings tab >Advanced button >
Troubleshoot tab.
2
Move the Hardware Acceleration slider to one
notch above None.
3
Click OK, and then OK again to leave the
Properties dialog.
4
Restart the Installation wizard.
In Linux
If the installer does not
start automatically
40
Run CMC_Installer.bin again.
Table 3
Troubleshooting Installation
Trouble
Solution
In VI Client
You don’t have the cursor
available, or you don’t
have the keyboard
available.
If your cursor is missing, you are in console mode.
Press Ctrl-Alt to regain the cursor.
You want to see your
VSA, but the window is
black.
Your console window has timed out. Click in the
window with your mouse, then press the
Backspace key.
If your keyboard is missing, move the mouse to
the console window and click once.
Documentation Available
For detailed instructions about using the Centralized Management Console
and the VSA, see the following resources. The User Manuals are available in
PDF format and are installed in the Documentation subdirectory with the
Centralized Management Console program files.
Online Help
All User Manual content is contained in the Online Help, available
from the menu bar under Help > Help Topics. Context sensitive help is
available by clicking the question mark on any window.
VSA User Manual
The VSA User Manual provides important information about configuring the
VSA virtual network environment, hardware configuration, and using the
VSA with physical platforms and the SAN/iQ software.
LeftHand SAN User Manual
The LeftHand SAN User Manual provides detailed instructions for using the
SAN/iQ software to create, access and manage the SAN data storage.
41
Remote Copy User Manual
The Remote Copy User Manual provides instructions for using the Remote
Copy capabilities of the SAN/iQ software.
Multi-Site SAN User Manual
The Multi-Site SAN User Manual provides instructions for configuring and
using the SAN/iQ® Multi-Site HA/DR Solution Pack, which must be
purchased separately.
42