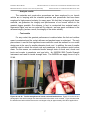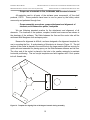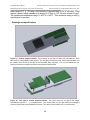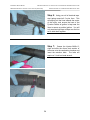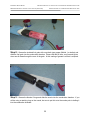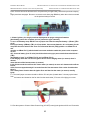
1
PRELIMINARY DESIGN REVIEW MEASURING RADIATION AS A FUNCTION OF ALTITUDE USING A HYBRID ROCKET PLATFORM NASA 2010 UNIVERSITY STUDENT LAUNCH INITIATIVE (2010 USLI) HARDING UNIVERSITY FLYING BISON 2010 USLI ROCKET TEAM Critical Design Review Report Measuring Radiation as a Function of Altitude Using a Hybrid Rocket Platform I) Summary of CDR report (1 page maximum) Team Summary ● School name – Harding University ● Location – 915 East Market Street, Searcy, AR 72149-0849 ● Teachers/Mentors – Edmond W. Wilson, Jr., Ph.D., Mentor Launch Vehicle Summary ● Size – Airframe is 90.3 in long and has a diameter of 4.09 in. The span diameter is 12.00 in. The estimated weight using RockSim, version 9.0, is 246.43 oz. ● Motor choice – Contrail Rockets Certified K-888-BM Hybrid Motor equipped with a medium graphite nozzle. A 75 mm diameter chamber whose volume is 2050 cm3 holds the liquid nitrous dioxide oxidizer. The oxidizer chamber is bolted to a 75 mm diameter x 10 in. long combustion chamber. The fuel grain is a Black Smoke fuel grain weighing 625 g. ● Recovery system – PerfectFlite Mini Altimeter records flight data and deploys drogue and main parachutes. Backup G-Wiz MC2 flight computer provides redundancy in case PerfectFlite fails to deploy parachutes. Drogue is a 24” Classic II Sky Angle Parachute and the main is a SkyAngle CERT-3 Large. Parachutes will be ejected with black powder charges on command of the flight computer using electric matches to initiate combustion. A Walston retrieval system consisting of a CA MODA 3750 MVSHF Rocket Transmitter, TRX-3S Receiver with three channels and a Folding 3-Element Antenna. ● Rail size – The simulation calls for a launch rail of at least 6 feet. Our rail has 7 feet of useable length and is 1 in. square with a 0.25 in. slot. Payload Summary ● Summarize experiment – The primary science experiment goal is to measure gamma radiation as a function of altitude using a Geiger counter. A secondary goal is to measure temperature, pressure and acceleration in the x-, y- and z- directions as a function of the flight trajectory. 1 PRELIMINARY DESIGN REVIEW MEASURING RADIATION AS A FUNCTION OF ALTITUDE USING A HYBRID ROCKET PLATFORM NASA 2010 UNIVERSITY STUDENT LAUNCH INITIATIVE (2010 USLI) HARDING UNIVERSITY FLYING BISON 2010 USLI ROCKET TEAM II) Changes made since PDR Highlight all changes made since PDR and the reason for those changes. ● Changes made to Vehicle Criteria – The three forward canards were removed from the airframe design because they violate competition flight rules. Consequently the tail fins were redesigned to compensate for canard removal. A larger main parachute was selected at the suggestion of the PDR Reviewers. ● Changes made to Payload Criteria – The payload goals and objectives have been reduced so that only gamma radiation will be measured and not alpha or beta radiation. The PDR reviewers felt that the shielding of the airframe would be too great to detect alpha and beta rays which have less penetrating power than gamma rays. A Walston Retrieval System was added because of the requirement that the rocket must have a retrieval system. ● Changes made to Activity Plan – no changes have been made to activity plan III) Vehicle Criteria Design and Verification of Launch Vehicle Flight Reliability confidence Mission Statement – Our mission goal is to design, build, test and fly a high powered hybrid rocket that will reach an altitude of exactly 1.00 mile and carry a science payload to measure gamma radiation as a function of altitude. A secondary goal is to measure temperature, pressure and x-, y-, z- acceleration during the flight. This mission will be done safely with no injuries, no damage to property and the entire rocket vehicle will be recovered without receiving any damage that would prevent it from further use. Mission Requirements – In order to meet these mission goals, the following systems and plans must be procured or produced: Airframe that is 4 in. diameter and long enough to house the rocket motor, two parachutes, two flight computers, retrieval transmitter and science payload. Hybrid rocket motor using nitrous oxide oxidizer and hydroxyterminated polybutadiene fuel capable of producing a total impulse of 2400 N∙s for 2.7 s. Nitrous oxide supply tank delivering 10 liters of nitrous in less than 5 minutes. A pressure regulator to safely and accurately dispense the liquid nitrous from the storage tank to the rocket oxidizer tank. A fueling apparatus able to fill the 2050 cm3 rocket oxidizer tank remotely from a distance of 300 ft. The filling apparatus must be operated remotely and must include the nitrous pressure regulator and fill and dump valves. 2 PRELIMINARY DESIGN REVIEW MEASURING RADIATION AS A FUNCTION OF ALTITUDE USING A HYBRID ROCKET PLATFORM NASA 2010 UNIVERSITY STUDENT LAUNCH INITIATIVE (2010 USLI) HARDING UNIVERSITY FLYING BISON 2010 USLI ROCKET TEAM The hand-held filling apparatus control must also have switches to arm the rocket, check for continuity of the motor ignition system and set off igniters inside the hybrid motor to initiate the rocket flight. Temperature control to keep nitrous supply tank pressure between 600 - 900 psi. On-board flight computer with backup computer capable of monitoring and recording apogee altitude and having pre-programmed capability to set off ejection charges to deploy a drogue parachute at apogee and a main parachute at 800 feet. Computers should have separate power supplies and manual switches to turn them on just before flight. Retrieval system that has an on-board transmitter and an external directional antenna and receiver. Drogue and Main parachutes: drogue to deploy at apogee with main to deploy at 800 ft. Parachutes attached to airframe securely with ample shock cord to prevent breaking of shock cord and minimizing collision and entanglement of separated airframe parts Airframe that can withstand flight stresses and landing forces and carry the science payload, motor, recovery parachutes, flight recorder and retrieval transmitter safely through the planned trajectory Fins that help maintain smooth and stable flight pattern with minimum turbulence Science payload with separate power supply to record gamma radiation, altitude, temperature, pressure, x-, y-, z- acceleration. An embedded controller will be required to activate the sensors, record and store their signals and provide interface to retrieve data at the end of the flight G-switch to switch on science payload electronics and sensors at lift off Portable Launch Stand with guide rail for holding, aiming and releasing rocket for flight Scale drawings of all components, systems and subsystems to be assembled into the final competition rocket including launch stand and fixtures used to construct sub-assemblies Inventory Manual of all items needed for successful and safe flight of competition rocket at USLI launch site Procedures Manual for preparation of the rocket for flight Safety Manual for safety procedures, safety information, best safe practices and MSDS sheets of all chemicals used Mission Success Criteria – The mission will be successful if all the mission goals are met: Pre-Launch Complete assembly Electronics activated and responsive Full battery Charge Establish RF connection Proper Motor preparation 3 PRELIMINARY DESIGN REVIEW MEASURING RADIATION AS A FUNCTION OF ALTITUDE USING A HYBRID ROCKET PLATFORM NASA 2010 UNIVERSITY STUDENT LAUNCH INITIATIVE (2010 USLI) HARDING UNIVERSITY FLYING BISON 2010 USLI ROCKET TEAM Launch Motor Ignition Rocket successfully leaves launch pad Correct thrust to weight ratio Stable flight by guidance rail Stabilization by fins Maintains integrity despite (LAUNCH) forces Motor burns completely Flight Thrust launches rocket to 5280 feet altitude Apogee reached Gauged by accelerometers/barometer Drogue parachute launched Rocket successfully separates Drogue Parachute Successfully deploys Rocket begins descent Barometer detects altitude of 800 feet Main parachute deploys Rocket successfully separates again Main parachute successfully deploys Rocket decelerates to 17 feet per second Rocket Lands Recovery Power maintained throughout flight Recovery transmitter sends coordinates Rocket recovered Data retrieved within 30 minute window Integrity Airframe integrity maintained Electronics functionality maintained Rocket remains in reusable condition Major Reports Proposal submitted on time Web Site Active PDR submitted on time CDR submitted on time FRR submitted on time Final Report submitted on time 4 PRELIMINARY DESIGN REVIEW MEASURING RADIATION AS A FUNCTION OF ALTITUDE USING A HYBRID ROCKET PLATFORM NASA 2010 UNIVERSITY STUDENT LAUNCH INITIATIVE (2010 USLI) HARDING UNIVERSITY FLYING BISON 2010 USLI ROCKET TEAM Safety and Environment No injuries to life forms Environment not affected in a negative way ● Major Milestone Schedule (Project Initiation, Design, Manufacturing, Verification, Operations, and Major Reviews) Table 1. Major Milestone Schedule (Milestones Accomplished are Greyed-Out) Task Oct Nov Dec Jan Feb Mar Apr Project Initiation Recruitment of Team Members, Goal Setting, Organization August and September 2009 Major Reviews and Deadlines Proposal to USLI Due 8 October 2009 Web Presence Established 12 November 2009 Preliminary Design Report Due 4 Dec 2009 Preliminary Design Review, PDR, 9:00 am, Tue, 8 December 2009 Critical Design Report Due 20 Jan 2010 Critical Design Review, CDR Flight Readiness Report Due 17 Mar 2010 Flight Readiness Review, FRR USLI Launch Competition, 14-19 Apr 2010 Post Launch Assessment Review, PLAR, 7 May 2010 Test Launch of Scale Model with Science Payload Prototype --◊ -------------◊ ------------------------◊ ------------------------◊ -----------------------------◊ -------------------------------------------------◊ ---------------------------------------------------------------------◊ TBD ◊-◊ ----------------------------------------------------------------------------◊ ---------------------------------------◊ Airframe Division Final Design of Airframe Order Materials for Airframe Conduct Testing of Airframe and Airframe Components Build and Paint Airframe -------------------------------◊ ---------------------------------◊ --------------------------------------------------------------◊ ---------------------------------------◊ Motor Division Order Motor and Ignition Hardware and materials Prepare Detailed Procedure for Motor Preparation and Flight Prepare Safety Document for Motor, fuel and oxidizer transportation, flight preparation, ignition, flight, maintenance, stowage Static Testing of Rocket Motors --------------------------------◊ --------------------------------◊ -----------------------------------------------------◊ ----------------------------------------------------------------------------◊ Science Payload Division Integrate Science Payload and Controller into Airframe Coupler Laboratory Test and Calibrate Science Payload Prepare Operations Guide for Science Payload -------------------------------------------◊ -------------------------------------------------◊ --------------------------------------------------------◊ Avionics Division Laboratory Test of Avionics Computers Install Flight Computers into Airframe Prepare Operations Guide for ---------------------------------------------◊ ------------------------------◊ --------------------------------------------------------◊ Launch Operations Division Prepare Inventory of Materials, Equipment, Supplies Order Needed Materials and Supplies Prepare Detailed Procedure for Launch of Rocket with Safety Test Launch Rocket in Memphis Prep and Launch Rocket at USLI Competition ----------------------------------◊ --------------------------◊ --------------------------------◊ -------------------------------------◊ ----------------------------------------------------------------------------◊ Recovery Division Use RockSim to Choose Recovery Parachutes and Supplies Purchase Parachutes and Supplies Integrate Recovery Hardware into Airframe Monitor Flight and Recover Rocket at Memphis Monitor Flight and Recover Rocket at USLI ------------◊ --------------------------------------------◊ ------------------------◊ -------------------------------------◊ ----------------------------------------------------------------------------◊ Outreach Division Design and Implement Harding Flying Bison USLI Website Outreach Project at Westside Elementary Outreach Project with Girls Scouts and Brownies Prepare Safety Manual for Flying Bison USLI Rocket Team Carry Out and Record Publicity Projects Seek External Funding Recruit New Team Members ---------------◊ -----------------◊ ------------------------◊ -----------------------------------------------------------------◊ ----------------------------------------------------------------------------◊ ----------------------------------------------------------------------------◊ ----------------------------------------------------------------------------◊ 5 PRELIMINARY DESIGN REVIEW MEASURING RADIATION AS A FUNCTION OF ALTITUDE USING A HYBRID ROCKET PLATFORM NASA 2010 UNIVERSITY STUDENT LAUNCH INITIATIVE (2010 USLI) HARDING UNIVERSITY FLYING BISON 2010 USLI ROCKET TEAM ● Review the design at a system level. ○ Updated drawings and specifications Figure 1. External view of airframe. Nosecone and boattail are plastic. Fins are fiberglass. Body tubes are fiberglass wrapped phenolic airframe tubing. Coupler tubes are phenolic airframe tubing and motor retainer is aluminum. Figure 2. Airframe internal structure. The coupler tubes are located as shown. The coupler tube aft of the nosecone houses the science payload, flight computers and recovery transmitter. The space between nosecone and payload coupler is used to store the main parachute while the space between the two couplers will house the drogue parachute. Figure 3. Airframe bracing schematic. The airframe braces are shown. There are four plywood spacers for the motor tube. A plywood bulkhead terminates the aftmost coupler. The science payload coupler is reinforced with two ¼” all-thread rods attached to plywood bulkheads. The eyebolts and allthread rods are secured with fender washers for additional strength. 6 PRELIMINARY DESIGN REVIEW MEASURING RADIATION AS A FUNCTION OF ALTITUDE USING A HYBRID ROCKET PLATFORM NASA 2010 UNIVERSITY STUDENT LAUNCH INITIATIVE (2010 USLI) HARDING UNIVERSITY FLYING BISON 2010 USLI ROCKET TEAM ○ Analysis results The materials and construction procedures we have employed in our launch vehicle are in keeping with the standard practices and procedures that have been employed in high-powered rocketry for many years. We feel that, in keeping with these methods, we guarantee the integrity and performance of our launch vehicle to the greatest degree possible. Our airframe, in fact, is constructed from material used in supersonic flights, and as our rocket will fly subsonic, we have great confidence in the airframe integrity (and as a result, the integrity of the entire vehicle). ○ Test results For any rocket, the greatest performance is realized when the fuel and oxidizer mass is maximized and the rocket airframe and payload mass is minimized. The only place where it was felt that significant mass reduction could be realized for our rocket design was in the use of a smaller diameter shock cord. In addition, the use of smaller eyebolts used to attach the shock cord and parachutes to the airframe would reduce mass. For this reason, we conducted tensile strength tests of shock cord, shock cord knots and coupler to parachute cord eye bolts. An INSRON 5569 Tensile Strength Instrument was used for tensile strength tests. The INSRON can apply forces of up to 50 kN. Figure 4a and 4b. Tensile strength test of shock cord and bowline knot. Figure 4a on the left is a photograph of the tensile strength test instrument with rocket shock cord mounted. Figure 4b shows that the bowline knot had not failed even as the cord began to fray at approximately 1300 lbf of applied force. 7 PRELIMINARY DESIGN REVIEW MEASURING RADIATION AS A FUNCTION OF ALTITUDE USING A HYBRID ROCKET PLATFORM NASA 2010 UNIVERSITY STUDENT LAUNCH INITIATIVE (2010 USLI) HARDING UNIVERSITY FLYING BISON 2010 USLI ROCKET TEAM Figure 5 is a graph of the results of the stress test shown in Figure 4a. The tensile strength test was stopped at 2608.4 lbf. The load on the shock cord is one-half the total force because two strands of the cord are used in the experiment. The slight dip at 4.4 inches is due to the knot slipping tighter (but not failing). The shock cord is good to at least 1304 lbf. Figure 5. Graph of results from shock cord with knot stress test. A coupler assembly that was a replica of the science payload coupler was constructed. The only difference was that it was 4 in. long instead of 12 in. long. The coupler was constructed of 3.78 in. i.d. phenolic airframe tube. The wall thickness was 0.062 in. Two rods of quarter inch all thread were used to secure the two plywood bulkheads together and to support the acrylic platform for the science instrumentation, the flight computers, the recovery transmitter and the batteries. One quarter inch bolts were used as the fasteners. Fender washers provided additional support. Fender washers were also used on the eyebolts. This device was subjected to a tensile strength test to determine the weakest link in the assembly. The test and results of the test are shown in Figures 6 and 7. Surprisingly, the eye bolts gave way before any other portion of the coupler. The eye bolts were not welded together and began to give at approximately 600 lbs of force. The all-thread, the plywood bulkheads and the phenolic airframe coupler tubing showed no signs of stress even after the eyebolts completely failed. Figure 6a and 6b. Testing of science payload coupler. The coupler was secured to the tensile strength instrument with heavier duty S hooks. The S hooks did not deform during the tests. 8 PRELIMINARY DESIGN REVIEW MEASURING RADIATION AS A FUNCTION OF ALTITUDE USING A HYBRID ROCKET PLATFORM NASA 2010 UNIVERSITY STUDENT LAUNCH INITIATIVE (2010 USLI) HARDING UNIVERSITY FLYING BISON 2010 USLI ROCKET TEAM Figure 7a and 7B. The photograph on the left shows the condition of the eyebolts after a force of 600 pounds had been applied. The photograph on the right shows that small D rings are quite strong and do not give way at 600 pounds. Figure 8. Graph of eyebolt stress tests. The graph shows that the eyebolts open up under a force of 600 lbf. ○ Preliminary Motor Selection The motor chosen is the next larger size motor than last year. Manufactured by Contrail Rockets, it was chosen so we could use the same 4 in. diameter airframe as last year but provide additional thrust to reach the one mile altitude that last year‟s rocket failed to do by 378 ft. The additional thrust will allow us to make the rocket airframe more robust by fiberglass wrapping of the phenolic airframe which, of course, adds additional mass. 9 PRELIMINARY DESIGN REVIEW MEASURING RADIATION AS A FUNCTION OF ALTITUDE USING A HYBRID ROCKET PLATFORM NASA 2010 UNIVERSITY STUDENT LAUNCH INITIATIVE (2010 USLI) HARDING UNIVERSITY FLYING BISON 2010 USLI ROCKET TEAM Figure 9. Contrail Rockets Certified K-888-BM Hybrid Motor. The motor is 75 mm diam. by 40 in. long. The combustion and nitrous storage chambers are steel and the nozzle is graphite. There are no moving parts for this motor. The nitrous storage tank overfill line comes out the back of the motor so that no additional holes must be drilled into the airframe. Figure 10. Components of K-888-BM Hybrid Motor. Top is nitrous storage chamber. Bottom left is 10 in. combustion chamber and bottom right is the medium nozzle. ● Demonstrate that the design can meet all system level functional requirements. The Contrail Rockets 75 mm K-888-BM rocket with a Black Smokey fuel grain and using nitrous oxidizer performed well in the RockSIM V9 simulations. We will field test the motor in a static test when we receive it from the supplier in early February. Then, we will conduct a full scale launch of the competition rocket with this motor system in mid February to insure that the motor will help achieve our goals. ● Specify approach to workmanship as it relates to mission success. The motor is a commercial product that has been certified according to NAR requirements. It is made of steel and all components bolted together for easy assembly and breakdown after firing. We have not taken possession of the motor yet although it has been ordered. It will fit in a standard phenolic motor tube that accommodates 3 inch diameter motors. 10 PRELIMINARY DESIGN REVIEW MEASURING RADIATION AS A FUNCTION OF ALTITUDE USING A HYBRID ROCKET PLATFORM NASA 2010 UNIVERSITY STUDENT LAUNCH INITIATIVE (2010 USLI) HARDING UNIVERSITY FLYING BISON 2010 USLI ROCKET TEAM ● Discuss planned additional component testing, functional testing, or static testing. A static test of the motor is planned as soon as it is received from the supply house. It will be tested on our newly designed rocket test stand. The static test will provide the team with experience in setting up the motor for firing and coordinating the activities of the team members, each having different launch responsibilities. Span = 8.00 in. Tip Chord = 4.00 in. Root = 8.00 in. Tang = 0.50 in. Sweep = 4.00 in. After the airframe and science payload are constructed, the entire rocket will be tested by launching it under USLI competition conditions at Shelby Farms in Memphis, Tennessee during the month of February under the direction of the Mid-South Rocket Society, NAR Section #550. ● Status and plans of remaining manufacturing and assembly The entire airframe must still be constructed after the critical design review is completed and the reviewer‟s suggestions are incorporated into the design. We plan to purchase the airframe components in as complete a form as possible to simplify and speed up construction. Figure 11. Public Missiles Fin Model FIN-D-01 Fiberglassing of the airframe will be contracted with the supplier. The delivered airframe tubes will be delivered already fiberglassed. The rocket parts supplier will also be contracted to cut fin slots into the boattail and airframe. In this way, only holes for the shear pins will need to be drilled. Also, holes in the science payload coupler will be needed for the on-off switches, computer cable connecters, indicator LEDs and air pressure equalization. ● Integrity of design ○ Suitability of shape, fin style for mission The fins, shown in Figure 11 were purchased from Public Missiles and are made from their G10 fiberglass laminate. G10 is a continuous woven glass fabric impregnated with epoxy resin. This material exhibits outstanding dimensional stability primarily because water absorption is virtually non-existent. The fin style was used in the RockSIM V9 simulation of a launch and appeared to function well. We will conduct a field test of the rocket with these fins in February. 11 PRELIMINARY DESIGN REVIEW MEASURING RADIATION AS A FUNCTION OF ALTITUDE USING A HYBRID ROCKET PLATFORM NASA 2010 UNIVERSITY STUDENT LAUNCH INITIATIVE (2010 USLI) HARDING UNIVERSITY FLYING BISON 2010 USLI ROCKET TEAM ○ Proper use of materials in fins, bulkheads, and structural elements All materials used in all parts of the airframe were commercial, off the shelf products, COTS. These products have been in use for years by the hobby rocket community and perfected through time. ○ Proper assembly procedures, proper attachment and alignment of elements, solid connection points, load paths We are following standard practice for the attachment and alignment of all elements. The locations of the spacers, couplers, boattail and nosecone are shown in the drawings of the airframe. The fillets between the fins and the motor tube will be reinforced with fiberglass cloth and epoxy resin. Because fin alignment is difficult, we have designed a fin alignment template for use in mounting the fins. A scale drawing of this device is shown in Figure 12. The tail section of the rocket is placed in the round hole in the larger section that has cutouts for guide rails and easement for placing epoxy on the fillets between airframe and tail fins. The other end of the rocket is placed in the hole in the smaller rectangle to maintain horizontal positioning. The two acrylic templates are held together with 4 foot quarter inch all- thread rods. Figure 12. Template for aligning fins at 120 degree intervals during assembly 12 PRELIMINARY DESIGN REVIEW MEASURING RADIATION AS A FUNCTION OF ALTITUDE USING A HYBRID ROCKET PLATFORM NASA 2010 UNIVERSITY STUDENT LAUNCH INITIATIVE (2010 USLI) HARDING UNIVERSITY FLYING BISON 2010 USLI ROCKET TEAM ○ Sufficient motor mounting and retention The motor has a steel thrust ring mounted in a groove in the combustion chamber near the nozzle end. This thrust ring is exactly the correct diameter to engage the end of the motor mount tube. However, in order to provide a much more robust engagement of the motor with the airframe, we are purchasing an Aero Pack Motor Retainer, Model RA-75H. It is composed of two pieces of precision machined 6061-T6 aluminum with Mil-Spec Type II black anodizing for wear and corrosion resistance. It has large quick-turn threads for fast tool-free motor change. The retainer is glued to the motor mount tube with JB Weld adhesive. Mounting and retention is secure. Figure 13. Aero Pack Motor Retainer for 75 mm motors. ○ Status of verification ● Safety and failure analysis Rocket analysis of failure modes including proposed and completed mitigations: The rocket will be the most robust vehicle that we have produced. The failures experienced with previous similar rockets were: o The parachute deployed during maximum thrust by the rocket motor, ripping the parachute from the airframe and causing total loss of rocket and payload. Our present design should not cause pressure changes that mislead the flight computers into thinking apogee has been reached prematurely. o A fin became unglued upon landing impact. We are going to reinforce the fin to motor mount attachment with fiberglass and epoxy. o The airframe might slip apart before the ejection charges are fired. We are using plastic shear pins to minimize this possibility. 13 PRELIMINARY DESIGN REVIEW MEASURING RADIATION AS A FUNCTION OF ALTITUDE USING A HYBRID ROCKET PLATFORM NASA 2010 UNIVERSITY STUDENT LAUNCH INITIATIVE (2010 USLI) o HARDING UNIVERSITY FLYING BISON 2010 USLI ROCKET TEAM Eyebolts may fail if the force exceeds 600 lbf. Heavier eyebolts will be chosen, if necessary, to avoid this situation. Recovery Subsystem ● Suitable parachute size for mass, attachment scheme, deployment process, test results with ejection charge and electronics The recovery subsystem is composed of the following components: PerfectFlite MiniAlt/WD to measure and store altitude and deploy drogue and main parachutes. DT2x Data Transfer Kit for connecting MiniAlt/WD to computer to download flight data G-Wiz MC-2.0 Flight Computer to provide redundant backup of the PerfectFlite MiniAlt/WD Computer Nine pin female to female cable with subminiature D connectors at each end wired in the NULL modem configuration to connect G-Wiz MC-2.0 to computer Software for use in downloading data from G-Wiz MC-2.0 to computer Ejection charges with electric matches attached to flight computers to deploy parachutes SkyAngle CERT-3 Series Large Parachute, with 57 square feet of surface SkyAngle Classic Series II Drogue Parachute with 6.3 square feet of surface Shock cord – to be determined Walston Retrieval System with CA MODA 3750 MVS-HF Rocket Transmitter, TRX-3S 3-Channel Receiver, and Folding 3-element Antenna Suitable parachute size for mass Parachute sizes were determined by RockSIM V9 modeling and by suggestions of the PDR Review Panel. The RockSIM V9 program does not seem to provide accurate results. The manufacturer‟s recommendation and PDR Review Panel recommendations for size was the same and that is what we followed. A full scale launch of competition rocket in mid February will validate parachute choice Attachment scheme Bowline knots will attach shock cord to eyebolts in the couplers and to the nosecone and aft bulkhead. Shock cord segments will be of lengths such that the airframe components do not bang against each other during descent. 14 PRELIMINARY DESIGN REVIEW MEASURING RADIATION AS A FUNCTION OF ALTITUDE USING A HYBRID ROCKET PLATFORM NASA 2010 UNIVERSITY STUDENT LAUNCH INITIATIVE (2010 USLI) HARDING UNIVERSITY FLYING BISON 2010 USLI ROCKET TEAM Deployment process Deployment will be through the two flight computers. Each flight computer will be wired to ejection charges independently. Test results with ejection charge and electronics This test will be conducted by full scale launch testing in mid February. ● Safety and failure analysis The only failure we have experienced with previous similar rockets was: The parachute deployed during maximum thrust by the rocket motor, ripping the parachute from the airframe and causing total loss of rocket and payload. Our present design should not cause pressure changes that mislead the flight computers into thinking apogee has been reached prematurely. Mission Performance Predictions ● State the mission performance criteria. Performance of the launch vehicle in flight will be subject to these criteria: Vehicle reaches velocity for stable flight before leaving launch guide. Vehicle maintains stable flight throughout. Vehicle does not “weathercock” unreasonably. Vehicle reaches apogee at target altitude. Vehicle descends at 61 feet/sec under drogue. Vehicle descends at 20 feet/sec under main. ● Show flight profile simulations, altitude predictions with real vehicle data, component weights, and actual motor thrust curve. Simulation Engines Loaded Maximum Altitude Feet 1 K-888 5689.57 2 K-888 5706.59 3 K-888 5700.75 Table 1. Flight Profile Simulations Maximum Velocity Feet/sec 672.90 673.11 673.03 Maximum Acceleration 2 Feet/sec 391.38 391.39 391.39 Time to Apogee sec 18.50 18.53 18.52 Velocity at Deployment Feet/sec 25.65 6.52 15.93 Altitude at Deployment Feet 5689.58 5706.59 5700.74 ● Show thoroughness and validity of analysis, drag assessment, scale modeling results. These tests will be done at a later time before full scale launch. 15 PRELIMINARY DESIGN REVIEW MEASURING RADIATION AS A FUNCTION OF ALTITUDE USING A HYBRID ROCKET PLATFORM NASA 2010 UNIVERSITY STUDENT LAUNCH INITIATIVE (2010 USLI) HARDING UNIVERSITY FLYING BISON 2010 USLI ROCKET TEAM ● Show stability margin, actual CP CG relationship and locations. Figure 14. RockSIM Rocket Schematic. The measurements for the center of pressure, CP, and center of gravity, CG are from the tip of the nosecone. The CP is 65.6 in., the CG is 52.0 in. The margin of stability is 3.40 body calibers which gives an overstable configuration. Payload Integration Ease of integration ● Describe integration plan The payload is completely self-contained in the forward coupler of the airframe. All components are in the coupler with their power supplies. Switches and cabling to the outside world are through the instrument switch mounting ring in the middle of the coupler. The coupler does not separate from its mating airframe tubes and will be screwed to them with plastic screws – 6 screws in each end of the coupler. ● Installation and removal, interface dimensions and precision fit Since the coupler is constructed from high powered rocket components off the shelf, COTS, it fits exactly into 4 inch phenolic airframe tubing. The airframe has an internal diameter of 3.90 in. and the phenolic coupler tubing has an outer diameter of 3.90 in. It is twelve inches long and mounts by sliding it into two airframe tubes and securing it with plastic screws. Slight sanding may be necessary to produce an exact fit if the joints are too tight and masking tape can be applied to the mating surface if the fit is too loose. The inside diameter of the coupler tube is 3.78 inches. ● Compatibility of elements Since the payload bay is made of standard high powered rocket parts used in virtually all rocket construction, all the materials are compatible. All the components of the electronic devices are on standard phenolic circuit boards and they are soldered in. The circuit boards are mounted on an acrylic chassis with stainless steel standoffs using 4-40 stainless steel screws. No gases or liquids or chemicals are part of the experiment. 16 PRELIMINARY DESIGN REVIEW MEASURING RADIATION AS A FUNCTION OF ALTITUDE USING A HYBRID ROCKET PLATFORM NASA 2010 UNIVERSITY STUDENT LAUNCH INITIATIVE (2010 USLI) HARDING UNIVERSITY FLYING BISON 2010 USLI ROCKET TEAM ● Simplicity of integration procedure Launch concerns and operation procedures ● Submit draft of final assembly and launch procedures A draft of final assembly and launch procedures has begun and is listed in Appendix A at the back of this document. ● Recovery preparation The Recovery Division Leader will be responsible for insuring the flight location transmitter is mounted securely in the Science Payload Coupler and is powered properly at launch. Another team member will use the folded antenna to track the rocket vehicle until it lands. These two plus another Recovery Division member will recover the rocket from the field, photograph it, inspect it briefly and bring it back to the launch site where the data from the science experiment and flight recorders can be downloaded onto a laptop computer. ● Motor preparation Motor preparation will be under the control of the Motor Division. The manufacturer‟s instruction manual copied in Appendix B will be followed to prepare the motor for launch. ● Igniter installation Igniter installation instructions are clearly illustrated in the motor manufacturer‟s motor preparation manual found in Appendix B. ● Setup on launcher Figure 14 a and b. Figure a shows the Harding Launch Platform. Figure b is a close-up detailed view. 17 PRELIMINARY DESIGN REVIEW MEASURING RADIATION AS A FUNCTION OF ALTITUDE USING A HYBRID ROCKET PLATFORM NASA 2010 UNIVERSITY STUDENT LAUNCH INITIATIVE (2010 USLI) HARDING UNIVERSITY FLYING BISON 2010 USLI ROCKET TEAM Figure 14 a and b shows the rocket launch platform designed for launching high powered rockets. The launch rail can be loosened by removing a clevis pin so that it can be lowered horizontal for loading the rocket onto the rail. The system can be adjusted to provide a launch angle from near horizontal to vertical. A flash arrestor protects the ground below from fire starts. The rail is a one inch square aluminum TSlotted Framing Rail, McMaster-Carr part number 47065T101. It has a 1/4th inch slot for the launch rails. ● Troubleshooting The full scale launch in mid February will help to identify trouble points if they exist. The launch will give the launch team the experience necessary to carry out a successful launch in a professional, timely manner. It will also help to fill the procedure manual for the competition launch. ● Post flight inspection The post flight inspection is a valuable part of the launch process. Photographs will be taken of the landing site and the landed rocket. Cursory inspection at the landing site will reveal whether or not the rocket did well upon landing. Once the rocket is brought back to the launch area, a more detailed inspection will be made and the data from the experiment and the flight computers downloaded to a laptop computer. Safety and Environment (Vehicle) ● Identify Safety Officer for your team– Edmond Wilson, Team Official, is the Safety Officer for the Harding Flying Bison 2010 USLI Rocket Team. He holds a NAR Level 2 Certification. ● Update the Preliminary analysis of the failure modes of the proposed design of the rocket, payload integration and launch operations, including proposed and completed mitigations. ● Update the listing of personnel hazards, and data demonstrating that Safety Hazards have been researched (such as Material Safety Data Sheets, operator’s manuals, NAR regulations), and that hazard mitigations have been addressed and mitigated. ● Discuss any environmental concerns. IV) Payload Criteria Testing and Design of Payload Experiment ● Review the design at a system level 18 PRELIMINARY DESIGN REVIEW MEASURING RADIATION AS A FUNCTION OF ALTITUDE USING A HYBRID ROCKET PLATFORM NASA 2010 UNIVERSITY STUDENT LAUNCH INITIATIVE (2010 USLI) HARDING UNIVERSITY FLYING BISON 2010 USLI ROCKET TEAM The science payload will be contained on three printed circuit boards as shown in the figures below. In addition a g-switch will be used to turn on the system at launch thereby saving power for use during the flight only. The system is powered by 2 nine volt batteries. Science payload consists of Flight computer number 1 Flight computer number 2 Embedded micromputer system Radiation counter Temperature sensor Pressure sensor X-, Y-, Z- accelerometers Battery power supply Radiation Sub system -- the Geiger counter kit used is GCK-05 from Images SI, Inc. The Geiger-Mueller Tube is neon plus halogen filled with a 0.38 in effective diameter mica end window of 1.5 to 2.0 mg per cm 2. It will detect the following radiation: Alpha particles above 3.0 MeV Beta particles above 50 KeV Gamma particles above 7 KeV. Temperature Subsystem -- the temperature transducer will be measured with a National Semiconductor LM50CIM3 transducer. This temperature transducer reads directly in Celcius degrees (10 mV/⁰C). The nonlinearity is less than 0.8⁰C over its temperature range of -40⁰C to +125⁰C. The accuracy at 25⁰C is ±2% of reading. It operates with any single polarity power supply delivering between 4.5 and 10 V. Its current drain is less than 130 mA. Pressure Subsystem -- the pressure transducer is a ASDX015A24R Honeywell device with a pressure measuring range of 0 to 15 psi and a burst pressure of 30 psi. It is powered by voltages in the range of 4.75 Vdc to 5.25 Vdc and has a current consumption of 6 mA. It will operate in the temperature range of -20⁰C to 105⁰C. It is survive 10 gram vibrations from 20 Hz to 2000 Hz and can survive a 100 g shock for 11 ms. Its lifetime is 1 million cycles minimum. Acceleration Subsystem -- There is one 1-axis low-range accelerometer, ADXL103CE, and one 2-axis low range accelerometer, ADXL203CE from Analog Devices. There is one 1-axis high-range accelerometer, AD22279-A-R2, and one 2axis high range accelerometer, AD22284-A-R2. All of these devices have an output full19 PRELIMINARY DESIGN REVIEW MEASURING RADIATION AS A FUNCTION OF ALTITUDE USING A HYBRID ROCKET PLATFORM NASA 2010 UNIVERSITY STUDENT LAUNCH INITIATIVE (2010 USLI) HARDING UNIVERSITY FLYING BISON 2010 USLI ROCKET TEAM scale range of 37 g. All have a non-linearity of approximately 0.2% of full scale. They require a power supply capable of producing 4.75 Vdc to 5.25 Vdc and at least 3.0 mA. The operational temperature range is -40⁰C to +105⁰C. Their maximum rating is 4000 g acceleration for any axis ○ Drawings and specifications Figure 15. Science payload chassis. The rectangle on the left is a bank of 9 volt batteries. Each device has its own separate power supply. The top right circuit board is the G-WIZ flight computer and the smaller circuit board on the right is the Perfectflite flight computer. The recovery transmitter (not shown) will also be mounted on this side of the payload chassis board. Figure 16. Top side of science payload chassis. The circuit board on the right is the Geiger counterBoard and the x- , y- accelerometers. The circuit board on the right holds the embedded controller and pressure and temperature sensors. The device in the middle is the z- accelerometer. 20 PRELIMINARY DESIGN REVIEW MEASURING RADIATION AS A FUNCTION OF ALTITUDE USING A HYBRID ROCKET PLATFORM NASA 2010 UNIVERSITY STUDENT LAUNCH INITIATIVE (2010 USLI) HARDING UNIVERSITY FLYING BISON 2010 USLI ROCKET TEAM ○ Analysis results There has been no analysis using electronic circuit models to determine whether the instrument payload is working properly. However, during construction, each device was tested before the next device was installed and all systems worked at that time. ○ Test results Testing will begin as soon as the CDR report is uploaded to the website on January 20, 2010. ○ Integrity of design The design has been thoroughly tested and the system can work. Further testing will reveal possible problem areas that can be addressed before the full scale launch in mid February 2010. ● Demonstrate that the design can meet all system level functional requirements The design does meet the system level functional requirements except that the Geiger counter, because it it mounted inside the airframe, will be shielded to a large extent from the alpha and beta radiation. Thus it will only be able to measure gamma radiation. ● Specify approach to workmanship as it relates to mission success The system was constructed and tested at each step of the construction. Workmanship was scrutinized and functionality verified. ● Discuss planned component testing, functional testing, or static testing Laboratory testing will take place in late January for each component and for the instrument as a whole. Radiation standards will be used to measure the instrument response while mounted in the rocket under flight configuration. ● Status and plans of remaining manufacturing and assembly The final assembly drawings have been prepared. Each of the three circuit boards, two flight computers, batteries, indicator LEDs and switches will be mounted on the acrylic chassis board and airframe instrument ring. All hardware is present and ready for assembly. ● Describe integration plan Integration plan is to mount the printed circuit boards and g-switch in the payload bay on one surface of a 10 in. by 3.70 in. by ¼ in acrylic chassis and attach on-off switches, indicating LEDs and computer cable interfaces to the outside world through 21 PRELIMINARY DESIGN REVIEW MEASURING RADIATION AS A FUNCTION OF ALTITUDE USING A HYBRID ROCKET PLATFORM NASA 2010 UNIVERSITY STUDENT LAUNCH INITIATIVE (2010 USLI) HARDING UNIVERSITY FLYING BISON 2010 USLI ROCKET TEAM the end caps and walls of the payload bay. The two flight computers and the batteries for all units will be mounted on the opposite surface. Connecting wires for the ejection charges will be fed through the two bulkheads at each end of the science payload coupler. ● Precision of instrumentation, repeatability of measurement We will test the ability of our Geiger counter sensor to measure alpha, beta and gamma radiation while mounted within the competition rocket. The Geiger counter will be calibrated with alpha, beta and gamma radiation laboratory standards to improve the quality of the measurements. Likewise, the accelerometers and pressure and temperature sensors will be calibrated in the laboratory before deployment on the competition rocket. A final science report section will be included in the final USLI report after the April 2010 competition. ● Safety and failure analysis o Payload analysis of failure modes including proposed and completed mitigations o The payload fits completely inside a coupler on the rocket airframe. The payload has flown successfully previously with no failure. We will pay attention to the robustness of all electrical connections and be sure to use fresh batteries. The power does not come on until a g-switch initiates data recording upon lift-off. o The payload will be flown on the test flight of the competition rocket to further test for failure. o The science payload coupler is undergoing a series of tests to evaluate its structural integrity. Payload Concept Features and Definition ● Creativity and originality Radiation consists of three major types: alpha, beta and gamma particles Alpha Rays are high speed helium nuclei. They are the least penetrating type of radiation. They can be stopped with a single thickness of paper or a few centimeters of air. Beta Rays are high speed electrons. They are more penetrating than alpha rays. Gamma Rays are units of energy and are the most penetrating. Gamma rays can penetrate several centimeters of steel or hundreds of meters of air. 22 PRELIMINARY DESIGN REVIEW MEASURING RADIATION AS A FUNCTION OF ALTITUDE USING A HYBRID ROCKET PLATFORM NASA 2010 UNIVERSITY STUDENT LAUNCH INITIATIVE (2010 USLI) HARDING UNIVERSITY FLYING BISON 2010 USLI ROCKET TEAM Cosmic and terrestrial radiation is of concern in everyday life on the surface of the Earth. It is more of a concern when moving to higher elevations, such as high mountainous elevations, traveling in jet aircraft or rocket travel to low Earth orbit. It is a serious problem for travel to other Solar System bodies such as the Moon or Mars. Radiation is not only harmful to humans; it is also damaging to electronic equipment, science experiments and spacecraft components. Single Event Phenomena, SEP, can cause burnout of electrical circuits or cause bit flips in logic circuits. An average value for radiation on the surface of the Earth is in the range of 14 counts per second. This level can increase many fold due to environmental factors such as building materials containing radioactive materials, smoke detectors, medical xrays, lantern mantles, etc. Cosmic radiation is particularly troublesome, especially from events happening on our Sun. Major Solar emissions can affect power grids and communication satellites. Radiation levels roughly double every 5000 feet in altitude. Sea level dosage is roughly one-half the level observed at one mile high, the target altitude of our rocket. ● Uniqueness or significance More information is needed at various locations and under various conditions about radiation at different altitudes. This small scale effort can lead to performing these same measurements with this instrumentation on sounding rockets and high altitude balloons. ● Suitable level of challenge This is a very appropriate project for college science and engineering students, CAD design, metal and electronic fabrication, tensile strength machines, presses and wind tunnels will be used. There will be lots of testing done and calibration. Finally, reports such as this one plus posters and oral presentations will all help to enhance the education of participants with real-world, hands-on activities. Science Value ● Describe Science Payload Objectives. Test and calibrate a Geiger-Mueller radiation counter Interface the Geiger counter to an embedded controller that will operate the instrument and collect and store the data. Test the complete, computer integrated instrument after mounting in the airframe using laboratory alpha, beta and gamma radiation standards. Test and calibrate a pressure sensor that will record pressure at constant intervals over the rocket trajectory 23 PRELIMINARY DESIGN REVIEW MEASURING RADIATION AS A FUNCTION OF ALTITUDE USING A HYBRID ROCKET PLATFORM NASA 2010 UNIVERSITY STUDENT LAUNCH INITIATIVE (2010 USLI) HARDING UNIVERSITY FLYING BISON 2010 USLI ROCKET TEAM Test and calibrate a temperature sensor to be used to record temperature as a function of altitude Test and calibrate a low sensitivity and a high sensitivity 3-axis accelerometer that will record the acceleration throughout the flight trajectory. ● State the payload success criteria Payload success will be achieved if all the sensors perform satisfactorily and data from each is collected and stored in the on-board computer memory. . ● Describe the experimental logic, approach, and method of investigation. ● Describe test and measurement, variables and controls. Variables are ambient pressure, humidity, temperature and radiation density. All of the sensors‟ operating ranges are well within those that might be encountered in northern Alabama in the spring unless there were at 3 sigma weather or radiation deviation. In the case of a 3 sigma deviation from the norm, the range officer would not allow the rocket flights. ● Show relevance of expected data, accuracy/error analysis. Data collected will be compared to that anticipated when possible. Accuracy can then be estimated. Error analysis will be made during laboratory testing once the payload is complete and testing begun. ● Describe the experiment process procedures. All the test equipment and radiation standards are in place waiting for testing to begin. Safety and Environment (Payload) ● Identify Safety Officer for your team – Edmond Wilson, Team Official, is the Safety Officer for the Harding Flying Bison 2010 USLI Rocket Team. He holds a NAR Level 2 Certification. o We have met with Searcy Fire Inspector, Phil Watkins, City of Searcy Fire Department, 501 W. Beebe Capps Blvd., Searcy, AR 72143, PH 501 279 1075, FAX 501 279 3892, EMAIL [email protected]. to go over our handling of solid rocket motors and electrical matches with him to insure that we were in compliance with all local, state and federal regulations. 24 PRELIMINARY DESIGN REVIEW MEASURING RADIATION AS A FUNCTION OF ALTITUDE USING A HYBRID ROCKET PLATFORM NASA 2010 UNIVERSITY STUDENT LAUNCH INITIATIVE (2010 USLI) HARDING UNIVERSITY FLYING BISON 2010 USLI ROCKET TEAM ● Update the Preliminary analysis of the failure modes of the proposed design of the rocket, payload integration and launch operations, including proposed and completed mitigations. Rocket analysis of failure modes including proposed and completed mitigations o A fin became unglued upon landing impact. We are going to reinforce the fin to motor mount attachment with fiberglass and epoxy. o The airframe might slip apart before the ejection charges are fired. We are using plastic shear pins to minimize this possibility. o The rocket might be lost upon landing. We have designed a radio transmitter recovery system that will allow us to track and find the rocket upon landing. o Payload analysis of failure modes including proposed and completed mitigations o The payload fits completely inside a coupler on the rocket airframe. The payload has flown successfully previously with no failure. We will pay attention to the robustness of all electrical connections and be sure to use fresh batteries. The power does not come on until a g-switch initiates data recording upon lift-off. o The payload will be flown on the test flight of the competition rocket to further test for failure. o The science payload coupler is undergoing a series of tests to evaluate its structural integrity. o Launch operations analysis of failure modes including proposed and completed mitigations o Loss of some oxidizer after filling and before countdown and launch. This was due to a misunderstanding on our part of how far the launch team had to be from the rocket. We now are ready to deploy the rocket from a distance of over 318 feet and we know how to maintain the oxidizer tank full until the launch command is given. o The nitrous oxidizer supply tank became too warm raising the pressure of nitrous to unacceptable levels for filling the rocket. We now have a procedure and hardware for maintaining the temperature of the nitrous supply tank to within a safe range. o The fuel ignition system failed because the voltage through the electric matches was too low. We now add a 12 volt battery in series with the ignition unit to proved ample voltage and current for ignition. 25 PRELIMINARY DESIGN REVIEW MEASURING RADIATION AS A FUNCTION OF ALTITUDE USING A HYBRID ROCKET PLATFORM NASA 2010 UNIVERSITY STUDENT LAUNCH INITIATIVE (2010 USLI) HARDING UNIVERSITY FLYING BISON 2010 USLI ROCKET TEAM ● Update the listing of personnel hazards, and data demonstrating that Safety Hazards have been researched (such as Material Safety Data Sheets, operator’s manuals, NAR regulations), and that hazard mitigations have been addressed and mitigated. Personnel hazards include: Injury to eyes or hands while machining payload or airframe parts. All will wear protective eyewear and instruction on preventing injury to the body during work periods will be conducted repeatedly for each phase of the work. Proper use of hand tools will be explained as needed for each process undertaken. Instruction on how to solder properly will be given when electrical circuits are being assembled. No chemicals are used in constructing or operating the payload. Only epoxy resin and spray acrylic paint is used in construction of airframe and payload. Protective gloves and face masks will be worn when working with these chemicals. The workplace will have the vent fan turned on to keep the fume levels to a minimum. All NAR regulations, MSDS safety sheets and tool and instrument manuals are being collected together in one central location for workers to access during the construction and testing phase. ● Discuss any environmental concerns – All payload work will be done in the laboratory under air-conditioning. No chemicals will be used. Other than brief smoke from the soldering process, there are no chemical hazards. Burns from inadvertently touch heated portion of soldering iron are virtually unknown and the small areas affected can easily be treated with burn ointment and band-aids. No electrical voltages high enough to cause shock are encountered with the equipment used. ● Discuss any environmental concerns. Our plan would pose no damage to the environment. We will use a flash arrestor on the bottom of our launch stand to protect the surrounding grass and weeds from catching on fire. A clean-up of the site after each launch will be conducted to remove trash and debris from the launch and recovery area. Only two to three people will enter the field to recover the rocket and they will be respectful of the crops in the launch field. The oxidizer is nitrous oxide. A small amount of this will be leaked to the atmosphere where it will be quickly dispersed. The amount will not contribute in any measurable way to the greenhouse effect. 26 PRELIMINARY DESIGN REVIEW MEASURING RADIATION AS A FUNCTION OF ALTITUDE USING A HYBRID ROCKET PLATFORM NASA 2010 UNIVERSITY STUDENT LAUNCH INITIATIVE (2010 USLI) HARDING UNIVERSITY FLYING BISON 2010 USLI ROCKET TEAM The fuel is hydroxyterminated polybutadiene, HTPB, which is essentially rubber. The spent fuel grain will be disposed of in a landfill where it will degrade back to carbon dioxide and water eventually. V) Activity Plan Show status of activities and schedule ● Budget plan The Harding Flying Bison Rocket Team applied for $9800 by submitting a proposal to the Arkansas Space Grant Consortium. Of this amount $3700 is to be used for team travel to Huntsville, Alabama to attend the rocket launch competition April 14-18. We had a $200 outreach component and $5900 for the rocket construction and expenses to travel to Memphis for the flight tests. Our proposal was funded but because of Federal Budgeting issues, we are guaranteed only $4800.00 unless the NASA Space Grant budget is fully funded. Furthermore, the funds are not available until April 1, 2010 when the fiscal year begins. The Arkansas Space Grant Consortium then announced a new competition using funds left over from this year being the end of a five year cycle. We applied for $6100 of these funds that would be immediately available and were funded. Because of these funds we can operate successfully in the 2010 USLI Competition and have a nice start on the 2011 USLI Competition, especially if the government restores all budgeted funds to the 2010 budget. We plan to ask BEI Industries, an aerospace company located in the State of Arkansas for some additional funding either in the form of cash or a summer internship for one of our students. ● Timeline The timeline with major milestones is given in Table 1. The milestones accomplished are grayed out in the table. We are behind in launching scale model rocket and hope to have this testing done during mid February. We are slightly behind in the construction of the airframe. We are behind in beginning to writing some of the procedures needed. Finally, we are behind in doing outreach with the Girl and Boy Scout Programs. ● Educational engagement We have completed an educational engagement project with the first grade at Westside Elementary. The project was to involve the students in the construction and flying of water bottle rockets. The project was a success and involved 25 students and at least that many parents. We are on schedule for having a rocket team display at the Harding University Library and have applied for presenting a Chapel program at Harding 27 PRELIMINARY DESIGN REVIEW MEASURING RADIATION AS A FUNCTION OF ALTITUDE USING A HYBRID ROCKET PLATFORM NASA 2010 UNIVERSITY STUDENT LAUNCH INITIATIVE (2010 USLI) HARDING UNIVERSITY FLYING BISON 2010 USLI ROCKET TEAM University in which the Flying Bison Team will be introduced and some highlights of our involvement in the USLI Program shown. Figure 17 a, b and c. First graders and their fabulous rockets. There were many very neat and flight worthy rockets at the launch. VI) Conclusion At this time, we believe we are on schedule with our mission objectives; we have much good work and testing to do. Our budget is secure and we are excited about the opportunities and challenges we will face. 28 PRELIMINARY DESIGN REVIEW MEASURING RADIATION AS A FUNCTION OF ALTITUDE USING A HYBRID ROCKET PLATFORM NASA 2010 UNIVERSITY STUDENT LAUNCH INITIATIVE (2010 USLI) HARDING UNIVERSITY FLYING BISON 2010 USLI ROCKET TEAM Appendix A: Launch Procedures Two days before leaving for competition: Check nitrous tanks by weighing to make sure they are full Charge all rechargeable batteries need for competition Check tool box to see all tools in place Go over list of supplies and materials that must be taken One day before leaving for competition: Remind all team members departure time Send Vice President for Academic Affairs Excuse Request for students Place all items going on trip in one location and go over check list to see if all items are present Wednesday, 14 April, 2010 – Departure Day Pick up van; load rocket and supplies; load students travel to Huntsville Friday, 16 April 2010 – Launch Day -1 Prep rocket motor Assemble science payload into coupler and check Saturday, 17 April 2010 – Launch Day Arrive at launch site with all supplies, materials and rocket Perform final rocket preparation; notify range officer ready for launch Launch team carries rocket, launch stand, ignition system and nitrous system and ignition cable to launch area Launch Manager does final check on instruments, rocket Launch Recovery Return to hotel Sunday, 18 April 2010 – Return to Harding University 29 PRELIMINARY DESIGN REVIEW MEASURING RADIATION AS A FUNCTION OF ALTITUDE USING A HYBRID ROCKET PLATFORM NASA 2010 UNIVERSITY STUDENT LAUNCH INITIATIVE (2010 USLI) HARDING UNIVERSITY FLYING BISON 2010 USLI ROCKET TEAM Appendix B: Motor Preparation Contrail Rockets 75mm Hybrid Rocket Motor Reload Instruction Manual Congratulations on your purchase of a Contrail Rockets 75mm Hybrid Reload. The supplied motor reload has been designed to operate in Contrail Rockets Hardware only. Before you begin assembly of this reload, please read through this manual and familiarize yourself with the steps. If you have any questions please contact Contrail Rockets. Included With this Reload Package is: Quantity Item Name 1 Fuel Grain 5 Press-Lock Injectors (User Selected At Time of Purchase) 2 Igniters (24 Volt Resistor Type Igniter) 2 Nylon Fill Lines (User Selected At Time of Purchase) 1 Nylon Crossover Line (Short version of item above) 1 1/8 Inch Vent Line (Clear) 2 O-Rings (Size 230) 1 Instruction Manual Not Included With this Reload Package is: Synthetic Type Grease (Mobile 1 Synthetic or Similar Recommended) Pyrodex Pellets (Muzzle Loading Pellets, Size 50/50 Recommended) Deep Wall Socket Set 7/16 Inch Socket for 1/8, and 3/16 Inch Injectors 1/2 Inch Socket for 1/4 Inch Injectors Allen Wrench (1/4 Inch Allen Wrench for 75mm Motors) Good Pair of Cutters (Recommended: Radio Shack Coax Cable Cutters) Roll of Electrical Tape Cleaning Supplies for Post Flight Cleanup 30 PRELIMINARY DESIGN REVIEW MEASURING RADIATION AS A FUNCTION OF ALTITUDE USING A HYBRID ROCKET PLATFORM NASA 2010 UNIVERSITY STUDENT LAUNCH INITIATIVE (2010 USLI) HARDING UNIVERSITY FLYING BISON 2010 USLI ROCKET TEAM Motor Assembly Instructions Step 1: Ensure that your motor hardware is clean and free from grease, oils, dirt and debris. Wipe the motor components with soap and water, to cut any residual grease from previous firings. Make sure you have all required tools and parts for motor assembly. Step 2: Begin by installing all O-Rings onto Nozzle and Injector Baffle. All O-rings are Dash Number 230. O-Rings should be free from any cracks, burns or damage. 31 PRELIMINARY DESIGN REVIEW MEASURING RADIATION AS A FUNCTION OF ALTITUDE USING A HYBRID ROCKET PLATFORM NASA 2010 UNIVERSITY STUDENT LAUNCH INITIATIVE (2010 USLI) HARDING UNIVERSITY FLYING BISON 2010 USLI ROCKET TEAM Step 3: Insert Press Lock Fittings into the Injector Face. A 1/8 Inch Fitting will always go in the center port. 1/8 inch Fittings are used for Slow Motors, 3/16 for Medium Motors and 1/4 Inch for Fast Motors. The Fittings should be tightened ½ turn past tight. Step 4: (Previous 4 Photo’s): Verify that you have the correct size and number of Pyrodex Pellets for your reload and then slide the igniter wire through the center hole of the pellet. Bend the resistor to the side of the powder pellet as shown. For 75mm motors we recommend (2) 50 Caliber/50 Grain Pyrodex Pellets. Ensure that you have placed the Resistor 90 Degrees away from the Nylon Line. This ensures proper ignition of the Pyrodex Pellet before the line bursts. The Pyrodex Pellets should be taped together and it is recommended that 2 wraps of Electrical tape should be sufficient over the entire igniter assembly to ensure ignition. Too Much Electrical Tape can be a bad thing and cause the pellets to burn to fast. You only need enough tape to hold them to the line. Prior to Moving onto the next step, ensure the lines are cut square and at a length of approximately ¾ of an inch from the top of the Pyrodex Pellets. 32 PRELIMINARY DESIGN REVIEW MEASURING RADIATION AS A FUNCTION OF ALTITUDE USING A HYBRID ROCKET PLATFORM NASA 2010 UNIVERSITY STUDENT LAUNCH INITIATIVE (2010 USLI) HARDING UNIVERSITY FLYING BISON 2010 USLI ROCKET TEAM Step 5: Insert the Fill lines w/ Pyrodex Pellets attached into the injector baffle on opposite sides. Ensure that the nylon lines go all the way into the press locks and go past the O-Ring Seal. You will feel it go past the O-ring and seat at the bottom of the fitting. You will now insert the clear vent line into the center fitting, and the short crossover line into the last 2 fittings. Ensure that all the lines are secure in the fittings prior to moving on. 33 PRELIMINARY DESIGN REVIEW MEASURING RADIATION AS A FUNCTION OF ALTITUDE USING A HYBRID ROCKET PLATFORM NASA 2010 UNIVERSITY STUDENT LAUNCH INITIATIVE (2010 USLI) HARDING UNIVERSITY FLYING BISON 2010 USLI ROCKET TEAM Step 6: Using your roll of electrical tape, start taping around all 5 nylon lines. This will slightly pull the lines towards the center of the motor, and ensure the heat of the Pyrodex Pellets at ignition is kept near the lines to ensure a positive ignition. You will only need a single layer of tape over the line set to hold them together. Step 7: Grease the Injector Baffle Orings and slide the nitrous tank section of the motor onto the combustion chamber and insert the retention bolts. The bolts will require a ¼ inch hex head wrench. 34 PRELIMINARY DESIGN REVIEW MEASURING RADIATION AS A FUNCTION OF ALTITUDE USING A HYBRID ROCKET PLATFORM NASA 2010 UNIVERSITY STUDENT LAUNCH INITIATIVE (2010 USLI) HARDING UNIVERSITY FLYING BISON 2010 USLI ROCKET TEAM Step 8: Grease the included fuel grain with a synthetic type grease (Mobile 1 or similar) and slide the fuel grain into the combustion chamber. Ensure that the fill lines, vent line and igniter wires are all drawn through the core of the grain. A thin coating of grease is all that is required. Step 9: Grease the Nozzle O-rings and slide the nozzle into the combustion chamber. If you will be using a retaining ring on the nozzle, be sure to put this onto the nozzle prior to bolting it into the combustion chamber. 35 PRELIMINARY DESIGN REVIEW MEASURING RADIATION AS A FUNCTION OF ALTITUDE USING A HYBRID ROCKET PLATFORM NASA 2010 UNIVERSITY STUDENT LAUNCH INITIATIVE (2010 USLI) HARDING UNIVERSITY FLYING BISON 2010 USLI ROCKET TEAM You’re Now Done Assembling your Contrail Rockets Hybrid Rocket Motor. Venting Instructions 75mm and larger Contrail Hybrids do not require a vent hole on the top of the motor. Instead, the motor will vent nitrous oxide through the combustion chamber. Prior to motor ignition, the clear nylon line is routed through the combustion chamber and to wherever the user prefers. A Re-usable Silver colored fitting is attached to the end of the clear line. It is a good idea to secure this fitting to your launch pad so that you can find it after the motor has fired. The Fitting has a restrictor inserted into the fitting, which allows for a positive vent stream to be seen when the motor is full and ready for launch. Launch Setup and Procedure - In order to fire any Contrail Rockets Hybrid Motor you will need to have available a Hybrid Ground Support System. We recommend the Contrail Rockets Ground Support System, or the Pratt Hobbies Ground Support System. For More information on Ground Support Contact your favorite hybrid vendor. Pad Setup is Simple. No Hybrid Motor should be operated when Nitrous Oxide Pressures are less than 600 psi or more than 900 psi. - It is required that you fill your Hybrid Motor from a Distance of no less than 100 Feet. Manufactures of Hybrid Ground Support will be more able and willing to help assist you in the pre flight setup and procedures which go along with there equipment. If you are not familiar with there equipment, ask them prior to use. 36 PRELIMINARY DESIGN REVIEW MEASURING RADIATION AS A FUNCTION OF ALTITUDE USING A HYBRID ROCKET PLATFORM NASA 2010 UNIVERSITY STUDENT LAUNCH INITIATIVE (2010 USLI) HARDING UNIVERSITY FLYING BISON 2010 USLI ROCKET TEAM Warnings - Only Contrail Rockets Certified Reloads are to be used in Contrail Rockets Hardware. The use of any other manufactures reload in Contrail Rockets Hardware will void your warranty and will also render the assembled motor non-certified. Never Approach a Hybrid Motor when filling or while the motor has pressurized Nitrous Oxide in it. - After Firing your motor, it may be hot, and should be handled with care. Always Wear Protective Eyewear, Gloves, and Clothing when working with Hybrid Motors, or Ground Support. Always follow the Tripoli Safety Code as well as the NFPA Safety Code for Mid and High Power Rocketry. - Not heeding these warnings could result in injury of yourself or others. Disposal and Cleanup If for any reason you need to return or dispose of your reload, please contact Contrail Rockets LLC. for information on how to return the item. Appropriate shipping and handling, as well as packaging requirements may be necessary. Any used items should be disposed of in the proper trash receptacle. Disassembly and Motor Cleaning Necessary Items: Broom Stick or Long Dowell for removing Internals (at least the length of the combustion chamber) Soap and Water for Cleanup Paper Towels Lighter Fluid for Cleaning Nozzles Socket Set for Removal of Press Lock Fittings Once you have fired the motor and it is time for cleanup you should begin by removing the retention bolts holding in the combustion chamber section only. Never disassemble the Nitrous Oxide Portion of the Motor. This will void all warranties. Remove the burned up press lock fittings in the injector face. Next, remove the burned grain from the combustion chamber and dispose of. Everything will then need to be cleaned using soap or lighter fluid. O-rings should be checked for cracks or burns, and replaced as necessary. 37 PRELIMINARY DESIGN REVIEW MEASURING RADIATION AS A FUNCTION OF ALTITUDE USING A HYBRID ROCKET PLATFORM NASA 2010 UNIVERSITY STUDENT LAUNCH INITIATIVE (2010 USLI) HARDING UNIVERSITY FLYING BISON 2010 USLI ROCKET TEAM Safety and First Aid Contrail Rockets Hybrid Motor Reloads will not burn without the presence of a High Temp Heat Source, and strong oxidizer. If for some reason, any part of a reload is ingested, induce vomiting and seek medical attention. Disclaimer Contrail Rockets LLC. specifically disclaims any warranties with respect to any and all products sold or distributed by it, the safety or suitability thereof, or the result obtained, whether express or implied, including without limitation, any implied warranty of merchantability of fitness for a particular purpose and/or any other warranty. Buyers and users assume all risk, responsibility and liability whatsoever for any and all injuries (including death, losses, or damages to persons or property), including consequential damages arising from the use of any product or data, whether or not occasioned by seller’s negligence or based on strict product liability or principles of indemnity or contribution. Contrail Rockets Neither assumes nor authorizes any person to assume for it any liability in connection with the use of any product or data. Contrail Rockets LLC. Ensures that reasonable care during the design and manufacture process. Because we can not control the use or storage of our products, Contrail Rockets, can not be held responsible for any personal injury or property damage resulting from the handling, use or storage of its products. The Purchaser assumes and accepts all liabilities and risks associated by the handling or use of Contrail Rockets Products. By Purchasing a Contrail Rocket, LLC. product, you are hereby acknowledging the above disclaimer, and agreeing to not hold Contrail Rockets, LLC., its owners, employees, stock holders, partners, or subcontractors for any harm or blame caused by the use of our product, caused by the purchaser, and/or end user. 38 PRELIMINARY DESIGN REVIEW MEASURING RADIATION AS A FUNCTION OF ALTITUDE USING A HYBRID ROCKET PLATFORM NASA 2010 UNIVERSITY STUDENT LAUNCH INITIATIVE (2010 USLI) HARDING UNIVERSITY FLYING BISON 2010 USLI ROCKET TEAM Warranty Our Products are Warranted for a time period of one year, from the date of original purchase. The warranty expressed by Contrail Rockets LLC., covers defects in material or workmanship. There shall be no expressed or implied warranty, which covers any item damaged, through the use of a Contrail Rocket Motor. This includes the motor hardware, electronics, and any other items which suffer from the misuse, neglect caused by the user. Contrail Rockets LLC. Reserves the right to alter the Warranty at any time, at their discretion. Contact Information Contrail Rockets LLC. 49 N. Acoma Blvd. Suite #2 Lake Havasu City, AZ 86403 United States of America Phone Number: 520-990-4721 Website: http://www.contrailrockets.com 39 PRELIMINARY DESIGN REVIEW MEASURING RADIATION AS A FUNCTION OF ALTITUDE USING A HYBRID ROCKET PLATFORM NASA 2010 UNIVERSITY STUDENT LAUNCH INITIATIVE (2010 USLI) HARDING UNIVERSITY FLYING BISON 2010 USLI ROCKET TEAM Appendix C: Altimeter User’s Manual miniAlt/WD User‟s Manual A miniature data logging altimeter with two event deployment capabilities for high power rockets. 15 Pray Street URL: www.perfectflite.com Amherst, MA 01002 Sales: [email protected] Voice (413) 549-3444 Support: [email protected] FAX (413) 549-1548 miniAlt/WD User‟s Manual Contents Preface ...............................................................................1 Theory of Operation ............................................................2 Preliminary Setup Getting to know your altimeter ..................................................3 Powering the altimeter ............................................................4 Connecting external switches ....................................................5 Configuring the altimeter .........................................................7 Numerical reporting method .....................................................9 Installation Basic payload module ...........................................................10 Sampling hole size chart ........................................................11 Apogee-only deployment .......................................................12 Dual-event deployment .........................................................13 Ejection Charges Ejection charge igniters .........................................................15 Making ejection charges ........................................................15 Operation Sequence of events ..............................................................16 Computer connection ............................................................18 Preflight checklist ................................................................19 On-ground testing ...............................................................20 Cautions ...........................................................................20 Appendix..........................................................................21 Specifications ....................................................................22 Mounting Hole Template ....................................................24 Warranty ..........................................................................25 Congratulations on your purchase of the new miniAlt/WD altimeter! 40 PRELIMINARY DESIGN REVIEW MEASURING RADIATION AS A FUNCTION OF ALTITUDE USING A HYBRID ROCKET PLATFORM NASA 2010 UNIVERSITY STUDENT LAUNCH INITIATIVE (2010 USLI) HARDING UNIVERSITY FLYING BISON 2010 USLI ROCKET TEAM Please read these instructions carefully before attempting to use the altimeter to insure safe and successful operation. Your new altimeter provides several useful functions: Peak altitude determination. After a flight with the altimeter installed, your rocket’s peak altitude (apogee) will be reported via a series of audible beeps. This will allow you to study the effect of various design parameters (fin/nose cone shape, fin airfoil, number of fins, etc.) on your rocket’s performance. It can also be used by clubs for altitude contests - compete to see who can get the most altitude out of a given engine size, etc. Electronic deployment of recovery devices. The altimeter provides electronic outputs for firing ejection charges at two points during flight: apogee and secondary (adjustable from 300 feet to 1700 feet above ground level.) Firing the first charge exactly at apogee insures that the recovery system is deployed while the rocket is traveling at the slowest possible speed. This minimizes the likelihood of rocket damage due to “zippered” body tubes and “stripped” parachutes which occur when deployment occurs at higher velocities. Electronic deployment is preferable to using the engine’s built-in timed ejection charge, which can vary from engine to engine and is usually limited to two or three specific time delays (which may not be optimal for your particular engine/ rocket combination). While it is often adequate to use single-event ejection at apogee, a twoevent deployment option is also provided. This involves ejecting a small parachute or streamer at apogee, allowing your rocket to fall at a fast but controlled rate to the secondary deployment level of 300 to 1700 feet AGL (switch selectable). At this point a larger main chute is deployed to bring your rocket slowly and safely down for a soft landing. This has the significant advantage of reducing the distance your rocket drifts on windy days, making safe recovery easier and more certain. Download of flight data to a personal computer. After recovery, you can connect your altimeter to an IBM compatible or Macintosh computer with the optional data transfer kit. This allows you to view a graph of altitude vs. time for the first 5.7 minutes of flight. The data are also saved as a standard text file which can be imported into spreadsheet programs for further analysis (velocity, acceleration, sink rate, etc). 1 Theory of Operation The miniAlt/WD altimeter determines altitude by sampling the surrounding air pressure during flight and comparing it with the air pressure at ground level. As the altitude increases, the air pressure decreases, and the onboard microprocessor converts the pressure difference to altitude. When the altimeter is turned on, it reads a bank of configuration switches and saves their values in memory. It then checks the barometric pressure sensor to make sure that the pressure reading is within normal limits. If an abnormal condition is detected, an error is reported. If pressure readings are normal, the values of the mach delay and main deployment level switch banks are reported via the built-in beeper. The peak altitude of the previous flight is then retrieved from nonvolatile EEPROM memory and reported. Next the ground level elevation is sampled every 50 milliseconds, and the ejection charges’ power and continuity status is checked and reported as the altimeter awaits launch. The continuity is rechecked and reported approximately once per second during this period. The microprocessor also looks for a sudden decrease in pressure signifying a rapid increase in altitude (launch detection). When the altitude exceeds a preset threshold (160 feet above the ground reading), launch is detected. The previous 16 altitude samples are saved to logging memory, and additional samples are added every 50 milliseconds for the duration of the flight. While awaiting launch the ground level will be updated if a slow change is detected to compensate for thermal and barometric drift. If a mach delay value was entered into the configuration switches, the altimeter waits for the prescribed time to elapse before beginning to check for apogee. This prevents a sudden increase in pressure due to the transition from subsonic to supersonic flight from being interpreted as a false descent (apogee) so that the apogee chute is not deployed prematurely. After any Mach Delay period has elapsed, pressure readings are taken every 50 milliseconds and converted to altitude above ground level. The altitude results are inspected to determine apogee (peak altitude). When the derived rate of ascent decreases to zero, apogee is detected and a power MOSFET is turned on to supply power to the apogee event ejection charge 41 PRELIMINARY DESIGN REVIEW MEASURING RADIATION AS A FUNCTION OF ALTITUDE USING A HYBRID ROCKET PLATFORM NASA 2010 UNIVERSITY STUDENT LAUNCH INITIATIVE (2010 USLI) HARDING UNIVERSITY FLYING BISON 2010 USLI ROCKET TEAM igniter. The peak altitude reading is also stored in nonvolatile memory for later retreival. Altitude readings continue to be taken during descent, and are compared with the main deployment threshold that was read from the switch bank on power-up. When the altitude has decreased to the main 2 Getting to Know Your Altimeter: Refer to figure 1 below to identify the following items: A) Battery terminals (note polarity +/-) B) Power switch terminals C) Main ejection charge terminals D) Drogue (Apogee) ejection charge terminals E) Serial data I/O connector F) Audio beeper G) Main deploy switch bank (switches 1-3) H) Mach delay switch bank (switches 4-6) Figure 1: Parts identification deployment level, another power MOSFET is turned on to supply power to the main parachute ejection charge igniter. When the altitude is less than 300’ and the sink rate is less than 4 feet per second, data collection is terminated. At this point the peak altitude is reported continuously at ten second intervals via a sequence of beeps. 3 Powering the Altimeter The altimeter’s electronics can be powered by any source of 6 volts to 10 volts that can provide at least 10 milliamps of current. Standard 9V batteries can be connected using the supplied battery clip. Make sure that both of the clip’s snaps are gripping the battery terminals firmly to prevent power interruption due to vibration. The larger battery terminal or clip terminal can be compressed inward if necessary to insure a snug fit. While the miniAlt/WD will fit easily inside a 24mm body tube, a standard 9V battery will not. For limited-space applications we recommend a battery consisting of 5 or 6 type SR-44/357 Silver Oxide cells in series. This configuration is small enough to fit in a type “N” battery holder, yet provides enough power to run the altimeter for over 8 hours. Using Alkaline cells will reduce the runtime significantly. Many other types of batteries (lithium coin and button cells, type A23 batteries, etc.) may appear to have enough capacity to run the altimeter for a reasonable time, but are frequently rated for a maximum discharge current of under 1 milliamp. If this is the case, when they are connected to the miniAlt/WD they will become depleted in a short time. Always check the runtime of a new battery configuration with a reliable voltmeter before committing to flight. Terminal Block Note To attach wires to the terminal blocks, loosen the retaining screw (facing upward from the board), insert the stripped wire end from the side, and retighten the screw. Make sure that you strip enough insulation from the wire (~3/16”) so the bare wire (not the insulation) is gripped by the contact. Do not allow an excess of bare wire outside the terminal, as it could shortcircuit to adjacent parts or wires. Always use solid wire (or tin any stranded wire ends with solder) – the loose strands in untinned stranded wire can “escape” during wire insertion and make contact with adjacent terminals. After inserting the wires and tightening the connections, tug the wires with a pair of longnose pliers to insure that they are gripped tightly. You do not want these connections to loosen in flight! 4 Connecting Switches Connect a suitable ON/OFF switch to the power switch terminals. One important consideration for the power switch is that it be “bounce-free” – 42 PRELIMINARY DESIGN REVIEW MEASURING RADIATION AS A FUNCTION OF ALTITUDE USING A HYBRID ROCKET PLATFORM NASA 2010 UNIVERSITY STUDENT LAUNCH INITIATIVE (2010 USLI) HARDING UNIVERSITY FLYING BISON 2010 USLI ROCKET TEAM you do not want the switch to turn off momentarily during vibration or acceleration, as the altimeter could reset and deployment would fail. The miniAlt/WD can tolerate a two second loss of power without affecting operation, but it is always wise to use the best quality switches possible. The power switch should be mounted with the switch movement perpendicular to the travel of the rocket. This will minimize the forces placed on the switch during acceleration/deceleration, which could inadvertently move the switch to the “off” position. If the switch is on the outside of the airframe or near any of the recovery device rigging, a cover should be fabricated for the switch to prevent it from being bumped to the “off” position due to impact with the rigging. One popular switch is the spring loaded “Push on/Push off” switch. If this type of switch is properly oriented in the electronics bay adjacent to the vent hole(s), a pointed object can be inserted into the vent hole to turn the switch on or off. Since no part of the switching mechanism is outside of the rocket, it has no impact on drag or aesthetics, and cannot be activated (or deactivated) inadvertently. Some switches of this type (e.g. PerfectFlite #POPO depicted below) have two “poles”, or independent switch circuits, activated by the same plunger. These are shown wired in parallel for additional redundancy. rod out, switch on rod in, switch off Another simple and effective switch can be made using a lever/plunger switch (eg. Omron SS-10T), a small piece of brass tubing, and a length of brass rod with a sharpened end. The brass tubing is secured to the top of the switch housing with a small amount of epoxy (do not use CA, as the outgassing during curing will get into the switch and ruin its contacts) such that when the sharpened end of the brass rod is inserted into the tubing it depresses the plunger. The switch assembly is mounted inside the altimeter bay, with a hole for the brass rod leading to the outside. The Normally Closed terminals of the switch are used in this case, so when the rod is inserted and the plunger is depressed the switch turns off (“opens”). A “remove before flight” flag can be hung from the end of the brass rod to remind you to turn on the altimeter. One advantage to using a Normally Closed switch is that failure of the external mechanical assemblies (brass tube) during flight will NOT turn the altimeter off. 6 Configuring the Altimeter Two sets of switches are provided for setting mach delay time and main recovery device deployment altitude. The switches are only read on powerup, so their status cannot be altered by flight induced vibration or shock. Any intentional modification of the switch settings should be done with power off so that they are read properly the next time the altimeter is turned on. The mach delay setting is used to prevent premature deployment of the 43 PRELIMINARY DESIGN REVIEW MEASURING RADIATION AS A FUNCTION OF ALTITUDE USING A HYBRID ROCKET PLATFORM NASA 2010 UNIVERSITY STUDENT LAUNCH INITIATIVE (2010 USLI) HARDING UNIVERSITY FLYING BISON 2010 USLI ROCKET TEAM apogee recovery device as the rocket makes the transition between subsonic and supersonic flight. During this period the pressure surrounding the airframe will increase suddenly, which could be interpreted as a decrease in altitude, triggering the apogee deployment event. If you think that your rocket will go supersonic, a computer simulation should be run to determine the time at which flight returns to subsonic speeds. Add in a safety factor of 20%-30% and enter the resulting time on switches 4, 5, and 6 according to the table below. The time that you enter should always be less than the simulation’s reported time to apogee. Important: If your rocket is not expected to exceed Mach 1, the mach delay time should be set to zero (switches 4-6 OFF). This will allow apogee detection to occur at the proper time. The altitude at which you would like your main recovery device to be deployed is set using switches 1, 2, and 3. Set the altitude high enough to insure that the chute will deploy fully in time to slow the rocket’s final descent, but low enough to prevent excessive drift. In most cases a setting of 500 to 900 feet is appropriate. If you have any doubt as to the time it will take for your chute to deploy, choose a number towards the upper end of this range and gradually reduce it if deployment speed allows. For small fields, loosely packed chutes, and windy conditions you may want to drop back to 300 feet. When the altimeter is first turned on, the current mach delay and main deployment settings are reported via the beeper (see the next section for details). This allows you to confirm that the correct settings are entered even if the altimeter is hidden inside your rocket. These settings are followed by a number representing the peak altitude attained on the altimeter’s last flight. 7 SW4 SW5 SW6 Delay off off off 0 seconds off off on 2 seconds off on off 4 seconds off on on 6 seconds on off off 8 seconds on off on 10 seconds on on off 12 seconds on on on 14 seconds Table 2 - Mach delay settings SW1 SW2 SW3 Altitude off off off 300 feet AGL off off on 500 feet AGL off on off 700 feet AGL off on on 900 feet AGL on off off 1100 feet AGL on off on 1300 feet AGL on on off 1500 feet AGL on on on 1700 feet AGL Table 1 - Main deployment settings 8 Numerical Reporting Numbers are reported as a long beep (separator), followed by a pattern of shorter beeps. With the exception of the one or two digit Mach Delay setting, all numbers are reported using up to five digits – a series of beeps for the first digit (tens of thousands of feet), a short pause, another series of beeps for the next digit (thousands of feet), etc. Leading zeroes are suppressed: 1,582 feet would be represented with four digits, not five digits as in 01582. Ten beeps are used to indicate the number zero (if zero beeps were used, you would not be able to differentiate between 2200 feet and 22 feet!). As an example, 12,560’ would be reported as: long beep-pause-beep-pause-beep-beep-pause-beep-beep-beep-beep-beeppausebeep-beep-beep-beep-beep-beep-pause-beep-beep-beep-beep-beepbeepbeep-beep-beep-beep-long pause Digit Reported as: 0 beep-beep-beep-beep-beep-beep-beep-beep-beep-beep 1 beep 2 beep-beep 3 beep-beep-beep 4 beep-beep-beep-beep 5 beep-beep-beep-beep-beep 6 beep-beep-beep-beep-beep-beep 7 beep-beep-beep-beep-beep-beep-beep 8 beep-beep-beep-beep-beep-beep-beep-beep 9 beep-beep-beep-beep-beep-beep-beep-beep-beep Table 3 - numerical beep sequences 9 44 PRELIMINARY DESIGN REVIEW MEASURING RADIATION AS A FUNCTION OF ALTITUDE USING A HYBRID ROCKET PLATFORM NASA 2010 UNIVERSITY STUDENT LAUNCH INITIATIVE (2010 USLI) HARDING UNIVERSITY FLYING BISON 2010 USLI ROCKET TEAM Installation Basic record-only mode Your altimeter needs to be installed in a separate payload compartment, sealed from the pressure and heat of the ejection charge gasses. It is not OK to tie it to the shock cord and pack it in with the chute! The high pressure and heat encountered during ejection would damage the delicate pressure sensor’s diaphragm. If you are not using the electronic ejection features and are just interested in peak altitude determination or data collection, the simplest mounting method involves adding a sealed payload compartment to your rocket. This is just a section of body tube behind the nosecone with a sealed tube coupler connecting it to the main body tube (see figure 5). Some rockets already have such a payload section, and one can be added easily if yours does not. Loose fit Glue Tight fit Sampling hole Altimeter Wadding You must drill a clean-edged hole in the payload section to allow outside air pressure to be sampled by the altimeter. This hole should be as far away from the nosecone and other body tube irregularities as possible (3X the body tube diameter or more) to minimize pressure disturbances being created by turbulent airflow over the body tube. Sand the area around the hole as necessary to eliminate flashing or raised edges. Exact sizing of the hole is not critical, refer to the table on the next page for suggestions. 10 Diameter Length Hole Size 1” 5” .031” (1/32”) 1.6” 6” .047” (3/64”) 2.1” 6” .078” (5/64”) 2.1” 12” .156” (5/32”) 3.0” 12” .219” (7/32”) 3.0” 18” .344” (11/32”) Other “D” Other “L” H=D*L*.006 Table 4 - Payload Section Size vs. Sampling Port Hole Size While not strictly necessary, the single sampling hole can be replaced by several smaller holes distributed around the airframe’s circumference. This will minimize the pressure variations due to wind currents perpendicular to the rocket’s direction of travel. If you are not using ejection charges, mounting and wiring is straightforward. Simply place the altimeter in the payload section - it does not matter which end of the altimeter faces “up”. Use pieces of foam rubber in front of and behind the altimeter to prevent it from shifting under acceleration and deceleration. A wrap of foam weather-strip around the center portion of the altimeter will provide a snug fit in 24mm/BT50 size body tubes, and a “sleeve” made out of standard foam pipe insulation can be used for larger size tubes. Make sure that your foam rubber pieces do not block the path from the air sampling hole to the altimeter’s pressure sensor element. A channel can be cut in pipe insulation for this purpose; make sure that the channel lines up with the sampling hole and the sensor’s air inlet. Your payload section should close securely so that the altimeter is not “ejected” upon motor burnout deceleration or chute deployment shock. 11 Setting up the altimeter for use as a recovery device with apogee-only or two-stage deployment is necessarily more complex. You may want to gain some experience with your altimeter in “reporting only” mode before using it for deployment. Then begin with a simple apogee-only deployment application, and move on up to two-stage deployment after you’ve gained experience with electronically-fired ejection charges. The following suggestions can be used as a “starting point”, and should be adapted to suit your specific application. To insure the highest degree of safety, all recovery systems should be ground-tested prior to launching. Using redundant backups (e.g. motor ejection charge in addition to electronic deployment) is always a good idea 45 PRELIMINARY DESIGN REVIEW MEASURING RADIATION AS A FUNCTION OF ALTITUDE USING A HYBRID ROCKET PLATFORM NASA 2010 UNIVERSITY STUDENT LAUNCH INITIATIVE (2010 USLI) HARDING UNIVERSITY FLYING BISON 2010 USLI ROCKET TEAM whenever possible. Installation with apogee deployment Installation with apogee-only electronic deployment is similar to the standard installation noted above. The altimeter is mounted in the sealed payload compartment, and a small hole is drilled through the rear bulkhead for the ejection charge cable (see figure 6). Route the ejection charge cable through the bulkhead with the altimeter connector end in the payload section, leaving sufficient wire aft of the bulkhead to allow connection of the ejection charge. Seal the point where the ejection charge cable passes through the bulkhead with silicone, epoxy, or hot melt glue to prevent ejection charge pressure from entering the payload compartment. Make sure that the altimeter, battery, and wires are mounted securely so they will not shift under the high G forces experienced during acceleration and burnout/deceleration. Leave some slack in the cables to prevent the plugs from pulling out of the terminal blocks if things do shift. Prior to launch you will attach the ejection charge’s leads to the loose ejection charge cable ends, twisting them tightly and taping them to prevent shorts. The ejection charge will then be loaded into the rocket’s airframe immediately in front of the motor, with flameproof wadding inserted after it to protect the chute. Pack the chute next, being careful to position the shroud lines and shock cord away from the ejection charge cable to minimize the likelihood of tangling. Then join the main airframe and payload sections, making sure that they are sufficiently loose to allow separation when the ejection charge fires. The altimeter should not be switched ON until your rocket is loaded onto the pad to prevent wind gusts, etc from prematurely firing the ejection charge. See the Preflight Checklist section for more details. 12 Loose fit Glue Tight fit Sampling hole Altimeter and eject battery Ejection charge Wadding Seal cable here Choose a motor with a delay that is a few seconds longer than you would normally use with the specific motor/rocket combination. The motor’s charge will then serve as a backup in the event of a primary ejection malfunction. Installation with dual event deployment Again, there are many possible variations of the following installation scheme. Careful attention to the design of your installation will make the difference between a successful installation and a failure. Ground test your setup before launching to insure proper separation and deployment of recovery devices. The basic premise is that you want two separable parachute compartments and a single sealed electronics bay. Perhaps the simplest method involves a basic setup similar to the apogee deployment system described above, with an additional sealed chute compartment behind the nosecone (see figure 7). A small parachute or streamer is ejected from the compartment aft of the payload/electronics section at apogee, and a larger chute is ejected from the compartment between the payload section and nosecone at a lower altitude (set by the Main Deployment switch bank). The ejection cable leading into the forward parachute compartment should be sealed in the same manner as the aft one to prevent ejection gas entry into the payload compartment. Two additional precautions should be made: First, the joint between the payload section and the forward parachute compartment should be either a very tight friction fit or preferably a positive-retention system like screws or retaining pins can be employed. This will prevent the shock of the main chute deployment from 13 separating this joint and ejecting the electronics. Second, the fit of the nosecone to the upper parachute compartment should be tight enough to 46 PRELIMINARY DESIGN REVIEW MEASURING RADIATION AS A FUNCTION OF ALTITUDE USING A HYBRID ROCKET PLATFORM NASA 2010 UNIVERSITY STUDENT LAUNCH INITIATIVE (2010 USLI) HARDING UNIVERSITY FLYING BISON 2010 USLI ROCKET TEAM prevent inadvertent separation at apogee, but loose enough to allow separation upon main chute ejection charge firing. Loose fit Glue Tight fit Sampling hole Altimeter and eject battery Apogee/drogue ejection charge Wadding Seal cable here Main chute ejection charge Wadding Drogue chute Main chute Glue Seal cable here A number of companies sell electronics bays intended for use with larger rocket kits or with your own scratchbuilt design. These bays usually consist of a section of coupler tube sized to fit in the intended airframe, with bulkheads to seal both ends. The front bulkhead is typically glued in place, and the rear bulkhead is made removable to allow access to the electronics. When this type of arrangement is used the third center section of airframe can be eliminated, as the electronics are completely contained within the coupler. If the coupler is held into the forward chute compartment with screws, it can be quickly removed and transferred to another rocket to allow one altimeter to be shared among many rockets. 14 Ejection charges The ejection charges used to deploy your recovery devices can be purchased commercially or made at home. Since ejection charges contain a quantity of explosive black powder, extreme care must be exercised while constructing and handling them. Keep your face and hands away from the end of any ejection charge that has been loaded with powder! Do not look into or reach inside rocket airframes with live ejection charges loaded, and remember that an accidentally- ejected nosecone can severely damage anything in its path. The miniAlt/WD altimeter requires low current electric matches for ejection charge ignition. DaveyFire N28B or Oxral ematches are suggested. A convenient, lower cost alternative for smaller rockets can be made using miniature Christmas tree bulbs. A kit for making this type of charge is available from PerfectFlite, and complete directions are available on our web site for the do-it-yourselfer. Flashbulbs are sometimes used, but are fragile, expensive, bulky, and prone to accidental triggering by weak electrical currents. For increased reliability, multiple igniters can be used with a single charge. The igniters are connected in parallel and attached to the altimeter’s terminal block. If one igniter fails, the other(s) will ignite the charge, preventing ejection failure. The miniAlt/WD provides enough current to fire up to ten parallel connected DaveyFire/Oxral ematches, although two is generally deemed sufficient. Basic ejection charges can be made in the following manner. Cut a section of cardboard tube (the tubing from shirt hangers works well) about 1” long, and use hot-melt glue to fill in a plug at one end. Work the glue in from the end that you want to plug, rotating the tube between your fingers until a solid seal is attained. Set the tube (glue end down) on a piece of paper until the glue cools. When cool, cut away the excess paper and inspect the plug for uniformity of thickness (3/16” to 1/4” is good) and lack of holes. Insert your ejection igniter in the open end of the tube, being careful to not damage the delicate ignition head. Bend the lead wires over the lip of the tube and use masking tape to secure them to the outside of the tube. Set the tube/igniter assembly down, open end up, to prepare for the addition of black powder. Making a stand out of a small block of wood with appropriatelysized holes drilled in it will hold your tubes more securely during the filling/sealing operation. 15 Add the appropriate amount of FFFFg black powder (multiply the volume of the parachute bay in cubic inches by .01 to get grams of black powder) and gently tap the side of the tube to distribute the black powder around 47 PRELIMINARY DESIGN REVIEW MEASURING RADIATION AS A FUNCTION OF ALTITUDE USING A HYBRID ROCKET PLATFORM NASA 2010 UNIVERSITY STUDENT LAUNCH INITIATIVE (2010 USLI) HARDING UNIVERSITY FLYING BISON 2010 USLI ROCKET TEAM the igniter head. Using a section of 1/8” wooden dowel, carefully press a small ball of flameproof wadding in on top of the black powder so that the powder is completely covered. Do not press too hard or you may damage the igniter element. Seal the end of the ejection charge with melted wax or a disc of tape. The purpose of the seal is simply to hold the powder in. You do NOT want to use something stronger like epoxy, which would make the tube rupture upon ignition, possibly damaging your rocket’s airframe. Using a wax or tape seal will keep the ejection charge tubing intact, so that it can be reloaded and reused. If you use molten wax, melt the wax using a flameless method (not a candle!) and keep it away from any open containers of black powder. Your ejection charge is now complete. Store loaded ejection charges in a safe manner, with the igniter wire ends shorted together until immediately prior to use. Since the actual amount of black powder necessary can vary based on a number of parameters (powder type, nosecone/coupler to tube friction, etc.) you should test your ejection charges on the ground before flight. Start with a little less powder, and increase the amount until the airframe separates reliably. Then add 50% as a safety factor to account for variations in friction due to humidity, etc. Operation To insure proper operation of your altimeter and any associated deployment systems, you must observe and adhere to the following sequence of events. If you launch before the altimeter is ready, ground level will not be sampled properly and deployment will not function properly. If you don’t have proper continuity through your ejection charge igniters, the recovery devices will not be deployed and serious rocket/property damage can occur. Sequence of events Prepare your rocket and install the engine before setting up the altimeter. Do not install the igniter into the engine until you are at the launch pad. If you are not using electronic deployment (just using the altitude reporting function) you can ignore the sections of the following text that deal with ejection charges. 16 If you are using electronic deployment, the apogee and main ejection charges and associated igniters should be loaded into your rocket and the wires connected to the altimeter’s ejection charge terminals. The power switch should be OFF (open circuit) and the battery should be connected. Make sure that the apogee and main ejection charge cables are not swapped, and that no wires are shorting together or to any conductive objects. Also insure that adequate wadding or other protection is used to prevent the hot ejection charge gasses from burning your parachute and shock cord. At this point you can have the RSO inspect your rocket (if applicable) and proceed to the launch pad. Install the igniter in the engine and place the rocket on the launcher. Turn the power switch ON and listen to the series of beeps from the altimeter. A one or two digit number, representing the Mach Delay switch settings, will be reported first. If you hear a continuous tone instead, the altimeter’s built-in self test is indicating a problem. Do not attempt to launch if this condition exists! After the Mach Delay setting is reported, the beeper will present a three or four digit number representing the main chute deployment altitude. If the Mach Delay or Main Deployment settings are not reported as expected, turn the altimeter OFF and inspect/correct the switch settings. Another three to five digit number will be reported after the main deployment altitude number. This represents the peak altitude attained on the last flight, as saved in the altimeter’s nonvolatile EEPROM memory. This reading is preserved even when the power is turned off, and is not cleared until a new flight is made. This allows you to retrieve post-flight altitude data from the altimeter even if your rocket is hung up in a tree for weeks with a dead battery! If the battery voltage is OK and you have ejection charges connected properly, the altimeter will now signal continuity with a series of beeps. A single beep every second indicates proper continuity on the apogee charge, two beeps indicates continuity on the main charge, and three beeps indicates continuity on both charges. The continuity beep annunciation will continue until the rocket is launched. If you hear a continuous tone at this point instead, this indicates that the battery low voltage alarm is triggered, signifying that the battery voltage is below acceptable limits. You must replace or recharge the battery if this condition exists. 17 48 PRELIMINARY DESIGN REVIEW MEASURING RADIATION AS A FUNCTION OF ALTITUDE USING A HYBRID ROCKET PLATFORM NASA 2010 UNIVERSITY STUDENT LAUNCH INITIATIVE (2010 USLI) HARDING UNIVERSITY FLYING BISON 2010 USLI ROCKET TEAM The ejection charges are now armed and ready (secondary arming occurs after the altimeter detects launch conditions of 160’ AGL altitude). From this point on you should exercise extreme caution, as you will be working with live charges. Keep your hands, face, and other body parts away from the ejection charges and the nosecone. If the charges should blow prematurely, you do not want to be in the path of the forcefully ejected nosecone or payload section. If continuity is being reported as expected, you can connect the engine’s igniter to the launch system. Your rocket is ready to launch! If continuity is not reported as expected, turn the altimeter power switch OFF and correct the problem. Do not launch without proper continuity! Warning: Launching your rocket before the continuity annunciation will result in failure. Always wait until you hear the continuity beeps (or silence if deployment is not being used) before allowing your rocket to be launched. When you recover your rocket, the altimeter will be beeping to report the peak altitude attained. Since this number is saved in nonvolatile memory, you can safely turn the altimeter OFF at any time. If you want to retrieve the altitude reading at a later time, simply turn the altimeter back on and listen for the third number reported (previous flight altitude). Computer Connection The altimeter can be connected to a computer via the appropriate cable kit and software. This will allow you to access the advanced features of the altimeter (telemetry enable, apogee delay enable, low voltage alarm threshold) and retrieve the saved flight data. Connection to the altimeter must be established before the continuity beep phase or after the flight. Connection is not allowed once the continuity beep phase has begun in order to keep any possible spurious input on the serial data line from terminating the flight (and deployment) sequence. While the altimeter’s commands are typically issued by the data capture software running on a PC or Mac, a complete listing of the commands as of this writing is available at the end of this manual. These commands can be used with a PDA and terminal emulator program for handy field reconfiguration and data retrieval. All commands and returned data are in ASCII text format for ease of access. 18 Preflight Checklist o Check voltage of main battery using an accurate voltmeter with the altimeter switched ON. A 9V alkaline should read > 9V, a 6 cell NiCad should read > 7.8V, and a 7 cell NiCad should read > 9.1V. Replace/ recharge battery if voltage is low. Note: This step is optional, as the altimeter will check battery voltage on power-up. o Prep rocket, install engine, do not install engine igniter. o Make sure power switch is OFF. o Install ejection charges (if used) and wadding/chute protection. o Connect ejection charge leads to altimeter’s ejection charge terminals, making sure that wires do not short together or short to anything else. Do not swap wires to apogee/main charges! o Have your rocket inspected by RSO if applicable, install engine igniter, and place rocket on launch pad. o Turn altimeter power switch ON. Confirm Mach Delay and Main Deployment settings. Last flight altitude will be reported as well. If you hear a continuous tone, turn altimeter OFF and do not fly. o Ejection charge continuity will be annunciated by a series of one, two, or three beeps. Do not launch if continuity status is not as expected! Ejection charges should be considered to be “armed” at this point and body parts kept clear! o If continuity is being reported as expected, attach launch system leads to engine igniter and launch! 19 Testing A simple apparatus for ground-testing the entire ejection system can be made with a small (~1” dia) plastic suction cup and a 15 feet of 1/8” plastic hose. Drill a hole in the center of the suction cup and insert one end of the plastic hose. Glue hose in place if friction fit is not achieved. Tape the suction cup to the outside of the rocket’s airframe such that the air sampling hole in the airframe lines up with the plastic hose i.d. Prep the recovery system as in the checklist above, omitting the rocket engine and its 49 PRELIMINARY DESIGN REVIEW MEASURING RADIATION AS A FUNCTION OF ALTITUDE USING A HYBRID ROCKET PLATFORM NASA 2010 UNIVERSITY STUDENT LAUNCH INITIATIVE (2010 USLI) HARDING UNIVERSITY FLYING BISON 2010 USLI ROCKET TEAM igniter. Place the rocket on a slightly angled launchpad, with the nosecone pointing away from people and other objects. After the system is armed and ready for “launch”, suck on the free end of the plastic hose to create a vacuum within the payload compartment. The altimeter will sense this as a launch condition. When you stop sucking on the hose, the altimeter will sense apogee and the payload section should be ejected from the booster. As you release the vacuum from the hose, the altimeter will sense the lower apparent altitude and will eject the nosecone from the payload section. If the sections do not separate with a reasonable amount of force, additional black powder should be added to the ejection charges to insure reliable separation. The firing channels can also be tested using the computer interface and software. A window under the “Altimeter > Test” menu has buttons for starting the continuity test and firing the igniter channels. While this may be more convenient when testing igniter and ejection charge setups, the complete vacuum test is more thorough, as it closely simulates the entire flight sequence. Cautions • Do not touch circuit board traces or components or allow metallic objects to touch them when the altimeter is powered on. This could cause damage to your altimeter or lead to premature ejection charge detonation. • Exercise caution when handling live ejection charges - they should be considered to be explosive devices and can cause injury or damage if handled improperly. • Do not expose altimeter to sudden temperature changes prior to 20 operation. The resulting circuit drift could cause premature ejection. • Do not allow strong wind gusts to enter the airframe pressure sensing hole - this could cause premature launch detection and ejection. • Do not allow direct sunlight to enter the pressure sensor’s vent hole this could cause premature launch detection and ejection. • Do not allow the altimeter to get wet. Only operate the altimeter within the environmental limits listed in the specifications section. • Check battery voltage(s) before each flight and replace/recharge if low. • Do not rupture pressure sensor diaphragm with excessive pressure or sharp object. • Always follow proper operational sequencing as listed in preflight checklist. Appendix Igniter Sources: Daveyfire............................................................................... N28B 7311 Greenhaven Drive, Suite 100 Sacremento, CA 95831-3572 (916) 391-2674 Countdown Hobbies (dealer) 7 P.T.Barnum Sq. Bethel, CT 06801-1838 (203)790-9010 www.countdownhobbies.com Performance Hobbies (dealer) 442 Jefferson Street NW Washington, DC 20011-3126 (202) 723-8257 www.performancehobbies.com 21 Luna Tech.............................................................................. Oxral 148 Moon Drive Owens Cross Roads, AL 35763 (256) 725-4224 www.pyropak.com PerfectFlite ............................................................................ ECK6 15 Pray Street Amherst, MA 01002 (413) 549-3444 www.perfectflite.com Specifications miniAlt/WD dimensions: 0.90”W x 3.00”L x 0.75”T weight: 20 grams (without battery) 50 PRELIMINARY DESIGN REVIEW MEASURING RADIATION AS A FUNCTION OF ALTITUDE USING A HYBRID ROCKET PLATFORM NASA 2010 UNIVERSITY STUDENT LAUNCH INITIATIVE (2010 USLI) HARDING UNIVERSITY FLYING BISON 2010 USLI ROCKET TEAM operating voltage: 9V nominal (6V - 10V) default low battery alarm: 8.4V operating current: 8 ma typical firing current: 27A peak, 190 mJ energy continuity check current: 8.9μA/V Serial data format: 8 data, no parity, 1 stop, XON/XOFF Serial data rate: 38,400 bps (commands, data) 9,600 bps (telemetry) maximum altitude: 25,000 feet MSL launch detect: 160 feet AGL event 1 output: apogee event 2 output: selectable 300-1700 feet AGL altitude accuracy: +/- .5% typical operating temperature: 0C to 70C 22 Command list Command Action A0 Turn 1 second apogee delay OFF A1 Turn 1 second apogee delay ON A[CR] Report current status of apogee delay ON/OFF C Start continuity beep sequence (send any char to end) D Dump data from last run FD Fire drogue channel FM Fire main channel I Identify altimeter model Lxx Set low voltage alarm threshold to xx/10 volts L[CR] Report current low voltage alarm threshold R Reboot S Report stats (ground, apogee, #samps, machdel, mainalt) T0 Turn telemetry output during flight OFF T1 Turn telemetry output during flight ON T[CR] Report current status of telemetry output ON/OFF V Report firmware version number Pin 1 Pin # Function 1 N/C 2 +5V (do not use) 3 RX data 4 TX data 5 GND 23 3.000” 2.750” Mounting Notes The supplied mounting hardware can be used to attach the altimeter to a 51 PRELIMINARY DESIGN REVIEW MEASURING RADIATION AS A FUNCTION OF ALTITUDE USING A HYBRID ROCKET PLATFORM NASA 2010 UNIVERSITY STUDENT LAUNCH INITIATIVE (2010 USLI) HARDING UNIVERSITY FLYING BISON 2010 USLI ROCKET TEAM mounting plate in your electronics bay. The pressure sensor is mounted on the bottom of the board to minimize the chance of sunlight or wind currents entering the sensing hole. Make sure that at least 1/32” clearance is provided between the mounting plate and the face of the pressure sensor to allow for the proper pressure sensor operation. 24 Warranty All assembled PerfectFlite products include a full three year/36 month warranty against defects in parts and workmanship. Should your PerfectFlite product fail during this period, call or email our Customer Service department for an RMA number and information about returning your product. The warranty applies to the altimeter only, and does not cover the rocket, motor, or other equipment. This warranty does not cover damage due to misuse, abuse, alteration, or operation outside of the recommended operating conditions included with your product. Broken pressure sensor diaphragms due to puncture or exposure to ejection charge pressure/hot gasses are NOT covered under this warranty. Liability Due care has been employed in the design and construction of this product so as to minimize the dangers inherent in its use. As the installation, setup, preparation, maintenance, and use of this equipment is beyond the control of the manufacturer, the purchaser and user accept sole responsibility for the safe and proper use of this product. The principals, employees, and vendors of the manufacturer shall not be held liable for any damage or claims resulting from any application of this product. If the purchaser and user are not confident in their ability to use the product in a safe manner it should be returned to the point of purchase immediately. Any use of this product signifies acceptance of the above terms by the purchaser and user. 25 52 PRELIMINARY DESIGN REVIEW MEASURING RADIATION AS A FUNCTION OF ALTITUDE USING A HYBRID ROCKET PLATFORM NASA 2010 UNIVERSITY STUDENT LAUNCH INITIATIVE (2010 USLI) HARDING UNIVERSITY FLYING BISON 2010 USLI ROCKET TEAM Appendix D: Flight Computer User’s Manual User Manual Version 1.4 Covering MC2 Firmware version 2.0 and later. G-Wiz MC2 / MC2 HiG 1 Table of Contents Limited Warranty and Disclaimer..................................................... 2 How to contact G-Wiz Partners ........................................................ 2 Introduction....................................................................................... 3 Features:............................................................................................. 4 Flight Computer Operation................................................................ 5 Quick Start Hardware Configuration................................................. 6 Easy Guide for Launch Setups:.......................................................... 7 1 Dual parachute deployment using one 9v. battery (No clustering or staging).............................................................................................. 7 2. Dual parachute deployment with dual batteries (No clustering or staging)............................................................................................... 9 3. Second Stage plus dual parachute deployment with dual batteries ............................................................................................................ 10 4. Single parachute deployment at apogee with one 9v. ......... 12 5. Cluster ignition, plus single parachute deployment at apogee using dual batteries ............................................................................................................ 13 Quick Start Software Configuration .................................................. 15 Mounting the Flight Computer............................................................ 17 Hardware ............................................................................................ 18 Software............................................................................................... 21 Configuration..................................................................................... 22 Read Memory / Read Multiple ........................................................ 23 Wipe Memory..................................................................................... 23 Bench Testing.................................................................................... 24 Calibration.......................................................................................... 25 Sensor Statistics................................................................................ 26 Firmware Update............................................................................... 27 Appendix A–Exported Data................................................................ 28 Appendix B–Mechanical Drawing ...................................................... 29 Appendix C - Specifications................................................................. 30 Appendix D–Installing USB Drivers on Macintosh............................. 31 Appendix E–Installing USB Drivers on Windows XP....................... 32 NOTE: This unit has not been tested with Hybrids at this time. We will post hybrid testing info, and a firmware update (if needed) when we have this data. G-Wiz MC2 / MC2 HiG 2 Limited Warranty and Disclaimer G-Wiz Partners warrants the G-Wiz MC2 and G-Wiz MC2 HiG Flight Computers to be free from defects in materials and workmanship and remain in working order for a period of 180 days. If the unit fails to operate as specified, the unit will be repaired or replaced at the discretion of G-Wiz Partners, providing the unit has not been damaged, modified, or serviced by anyone except for the manufacturer. G-Wiz MC2 and G-Wiz MC2 HiG Flight computers are sold as an experimental accessory only. Due to the nature of experimental electronic devices, especially when used in experimental carriers such as rockets, the 53 PRELIMINARY DESIGN REVIEW MEASURING RADIATION AS A FUNCTION OF ALTITUDE USING A HYBRID ROCKET PLATFORM NASA 2010 UNIVERSITY STUDENT LAUNCH INITIATIVE (2010 USLI) HARDING UNIVERSITY FLYING BISON 2010 USLI ROCKET TEAM possibility of failure can never totally be removed. The owners, employees, vendors and contractors of GWiz Partners shall not be liable for any special, incidental, or consequential damage or expense directly or indirectly arising from the customer or anyone‟s use, misuse, or inability to use this device either separately or in combination with other equipment or for personal injury or loss or destruction of other property, for experiment failure, or for any other cause. It is up to the user, the experimenter, to use good judgment and safe design practices and to properly pre-test the device for its intended performance in the intended vehicle. It is the user or experimenter‟s responsibility to assure the vehicle will perform in a safe manner and that all reasonable precautions are exercised to prevent injury or damage to anyone or anything. WARNING: Do not use this device unless you completely understand and agree with all the above statements and conditions. First time use of the G-Wiz MC2 or G-Wiz MC2 HiG Flight Computer signifies the user‟s acceptance of these terms and conditions How to contact G-Wiz Partners Please see our website at: http://www.gwiz-partners.com. Our web site has the latest versions of all our user manuals, Device Firmware, FlightView Software updates, and email contact information. G-Wiz MC2 / MC2 HiG 3 Introduction After reading this manual, if you have any questions or problems with either your flight computer or FlightView software, please visit us on the web at: http://www.gwiz-partners.com or write us at: [email protected] or at: G-Wiz Partners, PO Box 320103 Los Gatos, CA 95032-0101. A FAQ is maintained on the web site, and new versions of FlightView are posted there free for download. The G-Wiz MC2 and HiG flight computers are precision state-of-the-art recording altimeters that utilize dual sensors, both a barometer and accelerometer, to integrate, operate and record flight data for model and high power rockets. These are multi-functional units, and the MC2 HiG is operational within the extraordinary range of +/- 100 G‟s of acceleration; the MC2 is capable of +/- 50 G‟s. The unique shunt plug in the MC‟s allow the battery power and circuit continuity to be monitored and displayed while still plugged in, yet the charges are made safe. MC2 can control flight events for up to three separate flight operations: apogee deployment, low altitude deployment, and cluster or staging. In addition, MC2 has a 4th output port that is fully programmable. MC2‟s keep track of multiple flights by recording the accelerometer sensor data and the barometric sensor data in a 128k NVRAM. MC2‟s sophisticated firmware algorithms take full advantage of having a dual sensor system (the on-board accelerometer and barometric pressure sensor). The processor at the heart of these 2nd generation flight computers has an integrated 12-bit A to D converter along with a CPU core executing instructions at a rate of over 4 million instructions per second! They come standard with high current, open drain, power MOSFET channels initiating the pyrotechnic events. The G-Wiz Flight Computers use proprietary firmware algorithms to determine the key events in a rockets trajectory. 54 PRELIMINARY DESIGN REVIEW MEASURING RADIATION AS A FUNCTION OF ALTITUDE USING A HYBRID ROCKET PLATFORM NASA 2010 UNIVERSITY STUDENT LAUNCH INITIATIVE (2010 USLI) HARDING UNIVERSITY FLYING BISON 2010 USLI ROCKET TEAM The key events monitored are: Launch Booster burn-out Sustainer ignition (when applicable) Sustainer burn-out (when applicable) Coast Apogee (both inertial and barometric) Low altitude deployment Landed When used with proper batteries and pyrotechnic devices, these flight computers can air-start clusters or perform flawless staging, deploy a drogue at apogee and a main chute at programmable altitudes. You can also deploy a single chute at apogee. The peak altitude (determined by barometric pressure) is beeped out after the rocket has landed. Flight data analysis is accomplished with our FlightView software, which runs on PC and Power Mac‟s (and possibly others upon request). [FlightView is a Java application] FlightView will display the measured flight acceleration, inertial velocity, and barometric altitude in relation to the time in which the various flight events occurred. G-Wiz MC2 / MC2 HiG 4 Features: Beeper to indicate altitude and status, with blue status LED Continuous CPU and Pyro Battery monitoring prior to launch. Continuous continuity monitoring, prior to launch. Jumper to select between Cluster or Stage on Pyro channel 0 When used for Staging, can be set to 1st, 2nd, or 3rd stage. All channels have an optional timer delay before event trigger. 0-15 seconds in .1sec increments On board Safety Shunt, and terminals for optional extern shunt. Single battery, low current mode. Or dual battery high current mode (8A max) Recording at 33 samples per second, 12 bits per sample. RS-232 or USB Connections Configurable low-altitude. Can be set in 10 foot/meter increments to 2550 feet / meters. Metric or English for low-altitude configuration and max altitude readout. Reverse protection diode to protect against accidentally connecting a battery backwards. 4th output channel, totally programmable. Optional break-wire use for launch detect. Telemetry output (for future use) Capable of recording multiple flights. Barometric altitude over 70K feet MSL Maximum acceleration of 56Gs (MC2) or 112Gs (MC2 HiG) Firmware in Flash memory, and upgradeable by user. G-Wiz MC2 / MC2 HiG 5 Flight Computer Operation Power On When First powered on, the LED will light for 1-2 seconds (with no sound), then start flashing in time with the beeper. The normal sequence is: 1. One or Two medium beeps (one for Cluster, 2 for Stage) 2. Half second pause 3. One or Two medium beeps (one if recording will start at beginning of memory, 2 if not) 4. Half second pause 5. A single quick“chirp”or double“chirp”for each Pyro ports (one means good continuity) 6. 1 second pause 7. Repeat from 1 55 PRELIMINARY DESIGN REVIEW MEASURING RADIATION AS A FUNCTION OF ALTITUDE USING A HYBRID ROCKET PLATFORM NASA 2010 UNIVERSITY STUDENT LAUNCH INITIATIVE (2010 USLI) HARDING UNIVERSITY FLYING BISON 2010 USLI ROCKET TEAM Where in step 1, a single beep indicates that pyro 1 will be used for Clustering (i.e. triggered on launch detect), and 2 beeps indicates staging. In step 3, on MC2, a single beep indicates that recording will begin at the begging of internal memory. If you have flown several times, this means you have run out of memory, and are about to start writing over memory. Two beeps means that you have previous flights recorded, and have at least 1 minute of recording space left. The“chirps”in step 5 indicate continuity of the pyro ports. Starting with port 0, one chirp is“Good”continuity, 2 chirps is“Bad”continuity. Occasionally, this sequence will start with a two-tone“warble”followed by 2 beeps. This means that either the pyro or CPU battery is low, and should be changed. It can also be caused by forgetting to place a jumper wire from CBatt+ to PBatt+ when using just one battery. Error Indication If an error is detected at power on, it will cause the beeper to emit a two-tone“warble”instead of the usual beep sequence above. If the problem is only low-power, then the above sequence will be followed after the warble. It is OK to fly, if you don‟t have to wait on the pad long. More serious problems are indicated by a series of beeps after the warble, with the warble–beep pattern repeated. If you get this: Do not Fly! The number of beeps is used to determine the problem. The two most likely are: 1 Beep–Power On Self Test Failure. Usually caused by a damaged sensor. You should contact G-Wiz. 2 Beeps–Very Low Power–Change Battery Immediately! Landing After landing, the MC computer will begin the readout phase by beeps from the piezo beeper. The numbers are beeped out in quick sequences with very brief pauses between each number sequence. ZERO is represented as a long beeeep, 1 is a quick chirp, 2 is 2 chirps, and so on. After the number sequences the unit will pause for ONE FULL SECOND and then repeat the number sequences. For example, 5081 feet of altitude would be represented in beeps by: chirp chirp chirp chirp chirp (5)–beeeep (0)–chirp chirp chirp chirp chirp chirp chirp chirp (8)– chirp (1)– pause–then repeat the sequence, in other words, 5 chirps–quick pause–1 long beep (for zero)–quick pause–8 quick chirps–quick pause–1 chirp–then a full one second pause (noting the end of the sequence)–then repeat the number sequences. If the example is 12,112 feet it would equal: chirp–chirp chirp–chirp–chirp–chirp chirp– pause–repeat sequence. In the Configuration dialog, you can optionally elect to get maximum speed as well. If this option is selected, altitude and speed readouts will alternate. The status LED will be on for the entire altitude readout, and off for the entire speed readout. The computer must be turned off (then on) before launching again. Data will not be lost. G-Wiz MC2 / MC2 HiG 6 Quick Start Hardware Configuration 56 PRELIMINARY DESIGN REVIEW MEASURING RADIATION AS A FUNCTION OF ALTITUDE USING A HYBRID ROCKET PLATFORM NASA 2010 UNIVERSITY STUDENT LAUNCH INITIATIVE (2010 USLI) HARDING UNIVERSITY FLYING BISON 2010 USLI ROCKET TEAM There are two jumpers on this computer, one used to switch pyro 0 from cluster to stage use, the other to switch high or low current limit on all outputs. MC2 / MC2 HiG: Use the following guide to wire batteries, charges and igniters to the terminal bar. This information is also printed on the PC board under the connector, but due to a mix-up, is printed backwards. Easy Guide for Launch Setups: 1 Dual parachute deployment using one 9v. battery (No clustering or staging). [A single battery powers both the computer and firing devices] 1.1.Run a jumper wire from the“CPU Power”+ (or CBatt+) terminal (TB2 Pin 6 on the terminal bars) to the“Pyro Power”+ (or PBatt+) terminal (TB1 Pin 10 on the terminal bars) (See photo 1 below) 57 PRELIMINARY DESIGN REVIEW MEASURING RADIATION AS A FUNCTION OF ALTITUDE USING A HYBRID ROCKET PLATFORM NASA 2010 UNIVERSITY STUDENT LAUNCH INITIATIVE (2010 USLI) HARDING UNIVERSITY FLYING BISON 2010 USLI ROCKET TEAM 1.2.Pull the small twin pin jumper connector OFF of the JP1 twin pins (located about 1/3 the way up the board from the bottom–and located on the far side from the terminal bar.) This sets it for low pyro current, which is best when using a single battery. [Use Davyfire 28b‟s to fire your charges in the low current mode, as any other electric match device will most likely not work–unless using two batteries and the High current mode with the twin pin JP1 jumper ON (See JP1 being removed in photo 3 below) 1.4. This is the only jumper you have to deal with for dual deployment with a single battery–all other jumpers should be ON the twin pin connectors. 1.5. Connect the power source, a 9 volt battery (preferably with some type of switch in the circuit), to the nose end of the terminal bar (either TB1 Pins 9 & 10 or TB2 Pins 5 & 6). 1.6. With the shunt plug in place (or power disconnected), wire the Drogue chute firing device to the Apogee + and–terminals (TB1 pins 3 and 4) (Davyfire 28b firing devices are not polarity sensitive). (If testing, test lights may not have the proper resistance to signal the LED and beeper) Shunt Plug JumperWire G-Wiz MC2 / MC2 HiG 8 1.7. Wire the Main chute firing device to the Low Alt + and–terminals (TB1 pins 5 and 6). 1.8. Once all the correct firing devices are hooked up you can test the circuits. Turn on your power switch to the altimeter with the shunt plug plugged in. Once you‟ve tested it by listening to the beep sequence or observing the status LED, you can either leave it on or turn it off until the rocket is mounted on the pad. The launch sensor is pretty robust and the shunt plug will not allow the charges to fire.When you turn on the power to the altimeter the beeper and status LED will: 58 PRELIMINARY DESIGN REVIEW MEASURING RADIATION AS A FUNCTION OF ALTITUDE USING A HYBRID ROCKET PLATFORM NASA 2010 UNIVERSITY STUDENT LAUNCH INITIATIVE (2010 USLI) HARDING UNIVERSITY FLYING BISON 2010 USLI ROCKET TEAM Emit a two quick tones (signaling the battery is OK, and that the cluster/stage jumper is set to stage) If not, it will warble. If it warbles the battery is getting low. If it warbles fast the battery is too low to function properly (if no sound check the required jumper wire for single battery use running from CBatt+ to PBatt+). Then emit one or two quick tones (signaling that recording will start at the beginning (one tone) or not (two tones) ) Then emit two chirps (signaling the cluster and staging channel has nothing connected to it) Then emit a single chirp (signaling the apogee channel firing device, a Davyfire N28B has continuity). Two quick tones means there is No continuity. Then emit a single chirp (signaling the main chute channel Davyfire N28B has continuity). Two quick tones means there is No continuity. Then emit two chirps (signaling the user channel has nothing connected to it) Then it will pause and cycle the beep pattern again. 1.9. Photo 4 below shows the altimeter connected to a single battery, and set to deploy a drogue at apogee and a main at 800 feet (the default). Be sure to remove the red shunt plug JP2/3 only when the rocket is mounted on the pad and ready to launch. 2. Dual parachute deployment with dual batteries (No clustering or staging). [One battery powers the computer and one powers the pryo channels] 2.1 To use a dual battery setup DO NOT use a jumper wire from the computer battery + (CBatt+) (TB2 pin 6) to the pyro battery +(PBatt+) (TB1 pin 10) terminals. Connect two batteries. A 9 volt battery for the computer should be wired to the“nose end”of terminal bar 2 (TB2) (positive + to CBatt+ Pin 6 and negative–to CBatt- Pin 5) (which should have some method to switch the power to the computer on and off). A second battery (9 to 15 volts) should be wired to the pyro power terminals terminal bar 1 (TB1), designated as“pyro”(+ to PBatt+ Pin 10, and –to PBatt- Pin 9). 2.2 The small twin pin jumper at JP1 should be ON the pins (located about ½ the way up the board from the bottom–and on the far side from the terminal bar.) This sets the altimeter for high pyro current, which should only be used in the dual battery configuration. (See photo 5) 59 PRELIMINARY DESIGN REVIEW MEASURING RADIATION AS A FUNCTION OF ALTITUDE USING A HYBRID ROCKET PLATFORM NASA 2010 UNIVERSITY STUDENT LAUNCH INITIATIVE (2010 USLI) HARDING UNIVERSITY FLYING BISON 2010 USLI ROCKET TEAM 2.3 This is the only jumper you have to deal with for normal single motor launches with dual deployment parachutes, even though you‟re using dual batteries. 2.4 Once all the correct firing devices are hooked up you can test the circuits. Turn on your power switch to the altimeter with the shunt plug plugged in. Once you‟ve tested it by listening to the beep sequence or observing the status LED, you can either leave it on or turn it off until the rocket is mounted on the pad. The launch sensor is pretty robust and the shunt plug will not allow the charges to fire.When you turn on the power to the altimeter the beeper and status LED will: Emit a two quick tones (signaling the battery is OK, and that the cluster/stage jumper is set to stage) If not, it will warble. If it warbles the battery is getting low. If it warbles fast the battery is too low to function properly (if no sound check the required jumper wire for single battery use running from CBatt+ to PBatt+). Then emit one or two quick tones (signaling that recording will start at the beginning (one tone) or not (two tones)) Then emit two chirps (signaling the cluster and staging channel has nothing connected to it) Then emit a single chirp (signaling the apogee channel firing device, a Davyfire N28B has continuity). Two quick tones means there is No continuity. Then emit a single chirp (signaling the main chute channel Davyfire N28B has continuity). Two quick tones means there is No continuity. Then emit two chirps (signaling the user channel has nothing connected to it) Then it will pause and cycle the beep pattern again. 2.5 In photo 6 the altimeter is connected to separate batteries to power the computer and the pryo channels. Charges are wired to deploy both apogee and low altitude parachutes (main set at the default of 800 feet). Be sure to remove the red shunt plug JP2/3 only when the rocket is mounted on the pad and ready to launch. 3. Second Stage plus dual parachute deployment with dual batteries [One battery powers the computer and one powers the pryo channels] 3.1. To use a dual battery setup DO NOT use a jumper wire from the computer battery + (CBatt+) (TB2 pin 6) to the pyro battery +(PBatt+) (TB1 pin 10) terminals. Connect two batteries. A 9 volt battery for the CPU should be wired to the“nose end”of terminal block 2 (TB2) (positive + to CBatt+ Pin 6 and negative–to CBatt- Pin 5) (which should have some method to switch the power to the computer on and off). A second battery (9 to 15 volts) should be wired to the pyro power terminals terminal bar 1 (TB1), designated as“pyro”(+ to PBatt+ Pin 10, and –to PBatt- Pin 9). In the Staging mode the unit fires an ignition device for the staging motor (or motors) when it detects motor burnout of the booster motor (or motors). In the Cluster mode the unit fires the cluster motor (or motors) as soon as it detects and confirms launch, which occurs at approximately 0.5 seconds from the first movement of the rocket. Consider that there is also a delay factor from the time the igniter fires until the time the motor (or motors) 60 PRELIMINARY DESIGN REVIEW MEASURING RADIATION AS A FUNCTION OF ALTITUDE USING A HYBRID ROCKET PLATFORM NASA 2010 UNIVERSITY STUDENT LAUNCH INITIATIVE (2010 USLI) HARDING UNIVERSITY FLYING BISON 2010 USLI ROCKET TEAM actually ignite. 3.2. The small jumper connector should be ON the JP1 twin pins (located about ? the way up the board from the bottom–and located on the far side from the terminal bar). This sets it for High pyro current (which is required when setting the altimeter for any type of staging or clustering). (See photo 7 below) 3.3. Set the system to stage. Staging (JP8 ON) fires a motor (or motors) when the booster burns out. Set it to stage by plugging in the JP8 twin pin jumper. The JP8 jumper is located just forward of the status LED on the terminal bar side of the board. (See photo 8 below) 3.4. Once all the correct firing devices are hooked up you can test the circuits. Turn on your power switch to the altimeter with the shunt plug plugged in. Once you‟ve tested it by listening to the beep sequence or observing the status LED, you can either leave it on or turn it off until the rocket is mounted on the pad. The launch sensor is pretty robust and the shunt plug will not allow the charges to fire.When you turn on the power to the altimeter the beeper and status LED will: Emit two quick tones (signaling the battery is OK, and that the cluster/stage jumper is set to stage) If not, it will warble. If it warbles the battery is getting low. If it warbles fast the battery is too low to function properly (if no sound check the required jumper wire for single battery use running from CBatt+ to PBatt+). Then emit one or two quick tones (signaling that recording will start at the beginning (one tone) or not (two tones)) Then emit a single chirp (signaling the cluster and staging channel firing device, a Davyfire N28B has continuity). Two quick tones means there is No continuity. Then emit a single chirp (signaling the apogee channel firing device, a Davyfire N28B has continuity). Two quick tones means there is No continuity. Then emit a single chirp (signaling the main chute channel Davyfire N28B has continuity). Two quick tones means there is No continuity. 61 PRELIMINARY DESIGN REVIEW MEASURING RADIATION AS A FUNCTION OF ALTITUDE USING A HYBRID ROCKET PLATFORM NASA 2010 UNIVERSITY STUDENT LAUNCH INITIATIVE (2010 USLI) HARDING UNIVERSITY FLYING BISON 2010 USLI ROCKET TEAM Then emit two chirps (signaling the user channel has nothing connected to it) Then it will pause and cycle the beep pattern again. 2.1 In photo 9 the altimeter is connected to separate batteries to power the computer and the pryo channels, charges are wired for apogee and low altitude deployment (in this case, the default 800 feet) and a stage sequence (JP8 ON) (which fires when the altimeter senses the booster motor burnout). Be sure to remove the red shunt plug JP2/3 only when the rocket is mounted on the pad and ready to launch. 4. Single parachute deployment at apogee with one 9v. Follow the instructions in section 1.1 just as you would when setting up for dual deployment with a single battery. The only difference is that there is but one firing device to connect. Omit step 6 (connecting a device to the low altitude pyro ports).With the shunt plug in place (or power disconnected), be sure you connect your firing device to the Apogee + and–terminals (pin 3 and 4) [Use Davyfire 28b‟s to fire your charges in the low current mode, as any other electric match device will most likely not work–unless using two batteries and the High current mode with the twin pin JP1 jumper ON] Once all the correct firing devices are hooked up you can test the circuits. Turn on your power switch to the altimeter with the shunt plug plugged in. Once you‟ve tested it by listening to the beep sequence or observing the status LED, you can either leave it on or turn it off until the rocket is mounted on the pad. The launch sensor is pretty robust and the shunt plug will not allow the charges to fire.When you turn on the power to the altimeter the beeper and status LED will: Emit two quick tones (signaling the battery is OK, and that the cluster/stage jumper is set to stage) If not, it will warble. If it warbles the battery is getting low. If it warbles fast the battery is too low to function properly (if no sound check the required jumper wire for single battery use running from CBatt+ to PBatt+). Then emit one or two quick tones (signaling that recording will start at the beginning (one tone) or not (two tones)) Then emit two chirps (signaling the cluster and staging channel has nothing connected to it) Then emit a single chirp (signaling the apogee channel firing device, a Davyfire N28B has continuity). Two quick tones means there is No continuity. Then emit a single chirp (signaling the main chute channel Davyfire N28B has continuity). Two quick tones means there is No continuity. Then emit two chirps (signaling the user channel has nothing connected to it) Then it will pause and cycle the beep pattern again. 62 PRELIMINARY DESIGN REVIEW MEASURING RADIATION AS A FUNCTION OF ALTITUDE USING A HYBRID ROCKET PLATFORM NASA 2010 UNIVERSITY STUDENT LAUNCH INITIATIVE (2010 USLI) HARDING UNIVERSITY FLYING BISON 2010 USLI ROCKET TEAM Photo 10 below shows the altimeter set to be powered by a single battery and wired up and set to deploy a single parachute at apogee. Be sure to remove the red shunt plug JP2/3 only when the rocket is mounted on the pad and ready to launch. 5. Cluster ignition, plus single parachute deployment at apogee using dual batteries [One battery powers the computer and one powers the pryo channels] To use a dual battery setup DO NOT use a jumper wire from the computer battery + (CBatt+) (TB2 pin 6) to the pyro battery +(PBatt+) (TB1 pin 10) terminals. Connect two batteries. A 9 volt battery for the computer should be wired to the“nose end”of terminal block 2 (TB2) (positive + to CBatt+ Pin 6 and negative–to CBatt- Pin 5) (which should have some method to switch the power to the computer on and off). A second battery (9 to 15 volts) should be wired to the pyro power terminals terminal block 1 (TB1), designated as“pyro”(+ to PBatt+ Pin 10, and –to PBatt- Pin 9). In the Staging mode the unit fires an ignition device for the staging motor (or motors) when it detects motor burnout of the booster motor (or motors). In the Cluster mode the unit fires the cluster motor (or motors) as soon as it detects and confirms launch, which occurs at approximately 0.5 seconds from the first movement of the rocket. Consider that there is also a delay factor from the time the igniter fires until the time the motor (or motors) actually ignite. 5.1. The small jumper connector should be ON the JP1 twin pins (located about ? the way up the board from the bottom–and located on the far side from the terminal bar.) This sets it for High pyro current 5.2. Set the system to Cluster. When Cluster firing (JP8 OFF) motor(s) the igniters will fire at 0.5 seconds 63 PRELIMINARY DESIGN REVIEW MEASURING RADIATION AS A FUNCTION OF ALTITUDE USING A HYBRID ROCKET PLATFORM NASA 2010 UNIVERSITY STUDENT LAUNCH INITIATIVE (2010 USLI) HARDING UNIVERSITY FLYING BISON 2010 USLI ROCKET TEAM after the rocket begins moving (the ignition of motors usually lags behind this). Set the altimeter for clusters by removing the jumper from JP8 twin pins. The JP8 jumper is located just forward of the status LED on the terminal bar side of the board. (See photo 12 below) 5.3. Once all the correct firing devices are hooked up you can test the circuits. Turn on your power switch to the altimeter with the shunt plug plugged in. Once you‟ve tested it by listening to the beep sequence or observing the status LED, you can either leave it on or turn it off until the rocket is mounted on the pad. The launch sensor is pretty robust and the shunt plug will not allow the charges to fire.When you turn on the power to the altimeter the beeper and status LED will: Emit one long tone (signaling the battery is OK, and that the cluster/stage jumper is set to cluster) If not, it will warble. If it warbles the battery is getting low. If it warbles fast the battery is too low to function properly (if no sound check the required jumper wire for single battery use running from com bat + to pyro bat +). Remove Remove G-Wiz MC2 / MC2 HiG 14 Then emit one or two quick tones (signaling that recording will start at the beginning (one tone) or not (two tones)) Then emit a single chirp (signaling the cluster and staging channel firing device, a Davyfire N28B has continuity). Two quick tones means there is No continuity. Then emit a single chirp (signaling the apogee channel firing device, a Davyfire N28B has continuity). Two quick tones means there is No continuity. Then emit two chirps (signaling the main chute channel has nothing connected to it Then emit two chirps (signaling the user channel has nothing connected to it) Then it will pause and cycle the beep pattern again. 5.4. In photo 13 the altimeter is connected to separate batteries to power the computer and the pryo channels, charges are wired for apogee and low altitude deployment (in this case, the default 800 feet) and a stage sequence (JP8 OFF) (which fires when the altimeter senses the booster motor burnout). Be sure to remove the red shunt plug JP2/3 only when the rocket is mounted on the pad and ready to launch. Quick Start Software Configuration By default, the MC2 computer comes configured to behave just like its first generation cousin. Staging is for first 64 PRELIMINARY DESIGN REVIEW MEASURING RADIATION AS A FUNCTION OF ALTITUDE USING A HYBRID ROCKET PLATFORM NASA 2010 UNIVERSITY STUDENT LAUNCH INITIATIVE (2010 USLI) HARDING UNIVERSITY FLYING BISON 2010 USLI ROCKET TEAM stage, low altitude in 800 ft. English units are used, no delays are used. If this is what you want, no more need be done. To change something: 1. Make Sure that FlightView is installed on your computer, and that you have an available serial port and G-Wiz serial interface or an available USB port and G-Wiz USB interface.. a. Insert CD-Rom and open“Install.html”or go to http://www.gwizpartners. com/Downloads/install/install.html using your computer‟s browser. b. Follow the instructions to install FlightView for your computer. 2. (Optional) Connect G-Wiz USB interface. a. Connect interface board to Flight Computer by inserting the 8 pin connector (JP5) to the matching socket on the MC2. See photo 14 below. b. Connect USB Cable to interface board and computer. c. Connect power to the MC2. d. The install process places the drivers for your machine in a directory under your install directory. Under Windows, a dialog will appear asking how to install the drivers. Do not search the internet, or the computer. Instead, elect to tell it where the drivers are. If you installed at the default location, this will be: C:\Program Files\GWizViewer\usbDrivers. This process is shown in detail for Windows XP in Appendix E. Macintosh users should follow the procedure in described in Appendix D. 3. (Optional) Connect G-Wiz RS-232 serial interface. a. Connect interface board to Flight Computer by inserting the 8 pin connector (JP5) to the matching socket on the MC2. See photo 14 below. b. Connect power to MC2. c. Connect a Straight Through serial cable between interface and computer. Note that this is different then the original MC. 4. Run FlightView a. Select“G-Wiz / Connect”from the menus. A dialog will appear asking which port the G-Wiz is connected to. Note that the USB interface will install as a serial port. On a PC, it will generally be a COM port larger then“4”. b. Choose the correct port, and click“OK”. It should say“connected to G-Wiz MC2”in the bottom left of the screen. c. Select“G-Wiz / Configure”. d. The following Dialog Box will appear, allowing you to change the pyro port configuration. e. See the“FlightView : Configuration”later in this manual for details. G-Wiz MC2 / MC2 HiG 16 65 PRELIMINARY DESIGN REVIEW MEASURING RADIATION AS A FUNCTION OF ALTITUDE USING A HYBRID ROCKET PLATFORM NASA 2010 UNIVERSITY STUDENT LAUNCH INITIATIVE (2010 USLI) HARDING UNIVERSITY FLYING BISON 2010 USLI ROCKET TEAM f. Press“Upload & Exit”when done. The new configuration will not be loaded until the Flight Computer has been turned off, then on again. g. More detail is given in the“Software”section. G-Wiz MC2 / MC2 HiG 17 Mounting the Flight Computer The flight computer must be mounted in the correct orientation to operate. It will NOT operate otherwise. The “nose”end is indicated on the board, but to confirm the orientation, the terminal block should to be at the rear, or aft end (the nose end is also indicated in photo 1). The computer should be mounted lengthwise with the axis of the rocket. It‟s designed to be mounted with 4-40 hardware. The computer must also be protected from the ejection gasses. Ejection gasses are corrosive and will damage the flight computer, voiding your warranty. If you are mounting to carbon fiber airframes be certain the shunt plug doesn‟t ground to the carbon fiber airframe, as carbon conducts electricity. See the following pictures to confirm the orientation for mounting. Hardware The Flight Computer The MC2 and MC2 HiG look identical. From the top: 66 PRELIMINARY DESIGN REVIEW MEASURING RADIATION AS A FUNCTION OF ALTITUDE USING A HYBRID ROCKET PLATFORM NASA 2010 UNIVERSITY STUDENT LAUNCH INITIATIVE (2010 USLI) HARDING UNIVERSITY FLYING BISON 2010 USLI ROCKET TEAM Major components: CPU–The microprocessor that controls everything. The“Brain”of the Flight Computer. NVRAM–The memory where recorded data is stored. MOSFET–The are 1 of these for every pyro port (plus a few more). They are capable of switching up to 8 amps of current if the pyro battery used can supply it. Accelerometer–The sensor used to measure acceleration. Pressure Sensor–Used to measure barometric pressure. Barometric pressure is used to calculate the pressure altitude of the rocket, based on the NASA Standard Atmosphere Model. Terminal Blocks–Used connect wires to the Flight Computer. Electric matches, etc. Batteries in the 9-12v range should be used for both pyro and CPU power. The“break wire”and“external shunt”connections are basically switch inputs. Connecting a wire between the two terminals of the“external shunt”is the same as inserting the shunt into the red connectors. This connection must be broken for the pyro ports to be functional. The“break wire”input is similar. Connect a wire between these two terminals, and power the computer on. If configured, when the wire is broken (switch opened), launch will be detected. If not configured, an event will be generated instead. JP2 & JP3–Safety shunt. If the safety pin is inserted into these connectors, the pyro ports will be unable to fire. They can still detect continuity, however. JP1–Low power jumper. With this jumper IN, the computer will be in low power mode, which limits the current to each pyro port to 1 amp. This is sufficient for low current electric matches, such as the DaveyFire 28B. In low current mode, one battery can safely be used, and a wire jumper connected between pyro and CPU battery“+”terminals. We recommend using the Bench Test feature (decribed later) to test electric matches before flight. 67 PRELIMINARY DESIGN REVIEW MEASURING RADIATION AS A FUNCTION OF ALTITUDE USING A HYBRID ROCKET PLATFORM NASA 2010 UNIVERSITY STUDENT LAUNCH INITIATIVE (2010 USLI) HARDING UNIVERSITY FLYING BISON 2010 USLI ROCKET TEAM JP8–Cluster / Stage jumper. When IN, pyro 0 will fire at burnout (or the 2nd or 3rd burnout, depending on config). When OUT, pyro 0 will fire when launch is detected, approximately half a second into the flight. J2–This connector, if installed, is used at the factory to install or upgrade the Flight Computer‟s software. JP6–Telemetry output. Connects to a future G-Wiz product. JP5–Communications interface socket. Connects to either the G-Wiz USB interface or G-Wiz RS-232 interface. Beeper–Used to indicate status audibly. Status LED–Used to give a visual status indication. Using the Safety Shunt The MC2 has 2 Safety shunt inputs: The JP 2 / 3 pair, and terminals 1 & 2 of Terminal block 2. These are parallel inputs, and are identical. The built-in shunt (JP 2 / 3) should be used if the unit is mounted near enough to the airframe that the shunt can be inserted through a hole. If this is not possible, you may mount an external shunt in or near the airframe, and wire it to the Terminal Block. In normal use, the shunt should be inserted before the unit is powered on, and should be removed after all other prep work on the pad. Removing this shunt arms the pyro outputs, enabling them to fire when signaled. Using a Break Wire MC2 has a fairly stiff requirement for launch detect, require about 2.5g for half a second or so. Higher accelerations will result in shorter detect times, but even a 50g launch will need about a tenth of a second. If your launch will be faster (some zinc–sulfur rockets have very high G thrusts for very short periods), or slower (low thrust to weight) then this, you can use a break-wire for launch detect. The wire should be connected between terminal bock 2‟s pins 3 & 4, and be placed across the nozzle of the motor, or other location where launch will cause the wire to break. MC2 needs to be configured for this type of launch (See figure 3, below). If not configured as a launch detect, this input can be used to trigger Pyro 3 on make or break during flight. G-Wiz MC2 / MC2 HiG 20 Linking to a PC Connect to an available RS232 serial (COM) port on your computer using a 9-pin male to female subminiature„D‟connector cable wired straight through (also known as a“serial printer cable”). These cables are readily available at most computer stores. Linking to an iMac or Power Mac If you are using a MAC, you‟ll want to use the G-Wiz USB interface. The driver for this should have been installed when FlightView 2.x was installed. If not, look in the FlightView CD under the“Drivers:OS X”or“Drivers:OS9” directory. Connect a 9 volt battery to the altimeter. Power up the G-Wiz flight computer. You‟ll hear a series of beeps (it will quit once you‟ve linked to the software). If using a single 9 volt battery connect it to the PBatt+ (TB1 pin 10) and PBatt–(TB1 pin 9) terminals, taking care to be sure the polarity is correct. Connect a jumper wire from the PBatt+ (TB1 pin 10) on the terminal block to the 68 PRELIMINARY DESIGN REVIEW MEASURING RADIATION AS A FUNCTION OF ALTITUDE USING A HYBRID ROCKET PLATFORM NASA 2010 UNIVERSITY STUDENT LAUNCH INITIATIVE (2010 USLI) HARDING UNIVERSITY FLYING BISON 2010 USLI ROCKET TEAM CBatt+ (TB2 pin 6) terminal, just as you would for any single battery use (see photo 10). If using dual batteries, connect one 9 volt battery to the PBatt + (TB1 pin 10) and–(TB1 pin 9) terminals, taking care to be sure the polarity is correct. Then connect another to the CBatt + (TB2 pin 6) and–(TB2 Pin 5) terminals (in this situation do not use a jumper wire). In other words, connect the batteries just as you would for any dual battery use. Again, take care to be sure the polarity is correct to each battery. See photo 13. G-Wiz MC2 / MC2 HiG 21 Software FlightView MC2 Features Starting with version 2.1 FlightView supports MC2 configuration and data viewing, in addition to its base feature set. When you try to connect, you will see a dialog similar to Figure 1. With a list of Serial Ports available. Select the port connected to your computer, and click OK. If you commonly connect to the same port, you should not see this again, unless there is some other problem connecting. Your choice is saved, and will be tried first for subsequent connections. Figure 1 When Connected, The GWiz Menu (See Figure 2) will have several additional items, and there will be a banner at the bottom of the window indicating that a connection has been made. If you have a MC2 HiG, you may see the string“MH2”used instead of“MC2” Figure 2 The additional menu items allow you to: Read all the flights in memory Do emergency reads (in case of“incomplete flights” Wipe the flight memory Configure the computer Calibrate the accelerometer Bench Test the computer Get Statistical Data on the Sensors. Upgrade the Firmware (NOTE: The“Read Memory”menu item will only read the first flight. Use“Read Multiple Flights”to read all stored flights). G-Wiz MC2 / MC2 HiG 22 Configuration The configuration item will read the configuration memory of MC2, and display it in the dialog shown in Figure 3:: 69 PRELIMINARY DESIGN REVIEW MEASURING RADIATION AS A FUNCTION OF ALTITUDE USING A HYBRID ROCKET PLATFORM NASA 2010 UNIVERSITY STUDENT LAUNCH INITIATIVE (2010 USLI) HARDING UNIVERSITY FLYING BISON 2010 USLI ROCKET TEAM The Configuration Dialog allows you to change the behavior of the MC2 in flight. It is divided by port, as each port has a specific function. Pyro 0 is used for igniting a Cluster at liftoff (JP8 OUT) or Staging (JP8 IN). You can add a delay of 015 seconds (fractions permitted) between the event, and the firing of the port. You can also set which stage to fire, when JP8 is IN - 1st, 2nd, or 3rd, corresponding to howmany "burnout" events to look fore before firing. Pyro 1 is used for Apogee deployment. You can specify a delay, as above, and you can specify whether to use Inertial Apogee (RECOMMENDED) or Barometric Apogee. Using Barometric Apogee is useful in strapon boosters and other situations where tumbling may occur. Tumbling confuses the inertial apogee algorithm. Pyro 2 is used for Main deployment. You have two choices - you can set an altitude to deploy at from 10 to 2550 feet or meters (based on selection of Meters check-box, below) in increments of 10, and you can add a delay as well. Or you can deploy the main a given time after (inertial) apogee. This is a special feature included for the ARLISS flights, but may also be useful to provide 2 stage deployment in conditions where the computer cannot be exposed to atmospheric pressure, or when Barometric apogee is selected for Pyro 1 to cover both bases. Pyro 3 is totally open. You can select an event causing it to turn on, and a different event (or the same, plus a delay) to turn it off. Delays are possible for both on and off events. Some event may require additional information, which can also be supplied. Available events are: o Launch Confirmed o Burnout N (Nth Burnout) o Stage N (Nth acceleration) G-Wiz MC2 / MC2 HiG 23 70 PRELIMINARY DESIGN REVIEW MEASURING RADIATION AS A FUNCTION OF ALTITUDE USING A HYBRID ROCKET PLATFORM NASA 2010 UNIVERSITY STUDENT LAUNCH INITIATIVE (2010 USLI) HARDING UNIVERSITY FLYING BISON 2010 USLI ROCKET TEAM o Inertial Apogee o Barometric Apogee o Ascending above <Altitude> o Descending below <Altitude> o Landed o Break-wire (Make=0, Break=1, Toggle=2) (Note: This is available only if not using a break wire for launch detect) There are also three global options, selectable by checking the appropriate box: Beep max speed at Landing -When selected, the MC2 will alternate beeping maximum altitude and maximum speed upon landing. The status LED will light to indicate altitude. Use Break-wire for Launch Detect - When selected, expects the break-wire inputs to be shorted at power up. When broken, the rocket is assumed to have been launched, regardless of the acceleration measured. Use Meters for Altitude and Speed -When selected, uses metric measurement for readout and altitude specification. After uploading the new configuration, the Flight Computer must be turned off, and on again before the new configuration will be used. Read Memory / Read Multiple This is what you purchased MC2 for–data collection. The default“Read Memory”item will only read the first flight in memory, while“Read Multiple”reads them all, generating multiple data windows. Data Windows (see Figure 4) have several tabs, allowing you to view text flight data, a summary of calculated results from your flight, separate graphs for Barometric Altitude, Acceleration, Integrated Airspeed, Integrated Altitude, and a special graph allowing you to see a configured combination of multiple data sets: Figure 4 Wipe Memory Because MC2 can record multiple flights, it is now necessary to explicitly delete recorded flight data. When MC2 runs out of memory, it will give a single beep (after the Cluster / Stage beep(s)) to let you know it is starting at the beginning. If you fly, it will write over previous data. You can also use this menu item to delete memory after reading. A confirmation dialog will be displayed before anything is done. See Figure 5. Deleting memory can take a couple of minutes. Figure 5 G-Wiz MC2 / MC2 HiG 24 Bench Testing The Bench Test item will scan the sensors and ports of MC2, then display this dialog in Figure 6: Figure 6 71 PRELIMINARY DESIGN REVIEW MEASURING RADIATION AS A FUNCTION OF ALTITUDE USING A HYBRID ROCKET PLATFORM NASA 2010 UNIVERSITY STUDENT LAUNCH INITIATIVE (2010 USLI) HARDING UNIVERSITY FLYING BISON 2010 USLI ROCKET TEAM This window shows the current values of all sensors, and the continuity state of the pyro outputs. In addition, there is an 'indicator light' to tell you the relative quality of that value. Green is good, Red bad, and Yellow questionable. Note that open pyro ports will generate yellow indicators, as there is probably legitimately nothing in them. Continuity reads as“Good”if the igniter value is between 0 and 30 ohms. You may also selectively arm and fire the pyro channels to test battery power or igniters. Pressing the 'Update' button will cause all values to be re-read. For the sensor self-tests, the barometer should read somewhere in the area of 100kPa +- 20kPa. Acceleration -1 to +1 g depending on computer orientation, and accelerometer selftest status should be at 12g +- 2gs. In addition, the Test Flight button may be pressed, bringing up a dialog allowing a simple fake inertial test flight to be flown. See Figure 7. This window can be used to initiate a simple 2 stage, inertial only test flight, and follow its progress. When "Start" is pressed, the Flight Computer will start beeping again, as if it were on the pad. It will stop when it recognizes launch. This will test all the inertial related systems in the computer (except the accelerometer itself) - it is being fed fake acceleration values, but otherwise behaves as if they are real. You may connect electric matches, or 72 PRELIMINARY DESIGN REVIEW MEASURING RADIATION AS A FUNCTION OF ALTITUDE USING A HYBRID ROCKET PLATFORM NASA 2010 UNIVERSITY STUDENT LAUNCH INITIATIVE (2010 USLI) HARDING UNIVERSITY FLYING BISON 2010 USLI ROCKET TEAM lights to the pyro ports to watch them activate. The "LED"s in the window will "light" when each stage of flight is recognized. After landing, altitude readout will happen briefly. At this point, you should disconnect FlightView from the Flight Computer, and the Flight Computer turned off, then on again. It has flown a flight, and does not think it is connected anymore. Calibration Sensor Statistics This is a tool that exists just to satisfy your curiosity. There are 4 analog inputs on the MC2, and this menu item displays a dialog (see Figure 9) that lets you choose one, and display data from that sensor continuously as a Graph (Figure 10) or as a Histogram (Figure 11), along with accumulated statistical data. Data shown includes: Current–The value just read. Mean–That statistical mean of the last 100 samples. Std. Dev.–The Standard Deviation of the last 100 samples. Std. Variance–The Standard Variance of the last 100 samples. ENOB–The Effective Number of Bits. Essentially, a measure of how clean the data is. 73 PRELIMINARY DESIGN REVIEW MEASURING RADIATION AS A FUNCTION OF ALTITUDE USING A HYBRID ROCKET PLATFORM NASA 2010 UNIVERSITY STUDENT LAUNCH INITIATIVE (2010 USLI) HARDING UNIVERSITY FLYING BISON 2010 USLI ROCKET TEAM Firmware Update This is the item we hope you will need least. From time to time, we may discover bugs in the MC2, or even want to add features. MC2 is capable of having its firmware upgraded by the customer. When we have an upgrade, it will be available on ourWeb site (http://www.gwiz-partners.com) as a free download. It will very likely be archived in a ZIP file, and therefore need to be un-archived before loading. This menu item will display a common file dialog (see Figure 12) allowing you to load a firmware update file. It is very important that during the update process, nothing disturb either computer. If something should happen or the update fail, don‟t panic. Power cycle the MC2, and try again. Multiple failures should they occur, should be reported. It is possible, if the update was interrupted, that after a power cycle, the MC2 doesn‟t beep its usual pattern, but just sits there, with the LED flashing. That‟s OK, it should still connect, though the only thing you will be able to do is“update”. 74 PRELIMINARY DESIGN REVIEW MEASURING RADIATION AS A FUNCTION OF ALTITUDE USING A HYBRID ROCKET PLATFORM NASA 2010 UNIVERSITY STUDENT LAUNCH INITIATIVE (2010 USLI) HARDING UNIVERSITY FLYING BISON 2010 USLI ROCKET TEAM Figure 12 G-Wiz MC2 / MC2 HiG 28 Appendix A–Exported Data The„Export Raw‟function in FlightView 2.0 or later (or just„Export‟in earlier versions) creates a text file with 3 columns of data. For MC2 33 rows of data are issued in one second. In general, these are raw sensor readings in decimal, and take need more information to interpret. See“How Flight ComputersWork”for details of how to interpret this data. It is on our website at: http://www.gwiz-partners.com/Tech/Flight_Computers.pdf. First, column 2 is acceleration data in the range 0 to 4095 (12 bits), representing accelerations from -56g to 56g (or 112g to 112g on the MC2 HiG) with 0g generally around 2048. The sensor used is the Motorola 2202D on the MC2, and the MMA2204D on the MC2 HiG. You should locate the data sheets for these sensors, but the core information is: Specification MMA2202 MMA2204 Full Scale Range +-56g +-112g Full Scale Span 4.48v 4.48v Sensitivity 40mV/g 20mV/g Offset (0g) 2.5v Nominal (2.35v-2.65v) 2.5v Nominal (2.35v-2.65v) Column 1 is barometric pressure data, also in the range 0 to 4095 (12 bits). This represents pressure data from approximately 0 to 14.5 lbs per square inch. The data sheet gives pressure in„kilo Pascals‟, where 1kPa = .145psi. The sensor used here is the MPX2102A by Motorola. Pressure readings start high, and go down as altitude goes up. This is a milli-volt output sensor, and is amplified by 93x before reading. Core information: Specification MPX2102A Full scale range 0kPa–100kPa Full scale span 20mV Offset 0 Sensitivity .2mV/kPa Column 3 is the“Event”column. It contains a word describing the event (if any) that has occurred as of that reading. These events are, for the most part, self-describing. The one exception is“event(1)”, which is an internal event issued when launch may have occurred, but before it has been validated. G-Wiz MC2 / MC2 HiG 29 Appendix B–Mechanical Drawing 75 PRELIMINARY DESIGN REVIEW MEASURING RADIATION AS A FUNCTION OF ALTITUDE USING A HYBRID ROCKET PLATFORM NASA 2010 UNIVERSITY STUDENT LAUNCH INITIATIVE (2010 USLI) HARDING UNIVERSITY FLYING BISON 2010 USLI ROCKET TEAM Appendix C - Specifications Parameter MC 2.0 MC 2.0-HiG Max. Acceleration +/- 56 g +/- 112.5 g Max. Inertial Altitude (32-bit math) 100K+ feet MSL1 Max. Barometric Altitude (ADC limit–16-bit math) 75K feet MSL1 Number of Pyro Channels 4 Maximum continuous current per Pyro Channel 8 Amps Number of batteries required 1 or 2 Recommended Computer Power Battery 9 VDC transistor battery (Duracell MN1604) Max. voltage applied to Computer or Pyro Battery input terminals (TB1, pins 9 & 10 or TB2, pins 5 & 6) 76 PRELIMINARY DESIGN REVIEW MEASURING RADIATION AS A FUNCTION OF ALTITUDE USING A HYBRID ROCKET PLATFORM NASA 2010 UNIVERSITY STUDENT LAUNCH INITIATIVE (2010 USLI) HARDING UNIVERSITY FLYING BISON 2010 USLI ROCKET TEAM 15 VDC Computer current consumption 48mA typ.–idle 100ma typ.–beeper/LED active Pyro Channel test current (9VDC battery) 3.5mA Pyro Channel firing time Channels 1 to 3: 1 second Channel 4: varies by programming Pyro Channel functions 1: Stage(1, 2, or 3)/cluster, 2: Apogee parachute deployment, 3: Low altitude parachute deployment, 4: Event Programmable Low Altitude Pyro Channel activation User Programmable (+/- 20 feet) ADC Resolution 12-bits Sample Rate 33 samples/second/sensor Altitude readout Status LED and acoustic beeper (Barometric Altitude) Number of LEDs 1 Status LED (Continuity and battery voltage) Data Recording Depth 128Kbytes (13.5 minutes) Host Computer Interface USB 2.0 (TTL/CMOS to G-Wiz USB-Serial Interface Adapter) RS-232 (TTL/CMOS to G-Wiz RS-232 Interface Adapter) Main Battery Life (with separate Pyro Battery) 4 hours Weight (grams) 36.5 grams 45 grams Operating Temp. Range2 0-80°C 1 Flights over 30,000 feet MSL require MC 2.0 to be coated with a special epoxy coating. The coating protects the circuit board and components from condensing moisture. This also insures proper electrical operation of MC 2.0. Please contact GWiz Partners for special order options. 2 MC 2.0 and MC 2.0 HiG are available with special extended operating temperature components to extend the operating temperature to– 40°C to +85°C. Contact G-Wiz Partners for details. G-Wiz MC2 / MC2 HiG 31 Appendix D–Installing USB Drivers on Macintosh Unfortunately, installing the USB drivers on the Mac is a bit complex. First, make sure you have FlightView 2.21 or later. If not, it can be downloaded from our web-site: www.gwiz-partners.com. Open the folder where FlightView was installed, usually Applications:GWizViewer You should see a package icon with the name“FTDIUSBSerialDriver”. Double click to install. Next is a bit harder. First, you need to know your administrator password. Go to your utilities folder, and open a terminal window. At the prompt, type:“cd /Library/StartupItems/FTDIReEnumerate”and hit return. Now type“sudo pico FTDIReEnumerate”and hit return. The Mac will ask for your administrator password, and then display a file in an editor window within the Terminal. There will be a line that looks like this: /Library/StartupItems/FTDIReEnumerate/ReEnumerate –v0403 –p6001 You should replace it with these two lines: /Library/StartupItems/FTDIReEnumerate/ReEnumerate –v0403 –pEE18 /Library/StartupItems/FTDIReEnumerate/ReEnumerate –v0403 –pDA38 Then save the file, exit the editor, exit Terminal, and Restart the Macintosh. 77 PRELIMINARY DESIGN REVIEW MEASURING RADIATION AS A FUNCTION OF ALTITUDE USING A HYBRID ROCKET PLATFORM NASA 2010 UNIVERSITY STUDENT LAUNCH INITIATIVE (2010 USLI) HARDING UNIVERSITY FLYING BISON 2010 USLI ROCKET TEAM You should now be able to connect to MC2 using USB. G-Wiz MC2 / MC2 HiG 32 Appendix E–Installing USB Drivers onWindows XP Windows XP seems to be harder for people to install our drivers on, so here is something of a guided tour. When our USB board or Telemetry base station is first connected,Windows XP will display a dialog like this: 78