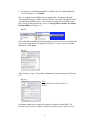
1
Accordent PresenterPRO v. 6.1
User’s Manual
Important Notice
This User’s Manual is delivered subject to the following conditions and restrictions:
•
This documentation contains proprietary information belonging to Accordent
Technologies, Inc. (“Accordent”). Such information is hereby supplied solely
for the purpose of assisting explicitly authorized users in the proper operation
of Accordent software.
•
Without the express prior written permission of Accordent, no part of the
contents hereof may be used for any other purpose, disclosed to any person or
firm, or reproduced by any means.
The text and drawings herein are for the purposes of illustration and reference only.
The specifications on which they are based are subject to change without notice.
Accordent invites comment on its manuals. Please send us your comments and
suggestions via e-mail at [email protected] and indicate which manual you are
commenting on.
Copyright© 2009 Accordent Technologies, Inc. All rights reserved. All other
company brand and product names are trademarks of their respective owners.
Table of Contents
1. INTRODUCING ACCORDENT PRESENTERPRO, V.6.1 ................................... 2 1.1 Introducing Accordent PresenterPRO...................................................................... 2 2. SYSTEM REQUIREMENTS ..................................................................................... 3 2.1 System Requirements for Accordent PresenterPRO................................................ 3 3. INSTALLATION & REGISTRATION .................................................................... 4 3.1
3.2
3.3
3.4
Installation & Registration Overview ...................................................................... 4 Installing & Registering Accordent PresenterPRO.................................................. 4 Installing the PE-Controller ..................................................................................... 7 Installing the Accordent PowerPoint Add-In ........................................................... 9 4. USING THE PRESENTATION WIZARD ............................................................. 11 4.1 Presentation Wizard Overview .............................................................................. 11 4.2 Using the Presentation Wizard............................................................................... 11 4.3 Project Info Page .................................................................................................... 12 4.3.1 Creating A Project Directory ...................................................................................... 13 4.3.2 Selecting A Publishing Type ...................................................................................... 13 4.4 Interface Options Page ........................................................................................... 14 4.4.1 Selecting An Interface ................................................................................................ 16 4.4.2 Completing The “General” Screen ............................................................................. 17 4.5 Slide & PDF Import Screen ................................................................................... 20 4.5.1 Importing Slides & PDFs............................................................................................ 21 4.5.2 Converting Slides to JPG or GIF ................................................................................ 23 4.5.3 Display Slide Titles...................................................................................................... 23 4.5.4 Display Slide Notes ..................................................................................................... 24 4.5.5 Enable Slide Navigation ............................................................................................. 24 4.6 Q&A Screen ........................................................................................................... 25 4.6.1 Email Q&A ................................................................................................................. 25 4.6.2 Moderated Q&A ......................................................................................................... 25 4.7 Chat Screen ............................................................................................................ 26 4.7.1 Use Included Chat Solution ........................................................................................ 26 4.7.2 Use Custom Chat Solution.......................................................................................... 27 4.8 Interactive Screen................................................................................................... 27 4.9 Registration Screen ................................................................................................ 27 4.10 Advanced Screen ................................................................................................. 29 4.11 Publishing Information ........................................................................................ 31 4.11.1 Completing The Publishing Information Fields ....................................................... 32 4.11.2 Completing the FTP/SFTP Fields ............................................................................. 32 4.11.3 Completing The UNC Fields .................................................................................... 34 4.11.4 Selecting A Web Server ......................................................................................... 34 4.11.5 Using Advanced FTP Settings ................................................................................ 34 4.12 Media Information Page ...................................................................................... 36 4.12.1 Entering Media Locations ......................................................................................... 37 4.12.2 Enabling An Individual Stream ................................................................................ 38 4.12.3 In-Band & Out-of-Band Synchronization ................................................................. 38 4.12.4 Selecting In Band & Configuring the PE-Controller ................................................ 39 4.12.5 Initiating the PE-Controller Service ......................................................................... 47 4.12.6 Configuring Accordent PresenterPRO To Manage The PE-Controller .................... 48 4.12.7 Configuring for Closed Captioning ........................................................................... 50 4.12.8 Testing the Encoder ................................................................................................... 53 4.12.9 Using Out-Of-Band: Interface Update Interval ........................................................ 54 4.12.10 Using Auxiliary Audio/Video Sources (Out-of-Band Only) ................................... 55 4.12.11 Inputting Clip Information ...................................................................................... 56 4.13 Distribute Content Page ....................................................................................... 57 4.14 Using Configuration Files .................................................................................... 58 4.14.1 Saving a Configuration File ...................................................................................... 58 4.14.2 Accessing a Configuration File................................................................................. 59 5. INTRODUCTION TO AND USING THE PRESENTATION MANAGER ....... 60 5.1 Presentation Manager Overview ............................................................................ 60 5.1.1
5.1.2
5.1.3
5.1.4
5.1.5
5.1.6
5.1.7
5.1.8
Slide Preview & Publish ............................................................................................. 60 URL Preview & Publish ............................................................................................. 61 Interactive Preview & Publish .................................................................................... 61 Chapters Screen .......................................................................................................... 62 Moderated Q&A ......................................................................................................... 62 Registration ................................................................................................................. 63 Event Launch & Event Record ................................................................................... 63 Starting A Practice Run .............................................................................................. 64 5.2 Managing & Publishing Slides .............................................................................. 64 5.2.1 Slide Preview .............................................................................................................. 65 5.2.2 Slide Preview & Publish ............................................................................................. 65 5.2.3 Slide Auto-Publish ...................................................................................................... 66 5.2.4 Last Minute Slide & PDF Import ............................................................................... 66 5.3 Managing & Publishing URLs.............................................................................. 68 5.3.1 Preparing URLs .......................................................................................................... 69 5.3.2 Saving & Opening A URL List .................................................................................. 70 5.3.3 Targeting URLs .......................................................................................................... 71 5.3.4 Publishing URLs ......................................................................................................... 72 5.4 Creating & Publishing Interactive Content ............................................................ 73 5.4.1 Selecting An Interactive Content Type ....................................................................... 74 5.4.2 Displaying or Hiding Answer Results ........................................................................ 75 5.4.3 Adding & Deleting Interactive Content ...................................................................... 76 5.4.4 Saving & Opening An Interactive Content List .......................................................... 77 5.4.5 Publishing Interactive Content.................................................................................... 78 5.5 Creating & Editing Chapters .................................................................................. 79 5.5.1 Creating Chapters Automatically................................................................................ 79 Automatic ...................................................................................................................... 79 Custom chapters ............................................................................................................ 79 5.5.2 Creating Custom Chapters .......................................................................................... 80 5.6 Using Moderated Q&A .......................................................................................... 80 5.7 Using the Registration Page ................................................................................... 83 6. PREPARING TO LAUNCH A PRESENTATION ................................................ 84 6.1 Pre-Launch Preparation ......................................................................................... 84 6.2 In-Band & Out-Of-Band Preparation..................................................................... 84 6.2.1
6.2.2
6.2.3
6.2.4
Out-of-Band ................................................................................................................ 84 Setting Encoding Time Offsets ................................................................................... 85 Auxiliary Media Time Offset ..................................................................................... 86 In-Band Distribution ................................................................................................... 86 6.3 Testing Presentation Settings .................................................................................. 87 7. USING THE ACCORDENT POWERPOINT ADD-IN ........................................ 88 7.1 Using The Accordent PowerPoint Add-In ............................................................. 88 8. LAUNCHING A PRESENTATION ........................................................................ 91 8.1 Launching A Presentation ...................................................................................... 91 8.2 Controlling Presentation Events ............................................................................ 92 8.3 Stopping A Presentation ........................................................................................ 92 9. ARCHIVING A PRESENTATION ......................................................................... 94 9.1 Archive Wizard Overview ..................................................................................... 94 9.2 Accessing the Archive Wizard............................................................................... 94 9.3 Using the “Event Details” Page ............................................................................. 95 9.3.1
9.3.2
9.3.3
9.3.4
Editing Publish Times................................................................................................. 96 Adding Slides & URLs ............................................................................................... 96 Deleting Non-Streaming Content ............................................................................... 98 Using The Event Time Shift To Edit Events .............................................................. 99 9.4 Editing Chapters................................................................................................... 100 9.4.1 Editing Chapter Times & Titles ................................................................................ 101 9.4.2 Using Chapter Event Time Shift To Edit Chapters .................................................. 102 9.5 Inputting Media Locations ................................................................................... 103 9.5.1 Cropping A Presentation............................................................................................ 105 9.6 Creating & Publishing Archived Media .............................................................. 106 9.6.1 Publication to CD or File Server............................................................................... 106 9.6.2 Creating & Publishing Media For On Demand Use ................................................. 107 9.6.3 Streaming Media Upload Information ...................................................................... 108 9.6.4 Completing the Web Content Page ........................................................................... 111 9.7 Distributing A Presentation.................................................................................. 113 1
1. Introducing Accordent PresenterPRO, v.6.1
1.1 Introducing Accordent PresenterPRO
Accordent PresenterPRO v6.1 is an enterprise-grade, software-based authoring
tool that enables organizations to create professional, multimedia presentations
around live or on demand streaming media. Whether your goal is to communicate
with co-workers, clients, students, shareholders or others, Accordent
PresenterPRO provides all of the tools needed to create and publish interactive
presentations to the Web, a CD ROM or to a file server.
Accordent PresenterPRO includes five components. The application itself
comprises the Presentation Wizard, the Presentation Manager and the Archive
Wizard. The Accordent PresenterPRO Encoder-Controller and Accordent
PowerPoint Add-In are separate applications and are typically installed on a
different machine than Accordent PresenterPRO.
The Presentation Wizard is an easy-to-use authoring tool that is used to prepare
a presentation, including importing slides, choosing the functionality that will be included
in the presentation, and choosing and customizing an interface.
The Presentation Manager is used to manage a live presentation, including the
publishing of slides and URLs, as well as interactive elements such as polling and
moderated Q&A.
The Archive Wizard is used to edit (a presentation and publish the presentation
for on demand use.
The Accordent Accordent PresenterPRO Encoder Controller (“PEController”) is used to launch one or more encoders when the presentation is going to be
delivered in-band. i.e. streaming and synchronized content are bound at the encoder prior
to delivery.
The Accordent PowerPoint Add-In is used in conjunction with Accordent
PresenterPRO and enables a presenter to control the synchronization of slides from a
remote computer (e.g. From a presenter’s laptop).
This User’s Manual will explain how the Presentation Wizard, Presentation
Manager, Archive Wizard, PE-Controller and the Acordent PowerPoint Add-In
will help you create and publish superior presentations with unprecedented ease
and efficiency.
2
2
2. System Requirements
2.1 System Requirements for Accordent PresenterPRO
In order to successfully operate Accordent PresenterPRO, the following system
requirements must be met.
Hardware
• Pentium IV or higher
• 512 MB or more RAM
• 500 MB free disk space
• Web Server
• Streaming Media Server or outsourced encoding solution
• Video Camera
• Screen Resolution of 1024 x 768 or better
Presenter Software
• Microsoft Windows XP Pro
• Microsoft Internet Explorer 6 or higher
• Microsoft PowerPoint 2003 or higher
• Screen Resolution of 1024 x 768 or better
Viewer Requirements
• Windows Media Player version 6 or higher (for viewing video
encoded in Windows Media)
• Real Player G2 or higher (for viewing video encoded in Real Media)
• Microsoft or Macintosh OS-compatible (IE, Firefox)
3
3
3. Installation & Registration
3.1 Installation & Registration Overview
Accordent PresenterPRO, the PE-Controller and the Accordent PowerPoint AddIn are included together on the same installation disc or electronic link. As soon
as the installation disc is inserted or the download link is clicked, a prompt will
ask which application(s) should be installed.
Since you may want Accordent PresenterPRO, the PE Controller and the
Accordent PowerPoint Add-In to be installed on different machines, it is
important to select only the application(s) that you want installed on a particular
machine.
An Internet connection is required to install Accordent PresenterPRO, the PEController and the Accordent PowerPoint Add-In.
3.2 Installing & Registering Accordent PresenterPRO
After closing all open programs, follow the steps below to install Accordent
PresenterPRO.
1. If you are installing Accordent PresenterPRO via disc, insert the Accordent
PresenterPRO installation disc into the CD-ROM drive. Open the “My
Computer” folder. Double-click the CD-ROM drive icon.
If you are using an electronic link to install Accordent PresenterPRO, click
Open on the “File Download” screen to begin the installation process. To
complete the process, follow the steps below:
2. When the Welcome screen appears, click Next.
3. On the Destination Location screen, either select a location for Accordent
PresenterPRO using the Browse button or use the default setting and click
Next.
4. On the Select Components screen, select PresenterPRO and click Next.
(You may also select “Manuals” if would like a digital copy of the Accordent
PresenterPRO manuals on the same machine).
5. On the Start Installation screen, click Next. Accordent PresenterPRO will
begin installing.
4
6. As soon as Accordent PresenterPRO is installed, the Successful Installation
screen will appear. Click Finish.
Once Accordent PresenterPRO has been installed, the “Presentation Wizard,”
“Presentation Manager” and the “Archive Wizard” can each be launched from the
Accordent PresenterPRO menu. To access the Accordent PresenterPRO menu,
first click the desktop Start menu. Next, click Programs/Accordent/ Accordent
PresenterPRO (See Figure 3-1).
Fig. 3-1
If Accordent PresenterPRO is being launched for the first time, the Accordent End
User License Agreement will appear (See Figure 3-2). Once you have read the
agreement, click I Agree.
Fig. 3-2
After clicking “I Agree,” the product “Registration” page will appear (See Figure
3-3).
Fig. 3-3
Note:
Required fields are indicated with a red
asterisk.
An Internet connection is required to register Accordent PresenterPRO. If a
firewall or proxy server is in place, it may be necessary to use a specific server
5
and port to register Accordent PresenterPRO. To access the Proxy Settings, click
Proxy Settings (See Figure 3-4).
Fig. 3-4
The Proxy Settings fields will appear (See Figure 3-5).
Fig. 3-5
The “Proxy Settings” fields provide the following options:
•
System HTTP Proxy Settings: the System HTTP proxy settings are the default
system proxy settings setup by Internet Explorer
•
No HTTP Proxy: no HTTP Proxy creates a direct connection to the Internet and
should be used when no proxy is in place
•
HTTP Proxy: the HTTP proxy is a custom proxy and the server location must be
specified. If the custom proxy will not be using Port 8080, it is also necessary to
include the port that will be used.
On the Proxy Settings screen, highlight the desired proxy setting (See Figure 3-6).
Fig. 3-6
If “Use HTTP Proxy” was highlighted, enter the server location for the custom
proxy server in the “Server Address” field (See Figure 3-7).
6
Fig. 3-7
If the HTTP proxy server will not be using Port 8080, enter the desired port in the
“Port” field (See Figure 3-8).
Fig. 3-8
After completing the fields on the “Registration” page, click Register and the
Accordent PresenterPRO menu will appear (See Figure 3-9).
Fig. 3-9
3.3 Installing the PE-Controller
Important: The PE-Controller should be installed on the encoder machine, which
may be different from the workstation on which Accordent PresenterPRO is
installed.
7
1. Insert the Accordent PresenterPRO installation disc into the CD-ROM
drive. Open the “My Computer” folder & double-click the CD-ROM
drive icon.
If you are installing Accordent PresenterPRO via electronic link, click Open on
the File Download screen and, after the application has been downloaded, use the
following instructions:
2. When the Welcome screen appears, click Next.
3. On the Destination Location screen, either select a location for the PEController using the Browse button or use the default setting and click
Next.
4. On the Select Components screen, select PE-Controller and click Next.
5. On the Start Installation screen, click Next.
6. When complete, the Successful Installation screen will appear. Click
Finish.
Once installed, the PE-Controller can be registered by launching the PEController by either i) using the Start menu or ii) double-clicking the PEController icon on the desktop. The PE-Controller Registration screen will appear
(See Figure 3-10).
Fig. 3-10
After completing the fields on the “Registration” page, click Register. The PEController will appear (See Figure 3-11).
8
Fig. 3-11
3.4 Installing the Accordent PowerPoint Add-In
Important: The Accordent PowerPoint Add-In should be installed on a different
computer than the machine on which Accordent PresenterPRO is installed as the
Add-In is designed to enable a remote machine to synchronize slides without
having Accordent PresenterPRO installed.
1. Insert the Accordent PresenterPRO installation disc into the CD-ROM
drive. Open the “My Computer” folder & double-click the CD-ROM
drive icon.
If you are installing Accordent PresenterPRO via electronic link, click Open on
the File Download screen and, after the application has been downloaded, use the
following instructions.
2. When the Welcome screen appears, click Next.
3. On the Destination Location screen, either select a location for the
Accordent PowerPoint Add-In using the Browse button or use the default
setting and click Next.
4. On the Select Components screen, select PowerPoint Add-In and click
Next.
5. On the Start Installation screen, click Next. The Accordent PowerPoint
Add-In will begin installing.
6. When complete, the Successful Installation screen will appear. Click
Finish.
Once installed, the Accordent PowerPoint Add-In can be registered and activated
by launching Microsoft PowerPoint (“PowerPoint”).
9
In PowerPoint, highlight the Tools drop-down menu and select Add-Ins. The
Add-Ins menu will appear (See Figure 3-12).
Fig. 3-12
Important:
Macro security must be set to medium or low or
the Accordent PowerPoint Add-In will not install.
In the Add-Ins screen select Accordentv6.0 and click Close.
Next, highlight the Tools drop-down menu and select Add-Ins Options. The
Accordent PowerPoint Add-Ins Registration screen will appear (See Figure 3-13).
Fig. 3-13
After completing the fields on the “Registration” page, click Register and the
Accordent PowerPoint Add-In will appear (See Figure 3-14).
Fig. 3-14
10
4
4. Using The Presentation Wizard
4.1 Presentation Wizard Overview
The Presentation Wizard is used to prepare a presentation and to configure the
presentation for live or on demand distribution. Among other tasks, the
Presentation Wizard is used to:
z Import Microsoft PowerPoint slides and convert the slides for distribution
over the Internet
z Choose an interface in which the presentation will be displayed that
determines both the look and feel as well as the functionality, such as polling
and closed captioning, that will be included in a presentation
z Provide server locations for the streaming and non-streaming assets that will
be distributed during the presentation if the presentation is being published to
the Web
Many of the functions included in the Presentation Wizard are optional and affect
the layout and aesthetics of the presentation interface. The Example Interface
(below) can be used as a reference when deciding what functionality to include.
Example Interface
Logo/URL
An optional branded logo
and URL can be added to
the interface.
Slides
The slide window also can
contain URLs.
Audio/Video
Slide Navigation
Slide navigation can be included at
the Presenter’s discretion.
Titles & Text
Customize the interface with
titles and sub-titles text e,g
speaker title & bios.
Email Presenter
Enable the audience to email
questions and comments to the
presenter.
4.2 Using the Presentation Wizard
When the Presentation Wizard is first launched, the “General Information” page
will be displayed (See Figure 4-1).
11
Fig. 4-1
Displayed at the bottom of the Presentation Wizard is step-by-step guide to the
tasks that should be completed (See Figure 4-2).
Fig. 4-2
Once a step is completed, the next step can be accessed by clicking Next on the
bottom-right of the Presentation Wizard.
4.3 Project Info Page
The “Project Info” page is used to create a local project directory in which
presentation assets will be stored prior to merging the presentation with live or on
demand streaming media. These presentation assets include, among other
information, the Microsoft PowerPoint slides that have been converted to jpegs or
gifs, the interface in which the presentation will be displayed and all media
locations.
The “Project Info” page also is used to specify whether a presentation will be
published to the Web and to a CD directory/file server, or to a CD directory/file
server only. Depending on which option is selected, the Presentation Wizard will
include only the steps required to prepare the presentation for the desired
publishing point(s).
12
4.3.1 Creating A Project Directory
To create a project directory, either:
•
Enter a directory name in the “Project Directory” field (proceed to
Section 4.3.2 - Selecting A Publishing Point - below) or
•
Browse for a project directory by clicking Browse (See Figure 4-3).
Fig. 4-3
Note:
If the project directory
did not formerly exist,
Accordent
PresenterPRO will
automatically create it.
Use the “Browse” window to locate the directory (See Figure 4-4).
Fig. 4-4
Highlight the desired directory and click OK. The directory location will appear
in the “File Location” field in the Presentation Wizard.
4.3.2 Selecting A Publishing Type
The “Project Info” page enables the presenter to determine whether the
presentation will be published to both the Web and a CD/File Server, or to a
CD/File Server only (See Figure 4-5).
Fig. 4-5
13
Selecting CD and/or File Server only will simplify the presentation creation
process and remove several steps from the Presentation Wizard - specifically the
“Streaming Info” and “Publishing Info” pages that must be completed when
publishing a presentation to the Web.
Note: If it is uncertain whether a presentation will be published to the Web and/or
a CD/File Server, it is advisable to select the Web and CD field.
Once the publishing destination has been selected, click Next. The “Interface
Options” page will appear (See Figure 4-6).
Fig. 4-6
4.4 Interface Options Page
The “Interface Options” page contains all the template interfaces that are
included with Accordent PresenterPRO, as well as those that may have been
subsequently added to the interface directory. Each template may include unique
functionality and have a unique look, depending upon how the template has been
defined.
When a template is selected, the fields on the “General” screen and the buttons
across the top of the “Interface Options” page, will either be bold or grayed out
(See Figure 4-7), indicating the functionality and features that are included in the
selected interface.
14
Fig. 4-7
In addition to a video/audio window, a template interface may include:
General
•
•
•
•
•
•
The ability to add titles and sub-titles to the interface
The ability to add speaker and date/time information to the interface
The ability to add branded logos and links to the interface
The ability to add downloadable documents to the interface
Chaptering
Closed captioning
Slides
•
•
•
•
The ability to import one or more PowerPoint or PDF files
The ability to convert slides to jpeg or gif format
The ability to display slide titles
The ability to enable the audience to navigate slides
Q&A
•
•
The ability to include “Email the Presenter” functionality
The ability to include moderated Question & Answer
Chat
•
The ability to include the chat solution that is included in Accordent
PresenterPRO
15
•
The ability to include a custom chat solution
Interactive
•
•
•
The ability to include polling
The ability to include trivia
The ability to include facts
Registration
•
•
The ability to include a custom registration page that can be password
and ID protected
The ability to include a registration page that will log attendees
Advanced Features
•
The ability to add e.g. download PowerPoint presentation
4.4.1 Selecting An Interface
On the left side of the “Interface Options” page is the “Interface Template”
window (See Figure 4-8) that contains several interface styles.
Fig. 4-8
Use the “Interface Style” drop-down menu to select an interface style (See Figure
4-9).
Fig. 4-9
Note:
The “Interface Style” drop-down menu is
used to organize interface styles by
functionality (e.g audio-only interface) or
by use (e.g. HR interface).
Once an interface style has been selected, one or more interface thumbnails will
appear in the “Interface Template” window. To select an interface, click on the
interface in the “Interface Template” window.
16
Each time an interface is highlighted, a description of the interface will appear in
the “Interface Description” field and the title of the selected interface will appear
in the “Interface Currently Selected” field (See Figure 4-10).
Fig. 4-10
To select a different interface, simply click on a different interface in the “Interface
Template” window.
4.4.2 Completing The “General” Screen
When the “Interface Options” page is opened, the “General” screen will be the
first screen displayed (See Figure 4-11).
Fig. 4-11
The fields on the “General” screen are used to:
• Add titles and sub-titles to the interface
• Add speaker and date/time information to the interface
• Add branded logos and links to the interface
• Add downloadable documents to the interface
• Determine whether chaptering is included in the interface
• Determine whether closed captioning is included in the interface
If specific fields are grayed out, then those fields are not supported by the selected
interface.
17
Titles and Sub-Titles
Once an interface has been selected, the user may have the option of including a
browser title (See Figure 4-12)
Fig. 4-12
and up to three titles within the user interface (See Figure 4-13), as indicated by
whether some or all of those fields are active.
Fig. 4-13
Note:
Not every interface is
configured to display titles. If
titles are desired, be certain to
choose an interface type that
includes a space for titles.
To include a title in the browser header, enter the title in the “Title Bar” field (See
Figure 4-14).
Fig. 4-14
To include title lines in the user interface, enter the title(s) in the “Title” fields
(See Figure 4-15).
Fig. 4-15
Note:
The titles are displayed in the
user interface in descending
order from “Title 1.”
Consequently, Titles 2 and 3
are generally used as sub-titles.
Speaker Name and Date & Time
In addition to titles and sub-titles, the interface can be further customized with the
presentation speaker’s name and the date/time of the presentation.
18
If desired, enter the name of the speaker in the speaker field (See Figure 4-16).
Fig. 4-16
If desired, enter the date and time or click Get Current (See Figure 4-17).
Fig. 4-17
Logos & URLs
The interface can be further customized with branded logos - displayed in a
designated location in the Interface - and URL links. To include a logo image,
enter the logo URL in the “Logo Image URL” field (See Figure 4-18).
Fig. 4-18
To generate a link from the logo image to a web page, enter the URL to where the
image will link in the “Logo Link URL” field (See Figure 4-19).
Fig. 4-19
Downloadable Document
The presenter may want to offer audience members an opportunity to download a
PDF or other document related to the presentation.
To include a downloadable document, enter the URL or file location for the
document in the “Downloadable Document” field (See Figure 4-20).
Fig. 4-20
Additionally, the “Find” button can be used to search for the document on local
drives.
19
Chaptering & Closed Captioning
Accordent PresenterPRO includes chaptering and indexing features that enable
the content author to automatically create chapters based on prescribed criteria,
such as each published slide, or to manually create chapters based on unique
criteria, such as a change in subject matter or speaker.
Accordent PresenterPRO also enables the presenter to include closed captioning
functionality using RealNetworks’ RealText or SAMI files.
Both chaptering and closed captioning are features that are managed in the
Presentation Manager (See Chapter 5). To access these features in the
Presentation Manager, however, it is necessary to select an interface that supports
these features. If an interface that supports these features is selected, “Available”
will appear beside Chaptering and Closed Captioning on the upper right-hand side
of the General Screen (See Figure 4-21).
Fig. 4-21
4.5 Slide & PDF Import Screen
Accordent PresenterPRO enables the presenter to synchronize standard Microsoft
PowerPoint slides with live or recorded streaming media. As an alternative to
PowerPoint, Accordent PresenterPRO also enables users to import PDF files
(either multi- or single-page documents) and convert each PDF page into an
image that can be distributed over the Internet similar to a converted PPT slide.
Using its proprietary conversion process, Accordent PresenterPRO will
automatically format imported slides and PDF files and pages for display on the
Internet.
The “Slide Import” screen also enables the presenter to:
• Choose whether the imported slides (or PDF pages) will be
converted into .gif or .jpg format to achieve optimal quality and
file size
• Choose whether to display slide titles to the audience
• Choose whether to enable the audience to navigate through the
slide deck
20
4.5.1 Importing Slides & PDFs
To access the Slide Import screen, click Slides on the Interface Options page (See
Figure 4-22).
Fig. 4-22
To import Microsoft PowerPoint slides or PDFs into Accordent PresenterPRO,
either enter the PowerPoint or PDF file location in the “File Location” field or
click Add File to search for the file (See Figure 4-23).
Fig. 4-23
Note:
Accordent PresenterPRO
will automatically size the
images to fit within the
interface that is selected
using the Presentation
Wizard.
After clicking Add, the “Browse” window will appear (See Figure 4-24). Locate
the desired file, highlight the PowerPoint or PDF file and click Open.
Fig. 4-24
This process may be repeated to add as many PowerPoint slide or PDF files as
required.
To add a single slide or PDF page, click on the Add Single Slide button (See
Figure 4-25).
21
Fig. 4-25
The “Browse” window will appear to locate the desired Microsoft PowerPoint or
PDF file. Highlight the PowerPoint or PDF file and click Open. A box will
appear to allow you to browse through the whole PowerPoint or PDF document in
order to choose the single slide or page you would like to import. After you have
found the slide or page you would like to add, click Add Slide (See Figure 4.26).
Fig. 4-26
This will import the single slide or page and list the number of that slide or page
in the slides box.
To delete PowerPoint files that have been included in the list, click Clear List
(See Figure 4-27).
Fig. 4-27
To change the order of any PowerPoint file, single slide or .pdf page in your list,
highlight the file you want to change and click the plus or minus button on the
right to position the file where you would like it (See Figure 4.28)
22
Fig. 4-28
4.5.2 Converting Slides to JPG or GIF
The “JPG” and “GIF” fields on the “Slide Import” screen enable the presenter to
select whether the Microsoft PowerPoint slides will be converted into .jpg or .gif
format (See Figure 4-29). JPG is the preferred format for image intensive slides,
while GIF is the preferred format for text intensive slides.
Fig. 4-29
After selecting a conversion format, use the Image Compression Quality feature
to specify the slide conversion quality (See Figure 4-30). The primary
considerations are audience connection speed, audience size and slide content.
Using a lower compression quality will reduce the file size; using high quality
compression will preserve image integrity while resulting in a larger file size.
Fig. 4-30
Note:
Accordent PresenterPRO will default to
80% image compression quality.
4.5.3 Display Slide Titles
Depending on how the interface is defined, the presenter can display the
PowerPoint slide titles to the audience (See Figure 4-31).
23
Fig. 4-31
Note:
When naming slides, keep in mind
that the titles will be visible to the end
user if “Display Slide Titles” is
enabled.
To display slide titles to the audience, check the “Display Slide Titles” field (See
Figure 4-32).
Fig. 4-32
4.5.4 Display Slide Notes
PowerPoint allows a content creator to include notes with each PowerPoint Slide.
To display slide notes to the presentation audience, check Display Slide Notes
(See Figure 4-33).
Fig. 4-33
Note:
Just as slides are, slide notes are separated
and displayed on a slide-by-slide basis. This
ensures that no notes are displayed before
the appropriate slide is displayed.
4.5.5 Enable Slide Navigation
Depending on how the interface is defined, the interface may include “Slide
Navigation” functionality that enables the audience to navigate through the
Microsoft PowerPoint slides during the presentation (See Figure 4-34).
IMPORTANT: The Slide Navigation feature enables the audience to navigate the entire
slide deck; consequently, this feature should not be used if there are slides in the slide
deck that will not be displayed during the actual presentation.
Fig. 4-34
Note:
While the “Slide Navigation” function
enables the audience to navigate slides,
24
the audience will be returned to the current slide each time a new slide is
displayed by the presenter.
To enable “Slide Navigation,” check Slide Navigation (See Figure 4-35).
Fig. 4-35
4.6 Q&A Screen
Accordent PresenterPRO includes Q&A functionality that enables audience
members to submit questions to the presenter. Questions can either be submitted
to a prescribed email address or, by using the moderated Q&A feature, submitted
and reviewed directly in the Presentation Manager or at a prescribed web location.
4.6.1 Email Q&A
Select the “Email” field to enable the presenter to receive emailed questions at a
prescribed email address (See Figure 4-36).
Fig. 4-36
The “Email Address” field will appear (See Figure 4-37).
Fig. 4-37
Enter the email address to which questions should be sent
Note: If no email address is entered, the email field will still be included in the
client-side interface but emails will not be received by the presenter.
4.6.2 Moderated Q&A
Accordent PresenterPRO also includes a moderated Q&A feature that is
configured to automatically deliver questions directly to the Presentation Manager
and to organize questions in the order in which they are received and reviewed.
Questions also can be directed to a unique web location where a moderator can
review questions before forwarding questions directly to the presenter.
25
Note:
This section discusses only how to include moderated Q&A in the presentation
and how to provide a moderator password to access submitted questions. For
additional information on the management of moderated Q&A during a
presentation, please see Section 5.6.
To include moderated Q&A feature, select “Moderated” (See Figure 4-38).
Fig. 4-38
Enter a password in the “Access Password” field (See Figure 4-39).
Note: It is important to remember this password, as it is required to access the
administrator screen that receives and displays submitted questions.
Fig. 4-39
4.7 Chat Screen
Accordent PresenterPRO includes a built-in hosted chat solution that utilizes
Volano’s proprietary VolanoChat software and also supports the use of custom
third-party chat solutions.
4.7.1 Use Included Chat Solution
To “Use Included Chat Solution”, enter the server location provided by Accordent
in the “Server URL” field (See Figure 4-40). If a server location has not been
provided, call Accordent Support at (310) 374-7491 and one will be provided.
Fig. 4-40
Next enter the group name that has been provided by Accordent (See Figure 441).
Fig. 4-41
26
Use the drop-down menu to select a language for chat (See Figure 4-42).
Fig. 4-42
4.7.2 Use Custom Chat Solution
The “Use Custom Chat Solution” function enables the presenter to use an internal
or third-party chat solution within an Accordent PresenterPRO presentation. To
use a custom chat solution, enter the Server URL (See Figure 4-43).
Fig. 4-43
4.8 Interactive Screen
Accordent PresenterPRO provides the option of including surveys, facts and/
or customized questions (collectively called “Interactive Questions”) in a
presentation.
The “Interactive” screen indicates whether or not interactive functionality is
included in the selected interface (See Figure 4-44)
Fig. 4-44
Note: Interactive functionality requires a web server and will not be available if
the presentation is being published to a CD or File Server only.
4.9 Registration Screen
The “Registration” screen is used to create optional and mandatory audience
registration fields. There are three modes of registration - only one of which will
be available depending on the selected interface:
(1) Optional registration that requests, but does not require, the audience to
enter information, such as name, company, etc. (See Figure 4-45).
27
Fig. 4-45
(2) Mandatory registration that requires an audience member to provide a user
ID (See Figure 4-46).
Fig. 4-46
(3) Mandatory registration that requires an audience member to provide a
User ID and Login Password (See Figure 4-47).
Fig. 4-47
If you have selected Mandatory registration, User ID and/or Password fields will
need to completed either individually or by group (e.g. importing an Excel
spreadsheet containing the IDs and Passwords).
To add individual passwords, click Add and enter the individual ID and password
in the designated fields (See Figure 4-48).
Fig. 4-48
28
To import a list of previously created IDs and passwords, click Import List
(See Figure 4-49).
Note: Lists typically are imported from a standard Excel spreadsheet.
Fig. 4-49
To edit a registration list, click Edit (See Figure 4-50).
Fig. 4-50
To delete a registrant or registrants, click Delete (See Figure 4-51).
Fig. 4-51
4.10 Advanced Screen
While Accordent PresenterPRO includes many options for customizing an
interface, it also enables content authors to add entirely unique features that can
be controlled through Accordent PresenterPRO. For example, while the
“General” screen enables a presenter to include the speaker name/date, the
“Advanced” screen can be used to create “Speaker Bio” or “Today’s
Topics” fields.
An advanced feature template must be designed in advance of using the “Interface
Options” screen and the template must contain an“advancedskin.xml” file.
Note: This section addresses using an advanced template once it has been
designed and imported into Accordent PresenterPRO. The design of Advanced
Templates, which requires basic HTML programming and graphics skills, is
addressed in detail in the Creating Custom Templates manual.
Once the Advanced fields are created in the template, the fields will be displayed
on the “Advanced” screen (See Figure 4-52).
29
Fig. 4-52
The “Advanced” screen contains the Name, Value and Description fields (See
Figure 4-53).
Fig. 4-53
The “Name” and “Description” fields are determined by the person that has
designed the interface. The “Value” field is dynamic and is used to customize the
advanced feature(s) in the interface.
Example:
The name field might contain “HR PowerPoint” and the description field might
contain “PowerPoint download for New Hires.” The advanced feature “Value”
field is then used to import the relevant PowerPoint slide file into the interface for
download by an audience member. This feature also can be used to modify the
interface to display e.g. a call-in phone number that changes weekly.
To incorporate a value in an advanced template, enter the value in the Value field
and click Save (See Figure 4-54).
Fig. 4-54
This feature can be used to include as many advanced features as are available in
the interface.
Once the “Interface Options” page has been completed, click Next. The
“Publishing Information” page will appear (See Figure 4-55).
30
Fig. 4-55
4.11 Publishing Information
The “Publishing Information” page enables the presenter to select the webdirectory (or directories) that will be accessed by the presentation audience.
This page also enables the presenter to select the FTP information that will be
used to publish the Interface Graphics, Slides, URLs and the Interface and
Synchronization HTML to a web-directory (See Figure 4-56).
Fig. 4-56
Additionally, Accordent PresenterPRO enables content authors to publish content
to either a single publishing point or up to six separate publishing points.
Benefits of Using Multiple Publishing Points
There are several reasons that you may want to leverage multiple publishing
points, including:
•
•
•
Can be used to “load-balance” the distribution of the presentation assets to
reduce reliance on a single server and help scale distribution resources.
Can be used to publish individual components of the presentation to different
servers or clusters of servers (e.g. interface server, slide server, polling
server).
Can be used to publish an internal (“behind the firewall”) and external
presentation simultaneously.
31
While Accordent PresenterPRO defaults to a single publishing point (See Figure
4-57), multiple publishing points can be accessed by selecting the “Multiple
Publishing Points” field (See Figure 4-58).
Fig. 4-57
Fig. 4-58
The following sections describe the process for completing the publishing fields.
These instructions apply whether one publishing point or multiple publishing
points are being used.
4.11.1 Completing The Publishing Information Fields
In the “Web Directory” field, enter the URL that the audience will use to view the
interface graphics (See Figure 4-59).
Fig. 4-59
Once the “Web Directory” field has been completed, select the type of transfer
that will be used: either FTP, Secure FTP or UNC (See Figure 4-60).
Fig. 4-60
If FTP or SFTP is selected, proceed to Section 4.11.2. If UNC or Mapped Drive
is selected, proceed to Section 4.11.3.
4.11.2 Completing the FTP/SFTP Fields
If FTP/SFTP is selected, the FTP/SFTP Server IP, User, Password, Subdirectory
and Port fields will appear (See Figure 4-61).
32
Fig. 4-61
The FTP and SFTP fields should be completed as follows:
In the “FTP/SFTP Server IP” field, enter the IP address for the FTP/SFTP Server
that will be used to publish the presentation (See Figure 4-62).
Fig. 4-62
“User” Field:
Enter the User ID for the FTP Server (See Figure 4-63).
Fig. 4-63
“Password” Field:
Enter the password for the FTP Server (See Figure 4-64)
Fig. 4-64
“Sub Directory” Field:
The “Sub Directory” field gives the developer the option of putting a presentation
in an FTP directory. To do this, enter the directory in the “Sub Directory” field
(See Figure 4-65).
Fig. 4-65
“Port” Field:
The Port field enables the presenter to transfer data through a port. The default
setting for the FTP “Port” field is 21; the default setting for the SFTP “Port” field
is 22. Enter the desired port number in the “Port” field (See Figure 4-66).
33
Fig. 4-66
4.11.3 Completing The UNC Fields
If UNC is selected, it is necessary to create a UNC upload path by entering the
UNC path in the Upload Path field (See Figure 4-67).
Fig. 4-67
Note:
UNC names consist of three parts:
a server name, a share name and
an optional file path that are
combined using backslashes as
follows: \\server\share\file_path
4.11.4 Selecting A Web Server
The “Publishing Info” screen also is used to specify the type of web server that
will be used to distribute the interface graphics, images, interactive questions etc.
Use the “Web Server CGI” drop down menu to specify the type of web server and
platform that is being used (See Figure 4-68). Select either Microsoft ASP or
PHP.
Fig. 4-68
4.11.5 Using Advanced FTP Settings
In addition to the standard FTP settings, Accordent PresenterPRO includes
advanced settings that can be used to publish to an active FTP server and to a
proxy server to FTP through a firewall.
Click Advanced Settings (See Figure 4-69).
34
Fig. 4-69
The advanced settings fields will appear (See Figure 4-70).
Fig. 4-70
On the Advanced Settings screen, it is first necessary to specify either a Passive or
Active FTP connection type (See Figure 4-71).
Fig. 4-71
Note:
The Connect Type will default to the
Passive field.
Once
the
an FTP connection has been selected,
Firewall Support fields can be used to
designate a proxy server that will be
used to FTP through the firewall (See Figure 4-72).
Fig. 4-72
The Firewall Support fields should be completed as follows:
“Off/On” Fields:
The “On” and “Off” fields are used to enable and disable firewall support. If
firewall support is required, select On.
35
“Firewall Type” Fields:
To select a firewall type, use the Firewall Type drop-down menu and highlight the
desired firewall type.
“Firewall Host” Field:
The “Firewall Host” field is used to specify the IP address for the firewall.
“Firewall Port” Field:
The “Firewall Port” field is used to specify the port address for the firewall.
“Firewall Logon Name” Field:
The Firewall Logon Name is used to input the user logon. Depending on the
configuration and firewall being used, it may not be necessary to complete this
field.
“Firewall Password” Field:
The Firewall Password is used to input the user password. Depending on the
configuration and firewall being used, it may not be necessary to complete this
field.
After completing the Publishing Information screen, click Next. The Streaming
Info page will appear (See Figure 4-73).
Fig. 4-73
4.12 Media Information Page
The “Media Information” page is used to input the locations of the streaming
media that will be incorporated into the presentation as well as to specify whether
36
the synchronization of the presentation will be delivered “In-Band” or “Out-ofBand.”
Note: While this Chapter is focused on the Presentation Wizard, discussion of the
Media Information Page and In-Band distribution will include discussion of the
PE-Controller, which is a separate application that resides on the encoder and
must be configured prior to using In-Band synchronization.
4.12.1 Entering Media Locations
Accordent PresenterPRO supports live and on demand streaming media that has
been encoded for Microsoft and RealNetworks media players at Low, Medium
and High bandwidth speeds.
To choose a media type, highlight the tab at the top of the “Streaming Media
Information” page that refers to the desired media type/format (See Figure 4-74).
Fig. 4-74
Note:
The individual
streams are
designated by
Stream One, Stream
Two, etc. They can
be associated with
any desired
bandwidth speed
(e.g. Stream One
can be used for 100
kilobits, 300
kilobits, etc.)
Once the media type has been highlighted, it is necessary to enter the stream URL
and HTTP base URL for each media format and bandwidth speed.
• The Stream URL is the URL that an audience member would click to
launch the streaming media.
•
The HTTP base URL is the location of the web server that will be used to
deliver the web content in conjunction with a particular stream. For
example, different base URLs might be used if one stream is being
delivered internally and will be used in conjunction with an internal web
server, while another stream will be delivered externally and use a web
server designed to deliver web content externally.
37
For each desired media format and bandwidth speed, enter the Stream URL and
HTTP Base URL in the “Stream URL” and “HTTP Base URL” fields,
respectively (See Figure 4-75).
Fig. 4-75
Repeat this step for each desired media platform.
4.12.2 Enabling An Individual Stream
After completing the Stream URL and HTTP Base URL fields, select Enable
(See Figure 4-76).
Fig. 4-76
Note:
Prior to launching a presentation, it is necessary to make
sure that each stream that will be incorporated into the
presentation is enabled.
After enabling a stream, it must be decided whether the stream will be delivered
“in-band” or “out-of-band.” A detailed discussion of these delivery options is
provided in Section 4.12.3 and 4.12.4.
4.12.3 In-Band & Out-of-Band Synchronization
Before completing the “Media Information” page, it is important to decide
whether the presentation will be distributed in-band or out-of-band. In-band
synchronization is a process that binds the streaming media (audio and/or video)
with the synchronized, non-streaming content (PowerPoint slides, etc.) at the
encoder prior to delivery. Once the content is bound together at the encoder, it is
delivered as a single output. The primary benefits of using in-band
synchronization are:
• Because the media is embedded together before it is delivered, the nonstreaming content will be perfectly synchronized with the streaming media
as the media is delivered to the audience
• No encoding time offsets are required because the streaming and nonstreaming media are bound at the encoding stage and, therefore, all
elements of the presentation will share the same latencies during delivery.
Out-of-band synchronization does not bind the streaming media and the nonstreaming content at the encoder, but rather, delivers each component of the
presentation separately. As a result, the non-streaming media can be manipulated
38
during delivery to enhance scalability and to leverage a greater range of video and
audio sources, including phone bridges and closed circuit television. The primary
benefits of using out-of-band synchronization include:
• Distribution of non-streaming content can be staggered so that the web-server
is not delivering content (e.g. PowerPoint slides) to the entire audience at the
exact same moment.
• No additional software needs to be installed on an encoder
• Out-of-band distribution enables a content author to deliver synchronized
web content, such as PowerPoint slides, in tandem with non-streaming audio
and video, such as closed circuit television.
4.12.4 Selecting In Band & Configuring the PE-Controller
If you are using out-of-band distribution only, please proceed to Section 4.12.7.
Using In-Band distribution requires the PE-Controller, which is a separate install
included in Accordent PresenterPRO. The PE-Controller is an application that
resides on the encoder and enables Accordent PresenterPRO to communicate
with, launch and control the Microsoft and Real encoders. The encoder (and the
PE-controller) can be located on a remote system or on the same system that
Accordent PresenterPRO is residing.
Prior to completing the in-band fields in the Presentation Wizard, it is first
necessary to configure the PE-Controller.
Configuring The PE-Controller
After installing the PE-Controller on the encoding system, launch the PEController. The Accordent PresenterPRO Encoder Controller will appear (See
Figure 4-77).
Fig. 4-77
The PE-Controller contains four screens that enable you to configure and manage
encoding “jobs,” as follows:
39
Main Screen:
The “Main” screen is used to set presenter and administrator passwords and, if
necessary, to view an error log. Click Passwords & Settings (See Figure 4-78).
Fig. 4-78
The PE-Controller Configuration window will appear (See Figure 4-79).
Fig. 4-79
The PE-Controller Configuration screen is used to enable Accordent
PresenterPRO to configure and control the encoders remotely. The PE-Controller
Configuration screen includes the following fields:
•
Password: The Password field is used to set the Presenter password, which
gives a presenter the ability to start, stop and synchronize with the encoder
through Accordent PresenterPRO.
•
Admin Password: The Admin Password field is used to configure specific
encoding sessions. This password is required if Accordent PresenterPRO will
be used to configure encoding sessions remotely.
Note: Both passwords are required.
Once the Password and Admin Password fields have been completed, it is
necessary to specify whether the PE Controller will run from a local system
account or from a custom account (See Figures 4-80 and 4-81).
Fig. 4-80
Fig. 4-81
Note: It is rare that a custom account will be used unless the Local System
40
Account did not provide the user rights required to run the PE-Controller as a
service (See Section 4.12.5).
If a custom account is being used, it is necessary to complete the “User Name”
and “Password” fields (See Figure 4-82).
Fig. 4-82
After completing the PE-Controller Configuration fields, click OK.
At this stage, the PE-Controller will run as an application, which means that it
will have to be launched and started each time the machine is re-booted. As
discussed in Section 4.12.5, below, the PE-Controller also can be run as a service,
which means that it can be set to run automatically anytime the encoding machine
is on.
The View Config button will allow you to view all of your current settings (See
Figure 4-83).
Fig. 4-83
The View Config screen is shown in Figure 4-84.
Fig. 4-84
41
Windows Media Screen
The Windows Media screen is used to see which Windows Media streams have
been enabled in Accordent PresenterPRO. When one or more streams is enabled
in Accordent PresenterPRO, it will be highlighted (See Figure 4-85).
Fig. 4-85
To view the stream, click View Stream (See Figure 4-86).
Fig. 4-86
The Windows Media screen is also used to manage existing encoding profiles and
to create new profiles.
To access the profile management screens, click Manage Profiles (See Figure 487).
Fig. 4-87
42
Note: While the Manage Profiles feature enables the management of profiles
through the Encoder Controller, the primary reason it is included is that scripts
must be enabled for a profile for that profile to be accessible later in Accordent
PresenterPRO. This requirement only applies to Windows Media.
The “Manage Profiles” screen will appear (See Figure 4-88).
Fig. 4-88
On the Manage Profiles screen, you can either select and edit an existing profile
by selecting the profile and clicking Edit or you can create a new profile by
clicking New (See Figures 4-89 & 4-90 respectively).
Fig. 4-89
Fig. 4-90
While the “Edit Profile” and “New Profile” screens can be used to create and edit
profiles, the most important task is to enable scripts for each profile that you want
to be able to access in Accordent PresenterPRO. If scripts are not enabled for the
profile, it will not be accessible in Accordent PresenterPRO. To enable a script in
either the Create Profile or Manage Profile screens, select Script (See Figure 491).
Fig. 4-91
43
After selecting Script, either make additional edits if desired or return to the PEController.
RealProducer Screen
The RealProducer Screen is used to view which RealMedia streams have been
enabled in the Presentation Wizard and to configure the inputs for each of the
enabled streams.
Note: It is not necessary to enable scripts for RealMedia.
To access the “Helix Producer” screen, click Real Media (See Figure 4-92).
Fig. 4-92
The “RealProducer” screen is used to view streams that have been enabled in
Accordent PresenterPRO and to configure the inputs that are being used to
capture each enabled stream.
To view an enabled stream, click View Stream (See Figure 4-93).
Fig. 4-93
Note: The Use Helix Encoder check box will only be adjustable if you
have the Real Producer 8.5 installed. With this option unchecked you
will utilizing the Real Producer 8.5 and all of its codecs and encoding
methods.
44
The encoder will appear (See Figure 4-94). To view your input select the Live
Preview check box.
Fig. 4-94
To configure an input, click Stream (See Figure 4-95)
Fig. 4-95
The input device configuration screen will appear (See Figure 4-96).
Fig. 4-96
45
Relay Screen
The PE-Controller Relay screen is used to relay instructions to one or more
additional PE-controllers. Once the Relay feature is configured, the Presentation
Wizard can be used to send instructions to multiple encoders performing different
functions. Click Relay (See Figure 4-97).
Example: This feature can be used to send launch, synchronization and stop
information from an “Origin Encoder”, encoding English content, to a “Second
Encoder”, encoding content in Japanese so that the second encoder pulls different
synchronized content, consistent with the stream containing Japanese content.
Fig. 4-97
Once the Relay screen is displayed, click Allow Relay (See Figure 4-98).
Fig. 4-98
Once Allow Relay is selected, you can Add, Edit or Delete relay server
information that will link the PE-Controller you are currently using to another PEController on another machine. Click Add or Edit (See Figure 4-99).
Fig. 4-99
The Add or Edit screen will appear (See Figure 4-100). The fields on both
screens are identical.
46
Fig. 4-100
The Add and Edit screens contain four fields that should be completed as follows:
Base URL: The Base URL is the location of the web server that will be
distributing the web content being called by the encoder receiving relayed
instructions.
Replace URL: The Replace URL is the location of the web server that the origin
encoder is using but that is being replaced by the Base URL so that the second
encoder can receive different web content.
Address: The IP Address of the relayed encoder.
Port: The Port that will be used to communicate with the relayed encoder.
Click Save (See Figure 4-101).
Fig. 4-101
4.12.5 Initiating the PE-Controller Service
Once the PE-Controller fields have been completed, the “service” must be
initiated on the encoder. To initiate the service:
1. Launch the Control Panel on the encoder and click Administrative Tools.
2. After clicking Administrative Tools, click Services. Within the Services
directory, click PEController.
3. The PE Controller Local Properties window will appear (See Figure 4-102).
47
Fig. 4-102
On the PE-Controller Properties window, use the Start-Up type drop-down menu
to select whether the PE-Controller will start automatically whenever the
encoding machine is on, or manually.
After selecting a Startup type, click Start to start the PE-Controller or OK to save
the PE-Controller Properties settings.
Next return to the Streaming Media Info page in Accordent PresenterPRO to
configure Accordent PresenterPRO to communicate with the PE-Controller (See
Section 4.12.6, below).
4.12.6 Configuring Accordent PresenterPRO To Manage The PEController
On the Streaming Media Info page, the “Stream URL Link” field and “HTTP
Base URL” fields should have already been completed (See Section 4.12.1).
If the PE-Controller is going to be used, select Use Encoder Controller for each
desired stream (See Figure 4-103).
Fig. 4-103
The Address, Port, Password and Admin Password fields will appear as well as
the Configure button (See Figure 4-104).
Fig. 4-104
48
These fields should be completed as follows:
Address Field: Enter the address of the encoder. The default “loop back” address
is typically “127.0.0.1”.
Port Field: Enter the Port that the encoder is using. The port number can be
found in the PE Controller Configuration window (See Figure 4-105).
Fig. 4-105
Password Field: Enter the password that was entered in the PE-Controller to
access the encoder.
Admin Password Field: Enter the admin password that was entered in the PEController to provide administration rights (See Figure 4-106).
Fig. 4-106
Note: Unless encoder profiles are going to be changed, it is often not necessary to
enter an administration password.
Clicking the Configure button will launch the Encoder Settings window for the
encoder, either Real or Microsoft, that is being configured (See Figures 4-107
through 4-109 and 4-110 though 4-112, respectively).
Fig. 4-107 (RN)
Fig. 4-108 (RN)
49
Fig. 4-109 (RN)
Fig. 4-110 (MS)
Fig. 4-111 (MS)
Fig. 4-112 (MS)
The Microsoft and RealNetworks encoders should be completed in the same way
that they would if Accordent PresenterPRO was not being used with one
exception: Script commands must be enabled for Microsoft.
The in-band encoding fields should be repeated for each stream for which in-band
synchronization will be used.
Note: It is possible that some of the streams will use in-band while other streams
will leverage out-of-band synchronization (See Section 4.12.4 on Using Out-ofBand).
4.12.7 Configuring for Closed Captioning
Accordent PresenterPRO includes closed captioning support for RealNetworks
encoded text. To include closed captioning, it is first necessary to select an
interface in which closed captioning is available – marked “Available” beside
50
Closed Caption on the General interface screen in the Presentation Wizard (See
Figure 4-113).
Fig. 4-113
To include closed captioning, click Real Media on the Streaming Info page (See
Figure 4-114).
Fig. 4-114
At the bottom of the RealNetworks screen are the “Closed Captioning” fields (See
Figure 4-115).
Fig. 4-115
In the “Closed Captioning” section, first click Enable (See Figure 4-116).
Fig. 4-116
Then enter the closed captioning stream URL link in the “Stream URL Link” field
(See Figure 4-117).
Fig. 4-117
51
Beneath the Enable and Stream URL fields are the Address, Port, Password and
Admin Password fields, which should be completed as follows:
Address Field: Enter the address of the encoder. The default “loop back” address
is typically “127.0.0.1”.
Port Field: Enter the Port that the encoder is using. The port number can be
found in the PE Controller Configuration window.
Password Field: Enter the password that was entered in the PE-Controller to
access the encoder.
Admin Password Field: Enter the admin password that was entered in the PEController to provide administration rights. Unless encoder profiles are going to
be changed, it is often not necessary to enter an administration password.
You can also configure the closed captioning encoder by clicking Configure (See
Figure 4-118).
Fig. 4-118
The “Closed Captioning Encoder Settings” screen will appear (See Figures 4-119
and 4-120).
Fig. 4-119
Fig. 4-120
There are ten fields on the Encoder Settings screen that should be completed as
follows:
52
Enable: Highlight the “Enable” field to enable the closed captioning encoder to
be started and stopped using Accordent PresenterPRO.
Address: Enter the address of the encoder. The default “loop back” address is
typically “127.0.0.1”.
Port: Enter the Port that the encoder is using.
Password Field: Enter the password that was entered in the PE-Controller to
access the encoder.
Video Source: Use the “Video Source” drop down menu to select the device that
will be used to create the closed captioning content.
Enable Archive: Highlight the “Enable Archive” field to instruct the encoder to
create an archived closed captioning file.
Archive File Name: Enter a name for the archived closed captioning file. The
file suffix should be “.rt” for RealText.
Archive Folder Path: Enter a location where the archived file will be stored after
it is created.
After completing the “CC Encoder Settings” screen, click OK (See Figures 4-121
and 4-122).
Fig. 4-121
Fig. 4-122
4.12.8 Testing the Encoder
If using the in-band encoding method, you can test your encoding information to
ensure they are correct. At the bottom of the Streaming Info page there is a Start
Encoder Test (See figure 4-123).
53
Fig. 4-123
Click the Start Encoder Test button. You will have one of two pop-up boxes
appear. If you get the message saying Encoder Started then you have proper
communication with the encoder (See figure 4-124). If you receive a message
saying Check Encoder Settings, then you are not communicating properly with
your encoder (See figure 4-125).
Fig. 4-124
Fig. 4-125
When finished, click on Stop Encoder Test (See figure 4-126).
Fig. 4-126
4.12.9 Using Out-Of-Band: Interface Update Interval
Whether using in-band or out-of-band synchronization, the Enable, Stream URL
Link and HTTP Base URL Link fields must be completed, as described in Section
4.12.1.
If Out-of-Band synchronization is being used for one or more streams, first make
sure that the “Use Encoder Controller” field on the Streaming Media Info page is
not selected (See Figure 4-127).
Fig. 4-127
Note:
By default, Accordent PresenterPRO will
synchronize out-of-band if “Use Encoder
Controller” is not selected.
54
Once out-of-band distribution is selected (by default), the content author has the
option of customizing the Interface Update Interval. This feature is used to
prescribe the frequency with which the audience interface checks the web-server
for new, non-streaming content. The default update interval setting is five
seconds, which means the average client interface will get an event within 2 ½
seconds of that event being “pushed.”
To set the Interface Update Interval, enter the interval, in seconds, in the
“Interface Update Interval” field (See Figure 4-128).
Fig. 4-128
Note:
Increasing the Interface Update
Interval has the effect of reducing
the burden on the server and,
consequently, increasing the number
of simultaneous users that a server
can support.
4.12.10 Using Auxiliary Audio/Video Sources (Out-of-Band Only)
While many web-based presentations will include only streaming media, when
out-of-band distribution has been selected, Accordent PresenterPRO also enables
a presenter to synchronize Microsoft PowerPoint slides and URLs with nonstreaming audio and video, including phone bridges and closed circuit television.
Example: A presentation is being produced for an audience that will include
viewers that will view the presentation via computer only, and viewers that will
receive the slides via computer and the audio via a phone bridge. By using the
Auxiliary Audio/Video Source, a presenter can create a presentation that will
deliver slides and URLs that are perfectly synchronized with the online media
presentation – as well as with the real time audio being exchanged over the phone
bridge.
To synchronize a presentation with non-streaming media, first click on the
“Auxiliary” tab (See Figure 4-129).
Fig. 4-129
Once the “Auxiliary” page is opened, it is necessary to enable the auxiliary media
function. To do so, select the “Enable Auxiliary Media” field (See Figure 4-130).
55
Fig. 4-130
Enabling the auxiliary media function will produce two results. First, it will
enable a link to be generated to a presentation utilizing the auxiliary media. e.g.
the phone bridge presentation link.
To generate a link to the auxiliary media, enter the link in the “HTTP Base URL”
field (See Figure 4-131).
Fig. 4-131
Second, it will generate an “auxiliary” field in the “Encoding Time Offset”
window. As explained in Chapter 6, the Encoding Time Offset window is used to
account for delays that occur during the capture and encoding of video and audio;
the additional time offset can be used to account for delays of other types of
media, which may include audio transferred over the phone or closed circuit video
transferred via satellite. In both cases, the offset is generally negligible.
4.12.11 Inputting Clip Information
In addition to enabling streaming and auxiliary media, the Streaming Media Info
page also enables the content author to assign clip information to the streaming
media. The clip information, or metadata, will be attached to the streaming media
clips for organizational purposes.
Note: If the clip is being viewed in the player only, and not in a Accordent
PresenterPRO interface, the clip information will be displayed in the player.
Click the Clip Information tab (See Figure 4-132).
Fig. 4-132
The Clip Information screen will appear (See Figure 4-133).
Fig. 4-133
56
The Clip Information screen contains the following fields:
• Title
• Author
• Copyrights
• Description
• Keywords
Enter the desired information in one or more of the Clip Information fields and
click Next. The “Distribute Content” page will appear (See Figure 4-134).
Fig. 4-134
4.13 Distribute Content Page
The “Distribute Content” page is used to upload a presentation to the project
directories once all of the previous Presentation Wizard steps have been
completed.
To upload the presentation, click Distribute Content (See Figure 4-135).
Fig. 4-135
If “Display Slide Titles” was selected, a slide title message box will appear (See
Figure 4-136). The presenter has the option of checking the title of each slide or
clicking Ok To All.
57
Fig. 4-136
4.14 Using Configuration Files
The Presentation Wizard enables users to save configuration files, which are files
that contain all of the information input into the Presentation Wizard by the
presenter or a third party in advance of a presentation. Configuration files make it
easy to prepare the presentation on behalf of a presenter that may not have access
to certain information, including passwords, server and encoder locations.
4.14.1 Saving a Configuration File
The Presentation Wizard contains a workflow that requires the user to complete
several fields and to select an interface type, whether PowerPoint slides will be
converted to jpeg or gif, etc. Once this information is completed, it can be saved
in a configuration file that will repopulate the Presentation Wizard with the exact
same information when the configuration file is accessed.
Once the desired information has been entered, highlight the File drop-down
menu in the Presentation Wizard and select Save Config File (See Figure 4-137)
Fig. 4-137
Note:
It is possible to save the same information in
multiple configuration files under different names
or to create configuration files with different
information without closing Accordent
PresenterPRO.
The “Save File” window will appear (See Figure 4-138).
Fig. 4-138
58
Enter the name of the configuration file in the “File Name” field and click Save.
4.14.2 Accessing a Configuration File
If Presentation Wizard information has previously been saved in a configuration
file, the configuration file can be accessed by highlighting the File drop-down
menu in the Presentation Wizard and select Open Config File (See Figure 4-139).
Fig. 4-139
The “Open File” window will appear (See Figure 4-140).
Fig. 4-140
Once the desired configuration file is located, double-click on the configuration
file. All of the settings and information saved in the configuration file will repopulate the Presentation Wizard.
Depending on what information was saved in the configuration file, it may still be
necessary to enter certain information or to complete certain fields. Additionally,
information provided by a configuration file can be changed once accessed. e.g. a
different interface or PowerPoint slide deck can be selected, etc.
59
5
5. Introduction To And Using The Presentation Manager
5.1 Presentation Manager Overview
The Accordent PresenterPRO Presentation Manager is used to preview and
publish synchronized content, including slides, URLs and interactive content,
with live and on demand streaming media. The Presentation Manager also is used
to manage moderated Q&A and review which audience members have registered
for and logged into the presentation.
The primary components of the Presentation Manager are the:
• Slide Preview & Publish Screen
• URL Preview & Publish Screen
• Interactive Screen
• Chapters Screen
• Q&A Screen
• Registration Screen
• Event List Window
5.1.1 Slide Preview & Publish
On the left hand side of the Presentation Manager is the “Slide” tab that displays
the “Slide Preview & Publish” screen (See Figure 5-1).
Fig. 5-1
The “Slide Preview & Publish” screen is used to navigate, preview and publish
Microsoft PowerPoint slides.
60
5.1.2 URL Preview & Publish
To the right of the “Slide” tab is the “URL” tab that displays the “URL Preview &
Publish” screen (See Figure 5-2).
Fig. 5-2
The “URL & Files Preview & Publish” screen is used to select, preview and
publish URLs and files during a presentation. Among other options, this screen
enables the developer to choose a different target frame within the interface or
publish as a separate pop-up window.
5.1.3 Interactive Preview & Publish
To the right of the “URL” table is the “Interactive” tab that displays the
“Interactive Preview & Publish” screen (See Figure 5-3).
Fig. 5-3
61
The “Interactive Preview & Publish” screen is used to draft, preview and publish
interactive content during a presentation. Among other options, this screen
enables the developer to display polling questions, trivia and facts. All answers
submitted to interactive questions are tabulated in real time and the results can be
displayed to or hidden from the audience at the presenter’s option.
5.1.4 Chapters Screen
To the right of the “Interactive” tab is the “Chapters & Breaks” tab that displays
the “Chapters & Breaks” screen (See Figure 5-4).
Fig. 5-4
The “Chapters & Breaks” screen is used to generate chapters that are displayed in
the presentation interface when the presentation is posted on demand. Chapters
can be automatically generated each time a specific event occurs, such as the
display of a slide, or custom chapters can be created. Breaks are used to insert
times in your presentation that are to be cut out of the on demand presentation.
For example, if you have a break during your live encoding where nothing is
going on and you do not want the on demand presentation to show these breaks,
then you can “cut” that portion of the presentation out.
5.1.5 Moderated Q&A
To the right of the “Chapters” tab is the “Q&A” tab that displays the “Q&A”
screen (See Figure 5-5).
Fig. 5-5
62
The “Q&A” screen is used to review questions submitted to the presenter using
the moderated Q&A feature of Accordent PresenterPRO. Moderated Q&A will
organize submitted questions and enables the presenter to answer them directly or
at a later time.
5.1.6 Registration
To the right of the “Q&A” tab is the “Registration” tab that displays the
“Registration” screen (See Figure 5-6).
Fig. 5-6
The “Registration” screen is used to preview which audience members have
registered for the presentation. You can save the list of viewers who registered in
a .csv file by clicking on the “Save .csv file” button on the bottom of the
registration screen.
5.1.7 Event Launch & Event Record
On the right hand side of the Presentation Manager are the event launch controls
and the “Event List” window (See Figure 5-7). The “Event List” window is used
to record each event that occurs during a presentation so that presentations can be
modified for on demand use or published to a network drive or CD ROM.
Fig. 5-7
The event launch controls are used to start/stop a presentation (See Figure 5-8).
63
Fig. 5-8
Note:
Launching or stopping an event
does not control the streaming
portion of the event; rather, it
launches the user-interface and,
once published, the nonstreaming content that will be
synchronized with the video.
5.1.8 Starting A Practice Run
Accordent PresenterPRO includes a “Practice Run” option that enables a
presenter to practice with the content and test the encoders without publishing live
to the Internet. Click Start A Practice Run (See Figure 5-9).
Fig. 5-9
5.2 Managing & Publishing Slides
To access the “Slide Preview & Publish” page, click the “Slide” tab on the
Presentation Manager (See Figure 5-10).
Fig. 5-10
Once the “Slide Preview & Publish” page is displayed, thumbnails of the
imported Microsoft PowerPoint slides will be displayed in the “Slide Selector”
window (See Figure 5-11).
64
Fig. 5-11
To navigate the thumbnail slides, use the scrollbar on the right-hand side of
the “Slide Selector” window. The right and left arrows also can be used to
navigate the thumbnails.
5.2.1 Slide Preview
To navigate the thumbnail slides, use the scrollbar on the right-hand side of
the “Slide Selector” window. The right and left arrows also can be used to
navigate the thumbnails.
Fig. 5-12
Note:
The slide that is displayed
in the “Preview Slide”
window is the slide that is
queued up to be displayed.
Before publishing a slide,
make certain the correct
slide is displayed in the
“Slide Preview” window.
5.2.2 Slide Preview & Publish
The Presentation Manager defaults to a Preview & Publish setting - a two-step
process: (1) the slide is highlighted and displayed in the “Slide Preview” window,
(2) before the slide is published, the presenter must click Push Slide to publish
the slide (See Figure 5-13).
Fig. 5-13
Note:
If the Presenter intends to display a
Microsoft PowerPoint slide as soon
as the presentation is launched,
select the desired slide and click
Push Slide before the presentation is
launched.
65
Once a slide is displayed, the displayed slide will appear in the “Audience Slide”
window (See Figure 5-14).
Fig. 5-14
5.2.3 Slide Auto-Publish
In addition to enabling the presenter to preview and manually display Microsoft
PowerPoint slides, the Presentation Manager also enables the presenter to publish
the slide by highlighting the slide in the “Slide Selector” window. To initiate the
Auto-Publish function, check Auto Slide Display in the “Settings” drop-down
menu (See Figure 5-15).
Fig. 5-15
Note:
When the auto-publish function is active, slides can be
displayed by either highlighting the slide or using the
right and left arrows on the keyboard to navigate from
slide to slide. The presenter should not use the right
and left arrows if s/he intends to skip certain slides
during the presentation, as every slide highlighted
using the right and left arrows will be displayed.
Once auto-publish functionality is enabled, every highlighted slide will
automatically be displayed.
5.2.4 Last Minute Slide & PDF Import
In previous versions of Accordent PresenterPRO, PowerPoint slides and PDF
documents could only be imported using the Presentation Wizard. In Accordent
PresenterPRO v6.0, the Presentation Manager has been equipped with a slide
import feature that enables a presenter to import and upload slides and PDFs
minutes before or even during a presentation.
To access the slide import feature, select Import Slides in the File drop-down
menu (See Figure 5-16).
66
Fig. 5-16
The Import Slides window will appear (See Figure 5-17).
Fig. 5-17
The Import Slides window is used to import one or more slide presentations into
Presentation Manager.
To add slides, click Add and use the Browse window to locate the desired
PowerPoint slide deck(s) (See Figure 5-18).
Fig. 5-18
Note:
The Delete and Clear List buttons
can be used to delete a single
PowerPoint slide deck or an entire
list of slide decks, respectively.
Once the slide deck(s) have been selected, they can be imported into the
Presentation Manager in one of two ways:
•
The slides can be appended to the end of the slides already imported in the
Presentation Manager (See Figure 5-19)
67
•
The slides can overwrite the slides already imported into the Presentation
Manager.
Fig. 5-19
Example:
A slide deck has been
imported and appended to a
slide presentation already in
Accordent PresenterPRO.
The first set of slides ends at
Slide 3 and the newly
imported presentation
commences at Slide 4.
To import a slide deck and have it appended to the end of previously imported
slides, select Append Slides, then click Import (See Figure 5-20). To import a
slide deck and have it overwrite slides already imported into the Presentation
Manager, click Overwrite, then click Import.
Fig. 5-20
The imported slides will simultaneously be:
• Converted into HTML content for distribution over the Web
• Imported into the Presentation Manager
• Published to the prescribed web server(s)
The imported slides will now be visible in the Presentation Manager.
5.3 Managing & Publishing URLs
On the left hand side of the “URL Preview & Publish” page is the “URL List”
window (See Figure 5-21).
68
Fig. 5-21
A selected URL will be displayed in the “URL Options” fields (See Figure 5-22).
Fig. 5-22
5.3.1 Preparing URLs
URLs can be prepared either prior to or during a presentation. To prepare a URL,
enter the URL in the “URL Selected” window. The URL can be published from
the URL window by clicking Push URL or the URL can be added to the “URL
Selector” window and displayed later.
To add a URL to the “URL Selector” window, type the URL in the URL window
and click Add to List (See Figure 5-23). Repeat this process to add as many
URLs as desired.
Fig. 5-23
Note:
When adding URLs,
make sure to include the
prefix http://.
The
URL page also
enables the presenter to create a URL list by using the “Slide Preview” function.
To create a URL list, type a URL and click Preview URL (See Figure 5-24).
Fig. 5-24
69
Once Slide Preview is clicked, the URL and web page will be displayed in the
“URL Preview” window (Fig 5-25). To add URLs to the URL Selector window,
navigate the web page to access new URLs and click Add to List.
Fig. 5-25
Added URLs will be displayed in the URL Selector window in the order they
were added.
5.3.2 Saving & Opening A URL List
URLs added to the URL Selector can be saved and the file containing the URLs
can be accessed for a future presentation. To save a URL list, click Save List
(See Figure 5-26).
Fig. 5-26
Once “Save List” is clicked the list will automatically be saved to the local project
folder.
To open a save URL list, click Open URL List at the bottom-left of the
Presentation Manager (See Figure 5-27).
70
Fig. 5-27
Once “Open URL List” is clicked, the “File Open” window will appear. Locate
the desired URL List, then click Open (See Figure 5-28).
Fig. 5-28
Once “Open” is clicked, the URL List will appear in the URL Selector window in
the Presentation Manager.
5.3.3 Targeting URLs
By default, a URL will be displayed in the same interface location in which
PowerPoint slides are displayed. URLs, however, may also be displayed as a
pop-up in a separate browser window or, if the template is so defined, in any
number of locations throughout the template.
To target a URL to a pop-up browser, use the “Target” drop down menu and
select New Window. The selected URL will now be displayed in a pop-up
window (See Figure 5-29).
71
Fig. 5-29
To target a URL to a different region of the interface, use the “Target” drop down
menu and select the desired interface location (See Figure 5-30). The available
target options will be determined by how the interface was defined and all
available target areas will be listed in the drop-down menu.
Fig. 5-30
Note:
Each URL can be targeted to a
unique frame.
5.3.4 Publishing URLs
The first step in publishing a URL is ensuring that the desired URL is displayed in
the “URL” field (See Figure 5-31).
Fig. 5-31
To display a URL in the “URL Selected” window, either:
•
•
Type the desired URL in the “URL” field or
Highlight the desired URL in “URL List” window (See Figure 5-32).
Fig. 5-32
72
Once a URL is displayed in the “URL” field, the presenter can choose whether
the URL will target the slide window, a pop up window or another region of the
interface.
Once the desired options have been selected, the URL can be displayed by
clicking Push Content to Audience (See Figure 5-33).
Fig. 5-33
As soon as a URL is displayed, the Event List will show that a URL has been
published and the time that the URL was published (See Figure 5-34).
Fig. 5-34
5.4 Creating & Publishing Interactive Content
The Interactive Content page is used to create several different types of interactive
content, including:
• Surveys
• Trivia
• Question & Answer
• Facts
This page also is used to publish images and text (e.g. “Now Speaking”) and to
clear interactive content that no longer should be displayed.
73
5.4.1 Selecting An Interactive Content Type
The first step in creating interactive content is to select the type of content that
will be displayed. Use the Type drop-down menu and select an interactive
content type (See Figure 5-35).
Fig. 5-35
Once an interactive content type has been selected, the interactive content can be
assigned a title that will be displayed with the content in the presentation interface
(See Figure 5-36).
Fig. 5-36
Note:
Including the title with the
interactive content is optional.
To include a title, enter the title in the Title field (See Figure 5-37).
Fig. 5-37
Once a title has been entered, or if that option was skipped, next enter the text that
will comprise the interactive content (See Figures 5-38 through 5-41).
Fig. 5-38
Fact
To complete a fact, enter the fact in the
Fact Text field.
74
Fig. 5-39
Survey
To complete a survey, type the survey question
in the Question field and type up to six choices
in the Answers field.
Fig. 5-40
Trivia
To complete a trivia question, enter the question in
the Question field and enter the answer in the
Answer field.
Fig. 5-41
Image
To publish an image to the Content
window, enter the image URL in the
Image Source URL field. To make
the Image linkable, enter the image
link in the Image Link URL field.
5.4.2 Displaying or Hiding Answer Results
Surveys and trivia are used to collect answers from the audience. These answers
are tabulated immediately and can either be made available to the audience in real
time or hidden from the audience (See Figure 5-42).
Fig. 5-42
To hide either survey or trivia results, check Hide Results or Hide Answer,
respectively (See Figures 5-43 and 5-44).
Fig. 5-43
75
Fig. 5-44
Once the interactive content has been entered, the user has the option of
• displaying the interactive content immediately or
• adding the interactive content to a list of content that will be
displayed at a later time.
5.4.3 Adding & Deleting Interactive Content
To add interactive content to an interactive content list, click Add to List (See
Figure 5-45).
Fig. 5-45
The interactive content label, title (if added), and content will appear in the
Interactive List window (See Figure 5-46).
Fig. 5-46
To delete interactive content from the Interactive list, highlight the content that
will be deleted and click Delete Item (See Figure 5-47).
Fig. 5-47
76
5.4.4 Saving & Opening An Interactive Content List
Interactive content added to the Interactive List window can be saved and the file
containing this content can be accessed for a future presentation. To save an
Interactive List, click Save List (See Figure 5-48).
Fig. 5-48
Once “Save List” is clicked, the list will automatically be saved to the local
project folder.
To open a saved Interactive List, click Open List on the Presentation Manager
(See Figure 5-49).
Fig. 5-49
Once Open List is clicked, the File Open window will appear. Locate the desired
Interactive List and click Open (See Figure 5-50).
Fig. 5-50
Once Open is clicked, the Interactive List will appear in the Interactive List
window in the Presentation Manager.
77
5.4.5 Publishing Interactive Content
Interactive content can be published in two ways depending upon whether the
interactive content was created in advance or is being created during the
presentation and published immediately.
•
To publish interactive content that was created in advance, highlight the
interactive content in the Interactive List window and click Push
Interactive Content (See Figure 5-51).
•
To publish interactive content that was created “on the fly”, select the
type, enter a title (optional), enter the interactive content in the content
fields and click Push Interactive Content (See Figure 5-52).
Fig. 5-51
Fig. 5-52
Whether displaying previously created interactive content or content that has been
created on-the-fly, content in both situations is displayed by clicking Push
Interactive Content (See Figure 5-53).
Fig. 5-53
As soon as Display Interactive Content is clicked, the interactive content type and
the time at which it was displayed will be displayed in the Event List (See Figure
5-54).
78
Fig. 5-54
5.5 Creating & Editing Chapters
The Chapters page is used to create presentation sections that are displayed in the
interface and enable an audience member to jump to a specific point in a
presentation that has been published on demand or to a CD ROM.
In addition to enabling a presenter to manually create custom chapters, the
Chapters page can be used to automatically create chapters for each displayed
slide, displayed URL or displayed interactive question (See Figure 5-55).
Fig. 5-55
Automatic
• By Slide
• By URL
• By Interactive
Custom chapters
5.5.1 Creating Chapters Automatically
Often slide, URL and interactive content transitions that occur during a
presentation represent significant markers within that presentation. Consequently,
the Chapters page enables the presenter to automatically create a chapter, or
presentation segment, each time a slide, URL and/or interactive question is
displayed.
To automatically create a chapter based on a specific event, select the event type
that will be used to create a chapter. It should be noted that multiple event types
79
(i.e. slides, URLs and interactive questions) can be used individually or in
conjunction (See Figure 5-56).
Fig. 5-56
Note:
Chapters created using
displayed slides can use
either the slide title or slide
number.
5.5.2
Creating Custom Chapters
In addition to automatic chaptering, the Chapters page also enables the presenter
to create chapters manually based on specific criteria, such as a change in
speakers, a time interval or a change in subject matter. To create a custom
chapter, enter the chapter title that will be displayed in the interface in the
”Chapter” field and click Add Chapter (See Figure 5-57).
Fig. 5-57
Each time a chapter is created, the chapter and the time at which the chapter was
created will be displayed in the Chapter List window (See Figure 5-58).
Fig. 5-58
5.6 Using Moderated Q&A
The “Moderated Q&A” screen enables a presenter or a moderator to receive
questions and review questions submitted by the audience. The moderated Q&A
feature is designed to work directly through the Presentation Manager or to send
questions to a prescribed web location where a moderator can review questions
80
and forward them to the presenter’s screen in the Presentation Manager or to a
separate web location being reviewed by the presenter.
Note: Moderated Q&A enables the moderator and presenter to review questions
from a web-location for two reasons: (1) it enables the presenter to enlist the
help of a moderator located at any Internet-enabled location without requiring the
moderator to have a copy of Accordent PresenterPRO and (2) it enables the
presenter to review questions without leaving other screens in the Presentation
Manager, such as the “Slide” screen, that are used during a live presentation.
To access the “Moderated Q&A” screen, click Q&A (See Figure 5-59).
Fig. 5-59
If questions are being moderated at a web-location, as opposed to through the
Presentation Manager, enter the URL and complete the log-in information (See
Figure 5-60).
Fig. 5-60
As soon as a question is submitted, the question will be posted in the Presentation
Manager and at the web location entered above (See Figures 5-61 & 5-62).
Fig. 5-61
Fig. 5-62
81
If the registration feature is being used in conjunction with Moderated Q&A,
additional information about the person that submitted the question can be
accessed by double-clicking on the submitted question (See Figure 5-63).
Fig. 5-63
Once a question has been reviewed, that question can be filtered and, if appropriate,
forwarded to the presenter. To forward a question to the presenter, either click Filter
in the Presentation Manager (See Figure 5-64) or click Send To Presenter on the
web-based moderator screen (See Figure 5-65).
Fig. 5-64
Fig. 5-65
Note:
When a web-based moderator page is
being used, this page can be customized
to have a unique look and functionality consequently, the buttons on this page
may have different names than the
names used in this manual.
Once a question has been filtered to the presenter, it will appear on the presenter
screen in the Presentation Manager and on the presenter’s web-based Q&A screen if
one is being used (See Figure 5-66).
Fig. 5-66
Questions sent to the Presenter will be reflected as sent in both the Presentation
Manager and on the web-based moderator screen to help avoid re-sending questions
that have already been forwarded (See Figures 5-67 & 5-68).
Fig. 5-67
82
Fig. 5-68
Example:
In Figure 5-68, the first question has been
forwarded to the presenter and the Send to
Presenter button has been grayed out.
5.7 Using the Registration Page
The Registration page enables the presenter to preview which audience members
have logged into the presentation. If an audience member has registered for the
presentation, the audience member’s information and the time at which the
audience member registered for the presentation will be displayed in the “Value”
and “Time Stamp” fields respectively (See Figure 5-69).
Fig. 5-69
Additional information about the audience member, if it has been requested
through the registration process, can be accessed by double-clicking on the
registrant’s name. The “Viewer’s Details” window will appear (See Figure 5-70).
Fig. 5-70
83
6
6. Preparing To Launch A Presentation
6.1 Pre-Launch Preparation
Before streaming a live presentation, the Presenter may want to open both the
Accordent PresenterPRO Presentation Manager and the interface that will be
viewed by the audience. By opening the interface, the developer will be able to
monitor the identical presentation that the end user is viewing.
Additionally, if the presenter has previously prepared content, such as URL lists,
for use in a presentation, that content should be imported into the Presentation
Manager.
Also, as discussed below, both in-band and out-of-band synchronization require
the presenter to complete steps prior to launching a presentation:
•
Out-of-Band: The presenter must apply encoding time offsets to account for
the latency that occurs during the encoding of streaming media (See Section
6.2) and
•
In-Band: The presenter must use the PE-Controller to launch the encoders
that will be encoding the streaming media (See Section 6.2).
6.2 In-Band & Out-Of-Band Preparation
Previously, the “Media-Info” page in the Presentation Wizard was used to specify
whether the presentation would be delivered in-band or out-of-band. In-band
distribution is selected by clicking the “Use In-Band Encoder” field; if left unchecked, then out-of-band distribution is selected by default.
6.2.1 Out-of-Band
Because the streaming and non-streaming elements of a presentation are delivered
separately when out-of-band delivery is used, it is necessary to prescribe encoding
time offsets prior to launching a presentation to account for delays that may occur
during the encoding process.
Encoding time offsets enable the presenter to precisely delay the distribution of
non-streaming media content (e.g. Microsoft PowerPoint slides and URLs) to
ensure that the non-streaming content will remain the synchronized with
84
streaming video that is being produced, encoded and distributed in a live
environment.
Tip: To determine the appropriate encoding time offset, stream sample
audio/video through the same encoders that will be used during the presentation to
measure the delay each format experiences between initiating and viewing a
streamed video feed.
6.2.2 Setting Encoding Time Offsets
The default setting for the Encoding Time Offsets is zero seconds. If custom
offsets are desired, individual offsets can be applied for each media type and
connection speed.
To access the Encoding Time Offset window, open the “Settings” drop-down
menu and select Out Of Band Offsets (See Figure 6-1).
Fig. 6-1
After selecting Options, the “Live Encoding Time Offset” window will appear
(See Figure 6-2).
Fig. 6-2
To customize one or more individual offsets, enter a unique encoding time offset
in the “Time Offset” fields for each desired media type and connection speed (See
Figure 6-3).
85
Fig. 6-3
Note:
Encoding time offsets can be
altered prior to or during a
live presentation.
Once the desired offsets have been entered, click Apply to apply the time offset
and to keep the “Time Offset” window open or OK to apply the time offset and to
return to the Presentation Manager.
6.2.3 Auxiliary Media Time Offset
Accordent PresenterPRO enables a presentation to be synchronized with nonstreaming media, including phone bridges and closed circuit television. Since
encoding is not required to disseminate this media, the delay between the creation
and receipt of the media by the audience is generally much smaller.
Consequently, an additional link can be created for the audience members that
will be receiving the audio or video portion of the presentation via a nonstreaming media format.
To set an auxiliary media type encoding offset, enter the desired offset in the
“Auxiliary” field (See Figure 6-4).
Fig. 6-4
Once an offset has been entered into the “Auxiliary” field, click Apply or OK.
6.2.4 In-Band Distribution
If Use Encoder Control was highlighted on the “Media-Info” page, the streaming
and non-streaming content will be bound at the encoder and delivered as a single
piece of content.
If the PE-Controller was previously configured (See Section 4.12.4) and the “Use
Encoder Control” and related fields were completed in the Presentation Wizard
(See Section 4.12.6), then no additional preparation needs to be performed. The
encoders (and the presentations) will launch as soon as “Start” is clicked in the
Presentation Manager.
86
6.3 Testing Presentation Settings
Prior to launching a presentation, the Project Information screen can be used to
confirm and test a variety of presentation settings, including:
•
•
•
•
•
The webcast link that the audience will click to launch the presentation
An auxiliary link, if one has been created
The link to access moderated Q&A, if it is being created
The password for the moderated Q&A
The streaming media streams.
To access the Project Information screen, use the File drop-down menu and select
Project Information (See Figure 6-5).
Fig. 6-5
The Project Information screen will appear (See Figure 6-6).
Fig. 6-6
To test one or more settings, simply click on the desired setting field.
87
7
7. Using The Accordent PowerPoint Add-In
7.1 Using The Accordent PowerPoint Add-In
Accordent PresenterPRO includes an Accordent PowerPoint Add-In that enables
a presenter to synchronize PowerPoint slides from a remote computer. By
communicating directly with Accordent PresenterPRO, a computer with only
PowerPoint and the Accordent PowerPoint Add-In installed, can be used to create
slide synchronization files that become part of a synchronized, streaming
presentation.
Note: Because the Accordent PowerPoint Add-In works in conjunction with
Accordent PresenterPRO, it is necessary to configure Accordent PresenterPRO
prior to using the Accordent PowerPoint plug-i .
The Accordent PowerPoint Add-In should already be installed on the system that
will be used to present the PowerPoint slides. Once installed, the Add-In is
enabled by first highlighting the “Settings” drop-down menu in the Presentation
Manager and enabling Allow PowerPoint Add-in (See Figure 7-1).
Fig. 7-1
Once enabled, open Microsoft PowerPoint on the computer on which the
Accordent PowerPoint Add-In has been installed (the system that will be used to
synchronize PowerPoint slides).
In Microsoft PowerPoint, highlight the Tools drop-down menu in Microsoft
PowerPoint. On the tools drop-down menu, select the Accordent Add-In Options
(See Figure 7-2).
88
Fig. 7-2
The Accordent PowerPoint Add-In will appear (See Figure 7-3).
Fig. 7-3
In the “PresenterPRO Manager IP” and “Port” fields, enter the IP address and Port
number that will be used to link to Accordent PresenterPRO (See Figure 7-4).
Fig. 7-4
To initiate a PowerPoint presentation that will work in tandem with Accordent
PresenterPRO, click Start (See Figure 7-5).
89
Fig. 7-5
To stop using the Accordent PowerPoint Add-In during a presentation, click Stop
(See Figure 7-6).
Fig. 7-6
90
8
8. Launching A Presentation
8.1 Launching A Presentation
To launch a presentation, click Start on the right hand side of the Presentation
Manager (See Figure 8-1).
Fig. 8-1
Clicking “Start” will automatically connect the Presentation Manager to the FTP
server designated in the Presentation Wizard. A proper connection to the FTP
server will be indicated by a green light at the bottom-left of the Presentation
Manager (See Figure 8-2). If multiple publishing points are being used, multiple
green lights should appear.
Note: The encoder lights will turn green if the encoder connection is working. In
the example picture below, the encoders are red and, consequently, the presenter
can tell that encoder is not connected.
Fig. 8-2
Note:
The Presentation Manager will not
display “connected” if the presentation
is being prepared for CD only, as a FTP
connection is not required to publish the
presentation.
As soon as Start is clicked, the timer will begin recording for the duration of the
presentation and the “Event List” window will begin recording each event and the
time at which it occurred (See Figures 8-3 and 8-4).
Fig. 8-3
Fig. 8-4
91
8.2 Controlling Presentation Events
As discussed in Chapter 5, slides can be displayed in any order during the
presentation by either double-clicking the desired slide or using the right/left
arrow keys on the keyboard.
Similarly, URLs and interactive content can be displayed by selecting the desired
URL/Interactive content and clicking Push URL or Push Interactive. Although
it is suggested that URLs and interactive content be created before the
presentation, the same processes can be used to create and display new content
during the presentation.
8.3 Stopping A Presentation
At any time during or after a presentation, the presentation can be stopped by
clicking Stop on the right-hand side of the Presentation Manager (See Figure 8-5).
Fig. 8-5
A prompt will ask you to confirm. To stop the presentation, click OK (See Figure
8-6).
Fig. 8-6
A prompt will ask if you want to open the Archive Wizard. Click Yes (See Figure
8-7).
Fig. 8-7
92
A prompt will ask if you want to open the Archive Wizard. Click Yes (See Figure
8-7).
Fig. 8-8
93
9
9. Archiving A Presentation
9.1 Archive Wizard Overview
•
•
The Archive Wizard is used to edit the synchronization of PowerPoint slides and
URLs before posting a presentation on demand or publishing the presentation to a
CD. The Archive Wizard is also used to bind together the streaming and nonstreaming media that comprise the presentation. The binding process is only
necessary if:
The presentation was distributed out-of-band, meaning the elements of the
presentation were not previously bound together; or
The presentation was distributed in-band, but the Archive Wizard was used to edit
the presentation after it was initially created in the Presentation Manager.
Note: If a presentation was previously distributed in-band and no editing is
necessary, then it is not necessary to use the Archive Wizard. The completed
presentation will be available in the specified project directory.
9.2 Accessing the Archive Wizard
The Archive Wizard can be launched by either:
• Stopping a presentation while using the Presentation Manager and
clicking “Yes” to the prompt; or
• Opening the Accordent PresenterPRO Start Menu and selecting the
“Archive Wizard” field (See Figure 9-1).
Fig. 9-1
94
If using the Accordent PresenterPRO Start Menu to launch the Archive Wizard,
an “Open” window will appear after clicking OK (See Figure 9-2).
Fig. 9-2
Note:
Accordent PresenterPRO will automatically
default to the most recent presentation managed
in the Presentation Manager.
To open a previously created presentation for editing and/or posting for on
demand use, enter the file location in the “File Name” field and click Open (See
Figure 9-3).
Fig. 9-3
The Archive Wizard will appear with the “Event Details” page displayed (See
Figure 9-4).
Fig. 9-4
9.3 Using the “Event Details” Page
The “Events” page is used to edit the non-streaming elements of a presentation,
including:
• Changing the time at which an individual piece of content is published
• Adding and deleting non-streaming content
• Shifting all non-streaming content by a uniform amount of time (e.g.
all slides must be moved 30 seconds later to accommodate an added
introduction).
If the synchronization of non-streaming media is exactly as intended and no edits
are desired, click Next (See Section 9.5).
95
9.3.1 Editing Publish Times
On the left-hand side of the “Event Details” page is the “Event List” window that
lists every slide and URL that was published during the presentation, as well as
the time at which it was published.
Fig. 9-5
To modify the publish time of non-streaming content (e.g. slides and URLs), first
highlight the event in the “Event List” window. The publish time/type of content
will be displayed in the “Time” and “Type” fields respectively (See Figure 9-6).
Fig. 9-6
Note:
Timing must always be
input in the hh:mm:ss
format.
To modify the publish time, enter the new publish time in the “Time” field and
click Update (See Figure 9-7). The new publish time will be displayed in the
“Event List” window.
Fig. 9-7
9.3.2 Adding Slides & URLs
To add a slide or URL to a presentation, click New on the “Event Details” page
(See Figure 9-8).
Fig. 9-8
96
The “New Event Information” fields will appear (See Figure 9-9).
Fig. 9-9
In the “Time” field, enter the time at which the new content will be published.
Once a time is entered, use the “Type” drop-down menu to select “Slide,” or
“URL”, depending on the type of content that will be added. Depending on the
type of content selected, either the “Slide” drop-down menu or a “URL” field will
be displayed (See Figures 9-10 & 9-11).
Fig. 9-10
Fig. 9-11
Use the “Slide” drop down menu to select a slide (See Figure 9-12). If a new
URL is being added, enter the URL and use the “Target Frame” drop down menu
to specify where in the interface the URL will be displayed (See Figure 9-13).
Fig. 9-12
Fig. 9-13
Once a slide is selected or a URL entered, click Add (See Figure 9-14).
Fig. 9-14
97
The new Slide or URL will appear in the “Event List” window. If the nonstreaming content is not listed in chronological order after the edit, click Re-Sort
(See Figure 9-15).
Fig. 9-15
If no more edits are desired, click Next (See Figure 9-16).
Fig. 9-16
9.3.3 Deleting Non-Streaming Content
To delete a slide or URL, highlight the non-streaming media that will be deleted
in the “Event List” window. The publish time and content type will appear in the
“Time” and “Type” fields, respectively (See Figure 9-17).
Fig. 9-17
Once the highlighted content is displayed in the “Time” and “Type” fields, click
Delete (See Figure 9-18).
Fig. 9-18
98
Repeat these steps to delete additional non-streaming content. If no more edits
are desired, click Next (See Figure 9-19).
Fig. 9-19
9.3.4 Using The Event Time Shift To Edit Events
During the video editing process, content may be added to or deleted from the
beginning of video. e.g. an introduction or streaming ad may be included. Adding
or deleting content will have the effect of skewing the synchronization of nonstreaming content by a uniform length of time. Non-streaming content can be resynchronized with the streaming content by using the “Event Time Shift” page
(See Figure 9-20).
Fig. 9-20
Note:
If edits are made to the
middle of the video after
the synchronization
process, then each piece
of content must be resynchronized individually
using the “Editing
Publishing Times”
feature.
To access the “Event Time Shift” page, click the “Event Time Shift” tab (See
Figure 9-21).
Fig. 9-21
99
In the “Enter Time Shift Amount” field, enter the amount of time that nonstreaming content should be shifted (See Figure 9-22).
Fig. 9-22
Once a length of time has been entered, highlight either the “Forward Shift” or
“Backward Shift” field (See Figure 9-23).
• If video content has been deleted from the beginning of the video, a forward
shift should be used.
• If video content has been added to the beginning of the video, a backward
shift should be used.
Fig. 9-23
Once the “Event Time Shift” and “Backward”/”Forward” fields have been
completed, click Apply Shift (See Figure 9-24).
Fig. 9-24
The time shift will be applied to all non-streaming content and displayed in the
“Event List” window.
9.4 Editing Chapters
If chapters were created using the Presentation Manager, the chapters can be
edited using the “Chapters List” screen in the Archive Wizard. To access the
“Chapters List” screen, click the Chapters List tab (See Figure 9-25).
100
Fig. 9-25
On the left-hand side of the “Chapter List” screen is a list of all of the chapters
that were created during the presentation. This list can be modified by editing
existing chapters, adding chapters or deleting chapters.
9.4.1 Editing Chapter Times & Titles
To edit a chapter, highlight the chapter in the chapter list and enter the new time
and/or title in the “Time” and “Title” fields, respectively, and click Update (See
Figure 9-26).
Fig. 9-26
To delete a chapter, highlight the chapter in the chapter list and click Delete (See
Figure 9-27).
Fig. 9-27
To add a chapter, enter the new chapter time and title in the “Time” and “Title”
fields and click Add (See Figure 9-28).
Fig. 9-28
101
9.4.2 Using Chapter Event Time Shift To Edit Chapters
In addition to adding an deleting slides, the Archive Wizard also enables a content
author to apply an event time shift – either a forwards or backwards shift to the
chapters.
To access the chapter event shift feature, click Chapter Time Shift (See Figure
9-29).
Fig. 9-29
The “Chapter Time Shift” fields will appear. In the “Enter Time Shift Amount”
field, enter the amount of time that non-streaming content should be shifted (See
Figure 9-30).
Fig. 9-30
Once a length of time has been entered, highlight either the “Forward Shift” or
“Backward Shift” field (See Figure 9-31).
• If video content has been deleted from the beginning of the video, a forward
shift should be used.
• If video content has been added to the beginning of the video, a backward
shift should be used.
Fig. 9-31
Click Apply Shift (See Figure 9-32).
102
Fig. 9-32
Once all edits have been completed, click Next (See Figure 9-33
Fig. 9-33
The Media Locations page will appear (See Figure 9-34).
Fig. 9-34
9.5 Inputting Media Locations
The “Media Locations” page is used to publish the streaming media that has been
encoded for Microsoft and Real platforms.
To choose a media type, highlight the appropriate tab at the top of the “Media
Locations” page (See Figure 9-35).
103
Fig. 9-35
Enter the location of the local media file in the “High Bandwidth,” “Med
Bandwidth” and/or “Low Bandwidth” fields (See Figure 9-36).
Fig. 9-36
To search for a local media file, click Browse and use the browse window to
locate and open the local media file (See Figure 9-37).
Fig. 9-37
Once the location of the local media file has been selected for a format and
connection speed, enter a new file name for the archived media (See Figure 9-38)
and repeat for each desired format and connection speed.
Fig. 9-38
104
9.5.1 Cropping A Presentation
Before a presentation is posted on demand, the presenter may want to delete a
portion of the content at the beginning or end of the presentation (e.g. the speaker
was not yet ready, the first few minutes were used to test the encoder, etc.)
The Mark In and Mark Out features enable a presenter to edit the presentation by
deleting the unwanted content at the beginning (“Mark In”) and end of a
presentation “Mark Out”) by marking points in the presentation that will become
the new start and end time for the presentation.
To Mark In a presentation, first select Mark In (See Figure 9-39).
Fig. 9-39
As soon as Mark In is selected, the Mark In time field will become active. Enter
the amount of time that should be edited from the beginning of the media file in
the Mark In time field (See Figure 9-40).
Fig. 9-40
Beneath the “Mark In” fields are the “Mark Out” fields. Use these fields in the
same way to remove content from the end of a media file (See Figure 9-41).
Fig. 9-41
After completing “Streaming Info” page, click Next. The Create Media and
Publish page will appear (See Figure 9-42).
105
Fig. 9-42
9.6 Creating & Publishing Archived Media
The Create and Publish Media page is used to embed the synchronization events
in the new media file(s) and to prepare the completed presentations for on demand
distribution or publication to a CD ROM or file server.
9.6.1 Publication to CD or File Server
Select the “CD or File Server” field (See Figure 9-43).
Fig. 9-43
Note:
If CD is selected, Accordent
PresenterPRO will create a
presentation file that will be located in
the CD sub-directory in the Project
Directory.
Content such as URLs and interactive elements, require an Internet connection to
be viewed by the audience. Consequently, Accordent PresenterPRO enables the
presenter to determine whether or not they want to include or exclude Internetdependent content in a version of the presentation that is being published to CD
and/or a file server.
To include Internet-dependent content in a presentation being published to CD
and/or a file server, highlight Include URLs (See Figure 9-44); otherwise,
Accordent PresenterPRO will extract all Internet-dependent synchronized content
106
and the audience will be able to view the presentation without an Internet
connection.
Fig. 9-44
If the presentation is to be published to a CD or file server only, click Next (See
Figure 9-45). Otherwise, continue to Creating & Publishing For On Demand
Use (See Section 9.6.2, below).
Fig. 9-45
9.6.2 Creating & Publishing Media For On Demand Use
In addition to publishing to a CD and file server, the Archive Wizard also can be
used to prepare a presentation for on demand viewing.
To create the media files that will contain the commands required to run the
presentation from a streaming server, highlight Create Media (See Figure 9-46).
Fig. 9-46
Highlighting “Create Media” will generate media files that will reside in the
project directory. These files can be left in the project directory or they can be
published to a streaming media server automatically through Accordent
PresenterPRO. If you would like to leave these files in the Project Directory and
publish them at a later time, click Next and proceed to Section 9.7.
To upload the media files immediately using Accordent PresenterPRO, highlight
Upload Media (See Figure 9-47).
107
Fig. 9-47
If you have chosen to upload the presentation for on demand viewing, complete
the upload information for the specific streaming and web content that has been
incorporated into the presentation.
9.6.3 Streaming Media Upload Information
Your archived presentation will be created using RealNetworks and/or Microsoft
streaming media files. The upload fields for either media format are identical and
the instructions provided below should be used regardless of the format(s) used.
To access the Upload Information page, click on the Tab for the relevant media
format (See Figure 9-48).
Fig. 9-48
At the top of the Upload Information screen is the “URL Link” field, used to enter
the link that the viewer would click to watch the on demand video that is being
incorporated into the presentation.
Note:
Audience members will not click on this link directly; rather, Accordent
PresenterPRO will use this link to call the video once the presentation interface is
launched.
To specify the on demand media links that will be incorporated into the
presentation, enter the links into the Microsoft and/or RealNetworks fields as
applicable (See Figure 9-49).
Fig. 9-49
To the right of the “URL Link” field is the “Option URL” field, which can be
used to apply special URL parameters to organize and track specific media files.
108
Optional URL parameters can be applied to the links by entering those parameters
in the “Optional URL Parameters” field (See Figure 9-50).
Fig. 9-50
After completing the URL fields, next select either FTP or UNC depending on
how the streaming media content will be transferred to the streaming server(s)
(See Figure 9-51).
Fig. 9-51
FTP/SFTP Transfer Information
After selecting FTP/SFTP, the “FTP/SFTP Settings” fields will appear (See
Figure 9-52, next page).
Fig. 9-52
The FTP/SFTP Settings fields should be completed, as follows:
“FTP/SFTP Server IP” Field:
Enter the IP address for the FTP/SFTP Server that will be used to publish the
presentation (See Figure 9-53).
Fig. 9-53
“User” Field:
Enter the User ID for the FTP Server (See Figure 9-54).
109
Fig. 9-54
“Password” Field:
Enter the password for the FTP Server (See Figure 9-55).
Fig. 9-55
“Sub Directory” Field:
The “Sub Directory” field gives the developer the option of putting a presentation
in a FTP directory by entering the directory in the “Sub Directory” field (See
Figure 9-56).
Fig. 9-56
“Port” Field:
The Port field enables the presenter to transfer data through a port. The default
setting for the “Port” field is 21. To provide a port number, enter the port number
in the “Port” field (See Figure 9-57).
Fig. 9-57
Completing The UNC Fields
If UNC is the selected upload type, it is necessary to complete the Upload Path.
To create a UNC upload path, enter the UNC path in the Upload Path field (See
Figure 9-58).
Fig. 9-58
Note:
UNC names consist of three
parts: a server name, a share
name and an optional file path
that are combined using
backslashes as follows:
\\server\share\file_path
110
After completing the “Media Upload” screen(s), click the “Web Content” tab.
The “Web Content” screen will appear (See Figure 9-59).
Fig. 9-59
9.6.4 Completing the Web Content Page
•
•
•
The Web Content page is used to:
Automatically modify the streaming media links that are posted to the web server
to link to the archived on demand media files
Automatically upload the presentation detail files to the web server
Upload an archived RealNetworks closed caption file (.rt) to the web server.
To automatically modify the streaming media links and upload the modified links
to the web server, highlight Modify Links (See Figure 9-60).
Fig. 9-60
To automatically upload the presentation details to the web server, highlight
Upload Presentation Detail Files (See Figure 9-61).
Fig. 9-61
To upload an archived RealText closed caption file, enter the file location in the
“RealText Closed Caption” field (See Figure 9-62).
111
Fig. 9-62
If you would like to assign a new name to the archived RealText closed caption
file, enter the new name in the “New CC File Name” field (See Figure 9-63).
Fig. 9-63
To upload an archived SAMI closed caption file, enter the file location in the
“Windows SAMI” field (See Figure 9-64).
Fig. 9-64
If you would like to assign a new name to the archived SAMI closed caption file,
enter the new name in the “New SAMI File Name” field (See Figure 9-65).
Fig. 9-65
After completing the “Web Content” screen, click Next. Immediately after
clicking Next, the Distribute Content page will appear (See Figure 9-66).
Fig. 9-66
112
9.7 Distributing A Presentation
The final step in the presentation creation process is the binding of the media
assets into a presentation and the publishing of the presentation to the project
directory, a file server, and/or a streaming server. To merge and distribute the
presentation, click Distribute (See Figure 9-65).
Fig. 9-65
Once Accordent PresenterPRO has completed distributing the content, preview
buttons will appear at the base of the Archive Wizard (See Figure 9-66).
Fig. 9-66
The preview buttons enable the user to preview the CD and/or On Demand
versions of the presentation that was just created and published. If it was not
created, the preview button for that type of presentation will not appear.
After previewing the presentation or after skipping the preview option, click
Done.
Fig. 9-67
113
114