1
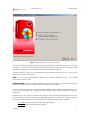
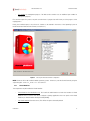
DENODO PLATFORM 4.5 INSTALLATION GUIDE th Aug 6 , 2012 NOTE This confidential document is the property of denodo technologies (hereinafter denodo). No part of the document may be copied, photographed, photocopied, electronically transferred, stored in a document management system or reproduced using any other mechanism without the prior, written authorization of denodo. copyright 2012 The total or partial reproduction of this document is forbidden without the written authorization of denodo technologies. Denodo Platform 4.5 Installation Guide CONTENTS PREFACE ................................................................................................................................................................................. I SCOPE ............................................................................................................................................................................... I WHO SHOULD USE THIS DOCUMENT ...................................................................................................................... I SUMMARY OF CONTENTS .......................................................................................................................................... I 1 INTRODUCTION ......................................................................................................................................... 2 2 2.1 2.2 2.2.1 2.2.2 2.2.3 2.2.4 2.3 2.3.1 2.3.2 2.3.3 2.3.4 2.4 2.4.1 2.4.2 2.4.3 2.4.4 2.5 2.6 3 3.1 3.2 3.2.1 3.3 3.4 3.4.1 3.4.2 3.4.3 3.4.4 INSTALLATION .......................................................................................................................................... 3 HARDWARE REQUIREMENTS ................................................................................................................ 3 SOFTWARE REQUIREMENTS ................................................................................................................. 3 Software requirements for Virtual DataPort ............................................................................................... 3 Software requirements for ITPilot ............................................................................................................... 3 Software requirements for Aracne .............................................................................................................. 4 Pre-installation actions in Windows Vista .................................................................................................. 4 USING THE INSTALLATION TOOL ......................................................................................................... 4 Virtual DataPort ............................................................................................................................................ 6 ITPilot ............................................................................................................................................................ 7 Aracne ........................................................................................................................................................... 9 Scheduler .................................................................................................................................................... 10 POST-INSTALLATION TASKS ............................................................................................................... 11 License installation..................................................................................................................................... 11 Post-installation tasks in Virtual DataPort ................................................................................................ 11 Post-installation tasks in ITPilot ................................................................................................................ 12 Post-installation tasks in Aracne ............................................................................................................... 13 PLATFORM CONFIGURATION .............................................................................................................. 15 UNINSTALLATION .................................................................................................................................. 15 DENODO PLATFORM CONTROL CENTER........................................................................................... 16 EXECUTION ............................................................................................................................................... 16 STARTING PLATFORM SERVERS AND TOOLS ................................................................................. 16 Configuration of start-up environments .................................................................................................... 17 UPDATE INSTALLATION ........................................................................................................................ 19 OTHER FUNCTIONS ................................................................................................................................ 19 Virtual Machine configuration ................................................................................................................... 19 Uninstalling the Platform ........................................................................................................................... 19 On-line documents...................................................................................................................................... 20 License information .................................................................................................................................... 20 REFERENCES ...................................................................................................................................................................... 22 Denodo Platform 4.5 Installation Guide CONTENTS OF FIGURES Figure 1 Figure 2 Figure 3 Figure 4 Figure 5 Figure 6 Figure 7 Figure 8 Initial installation screen for the Denodo Platform .................................................................................... 5 Choosing the internationalization configuration......................................................................................... 6 Selection of modules and components ....................................................................................................... 7 Denodo Platform Control Center ................................................................................................................ 16 Creation of start-up environments............................................................................................................. 18 Creation and editing of start-up environments ......................................................................................... 19 Uninstalling the Denodo Platform ............................................................................................................. 20 Information on the active license .............................................................................................................. 21 Denodo Platform 4.5 Installation Guide PREFACE SCOPE The Denodo Platform provides business applications with easy access to integrated views of various heterogeneous and distributed, structured and non-structured data sources. The Platform includes modules for real-time access and integration of all types of information, including that contained in databases, Web Services, hidden Web sites, and document repositories. This document introduces readers to the installation and configuration of the Platform and the use of the Denodo Platform Control Center tool that, among other uses, provides a single panel from where all the servers and tools comprising the Platform can be started and stopped. WHO SHOULD USE THIS DOCUMENT This document is aimed at developers and administrators requiring detailed information on how to install and configure the Denodo Platform and how to use the Denodo Platform Control Center tool. SUMMARY OF CONTENTS More specifically, this document: • Briefly introduces the Denodo Platform. • Describes the processes required to install each of the Platform modules. • Describes the use of the Denodo Platform Control Center that, among other uses, provides a single panel from where all the servers and tools comprising the Platform can be started and stopped. Preface i Denodo Platform 4.5 1 Installation Guide INTRODUCTION Nowadays, in order to support its own business processes, any organization of a certain importance makes use of an array of information systems developed over a period of time that use different data sources. Generally, these sources are developed using different technologies (relational databases, Web services, XML documents, spreadsheets, flat files, etc.) in line with very heterogeneous data models and include structured and non-structured information. Development of new services for clients or optimization of company business processes requires that new systems be built that need the data that is stored in these inherited data repositories. Another important trend to consider is the expansion of the Internet, a paradigmatic example of diffusion of information and heterogeneity of formats. Its contents are often a basic addition to corporate systems. Particularly, if you consider that clients, suppliers, and competitors are already used to offering Web interface to provide access to information of great interest. The Denodo Platform is a global solution for the real-time integration of heterogeneous and dispersed, structured and non-structured data sources. To do so, it combines different integrated modules: • The Virtual DataPort module provides real-time integration of any relevant information for the company, whatever its origin, format, and structure level. It enables “virtual databases” to be built that are made up of unified views of data from any type of data source, including databases, SOAP, and REST Web Services, XML, flat files, conventional Web sites (through the ITPilot module), LDAP servers, and non-structured information indexes. • The ITPilot module provides easy access to and structuring of datasets on the Web site. This process involves building an abstraction from the specific Web source called wrapper that isolates the client applications from the intrinsic characteristics of that site (access protocol, native data structure, etc.). Thus, the data contained on the hidden Web can be consulted and integrated just as easily and effectively as that contained in a conventional database. ITPilot provides a distributed and scalable environment for generating, executing, and maintaining wrappers. ITPilot also allows for structured data to be extracted from PDF and MS Word documents. • The Aracne module facilitates crawling, indexing, filtering, and querying of non-structured data in a wide range of repositories and formats. Aracne can integrate information contained in repositories such as the Web, file systems, relational databases, or e-mail servers. • In addition, the Scheduler module is a complementary tool that allows scheduling batch tasks using any of the former modules to automatically extract and filter data from several sources and export them to the desired format. Introduction 2 Denodo Platform 4.5 2 Installation Guide INSTALLATION This section focuses on the installation and configuration of the different modules of the Denodo Platform. 2.1 HARDWARE REQUIREMENTS The system has been satisfactorily tested on a PC Pentium IV 2.4 GHz 1 Gb RAM with Internet access. Initial installation requires approximately 300 MB disk space. 2.2 SOFTWARE REQUIREMENTS The following software must be pre-installed for the Denodo Platform: • An operating system with Java support. The system has been satisfactorily tested on Linux Fedora Core 5 and 6 [FED], Ubuntu 5.1, 7.1, 8.4 [UBU], CentOS 5 [CENT] and on Windows [WIND] operating systems (2000 Professional, 2000 Server, 2000 Advanced Server, 2003, XP, Vista). If you are installing in Windows Vista, see section 2.2.4. • Should you use an operating system different from Linux and Windows, it is also required Java 2 Runtime Environment Standard Edition (J2SE 1.5 or J2SE 1.6). Furthermore, the different modules of the Platform have additional requirements that must be met in order to use some of their components. These requirements are described in the following subsections. NOTICE: the installation of the Denodo Platform while any kind of antivirus software is active may cause an excessive delay of the process. 2.2.1 Software requirements for Virtual DataPort If the cache system is to be used, DataPort provides an embedded Apache Derby [DERBY] database that can be used for this purpose. Where required, an external JDBC Database Management System can also be used. In the current version of DataPort, the Oracle [ORCL] or MySQL MYSQL management systems can act as cache. 2.2.2 Software requirements for ITPilot Some of the components of ITPilot have additional software requirements: • The use of the automatic browser pool requires the prior installation of Microsoft Internet Explorer or 7.x or 8.x [MSIE] or Mozilla Firefox 1.5.x or 2.x [FRFOX]. • Should you want to use the Adobe PDF resource data extraction function, the system must be run on a Microsoft Windows machine with Adobe Acrobat Professional 7 or 8 previously installed. • Should you want to use the Microsoft Word resource data extraction function, the previous installation of OpenOffice 2.0.x [OOFF] is required. The maintenance server uses a relational database to store information about wrappers execution to allow later regeneration when the source changes. ITPilot provides an embedded Apache Derby [DERBY] database that can be Installation 3 Denodo Platform 4.5 Installation Guide used for this purpose. An external JDBC database management system can also be used. In the current ITPilot version, the system has been tested with MySQL 5.0 MYSQL, Oracle 9 [ORCL] and Postgres 7.4 [POSQL] • . ITPilot provides a tables creation script for these DB Management Systems. 2.2.3 Software requirements for Aracne Some of the components of Aracne have additional software requirements: • A machine with the Windows operating system is necessary to use Denodo Aracne with IECrawler or ExchangeMailCrawler. • Microsoft Internet Explorer 7.x or 8.x [MSIE] is required to use the IECrawler, the crawler for Web sites using javascript. • Microsoft ExchangeServer MAPI Client and Collaboration Data Objects [MAPI] must be installed on the machine in which the Denodo Aracne ExchangeMailCrawler is to be installed to use ExchangeMailCrawler, the crawler for contents saved in MSExchange, if Microsoft Exchange Server and the Denodo Aracne ExchangeMailCrawler server are installed in different machines. • To be able to extract the contents of the Word, Excel, and PowerPoint documents (or attached files in an email .eml), Microsoft Office [MSOFF] must be installed in the same machine as the Aracne server. 2.2.4 Pre-installation actions in Windows Vista If you are installing Denodo Platform in Windows Vista, first you need to deactivate “User Account Control”. You can activate it again after the installation. Follow the next steps to deactivate “User Account Control”: 1. 2. 3. 2.3 Click on “Control Panel” >>“User Accounts” >> “Turn User Account Control on or off”. Uncheck the “Use User Account Control (UAC) to help protect your computer” checkbox. Click ‘Accept’. USING THE INSTALLATION TOOL The modules forming part of the Denodo Platform are installed through a graphic tool. The installation wizard will guide you through each of the necessary configuration steps. After the introduction screen (see Figure 1), the installation process will display the product licensing conditions, which you should read carefully. If you accept the conditions, the system will request the internationalization configuration you require for the product (see Figure 2). Installation 4 Denodo Platform 4.5 Installation Guide Figure 1 Initial installation screen for the Denodo Platform The next screen displays the different modules that can be installed and the components contained in each module (see Figure 3). To choose a module, simply click on the check box alongside it. Later subsections will briefly describe the configuration parameters for each module, which can be modified during installation. The path in which the software is to be installed will then be requested (hereinafter DENODO_HOME). The tool copies the files required in this directory. NOTE: If you are installing Denodo Platform in Windows Vista, the path in which the software is to be installed cannot include “junctions” [JUN]. IMPORTANT NOTE: Where the installation is being run in the same path in which the Denodo Platform is already installed, the installation process will overwrite any existing definitions of metadata. Once the installation path has been selected, the installed components will be initially configured. Subsections 2.3.1, 2.3.2, 2.3.3 and 2.3.4 explain how to configure the Virtual DataPort, ITPilot, Aracne and Scheduler components, respectively. Installation process also includes a J2EE Web service container used to execute the web administration tools from some of the modules and to run the Web Services published by the Platform. To configure this module, the following information can be provided after the initial configuration of the remaining modules has been completed: - Port number in which the Web service container will be launched... Port number used to stop the Web service container. Installation 5 Denodo Platform 4.5 - Installation Guide Port number for management purposes. The Web service container uses an additional port number for management purposes. Files are then copied. This process may take several minutes. A progress bar will inform you of the progress of the copying process. Finally, the installation process also allows for shortcuts to be created in the menus of the Operating System to launch the Denodo Platform Control Center (see Section 3.1). Figure 2 Choosing the internationalization configuration NOTE: Shortcuts will not be installed in 64 bits operating systems. In that case, start the Control Center by using the script in the path: $DENODO_HOME/bin. See section 3.1. 2.3.1 Virtual DataPort Two components may be installed for Virtual DataPort: - Virtual DataPort client distribution only. This installs the administration tool and visual creation of Virtual DataPort views as well as the classes required to develop applications that run queries with Virtual DataPort (see Virtual DataPort Developer Guide [DEVDP]). - Full Virtual DataPort (client and server). This will be the option selected by default. Installation 6 Denodo Platform 4.5 Installation Guide Once the components have been selected, the system starts their configuration process. In the case of DataPort, the following configuration parameters can be specified: - Port number in which the DataPort server will be launched. Port number used to stop the DataPort server. Number for the Auxiliary Port. Communications between clients and the DataPort server use an additional port number known as “auxiliary” that can be specified at this time. In Windows operating systems, it is possible to specify that the DataPort server be installed as a service. NOTE: Where communications between clients and the server are to pass through firewall software, this must be configured to allow for access to the listening, stopping, and auxiliary ports. Figure 3 Selection of modules and components 2.3.2 ITPilot IMPORTANT NOTE: Before starting ITPilot installation you must: - Close all instances of Microsoft Internet Explorer and/or Mozilla Firefox running. - If you have Mozilla Firefox prior to version 1.5, it must be updated before starting installation. - In Linux installations, a Mozilla Firefox that is not installed as a package of the operating system must be used. Download a standard Mozilla Firefox [FRFOX] distribution. In the case of ITPilot, the following components may be installed: - Navigation Sequence Generator. Used to graphically generate automated Web browsing sequences during Installation 7 Denodo Platform 4.5 - Installation Guide the creation of wrappers on Web sources. It is installed as a task bar in the MS Internet Explorer browser. See the ITPilot Generation Environment Manual [GENITP]. Wrapper Generator Tool. Used to create wrappers on Web sources. See the ITPilot Generation Environment Manual [GENITP]. Wrapper Server. Used to run the wrappers created with previous components. See the ITPilot User Manual [ITPILOT]. Browser Pool. Wrapper execution environment component required to run automated browsing sequences based on MS Internet Explorer or Mozilla Firefox browsers. See the ITPilot User Manual [ITPILOT]. Maintenance Server. Used to automatically maintain ITPilot wrappers in light of changes to the sources. See the ITPilot User Manual [ITPILOT]. Administration Console. Web administration console for the wrapper execution environment. See the ITPilot User Manual [ITPILOT]. Wrapper Client Environment. Used to program applications directly using ITPilot wrappers. See ITPilot Developer Guide [DEVITP]. Sequence Executor ActiveX Control. See the ITPilot User Manual [ITPILOT]. Any components requiring configuration must be configured initially to conclude the installation process. The following subsections describe the configuration of each of the components requiring configuration. 2.3.2.1 Initial configuration of the Browser Pool: The following can be configured for the browser pool: - Pool listening port. Pool stopping port. Auxiliary port: auxiliary port used by the pool for communications with its clients. Initial browser launch port. It is possible to specify that the browser pool be installed as a service in Windows operating systems. NOTE: Where communications between the wrapper server and the browser pool are to pass through firewall software, this must be configured to allow for access to the listening, stopping, and auxiliary ports. The system must also be informed of the path where the external applications required for certain components are installed: - Path where Mozilla Firefox is installed. Firefox is necessary if the browser pool is to use this type of browser. Path where Acrobat Professional is installed. Necessary if you want to use its converters for PDF documents. Path where OpenOffice is installed. Necessary to deal with MS Word documents. 2.3.2.2 Wrapper Server The following can be configured for the wrapper server: - Server listening port. Server stopping port. Auxiliary port: auxiliary port used by the pool for communications with its clients. It is possible to specify that the wrapper server be installed as a service in Windows operating systems. NOTE: Where communications between clients and the server are to pass through firewall software, this must be configured to allow for access to the listening, stopping, and auxiliary ports. Installation 8 Denodo Platform 4.5 Installation Guide Where ITPilot is being installed in the same path as that in which Denodo Virtual DataPort has been previously installed, the values configured for these ports in the Virtual DataPort wrapper server will be overwritten with these values. Furthermore, if a browser pool is not being installed in the same installation, the pool access data to be used by the wrapper server must be configured: - Browser pool IP address. - Browser pool listening port. In the event of also installing a browser pool, the values indicated for the pool during installation will be used as values for these parameters. 2.3.2.3 Maintenance Server The following can be configured for the maintenance server: - Server listening port. Server stopping port. Auxiliary port: auxiliary port used by the pool for communications with its clients. Browser Pool IP address. The maintenance server also uses a browser pool, whereby its access data must be indicated in addition to domain and listening port configuration. Browser pool listening port. It is possible to specify that the wrapper maintenance server be installed as a service in Windows operating systems. Furthermore, if a wrapper server is not being installed in the same installation, the wrapper server access data with which it communicates must be configured: - Wrapper server IP address. - Wrapper server listening port. In the event of also installing a wrapper server, the values indicated for this server during installation will be used as values for these parameters. NOTE: Where communications between the wrapper server and the maintenance server are to pass through firewall software, this must be configured to allow for access to the server listening, stopping, and auxiliary ports. 2.3.3 Aracne In the case of Aracne, the following components can be installed (see Aracne Administration Guide [ARCN] for further information): - - Aracne Server. This includes the crawling modules (except IECrawler and ExchangeMailCrawler) and the task planning and configuration module. Indexing/search module. This includes the indexing and data search servers. If required, these servers can be installed in a different machine to that of the Aracne server. ExchangeMailCrawler. Microsoft Exchange Server e-mail account crawler. It must be installed in Windows machines belonging to the same domain as the machine on which Microsoft Exchange Server is executed, installation in the same machine as the Exchange e-mail server is run being valid and more effective. IECrawler. Advanced Web crawler based on MS Internet Explorer. Administration console. Web administration console that allows for crawling, filtering, and data indexing tasks to be configured, scheduled, and run. It also allows for queries on the collected data after running the crawling/indexing tasks. Any components requiring configuration must be configured initially to conclude the installation process. In the case of Aracne, the following will be requested: Installation 9 Denodo Platform 4.5 2.3.3.1 Installation Guide Administration Server The following can be configured for the administration server: - Port number at which the administration server will be launched. - Port number used to stop the administration server. - Number for the administration server Auxiliary Port. Communications between clients and the Denodo Aracne administration server use an additional port number known as “auxiliary” that can be specified at this time. - It is possible to specify that the administration server be installed as a service in Windows operating systems. NOTE: Where communications between clients and the server are to pass through firewall software, this must be configured to allow for access to the execution port and the auxiliary port. 2.3.3.2 Indexing and Search module The following can be configured for the indexing/search module: - Port numbers at which the indexing server and the search server will be launched, respectively. - Port numbers to be used to stop the indexing server and the search server, respectively. - Number for the Auxiliary Port of the indexing server and the search server, respectively. Communications between clients and the Denodo Aracne indexing and query servers use an additional port number known as “auxiliary” that can be specified at this time. - It is possible to specify that the Aracne indexing and query servers be installed as a service in Windows operating systems. NOTE: Where communications between the administration and indexing servers are to pass through firewall software, this must be configured to allow for access to the execution port and the auxiliary port. 2.3.3.3 ExchangeCrawler module The following can be configured for the ExchangeMailCrawler module: - Port number at which the ExchangeMailCrawler server will be launched. - It is possible to specify that the Aracne ExchangeMailCrawler server be installed as a service in Windows operating systems. NOTE: Where communications between the administration server and the ExchangeCrawler server are to pass through firewall software, this must be configured to allow for access to the execution port and the auxiliary port. 2.3.4 Scheduler In the case of the Scheduler module, the following components can be installed (see Scheduler Administration Guide [SCH] for more information): - Server. The server for scheduling and configuring batch tasks. Administration Console. Web administration tool that allows configuring, scheduling and executing batch data extraction tasks. During the installation process, it is needed to configure the following parameters for the server module: - Port number at which the server will be launched. Port number to be used to stop the server. Number for the Auxiliary Port of the server. Communications between clients and the Scheduler server use an additional port number known as “auxiliary” that can be specified at this time. It is possible to specify that the Scheduler server be installed as a service in Windows operating systems. Installation 10 Denodo Platform 4.5 Installation Guide NOTE: Where communications between the administration and indexing servers are to pass through firewall software, this must be configured to allow for access to the execution port and the auxiliary port. 2.4 POST-INSTALLATION TASKS After the installation tool has been run, there are still several tasks required before the software can be run. Firstly, the Platform license file must be installed. Section 2.4.1 describes how this is done. Subsequently, Sections 2.4.2, 2.4.3, and 2.4.4 explain the post-installation steps for the Virtual DataPort, ITPilot, and Aracne modules, respectively. 2.4.1 License installation For the software to work correctly, the license file denodo.lic must be located in the path DENODO_HOME/conf. If no license file is available, contact Denodo or the distributor. 2.4.2 Post-installation tasks in Virtual DataPort The following subsections describe the post-installation tasks for Virtual DataPort. 2.4.2.1 Creating the Cache System DB Where the cache system is to be used and an external database management system is to be used for this purpose, instead of the embedded Apache Derby database [DERBY], a Database Management System must also be installed to be used for this purpose. In the current version of DataPort the Oracle [ORCL] or MySQL MYSQL management systems can act as cache. If the embedded database is used, no action is required. The cache system can be configured using the Virtual DataPort administration tool (see Virtual DataPort Administrator Guide [VDP]). 2.4.2.2 External classpath It may be necessary to add new classes or libraries to the Denodo Virtual DataPort execution classpath. This occurs when it is needed to add a new JDBC driver not included in the distribution. There are two ways to add new classes or libraries to the Denodo Virtual DataPort execution classpath: • • Arrange the new classes using the path DENODO_HOME/extensions/dev/target/classes, where DENODO_HOME is the installation base path. The new libraries can be loaded in any directory included in DENODO_HOME/extensions. Making the environment variable DENODO_EXTERNAL_CLASSPATH point to the paths used to find the external classes or to the full paths to .jar files. The different paths must be separated using the character ‘;’. Example: The MySQL JDBC driver is not included with the DataPort distribution. If you want to install this driver so that it is available for DataPort, there are the following options: • • • Place the .jar file containing the driver (e.g. mysql-connector-java-production-bin3.0.14.jar) in any directory included in the DENODO_HOME/extensions directory. Decompress the .jar file containing the driver (e.g. mysql-connector-java-productionbin-3.0.14.jar) in the path DENODO_HOME/extensions/dev/target/classes. Add the entire path to the .jar file containing the driver among those included in the value of variable DENODO_EXTERNAL_CLASSPATH. Installation 11 Denodo Platform 4.5 2.4.3 Installation Guide Post-installation tasks in ITPilot Once ITPilot has been installed, certain configuration tasks must be carried out before it is run. 2.4.3.1 Configuration of Microsoft Internet Explorer and/or Firefox To run automated browser sequences, among other options ITPilot offers the possibility of using browser pools based on Microsoft Internet Explorer or Mozilla Firefox. An initial aspect to bear in mind is that the pool browsers will use the configuration established for Microsoft Internet Explorer and/or Firefox browsers in the system where the pool is run. • • It is recommended that home be a blank page (“about:blank”) to prevent each new browser started up by the pool from connecting to the home page before running an application request, which would cause an unnecessary delay. It is also a good idea to consider the proxy, security, and cookie options, as the pool browsers will act according to this configuration. 2.4.3.1.1 Late configuration of Firefox If during the Denodo Platform installation process the Firefox access path has never been configured, but its use is required, the following steps must be accomplished: 1. 2. Provide the browser installation path in the Firefox Home Directory field, on the ITPilot Administration tool’s Wrapper Server tab (see [USE] for more information). The <DENODO_HOME>/setup/itpilot/dll/iebrowser/denodo-runtime.xpi plugin must be installed by executing the command firefox -install-global-extension denodo-runtime.xpi from that same directory. 2.4.3.1.2 Execution as a Windows service In the event of the ITPilot browser pool being run as a Windows service, the service will be run by default using the predefined local system account user. In this case, the steps below must be followed to configure Microsoft Internet Explorer and/or Firefox for this account: 1. Open a Windows command console and run the command: sc.exe create servicename binpath= "cmd /k start" DisplayName= "Service Display Name" type= own This command creates a new service in Windows. servicename indicates the name of the service and Service Display Name its external name. 2. 3. 4. 5. Go to the Windows service administration and access the properties of the recently created service. On the "Start Session" tab, mark the "Allow services to interact with desktop" check box. Start the recently created service. On doing so, a new Windows command console will open with the local user account for the system. From the recently opened command console, open an instance of Microsoft Internet Explorer and/or Firefox. For example, if Internet Explorer is installed in the path C:\Program Files\Internet Explorer, simply run "C:\Program Files\Internet Explorer\iexplore.exe". Make the necessary configuration changes using the menus of the Microsoft Internet Explorer and/or Firefox instance opened. Installation 12 Denodo Platform 4.5 Installation Guide The above configuration has been successfully tested in machines with Windows XP and 2003 operating systems. If you do not want to modify the configuration of the local system account, the service can be started in the account of another user, after performing the previous steps in this account. To do so, modify the configuration properties of the service in Windows service administration. 2.4.3.2 Configuration of Adobe Acrobat Professional If during the Denodo Platfrom installation process the access path of Adobe Acrobat Professional has not been set, but its use is required, the following steps must be accomplished: 1. 2. Provide the installation path of the Adobe product to the Acrobat Prof. Plugins Directory field in the ITPilot Administration tool’s Wrapper Server tab (see [USE] for more information). The DDEPdfToHtml.api plugin, which is stored in the directory <DENODO_HOME>/dll/itpilot must be copied to the directory Acrobat/plug_ins where Adobe Acrobat is installed. 2.4.3.3 Enabling Internet Explorer Sequence Generation Toolbar in Microsoft Windows 2003 To show the Internet Explorer toolbars in a Microsoft Windows Server 2003 operating system, it is necessary to disable third-party tool bands and Browser Helper Objects. To manually disable the tool bands and Browser Helper Objects: 1. Close all instances of Internet Explorer, click Start, point to Settings, and then click on Control Panel. 2. Double-click Internet Options. 3. Click on the Advanced tab. 4. Under Browsing, clear the "Enable third-party browser extensions (requires restart)" check box by clicking on it. 5. Restart Internet Explorer. The previous steps are equivalent to set value "Enable Browser Extensions"="yes" in the registry key "HKCU\Software\Microsoft\Internet Explorer\Main". 2.4.3.4 Automatic Maintenance Database The maintenance server uses a relational database to store information about wrappers execution to allow later regeneration when the source changes. ITPilot provides an embedded Apache Derby [DERBY] database that can be used for this purpose. If the embedded database is going to be used, no action is required in this section. An external JDBC database management system can also be used. In the current ITPilot version, the system has been tested with MySQL 5.0 MYSQL, Oracle 9 [ORCL] and Postgres 7.4 [POSQL] ITPilot provides a tables creation script for these DB Management Systems in the path DENODO_HOME/scripts/itpilot/sql. If an external database is going to be used for this purpose, it is needed to install the database and run on it the corresponding tables creation script. 2.4.4 Post-installation tasks in Aracne Once Aracne has been installed, certain configuration tasks must be carried out before it is run. Installation 13 Denodo Platform 4.5 2.4.4.1 Installation Guide Microsoft Internet Explorer configuration An aspect to bear in mind on using the Aracne IECrawler module is that its browsers will use the configuration established for Microsoft Internet Explorer (MSIE): • It is recommended that the MSIE home be a blank page (“about:blank”) to prevent each new browser launched by IECrawler from connecting to the home page before running a task. • For HTTPS site crawling to be completed satisfactorily, the MSIE preferences must be established to prevent pop-up windows from informing users of the change to secure/insecure mode and to accept digital certificates (if not, the browsers may be blocked). These preferences are in MSIE in the ‘Internet Options’ option of the Tools menu, selecting the ‘Advanced Options’ tab and then the “Security” option group. • To connect to an FTP server using IECrawler, the Active or Passive connection mode of the MSIE FTP client must be configured. This will depend on the firewall software configuration in the client and in the FTP server. The preferences to establish the MSIE FTP client connection mode are in the ‘Internet Options’ option of the Tools menu, selecting the ‘Advanced Options’ tab and then the “Browse” option group. The MSIE connects in Active mode if the “Enable the list of folders for FTP sites” option is selected, even if the “Use passive FTP” option is selected. If the “Enable the list of folders for FTP sites” option is not selected and the “Use passive FTP” option is selected, the MSIE connects in Passive mode. • Due to the fact that the browsers behave in line with the configuration indicated in MSIE, the other MSIE security and cookie options should also be taken into account. In the event of Aracne being run as a Windows service, the service will be run by default using the predefined local system account user. In this case, the steps below must be followed to configure Microsoft Internet Explorer for this account: 1. Open a Windows command console and run the command: sc.exe create servicename binpath= "cmd /k start" DisplayName= "Service Display Name" type= own This command creates a new service in Windows. servicename indicates the name of the service and Service Display Name its external name. 2. 3. 4. 5. Go to the Windows service administration and access the properties of the recently created service. On the "Start Session" tab, mark the "Allow services to interact with desktop" check box. Start the recently created service. On doing so, a new Windows command console will open with the local user account for the system. From the recently opened command console, open an instance of Microsoft Internet Explorer. For example, if Internet Explorer is installed in the path C:\Program Files\Internet Explorer, simply run "C:\Program Files\Internet Explorer\iexplore.exe". Make the necessary configuration changes using the menus of the instance of Microsoft Internet Explorer opened. The above configuration has been successfully tested in machines with Windows XP and 2003 operating systems. If you do not want to modify the configuration of the local system account, the service can be started in the account of another user. To do so, modify the configuration properties of the service in Windows service administration. 2.4.4.2 Configuration for the ExchangeMailCrawler For Microsoft Exchange Server e-mail account crawling to be satisfactorily completed, Microsoft Outlook must be established as the pre-determined e-mail client in the machine where the ExchangeMailCrawler server has been installed. If this is to be established through the Windows register, the [HKEY_LOCAL_MACHINE\SOFTWARE\Clients\Mail] code must be modified so that its default value is "Microsoft Outlook". Installation 14 Denodo Platform 4.5 Installation Guide In the case of ExchangeMailCrawler running as a Windows service, for it to function correctly the service must start the session as a Microsoft Exchange Server Administrator. 2.5 PLATFORM CONFIGURATION See the Virtual DataPort Administrator Guide [VDP], the ITPilot User Manual [ITPILOT], the Aracne Administrator Guide [ARCN] and the Scheduler Administration Guide [SCH] for other configuration options of the Virtual DataPort, ITPilot, and Aracne modules, respectively. 2.6 UNINSTALLATION Use the Denodo Platform Control Center (see Section 3) or the direct access created during installation to uninstall all or some of the modules of the Denodo Platform. Installation 15 Denodo Platform 4.5 3 Installation Guide DENODO PLATFORM CONTROL CENTER The Denodo Platform Control Center allows for all Denodo Platform servers and tools, as well as a group of additional functions, to be started and stopped. This section describes its use. 3.1 EXECUTION To launch the Denodo Platform Control Center, use the shortcuts created on the desktop during installation and/or the application menus of your Operating System. It is also possible to start the tool using the script $DENODO_HOME/bin/denodo_platform.sh (denodo_platform.exe in Windows). 3.2 STARTING PLATFORM SERVERS AND TOOLS The buttons on the left of the control center (see Figure 4) lead to shortcuts to start and stop each of the servers and administration tools of the Platform modules. The “VDP” button leads to shortcuts related to the Virtual DataPort module, the “ITP” button refers to ITPilot, the “ARN” button refers to Aracne and the “Sched” button to the Scheduler. Figure 4 Denodo Platform Control Center See the Virtual DataPort Administrator Guide [VDP], the ITPilot User Manual [ITPILOT], the Aracne Administrator Guide [ARCN] and the Scheduler Administrator Guide [SCH] for a description of the servers and tools comprising the Virtual DataPort, ITPilot, Aracne and Scheduler modules, respectively. Denodo Platform Control Center 16 Denodo Platform 4.5 Press the Installation Guide button to start a server. The shortcut will go to “Starting” status until the server has started. The shortcut will then display the message “Started” together with the server stop ( ) and restart ( ) buttons. button in the lower-left part of the screen allows stopping all the currently launched servers of the Denodo The Platform. button in their To start the Virtual DataPort administration tool or the ITPilot wrapper generation tool, press the shortcut. To close these tools, use the ‘Exit’ option in their ‘File’ menu (they cannot be directly closed from the Control Center). To start ITPilot server web administration tool, Aracne server web administration tool or Scheduler web button in their shortcut. The tools are deployed in the Web service container administration tool, press the embedded with the Denodo Platform. To access the tools, use your web browser with, respectively, the following URLs (we assume the default 9090 port and that the Denodo Platform is installed in localhost): http://localhost:9090/webadmin/denodo-itpilot-admin/ http://localhost:9090/webadmin/denodo-aracne-admin/ http://localhost:9090/webadmin/denodo-scheduler-admin/ 3.2.1 Configuration of start-up environments Shortcuts can be defined to start servers and/or administration tools at the same time so that all elements of the Denodo Platform required in a certain environment can be started and stopped at once. For example, an environment called “VDP Development Environment” can be defined, which starts at the same time the Virtual DataPort execution server and its administration tool. To create a new environment, press the “Custom” button to access the new environment creation screen (see Figure button to access the environment editing screen, where you can select the name of the 5). Press the environment, the JAVA virtual machine to be used with same, and the modules to be started in that environment. The button is to modify an environment already created, and the Denodo Platform Control Center button is to delete it. 17 Denodo Platform 4.5 Installation Guide Figure 5 Creation of start-up environments Once an environment has been defined, it can be started or stopped by selecting it from the list of environments and pressing the or button, respectively. Denodo Platform Control Center 18 Denodo Platform 4.5 Installation Guide Figure 6 Creation and editing of start-up environments 3.3 UPDATE INSTALLATION At the top right of the screen corresponding to each of the Denodo Platform modules (Virtual DataPort, ITPilot, and Aracne) is the system. button. On pressing this button, information is displayed on the updates currently installed in the It is also possible to install a new update in the system by pressing the ‘Install’ button and selecting the file corresponding to the update to be installed. 3.4 OTHER FUNCTIONS This section describes other functions of the Control Center. 3.4.1 Virtual Machine configuration The ‘Configure’ button opens a dialog box to select the JAVA virtual machine to be used by the Denodo Platform. By pressing the ‘Edit’ button a dialog box is accessed to add, modify, and/or delete the JAVA virtual machines installed in the machine. To add a new virtual machine, simply specify the path in disk to the root installation directory of the JRE or JDK to be used. 3.4.2 Uninstalling the Platform The “Uninstall” button opens a dialog box to uninstall all or part of the Platform modules (see Figure 7). Before continuing with the uninstallation, stop all Denodo Platform servers and tools (including the Control Center) and close all active instances of Microsoft Internet Explorer and Mozilla Firefox. Denodo Platform Control Center 19 Denodo Platform 4.5 Installation Guide Figure 7 Uninstalling the Denodo Platform 3.4.3 On-line documents Clicking on the “Docs” button accesses the Denodo Web site page containing all the user manuals and guides for the Denodo Platform. 3.4.4 License information Clicking on the “License” button will open a dialog box displaying the license conditions of the Denodo Platform currently installed (see Figure 8). Uninstalling the Denodo Platform Denodo Platform Control Center 20 Denodo Platform 4.5 Installation Guide Figure 8 Information on the active license Denodo Platform Control Center 21 Denodo Platform 4.5 Installation Guide REFERENCES [ARCN] Denodo Aracne Administration Guide. Denodo Technologies 2008. [BEA] BEA Systems J2EE Application Server. http://www.bea.com/ [CENT] CENTOS: Community ENTerprise Operating System. http://www.centos.org/ [DERBY] Apache Derby. http://db.apache.org/derby/ [DEVITP] Denodo ITPilot Developer Guide. Denodo Technologies 2008. [DEVDP] Denodo Virtual DataPort Developer Guide. Denodo Technologies 2008. [FED] The Fedora Project. RedHat Corporation and the Fedora Community. http://fedora.redhat.com/ [FRFOX] Mozilla Firefox Browser. http://www.firefox.com/ [GENITP] ITPilot Generation Environment Manual . Denodo Technologies 2008. [ITPILOT] Denodo ITPilot User Manual. Denodo Technologies 2008. [JUN] Junction Points – Microsoft Developer Network. http://msdn.microsoft.com/en-us/library/bb756982.aspx [MAPI] Microsoft Exchange Server MAPI Client and Collaboration http://www.microsoft.com/downloads/details.aspx?FamilyID=e17e7f31-079a-43a9-bff20a110307611e&DisplayLang=en Data Objects [MSEX] Microsoft Exchange Server. http://www.microsoft.com/exchange/ [MSIE] Microsoft Internet Explorer. http://www.microsoft.com/windows/ie/ [MSOFF] Microsoft Office. http://office.microsoft.com/ [MYSQL] MySQL Open Source Database. http://www.mysql.com/ [NSEQL] Denodo ITPilot NSEQL Guide. Denodo Technologies Corporation 2008. [OOFF] Open Office Suite. http://www.openoffice.org/ [ORCL] Oracle Database. Oracle Corporation. http://www.oracle.com/database/index.html [POSQL] PostgreSQL Open Source Database. http://www.postgresql.org/ [SCH] Scheduler Administration Guide. Denodo Technologies. 2008 [TOM] Apache Jakarta Tomcat. The Apache Software Foundation. http://jakarta.apache.org/tomcat/ [UBU] The UBUNTU Linux-based Operating System. http://www.ubuntu.com/ [USE] Denodo ITPilot User Guide. Denodo Technologies, 2008. [VDP] Denodo Virtual DataPort Administrator Guide. Denodo Technologies 2008. [VQL] Denodo Virtual DataPort Advanced VQL Guide. Denodo Technologies 2008. [WAR] Web Application Archives (Tutorial). http://java.sun.com/j2ee/tutorial/1_3-fcs/doc/WCC3.html [WIND] Windows Operating Systems Family. Microsoft Corporation. http://www.microsoft.com/windows/default.mspx References 22